Introduction
Magento 2 Marketplace USPS Endicia Shipping add-on allows the seller and the store owner to generate USPS shipments via Endicia
From the Magento panel, the seller and the admin can purchase the Endicia postage and even check the account balance as well.
After creating the shipment, a customized Endicia shipment label can be generated.
Important Notes:
- You must be using Webkul Magento 2 Multi Vendor Module, else Marketplace USPS Endicia Shipping will not work.
- Origin address must be from United States.
- The seller or the admin needs to have an active account on Endicia and USPS.
Features
- Fetch USPS shipping rates via Endicia API.
- Purchase Endicia postage stamps from Magento.
- Check Endicia account balance details from Magento.
- Generate and print USPS Endicia shipping labels in PDF format.
- Tracking information is added automatically to the order.
- Enable or disable Marketplace USPS Endicia shipping method.
- Set shipping method name that will be shown on the storefront.
- Set packages request type.
- Vendors can manage their Endicia account and credentials from front-end.
- Endicia shipping rates will be calculated from seller’s address.
- Print and download invoice and packing slips.
- Module compatible with Magento 2.4.x version.
- Source code is 100% open for customization.
- Supports multiple languages and translations.
Installation
Step 1 – Upload Folder
After downloading the module zip file, extract it and go to src>app.
Now, you need to upload the app folder to the root directory of Magento installation.

Step 2 – Run Commands
Open the terminal from the Magento root directory and run the following commands:
php bin/magento setup:upgrade
php bin/magento setup:di:compile
php bin/magento setup:static-content:deploy
Step 3 – Clear Cache
Go to System>Cache Management and refresh all the cache types.

Language Translation
For translating the module language, please go to
app>code>Webkul>MarketplaceUspsEndicia>i18n and edit the en_US.csv file.
Now, translate the words on the right and upload the modified file to the same location.
The filename of the translated file should be according to the language and region code like de_DE.csv.

How to Get Endicia Account Credentials?
 At the time of creating a new account on Endicia, you set your Passphrase.
After that, the Account ID is sent to your registered email address.
To create a new account on Endicia, click here.

Module Configuration
After successfully installing the module, login to the admin panel and navigate to Stores>Configuration>Sales>Shipping Methods>Marketplace USPS Endicia.
The following options will be available:
Enabled for Checkout – Select Yes to show USPS Endicia shipping method at the checkout. Else select No for hiding this shipping method.
Title – Set the frontend title for this shipping method.
Account Number – Enter your Endicia account number here. Endicia assigns a unique Account Number when you sign up for the Endicia Label Server Web Service.
The Account Number is associated with an Endicia postage account and holds information about postage transactions as well as available balance for printing postage.
Passphrase – Enter your Endicia account passphrase here.
The Pass Phrase is a long and complex password. During the new account sign-up process, you will be asked to select a temporary Pass Phrase for the account.
Generate New Passphrase – Click here to generate a new passphrase for your Endicia account..
Machinable – It is set to Yes by default. If the mailpiece is non-machinable, please select No.
In case a parcel select ground mailpiece is marked as machinable is over 35 lbs. in weight, it will automatically be charged for the non-machinable price.
Endicia Mailpiece Shape – Select the mailpiece shape to use for shipments –
Letter, Parcel, Large Parcel, Flat Rate Envelope, Small Flat Envelope, Small Flate Rate Box, Medium Rate Box, Large Rate Box, Regional Rate Box A, and Regional Rate Box B.
Endicia Mail Class – Select which mail services to display to customers during the checkout process –
Priority Mail Express, First-Class Package Service, First-Class Mail Parcel, Library Mail, Media Mail, and Priority Mail.
For more details please visit –
https://www.endicia.com/DazzleHelp/Content/Postage/Mail_Classes%20List.htm
Show Estimated Delivery Days – Estimated Delivery Days in the Magento 2 Marketplace with USPS Endicia show customers when their packages will likely arrive.
This is calculated based on the selected shipping method and delivery location, helping buyers know how soon to expect their order.
Enabled Endicia Insurance – automatically includes insurance for shipments, protecting both the seller and buyer in case of loss or damage during transit.
Allow Sellers to Manage Endicia Account – Select Yes to allow the marketplace vendors to manage Endicia shipments from their end.
Show Return Address on Label – feature allows the seller’s return address to be automatically printed on shipping labels for easy returns handling.
Use Stealth Postage – hides the actual postage cost on the shipping label, preventing customers from seeing what the seller paid for shipping.
Displayed Error Message – Enter the error message content when the Endicia shipping method is not available to the customer during the checkout process.
Show Method if Not Applicable – Select Yes to display Endicia shipping even if it is not applicable to the delivery address.

Customer Front-End
The customer can check the shipping rates from the shopping cart and estimate the shipping costs and the taxes without going through the checkout process.

Checkout Process
At the time of the checkout process, the customer will see all the available USPS Endicia shipping services with the cost.

Vendor Front-End
The marketplace vendors need to enter their Endicia Account credentials for managing USPS Endicia shipments from Magento seller-frontend.
Navigate to My Account>Endicia Account Configuration and enter the following information.
Account ID – The vendor will enter its Endicia account number here.
Passphrase – The vendor will enter its Endicia account passphrase here.
Generate New Passphrase – Click here to create a new passphrase.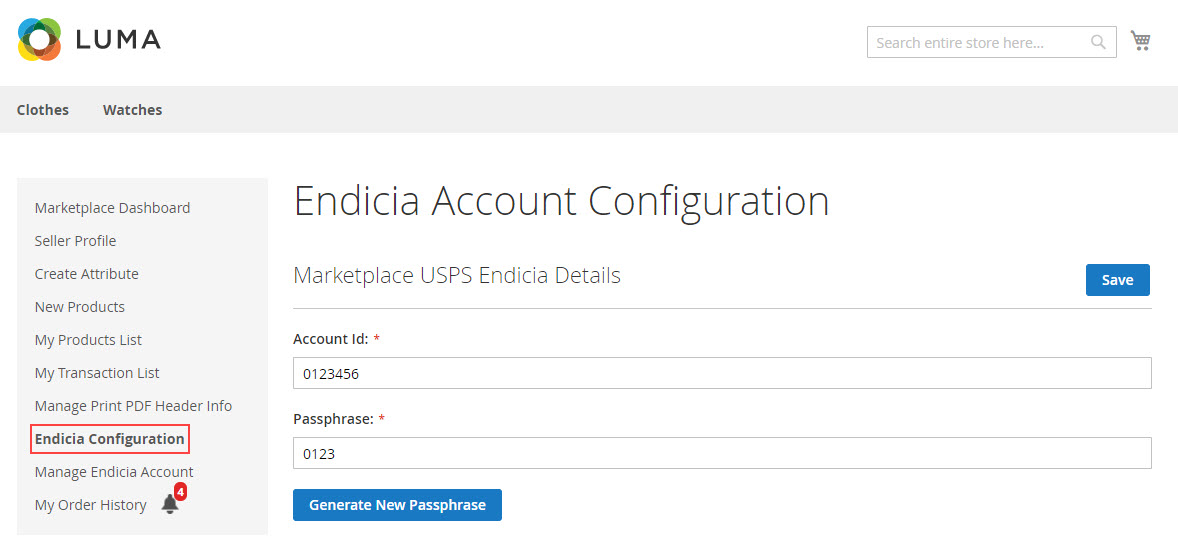
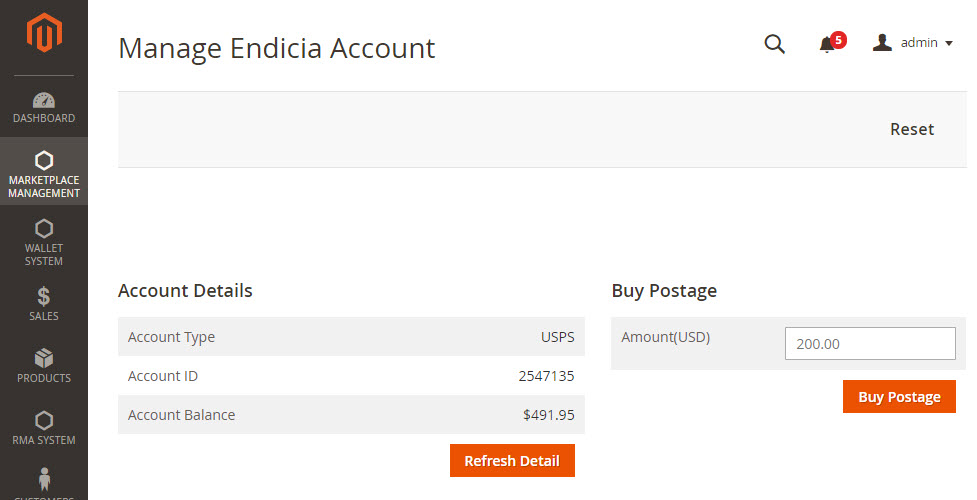
Manage Endicia Account
The vendor can manage its Endicia account by going to My Account>Manage Endicia Account.
From here, the vendor can check the account balance and buy postage easily.
The vendor can purchase postage stamps either from the pre-defined amount or enter the preferred amount in USD. Please make sure you have enough balance on your Endicia account.

View Order Details
Once the order is placed, the vendor can check the order and view the mail class selected by the customer.
After that, to generate the shipment tick the checkbox under Shipping Method, ‘Generate Endicia Postage Label’ and click ‘Ship‘ button on top.
Please make sure invoice is generated before generating the shipment.
Print Invoice
The vendor can print the invoice and download the PDF mentioning Endicia USPS shipping method.
See the sample invoice below.

Shipment Details
Once the invoice and shipment are created, the vendor can print the Endicia USPS Label.
Also, print packing slip, and send tracking information to customer.

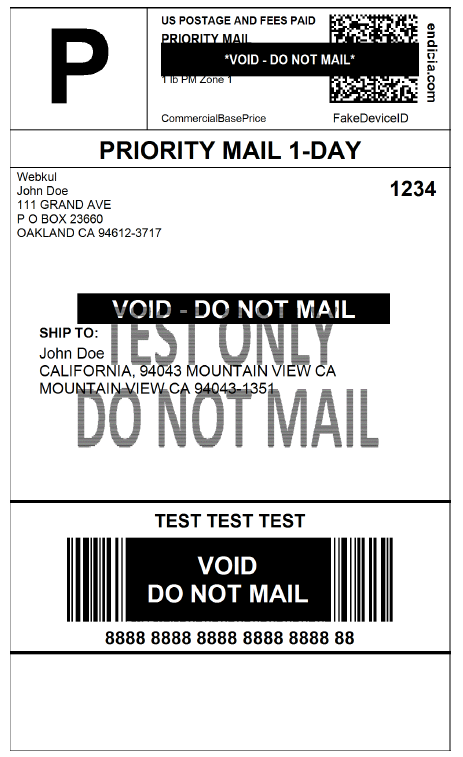
Print Endicia Shipping Label
To print the Endicia USPS shipping label, click Endicia USPS Label button, a PDF file will be created as below.
Print Packing Slip
For printing packing slip, click Print Shipment button, a PDF file will be generated mentioning various information about the shipment.
Manage Endicia Account by Admin
The admin can manage its Endicia account from the backend panel of Magento by navigating to
Marketplace Management>Marketplace USPS Endicia>Manage Endicia Account.
After that, the admin can see the balance amount and buy postage for the shipments.
The admin can also create Endicia USPS shipment from the backend. To do that, go to Sales>Orders>View.
First, create an invoice for the order and then click Ship button, the following page will appear.
Tick the ‘Create Shipping Label’ checkbox and click ‘Submit Shipment’ button.

Shipment Created
Once the admin creates the shipment, the admin can print and download the Endicia USPS shipping label.
The tracking information will be added automatically, the admin can also send the tracking information to the customer.

Admin Product
Without going through the checkout process, the customer will check the admin product for shipping rates from the shopping cart and estimate the shipping costs and taxes.

Checkout Process
The customer can see all the available USPS Endicia shipping services with the costs at the time of the checkout process.

Invoice
The admin may also create a backend shipment from Endicia USPS. First of all, create an order invoice and then press the ‘Submit Shipment’ button.

Shipment Created
The admin will print and download the Endicia USPS shipping label until the admin produces the shipment.
After that, tracking information is automatically applied, and the admin may send the tracking information to the customers as well.
![]()
Support
Thank you for reading this doc 🙂 in case you need more information or require any customization, then please send an email to [email protected].
You may also browse other Magento 2 marketplace addons and our quality Magento 2 extensions.
Current Product Version - 5.0.1
Supported Framework Version - Magento 2.0.x, 2.1.x, 2.2.x,2.3.x, 2.4.x

Be the first to comment.