Magento 2 Marketplace RMA extends multi-vendor returns for Magento 2. Customers, guests, sellers, and admins can create and manage Return Merchandise Authorization (RMA) requests per seller on marketplace orders.
If the seller is satisfy with the RMA reason of the customer then the seller will be able to replace or refund.
Adobe Commerce Marketplace RMA system is an add-on to the Marketplace module. To use this module, you must have installed the first Magento 2 Marketplace Extension module.
Check the plugin flow for the refund request –
Features – Marketplace RMA System
- Customers can request RMA to cancel the order.
- Customers can generate RMA for Refund/Replace.
- Sellers can do the Full or Partial refund.
- Allow the seller to do the offline/online refund.
- Dynamic selection of items for an order for making RMA request.
- Admin will create RMA reasons.
- Fraud Detection & Risk Scoring system.
- Wallet refund support (when Wallet module is installed).
- Admin email alerts for suspicious RMA requests.
- Return trends, resolution, and status analytics.
- The extension supports EU Withdrawal Button Compliance
- The admin will be able to see the seller-buyer conversation history.
- Automated Workflow Rules for RMA processing.
- Quick Order Cancellation popup for faster RMA creation.
- The admin can solve the Requested RMA for his products.
- RMA history for buyers and sellers with pagination.
- Guest users can request an RMA to cancel the order.
- The guest user can generate RMA for Refund/Replace.
- The extension is compatible with the Hyva Theme.
- GraphQL has been implemented for the extension.
Note:
EU Withdrawal Button Compliance
RMA Extension supports EU Withdrawal Button Compliance with Directive (EU) 2023/2673 by allowing merchants to provide a clearly labeled electronic cancellation button.
Customers can use this button to exercise their statutory 14-day right of withdrawal for eligible purchases in a simple and transparent manner.
Installation – Marketplace RMA System
Customers will get a zip folder and they have to extract the contents of this zip folder on their system.
The extracted folder has an src folder, inside the src folder you have the app folder.
You need to transfer this app folder into the Magento 2 root directory on the server as shown below.

After the successful installation, you have to run these commands in the Adobe Commerce root directory.
php bin/magento setup:upgrade
php bin/magento setup:di:compile
php bin/magento setup:static-content:deploy
After running the commands, you have to flush the cache from the Adobe Commerce Cloud admin panel by navigating through->System->Cache management as shown below.

Thus, in this way, you can install the RMA System module.
Multi-Lingual Support
For multilingual support, the admin will navigate through Store->Configuration->General ->Locale Options and select the locale as German (the language into which the admin wants to translate his store content).

Module Translation – Marketplace RMA System
If a user wants to translate their module from English to German then they need to follow the path app/code/Webkul/MpRmaSystem/i18n in their unzipped Magento Marketplace folder and will get a CSV file with the name “en_US.csv”.
Now they will rename that CSV as “de_DE.csv” and translate all right side content after the comma in the German language. After editing the CSV, save it and then upload it to the path app/code/Webkul/MpRmaSystem/i18n where they have installed Adobe Commerce on their server.
The module will translate into the German Language. It supports both the LTR and RTL languages.

Thus, in this way you can translate the RMA System module.
Marketplace RMA System Configuration
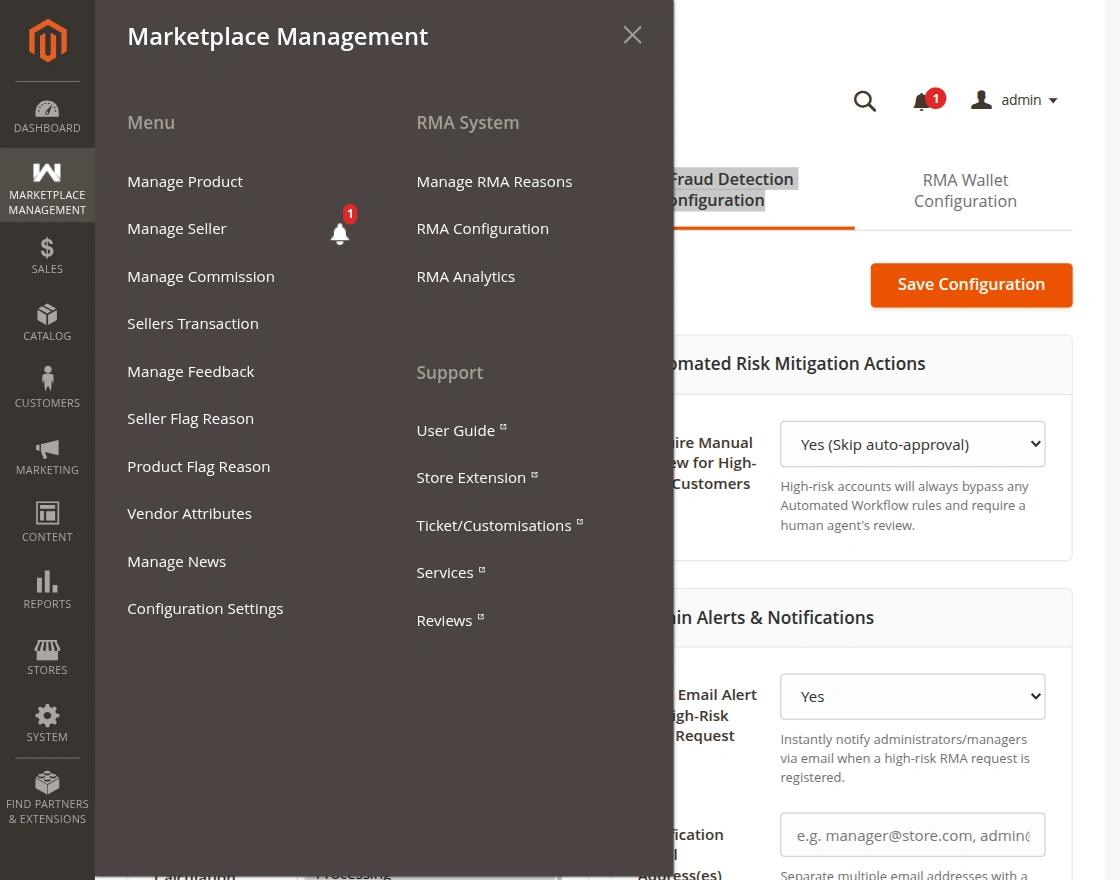
After the installation, the admin can configure the module settings by navigating through the path Marketplace Management ->RMA System ->RMA Configuration

General Settings
Default Allowed Days : Number of days after order placement during which customers can request a return.
Admin Email ID : Email address used for admin RMA notifications and system alerts.
Allow Seller Workflow Configuration : Lets sellers manage automated workflow and pending alert rules from their seller dashboard.
Allow Seller Fraud Configuration : Sellers manage fraud mitigation and notification settings for their own RMAs.
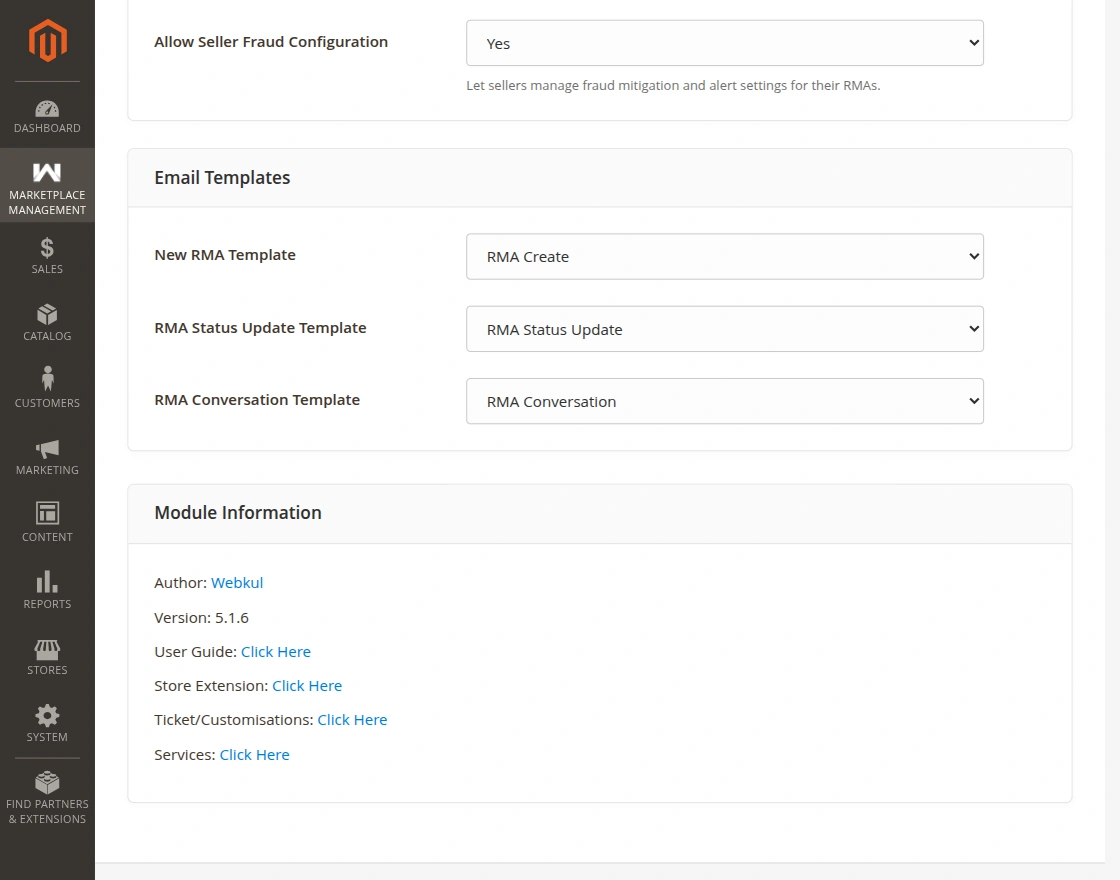
Email Template
New RMA Template : Transactional email template sent when a new RMA is created.
Update RMA Template
The admin will set the template for the updated RMA.
RMA Message Template
Here the store owner will see the template for the RMA message.
Thus, the module configuration completes in this way.
Automated Workflow Configuration
General Rules Settings
Enable Automated Workflow Rules : Master switch to activate or deactivate the entire rules engine.
Enable Pending RMA Alert : Sends an email alert when an RMA remains pending beyond the configured time.

Hours Threshold : Defines the number of hours an RMA can stay pending before triggering an alert.
Manager Email(s) : Specifies the email addresses that will receive pending RMA alerts.
Alert Email Template : Selects the email template used for pending RMA notifications.
Send Test Alert Email : Sends a sample pending RMA alert email to verify the notification settings.
Auto-Approve Rules
Enable Auto-Approve Rule : Automatically approves RMA requests that match the configured conditions.
Max Order Age (Days) : Approves RMAs only if the order age is within the specified number of days.
Allowed Return Reason(s) : Selects the return reasons eligible for automatic approval.
Allowed Resolution Type(s) : Selects the resolution types eligible for automatic approval.
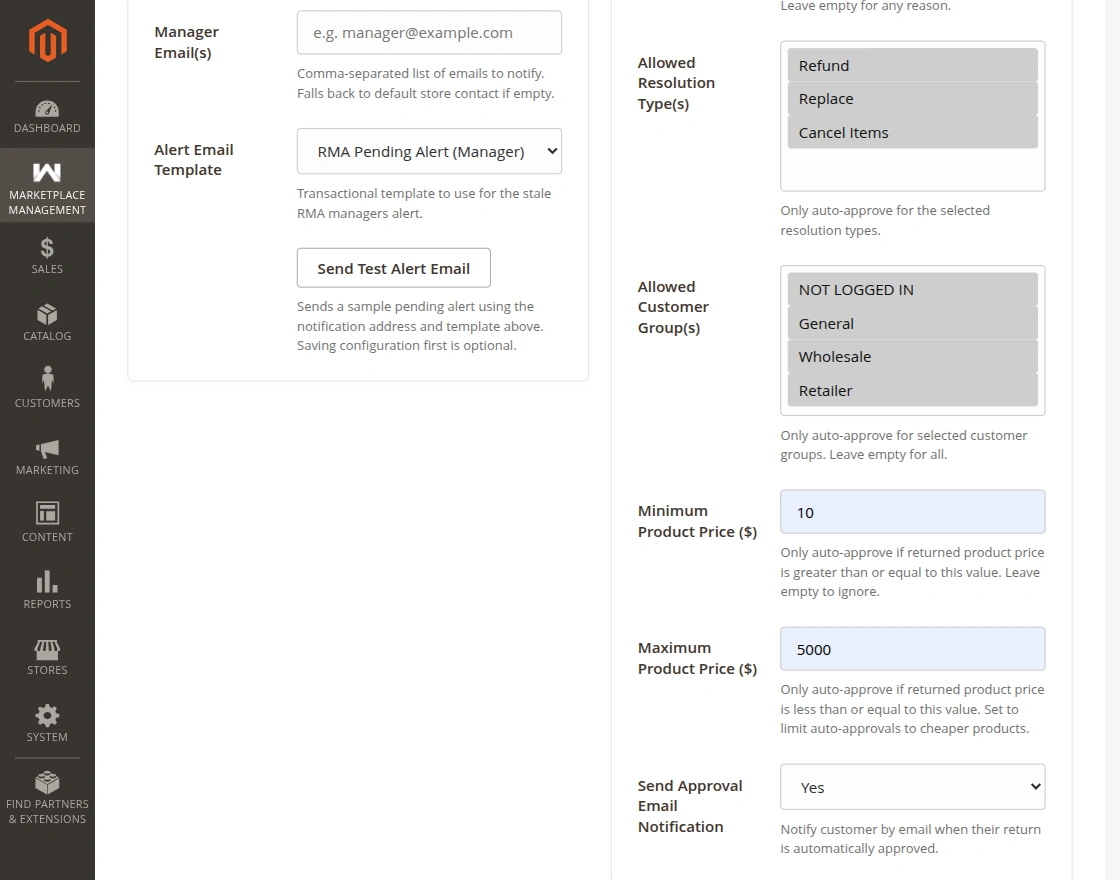
Allowed Customer Group(s) : Restricts automatic approval to the selected customer groups.
Minimum Product Price : Sets the minimum order value required for automatic approval.
Maximum Product Price : Only auto-approve if returned product price is less than or equal to this value. Set to limit auto-approvals to cheaper products.
Send Approval Email Notification : Notify customer by email when their return is automatically approved.
RMA Fraud Detection Configuration
Enable Fraud & Risk Scoring : Track return frequencies and compute customer risk scoring. When active, risk indicators display on the RMA admin grid.
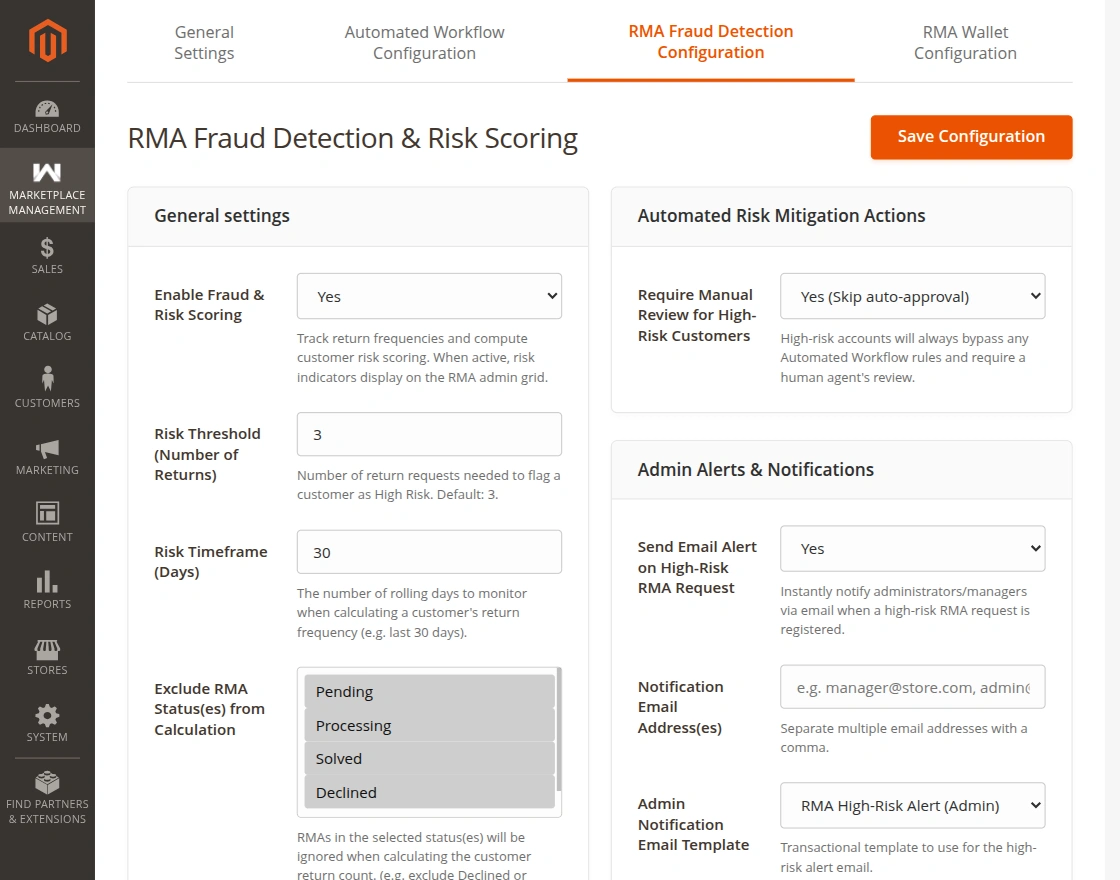
Risk Threshold (Number of Returns) : Specify the minimum number of return requests within the configured timeframe required to classify a customer as High Risk.
Risk Timeframe (Days) : Define the rolling number of days used to calculate a customer’s return frequency for risk evaluation.
Exclude RMA Status(es) from Calculation : Select RMA statuses that should be ignored when calculating a customer’s return count for fraud detection.
Automated Risk Mitigation Actions
Require Manual Review for High-Risk Customers : When enabled, RMA requests from High-Risk customers will bypass automated workflow rules and require manual administrator review.
Admin Alerts & Notifications
Send Email Alert on High-Risk RMA Request : Enable email notifications to administrators whenever a High-Risk RMA request is detected.
Notification Email Address(es) : Enter one or more email addresses that should receive High-Risk RMA alert notifications. Separate multiple addresses with commas.
Admin Notification Email Template : Select the email template that will be used when sending High-Risk RMA alert notifications to administrators.
Send Test Alert Email : Send a sample High-Risk RMA notification using the configured email addresses and selected email template to verify the notification settings.
Manage RMA Reasons
Now, the admin can manage the reasons for the RMA in his backend panel by navigating through Marketplace Management > RMA System > Manage RMA Reasons as shown below in the snapshot.

Here, the admin can:
- View all the existing RMA Reasons in the grid view list.
- Check the Status of the Reasons.
- Edit the details of the existing Reasons by clicking on the “Edit” link.
- Create new Reasons by clicking on the “Add New Reason” button.
Moreover, to add a new Reason, the admin will click on the “Add New Reason”. This will navigate the admin to the New Reason page as per the below image.

Here, the admin can create a new reason. And the customers will be able to select and use these reasons while filing their RMA.
Create a New RMA Request
Customers can file a new RMA request by navigating to their account menu item RMA ->Request New RMA.

After clicking the Request New RMA another page will open up, where the buyers will be able to request an RMA for the Resolution type as – Cancel Item, Replace, and Refund.
Note: The buyer can request for the RMA to Replace/Refund the purchase items if the invoice has been generate.
But if the invoice is not create, then the buyer can request the RMA to Cancel the purchased items.
Cancel Item
The buyer can request the RMA to cancel the order items if the invoice is not create. To cancel the order, the buyer will generate a new RMA request.

- Orders: Click the drop-down list to select the order for which the buyer wants to create an RMA request.
- Resolution: If the invoice is not generate then by default the Cancel Items option will appear in Resolution.
- Select items for which the buyer wants to file the RMA.
- Quantity: Choose the quantity for which the buyer will generate the RMA request.
- RMA reason: The buyer has to choose a reason for the RMA from the drop-down selections.
- Images: Upload the images of the item for which the buyer wants to file the RMA.
- Additional Information: Add additional information about the RMA reason in case the buyer does not find a valid reason from the drop-down list.
- Order Status: If the shipment of the order is not generate then in order status by default the Not Deliver option will appear.
Not Delivered/Delivered option
Henceforth, once the shipment of the order, generates then only you will get the Not Delivered/Delivered option in the Order Status drop-down.
Cancel Order – Seller End
Moreover, now the seller will log in to his account and check the requested RMA to cancel the order. For this, the seller will click on the Marketplace RMA system menu option as per the below image.
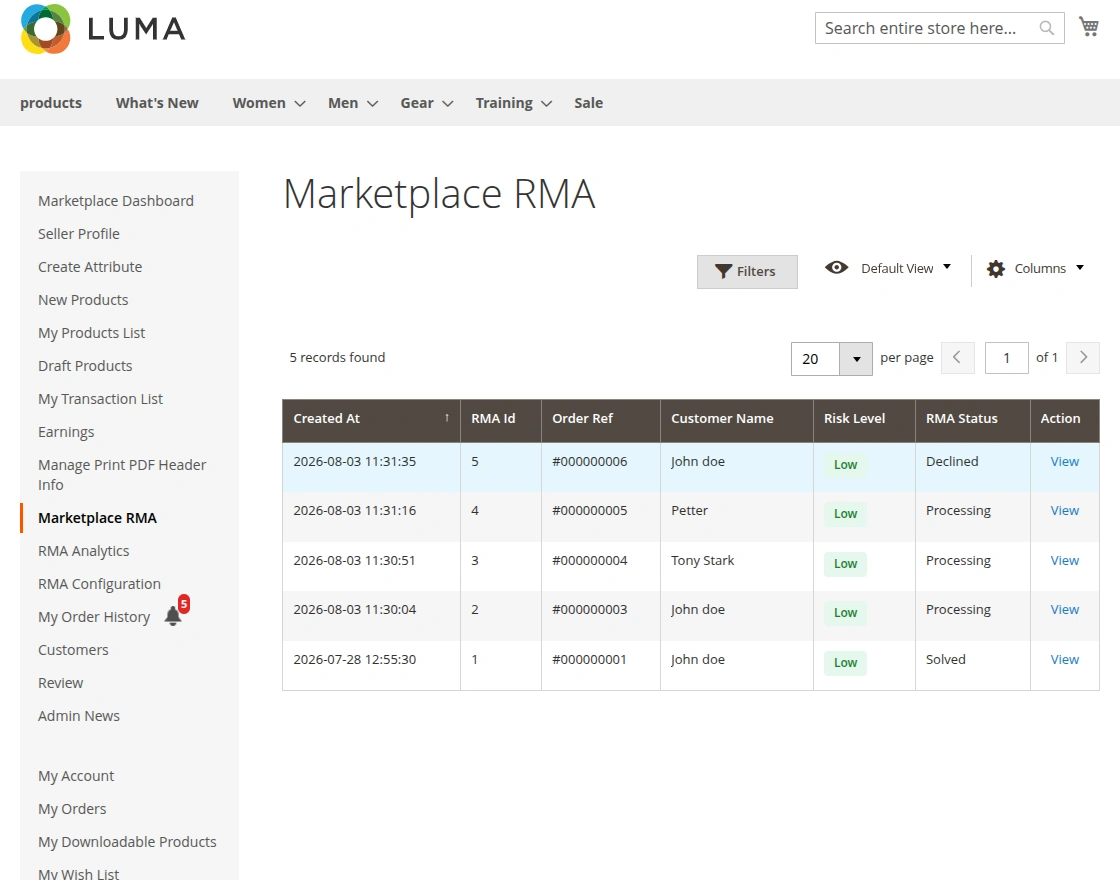
Henceforth, the seller can see the complete list of all the requested RMAs. The seller will click on the ‘View” link to view the RMA and navigates to the RMA details page.
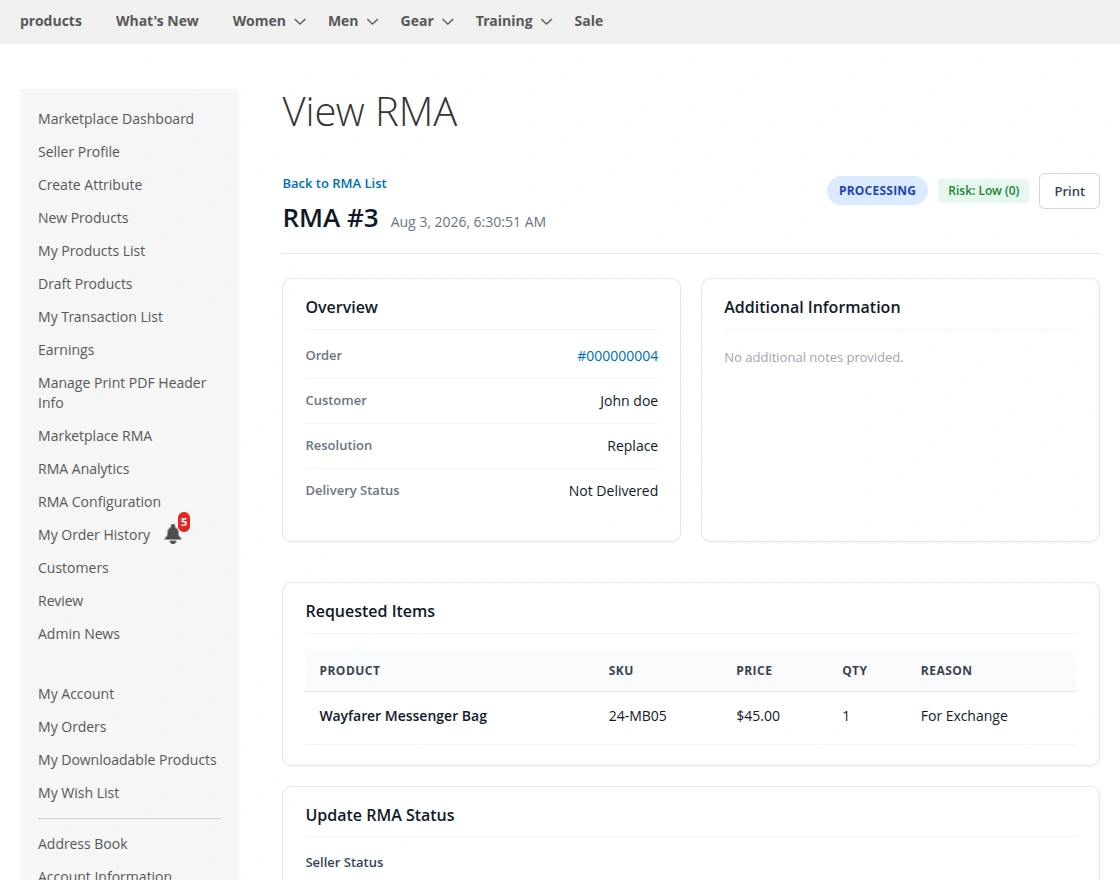
RMA details
On the RMA details page, the seller is able to see the RMA status as solved.
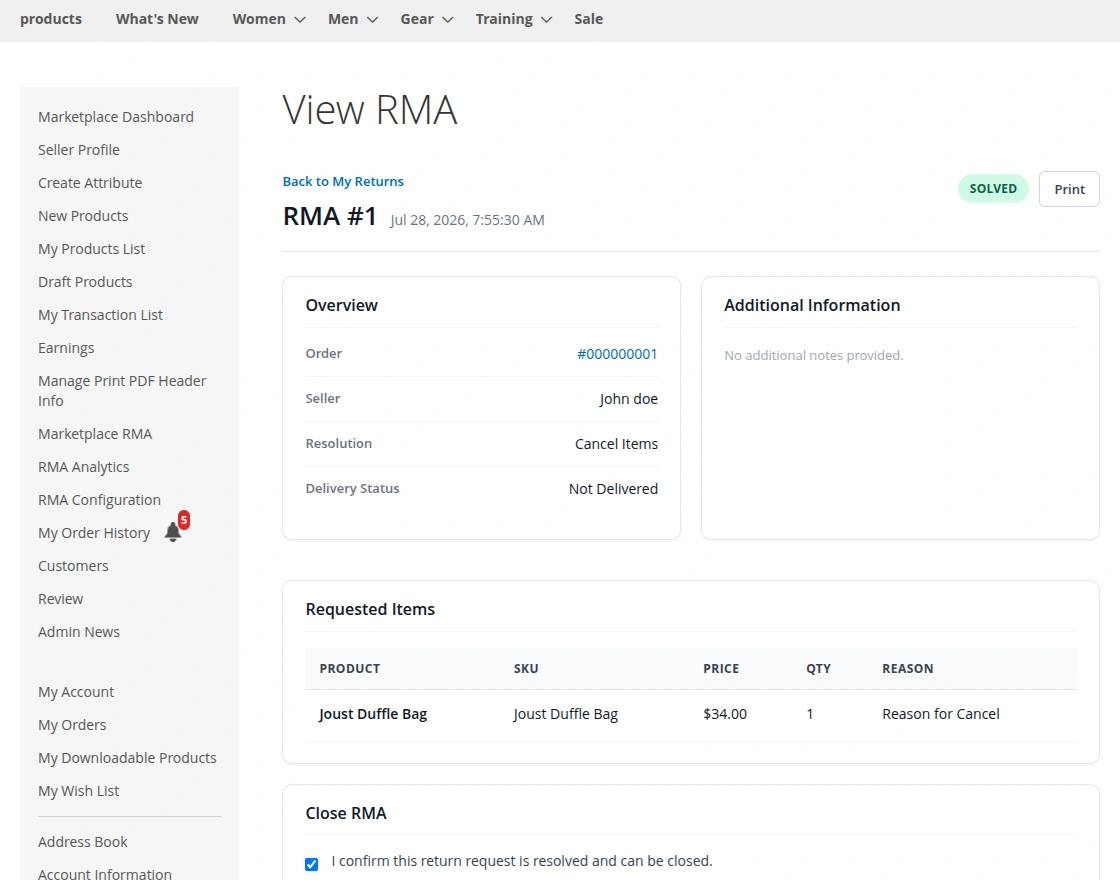
Now the customer will be able to see the status as solved for his requested RMA as shown below –
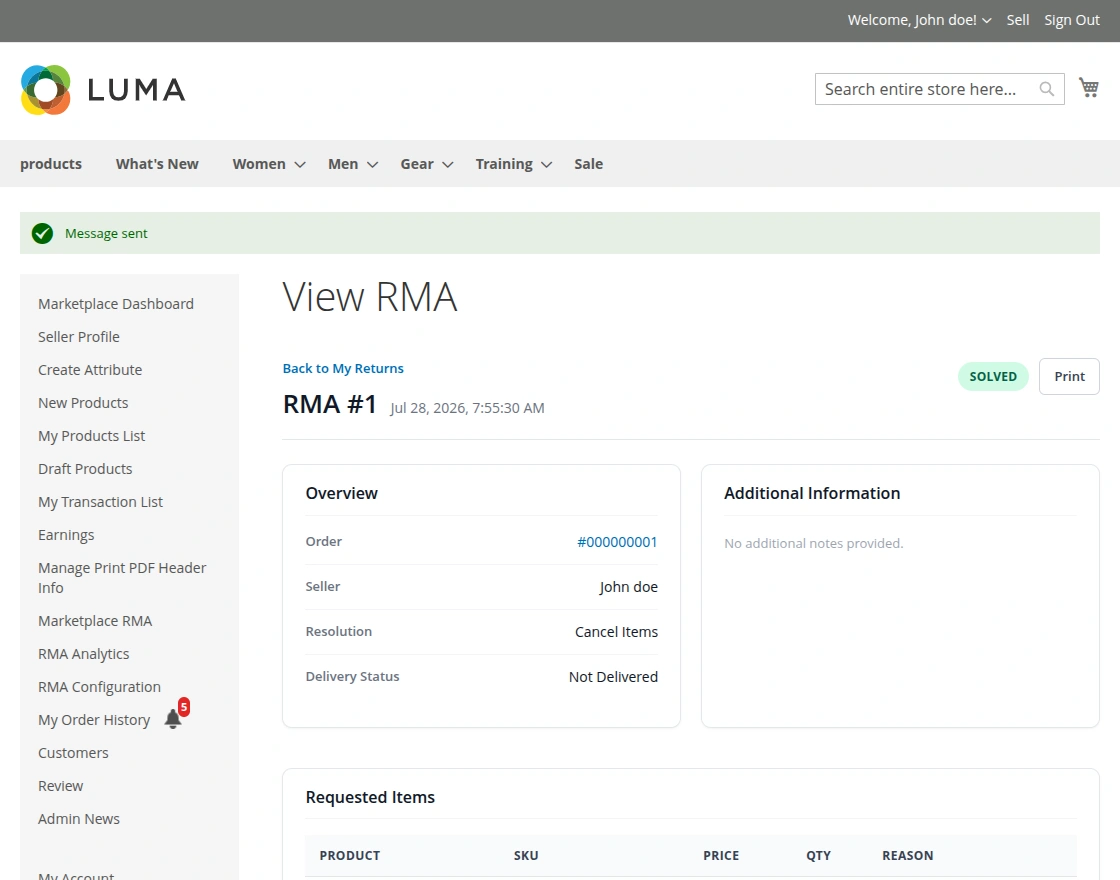
Moroever, Customers and sellers can chat with each other as mentioned below.
Replace Item – Customer End
With the help of the Marketplace RMA System, the buyers can request a replacement of the items order if the invoice has been generate. To replace the order, the buyer will:
Orders
Click the drop-down list to select the order for which the buyer wants to create an RMA request.
Resolution
If the invoice of the order is generate then only the Refund/Replace option will appear in the Resolution dropdown.
Select items
for which the buyer wants to file the RMA.
Quantity
Choose the quantity for which the buyer will generate the RMA request.
RMA reason
The buyer has to choose a reason for the RMA from the drop-down selections.
Images
Upload the images of the item for which the buyer wants to file the RMA.
Additional Information
Add additional information about the RMA reason in case the buyer does not find a valid reason from the drop-down.
Order Status
If the shipment of the order is not generate then in order status by default the Not Delivere option will appear.
Moreover, once the shipment of the order is generated then only you will get the Not Delivered/Delivered option in the Order Status drop-down.
NOT DELIVERED –
Suppose the buyer has placed an order for a T-Shirt with size L. After a few days, the buyer wants XL size instead of L size. As the invoice has been generated and the item is not delivered to the buyer.
Therefore, in this case, the buyer will select the order status “Not Delivered”. On the delivery day, the buyer will receive the XL size T-Shirt instead of L size.
DELIVERED –
Suppose the buyer has placed an order for a T-Shirt. The Buyer gets the delivery of the order after the generation of the invoice.
After receiving the order, the buyer notices the item has defects or the size does not fit. As the invoice has been generated and the item is also delivered to the buyer.
Therefore, in this case, the buyer will select the order status “Delivered”.

Replace Item – Seller End
Moreover, now the seller will log in to his account and check the requested RMA to replace the order. This seller will click on the Marketplace RMA menu option as per the below image.

Here, the seller can see the complete list of all the requested RMAs. The seller will click on the ‘View” link to view the RMA and get navigated to the RMA details page.
On the RMA details page, the sellers will be able to set the RMA status for the Replace of an item as – Pending, Not Recevice Package yet, Received Package, Dispatched Package, Declined.
After selecting the RMA status, the seller will click the save button after that as shown below.

RMA – Processing Status
The customer will be able to see the RMA status as “Processing” after the seller has selected the RMA status shown below.

To replace the product, the seller will ship the replacement product to the buyer.
Once the customer has received the dispatched package by the seller, they can select the checkbox “Agree To mark it as Solved” so as to close the requested RMA as shown below in the screenshot –

After a buyer has checked the option “Agree To mark it as Solved“, the buyer will be able to see the RMA status as Solved for the Requested RMA as shown below in the screenshot.

Refund Item – Customer End
With the help of the Marketplace RMA System, the buyers can request a refund for the ordered items. If the invoice is generated then only the customer can go for a refund. To refund the order, the buyer will:
- Orders: Click the drop-down list to select the order for which the buyer wants to create an RMA request.
- Resolution: If the invoice of the order is generated then only the Refund/Replace Option will appear in the Resolution dropdown.
- Select items for which the buyer wants to file the RMA.
- Quantity: Choose the quantity for which the buyer will generate the RMA request.
- RMA reason: The buyer has to choose a reason for the RMA from the drop-down selections.
- Images: Upload the images of the item for which the buyer wants to file the RMA.
- Additional Information: Add additional information about the RMA reason in case the buyer does not find a valid reason from the drop-down.
- Order Status: If the shipment of the order is not generated then by default the Not Delivered option will appear in the order status.
Moreover, once the shipment of the order is generated then only you will get the Not Delivered/Delivered option in the Order Status dropdown.
NOT DELIVERED –
Suppose the buyer has placed an order. After a few days, the buyer doesn’t want the product anymore. As the invoice has been generated and the item is not delivered to the buyer. Therefore, in this case, the buyer will select the order status “Not Delivered”.
DELIVERED –
Suppose the buyer has placed an order. The Buyer gets the delivery of the order after the generation of the invoice. After receiving the order, the buyer doesn’t want the product now. As the invoice has been generated and the item is also delivered to the buyer. Therefore, in this case, the buyer will select the order status “Delivered”.

Refund Item – Seller End
Moreover, now the seller will log in to his account and check the requested RMA to refund. This seller will click on the Marketplace RMA menu option.

The seller will click on the ‘View” link to view the RMA and get navigated to the RMA details page.
On the RMA details page, the seller can select a full or partial refund for the order.
Now they can click the Refund Offline button to replace/refund the amount back to the buyer.
The seller may select any of the RMA statuses such as Pending, Not Recevice Package yet, Received Package, Dispatched Package, Declined but after the refund, the status will automatically be changed to Solved.

The seller can refund the amount to the customers who have paid for the product. After the refund, a seller can see the Request RMA status as Solved as shown below.
You can get online refund also after clicking on the refund button , Online refund means the refund would be initiate from the same payment method through which payment has been completed.
The customers will also be able to see the RMA Status as Solved and will be able to check the option “Agree To Mark It As Solved” to complete the Requested RMA as “Solved” as shown below in the screenshot.
Now the customer can see the requested RMA for Refund as Solved as shown below in the screenshot –

NOTE:
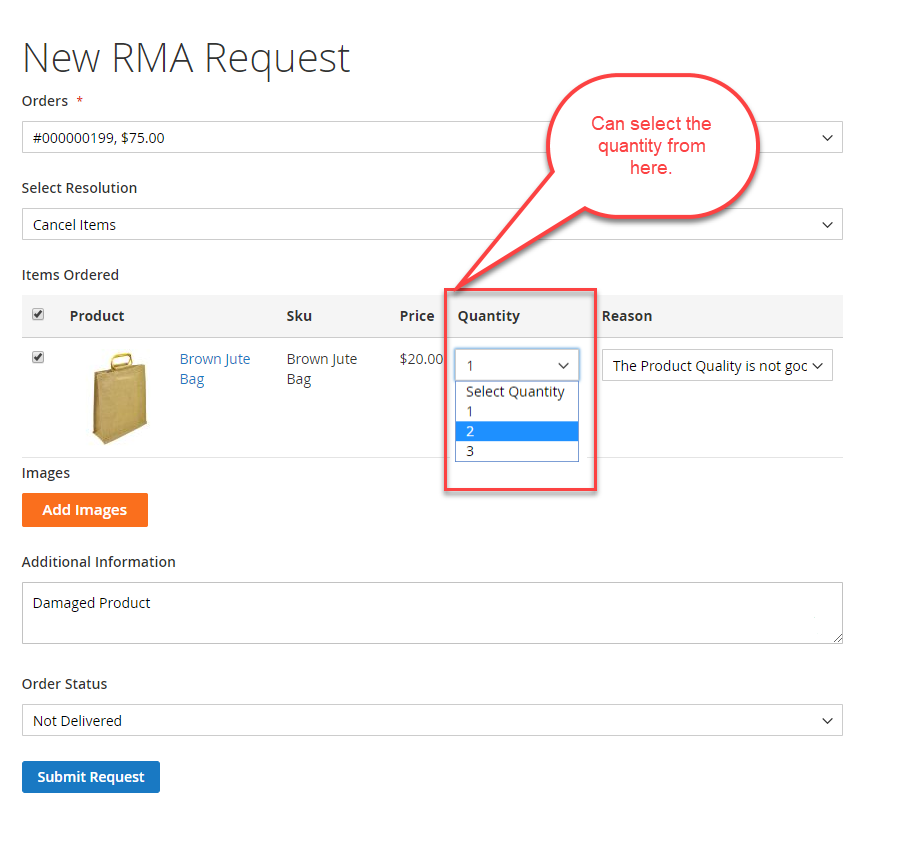
Create RMA quantity-wise:
The customer can create RMA quantity-wise. For example – The customer has placed an order for 3 bags. But the customer has received 2 damaged bags out of three. In this case, the customer can easily create an RMA for the damaged bags as per the below image.
RMA Analytics
RMA Analytics section provides administrators with a comprehensive overview of return requests through visual reports, summary cards, and an interactive RMA grid.
It helps monitor refund trends, return reasons, product performance, and the overall status of RMA requests from a single dashboard.
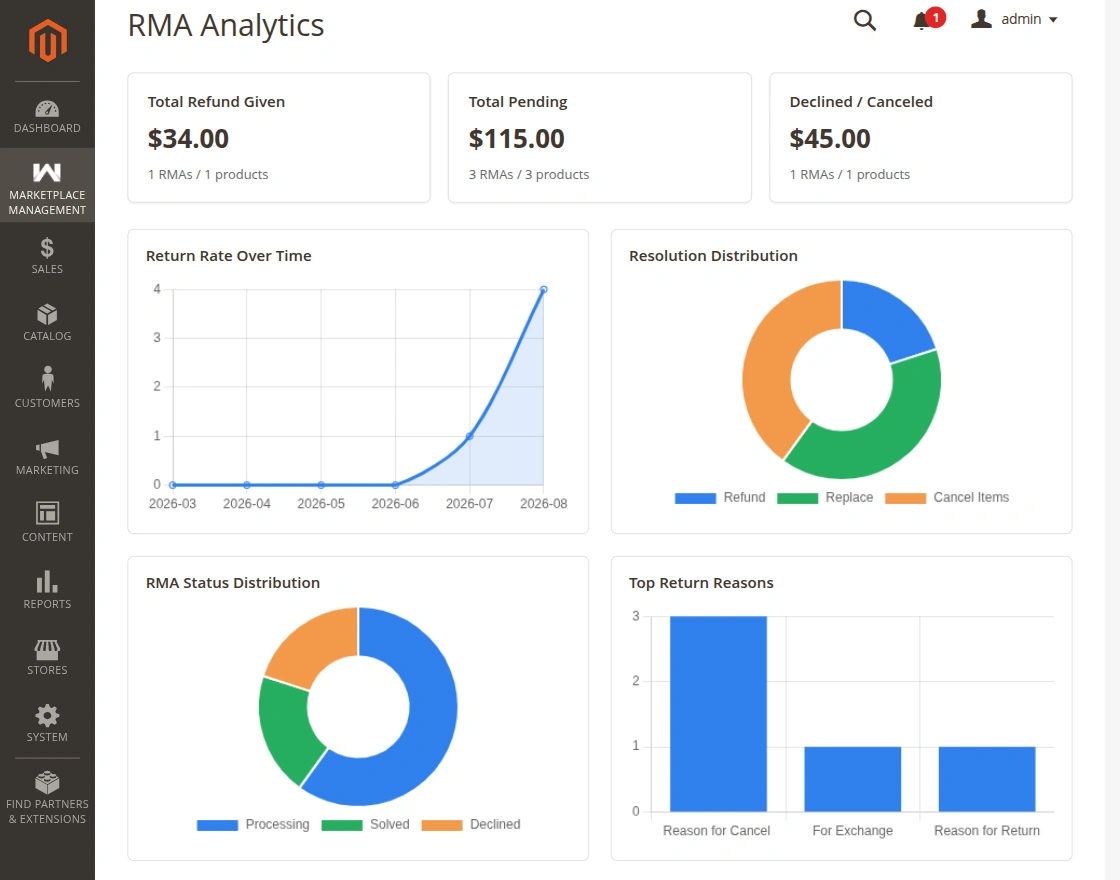
The dashboard displays key performance indicators to quickly evaluate return activity-
Total Refund Given : Displays the total refund amount, along with the number of RMAs and products refunded.
Total Pending : Shows the total value and count of RMA requests that are currently awaiting processing.
Declined / Canceled : Displays the total amount and number of RMAs that have been declined or canceled.
Return Rate Over Time: This line chart visualizes the number of RMA requests received over time, allowing administrators to identify return trends and seasonal patterns.
Resolution Distribution : The Resolution Distribution chart shows how customers are resolving their RMA requests, such as:
- Refund
- Replace
- Cancel Items
This helps identify the most frequently selected resolution type.
RMA Status Distribution : This doughnut chart provides a graphical overview of the current RMA statuses, including:
- Processing
- Solved
- Declined
Administrators can quickly understand the distribution of RMA requests across different workflow stages.

Top Return Reasons : Analytics dashboard displays the most common reasons selected by customers when creating return requests.
Top Returned Products : This chart highlights the products with the highest number of RMA requests, making it easier to identify items with frequent returns and improve product quality.
Top Returned Categories : Displays product categories generating the highest number of return requests, enabling merchants to analyze return trends at the category level.
Manage RMA Grid :
Manage RMA section lists all RMA requests in a structured grid with detailed information for easy monitoring and management.
The grid includes the following columns:
- RMA ID – Unique identifier of the RMA request.
- Resolution Type – Selected resolution such as Refund, Replace, or Cancel Items.
- Order Ref – Associated order reference number.
- Customer Name – Name of the customer who submitted the RMA.
- Seller – Marketplace seller associated with the request.
- Risk Level – Displays the fraud risk level (for example, Low, Medium, or High) calculated by the Fraud Detection system.
- RMA Status – Current status of the return request.
- Order Status – Current status of the original order.
- Action – Allows the administrator to view the complete RMA details.
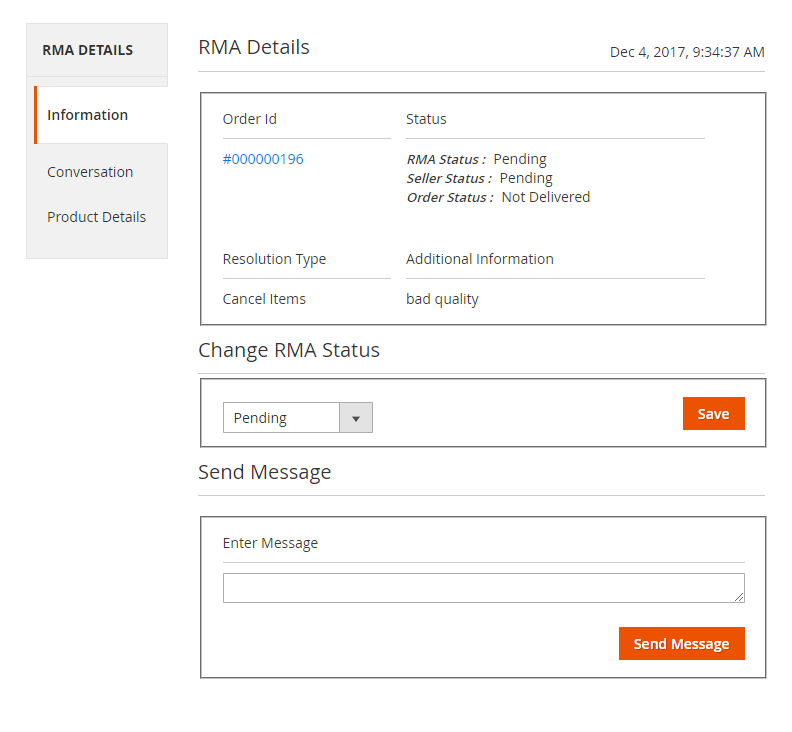
View RMA Details
To view the complete information of an RMA request, navigate to Marketplace Management → RMA System → RMA Analytics, locate the desired RMA in the Manage RMA grid, and click the View action.
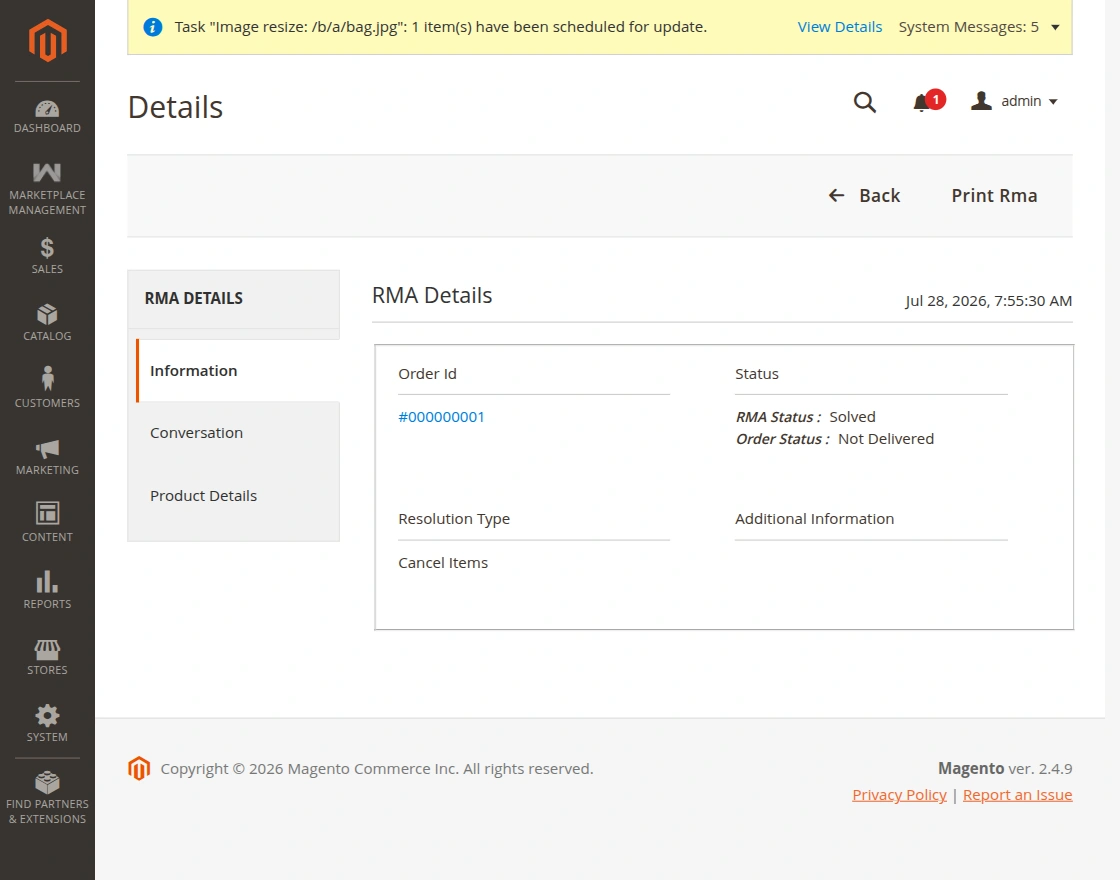
RMA Details page provides complete information about the selected return request in a well-organized interface.
Information
The Information tab displays the primary details of the RMA request, including:
- Order ID – Displays the associated order reference. Clicking the Order ID opens the corresponding order details.
- RMA Status – Shows the current status of the return request, such as Pending, Processing, Solved, or Declined.
- Order Status – Displays the current status of the original order.
- Resolution Type – Indicates the resolution selected by the customer, such as Refund, Replace, or Cancel Items.
- Additional Information – Displays any additional notes or comments provided during the RMA request creation.
Conversation
The Conversation tab contains the complete communication history between the customer, seller, and administrator. It allows administrators to review previous messages and continue the discussion related to the RMA request.
Product Details
The Product Details tab lists all products included in the RMA request along with their related information, such as the requested quantity, reason for return, and selected resolution type. This enables administrators to review the returned items before taking further action.
Additional Actions
The RMA Details page also provides the following actions:
- Back – Returns to the previous RMA listing page.
- Print RMA – Generates a printable version of the RMA details for documentation or record-keeping purposes.
Virtual Product:
There will be no “Order Status” field in the RMA for the virtual and the downloadable products unlike the other types of products.
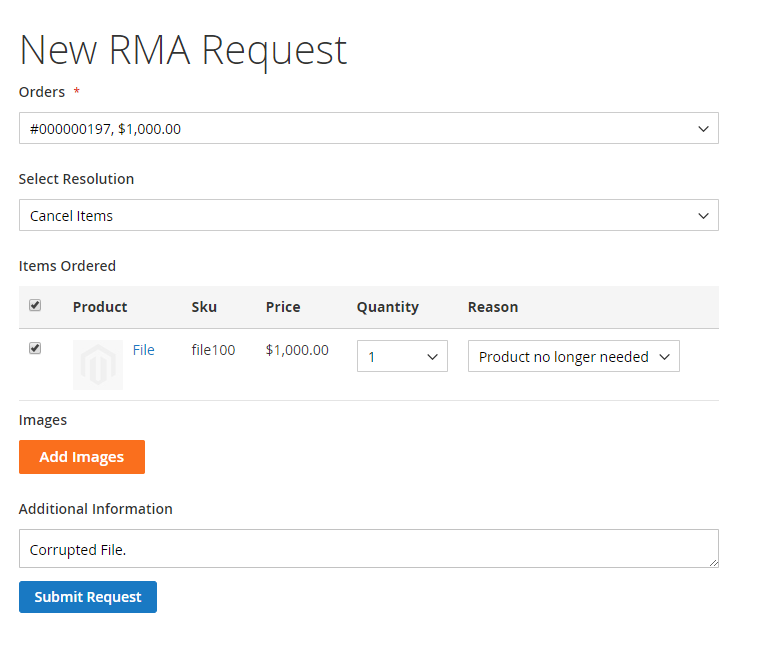
Create RMA seller wise:
Henceforth, with the help of the Marketplace RMA System, the customers can easily file an RMA if the order they have placed contains products from a single seller.
What if the customer has placed an order having multiple products belongs to different sellers. And, the customer wants to replace/cancel/refund the certain products which belong to different sellers.
In this case, the customer can create the RMA according to the sellers. The customer simply selects the seller of the product which he wants to replace/cancel/refund. Please refer the below images –

The above two RMA has been created for the same order – #000000197 but for different seller products. Because this order contains multiple products belongs to different sellers.
INFORMATION:
Admin will be able to see all the information about the RMA. And can easily manage the RMA for his products just like sellers.

CONVERSATION:
The admin will be able to see the conversation between the buyer and seller for this order as shown below –

PRODUCT DETAILS:
The admin will be able to see the product details like SKU, product name, and the quantity of the product –

NOTE: The admin can only view the details of the RMA placed for the seller’s products. The admin can’t manage the seller’s RMA.
GUEST- REQUEST A NEW RMA
Moreover, with the help of the Marketplace RMA System, the Guests Users also can request an RMA by navigating to RMA Returns footer menu item at the bottom of the page as shown below in the screenshot.

After the guest user places the order, he can generate an RMA request for Cancel, Replace or Refund of an ordered Item. For the Cancel part, the guest user can go for the cancel order before the invoice and shipping have been generated.
And for requesting a replacement or refund, the invoice should be generated for the ordered products then only the guest user can go for the RMA.
To file an RMA the guest user will go to the footer menu item at the bottom of the page and click on it. After that, the guest will see another page come up where the guest user needs to enter the Order ID and the E-mail ID to proceed for requesting the RMA as shown below in the screenshot.

After login, the guest user will be able to see the RMA request Panel and will click to generate a new RMA request.
Cancel Item – Guest
Moreover, with the help of the Marketplace RMA System, the guest user can request the RMA to cancel the ordered items if the invoice has not been created. To cancel the order, the guest user will:
- Orders: Click the drop-down list to select the order for which the guest user wants to create an RMA request.
- Resolution: If the invoice is not generated then by default the Cancel Items option will appear in Resolution.
- Select items for which the guest user wants to file the RMA.
-
Quantity: Choose the quantity for which the guest user will generate the RMA request.
- RMA reason: The guest user has to choose a reason for the RMA from the drop-down selections.
- Images: Upload the images of the item for which the guest user wants to file the RMA.
- Additional Information: Add additional information about the RMA reason in case the guest user does not find a valid reason from the drop-down list.
- Order Status: If the Resolution is Cancel Item then by default the Not Delivered option will appear in Order Status.

Manage Guest Cancel Item – seller
Moreover, with the help of the Marketplace RMA System, the seller will check the Requested RMA by the Guest User under his account menu item “Marketplace RMA”
The seller will be able to see the RMA status as solved as shown below.

The Guest user will also be able to see the RMA status as solved.

Marketplace RMA Configuration
Note: The RMA Wallet Configuration section is available only when the Magento 2 Multi Vendor Wallet is installed and enabled.
Since the RMA Wallet feature depends on the Wallet Extension, these configuration settings will automatically appear in the admin panel once the Wallet module is installed.
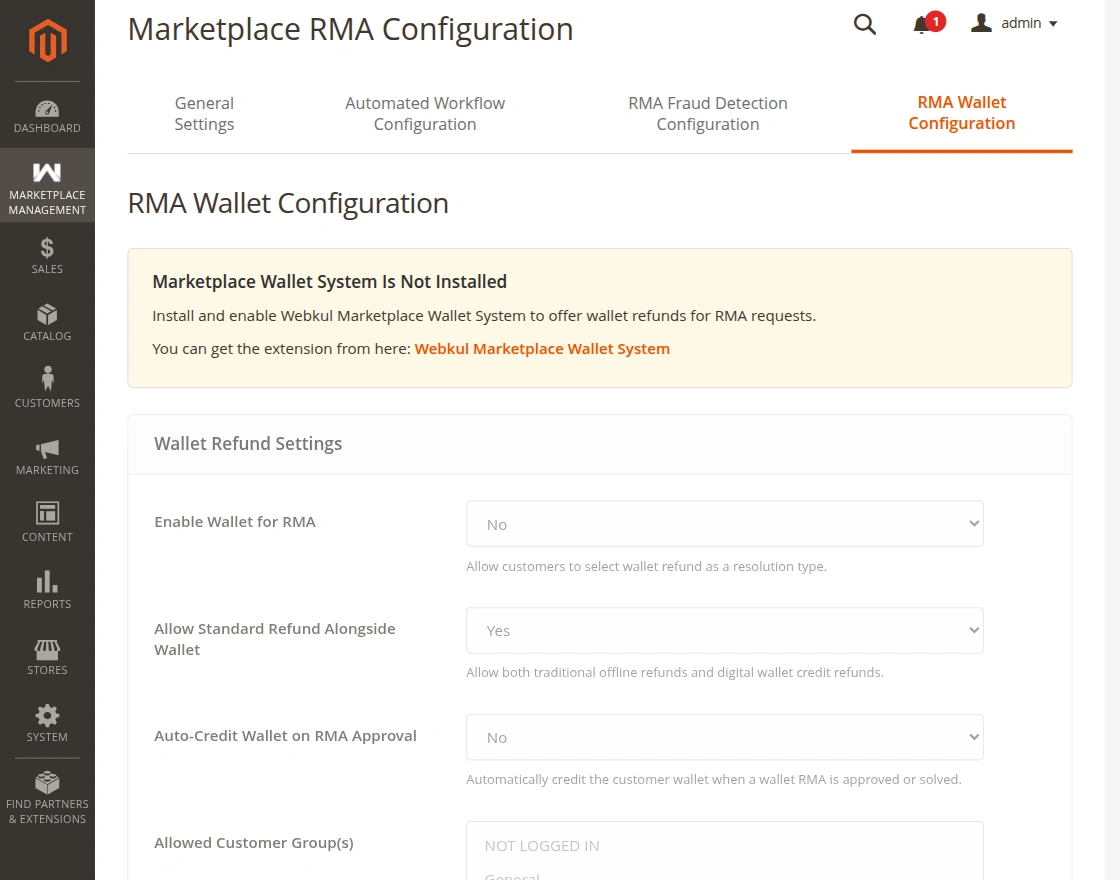
This integrates the RMA system with the digital store credit wallet. Seller can credit return amounts instantly to customer wallets.
Replace Item – Guest
Moreover, the guest Users can request a replacement of the items ordered if the invoice has been generated. To replace the order, the guest user will:
- Orders: Click the drop-down list to select the order for which the guest user wants to create an RMA request.
- Resolution: If the invoice of the order is generated then only the Refund/Replace option will appear in the Resolution dropdown.
- Select items for which the guest user wants to file the RMA.
- Quantity: Choose the quantity for which the guest user will generate the RMA request.
- RMA reason: The guest user has to choose a reason for the RMA from the drop-down selections.
- Images: Upload the images of the item for which the guest user wants to file the RMA.
- Additional Information: Add additional information about the RMA reason in case the guest user does not find a valid reason from the drop-down list.
- Order Status: If the shipment of the order is not generated then in order status by default the Not Delivered option will appear.
Once the shipment of the order is generated then only you will get the Not Delivered/Delivered option in the Order Status dropdown.
NOT DELIVERED –
However, suppose the guest user has placed an order for a T-Shirt with size L. After a few days, the guest user wants XL size instead of L size.
As the invoice has been generated and the item is not delivered to the guest user. Therefore, in this case, the guest user will select the order status “Not Delivered”.
On the delivery day, the guest user will receive the XL size T-Shirt instead of L size.
DELIVERED –
However, suppose the guest user has placed an order for a T-Shirt. The guest user gets the delivery of the order after the generation of the invoice. After receiving the order, the guest user notices the item has defects or the size does not fit.
As the invoice has been generated and the item is also delivered to the guest user. Therefore, in this case, the guest user will select the order status “Delivered”.

Manage Guest Replace Item – Seller
Henceforth, the seller will check the product replace RMA request from the guest user by navigating to his account menu item “Marketplace RMA”. Here, the seller can see the complete list of all the requested RMAs.
The seller will click on the ‘View” link to view the RMA and get navigated to the RMA details page.
On the RMA details page, the sellers will be able to set the RMA status for the Replace of an item as –
- Not Received- If the Product has not reached the seller.
- Received package- If the Product has reached back to the seller.
After selecting the RMA status, the seller will click the save button after that as shown below.

To replace the product, the seller will ship the replacement product to the buyer.
Henceforth, once the customer has received the dispatched package by the sellers.
They can select the checkbox “Agree To mark it as Solved” so as to close the requested RMA as shown below in the screenshot-

Guest – Refund Item
Moreover, the guest users can request a refund for the ordered items. If the invoice is generated then only the guest user can go for a refund. To refund the order, the guest user will:
- Orders: Click the drop-down list to select the order for which the guest user wants to create an RMA request.
- Resolution: If the invoice of the order is generated then only the Refund/Replace option will appear in the Resolution dropdown.
- Select items for which the guest user wants to file the RMA.
- Quantity: Choose the quantity for which the guest user will generate the RMA request.
- RMA reason: The buyer has to choose a reason for the RMA from the drop-down selections.
- Images: Upload the images of the item for which the guest user wants to file the RMA.
- Additional Information: Add additional information about the RMA reason in case the guest user does not find a valid reason from the drop-down.
- Order Status: If the shipment of the order is not generated then in order status by default the Not Delivered option will appear.
Henceforth, once the shipment of the order is generated then only you will get the Not Delivered/Delivered option in the Order Status drop-down.
NOT DELIVERED –
However, suppose the guest user has placed an order. After a few days, the guest user doesn’t want the product anymore. As the invoice has been generate and the item is not deliver to the guest user.
Therefore, in this case, the guest user will select the order status “Not Delivered”.
DELIVERED –
However, suppose the guest user has placed an order. The guest user gets the delivery of the order after the generation of the invoice. After receiving the order, the guest user doesn’t want the product now.
As the invoice generates and the item is also deliver to the guest user. Therefore, in this case, the guest user will select the order status “Delivered”.

Manage Guest Refund Item – Seller
Henceforth, the seller will select RMA Status but after refund and the status will automatically b changes to Solved.

RMA- Return Status History
Now Customer can see the status of their return request. Moreover, with the help of the Marketplace RMA System, customers can also generate an RMA request and track the information of their return request.

Support
This module is an essential part of Magento 2 RMA. Thus, that is all for the Magento 2 Marketplace RMA System still, have any issue feel free to add a ticket and let us know your views to make this module better webkul.uvdesk.com. You may also browse other Adobe Commerce marketplace addons and our quality Magento 2 extensions.
Current Product Version - 5.1.6
Supported Framework Version - Magento 2.0.x, 2.1.x, 2.2.x,2.3.x, 2.4.x


But I have one question, that is very important. Does it support REST API ?
Because I am developing a mobile application for the store. And I would like to know if it supports REST API?
Could you please provide me some information about it before I could purchase it?