Magento 2 Marketplace CS-Cart connector extension integrates the Magento 2 Marketplace store with the CS-Cart store.
You can synchronize the products and orders between Magento and the CS-Cart stores.
The store admin and sellers can now manage the Magento 2 store and CS-Cart store at the same time. This plugin allows the store merchants to manage multiple CS-Cart stores.
If you also want to use the Booking and reservation type of products on your Marketplace store then use our Magento 2 Marketplace Booking and reservation extension for the same.
Note: This module will work for simple and configurable products only.
Features
- The store merchant can set up various CS-Cart stores.
- The store owners and sellers can import products and orders from CS-Cart.
- The admin and sellers can also map Magento 2 categories to CS-Cart categories.
- The store admin and vendors can also pull real-time orders with the help of cron.
- Sellers and admin can import Simple as well as Configurable product types.
- In Magento 2 Marketplace CS-Cart Connector, the product information like base image, additional images, name, price, SKU, description, quantity, weight, and super attributes with options imported along with the product.
- The admin and seller can set default quantity and weight values for imported products in the Magento 2 store
- If a product is not created during the real-time order update, cron will create it for you automatically.
- The store admin and seller can manage and view the products from both stores.
- If no category is assigned for any product, then it will fall in default.
- The store admin and vendor can also export the products from Magento into CS-Cart.
Installation
The installation is quite simple just like the standard Magento 2 extensions.
#1 Download Module
Firstly, you need to log in to the Webkul Store, go to My Account>My Purchased Products section, verify, and then download and extract the contents of this zip folder on the system.
#2 Upload Folder
Once the module zip is extracted, follow path src>app and then copy the app folder into the Adobe Commerce Cloud root directory on the server as shown below:

Unzip the respective extension zip and create Webkul(vendor) and MpCscartConnector(module) name folder inside your Magento/app/code/ directory and then move all module files into the Magento root directory Magento2/app/code/Webkul/MpCscartconnector/ folder.
Run the Following Commands via the terminal
php bin/magento setup:upgrade
php bin/magento setup:di:compile
php bin/magento setup:static-content:deploy
php bin/magento indexer:reindex

php bin/magento cache:flush
Multilingual Support
Therefore, please navigate to Store>Configuration>General >Locale Options for Multilingual support. Also, select your desired language from the Locale option.
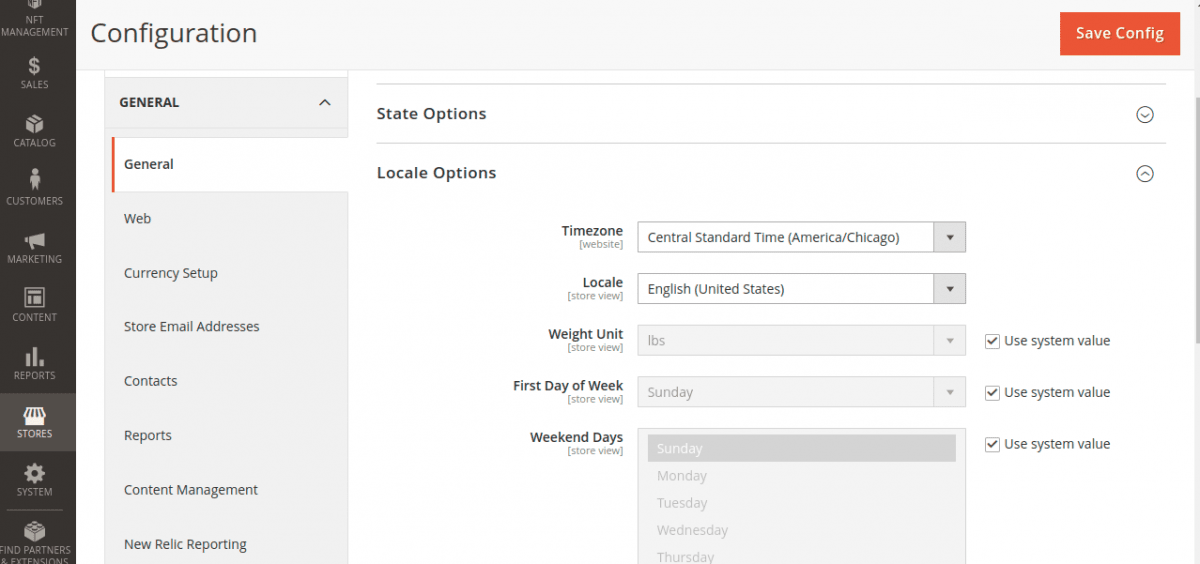
Thus, in this way, a multi-lingual configuration can be done.
Language Translation
For module translation, navigate to the following path in your system src/app/code/Webkul/MpCscartConnector/i18n/en_US.csv Open the file named en_US.CSV for editing as shown in the screenshot below.

Then replace the words after the comma(,) on the right in the file with your translated words.

After editing and translating the CSV file, save the file name according to your region language and country code such as – de_DE.CSV.
Followed by uploading the translated file to the same folder from which you obtained it. Now your module translation is complete.
Thus, in this way, language translation can be done.
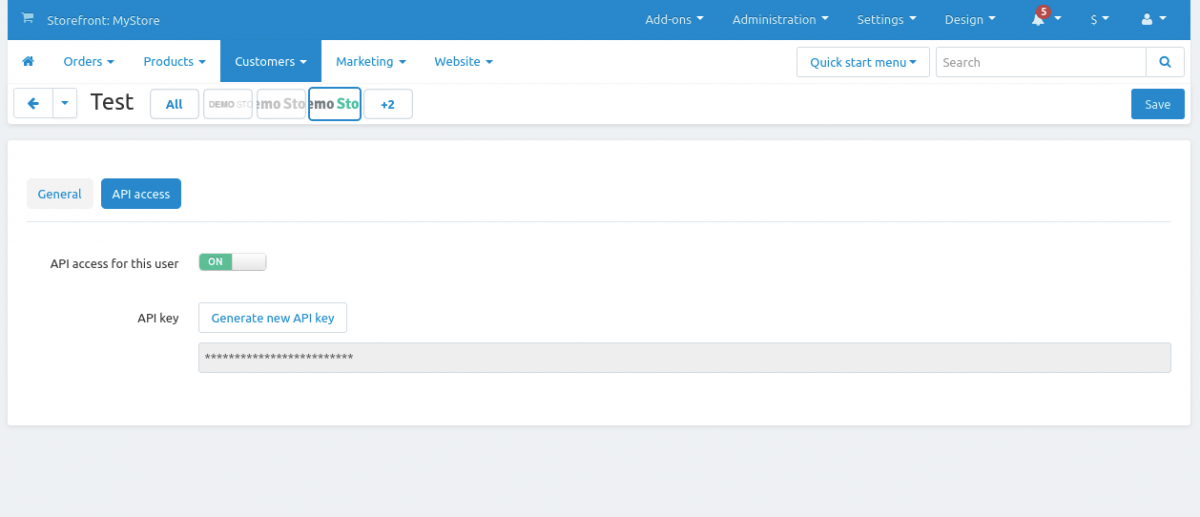
How to Get the CS-Cart API
Furthermore, to get the CS-Cart API keys you need to have CS-Cart installed. Now in your CS-Cart backend, you need to navigate through Edit profile> API Access in your profile.
Here, the API access must be on to get the API keys and the API keys will display in the API Key section.
Module Configuration
To install the Magento 2 Marketplace CS-Cart Connector extension, the admin will navigate through Stores> Configuration> CSCart Connector to make general configurations.
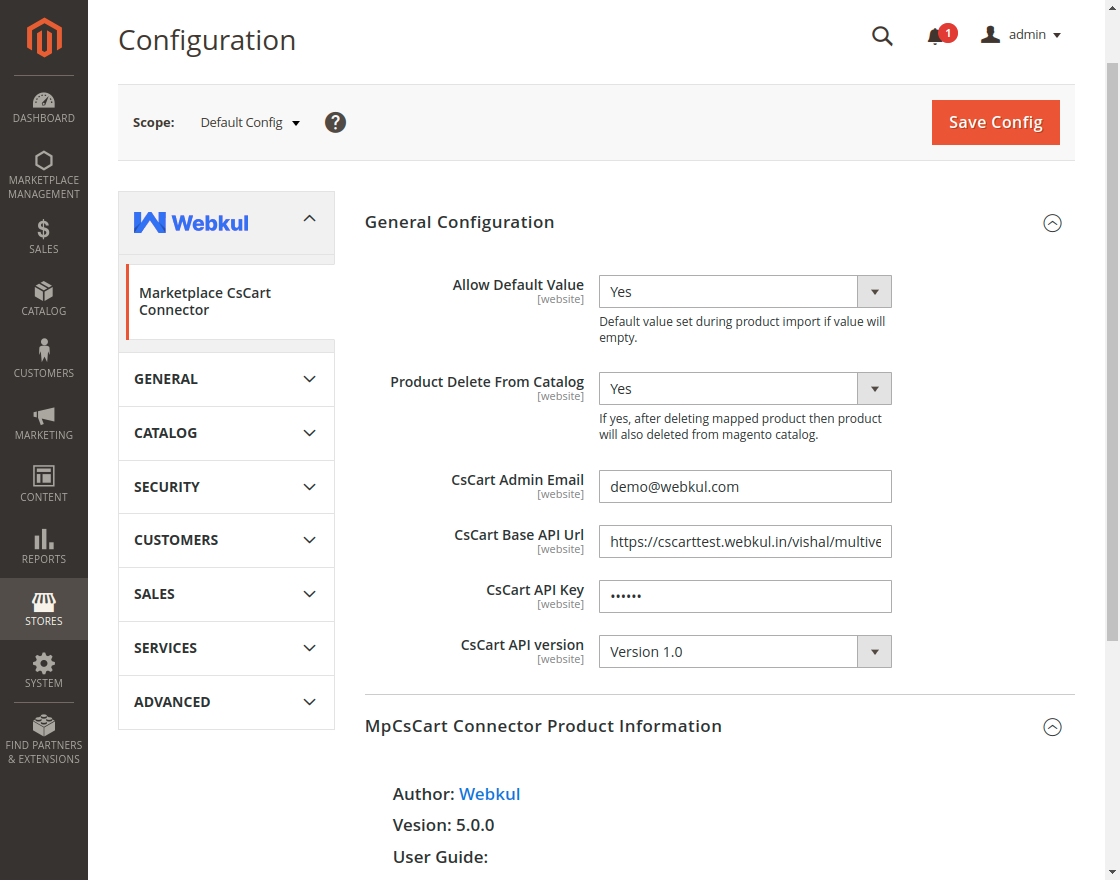
General Configuration:
Allow Default Value- If it is selected as Yes then the default values will assign to the product during import.
Product Default from Catalog- If the option is enabled, the product from Magento 2 catalog will also get deleted after deleting the mapped product.
CS-Cart Admin Email- The admin will enter the CS-Cart admin email.
CS-Cart Base API URL- Here, the store admin will enter the CS-Cart base URL of the storefront.
API Key- Enter the CS-Cart API key.
API Version- Select the CS-Cart API version.
Manage CS-Cart Stores
Now the admin will navigate through Marketplace Management>Marketplace CS-Cart connector to manage and add CS-Cart stores.
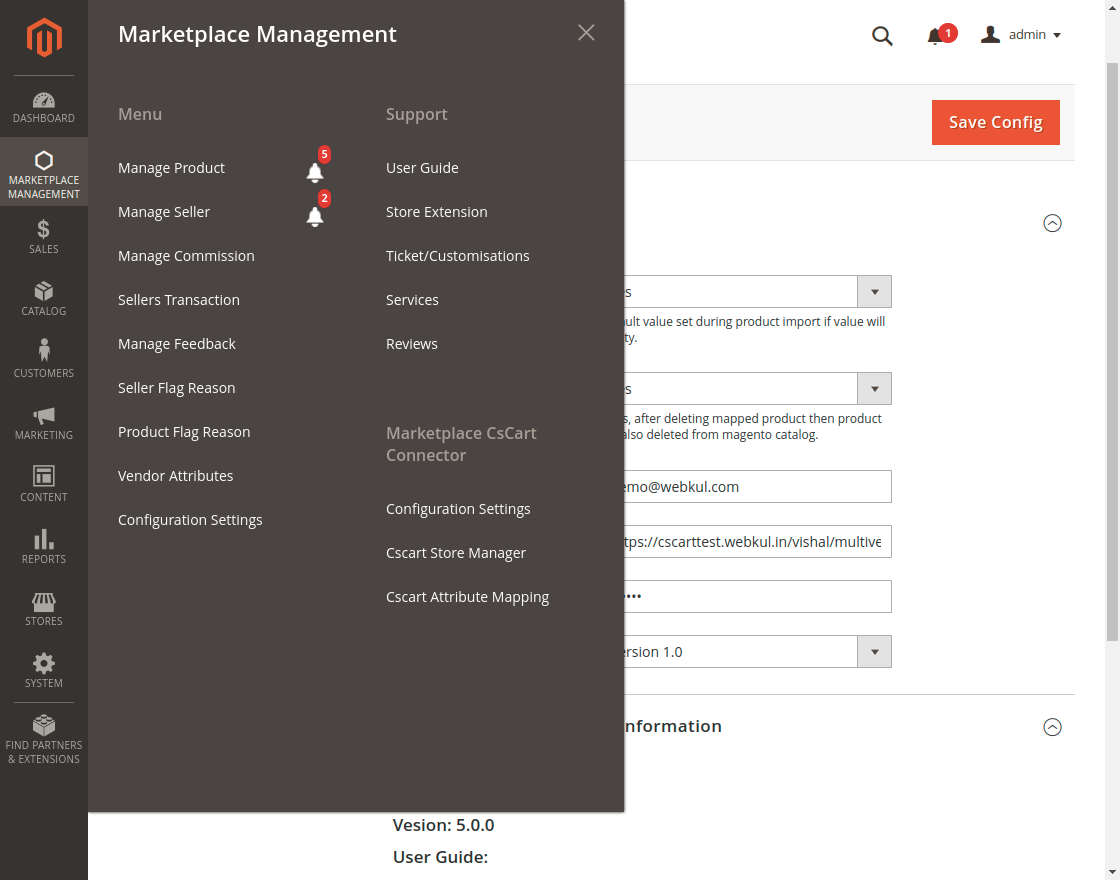
When you click on the configuration settings, it will open the same configuration page to configure the module.
CS-Cart Store Manager
The admin can add multiple CS-Cart stores here. The created store will be displayed here in the list.
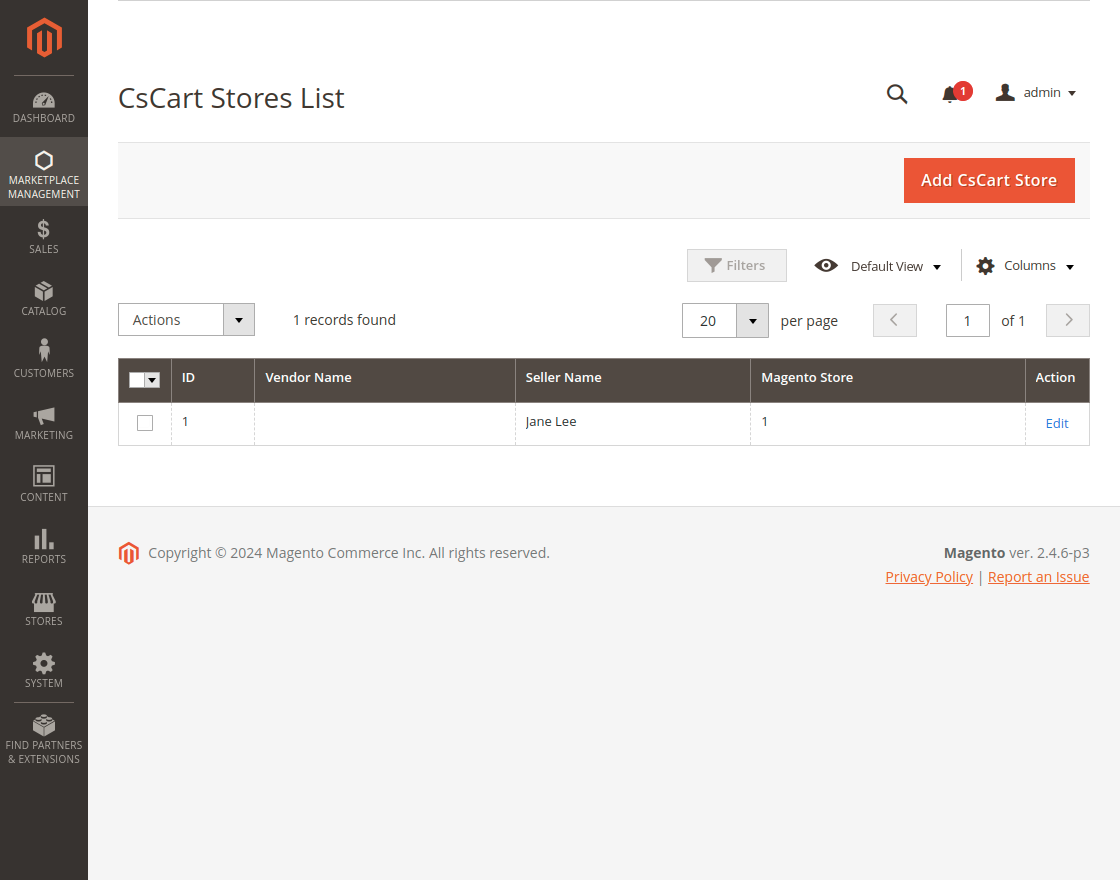
Click on the add new store button to create a new store.
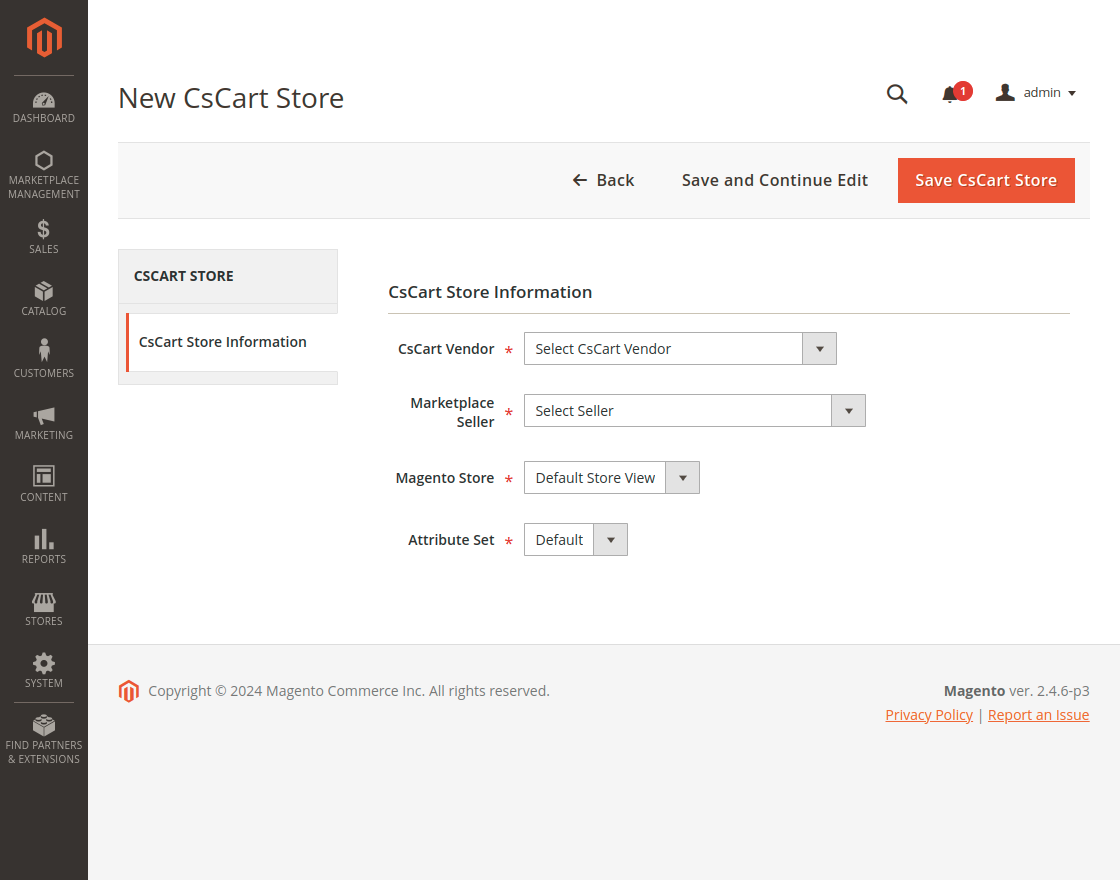
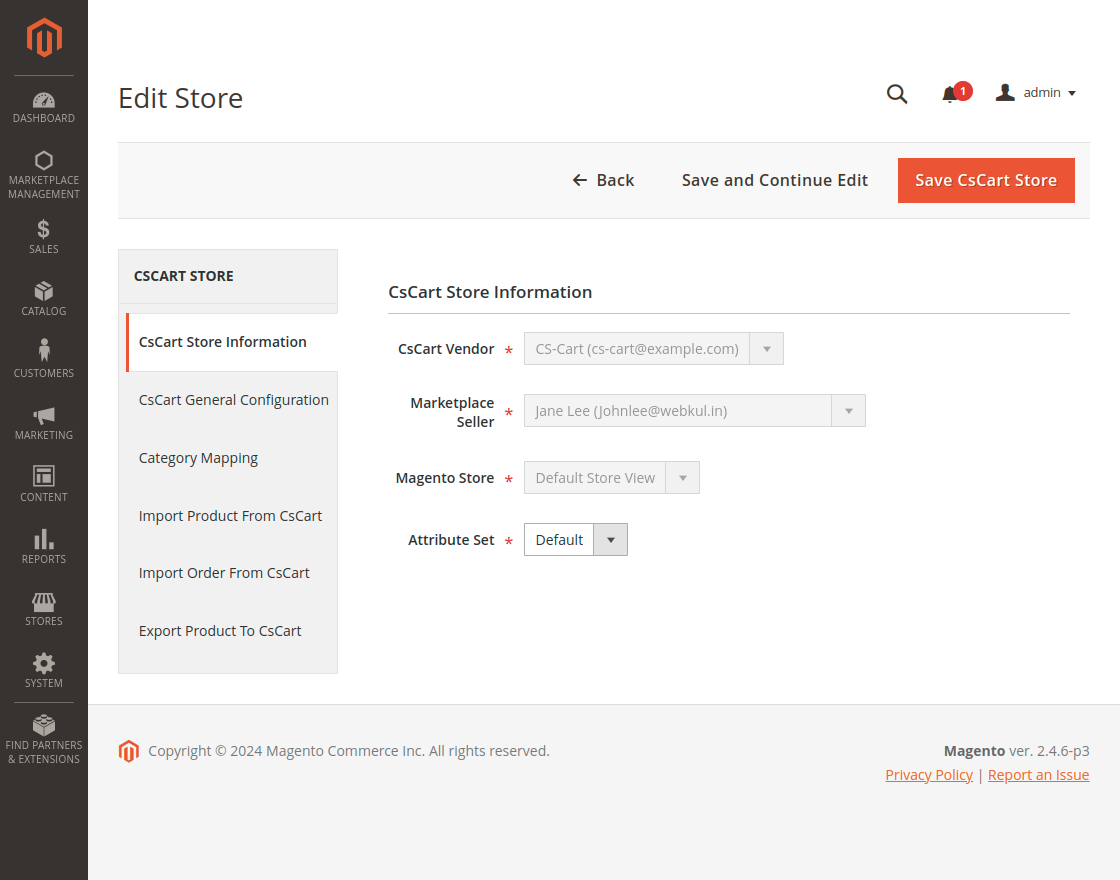
Furthermore, the admin will enter the CS-Cart store information.
CS-Cart Vendor – Add the vendor here which they created on the CS-Cart store.
Marketplace seller– The admin can select the seller from here to assign the store.
Magento Store- Select the Magento store to sync with the CS-Cart store.
Attribute Set- Select the attribute from here.
Once you enter these details and click on the save button the store will be created and the admin can perform various actions on that store.
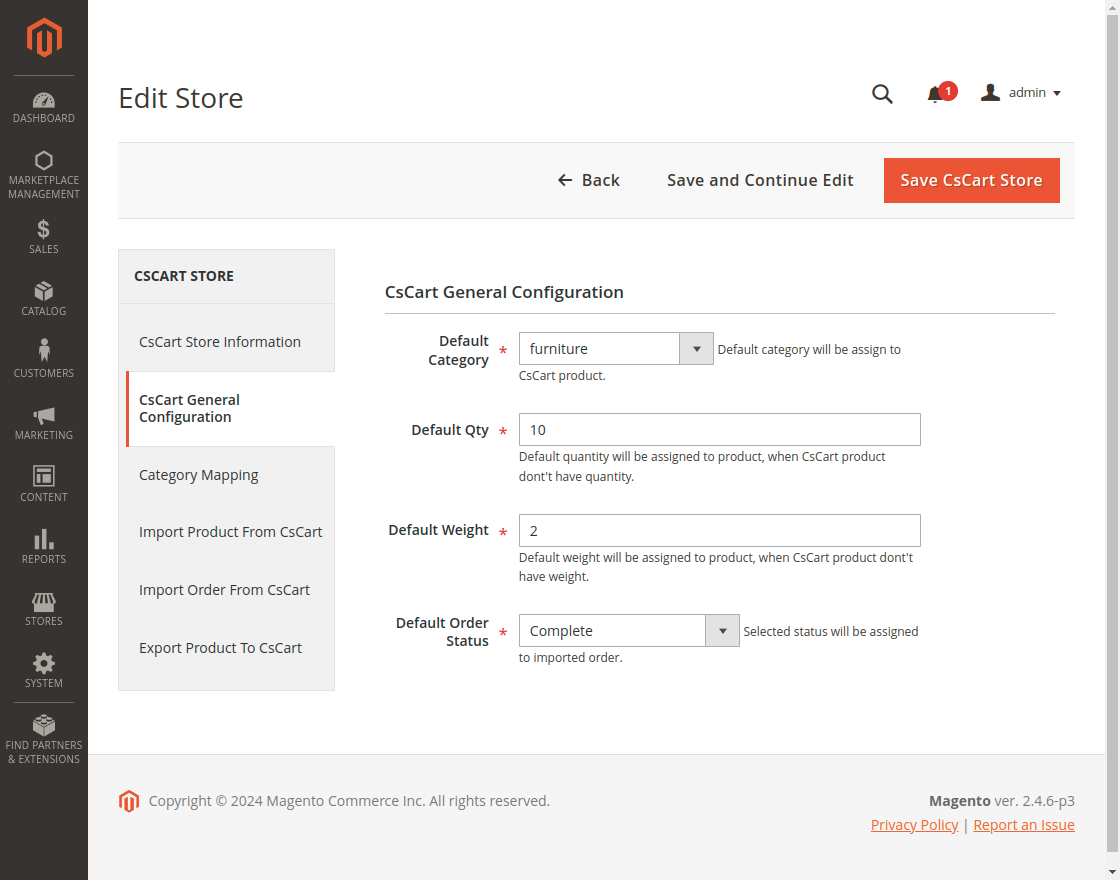
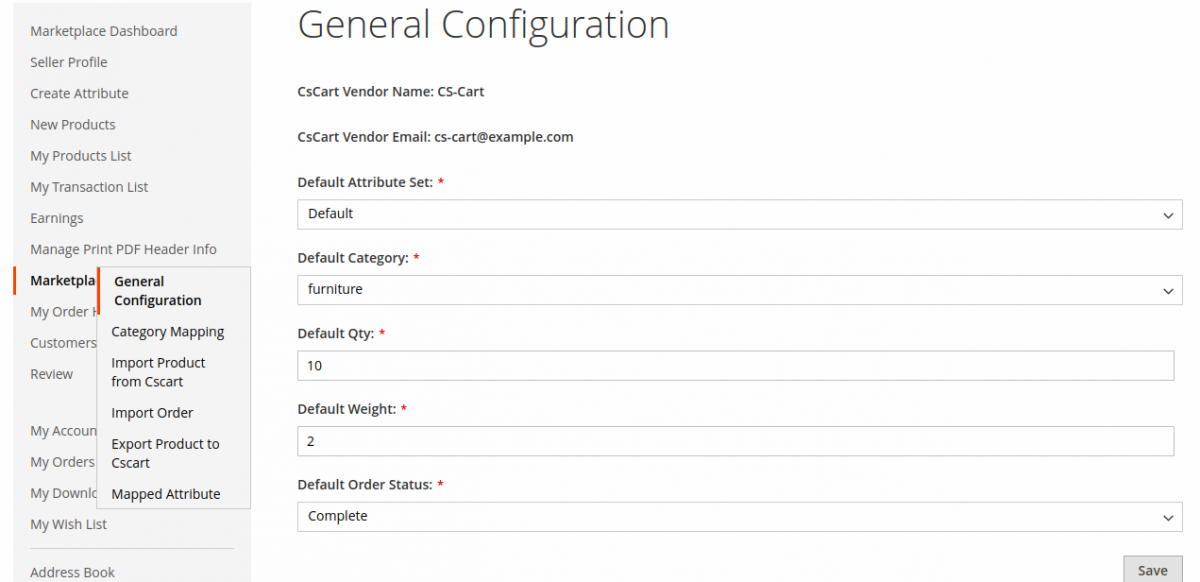
CS-Cart General Configuration
In the general configuration section, the admin has to enter the following details to complete the configuration.
Default Category- Select the default category to assign the CS-Cart product.
Default Quantity- After that, enter the default quantity. This quantity will be assigned to the product when the CS-Cart product does not have quantity.
Default Weight- Enter the default weight, which will be assigned to the product when the CS-Cart product does not have weight.
Default Order Status- Select the default order status from here. The default status will be assigned to the imported order.
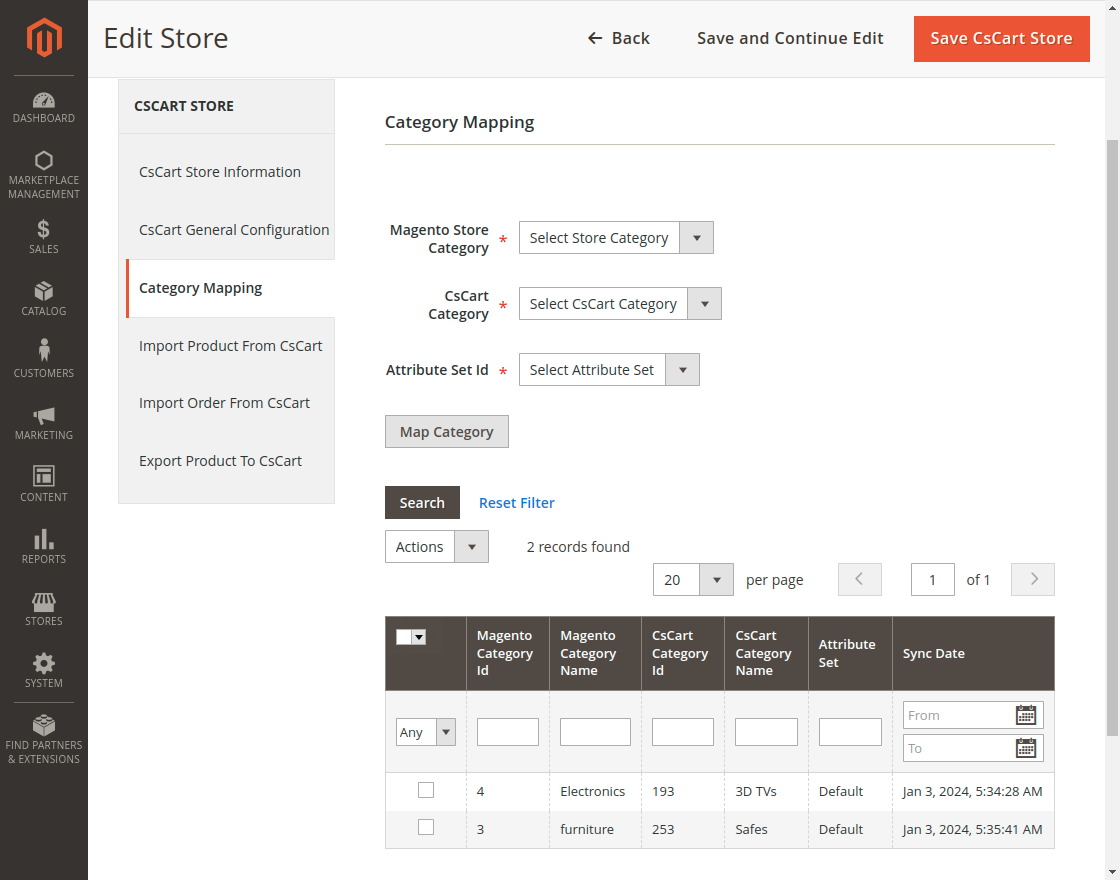
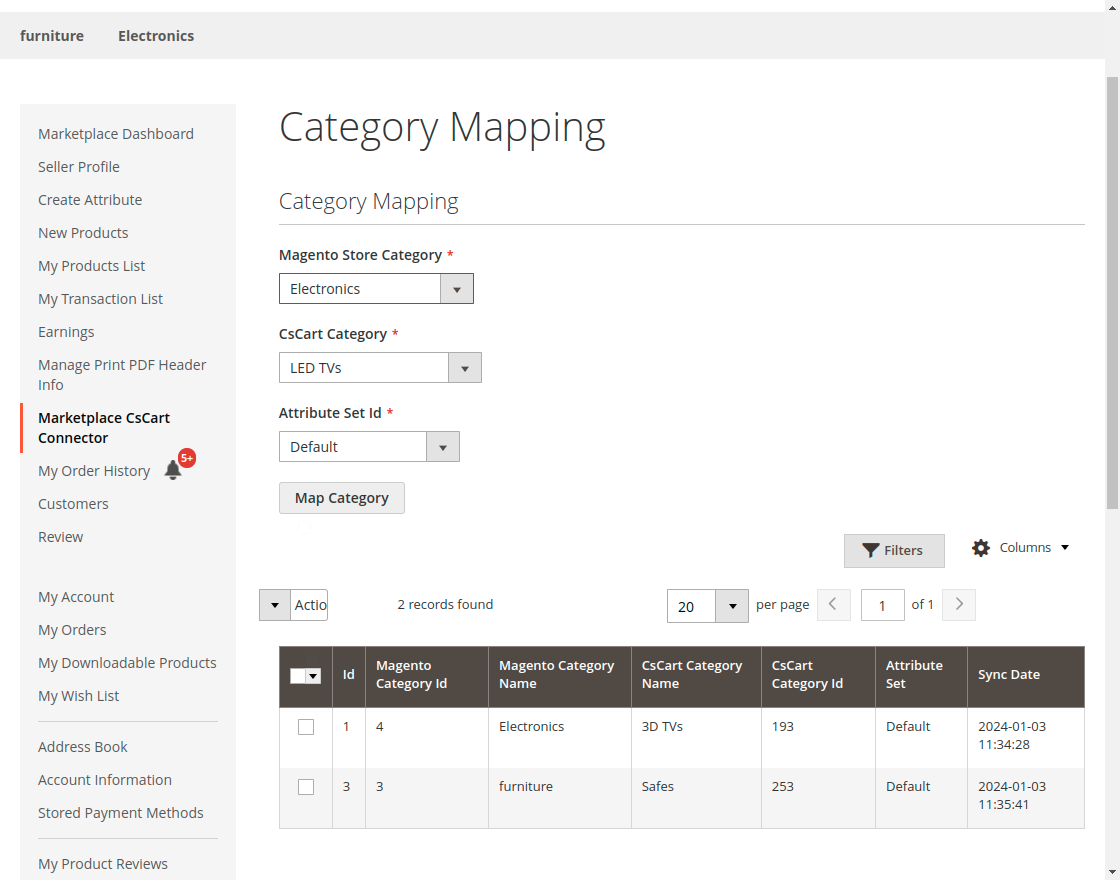
Category Mapping
Magento Store Category- The admin will select the Magento store category that you want to map to the CS-Cart store.
CS-Cart Store Category- After that, select the CS-Cart category that you want to map with Magento Store.
Attribute Set ID- Select the attribute set id.
Furthermore, click on the Map Category button to map the category. A list of mapped categories will be displayed after mapping here. The admin can also delete the mapped categories from the Action button.
Note:
- You can map one category at a time.
- If category mapping is not done for the CS-Cart store product category, then the import products will be assigned to the default Category as per the configuration.
- If the category mapping is done for the CS-Cart product category, then the imported products aren’t assigned to the default category. The imported products are automatically assigned to the mapped category only.
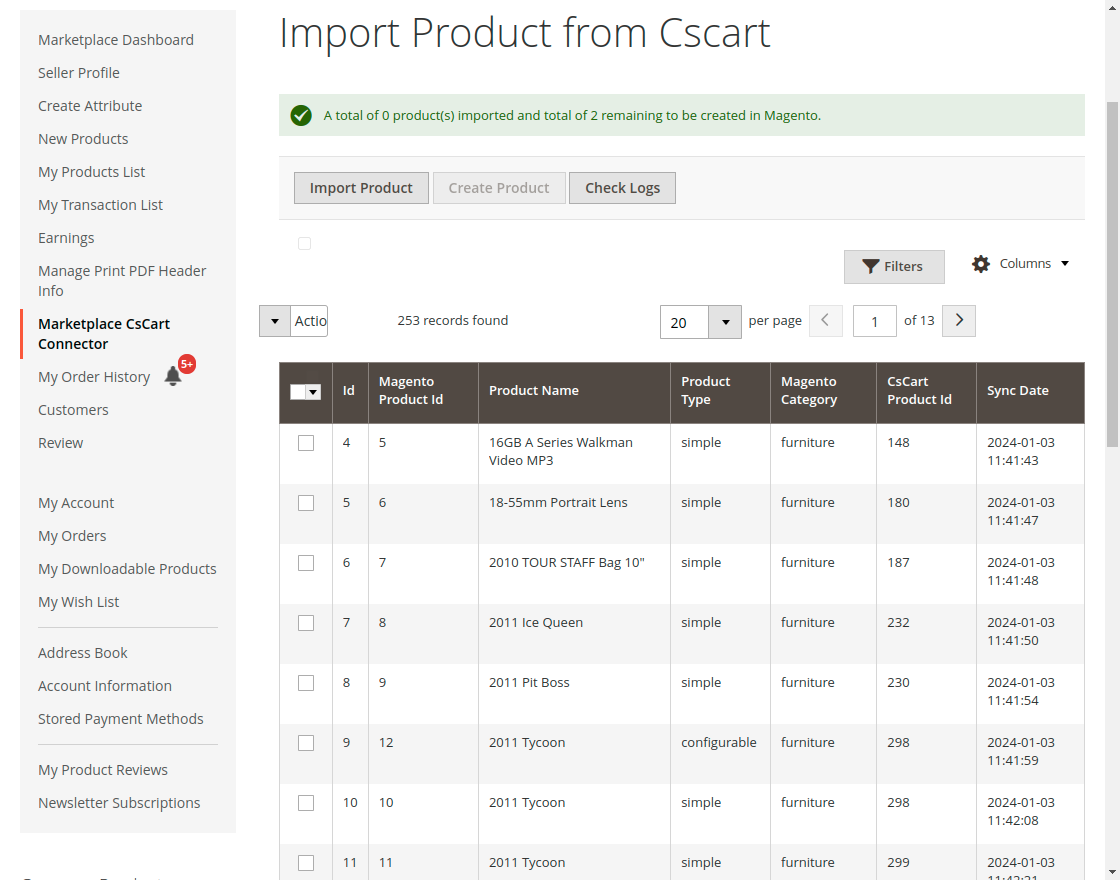
Import Product from CS-Cart
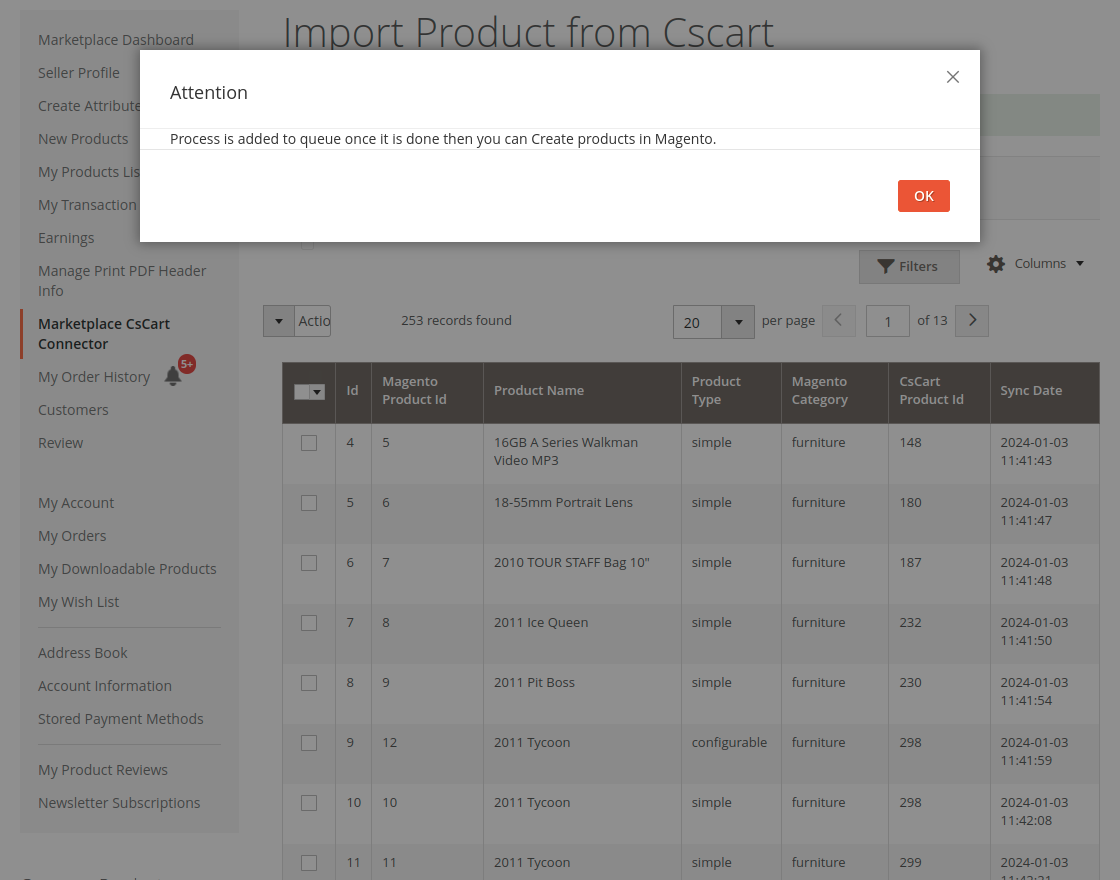
Import Product- The admin will click on the Import Product button to import the CS-Cart products.
Cron will run after importing the products.
Create Imported Products- The store owner can use it to create the imported products.

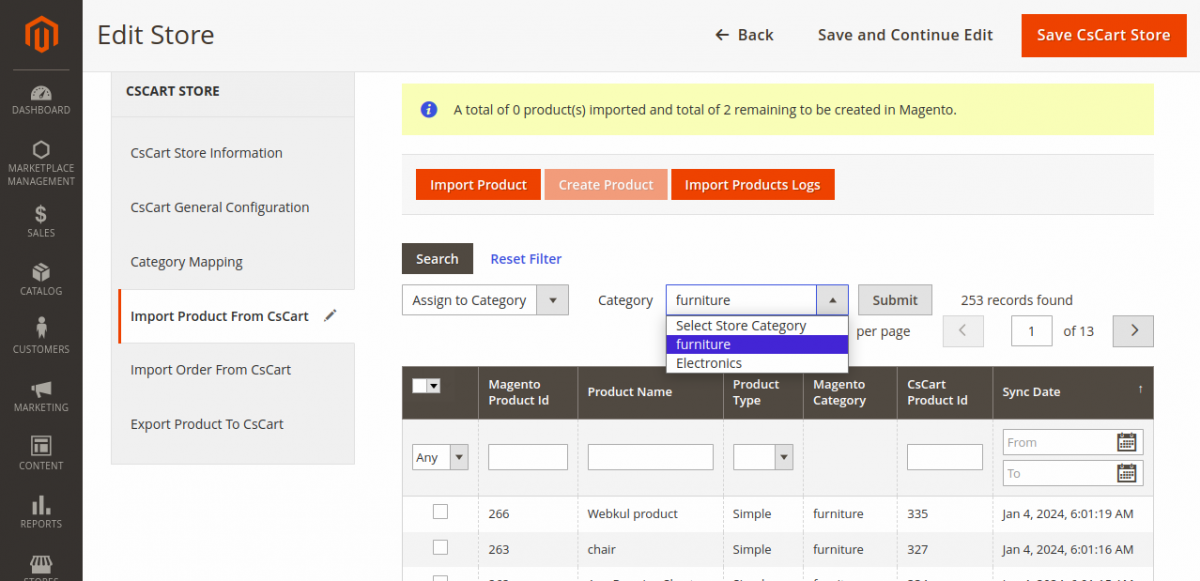
The admin can assign the products to a category also from the action button as shown below.
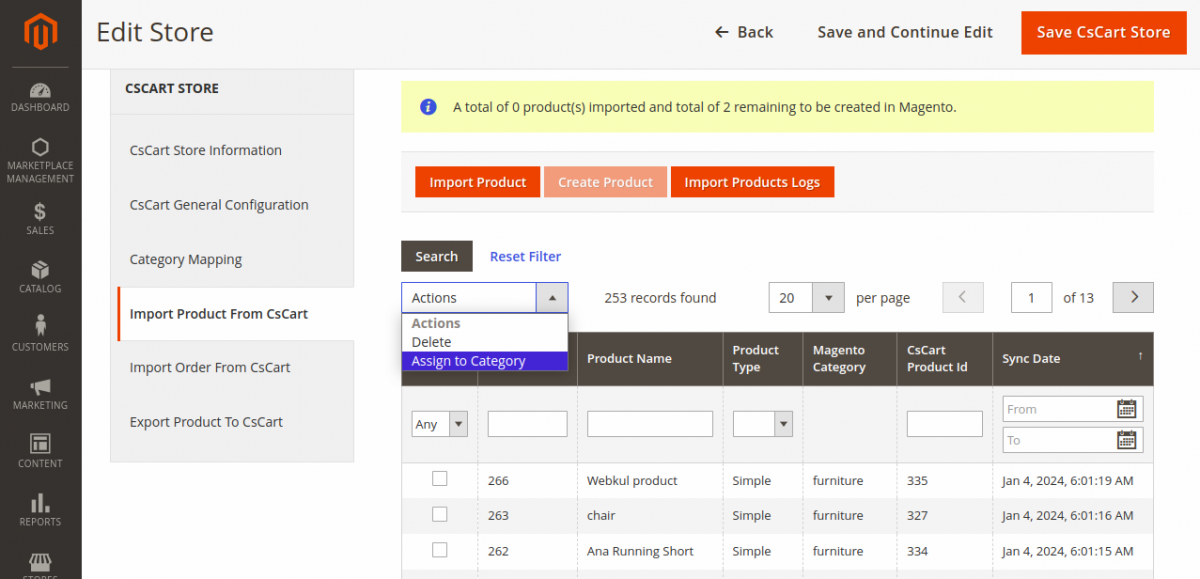
The store admin will select the Assign to Category option. After that, he will select the store category from the Category dropdown.
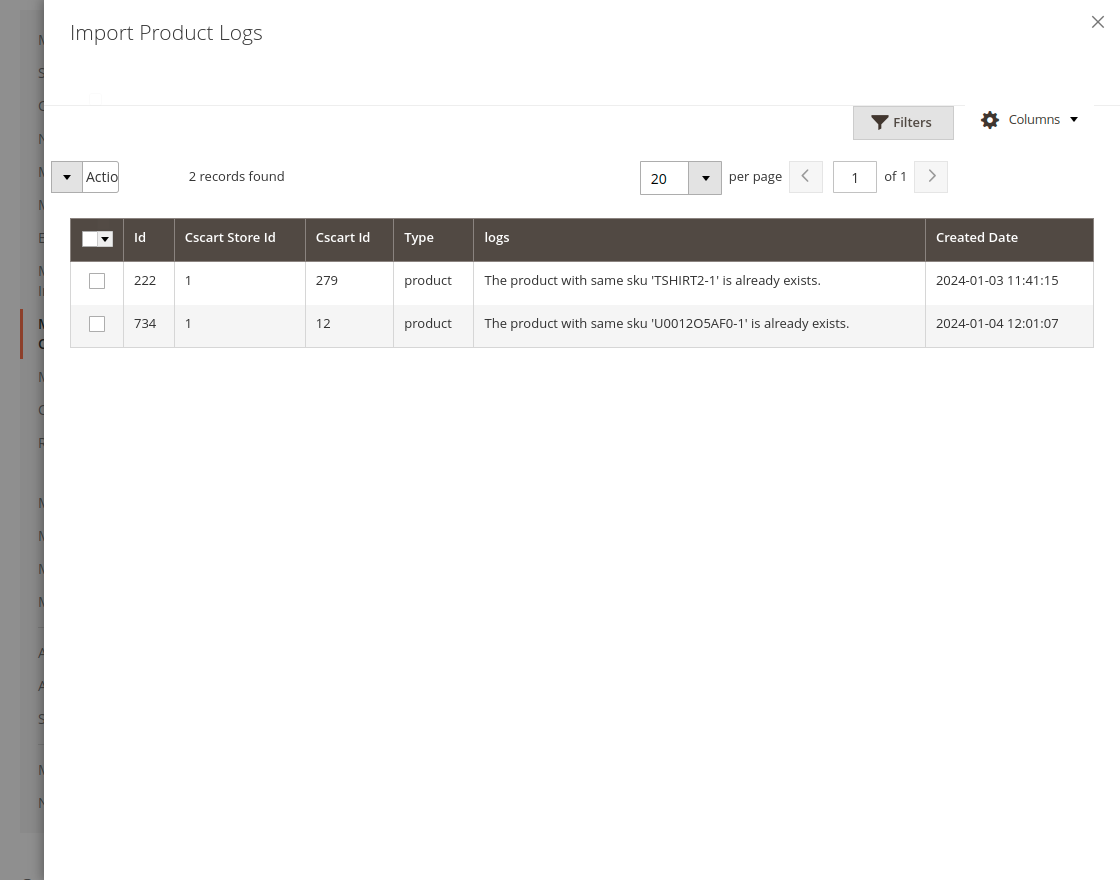
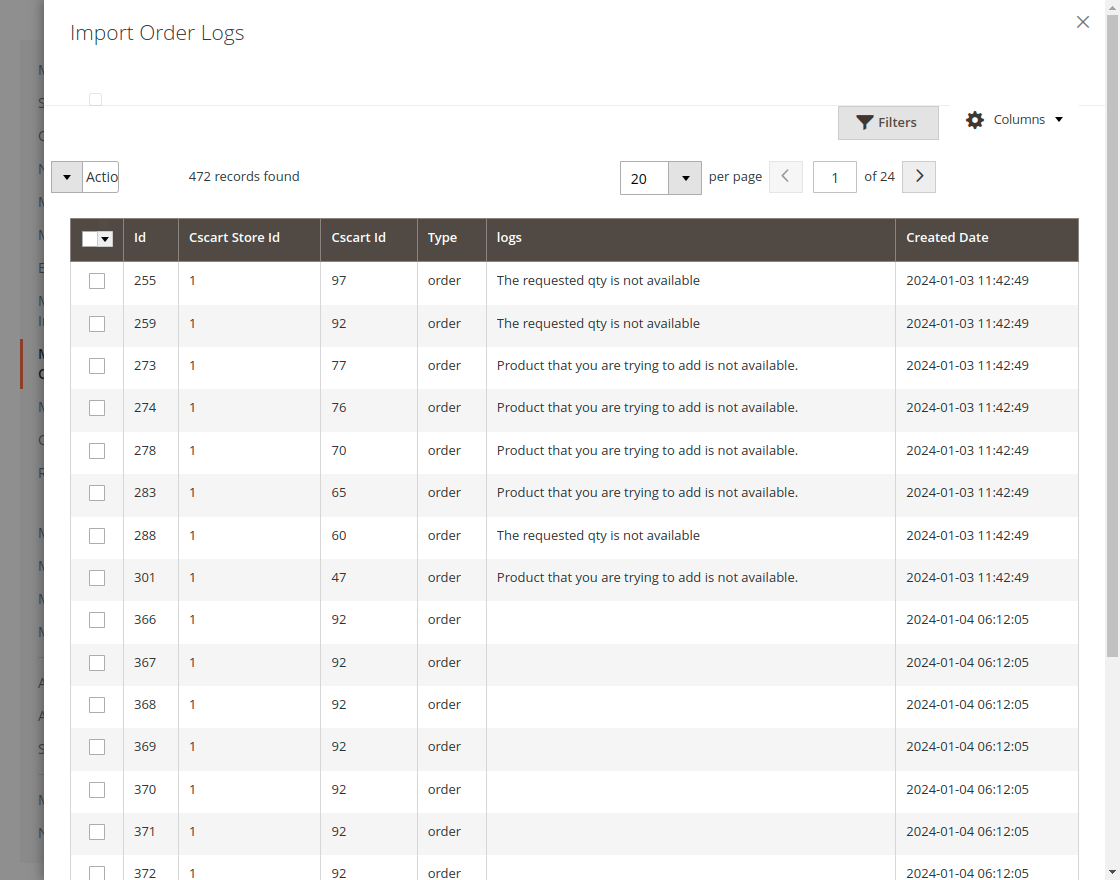
Import Product Logs – The admin can also import product logs from CS-Cart to the Magento store.
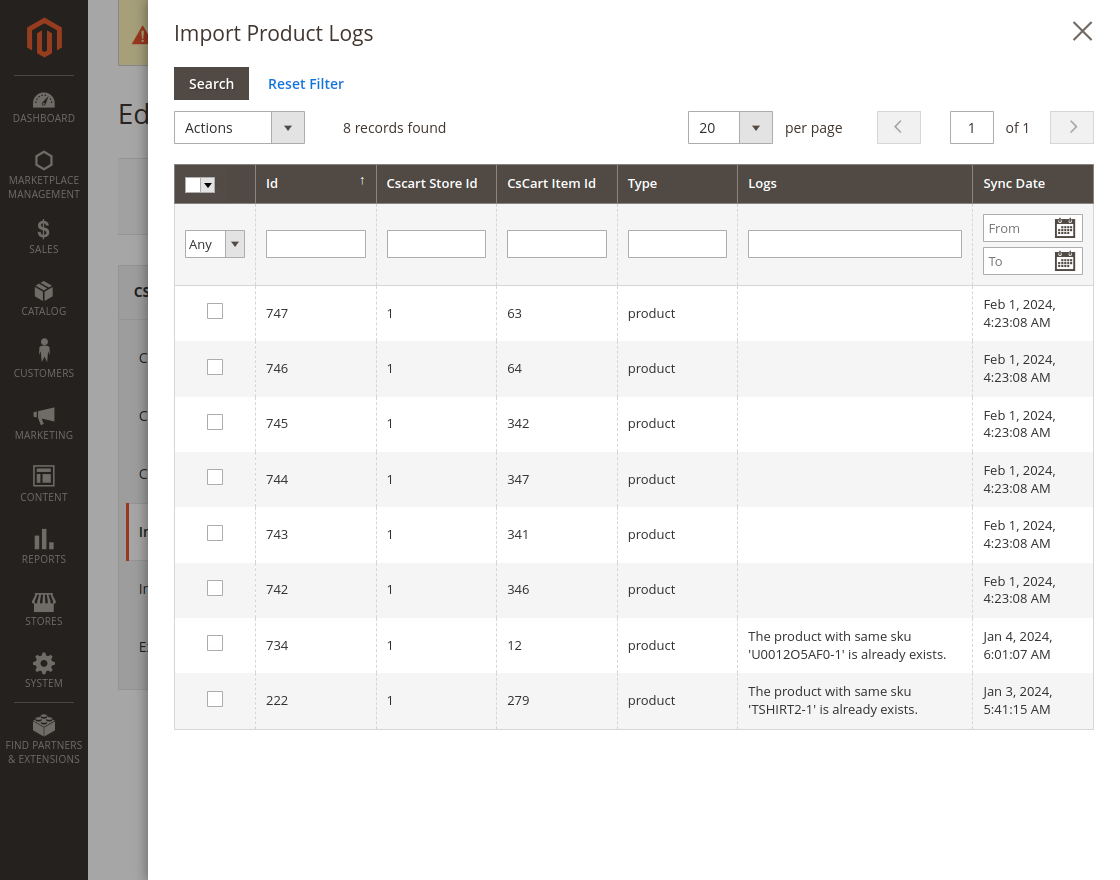
After successful import, the admin can view the imported products.
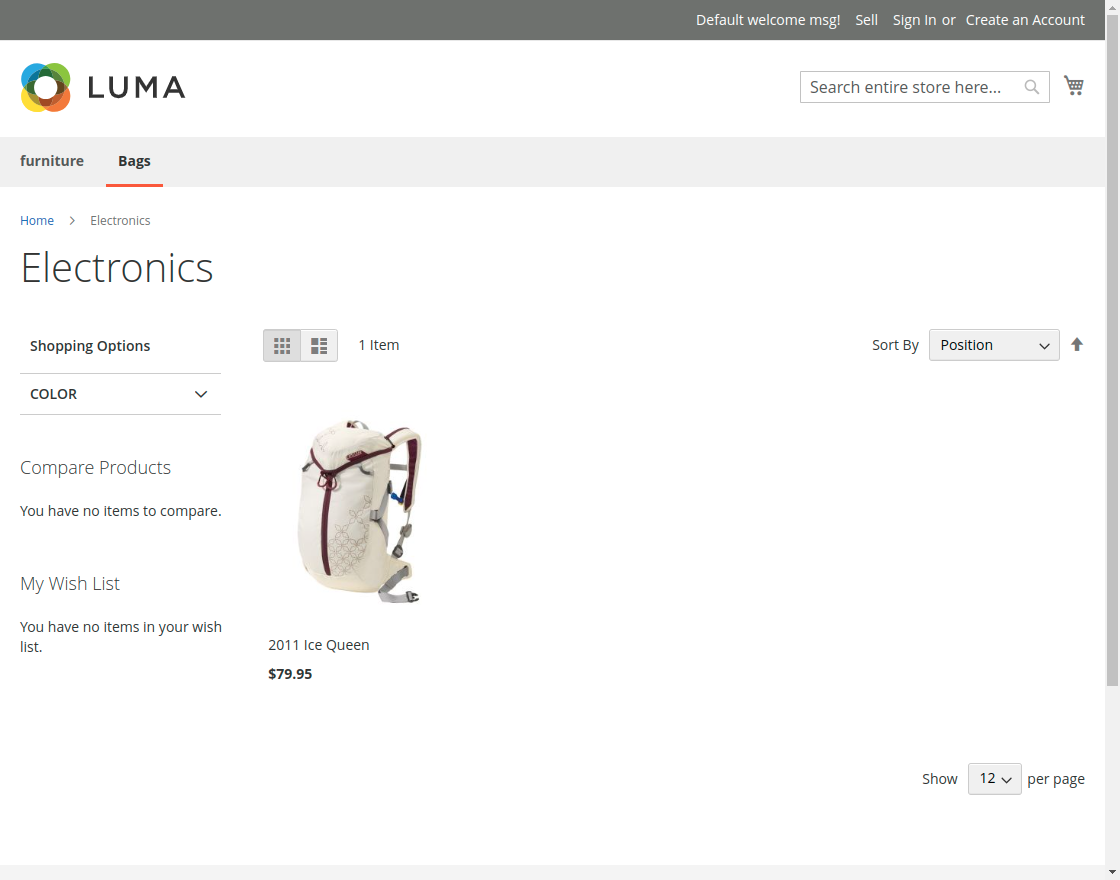
Configurable Product Import
Likewise, the simple products, you can also import the configurable product to the Magento store.

The configurable product will display with variations to the Magento store after import as shown in the below image.

Note:
- The product information like base image, additional images, name, price, SKU, description, quantity, weight, and super attributes with options imported along with the product.
- The module imports simple and configurable products.
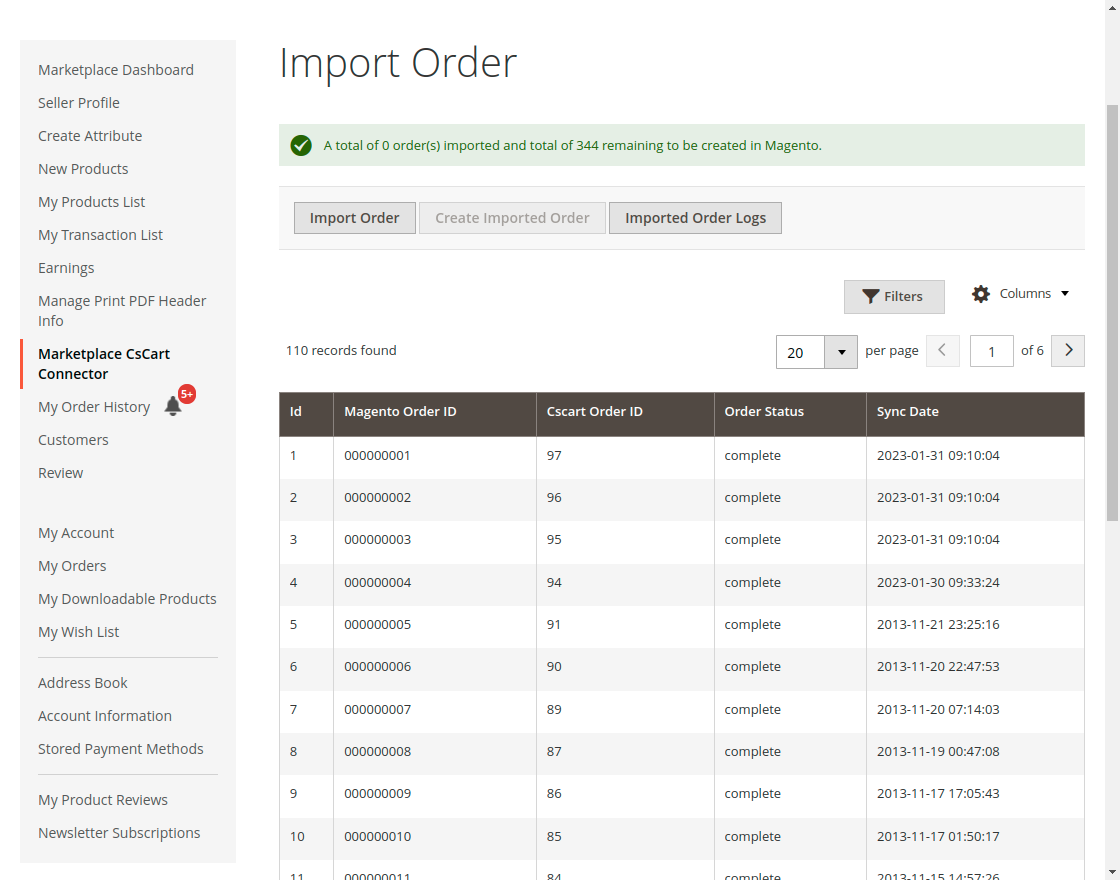
Import Order from CS-Cart
Import Order- The admin will click on the Import Order button to import the orders from CS-Cart.
Cron will run after importing the orders.
Create Imported Order- The store admin can use it to create or add the order to the Magento store.
Thus, the list of imported orders will display after the order import.
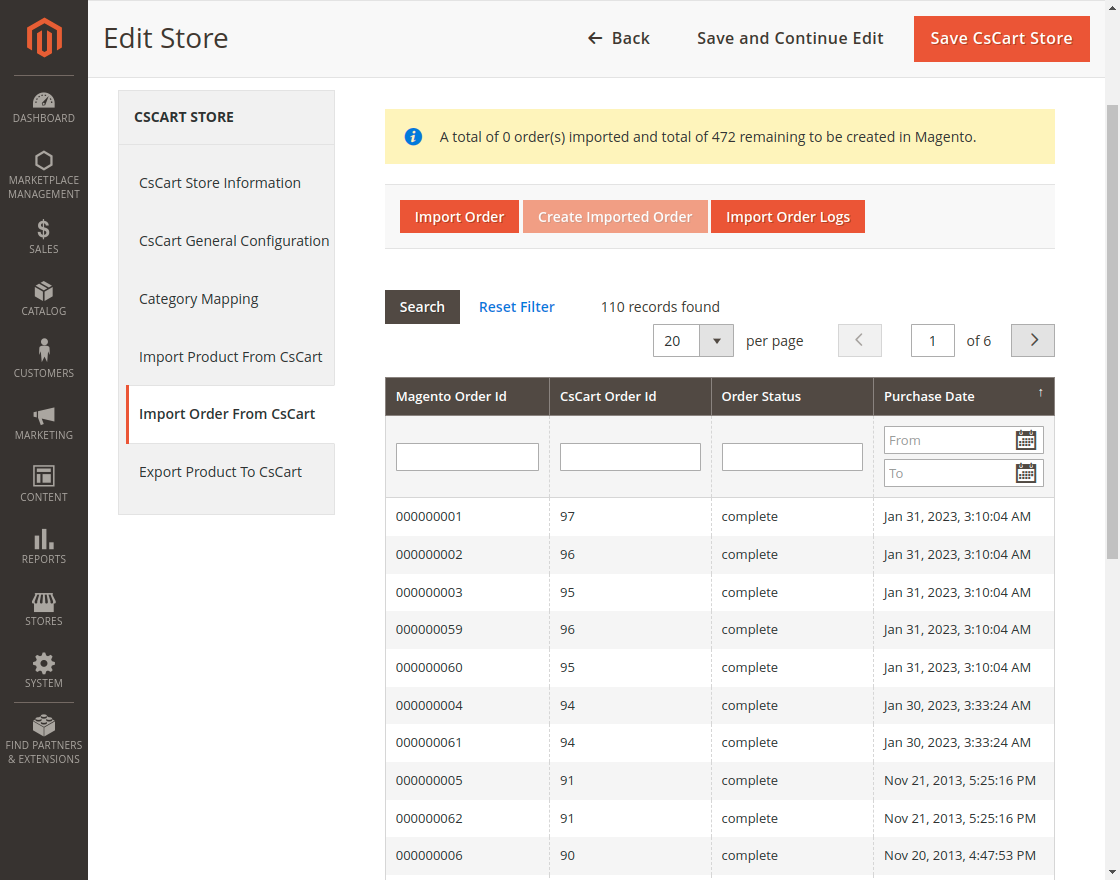
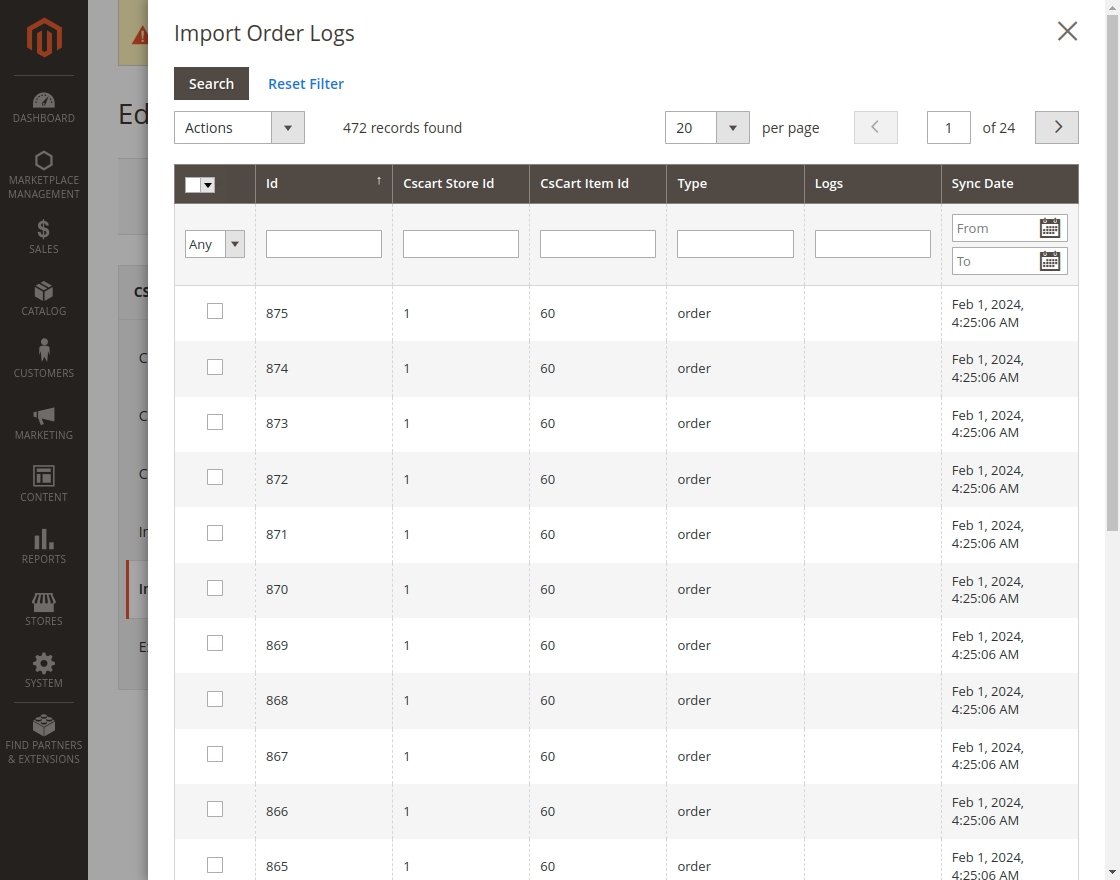
Import Order Logs – The admin can check the import order logs here.
Note:
- If you are importing orders using cron and certain order items do not exist in the Magento 2 store. Then, first, those items are created automatically in your Magento 2 store.
- The admin will not get any email notifications for any order placement on the Cs-Cart store. However, the admin needs to check those orders normally by navigating to Sales > Orders after importing them.
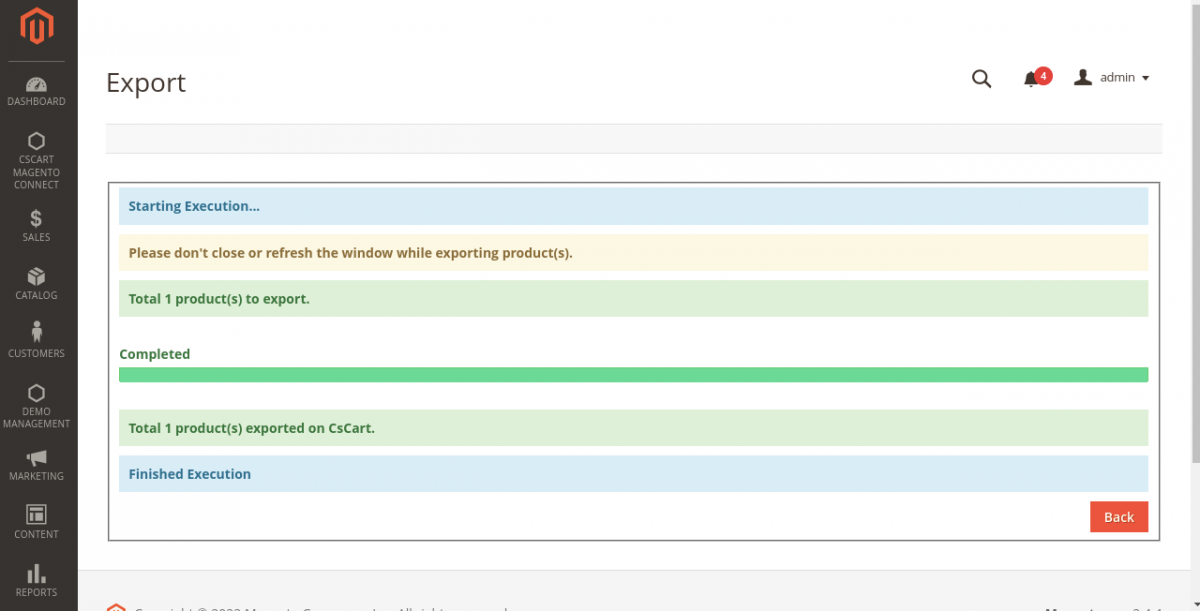
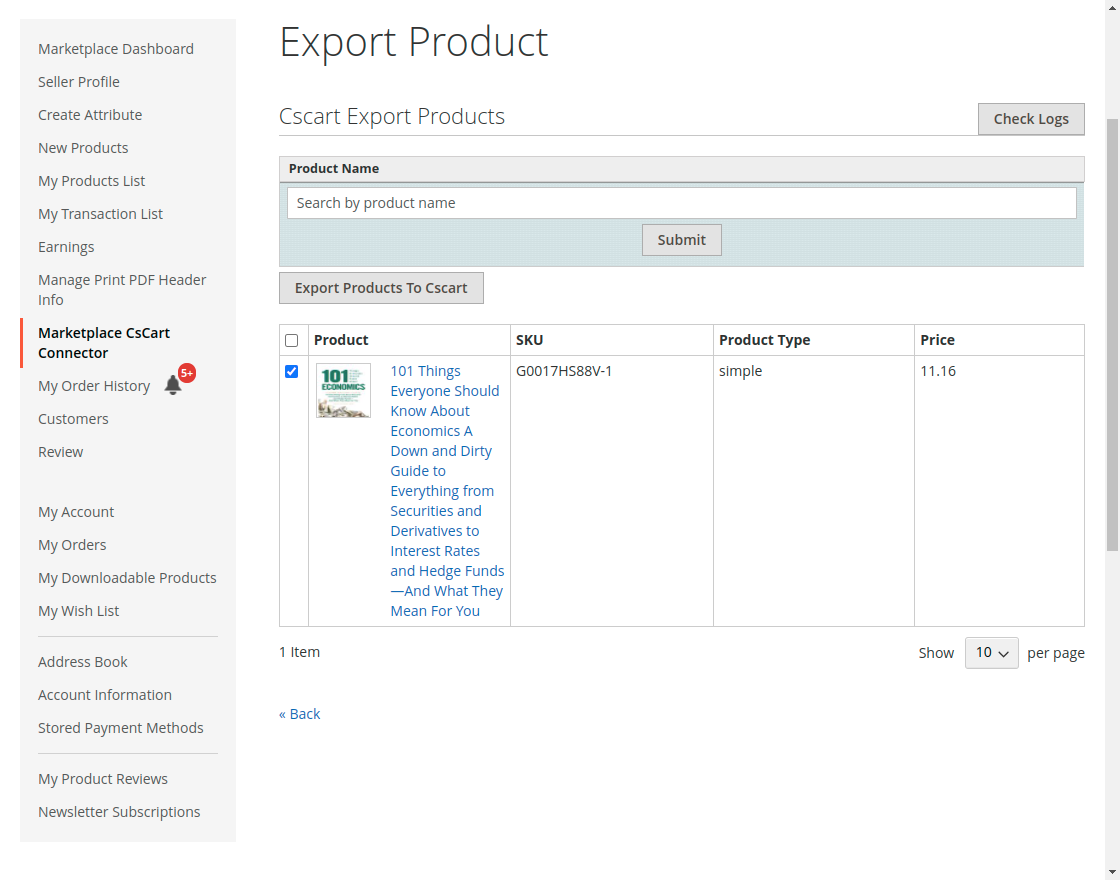
Export Product to CS-Cart
The store admin has to select the orders from the list and click on Save CSCart Store to export the products.

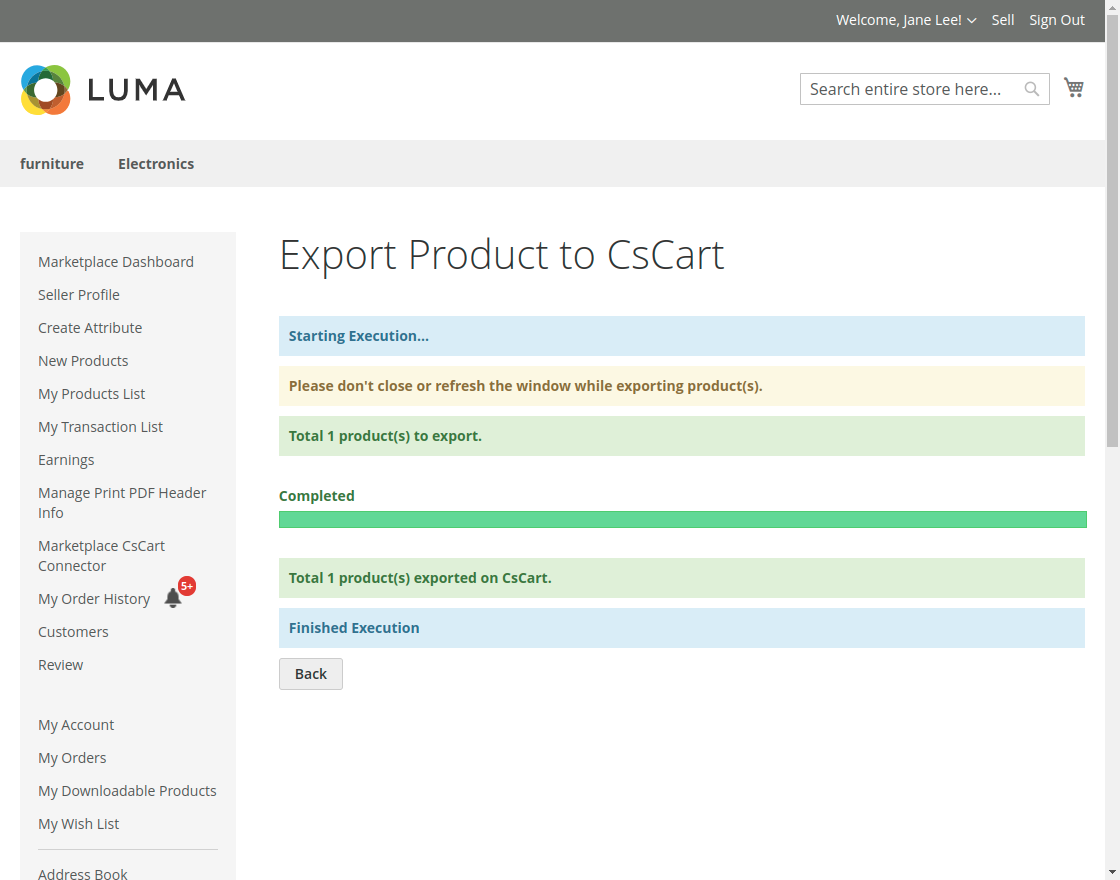
Afterward, clicking on Export Product will export the products with execution as shown below.
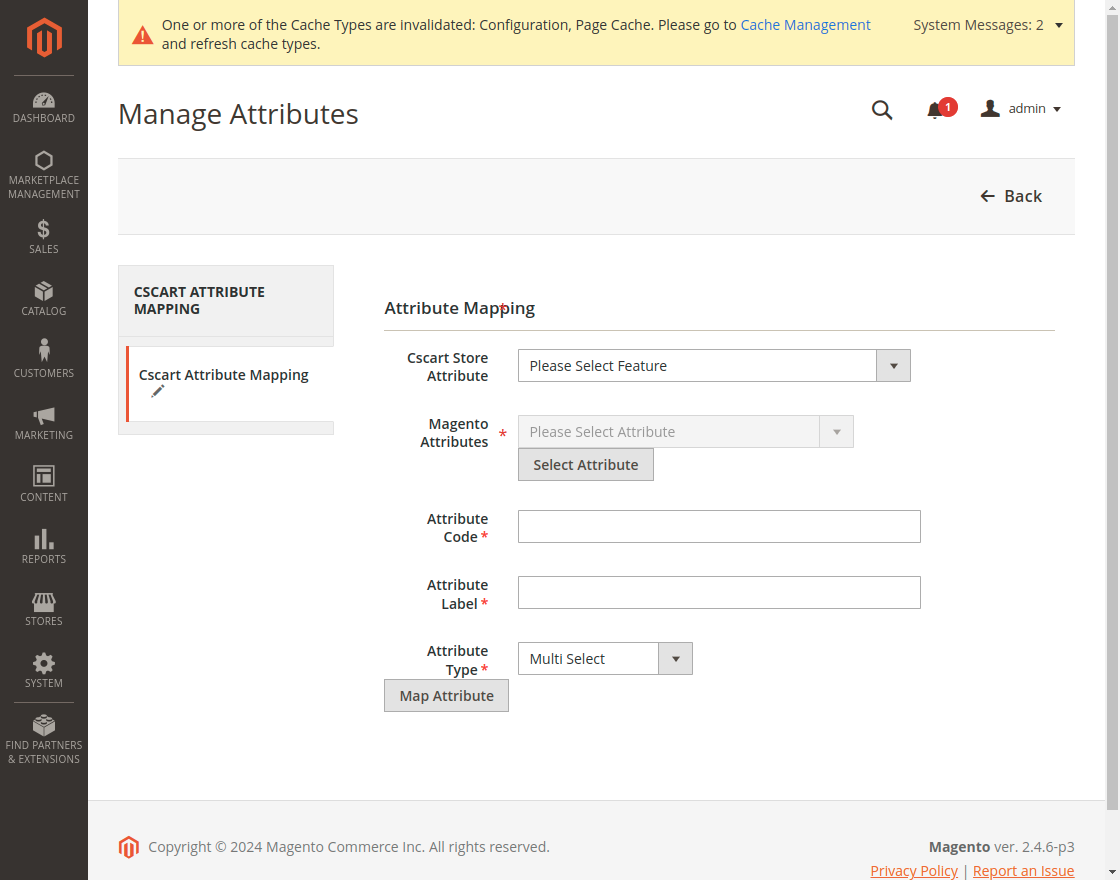
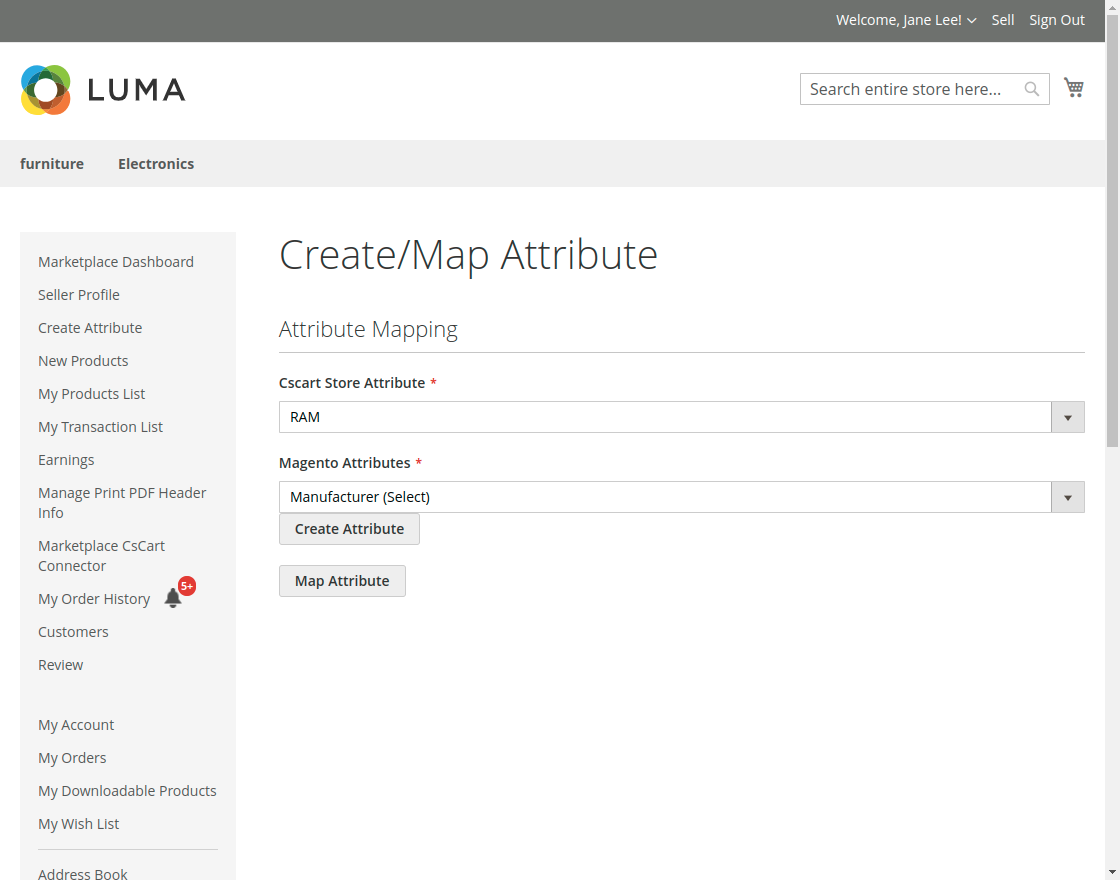
CS-Cart Attribute Mapping
The admin can map the CS-Cart attributes to Magento attributes.
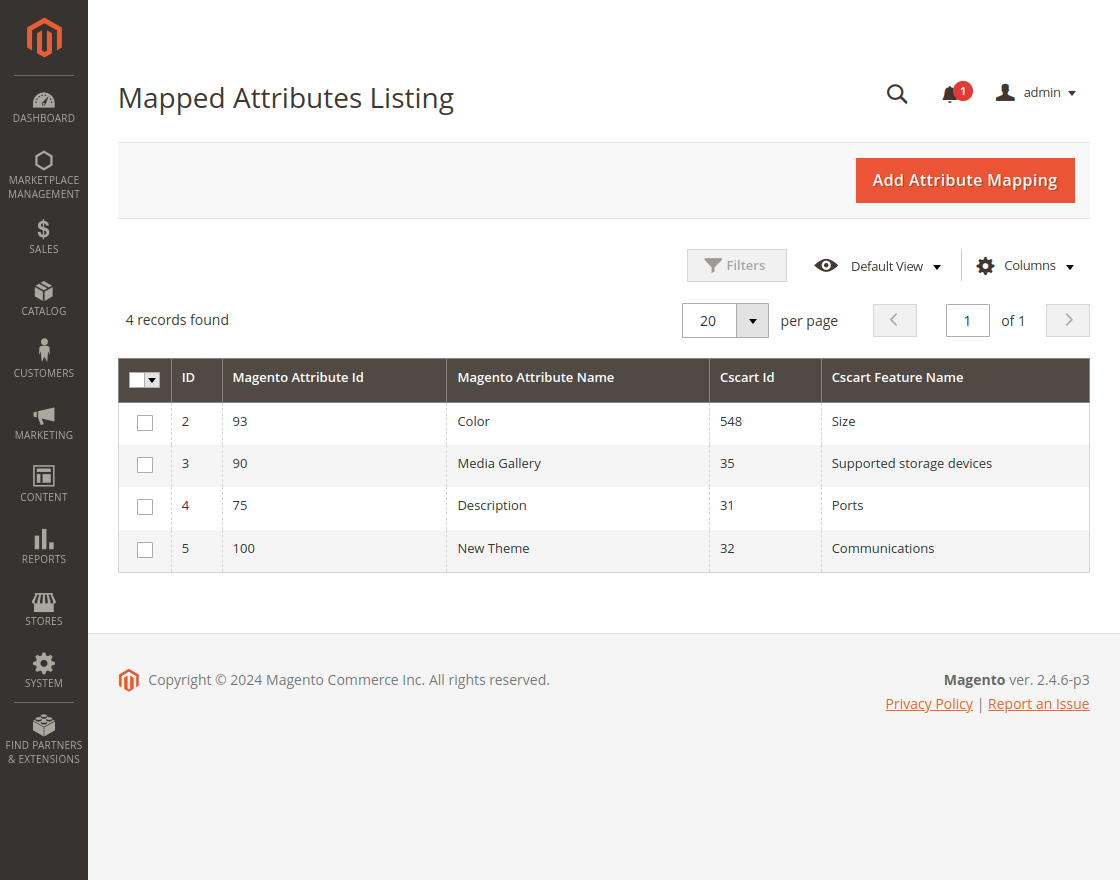
Click on the Add attribute mapping button to map new attributes. To map the existing attribute click on the Map attribute button.
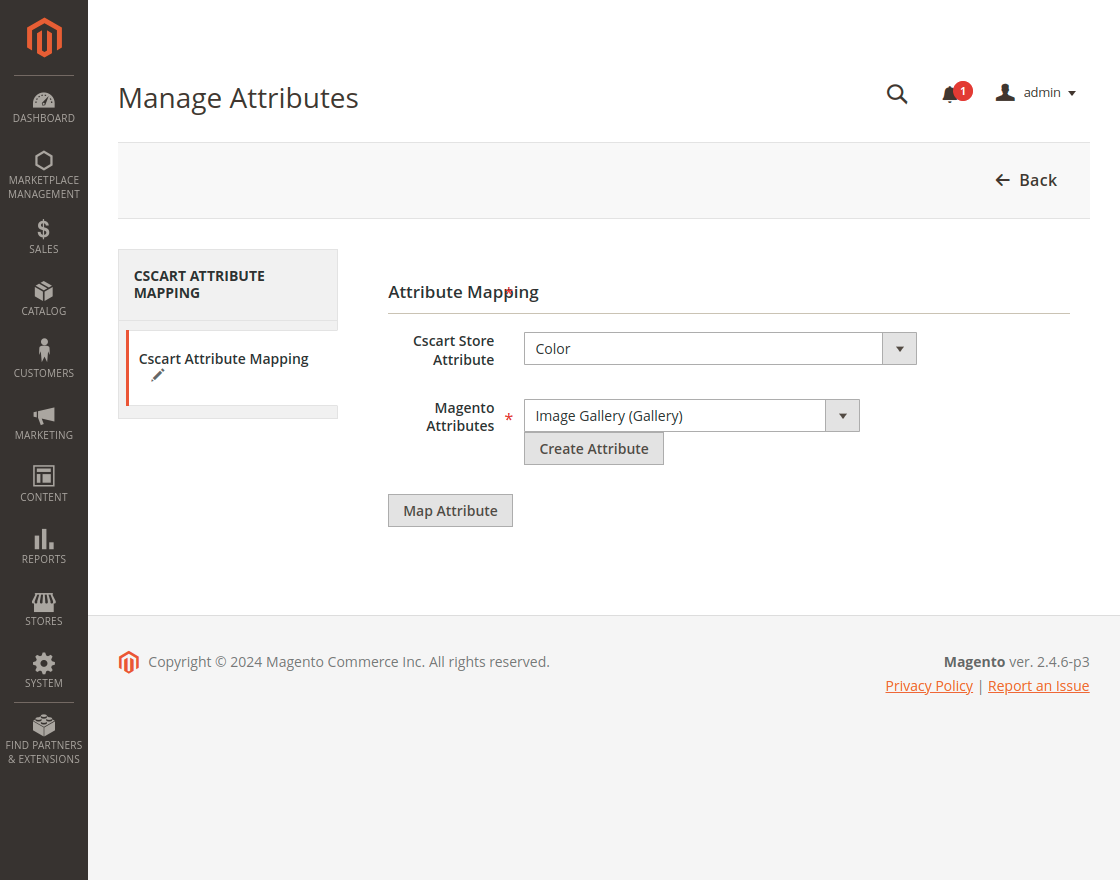
If you want to create a new attribute for mapping then click on create attribute button.
How CS-Cart Customer Create in Magento 2 While Order Import?
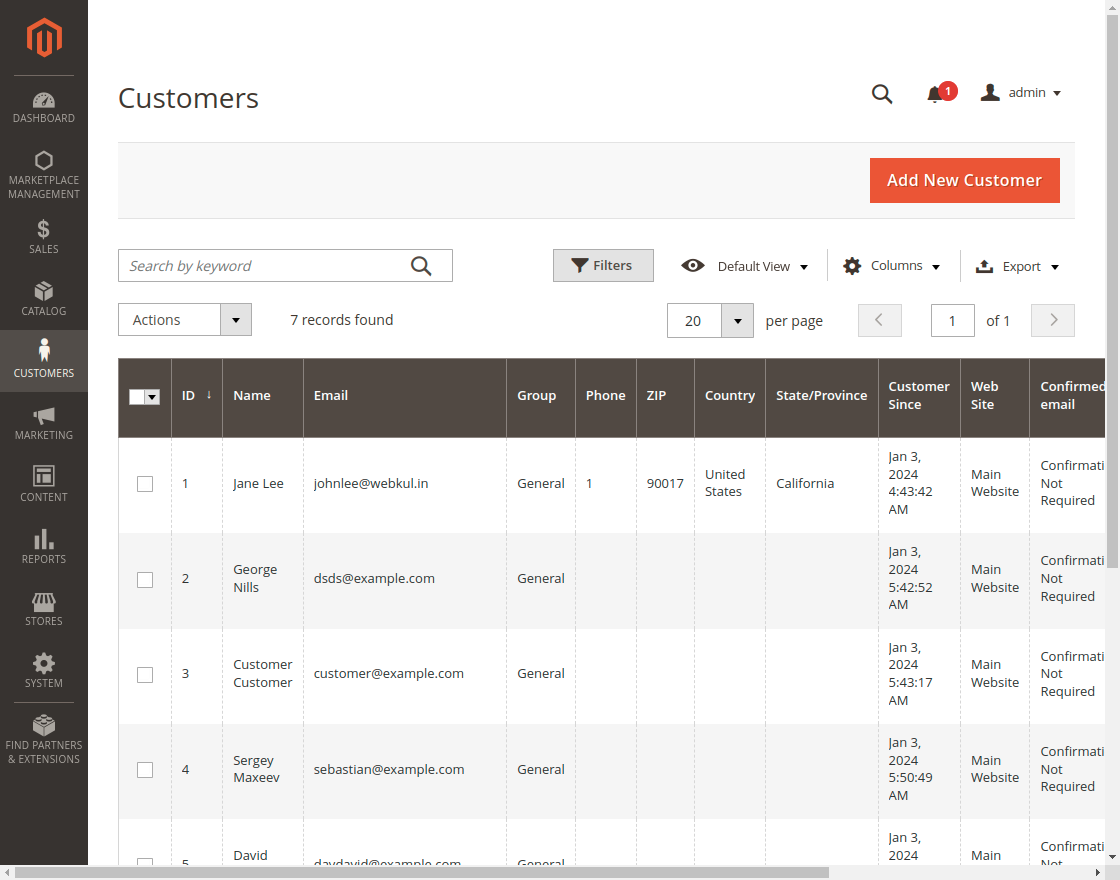
If you are importing the order and that customer doesn’t exist in Magento 2. Then, while order import the CS-Cart customer creates in Magento 2 automatically.
Seller End Workflow
In the Multivendor CS-Cart Connector sellers can make their configuration to import the products and orders. The seller needs to log in to their seller panel and navigate to My account > Marketplace CS-Cart Connector section.
In the general configuration enter details as follows.
Attribute Set – The seller can select the default attribute set here from the drop-down.
Default Category- Seller can select the default category to assign the CS-Cart product.
Default Quantity- Enter the default quantity. This quantity will be assigned to the product when the CS-Cart product does not have quantity.
Default Weight- Enter the default weight, which will be assigned to the product when the CS-Cart product does not have weight.
Default Order Status- Select the default order status from here. The default status will be assigned to the imported order.
Category Mapping
The sellers can map the category here by selecting the Magento store category, CS-Cart Category, and attribute set ID similar to admin settings.
The seller can also check the mapped category list and perform bulk action to delete any mapped category.
Import Product From CS-Cart
The vendors can import products from CS-Cart and create them for the Magento 2 store.
When click on the import button a popup will come to ask the permission once proceed the product will be imported from CS-Cart. Now, the seller can create the product here.
Sellers can also check the import product logs for previous events.
Import Order
Now import the orders from CS-Cart to the Magento 2 store.
Click on the import orders button and a pop-up will show once the seller proceeds with it they can create the order on the Magento 2 store. The seller can also check the import order logs as well.
Export Product to CS-Cart
The sellers can export the Magento products to the CS-Cart store.
Once the seller clicks on the export products to CS-Cart button a run job will display with the export process.
Mapped Attribute
In the Magento 2 Marketplace CS-Cart Connector, the vendors can check the mapped attribute list here and also map new attributes between CS-Cart and Magento 2.
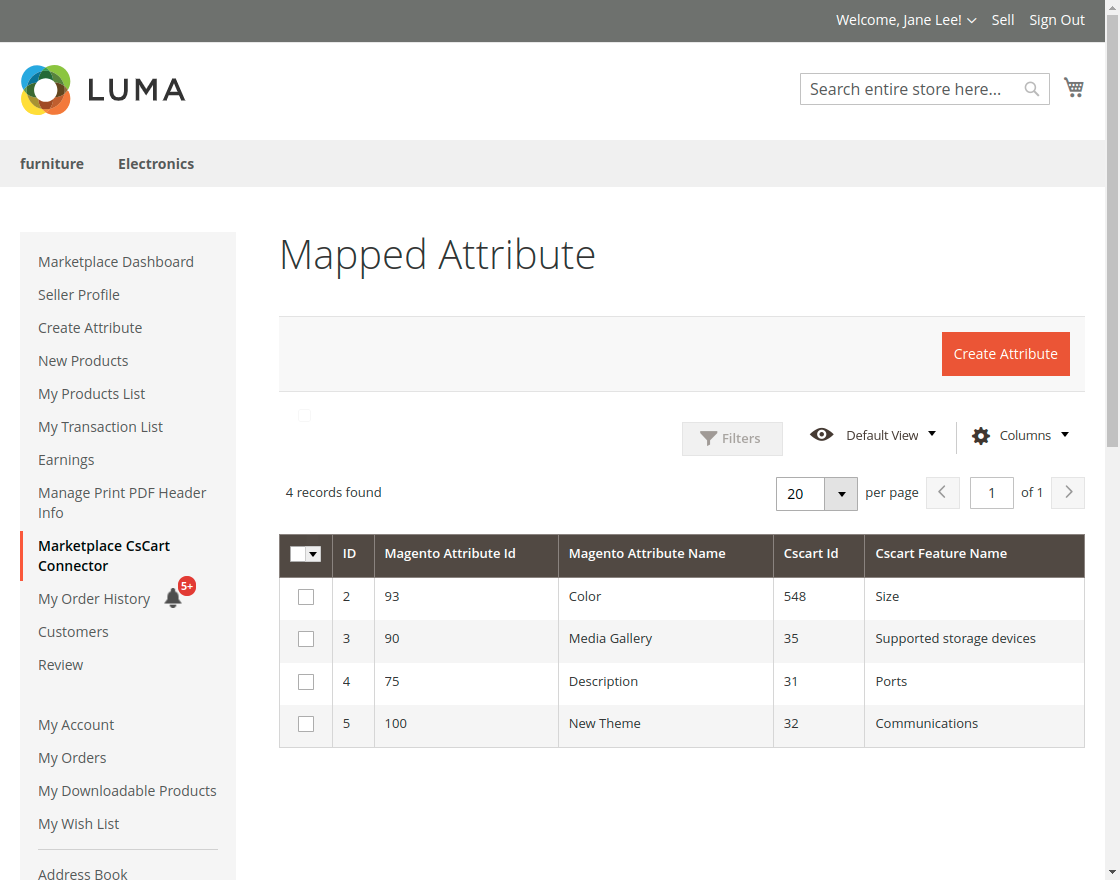
Create Attribute – The seller can create a new attribute from here and map it or they can use an existing attribute to map.
That is all about the Magento 2 Marketplace CS-Cart Connector. If you have any queries regarding the plugin, please feel free to contact us at Webkul Support System.
Current Product Version - 5.0.0
Supported Framework Version - Magento 2.0.x, 2.1.x, 2.2.x,2.3.x, 2.4.x

Be the first to comment.