Introduction:-
Magento 2 Marketplace Canada Post Shipping extension allows the admin to provide a Canada Post shipping method for shipping products.
This extension gets the shipping rates from the Canada Post’s API and now we have integrated it with the Magento 2 Marketplace.
Magento 2 Marketplace Canada Post Shipping extension is an add-on of the Marketplace Module.
To use this module you must have installed the first Magento 2 Marketplace Module .
Notes:
- The estimated delivery time shows for Canada, the US, and some other International addresses.
- The shipping rates are based according to the delivery details and product weight.
- If the weight of the product is zero, this shipping method will not work.
- An active Business Purpose Canada Post account is required for getting the API credentials.
- Rates are calculated using 3 decimals. Examples: for 450 g, enter .45; for 175 g, enter .175; for 10.5 kg, enter 10.5
- The maximum weight for a parcel is 30 kg (66 lb.).
Watch the video to understand the plugin workflow:-
Features
- Ability to enable/disable Canada Post Shipping method.
- The seller can print Canada Post Shipping label.
- Allowed multiple selections of Canada Post shipping method from admin.
- Set Shippers Details like name, phone number etc.
- Set Ship to applicable countries.
- Create a tracking Id for each order by the seller when an order is in processing state.
- The seller can add Invoice & Packing slip address, VAT, TAX information.
- Provide print for invoice of order at seller’s account.
- Ability to download Invoice and Shipping Slip easily.
- Provide accurate Canada Post shipping rates to customers for shipping.
- Allowed multiple selections of Canada Post shipping method that will be shown on the checkout page.
- This module can be used to ship the products from Canada to Canada, Canada to U.S.A, and Canada to other countries.
Installation
Install Extension from Webkul Store
#1 Download Module
Firstly, you need to log in to Webkul Store, go to My Account>My Purchased Products section.
Further, verify and then download and extract the contents of this zip folder on the system.
#2 Upload Folder
Once the module zip is extracted, follow path src>app and then copy the app folder into the Magento 2 root directory on the server as shown below.

#3 Run Commands
After uploading the module folder, you need to run the following commands in the Magento 2 root directory.
First command –
php bin/magento setup:upgrade
Second Command –
php bin/magento setup:di:compile
Third Command –
php bin/magento setup:static-content:deploy
Fourth Command –
php bin/magento indexer:reindex
Fifth Command –
php bin/magento cache:flush
Install Extension from Magento Marketplace
If you have purchased this extension from the Magento Marketplace then please follow the below process or visit this link.
#1 Get Access Keys
You need to get access keys, navigate to My Profile in Magento Marketplace, then choose Access Keys in the My Products section.
Go to Magento 2 and then you need to copy both the Access Keys – Public Key and Private Key. These access keys will be needed in the next steps for authentication.
If access keys are not created earlier, click Create A New Access Key, enter any name and click OK.
#2 Update composer.json File
To know the component name and version number, go to your Magento Marketplace account section, My Profile>My Purchases, then find this extension to view the details.
Please note – Below is an example image, every extension will have its unique component name and version.
After that, navigate to your Magento project directory and update your composer.json file in the following format.
composer require <component-name>:<version>
For example, to install version 5.0.0 of this extension you need to run the following command:
composer require webkul/marketplace-canada-post-shipping:5.0.0
Configuration For Multi-lingual Support
Translation
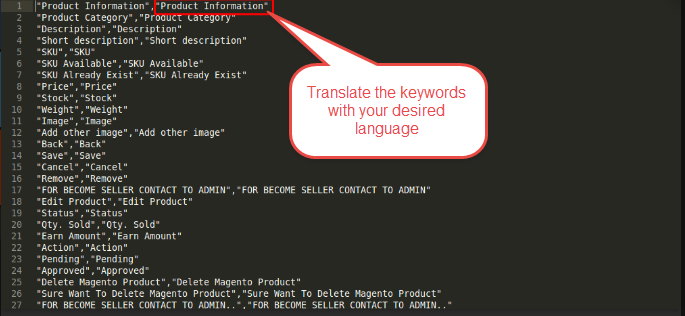
If the user wants to translate their module from English to German then they need to follow the path app/code/Webkul/MpCanadapostShipping/i18n
In their unzipped Magento Marketplace folder and will get a CSV file with the name “en_US.csv”.
Now they will rename that CSV as “de_DE.csv” and translate all right side content after the comma in the German language.
After editing the CSV, save it and then upload it to the path app/code/Webkul/MpCanadapostShipping/i18n where they have installed Magento 2 on the server.
The module will get translated in German Language. It supports both the LTR and RTL languages.
The user can edit the CSV like the image below.
How To Get Canada Post Credentials
Before doing the module configuration, the admin needs to have the Canada Post credentials.
The admin needs API Key, API Password, Customer Number, and Contract/Agreement Number (if any).
Please Note: – You need Business Purpose Canada Post account to get these credentials.
Create Account:
First, visit the Canada Post homepage. The following page will appear, click Sign In. 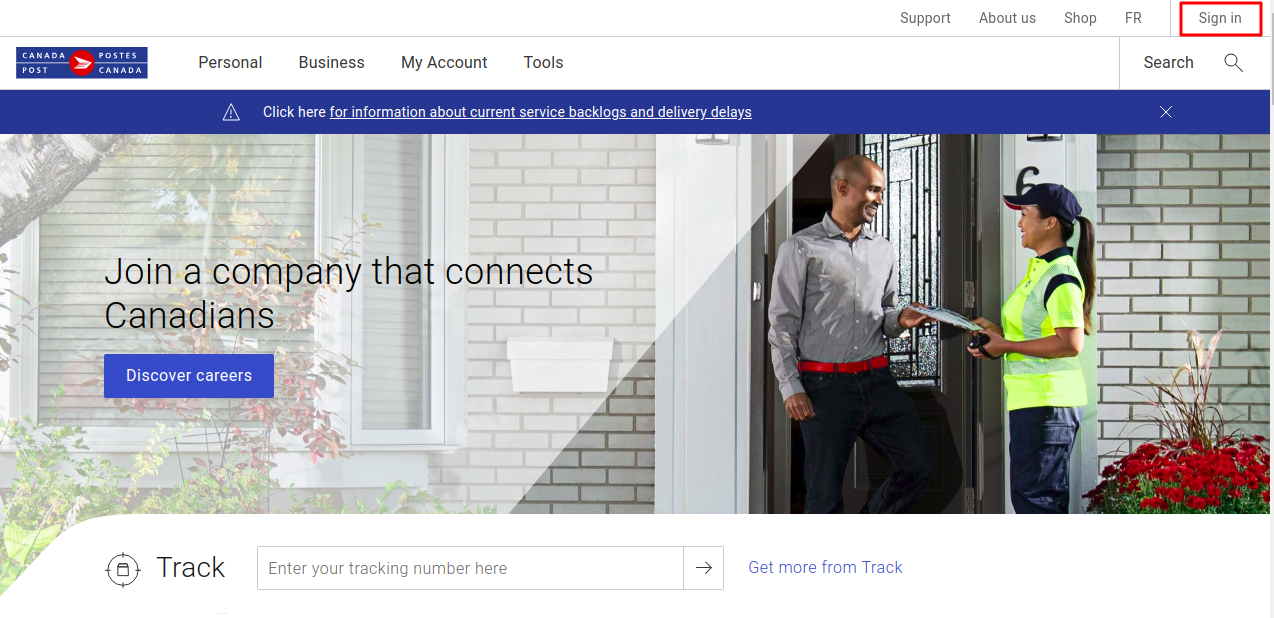
then click Register now to create a new account in the Pop-Up as per below image – 
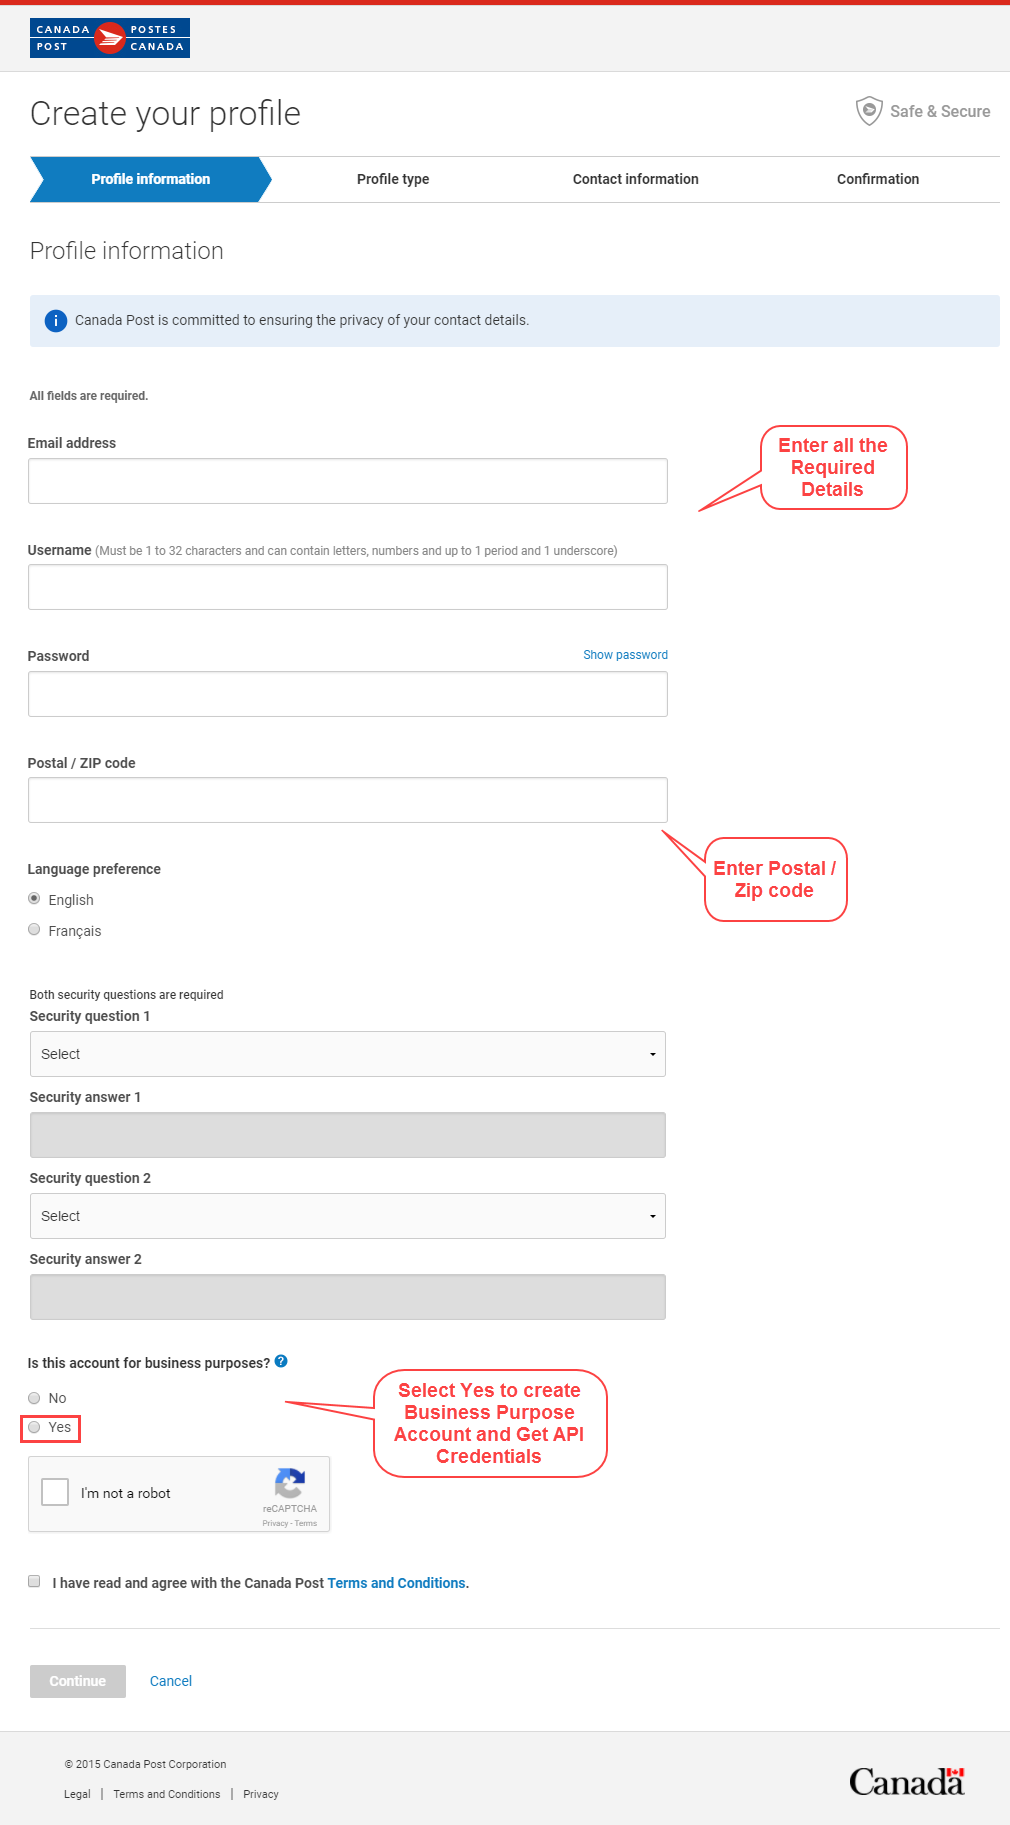
After clicking the Register now, the following page will appear. Fill in the information as required. Please make sure to select Yes for Is this account for business purposes?
Now, Choose Profile Type as Small Business, and click Select and continue button.
In this step, enter your contact information- business address, phone, first & last name, job title etc. After filling in all the necessary information click Continue.
After this information, you will get ” tell us about your business ” page. You can fill it immediately or later.
After providing the contact information, now you will get your Canada Post Customer Number. Please save this as it will be required for this module configuration.
Now, you will arrive at the dashboard page after clicking continue in the previous step. Navigate to Business >E-commerce >Integrate with our APIs.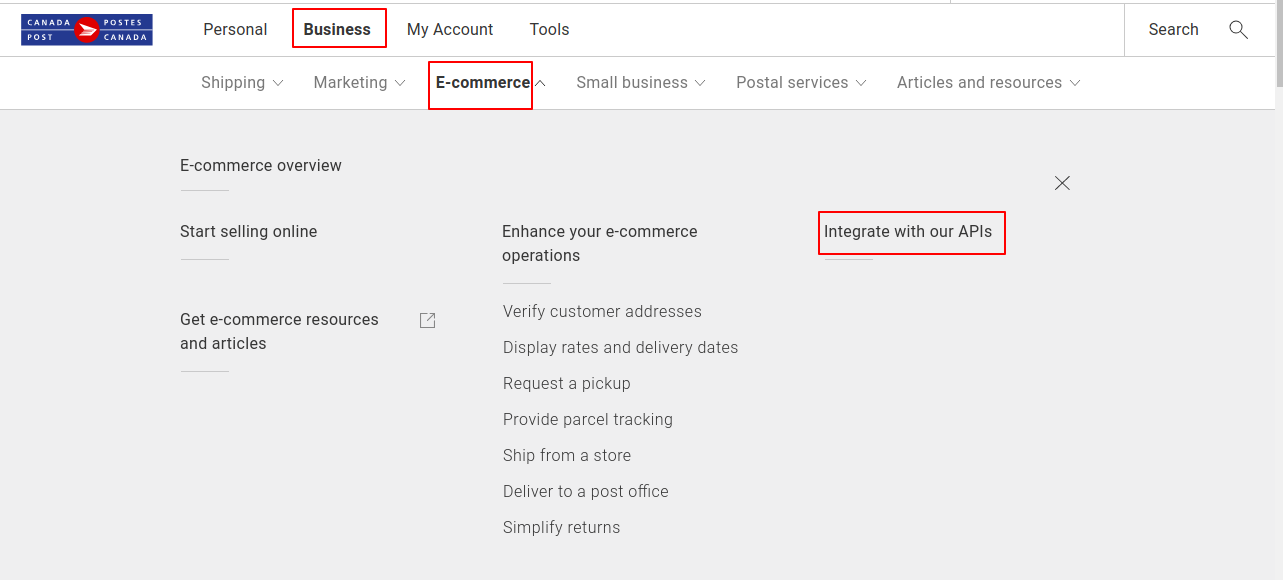
Clicking on Integrate with our APIs, then below page will appear – 
The following page will appear after clicking the Go to Developer Program. Click Join Now for creating API Key and Password.
Here, again click on Join Now –
 A pop-up window will appear about the Canada Post Developer Program Agreement. After reading the document, please click Agree and Continue.
Finally, you can now have your API Key and API Password. There will be two types of credentials, one for the Development (Test/ Sandbox Mode) and other for Production (Live).
How to get the Agreement/ Contract Number –
If customers wishing to apply for a Commercial Agreement with Canada Post.
For this customer need to meet certain conditions (ship at least 1,250 domestic parcels a year or 100 international parcels )must complete the appropriate Agreement Activation Form.
To apply, please call at 1-866-757-5480 or contact their Sales Representative.
Once all completed documentation is approved, Canada Post will provide the customer with a copy of all the required documentation.
Along with a Customer Number, an Agreement Number, and any other identification number required.
Configuration
After the successful installation of the Magento 2 Marketplace Canada Post Shipping module, you will be able to see the configuration panel under
Stores> Configuration> Sales> Shipping Methods> Marketplace Canada Post Shipping.
Here, the admin will –
- Enable the module for use by selecting Yes else select No to keep it disabled.
- Choose the mode of operation as Sandbox(testing mode) or Production(live mode) as required.
- Select the Agreement Type as the contract or non-contract type from the drop-down.
- Set the Title of the shipping method that is visible to the customers at the checkout.
- Enter the API User Id, API Password received after registering at the respective Canadapost website.
- Enter the Agreement and Client Number for your Canadapost account.
- The “Agreement Number” field will not be visible if select the “Agreement Type” field to the “Non-Contract” option.
- Set Delivery Time Offset as per requirement.
- Select Weight units as – Pounds or kilograms.
- Allowed methods (for contract and non-contract types) that will be available to the customers to choose from.
- Enable/Disable the free shipping threshold.
- Select a free shipping method from the list of methods.
- Set the value for the free shipping threshold.
- Choose to ship to – All Allowed Countries or Specific Countries.
- Enter the Error Message that is displayed if the method is not available.
- Choose to calculate the Handling Charges as – Fixed or Percentage.
- Set the Handling fee that will be applicable according to the prior selection of the Handling Charge.
- Select Yes to allow the sellers to save their Canada post shipping details else select No.
- Set Yes to show the error message if the method is not available.
- Choose Yes to generate a debug log in the system back-end else select No to not generate a debug log.
Note
You also need to set same weight unit (lbs/kgs ) for the store view (Locale) from the path Store> Configuration>General>Locale Options as shown below image.
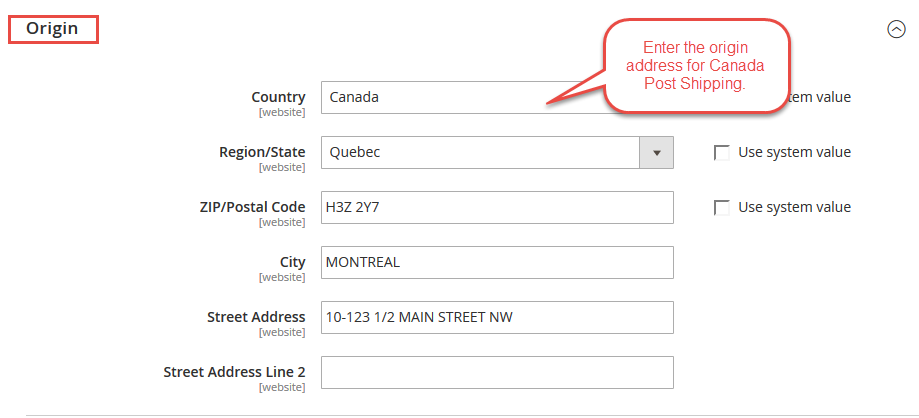
For proper working of Magento 2 Marketplace Canada Post Shipping, you need to set Canada shipping origin address and store information.
For Canada shipping origin address, please follow this path Stores> Configuration > Sales > Shipping Settings > Origin.
Here the admin can enter the origin address for Canada shipping.
For store information, please follow this path Store> Configuration>General>Store Information. Here the admin can fill store information as shown below. 
How To Use – Magento 2 Marketplace Canada Post Shipping
If Magento 2 Marketplace Canada Post Shipping module is enabled and the admin has set the setting “Allow Sellers to Save Canada Post Details” to “Yes“.
Then the seller can save his “Canada Post Configuration” as shown below in the snapshot.
Here, the seller will:
- Canada Post User Id: Enter the Canada Post User Id.
- Client Number: Enter the Client Number.
- Password: Enter the password for the Canada Post User Id.
- Agreement Type: Select the Agreement Type as the contract or non-contract type from the drop-down.
- Agreement Number: Enter the Agreement Number for your Canada Post account. The “Agreement Number” field will not be visible if the “Agreement Type” field is set to the option “Non-Contract” option.
The seller can also set the Invoice & Shipping address, VAT, TAX information under the account menu Marketplace >Manage Print PDF Header Info as below.
When a buyer will place an order for the seller’s product, the buyer can see Magento 2 Marketplace Canada Post Shipping method at the shopping cart page.
The buyer will select the Canada Post shipping method as per the choice.
Buyer can see selected shipping method under Order Review.
Note: In Magento 2 Marketplace Canada Post Shipping module, the Shipping rate will be calculated according to:
The Seller’s Origin Zip Code, Product Weight, and the Buyer’s Destination Zip Code.
Admin End:-Workflow
Seller End – Management
When the order is placed, the seller can see the order under “My Order History” as per the image below.

If the admin sets the “Allow Seller to Manage Order” option “yes” then the seller can manage the orders from the front-end.
Now the seller can generate invoices for their ordered products, generate the tracking number and shipment for the orders of their products.
Even the seller can notify the customers by sending them emails, cancel/refund the order and even print the order.
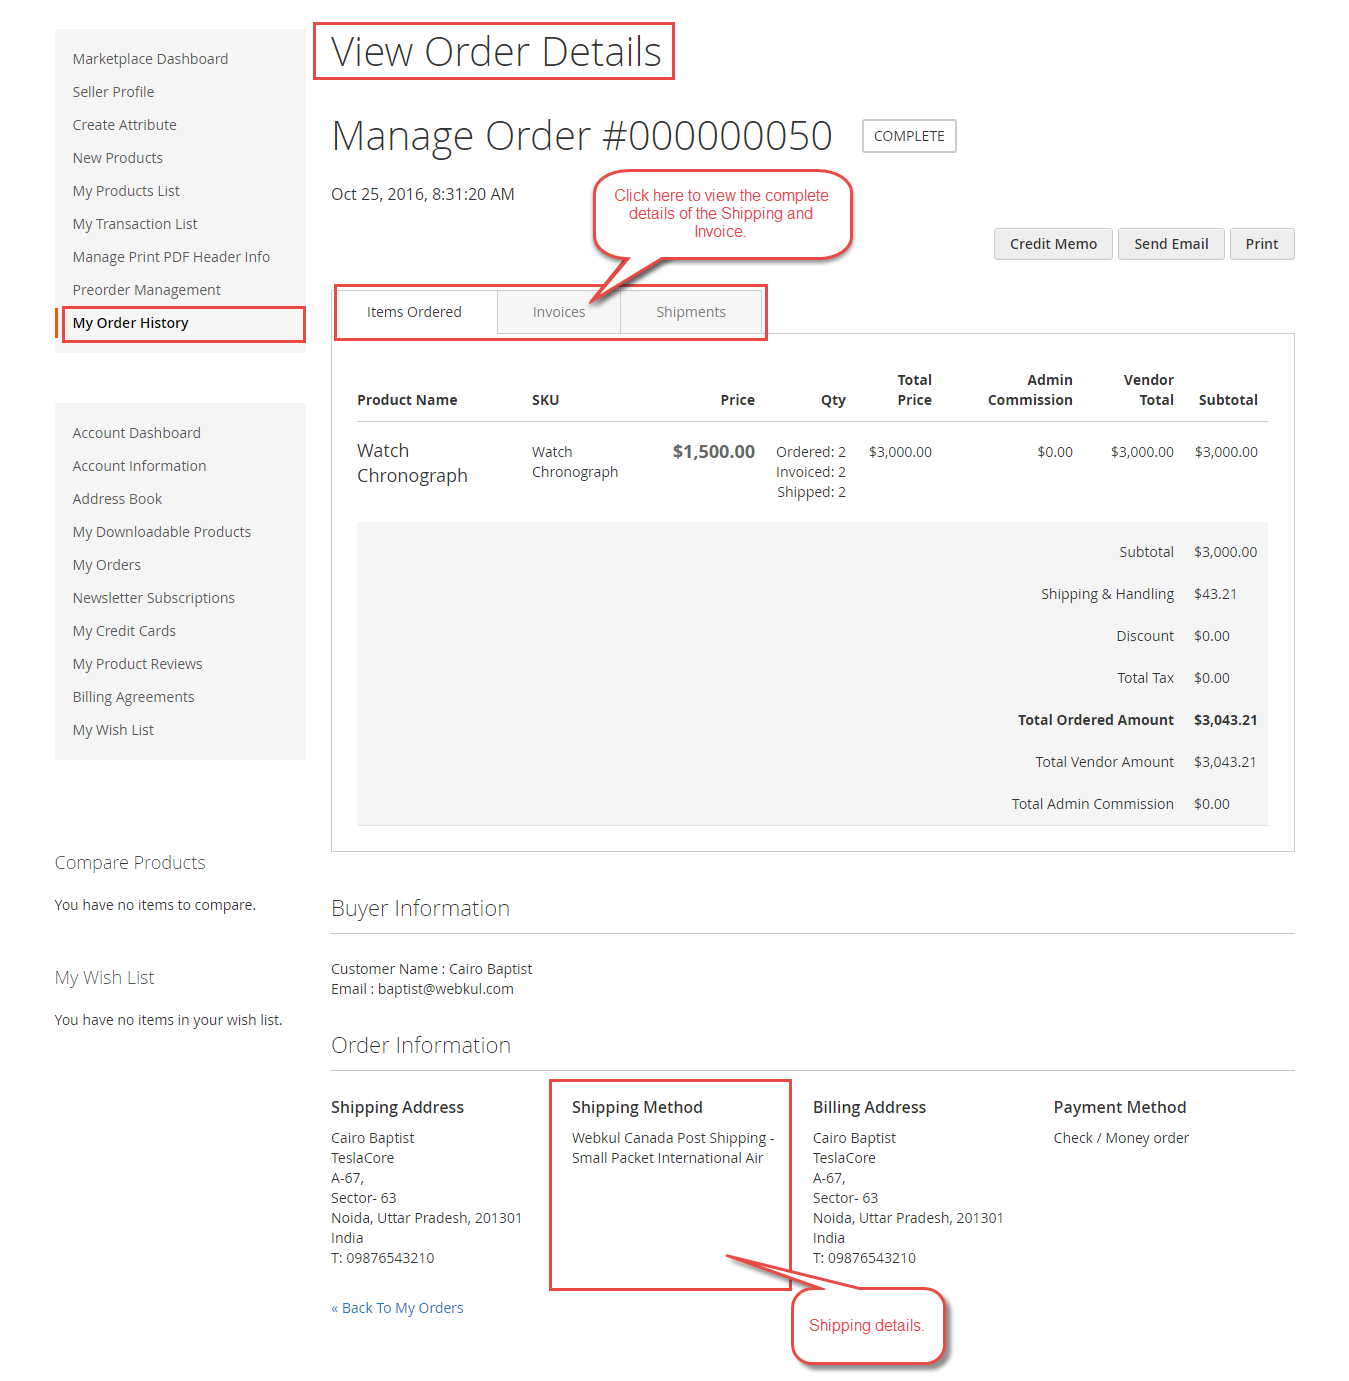
Once the seller generates the shipment and invoice, the seller will able to see complete order details as per the below snapshot.
Note : You need to set up the allowed currency under Stores->General->Currency Setup.
Here you will have to select the Canadian Dollar under the Allowed Currencies as per the screenshot below.
Also you will have to import the currency rates under Stores-> Currency-> Currency Rates as per the below screenshot.
-
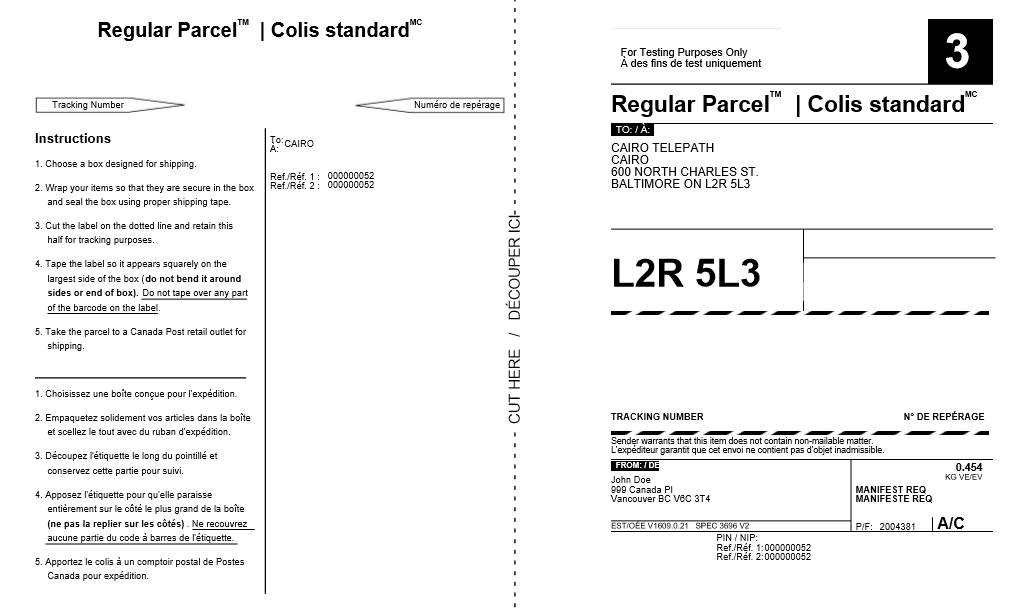
Canada to India Shipping label:
2. Canada to Canada Shipping label :
3. Canada to USA Shipping Label :
The seller can download the Shipping and Invoice slip very easily.
In the shipping and invoice slips, you can also see the company logo and address, vat, tax information which is entered by the seller under Manage Print PDF Header Info.
Shipping Slip –
Invoice Slip –
The seller can also download the PDF of shipping and invoice slip under Marketplace > My Order History.
After clicking on Download All Invoice Slip option a pop-up window will be open up. Here you will enter the date up to which you want to download the Invoice slip.
Similarly, the seller will click on the Download All Shipping Slip option and a pop-up window will be open up.
Here you will enter the date up to which you want to download the Shipping slip.
Admin can also generate the shipping label from the back end by navigating through Sales->Orders and then clicking the “View” option as shown below in the snapshot.

After this the order detail page opens up, admin will click on the Ship option to generate the shipment for the order.

After clicking the “Ship” option, the shipment generation page will open up. Here the admin will check the “Create Shipping Label“.
After that click the “Submit Shipment” option as shown below in the snapshot.
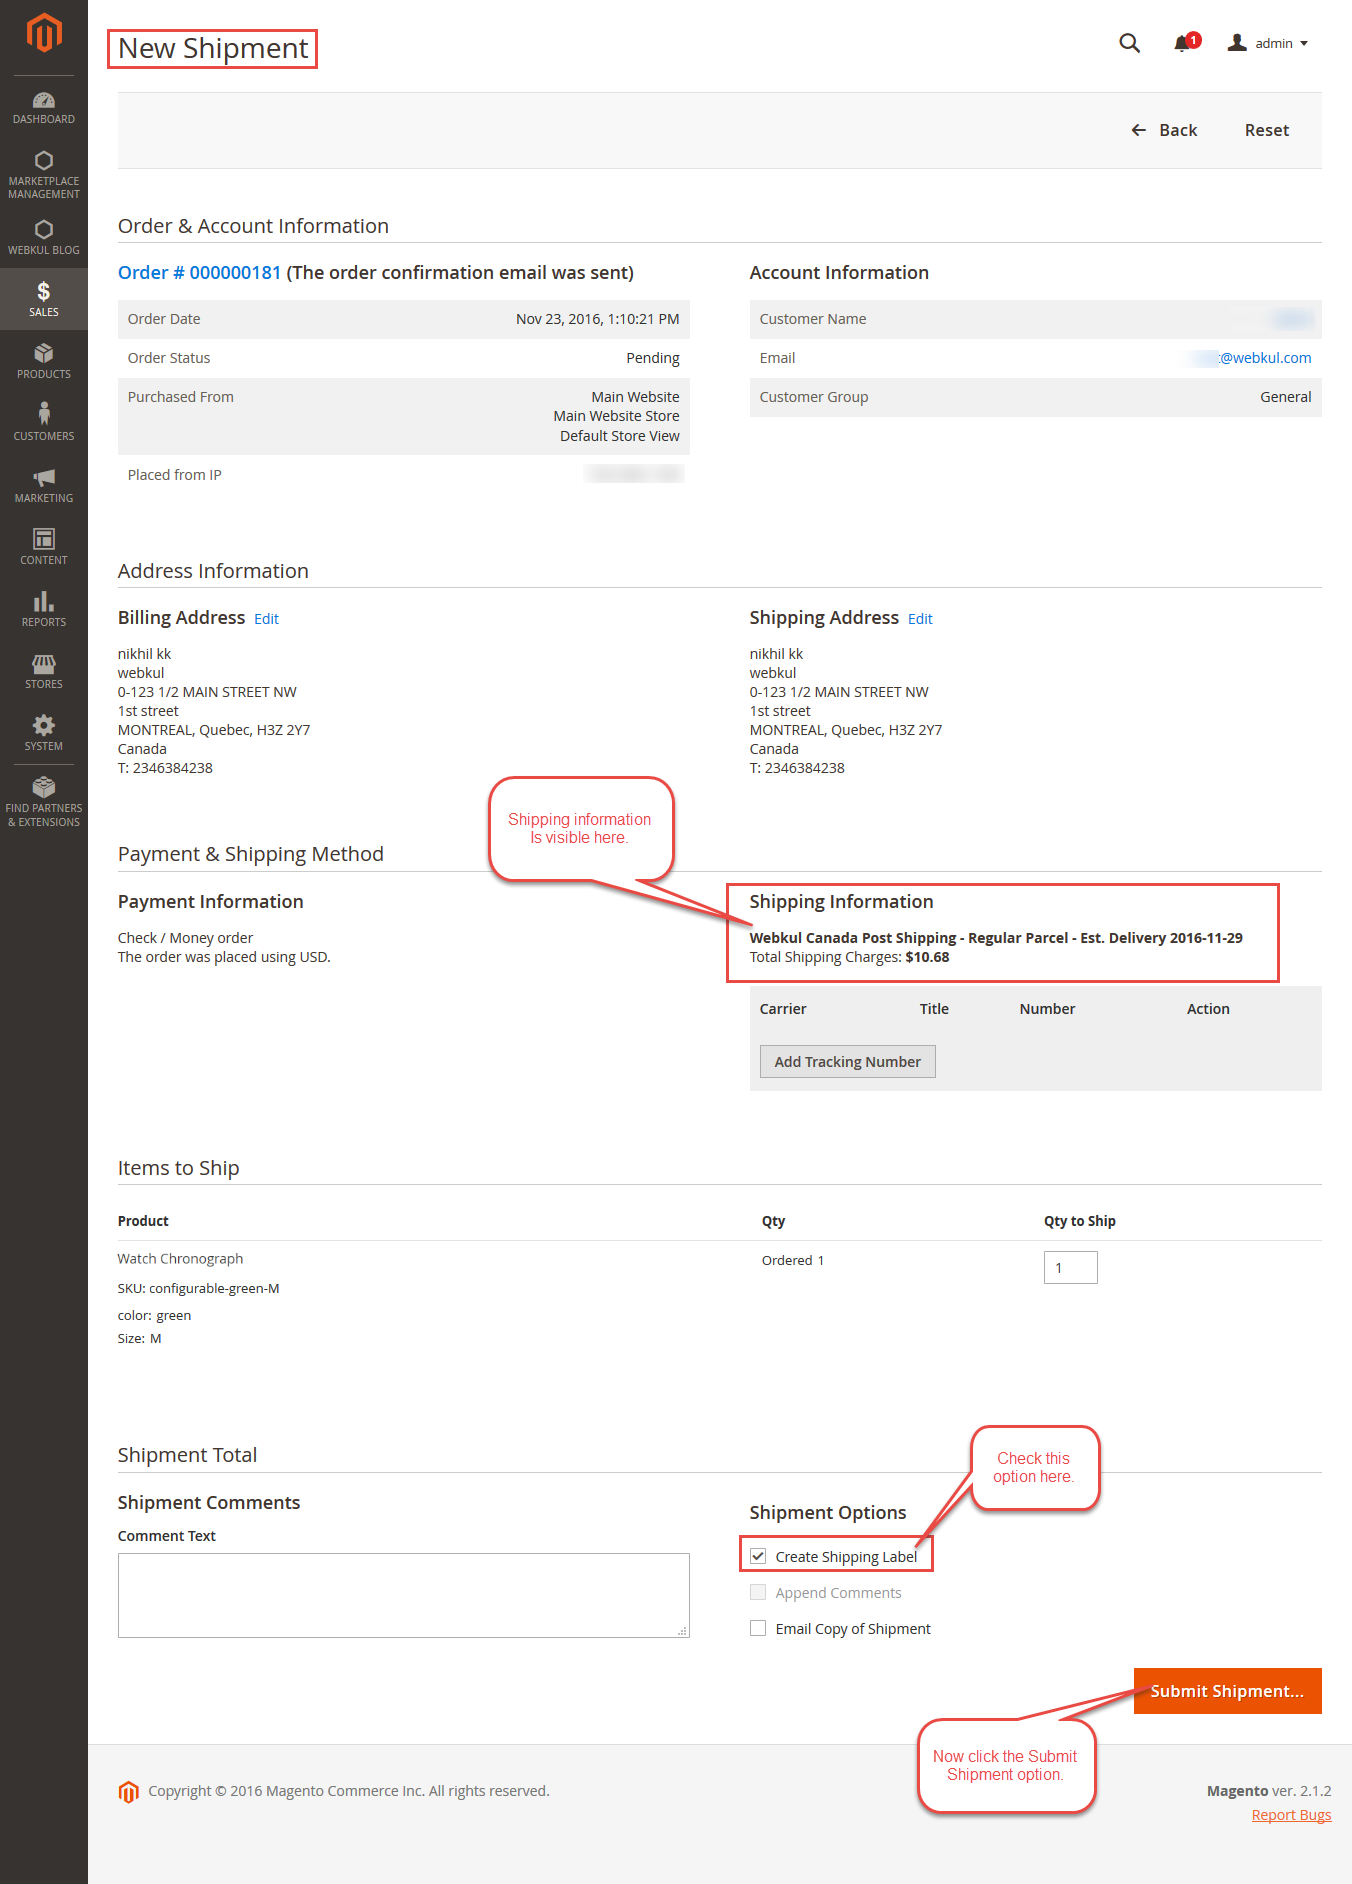
Now after clicking the Submit Shipping, the admin will first check the products that are to be added to the package.
Then click the button “Add Selected Products To Package” as per the below snapshot.
Lastly, the admin after clicking the “Add Selected Products To Package“, will click the button “Add products To Package“.
To add the products to the package and then enter the dimensions(length, width, and height). After you need to click the save button as shown below in the snapshot.
Note
Above all if the product weight is too low then you might get some warnings:
1.Weight-related warnings – 

Therefore, you will have to slightly increase or decrease the total weight as well as create the shipping label. For more information click here.
2. Non-delivery handling related warning –

If you get the above-mentioned warning after that then you will have to select one content value out of three (Return at seller’s Expense, Return to Seller, Abandon) for which shipping label will generate as shown below.
That’s all for the base Magento 2 Marketplace Canada Post Shipping.
Support
Have any issues feel free to add a ticket and let us know your views to make the module better webkul.uvdesk.com.
Get in touch
You may also browse other Magento 2 marketplace addons and our quality Magento 2 extensions.
Current Product Version - 5.0.2
Supported Framework Version - Magento 2.0.x, 2.1.x, 2.2.x,2.3.x, 2.4.x








2 comments
Thanks for reaching out and appreciating the content. For any queries or doubts just drop a mail at [email protected]
Warm Regards,
Team Webkul.