Magento 2 Marketplace Amazon Connector module integrates the Amazon store with your Marketplace. This module enables your marketplace sellers to import products and orders from Amazon store to the Marketplace store. The sellers can also export their products from Marketplace store to Amazon store.
The sellers can even assign the products that are left unassigned during the import to any category on their own. The module performs real-time updates of the synchronized product price and quantity on the Amazon store. The admin and sellers both can sync products from the Amazon store to their Marketplace store.
Note: This is an add-on of Magento 2 Marketplace. To use this module you must have installed first Magento 2 Marketplace Module
Video Tutorial of Magento 2 Multi Vendor Amazon Connector
Check a brief overview of the plugin –
Features of Marketplace Magento 2 Amazon Connector
- Synchronize the Magento 2 products to Amazon and vice versa.
- The admin and seller can import Amazon orders to Magento 2 store.
- Admin and the seller can set a default category for the imported products in the Magento 2 store.
- An admin can set default quantity and weight values for imported products in the Magento 2 store.
- The admin and the seller revise the changes for the product’s price and quantity occur in Magento 2 store, the results will reflect on the Amazon store.
- Admin and the seller can import Simple as well as Configurable product types.
- The product information like base image, name, price, and quantity get imported along with the product.
- Admin and the seller can export Simple product type.
- The product information like SKU, price, and quantity get exported along with the product.
- The admin can set the default store view and order status for the imported order in the Magento 2 store.
- admin and seller can manage the imported orders through Amazon seller central account only.
- Orders from Amazon store with status shipped, unshipped and partially shipped get imported to the Magento 2 store.
- The admin can view and manage the Amazon Accounts of all the sellers.
- Synchronized Amazon product work like same as Magento product.
- Admin can fetch the order between the desired date range.
- The orders will fetch automatically via Cron and if order items do not exist in Magento, it will automatically be created.
- The exported product status will be updated automatically via Cron.
Installation – Marketplace Magento 2 Amazon Connector
Customers will get a zip folder and they have to extract the contents of this zip folder on their system. The extracted folder has an src folder, inside the src folder you have the app folder. You need to transfer this app folder into the Magento 2 root directory on the server as shown below.
After the successful installation, you have to run these commands in the Magento 2 root directory.
First command – php bin/magento setup:upgrade

Second Command – php bin/magento setup:di:compile

Third Command – php bin/magento setup:static-content:deploy

Fourth Command – composer require guzzlehttp/guzzle:~6.0

Fifth Command – composer require league/csv:8.2.2

Sixth Command – composer require spatie/array-to-xml

After running the commands, you have to flush the cache from Magento admin panel by navigating through->System->Cache management as shown below.
Thus, that’s all about the installation of the module.
Multi-Lingual Configuration – Marketplace Magento 2 Amazon Connector
For Multilingual support, please navigate to Store>Configuration>General >Locale Options. And select your desired language from the Locale option.
Language Translation – Marketplace Magento 2 Amazon Connector
If you need to do the module translation, please navigate to the following path in your system app/code/Webkul/MpAmazonConnector/i18n.
Open the file named en_US.CSV for editing as shown in the below screenshot.

Once you have opened the file for editing. Replace the words after the comma(,) on the right with your translated words.

After editing and translating the CSV file, you need to save the translated file name according to your region language and country code such as – de_DE.CSV. Then upload the translated file to the same folder from where you have obtained it. Now your module translation is complete.

Thus, in this way, one can translate the module.
How to create/get the required credentials for the Magento 2 Amazon connector module
1. Registering as a developer
You must register as a Selling Partner API developer before you can register your Selling Partner API application. The way you register as a developer varies slightly depending on the type of application that you create. We will use the following:
- Private seller applications: Applications for sellers that are available only to your organization, and are self-authorized.
To register as a developer (for private seller applications)
- Sign in to Seller Central using the credentials that you want to associate with your developer account.
- In the Partner Network menu, click Develop Apps.
The Developer Central page appears. - If you have not yet completed a developer profile for this selling account, click the Proceed to Developer Profile button. Otherwise, click the Your Developer Profile link.
- Complete the form. In the Data Access section, in the dropdown box, select My organization sells on Amazon, and I only want to integrate to manage my own business only.
Note: If you want to import the buyer information and shipping address with the orders, then you must have access to the customer’s Personally Identifiable Information (PII). For this, you need Approval for the roles that are required to access buyer information and/or shipping address information. These are:
- Direct-to-consumer shipping. Required to access shipping address information.
- Tax remittance. Required to access buyer information.
- Tax invoicing. Required to access buyer information.
2. Checking the status of your request to register as a developer
After you have submitted your request to register as a developer, Amazon evaluates the information provided and approves or denies your request. If denied, you can address the reason for the denial and then resubmit your Developer Profile.
The following procedures show you how to check the status of your request to register as a developer, depending on the type of application you want to create.
To check the status of your request (private seller applications)
- Sign in to Seller Central with the credentials that you used when you registered as a developer.
- In the Partner Network menu, click Develop Apps.
The Developer Central page appears. - Follow the instructions in the Your developer registration is under the review banner. The banner will change to reflect the status of your application.
After we have registered you as a developer, you can create and configure IAM policies and entities. To view your developer information, see Viewing your application information and credentials.
3. Creating and configuring IAM policies and entities
The following steps explain how to create and configure IAM policies and entities with the end goal of creating an IAM role that you provide when you register your application. In this workflow you create an IAM user (with an AWS STS policy attached) that assumes an IAM role that has permissions to call Selling Partner API.
Steps:
1 Create an AWS account
2 Now create an IAM user
3 Create an IAM policy
4 Create an IAM role
5 Add an AWS Security Token Service policy to your IAM user
Step 1. Create an AWS account
You need an AWS account because the Selling Partner API security model uses AWS authentication credentials. If you’re not already an AWS customer, you can create a free AWS account. For more information, see AWS Free Tier.
Step 2. Create an IAM user
You need to create an IAM user to get AWS keys to authenticate calls to the Selling Partner API. We recommend creating a new IAM user exclusively for this purpose. Use the IAM user to assume the IAM role that you create in Step 4.
To create an IAM user
- If you are not already signed in, sign in to the AWS Management Console and open the IAM console at console.aws.amazon.com/iam.
- In the navigation pane on left, click Users and then click Add user button.

- Enter a user name for the new user.
- Select Programmatic access and then click the Next: Permissions button.

5. On the Set Permissions page, accept the defaults and click the Next: Tags. You will set permissions when you create an IAM role.

6. On the Add tags (optional) page, add optional tags if you want them, and then click the Next: Review button.

7. On the Review page, review the choices you have made. You can ignore the This user has no permissions warning. You will set permissions when you create an IAM role. When you are ready to proceed, click the Create user button.

The AWS access key ID for your new IAM user is displayed.
8. Click Show to view the AWS secret access key. To save the AWS access key, click Download .csv and then save the file to a safe location.

Important:
This is your only opportunity to view or download your AWS secret access key, which you will need to authenticate your calls to the Selling Partner API. Save the AWS access key ID and AWS secret access key in a safe and secure place. You will not have access to the AWS access key again after this step. If you lose your AWS secret access key you will need to create a new IAM user with its own new set of keys.
9. Click Close.
10. In the User name column, click your new IAM user and make a note of the User ARN. You will need it in Step 4. Create an IAM role.

11. Save your User ARN. You will need it:
i. In Registering your Application
ii. In Step 4. Create an IAM role.
Note: The created AWS access key ID and AWS secret access will be used for module configurations: Access Key of AWS IAM User, Secret Key of AWS IAM User
Step 3. Create an IAM policy
This IAM policy defines permissions to make calls to the Selling Partner API. You will attach it to the IAM role(that you create in Step 4. Create an IAM role) and the IAM user(that you created in the previous step).
Note: If your AWS account leverages AWS Organizations you must ensure that your organization level policy allows access to the Selling Partner API. For more information, refer to Managing AWS Organizations policies in the AWS documentation.
To create an IAM policy
1. Sign in to the AWS Management Console and open the IAM console at console.aws.amazon.com/iam.
2. In the navigation pane at the left, click Policies.
If this is your first time choosing Policies, the Welcome to Managed Policies page appears. Click Get Started.
3. Click the Create policy button.

4. Click the JSON tab.
5. Paste the following code into the text box, replace the existing code, and then click Review policy.{ “Version”: “2012-10-17”, “Statement”: [ { “Effect”: “Allow”, “Action”: “execute-api:Invoke”, “Resource”: “arn:aws:execute-api:*:*:*” } ] }


6. On the Review policy page, type a Name and a Description (optional) for the policy that you are creating.

7. Review the policy Summary to see the permissions that are granted by your policy, then click the Create policy button.

Your new IAM policy appears in the list.
Step 4. Create an IAM role
Now, Create an IAM role that trusts the IAM user that you created in Step 2. Create an IAM user and has permission to call the Selling Partner API.
To create an IAM role
1. If you are not already signed in, sign in to the AWS Management Console and open the IAM console at console.aws.amazon.com/iam.
2. In the navigation pane on left, click Roles and then click Create role button.

3. On the Create role page, click Another AWS account.

4. In the Account ID box, enter the account identifier for the AWS account in which you created your IAM user in Step 2. Create an IAM user, and then click the Next: Permissions button.

5. On the Attach permissions policies page, under the Policy Name, select the policy that you created in Step 3. Create an IAM policy, and then click Next: Tags.
Tip: Click Filter policies and then select Customer managed to narrow your choices.

6. On the Create role page, enter a role name in the Role name box, an optional role description in the Role description box, and then click the Create role button.

7. On the Add tags (optional) page, add optional tags if you want them, and then click the Next: Review button.

8. Under Role name, click the name of your new role.

The Summary page appears

9. Save your role ARN. You will need it:
i. In Step 5. Add an AWS Security Token Service policy to your IAM user.
Step 5. Add an AWS Security Token Service policy to your IAM user
Adding AWS Security Token Service (AWS STS) policy to your IAM user enables you to request temporary AWS access keys that you can use to authenticate your requests to the Selling Partner API. These credentials expire after a set period of time, helping you to control access to your AWS resources.
1. If you are not already signed in, sign in to the AWS Management Console and open the IAM console at console.aws.amazon.com/iam.
2. In the navigation pane on left, click Users and then click the user that you want to add the AWS STS policy to. In this workflow, choose the user you created in Step 2. Create an IAM user. You might choose a different IAM user for other use cases.

3. On the Permissions tab, click Add inline policy.

4. On the Create policy page, click Choose a service.
5. Click the STS service.
Tip. Type STS in the search box to narrow your choices.

6. Click the arrow next to Write to expand it.
7. Select AssumeRole.

8. Click the arrow next to Resources to expand it, and then click Add ARN.

9. In the Add ARN(s) dialog box, enter the role ARN from Step 4. Create an IAM role in the Specify ARN for role box, click Add, and then click the Review policy button.

10. On Review policy page, enter name for your policy in the Name box. Review the choices you have made. If you are ready to proceed, click Create policy button.
11. Again choose user you created in Step 2. Create an IAM user. Now, On Permissions tab, click “Add Permissions“.

12. Now, click on “Attach existing policies directly”. Then, select policy that you created in Step3. Create an IAM policy, and then click “Next: Review”.

13. Click on “Add Permissions“.

4. Registering your application
Before you register your application, create and configure your IAM policies and entities. We will register applications for
- Private seller applications: These are seller applications that are available only to your organization, and are self-authorized.
The following procedures show you how to register your application.
To register your application (for private seller applications)
- Sign in to Seller Central using the credentials that you used to register as a developer.
- In the Partner Network menu, click Develop Apps.
The Developer Central page appears. - Click the Add new app client button.
The App registration page appears. - Complete the form.


Important: When registering your application, the IAM ARN that you provide must be for the IAM User to which you attached the IAM policy from Step 3. Create an IAM policy. Since you register your application using your IAM user, be sure that the IAM policy is attached to it. Otherwise, your calls to the Selling Partner API will fail.
5. Viewing your application information and credentials
After you register your application you can view information about your application, as well as your Login with Amazon (LWA) credentials. Here, we have used :
- Private seller applications: These are seller applications that are available only to your organization, and are self-authorized.
The following procedures show you how to view your application information and credentials, depending on the application type.
To view your application information and credentials (for private seller applications)
- Sign in to Seller Central using the credentials that you used to register as a developer.
- In the Partner Network menu, click Develop Apps.
The Developer Central page displays information about your application(s), including the IAM ARN associated with them. - Click View under LWA credentials for the application you want.

Your LWA client identifier and client secret for that application appear. You will need these credentials in module configurations: App Client ID from Seller Central, The corresponding Client Secret
Self authorization
When you create a private application for your own organization you can self-authorize it to access your account information. Before doing this you must register as a developer and register your application. You can self-authorize your application in draft status; there is no reason to publish a private application.
To self-authorize your application (seller application)
- Sign in to Seller Central using the credentials that you used to register as a developer.
- In the Partner Network menu, click Develop Apps.
The Developer Central page appears. - For the application that you want to authorize, click the arrow next to the Edit App button, and then click Authorize.
The Authorize application page appears.

Note. If your selling partner account is merged with accounts in other regions, you will see an Authorize app button for each of your merged accounts.
4. Click the Authorize app button for each selling partner account that you want your application to access. The Marketplaces column indicates the marketplaces in which an account is active.
A Login with Amazon (LWA) refreshes token appears with every Authorize app button that you click.
Note:
1. Keep this LWA refresh token as this will be used in module configuration: Refresh Token
2. If you click on Authorize app button multiple times, a new refresh token is generated each time. Generating a new refresh token does not invalidate previous refresh tokens.
Module Configuration – Marketplace Magento 2 Amazon Connector
After the successful installation of the module, the admin can configure the module from the back end. For that, they need to navigate through Store > Marketplace Amazon Connector.

Account Settings:
Default Attribute Set: The admin can select the default attribute set that will be used for creating the category attributes in the Amazon connector.
Product Description With HTML: Choose whether you want to import the product with HTML description content or not.
Mapping Info
Marketplace-wise Default Account: Here, select the marketplace-wise default account by tapping the Add button as required.
Here the admin will select the Marketplace Id, Set the Developer Name, enter the Developer Id, along with that also enter the Amazon Seller Id.
Moreover, the admin need to enter the Amazon Access Key Id, and Secret Key.
Thus, in this way, the admin can configure the module.
Note – First, set up the amazon accounts. Then, you have to map the default accounts to be used with respective marketplaces. The mapped account will be used as default while fetching some common data for that marketplace like category attributes using the amazon API.
Manage Marketplace Magento 2 Amazon Account
However, after configuring the module, the admin needs to add Amazon account credentials.
Thus, the admin has to navigate to Marketplace Management > Manage Amazon Account for managing and adding Amazon Accounts.

Once the admin clicks on Manage Amazon Account, the following page will open showing Amazon Seller Accounts List with the Seller Name and Amazon Marketplace.

Here, the admin can view and manage the Amazon Accounts of all the sellers. And can:
- Edit – edit the Amazon account details by clicking on this link.
- Delete – remove the existing Amazon account from the list.
- Add Amazon Seller Account – add/create a new Amazon account.
Add Amazon Seller Account
And After clicking on “Add Amazon Seller Account“, the admin will navigate to the New Amazon Account page as per the below image.

Amazon Account Information:
- Seller: select the seller and this will not be changed once got saved in the Magento 2 Marketplace store.
- Store name: the admin can set the unique store name for their account.
- Attribute: The admin can select the attribute.
- Marketplace: Here the admin can select the location of the marketplace.
- Amazon Seller Id: here the admin will enter the Amazon seller id received while creating the Seller Central account.
- Access Key of AWS IAM user: The admin will enter the access key of AWS IAM user.
- Secret Key of AWS IAM user: here the admin will enter the secret key of AWS IAM user.
- App Client ID from the seller central: the admin will enter the app client ID.
- Client secret: here the admin will enter the corresponding client secret key.
- Refresh Token: here the admin will add the refresh token.
- AWS IAM entity for ARN: here the admin will select the entity whose ARN have used while creating App on amazon seller central.
- Customer PII Access: here the admin need to select yes/no if the developer profile has access to the customer’s Personally Identifiable Information.
- Marketplace: Select the Marketplace from the drop-down list.
Note: This module enables the admin to import products and orders from the Amazon store to Magento 2 Marketplace store. Also, to export products from Magento 2 Marketplace store to the Amazon store.
Magento 2 Amazon Account General Configuration
Moreover, the admin will configure the Magento 2 Marketplace Amazon Account:

Attribute Set – Attribute set: select the attribute set for the imported product.
Revise Amazon Product – If select Yes. Then any changes for the product’s price and quantity occur in Magento 2 Marketplace store, the results will also reflect on the Amazon store. But the changes which occur in the Amazon store will not reflect in Magento 2 Marketplace store. Else, select No for disabling product updating on Amazon.
Default Category – Select the Default Category of Magento 2 Marketplace store for assigning to Amazon products.
Default Store View – Select Default Store View of the Magento 2 Marketplace store for order syncing.
Inventory Source – The selected source will be assigned to amazon products by default.
Price Rule Applicable For – Product rule will be applicable to the selected option and inversely applicable for the unselected option.
Shipped Order Status – Selected status will be assigned to amazon orders.
Unshipped Order Status: The selected status will be assigned to amazon orders.
Partially Shipped Order Status: The selected status will be assigned to amazon orders.
Import Real-Time Orders: If selected yes then the real-time orders will be imported through cron.
Export Product Image: If selected yes, then the product base image will also be exported or revised to Amazon.
Get All Images of Product: All the images of the product will be imported, if selected yes.
Product Deleted from Catalog: The product base image will be revised to amazon.
Product Create – Select the product creation type as “with variation” if want to create the configurable product with variation in the Magento 2 Marketplace store after import. Else select “without variation” if want to create the configurable product as a simple product in the Magento 2 Marketplace store after import.
Default Website: The selected website will be used for product creation at Magento.
Default Product Qty: Default qty will be used when API response does not return item qty.
Default Product Weight: Default weight will be used when API response doesn’t return item weight.
Thus, in this way, the admin can configure Amazon Account.
Add New Products
Moreover, while adding a new product to the Magento Marketplace store, the admin will see a new tab “Amazon Product Identifier”.
Also, from here the admin can select any Unique Identifier from the drop-down list as per the requirement i.e ASIN, EAN, GTIN, ISBN, JAN, UPC.
Moreover, the admin has to provide a genuine Unique Identification Code as per the selected unique identifier which will be used while exporting the Magento products to Amazon shop.

NOTE: Magento 2 store products with no “Amazon Product Identifier” code will not get exported to the Amazon store.
Mapped Product
Moreover, the admin can import the desired products from the Amazon store to the Magento Marketplace store.

Also, to import products from the Amazon store, the admin will click on the Mapped Product tab as per the below image:

Here, the admin will:
- Select the import product option such as all, active, or inactive.
- Generate Report Id: This creates the seller’s account report which is used to send as a request to import the products from the Amazon store.

- Import Product From Amazon: when clicking on “Import Product from Amazon”, the temporary product data is created and stored in Magento 2 Marketplace database.

- Create Imported Product: It is used to create/add imported products to the Magento 2 Marketplace store.

Also, the admin can check the imported products by navigating to the store product category which has been set as the default category for the imported product from Amazon while module configuration.
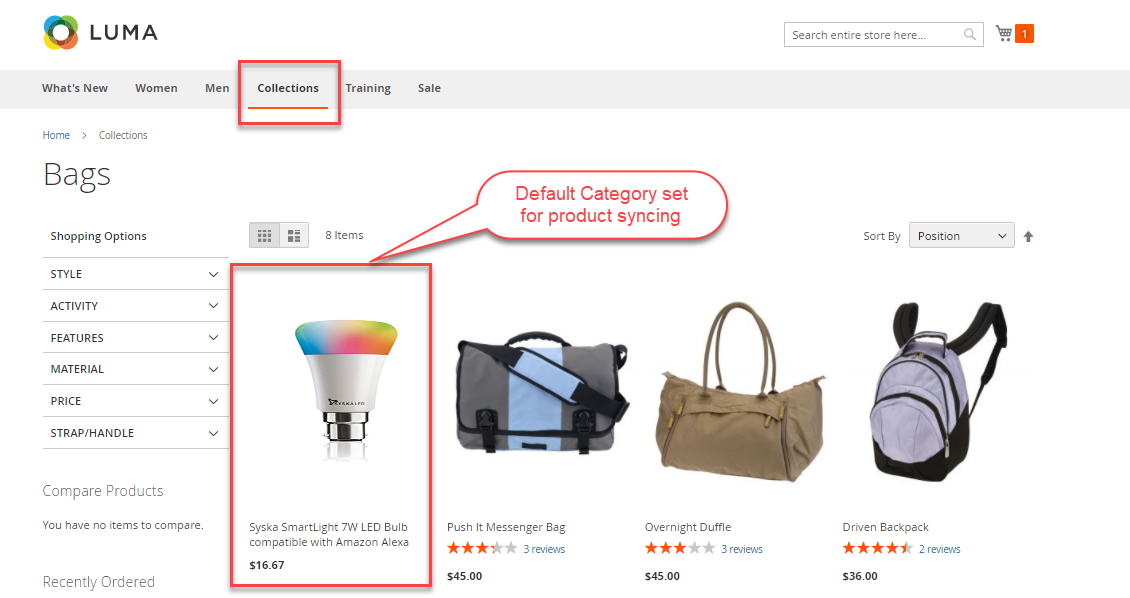
HOW TO CHANGE DEFAULT CATEGORY OF THE IMPORTED PRODUCTS:
Moreover, the admin can change the default category of imported products. For this, the admin will click on the Mapped Product tab as per the image.

To change the default category of the imported products, the admin will do the following:
- Select one or more than one product from the mapped products list.
- Select Assign to Category option from the Actions drop-down list. This will display the Category field and Submit button beside the Actions drop-down list.
- Select the desired category from the Category drop-down list.
- Proceed further by clicking on the Submit button.
NOTE: The product information like base image, name, price, and quantity get imported along with the product.
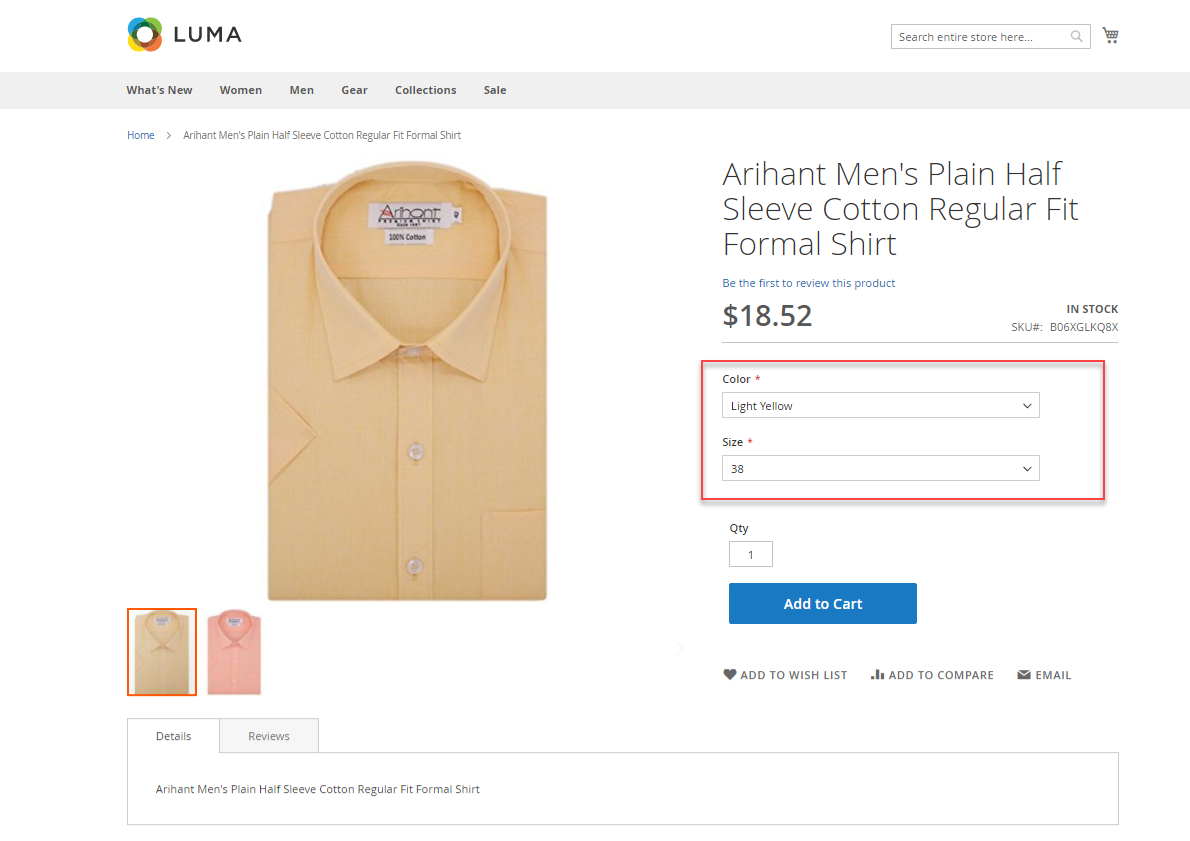
Configurable Product:
Additionally, with the simple product, the admin can even import the configurable product as per the below image.
CASE 1: Product With Variation
If the admin has set the field Product Create as Product With Variation then it will create the configurable product with variation in the Magento 2 Marketplace store after import.

However, after the mapping, the configurable product will be created with variation in the Magento 2 Marketplace store as per the below image.
CASE 2: Product Without Variation
If the admin has set the field Product Create as Product Without Variation then it will create the configurable product as a simple product in the Magento 2 Marketplace store after import.

After the mapping, the configurable product will be created without variation in the Magento 2 Marketplace store as per the below image.

Mapped Order
To import the orders from the Amazon store, the admin will click on the Import Order tab as per the image.

Here the admin will:
- Map Order: when clicking on the “Import Order” button, an Amazon Order Range page will open as per the image.

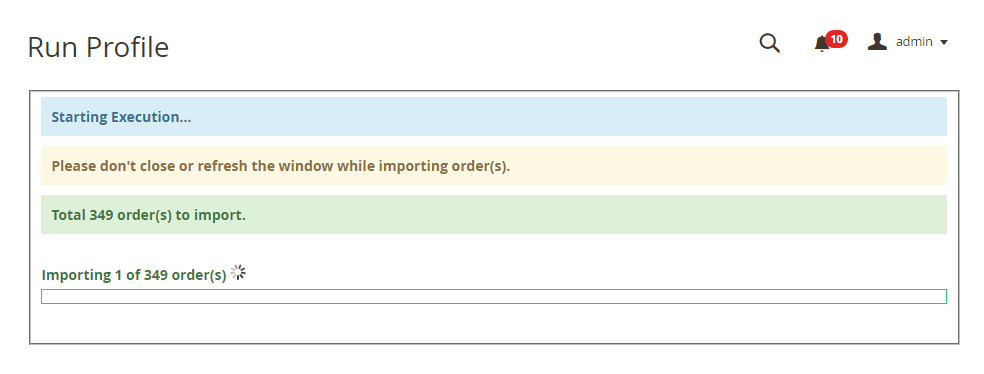
The admin will enter the date and time range. Proceed by clicking on the Import Order button and the temporary order data is created and store in Magento 2 database.
- Create Import order in Store: It is used to create/add the import orders to Magento 2 store.
Also, after complete execution of the run profile, a list will be generated for the mapped orders with details like Amazon Order Id, Order Status, Sync Date, and Purchase Date.
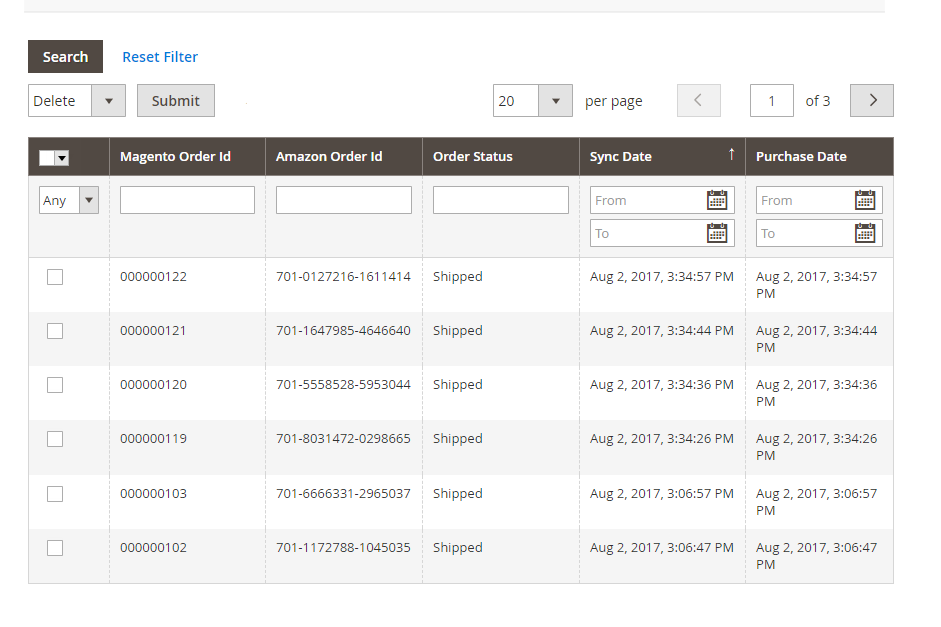 Also, the admin can check the details of import orders by navigating to the Sales > Orders. But the admin cannot manage the import orders from the Magento 2 store ie; the admin cannot create an invoice, shipment, cancel the order and make a refund.
Also, the admin can manage the import orders through Amazon seller central account only.
Note:
- A cron is set for this module. So, for auto-synchronization of orders, the admin has to configure the cron on Magento 2 server. This will automatically import the orders from the Amazon store to Magento 2 store after every one hour.
- The admin will not get any email notifications for any order place on the Amazon store for the admin products. However, the admin needs to check those orders normally by navigating to Sales > Orders after importing them.
Export Product To Amazon
The admin can export the Magento store products to the Amazon shop. For this, the admin will click on “Export Products” option under Amazon Account Information.

To Export the products to Amazon store, the admin will:
- Select the products which the admin wants to export to the Amazon store.
- Then select the “Export to Amazon” option from the “Action” drop-down list.
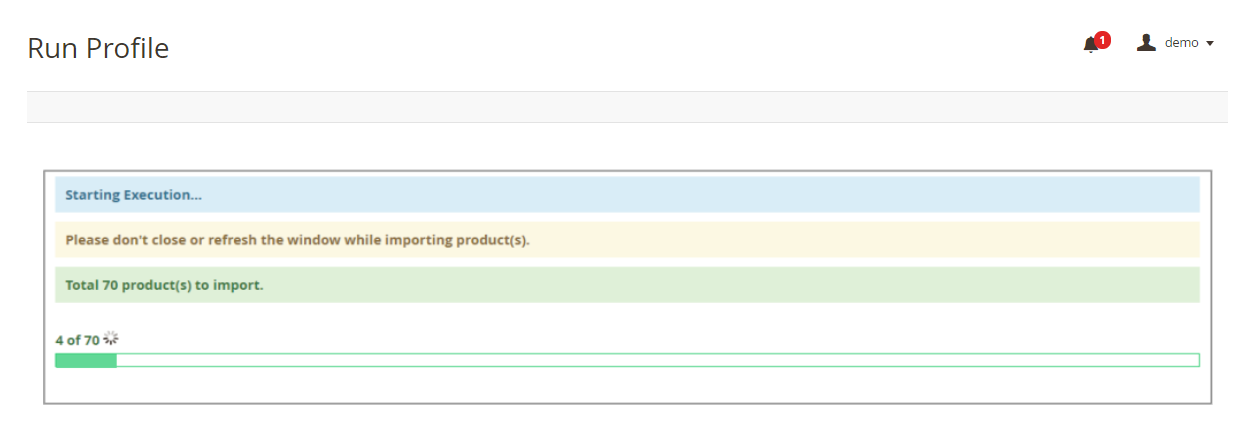
- Proceed further by clicking on the “Submit” button which gets visible when selects “Export to Amazon” option from the “Action” drop-down list. This will navigate the admin to the “Run Profile” page as per the image.

Once the execution is complete, the admin will go to his Amazon seller central account page and navigates to INVENTORY > Manage Inventory.
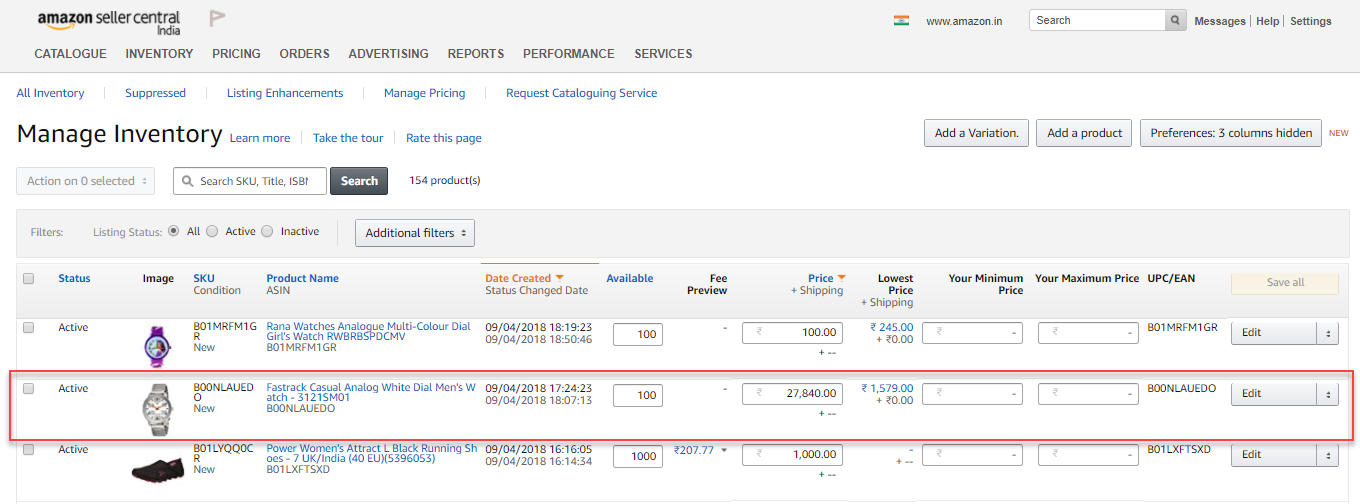
Here, the admin can check the export product after 15 minutes because the process of exporting products take 10-15 minutes to reflect the export products on the Amazon store. Also, the admin can click on the “Edit” button to edit the product details.
Notes:
- The admin can export only simple products.
- The product information like SKU, price, and quantity get export along with the product.
- A cron is set for this module. So, for the auto status update of export products, the admin has to configure the cron on Magento 2 server. This will automatically update the status of export products whether the products are export to the Amazon store successfully or not.
- For exporting products, the unique identification code of products must pre-exist in Amazon’s seller central catalog, newly assign unique identification code to products may not be export.
Seller End – Magento 2 Amazon Connector
The sellers will have a menu option Amazon Connect with some other menu options as per the below image.

Manage Account:
After clicking on “Manage Account”, the seller will navigate to the Amazon Configuration Detail page as per the below image.

Here, the seller will:
- Select the Amazon Marketplace from the drop-down list and click on the Authorization button.
- Enter the store name.
- Select the attribute set.
- Enter the access key and secret key of AWS IAM user and Amazon seller ID.
- Now, need to enter the App client ID from seller central.
- After that need the corresponding client secret.
- Now, enter the token and select the AWS IAM entity.
- And after that, mark the customer PII access as yes/no.
Furthermore, to save the configuration, the seller clicks on the “Save” button.
Manage Configuration:

Here the seller will:
- Select the Attribute Set for the imported product.
- Revise Amazon Product: If select Yes. Then any changes for the product’s price and quantity occur in Magento 2 Marketplace store, the results will also reflect on the Amazon store. But the changes which occur in the Amazon store will not reflect in Magento 2 Marketplace store. Else, select No for disabling product updating on Amazon.
- Default Category: Select the Default Category of the Magento 2 Marketplace store for assigning to Amazon products.
- Default Store View: Select the Default store view of the Magento 2 Marketplace store for assigning Amazon products.
- Inventory Source: Selected sources will be assigned to Amazon products by default.
- Price Rule Applicable for: The product rule will be applicable to the selected option and inversely applicable to the unselected products.
- Shipped Order Status: Selected status will be assigned to amazon orders.
- Unshipped Order Status: The selected status will be assigned to amazon orders.
- Partially Shipped Order Status: The selected status will be assigned to amazon orders.
- Import Real-Time Orders: If selected yes then the real-time orders will be imported through cron.
- Export Product Image: If selected yes, then the product base image will also be exported or revised to Amazon.
- Get All Images of Product: All the images of the product will be imported, if selected yes.

- Product Deleted from Catalog: The product base image will be revised to amazon.
- Product Create: Opted options will be used for product creation at Magento.
- Default Website: The selected website will be used for product creation at Magento.
- Default Product Qty: Default qty will be used when API response does not return item qty.
- Default Product Weight: Default weight will be used when API response doesn’t return item weight.
- Product Create: Select the product creation type as “with variation” if want to create the configurable product with variation in the Magento 2 Marketplace store after import. Else select “without variation” if want to create the configurable product as a simple product in the Magento 2 Marketplace store after import.
- Select the Order Status as Pending, Processing, Suspected Fraud, Complete, Closed, Canceled, On-Hold.
- Default Product Qty – This configured value will be used when you will sync the Amazon orders without importing the product first.
- Default Product Weight – This value will be used where Amazon product doesn’t contain the weight values.
To save the configuration, the seller clicks on the “Save” button.
Add Products – Seller End
While adding a new product to the Magento Marketplace store, the seller will see a field Unique Identification.
Here the seller can select any Amazon Unique Identifier type from the drop-down list as per the requirement such as ASIN, EAN, GTIN, ISBN, JAN, UPC.
And has to provide a genuine Amazon Unique Identification Code which will be used while exporting the Magento products to Amazon shop.

NOTE: Magento 2 store products with no “Unique Identifier Code” will not get export to the Amazon store.
Mapped Product – Seller End
The seller can import the desire products from the Amazon store to their Magento 2 store.

The seller can import the Amazon shop products to Magento 2 store. For this, the seller will click on the “Mapped Products” option under Amazon Connect.

Here, the seller will:
- Generate Product Report: This creates the seller’s account report which is used to send us a request to import the products from the Amazon store.

- Import Products: when clicking on “Import Product”, the temporary product data is created and store in Magento 2 database.

- Create Imported Product: It is used to create/add the import products to Magento 2 store.
The seller can check the import products by navigating to the store product category which has been set as the default category for the imported product from Amazon while module configuration.

NOTE:
- The product information like base image, name, price, and quantity get import along with the product.
- The seller can import simple and configurable products.
Unassigned Product – Seller End
Moreover, the seller can assign the categories to the import products that have left unassigned. For this, the seller will click on the “Unassigned Product” option under Amazon Connect.
Clicking on the Unassigned Product option will navigate the seller to the Assign Imported Product page as per the below image.

To assign the category to the imported products, the seller will do the following:
- Select one or more than one product from the imported products list.
- Choose the desired category from the Product Category drop-down list.
- Proceed further by clicking on the Assign Product to the Category button.
Also, upon the successful allocation of the category, the seller will get the success message. Also, the seller can check the newly assigned category of the product. For that, they need to navigate to the category which has been assigned to the product.
Export Product – Seller End – Magento 2 Amazon Connector
The seller can export the Magento 2 store products to the Amazon shop. For this, the seller will click on the “Export Products ” option under Amazon Connect.
Clicking the Export Products will navigate the seller to the Export Product To Amazon page as per the below image.

To export the products to the Amazon store, the seller will:
- Select the products which the seller wants to export to the Amazon store.
- Then click on the “Export to Amazon” button.
- Upon the successful sync, the seller will get the success message as per the below image.

Then, the admin will go to his Amazon seller central account page and navigates to INVENTORY>Manage Inventory.

Here, the seller can check the export product after 15 minutes. Because the process of exporting products takes 10-15 minutes to reflect the export products on the Amazon store. Also, the seller can click on the “Edit” button to edit the product details.
Notes:
- The seller can export simple products.
- The product information like SKU, price, and quantity get export along with the product.
- A cron is set for this module. So, for the auto status update of export products, the admin has to configure the cron on Magento 2 server. This will automatically update the status of exported products whether the products are exported to the Amazon store successfully or not.
- For exporting products, the unique identification code of products must pre-exist in Amazon’s seller central catalog, newly assigned unique identification code to products may not be exported.
Mapped Order – Seller End – Magento 2 Amazon Connector
The seller can import the Amazon shop order to Magento 2 store. For this, the seller will click on the “Mapped order” option under Amazon Connect.
Clicking the Mapped order will navigate the seller to the Mapped order page as per the below image.

After that, clicking on the “Import Order” button, an Amazon Order Range page will open as per the image.

The seller will enter the date and time range. Proceed by clicking on the submit button and the temporary order data is created and stored in Magento 2 database.
Create Imported order: It is used to create/add the imported orders to Magento 2 store.
After complete execution of the run profile, a list will be generated for the imported orders. Along with details like Magento order Id, Amazon Order Id, Order Status, Sync Date, and Purchase Date.

Support
Thus, that’s all about Magento 2 Marketplace Amazon Connector If you have any issue, please feel free to add a ticket and let us know your views at our HelpDesk System. You may also browse other Magento 2 marketplace addons and our quality Magento 2 extensions.
Current Product Version - 5.0.1
Supported Framework Version - Magento 2.0.x, 2.1.x, 2.2.x,2.3.x, 2.4.x

Can we import ISBN attribute in products magento2 from amazon?
Thanks