Magento 2 HelpDesk Extension is a ticketing system software that draws customer support requests and manages them in one location.
You can assign tickets to the agent, making ticket management much easier for the agent to assist the customer and resolve their issue.
Helpdesk builds on the definition to serve their customers by creating a powerful ticket management platform that allows you to centralize all tickets with ticket status, priority, types, and much more.
You can easily increase productivity by automating ticket management via SLA, Events & Triggers, Ticket Rules, etc. Helpdesk enables support via the web and email.
Note:
- If you are looking for a saas-based helpdesk system, then you can refer to our Adobe Commerce UVdesk Helpdesk module.
- You can also build your custom help desk system using UVdesk.
Check the videos below to better understand the extension –
How to manage customers –
How to resolve Customer queries –
Initial configuration settings –
Features
- It allows the creation of ticket status, ticket priority, ticket types, and ticket custom fields.
- Allow merging multiple tickets into a single ticket.
- Admin is having the ability for splitting a single ticket into multiple tickets if a ticket is too big to manage.
- With the help of this module, it is easy to manage and create an unlimited number of customers.
- Admin is having the ability for managing and creating an unlimited number of agents.
- Allow creating organization and managing tickets based on the organization level.
- It allows the creation and management of multiple agents and agent levels.
- Admin managing and creating unlimited agent groups.
- The Admin can define business hours and holidays based on SLAs.
- With the help of this module, the admin can manage and create predefined responses with action.
- Allow managing and creating a support center for the customer.
- Support manual and automatic ticket mails fetching.
- Configure email piping ie; the customers can reply directly from the ticket system without login into their inbox.
- Allow managing and creating multiple Service level agreements (SLA).
- Easy settings to define and trigger the multiple actions in response to the event that occurs in the helpdesk system.
- Can create a custom attribute for the ticket page to get additional data & information from the customers.
- Flexible settings for creating roles and ACL system(access control list).
- Support ticket lock feature to check who all are accessing a particular ticket.
- Working with all the templates including responsive themes.
- The source code is open so it can easily be customized.
- GraphQL has been implemented in the extension.
- The extension is compatible with the Hyva theme.
Note
1. Before Installing the helpdesk module, PHP/imap extension should be enabled in your PHP server.
Installation
The customers will get a zip folder and they have to extract the contents of this zip folder on their system. The extracted folder has an src folder, inside the src folder you have the app folder.
You need to transfer this app folder into the Adobe Commerce Cloud root directory on the server as shown below.

After the successful installation, you have to run the below-mentioned command in the Adobe Commerce root directory.
# Run Commands
You need to run the following commands:
php bin/magento setup:upgrade
php bin/magento setup:di:compile
php bin/magento setup:static-content:deploy
php bin/magento indexer:reindex
php bin/magento cache:flush
Multi-Lingual Configuration
For Multilingual support, please navigate to Store>Configuration>General >Locale Options. And select your desired language from the Locale option.

Language Translation
If you want to translate Adobe Commerce HelpDesk Extension, please navigate to the following path in your system app/code/Webkul/Helpdesk/i18n. Open the file named en_US.CSV for editing as shown in the below screenshot.

Once you have opened the file for editing. Replace the words after the comma(,) on the right with your translated words.
After editing and translating the CSV file, you need to save the translated file name according to your region language and country code such as – de_DE.CSV.
Then upload the translated file to the same folder from where you have obtained it. Now the translation of Adobe Commerce Cloud HelpDesk Extension is complete.

Module Configuration
After the installation, the admin will configure the Magento 2 Helpdesk Extension settings. For this, the admin will navigate to Stores ->Configuration -> Webkul -> Helpdesk as per the below image.

HelpDesk Settings:

Here, the admin will configure the basic settings of the Adobe Commerce Helpdesk Extension like –
- Ticket System Name: Set the name for the ticket system.
- Ticket System Email-Id: Set the email i.d for the ticket system from which the emails will be sent.
- Enter Upload File Size: Define the file size to be uploaded by the customers.
- Login Required for Ticket Creation: If set as YES then the customer has to log in to their accounts and then can generate tickets. If set as NO then any customer can generate a ticket without logging into the helpdesk.
- Allowed File Extensions: Define file extensions to be uploaded by the customers.
- Allow WYSIWYG Editor on front: If set to YES then the customer can use the editor. Else set as a NO then customers can’t use the editor.
- Date Format: Set the date format so that the Helpdesk will display dates in this particular format.
- Customer Can Delete Ticket: If set to YES then the customer can delete their ticket. Else set to NO to restrict the customer from deleting their ticket.
- Customer Can Close Ticket: If set to YES then the customer can close their ticket. Else set to NO to restrict the customer from closing their ticket.
- Priority On Ticket Creation Page: If set as YES then the ticket priority field will be displayed on the ticket creation page which the customer can update while creating the ticket. Else set as NO to restrict the display of the ticket priority field for the customers on the ticket creation page.
More Settings
- Status on Ticket Creation Page: If set as YES then the ticket status field will be displayed on the ticket creation page which the customer can update while creating the ticket. Else set as NO to restrict the display of the ticket status field for the customers on the ticket creation page.
- Group On Ticket Creation Page: If set as YES then the ticket group field will be displayed on the ticket creation page which the customer can update while creating the ticket. Else set as NO to restrict the display of the ticket group field for the customers on the ticket creation page.
- Customer Can Delete Own Thread: If set to YES then the customer can delete their own thread in the ticket. Else set to NO to restrict the customer from deleting their own thread in the ticket.
- The agent can see all tickets: If set to YES then the agent can see all the tickets.
- Customer Can Add CC: If set to YES then the customer can add collaborators to their ticket. Else set to NO to restrict the customer from adding collaborators to their ticket.
Ticket Status:
In the backend, the admin can create various ticket statuses and here will configure those ticket statuses as per the choice like –

- Open: Configure the ticket status when the ticket is open.
- New: Configure the ticket status when the ticket is new.
- Pending: Configure the ticket status when the ticket is pending.
- Solved: Configure the ticket status when the ticket is solved.
- Closed: Configure the ticket status when the ticket is closed.
- Spam: Configure the ticket status when the ticket is spam.
Default Setting:

Here, the admin will configure the default values for the fields which will be automatically filled if a customer left them blank like –
- Status: Configure the default ticket status when the status of the ticket is not defined.
- Ticket Type: Configure the default ticket type when the type of ticket is not defined.
- Group: Configure the default ticket group when the group of the ticket is not defined.
- Priority: Configure the default ticket priority when the priority of the ticket is not defined.
Ticket View:
Here, the admin will manage the ticket page view like this –

- Ticket Thread Limit: Define the ticket thread limit. e.g-1,2,3 etc. So that the customers can view the configured number of threads in the ticket. And if they want to see all the threads they can expand them.
- Draft Saving Time: Set draft saving time. So that whenever any agent or admin will be typing a message it will automatically get saved after that specified interval of time.
- Lock View Time: Configure the lock view time.
- Lock Expire Time: Configure the lock expiration time.
Activity:
Here, the admin can configure the activities which will be shown in the dashboard like –

- Activity Limit Dashboard: Limit the number of activities to be shown on the dashboard. The activities are the actions performed by agents or admin on the tickets like- status change, priority change, etc.
- Generate Activity: Select the items from the list for which the activity is to be generated.
- Priority on delete: Set activity priority on deleting a particular ticket.
- The Priority on add: Set activity priority on adding a particular ticket.
- Priority on edit: Set activity priority on editing a particular ticket.
Once the admin is done with the Adobe Commerce Helpdesk Extension settings, the admin will have a Helpdesk Manager menu option as per the below image.

Here, the admin will have several sub-menu options to manage the helpdesk system which we will discuss one by one in detail.
Dashboard
This is the dashboard of the ticket system which will display the tickets by the respective ticket’s status separately.
Tickets Management
This section is to manage the tickets.
- Tickets
- Ticket Type
- ManageTicket Status
- Ticket Priority
- Manage Ticket Custom Attribute
- Manage Ticket Tag
Agent Management
This section is to manage and create the new agents who will handle the tickets.
- Agents
- Agent Level
- Groups
Customer Management
This section is to manage the customers who have created the tickets.
- Customer
- Organization
Connect Email
This section is to manage the support content for better ticketing support.
- Manage Business Hours
- Events and Triggers
- Responses
- Manage SLA Policies
- Support Center
- Manage Email Template
- Connect Email(s)
- Activity
Reporting
This section is to view the complete report summary of the customers and the agents.
- Customer Report Summary
- Agent Report Summary
Dashboard
To view the dashboard, the agent will navigate to Helpdesk Manager -> Dashboard as per the below image.

On the top, the agent can view the tickets by the respective ticket’s status separately. This will helps the agent to get statistics with complete details about the tickets.
And under the “Recent Activity” section, the recent activities performed by the admin/agent will display and it will display the limited activities configured by the admin.
Suppose the admin has configured 5 activities in the backend, then it will display only the 5 most recent activities on the dashboard. So the older activities will get deleted automatically if the new activity occurs.
And, can click on the icon to view the agent details like name and email address as per the below image.

Manage Tickets
The agents can easily manage tickets in the helpdesk system by navigating to Helpdesk Manager -> Manage Tickets as per the below image.

Here the agents can perform various activities like –
ACTION:
Here, the agent can easily change the ticket status, type, priority, group, and agent and can even delete the ticket. For this first, select the tickets that the agent wants to update.

Then, click on Action and select the action type from the drop-down that the agent wants to perform on the selected tickets. After submitting the selected action, the ticket gets updated.
CREATE TICKET:
Here, the agent can create new tickets on behalf of customers. For this, the agent needs to click on the Create Ticket button as per the below image.

Clicking on Create Ticket button navigates the agent to the New Ticket page as per the below image.

Here, the agent will enter the ticket details like-
- Customer Name: enter the customer name on whose behalf the agent will be creating the ticket.
- Email: Enter the customer’s email address.
- Type: The admin can select the ticket type from the dropdown.
- Priority: The admin can select the priority based on the available options in the dropdown.
- Group: The admin can assign the group to the ticket as per the available options in the dropdown.
- Status: The admin can assign the status of the ticket as per the available options in the dropdown.
- Subject: Enter the subject of the ticket.
- Query: Enter the customer query.
- File Upload: If the admin is having any relevant files as well with the queries then the admin can also upload the same.
And lastly, save the ticket details by clicking the Save Ticket button.
MERGE TICKETS:
The agent can even merge multiple tickets. For this first, select the tickets that the agent wants to merge.

Then, click on the Merge button, and a pop-up will appear.

While merging the multiple tickets and one ticket will be set as the primary ticket which the agent can even change as per the choice.
For changing the primary ticket, simply check the checkbox of the ticket which the agent wants to set as the primary ticket. The agent can also remove the ticket from merging by clicking the blue cross button.
And lastly, click on the Merge button to merge the tickets.
VIEW/REPLY TICKET:
The agent will click on the View/Reply link to view or add a reply to the ticket.

Here, the agent can-
- Reply: reply tickets from this screen.
- Add cc/bcc: add cc bcc recipients if enabled from the backend option.
- Forward: forward the ticket by clicking on the forward button and the ticket content will appear in the reply text field.
- Ticket note: This ticket note can be added by the one who will be working on the ticket. Admin/Agent can add a note for future reference.
- Ticket tags: This ticket tag can be added by the one who is working on the ticket. Tags help the Agent/Admin to search the tickets in the future using filters.
- Lock view: This feature indicates one or more agent is viewing that particular ticket. If only one agent is viewing that ticket then the marker will be blue and if more than 1 agent is viewing that ticket then the marker will turn red and show a pop-up with the name of the other agent working on that ticket.

- Add a note: add an internal note to the ticket which will be visible to the agents only.
- Mark spam: mark the ticket as spam by clicking the mark spam button.
- Delete: delete the ticket by clicking on the delete button.
- Response: choose a response from the list of responses that have been made earlier on the ticket. The response will include various actions like-Group update, Priority update, reply added, etc so that it will be easy for the agents to add a response to a ticket.

- Split: break the single ticket into multiple tickets if a ticket is too big to manage.

Ticket Type
The agent can manage and add multiple new ticket types.

Here, the agent can:
- View the complete list of existing ticket types.
- Edit any ticket type by clicking on the Edit link.
- Update the Status or Delete any ticket type from the Action drop-down list.
- Add a new ticket type by clicking on the Add-Type button.
For adding the new ticket type, the agent will click on the Add Type button. This will navigate the agent to the “Ticket Type” page as per the below image.

Here, the agent will:
- Name: enter the name of the ticket type.
- Description: enter the description of the new ticket type.
- Status: set the status as enable/disable of ticket type.
And lastly, click on the Save button to create the new ticket type successfully.
Ticket Status
The agent can manage and add multiple new ticket statuses.

Here, the agent can:
- View the complete list of existing tickets’ status.
- Edit any ticket status by clicking on the Edit link.
- Update the Status or Delete any ticket status from the Action drop-down list.
- Add new ticket status by clicking on the Add Status button.
For adding the new ticket status, the agent will click on the Add Status button. This will navigate the agent to the “Add Status” page as per the below image.

Here, the agent will:
- Name: enter the name of the ticket status.
- Description: enter the description of the new ticket status.
- Status: set the status as enable/disable the ticket status.
And lastly, click on the Save button to create the new ticket status successfully.
Ticket Priority
The agent can manage and add multiple new ticket priority types.

Here, the agent can:
- View the complete list of existing ticket priority types.
- Edit any ticket priority type by clicking on the Edit link.
- Update the Status or Delete any ticket priority type from the Action drop-down list.
- Add a new ticket priority type by clicking on the Add Status button.
For adding the new ticket priority type, the agent will click on the Add Priority button. This will navigate the agent to the “Add Priority” page as per the below image.

Here, the agent will:
- Name: enter the name of the ticket priority.
- Description: enter the description of the new ticket priority.
- Status: set the status as enable/disable of the ticket priority.
And lastly, click on the Save button to create the new ticket priority type successfully.
Ticket Custom Attribute
The agent can add a ticket custom attribute to get additional data & information about the ticket from the customers. So, the agent can manage and add any number of custom attributes.

Here, the agent can:
- View the complete list of existing ticket custom attributes.
- Edit any custom attribute by clicking on the Edit link.
- Manage the visibility of the custom attribute in the ticket or Delete any custom attribute from the Action drop-down list.
- Add new custom attributes by clicking on the Add Attribute button.
For adding the new custom attribute, the agent will click on the Add Attribute button. This will navigate the agent to the “Add Attribute” page as per the below image.

Here, the agent will:
- Default Label: enter the name of the new custom attribute.
- Attribute code: enter a code to the custom attribute. This code will be unique and can’t be changed further.
- Field dependency: create the custom attribute as the dependable field in the ticket. For this, simply select the parent field on which the custom attribute will be dependent.
During a dependable field, if the customer chooses an option and on the selection of an option, another field will open up. If the agent doesn’t want to show it as a dependable field then just have to leave it blank. - Input type: select the input type of the field.
- Values required: select YES to make this field mandatory and hence the values are required. Else select NO.
- Input validation: make validation to the data entered for the custom attribute.
- Status: set the status as enable/ disable of the custom attribute.
- Manage Options: create the options for the custom attribute if the Input type is selected as “drop-down” and “multi-select”.
And lastly, click on the Save button to create the new custom attribute successfully.
Manage Tags
Under this section, the agent can manage the multiple tags used in the ticket.

Here, the agent can:
- View the complete list of the tags the agent has used or created in the ticket.
- Delete the tags from the Action drop-down list. If a tag is deleted from here, then that tag will get removed automatically from the ticket it was used for. So, will no longer be visible in the ticket.
Agents
The helpdesk system allows you to manage and add multiple agents. These agents reply to the tickets assigned to them and in this way, one can manage a large number of tickets.

Here, the admin can:
- View the complete list of existing agents.
- Edit any agent details by clicking on the Edit link.
- Add a new agent by clicking on the Add Agent button.
For adding the new agent, the admin will click on the Add Agent button. This will navigate the admin to the “Add Agent” page as per the below image.

Here, the admin will:
Account Information
- Username: enter the username of the new agent account.
- First Name: enter the first name of the agent.
- Last Name: enter the last name of the agent.
- E-mail: enter the e-mail address of the agent.
- Password: set the password for the agent account.
- Password Confirmation: re-enter the set password to confirm it.
- Level: set the agent expertise level for managing the tickets like the expert, average, below average, etc.
- This account is: set the agent account as active or inactive.
- Time Zone: set the time zone.
- Signature: configure the agent signature which will be visible in the ticket replies.
- Agent Group: configure the agent group.
- Ticket Scope: define the ticket access scope for the agent.

Global access: In this, the agent will be able to access all the tickets of the helpdesk and can reply to or edit any ticket.
Group access: In this agent has access to the tickets of every agent in a particular group. The agent can reply and edit any ticket of that particular group.
Restricted access: The agents cannot access any ticket.
Current User Identity Verification
- Your Password: the agent who is creating the new agent needs to enter his own account password to confirm the identity.
After defining the basic information, the agent will select the role type for the new agent so that the agent can access those features only that the role includes.

And lastly, click on the Save button to create the new agent successfully
Agent Level
The agent can manage and add multiple level types for the agent.

Here, the agent can:
- View the complete list of existing level types.
- Edit any level details by clicking on the Edit link.
- Update the Status or Delete any level type from the Action drop-down list.
- Add a new level by clicking on the Add Level button.
For adding the new level type, the agent will click on the Add Level button. This will navigate the agent to the “Add Level” page as per the below image.

Here, the agent will:
- Name: enter the name of the level type.
- Description: enter the description of the new level type.
- Status: set the status as enable/disable of the level type.
And lastly, click on the Save button to create the new level successfully.
Groups
The system allows adding various groups for the tickets and agents. So that agents can see the tickets of their groups and can work on all those tickets. The agent can manage and add multiple groups.

Here, the agent can:
- View the complete list of the existing group.
- Edit any group details by clicking on the Edit link.
- Update the Status or Delete any group from the Action drop-down list.
- Add a new group by clicking on the Add Group button.
For adding the new group, the agent will click on the Add Group button. This will navigate the agent to the “Add Group” page as per the below image.

Here, the agent will:
- Name: enter the name of the group.
- Description: enter the description of the new group.
- Status: set the status as enable/disable of the group.
And lastly, click on the Save button to create the new group successfully.
Customer
The agent can manage and add new customers.

Here, the agent can:
- View the complete list of the helpdesk customers who have created the tickets.
- Edit any customer details by clicking on the Edit link.
- Delete any customer from the Action drop-down list.
- Add a new customer by clicking on the Add Customer button.
For adding a new customer, the agent will click on the Add Customer button. This will navigate the agent to the “Add Customer” page as per the below image.

Here, the agent will:
- Customer Name: enter the name of the customer.
- Email: enter the email address of the customer.
- Select Customer: select the Magento customer with whom the agent wants to map the new customer. This will merge the data of Adobe Commerce Cloud store customers with the Helpdesk customer.
- Select Organizations: select the organization to put the customer in that organization.
And lastly, click on the Save button to create a new customer successfully.
Organization
The agent can manage and add multiple organizations for the customers.

Here, the agent can:
- View the complete list of existing organizations.
- Edit any organization details by clicking on the Edit link.
- Delete any organization from the Action drop-down list.
- Add the new organization by clicking on the Add Organization button.
By creating the organizations, the agent can put customers in the different organizations to which they belong. For adding the new organization, the agent will click on the Add Organization button.
This will navigate the agent to the “Add Organization” page as per the below image.

Here, the agent will:
- Name: enter the name of the organization.
- Description: enter the description of the organization.
- Domain: enter the organization URL address.
- Customer: Select the Adobe Commerce customers the agent wants to put in the organization.
- Customer Role: set the status as enable/disable of the organization.
- Groups: select the groups of the organization.
And lastly, click on the Save button to create the new organization successfully.
Business Hours
The agent can manage and add business hours. Using business hours you can customize the work timings based on when you are actually working.
The agent can also set up holidays as exceptions to the business hours set in their schedule.

Here, the agent can:
- View the complete list of the existing Business Hours.
- Edit any Business Hours details by clicking on the Edit link.
- Delete any Business Hours from the Action drop-down list.
- Add Business Hours by clicking on the Add Business Hour button.
For adding the new Business Hour, the agent will click on the Add Business Hour button. This will navigate the agent to the “Add Business Hour” page as per the below image.

Here, the agent will:
Business Hour Info
- Name: enter the name of the Business Hour.
- Description: enter the description of the Business Hour.
- Timezone: set the timezone for your business hours.
Helpdesk Hours
After adding the basic info on the business hours, the agent will add the actual working hours as per the below image.

In this, the agent can define the working/non-working hours and also set working and non-working days. These details will be very much helpful for making and implementing SLAs.
Yearly Holiday List
After defining the helpdesk hours, the agent can also add a holiday list for the whole year.

And lastly, click on the Save button to create the new Business Hour successfully.
Events And Triggers
Events are the activities that are performed on the helpdesk system by either customer or the agent. Whereas triggers contain conditions and actions which are executed in response to the events that occurred.
The agent can define triggers like modifying the status, changing priorities, and even sending out notification alerts as soon as certain event conditions are met. For example, a trigger-send mail to the customer can be set when a ticket status will be changed to close by the agent.

Here, the agent can:
- View the complete list of the existing events.
- Edit any event details by clicking on the Edit link.
- Delete any events from the Action drop-down list.
- Add events by clicking on the Add Event button.
Add Event:
For adding the new event, the agent will click on the Add Event button. This will navigate the agent to the “Add Event” page as per the below image.

Here, the agent will:
- Name: enter the name of the event.
- Description: enter the description of the event.
- Status: set the status as enable/disable of the event.
After configuring the basic details of the events, the agent will define the action which will be triggered in response to the event occurring.

Here, the agent will-
- Events: select an event for which you want to trigger an action in response to the helpdesk system.
- At least one condition for events & triggers to apply: select conditions for the action to be executed. This is based on the “OR Operator” concept means at least one condition needs to be met to trigger the action.
- All conditions for events & triggers: select conditions for the action to be executed. This is based on the “AND Operator” concept means all the conditions need to be met to trigger the action.
- Action: define the various activities which will get executed when the specified condition meets.
And lastly, click on the Save button to create the new Event & Trigger successfully.
Note:
- In a single event, only one condition type will work at a time either At least one condition for events & triggers or All conditions for events & triggers.
- In a single event, if both conditions are defined. Then, it will first check At least one condition type and if met, it will execute the action. And if not met, it will then check the All condition type.
Example:
The admin has made an event – reply over the ticket as per the below image.

This is will trigger the action and the customers will get notified about the reply in their mailbox.

Responses
The agent can manage and add multiple responses.

Here, the agent can:
- View the complete list of the existing responses.
- Edit any response details by clicking on the Edit link.
- Delete any response from the Action drop-down list.
- Add a response by clicking on the Add Response button.
For adding the new response, the agent will click on the Add Response button. This will navigate the agent to the “Add Response” page as per the below image.

Here, the agent will:
- Name: enter the name of the response.
- Description: enter the description of the response.
- Can Use: specify who can use this response.
- Status: set the status as enable/disable the response.
After configuring the basic details of the response, the agent will define the action which will be implemented as a response.

Here, the agent will:
- Select the action from the drop-down list i.e by using this response what action will be performed in the ticket.
For example, the agent has created a response saying “Update Status” which defined the action “set priority as high”. Then by choosing that response on the “edit ticket” page, it will work as per the configured action. - Can even add multiple actions by clicking on Add Action button.
- Also, add variables in the actions by clicking on the Insert Variable button.
And lastly, click on the Save button to create the new Response successfully.
Manage SLA Policies
The agent must make a Service Level Agreement (SLA) policy to create targets for the tickets that need more attention and need to be resolved as soon as possible. For this, the agent can manage and add multiple SLA policies.

Here, the agent can:
- View the complete list of the existing SLA.
- Edit any SLA policy details by clicking on the Edit link.
- Delete any SLA policy from the Action drop-down list.
- Add SLA policy by clicking on the Add Item button.
SLA policies will specify when the customers can expect a response and resolution from you after submitting the support request.
It lets you set the standards of performance the support team will deliver. Also, can set SLA policies for the time within which agents should respond and resolve tickets. And can even define automatic escalation rules to notify concerned agents about SLA violations.
For adding the new SLA policy, the agent will click on the Add Item button. This will navigate the agent to the “Add Event” page as per the below image.

Here, the agent will:
SLA Policy
- Name: enter the name of the policy.
- Description: enter the description of the policy.
- Sort Order: specify the sort order of the policy.
SLA Targets
After configuring the basic details of the SLA policy, the agent will define the SLA targets.

Here, the agents can make the targets for the SLA. And set the response and resolution time for the ticket based on ticket priority. So a specific time limit will be set for every type of ticket.
Conditions for SLA
After defining the targets, the agent will set the conditions for the SLA.

Here, the agent will configure the conditions for which the SLA will work for the helpdesk-
- At least one condition for SLA to apply: select conditions for the action to be executed. This is based on the “OR Operator” concept means at least one condition needs to be met to trigger the action.
- All conditions for SLA: select conditions for the action to be executed. This is based on the “AND Operator” concept means all the conditions need to be met to trigger the action.
And lastly, click on the Save button to create the new SLA policy successfully.
Note:
- In the single SLA policy, only one condition type will work at a time either At least one condition for SLA or All conditions for SLA.
- In the single SLA policy, if both conditions are defined. Then, it will first check At least one condition type and if met, it will execute the action. And if not met, it will then check the All condition type.
Support Center
In this, the agent will manage the information for the customer so that commonly asked queries can be solved without creating a ticket. The agent can manage and create multiple support centers.

Here, the agent can:
- View the complete list of the existing support center.
- Edit any support center details by clicking on the Edit link.
- Update the Status or Delete any support center from the Action drop-down list.
- Add a new support center by clicking on the Add Item button.
For adding the new support center, the agent will click on the Add GroupItem button. This will navigate the agent to the “Add Support Center” page as per the below image.

In the support center, the agent will create some predefined questions and their answers. So that whenever a customer has a query or needs support, they will read the solutions from these support center templates.
Here, the admin will:
- Support Center Name: enter the name of the support center.
- Description: enter the description of the support center.
- CMS Page: select the CMS pages where this information will display.
- Status: set the status as enable/disable of the support center.
And lastly, click on the Save button to create the new support center successfully.
Email Templates
The agent can manage and add multiple email templates that they can use in the helpdesk system.

Here, the agent can:
- View the complete list of the existing mail templates.
- Edit any mail template details by clicking on the Edit link.
- Preview any mail template by clicking on the Preview link.
- Add a new template by clicking on the Add New Template button.
For adding the new template, the agent will click on the Add New Template button. This will navigate the agent to the “Template Information” page as per the below image.

Here, the admin will:
- Name: enter the name of the template.
- Subject: enter the subject of the mail.
- Content: enter the content of the mail. And can even insert mail keywords in the subject and body of the mail template by clicking on the Insert Variable button.
- Styles: add style to display the template.
And lastly, click on the Save button to create the new mail template successfully.
Connect Email(s)
Email is a medium for customers to submit tickets to the Helpdesk and has conversations with agents to resolve their issues. In the helpdesk system, the agent can even connect mail.
For example: when a customer sends a mail to an email address, a ticket gets created in the Helpdesk System automatically. Or if an agent updates the ticket, a notification email is sent to the customer automatically from the configured email id.
Webkul helpdesk system is the one and only helpdesk system in the world that provides an email piping feature which means your customer can reply directly from their email and they don’t need to log in to the ticket system.

Here, the agent can:
- View the complete list of the connect emails.
- Update the Status or Delete any connect mail by clicking on the Action drop-down list.
- Edit any connect mail by clicking on the Edit link.
- Add new connect mail by clicking on the Add Item button.
For adding the new connect mail, the agent will click on the Add Item button. This will navigate the agent to the “Connect Mail Information” page as per the below image.

Here, the admin will:
Connect Email Info
- Name: enter the name of the mail.
- Description: enter the subject mail.
- Email: enter the email id which will be configured further for Email piping.
- Status: set status as enable/disable of the mail.
IMAP/POP Configuration

- Username: enter the username of the email. For example- Your full email address ([email protected]).
- Password: enter the password of the above account.
- Host Name: enter the hostname of your mail provider.
- Port: enter the port number of the email.
- Mailbox: enter the name of the mailbox.
- Protocol: Select the protocol which you want to select – IMAP/POP.POP and IMAP are protocols that allow you to download messages from (Gmail, Yahoo, and Hotmail) servers onto your computer. So that you can access your mail with programs like Microsoft Outlook or Thunderbird even when you aren’t connected to the Internet.
- Fetch Email(no.): set no. of emails to be fetched.
- Helpdesk Action: set the action to be taken for the fetched emails.
- Move Email(s): define the name of the folder if the selected action for Helpdesk Action is Create Folder.
Note: This information has to be filled in to configure the Email piping.
Email services setting for Gmail:
If you are using Gmail then you have to enter imap.gmail.com as the hostname, and 993 as a port. To check more details visit https://support.google.com/mail/troubleshooter/1668960?hl=en
For configuring IMAP

For configuring the POP
- Sign in to your Gmail account.
- Click the gear in the top right.
- Select settings.
- Click Forwarding and POP/IMAP.
- Select Enable POP for all mail or Enable POP for mail that arrives from now on.
- Choose what to do with your messages after your POP client or device receives them.
- Click save changes.
Email settings for Yahoo:
For configuring the IMAP and POP.

Email service setting for Hotmail:
For configuring IMAP and POP

Default Values of the Ticket
Then, the agent needs to set the default values(group, type, and priority) for those tickets which are created through emails.

And lastly, click on the Save button to create the new connect mail successfully.
Note: Manual and Automatic mail fetching
After saving the connecting mail successfully, the agent can view a new option Fetch Mail as per the below screenshot.
The agent can click the Fetch Mail option to fetch emails manually. Else can set the cron to automatically fetch the mail.
Activity
Under this section, an activity list will be displayed. The list will show all the activities performed in the helpdesk so the agent can see all activities.

And can even delete various activities from the list by clicking on the Action drop-down list.
Customer Report Summary
Under this section, the customer report is visible. The customer report is the summary of the customer’s total ticket, resolve time, first response time, and average resolve time is visible.

Agent Report Summary
Under this section, the agent report will be visible. The agent report is the summary of the agent’s total ticket, resolve time, first response time, and average resolve time will be visible.

Front-End
In this front end, the customer and store visitor both can see the Support Center section.
LOGGED-IN-CUSTOMER OR GUEST USER
Logged-in customers and the guest user will be able to see the Support Center section.

Clicking the Support Center section will display the solutions to the most common queries and issues the customers get encountered so that they don’t need to generate any tickets.

And if the customer doesn’t find the solution to their queries from the support center, they can generate a ticket.
Customer generate support ticket
For this, they simply click the Ticket(s) drop-down list followed by clicking the Generate Ticket submenu option.

Clicking the Generate Ticket submenu option will navigate the customers to a page where they can create the ticket as per the below image.
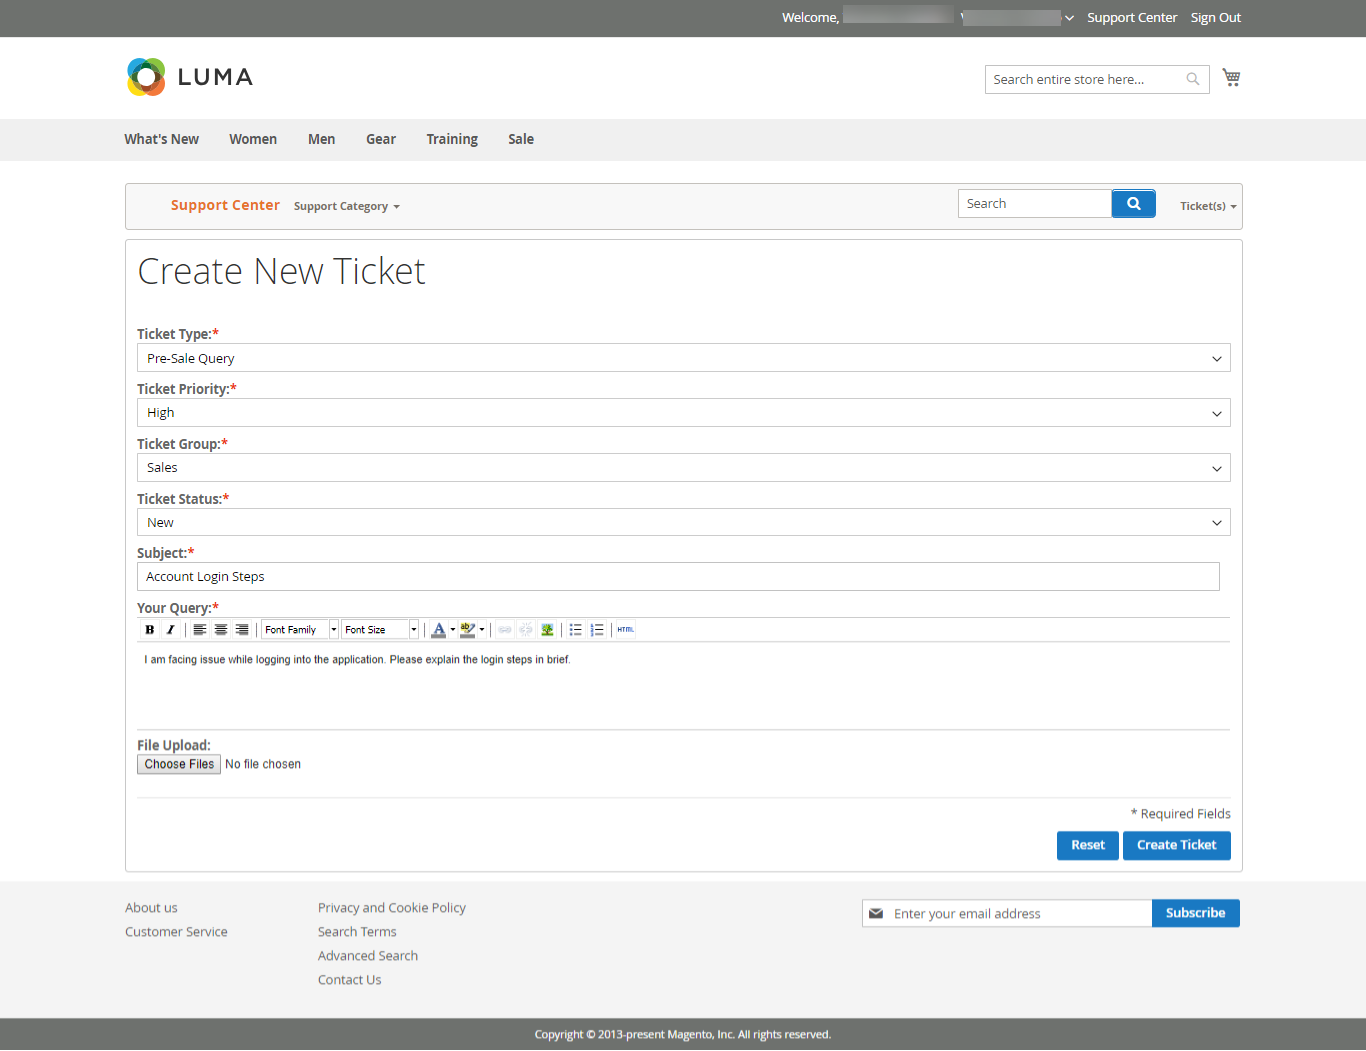
Here, the customer can:
- Type: select the ticket type.
- Priority: select the ticket priority.
- Group: select the ticket group.
- Status: select the ticket status.
- Subject: select the subject of the query.
- Your Query: enter the complete query.
- File Upload: Upload the attachments if required.
And lastly hit the Create Ticket button to generate the ticket successfully. This will navigate the customer to the tickets list page as per the below image.

Here, the success message with the ticket id will be displayed and the ticket list of the customer will be visible. The customer can:
- Sort the ticket list based on ticket id, subject, type, priority, status, and date added.
- Filter the ticket based on priority and status.
- Clear the filter used.
- Delete the tickets as per your choice.
- View the complete details of the ticket and its status.
To view the complete ticket, click the view button.

Here, the customer can view the complete details of the tickets. And can even delete the ticket threads if allowed from the admin backend.
Manage Ticket
To navigate to the ticket list page to view the ticket status simply click on the Ticket(s) drop-down list followed by clicking the Generate Ticket submenu option as per the below image.

Clicking the Ticket(s) Status submenu option will navigate the customers to a page where they can check the ticket status as per the below image.

GUEST USERS
The guest users can see the Support Center section. This will display the solutions to the most common queries and issues the customers are facing so that they don’t need to generate any tickets.

And if the customer doesn’t find the solution to their queries from the support center, they can generate a ticket. For this, they simply click the Ticket(s) drop-down list followed by clicking the Generate Ticket submenu option.

Clicking the Generate Ticket submenu option will navigate the customers to a page where they can create the ticket as per the below image.
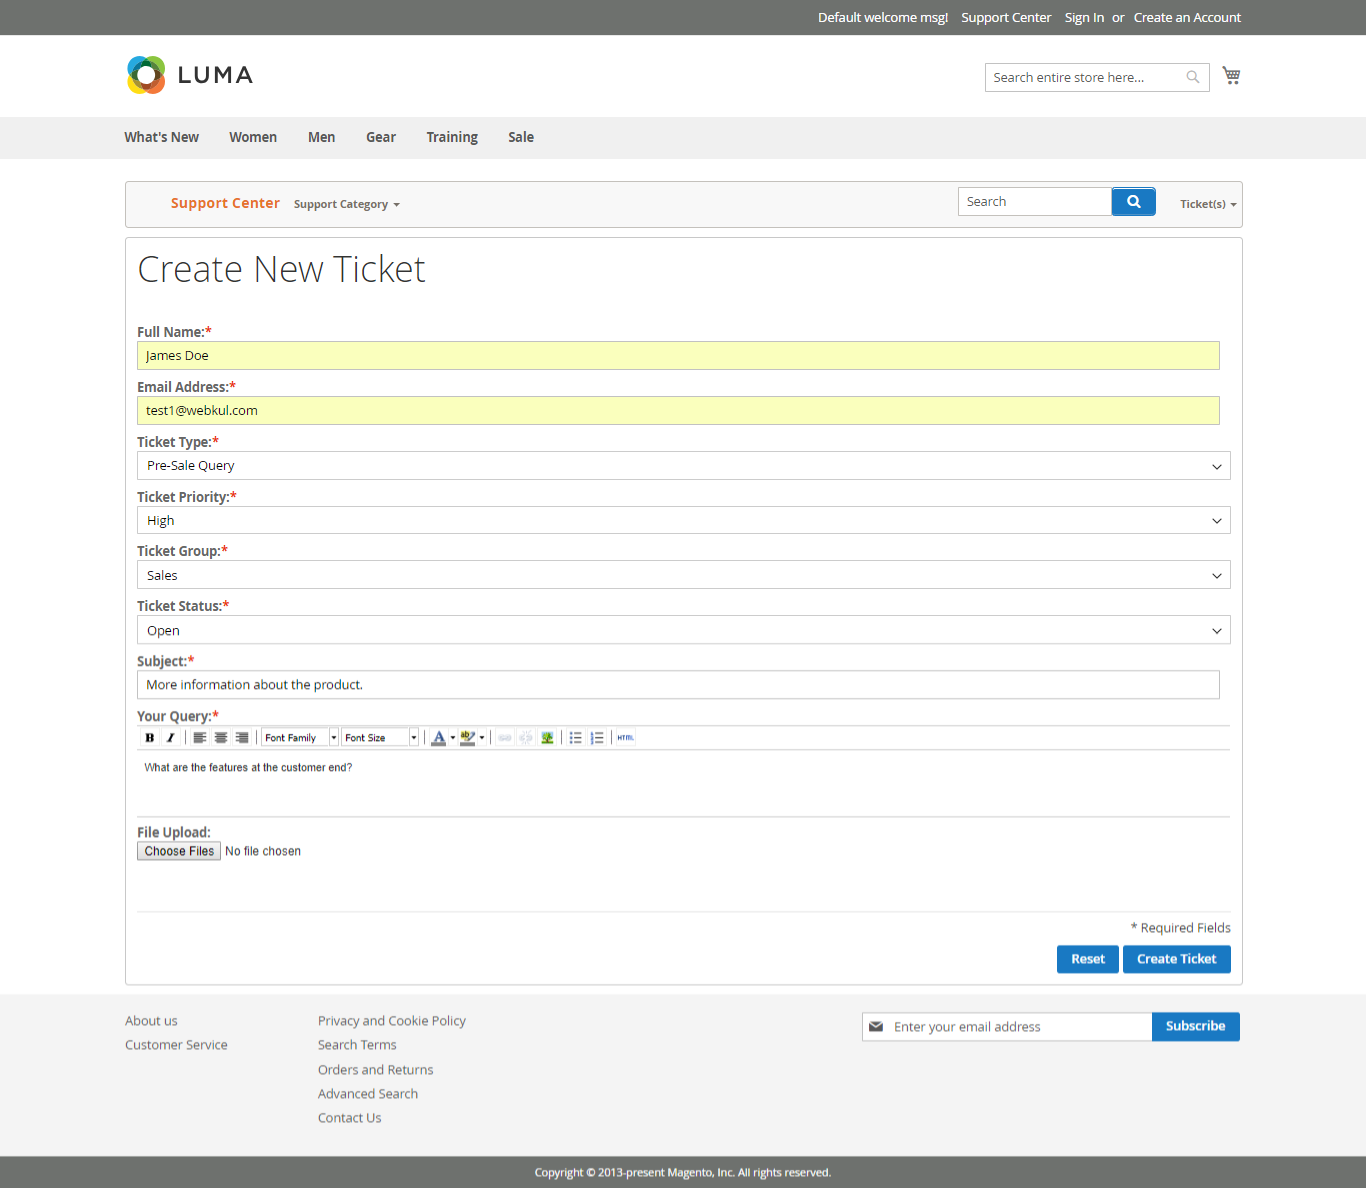
Here, the customer can:
- Name: enter the name.
- Email Address: enter the email address at which the customer will be notified about the ticket activities.
- Type: select the ticket type.
- Priority: select the ticket priority.
- Group: select the ticket group.
- Status: Select the ticket status.
- Subject: select the subject of the query.
- Your Query: enter the complete query.
- File Upload: Upload the attachments if required.
And lastly hit the Create Ticket button to generate the ticket successfully, furthermore it will display the success message as shown in the below image.

After creating the ticket, the customers can even check their ticket status by feeding the email address which they have provided while creating the ticket and the ticket id followed by hitting the Continue button.
The customers can also check the status of their previously created tickets. For this, they simply click the Ticket(s) drop-down list followed by clicking the Ticket(s) Status submenu option.

Ticket Status:
Clicking the Ticket(s) Status submenu option will navigate the customers to a page and on that page, they can check the ticket status as per the below image.

Here, the customers will feed the email address which they have provided while creating the ticket and the ticket id followed by hitting the Continue button. This will display the helpdesk ticket view screen as per the below image.
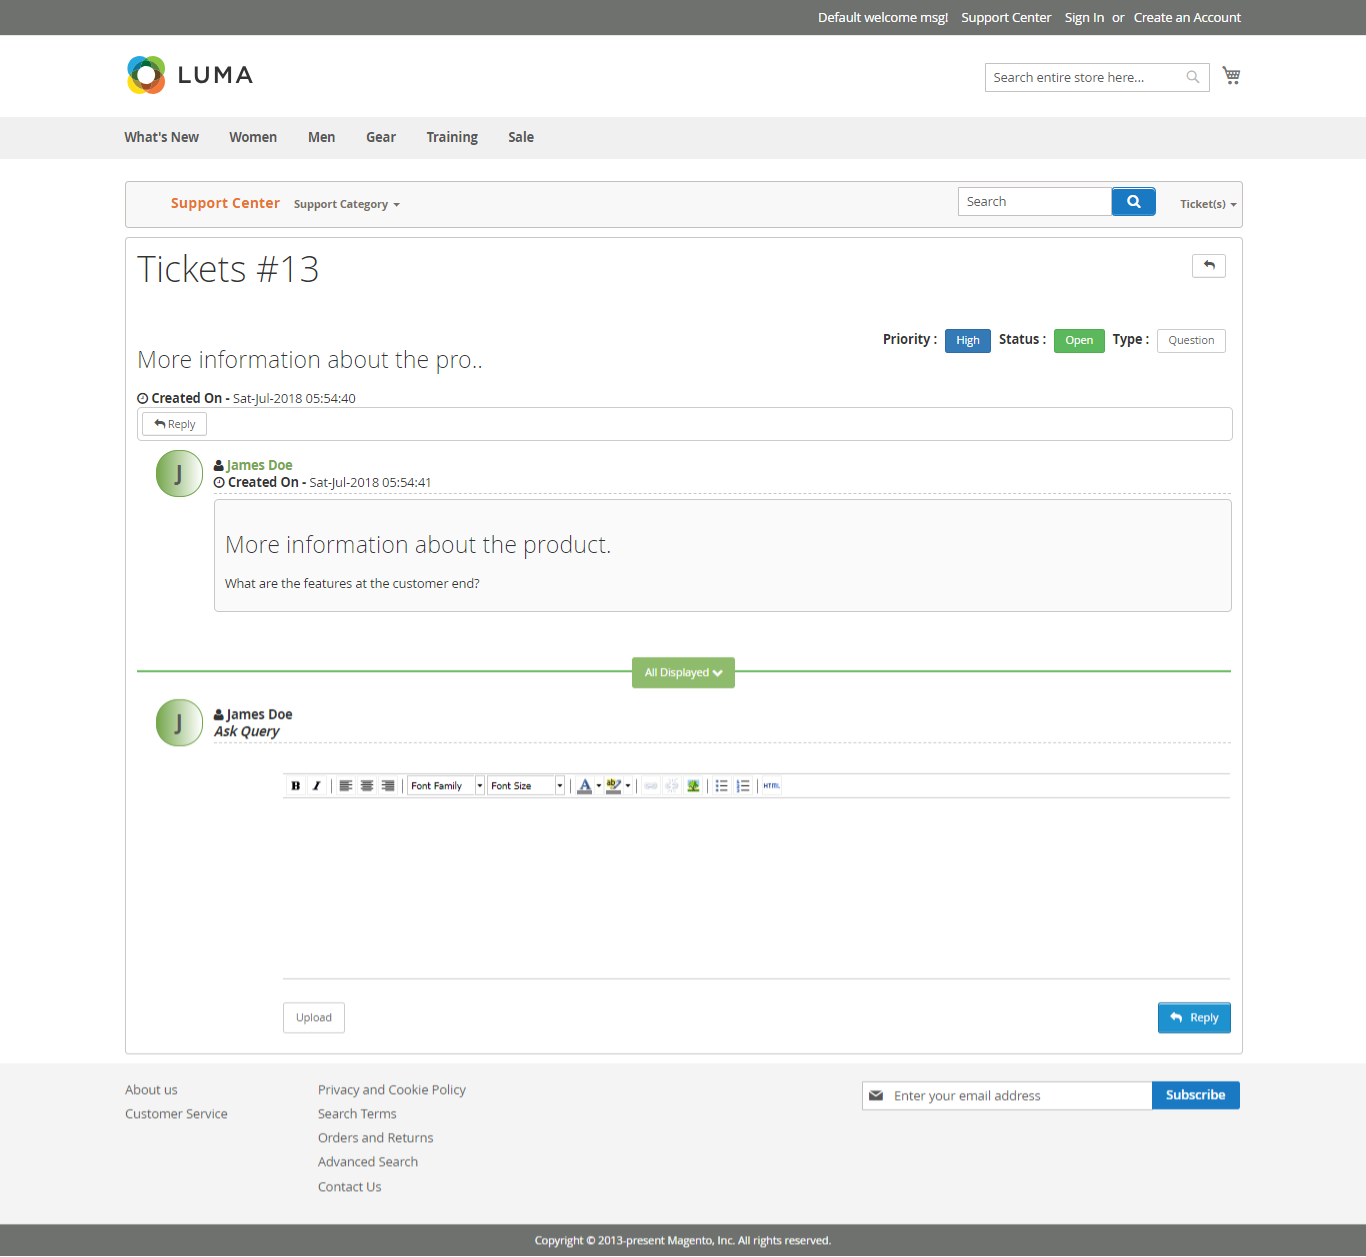
Here the customer can reply to the ticket and can also see the previous replies.
Additionally, to keep your HelpDesk extension running smoothly and securely, Webkul offers comprehensive Magento 2 support services, including 24/7 technical assistance, performance optimization, and regular security patches. You may also check our quality Magento 2 Extensions.
Support
That’s all for the Magento 2 Helpdesk Extension. Still, have any issues, feel free to add a ticket at webkul.uvdesk.com
Current Product Version - 5.0.3
Supported Framework Version - Magento 2.0.x, 2.1.x, 2.2.x,2.3.x, 2.4.x

2 comments
Thanks for the Appreciation. In case any further queries regarding the module, please drop us a mail at [email protected] and we will for sure assist you. Thanks