Introduction
Magento 2 Delivery Date extension allow the customers to choose the preferred date and time for their orders.
With the help of Magento 2 Delivery Date and Time extension, the admin can create multiple delivery slots for each day of the week and specify the maximum order quota for each slot.
Watch the video tutorial below to know how to set up the extension:
Watch how Adobe Commerce Delivery Date and Time works:
Features
- Enable or disable the module
- The admin can select the available days for the delivery
- Mention how many days to display to the customer
- Set minimum order time required for order processing
- Display error when no delivery slot is available
- The admin can create and edit multiple slots for each day of the week
- The admin can set the order quotas for each slot for better management
- View all the orders received for the delivery slot
- Delivery information appears in the sales order and email
- Delivery information is visible on PDF documents – invoice, shipping slip, and credit memo
- Magento 2 Delivery Date extension supports multiple-languages translations
- Source code is 100% open for customization
- GraphQL is implemented for the extension.
- Magento 2 Delivery Date and Time extension is compatible with the Hyva Theme.
Installation
Step 1 – Upload Folder
After downloading the module zip file, extract the contents and go to src folder. Then, upload app folder to the root directory of the Magento installation.

Step 2 – Run Commands
In the root directory of Adobe Commerce installation, run the following commands on the terminal.
php bin/magento setup:upgrade
php bin/magento setup:di:compile
php bin/magento setup:static-content:deploy
php bin/magento indexer:reindex
php bin/magento cache:flush
Multi-Language Support
The extension supports multiple languages translations, to do that first go to Stores>Configuration>General >Locale Options.
Then, select your desired region and language from the Locale drop-down menu. For example – German (Germany)
Now, you need to translate the module language by editing the language CSV file. Go to app/code/Webkul/TimeSlotDelivery/i18n. Open the en_US.csv file and edit the words on the right.
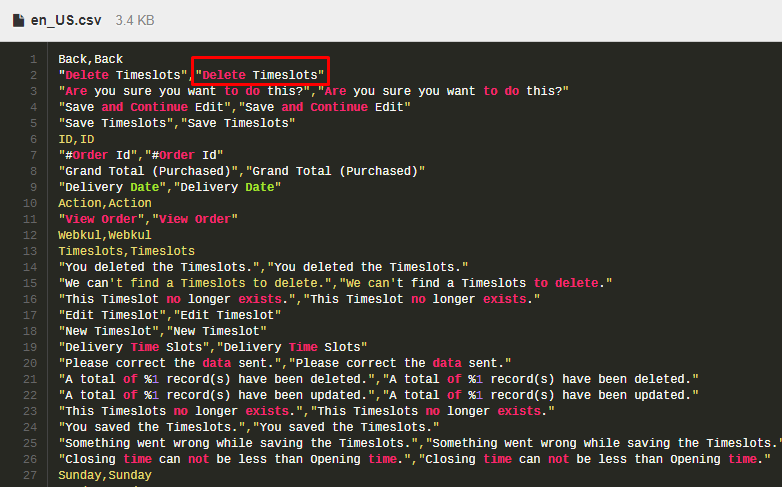
After editing the language CSV file, copy the new translated file to the same location – app/code/Webkul/TimeSlotDelivery/i18n.
Please make sure you change the filename according to your language code and region. For example – de_DE.csv
Module Configuration
For doing the module configuration, please follow Stores>Configuration>Webkul>Delivery Time Slots. The following settings will be available:
Enable – Select Yes to enable Adobe Commerce Delivery Date and Time extension. To disable this module, select No.
Allowed Days for Delivery – Select which days of the week, and the customer can choose the delivery day. The day(s) which are not selected will not appear on the front end.
Display Total Number of Days – Enter how many dates should be displayed to the customers for choosing the delivery slot.
Minimum Time Required in Order Process – The admin can set the buffer time (in days) for the delivery slots.
For example – If 2 is entered here and the customer is placing the order on Monday, the customer will see the available slots from Wednesday onwards.
Delivery Slot Not Available Error – Enter error message content for the frontend, when no delivery slots are available.
Delivery Slots Frontend Layout – Allows admin to choose a suitable layout from the grid for the storefront.
Three types of layout are available Dropdown Type Select, Chip Type Selection, and Box Type Selection.

Manage Delivery Slots
Once the admin completes the module configuration, the admin can manage the delivery time slots by following Delivery Time Slots>Manage Delivery Time Slots. The following page will appear.
Follow the steps:
- First, click the Add New Slot button to add a new delivery slot.
- Select the delivery day and mention the start time and end time.
- Set the Quotas for the slot. Mention how many orders can be processed for this slot.
- Set the status as Enabled and click Save Time Slots buttons.
You can Add, Edit, or Remove any number of delivery slots as per your requirements.

Furthermore, the admin can add the timeslot selection as per the zip codes.

They will navigate through Delivery Time Slots>Magento Delivery Zip Codes to add the time slots for zip codes.

The below screenshot will display to the admin by clicking on Add New Zip Code.

Here, the admin needs to enter the details for zip from, zip to, enable the status, and select the timeslots which he wants to add.
Now by clicking on the Save button and the new zip code will get added.
The admin can also add the time slots for the orders created manually from the admin backend panel.
To do so, the admin will navigate through Sales->Orders->Create New Order.
After that, the admin can choose the shipping and delivery time slot for the order being created.

Customer Front-End
The customers can view the available delivery time slots, and day at the product page by clicking on the Check Delivery Time Slot option.

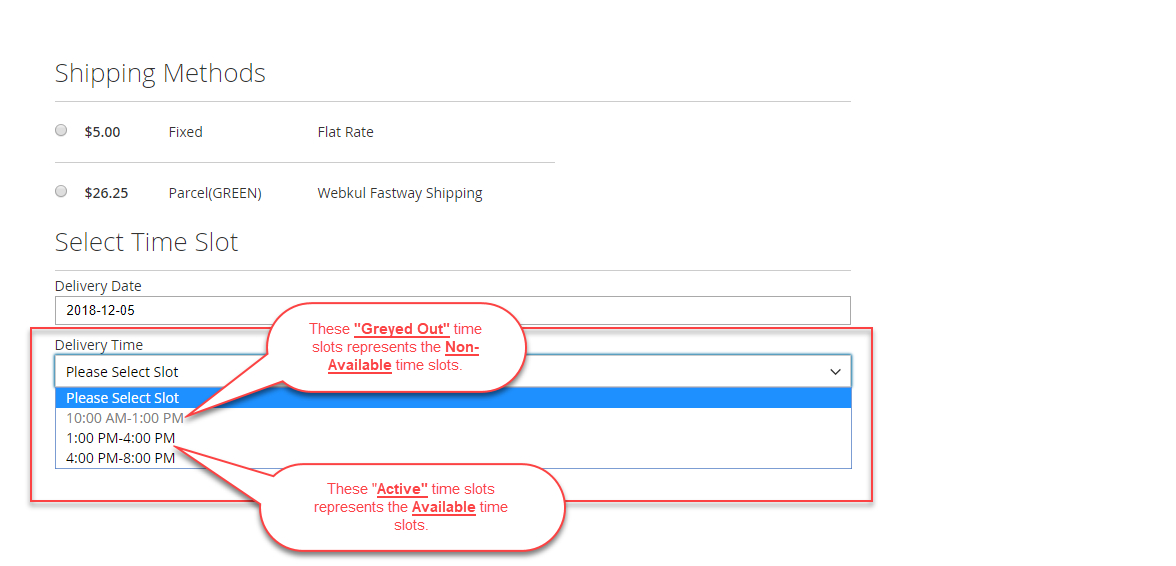
Now, during the checkout process, the customer can easily select the delivery time date and slots as shown below:
When Dropdown Type Layout Selected in Backend

Here, the customer will-
- Select the shipping method available.
- Then, select the Delivery Date from the calendar.
- And finally, select the Time Slot as per convenience.
Delivery Time Slot Selected
Once the delivery slot is selected, the customer will see the selected Delivery Date and Delivery Time on the right.

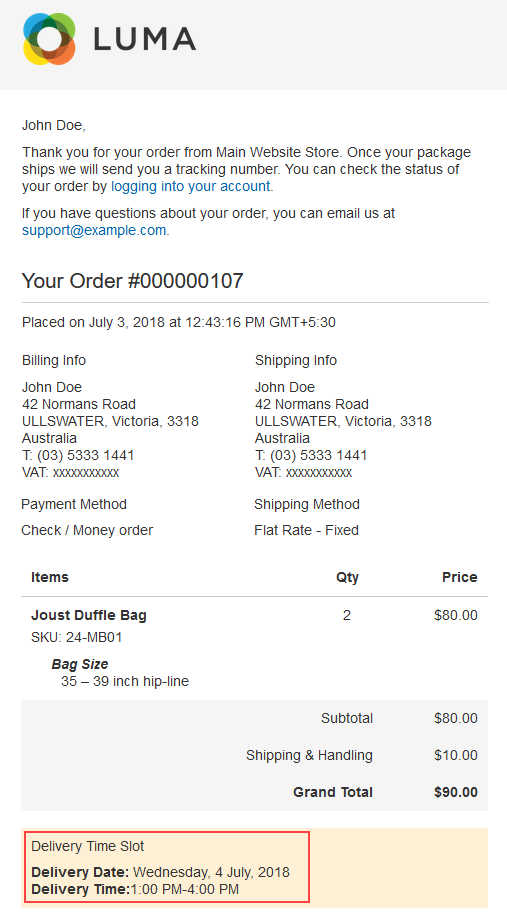
Delivery Information on Email
The same delivery date and time information will also appear on the sales order email to the customer.
Order Details
The customer can also check the delivery information by viewing the order details.

When Chip Type Layout Selected in Backend

The delivery date and time options are also available in the Magento 2 Pathology lab Management extension.
When Box Type Layout Selected in Backend
Similarly, it will display as per the entered zip code on the checkout page once the customer adds the shipping address as per the below image.

ZipCode Validation
The buyers will only be able to see the time slots if they will enter the zip code. If the customer does not enter the zip code then it will display a message as shown below.

The time slots will display in the form of a box on the product page when the customer checks the available time slots by entering the zip code.

Multi-Shipping at Checkout
Customers can now checkout with multiple addresses by selecting the time slots for different addresses.
The customer can see the option for multi-address checkout right below the Proceed to Checkout button as shown below.

The below page will appear by clicking on the Checkout with Multiple Addresses to the customer for selecting multiple addresses.

From here, the buyer will select the address and quantity for the shipping of that product. Now, by clicking on the Go to Shipping Information button the below page will display.

The customer can view the available time slots for the addresses separately from here.
View Slot Orders
The admin can view all the delivery slot orders by going to Delivery Time Slots>Manage Delivery Time Slots>Time Slot Orders. Here the admin can view the chosen delivery date and time for the orders.

View Order
The admin can also view the delivery information on viewing the order information.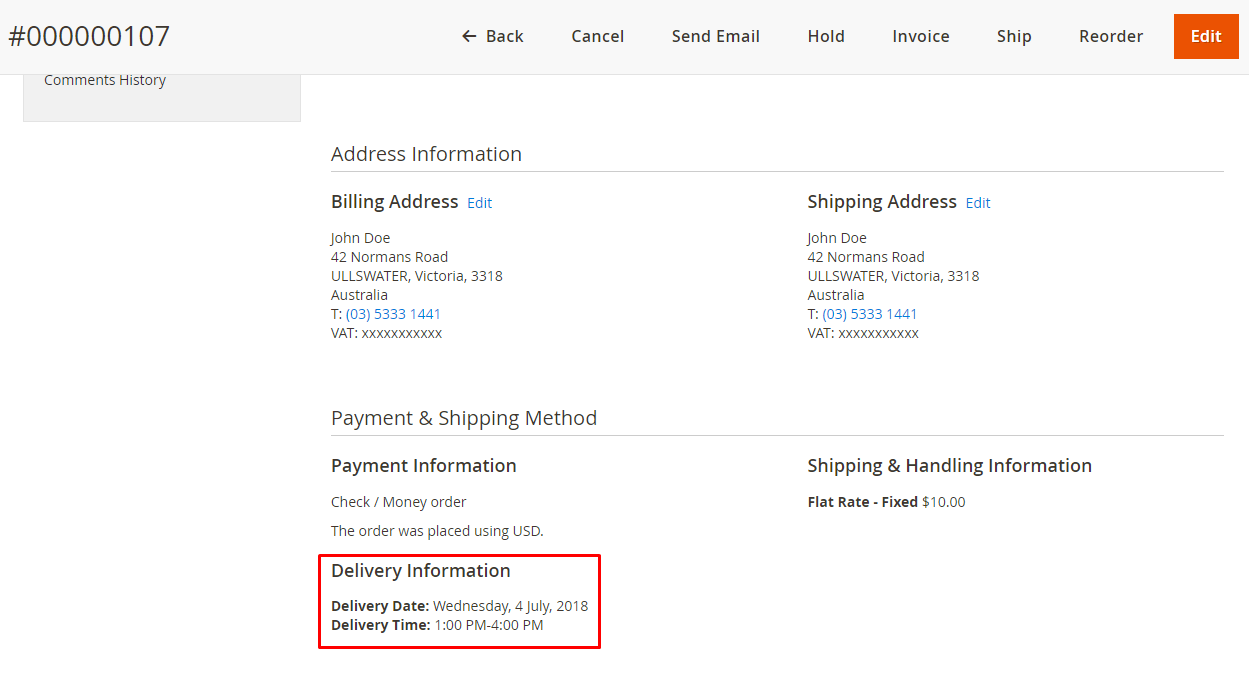
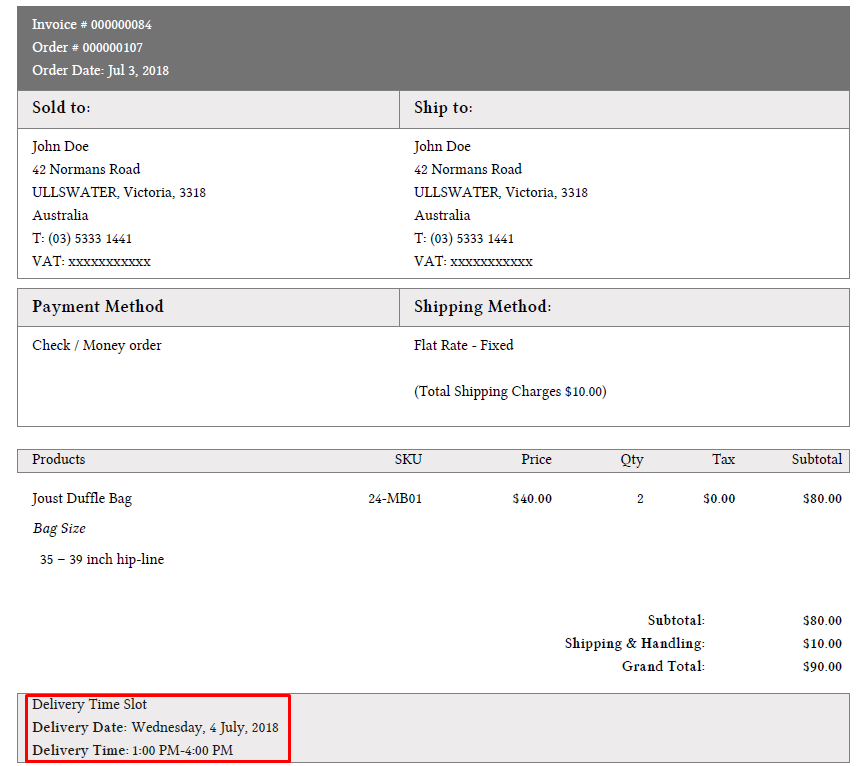
PDF Documents
The selected delivery information also appears for invoices, shipments, and credit memo as well. Check out the following screenshots showing the delivery date and time for the order.
Invoice
Shipping Packing Slip 
Credit Memo 
Support
That is all about the Magento 2 Delivery Date and Time. If you have any queries regarding the plugin, please contact us at Webkul Support System.
Explore the Adobe Commerce Cloud development service by Webkul. You may also browse other Magento 2 marketplace addons. Also our quality Magento 2 extensions.
Current Product Version - 5.0.7-p2
Supported Framework Version - Magento 2.0.x, 2.1.x, 2.2.x,2.3.x, 2.4.x

take the feeds additionally? I am glad to find numerous useful information here within the post, we’d like work out more techniques in this regard,
thanks for sharing.