Magento 2 Cloudflare Turnstile – protects storefront and admin forms from spam, bots, and automated attacks.
It secures customer login, registration, checkout, contact, newsletter, and other forms using Cloudflare’s privacy-focused CAPTCHA solution.
To integrate Cloudflare Turnstile with Magento 2, configure the Site Key and Secret Key in the admin panel.
These keys enable secure communication between Magento and Cloudflare for server-side token verification.
Check the working in the video mentioned below –
Features of Magento 2 Cloudflare Turnstile
- Enable Cloudflare Turnstile on storefront and admin forms.
- Protect customer login, registration, forgot password, account information edit, contact, product review, newsletter, coupon, checkout, and track order forms.
- Support Form Builder and popular third-party form extensions.
- Configure validation rules based on login status, IP addresses, countries, and failure thresholds.
- Monitor verification activity through logs and admin reports.
- Receive digest email and webhook notifications for verification failures.
- Configure form-specific appearance settings, including theme, size, language, labels, and helper text.
- Compatible with multi-store Magento deployments.
- Compatible with the Hyvä theme.
Installation of Magento 2 Cloudflare Turnstile
#1 Download Module
Firstly, you need to log in to Webkul Store, go to My Account>My Purchased Products section, verify and then download and extract the contents of this zip folder on the system.
#2 Upload Folder
Once the module zip is extracted, follow path src>app and then copy the app folder into the Adobe Commerce Cloud root directory on the server as shown below:

#3 Run Commands
After uploading the module folder, you need to run the following commands in the Magento 2 root directory:
php bin/magento setup:upgrade
php bin/magento setup:di:compile
php bin/magento setup:static-content:deploy
php bin/magento indexer:reindex
php bin/magento cache:flush
Language Translation of Magento 2 Cloudflare Turnstile
For translating the module language, navigate through src/app/code/Webkul/CloudflareTurnstile/i18n/en_US.csv and edit the en_US.csv file.
Thereafter, rename the CSV as “en_SA.csv” and translate all right side content after the comma in the Arabic language. After editing the CSV, save it.

Then upload it to the path src/app/code/Webkul/CloudflareTurnstile/i18n where Magento 2 is installed on the server.
The module gets translated into the Arabic Language. It supports both RTL and LTR languages.
The user can edit the CSV like the image below.

How to Get Site and Secret Key – Magento 2 Cloudflare Turnstile
The admin needs to sign up for the Cloudflare account. If they already have one, log in to the Cloudflare dashboard and open the account.

It will navigate you to the dashboard.

Now go to Turnstile.

All added sites will display here, for creating a new one click on add site button and it will navigate to another page.

Here, the admin needs to enter the following details.
Site Name: Add a name for the widget to identify it in the future.
Domain: Enter your website’s hostname or select from your existing websites on Cloudflare.
Widget Type: Select the widget type as managed, non-interactive, or visible.
Once you have entered the site name, domain, and selected the widget type, click the create button.

Upon clicking the create button, you will be redirected to the Turnstile page where you can view:
- Domain
- Visitor Solve Rate
- API Solve Rate
- Selected widget type
- Site key
Click on settings to view the site and secret key.

Configuration of Magento 2 Cloudflare Turnstile
Admin must log in to their Magento 2 admin account, navigate to Stores > Configuration > Cloudflare Turnstile, and enter the details.
API Settings
The API Settings section allows the admin to configure the Cloudflare credentials required for Turnstile integration.
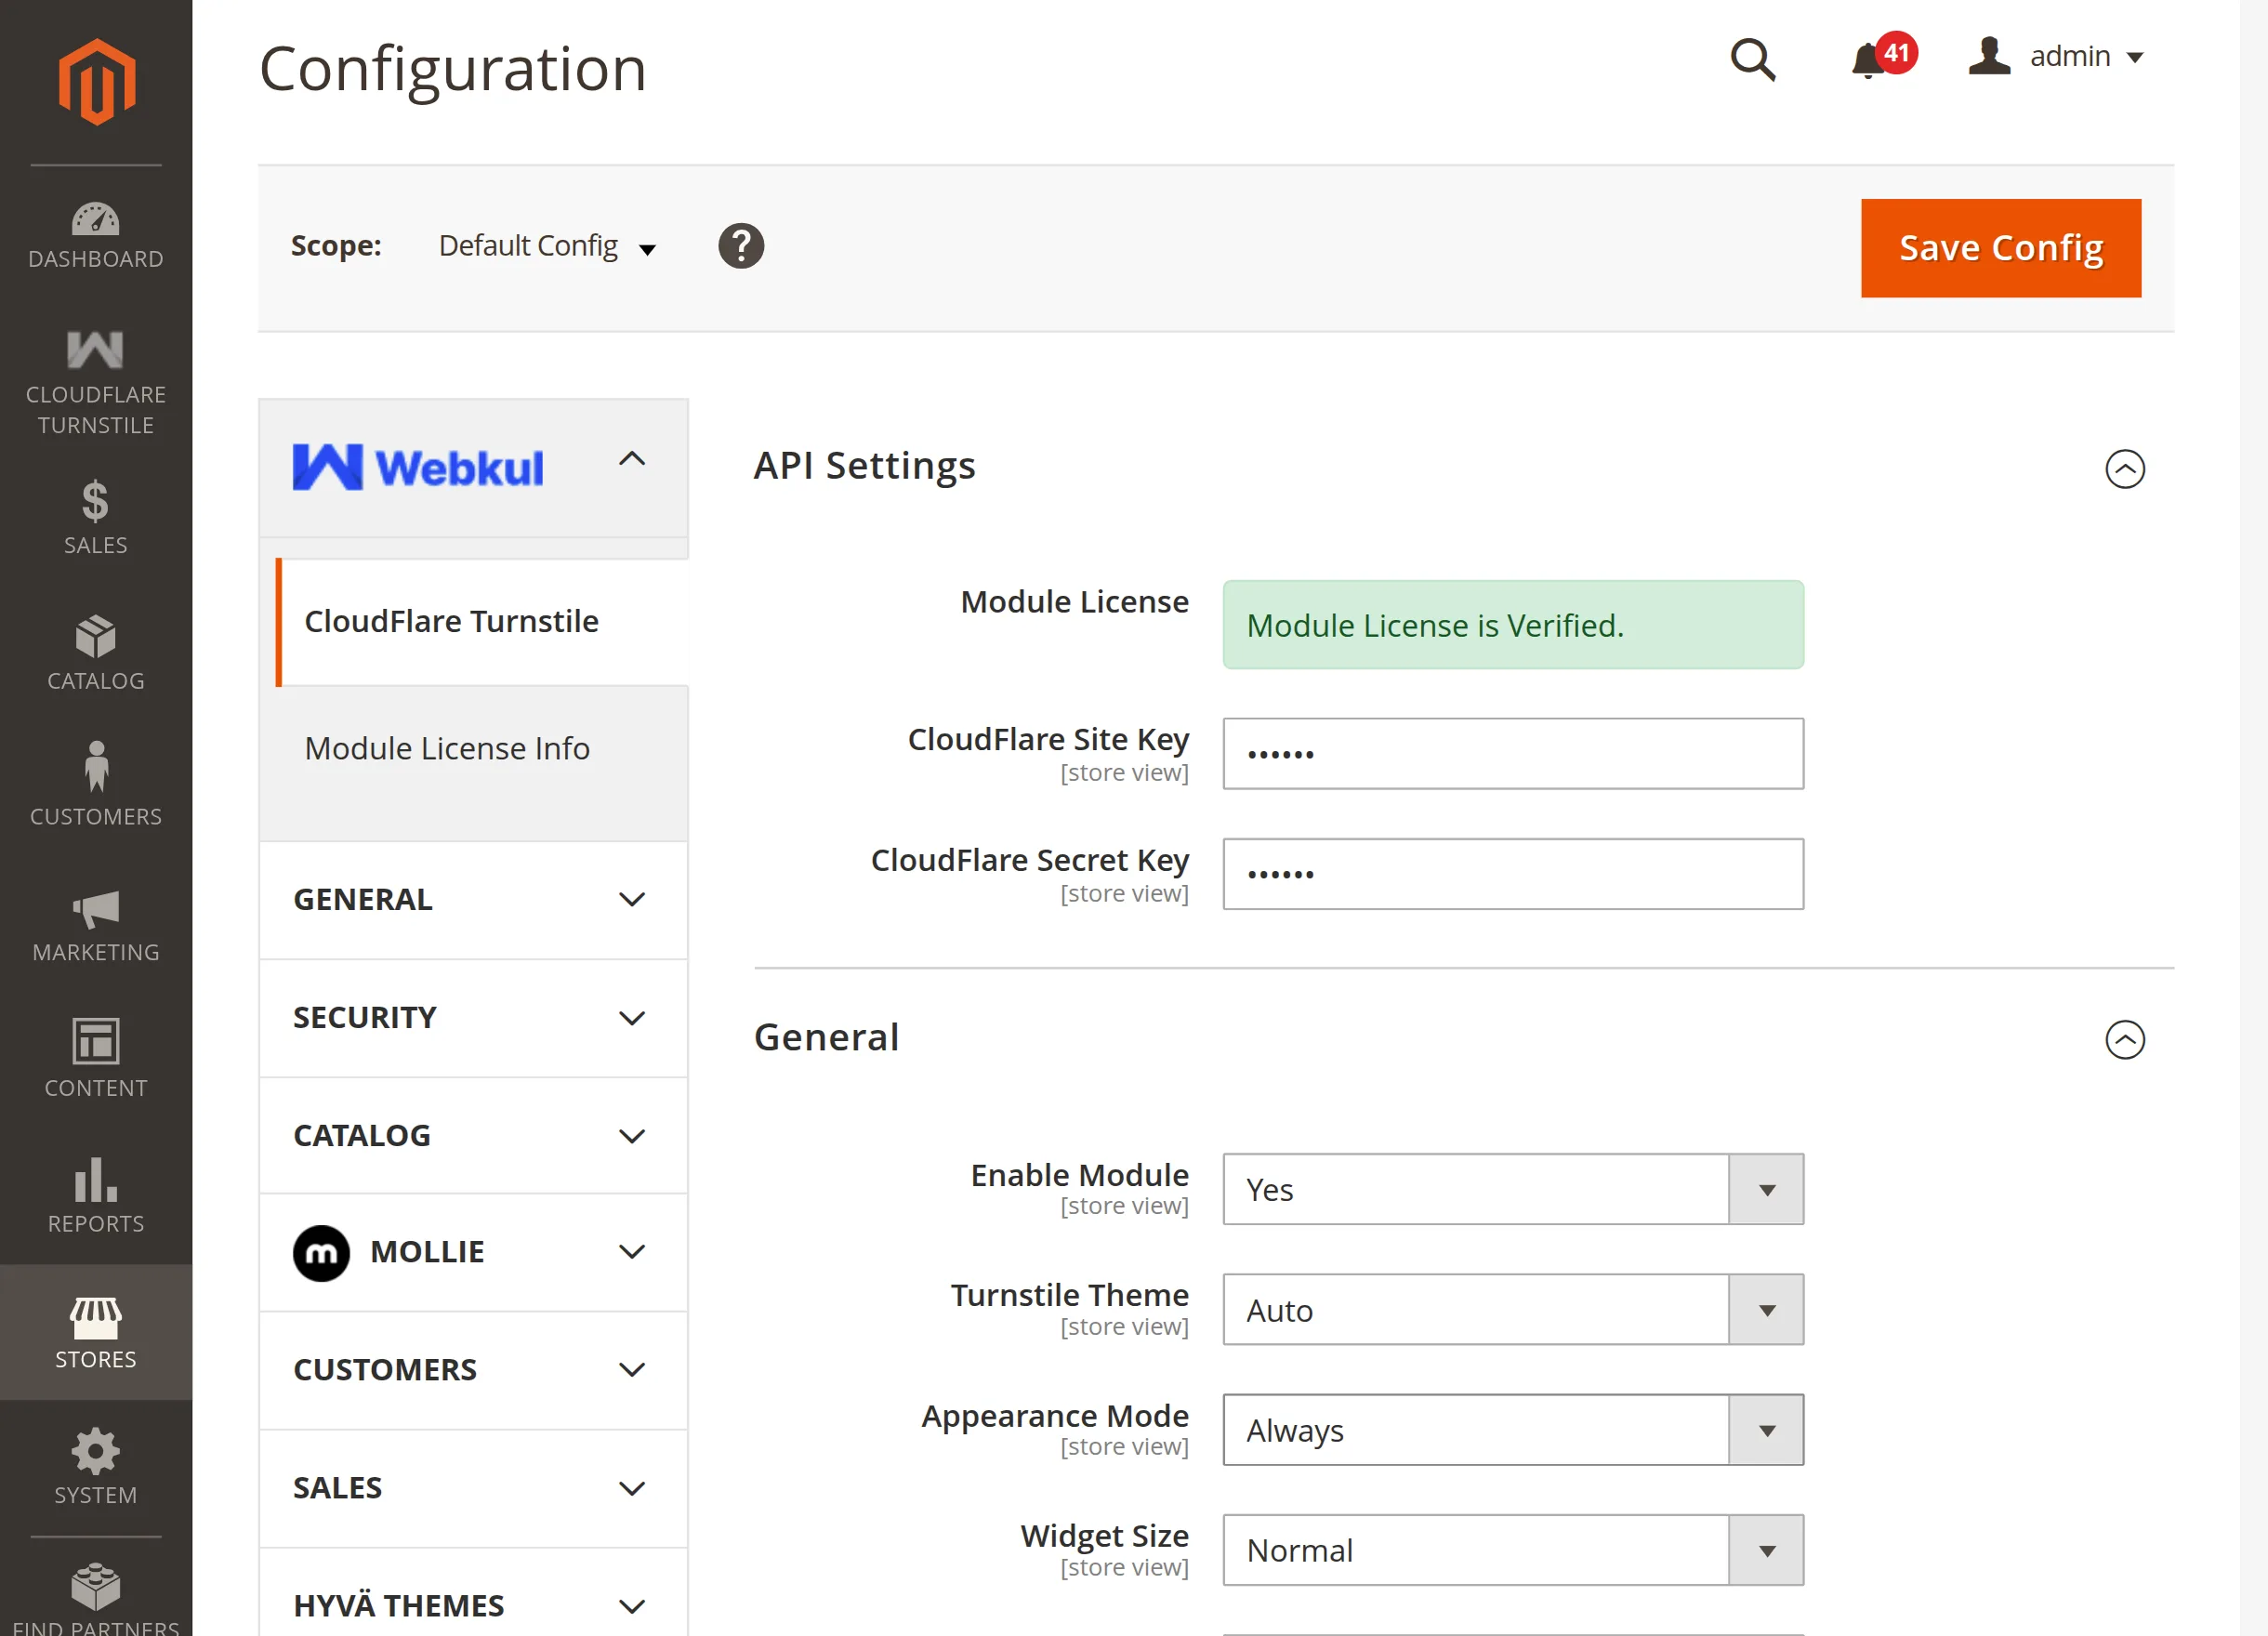
Module License: This field shows the current license status of the extension. Once the system verifies the license successfully, it confirms that the module is active and ready to use.
CloudFlare Site Key: The admin can enter the Site Key generated from the Cloudflare Turnstile dashboard.
Magento uses this key to display the Turnstile widget on the configured forms.
CloudFlare Secret Key: The admin can provide the Secret Key obtained from Cloudflare.
Magento uses this key to verify the Turnstile response before processing form submissions.he display theme for the Turnstile verification widget.
General Settings
The General Settings section allows the admin to manage the overall behavior and appearance of the Turnstile widget.
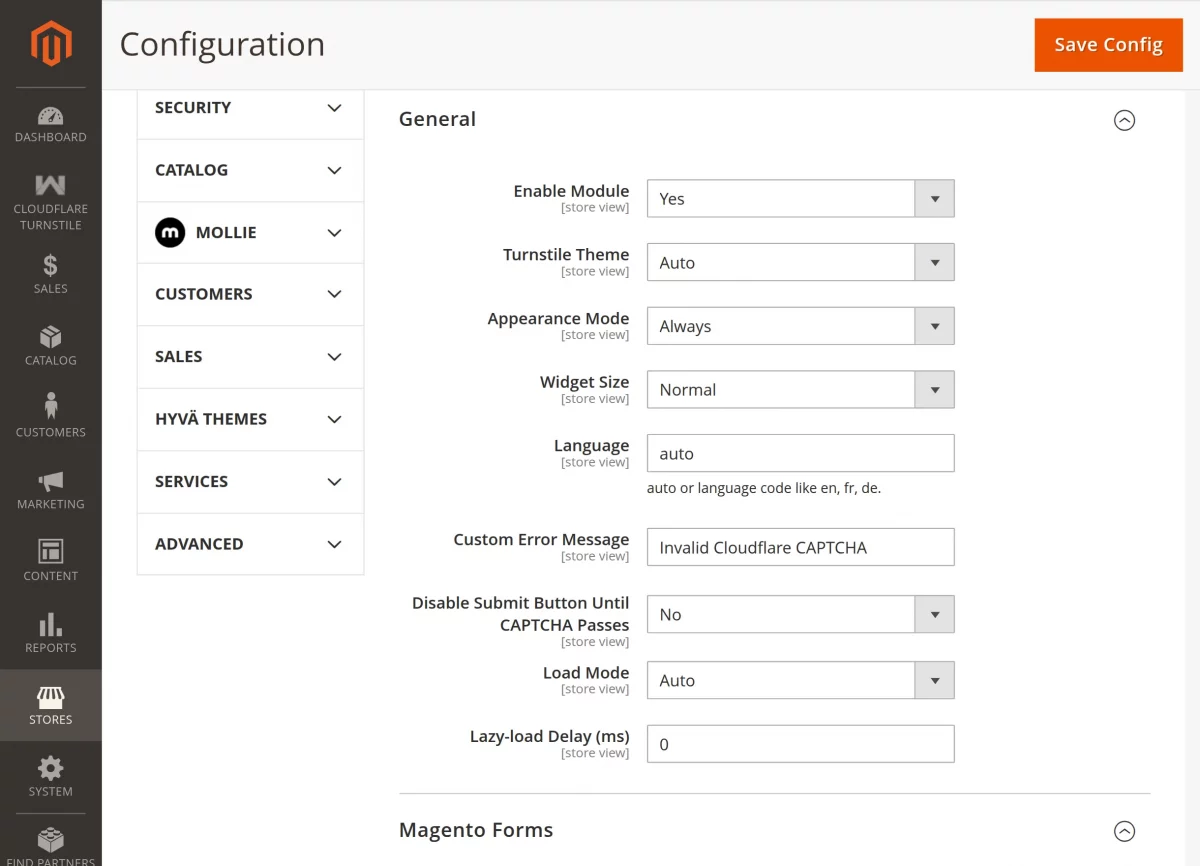
Enable Module: This option allows the admin to enable or disable the Cloudflare Turnstile functionality in the Magento 2 store.
Turnstile Theme: The admin can choose the widget theme to match the storefront design using the available appearance options.
Appearance Mode: This setting lets the admin control the display behavior of the Turnstile widget on protected forms.
The selected option determines when and how the widget appears to users during form interactions.
Widget Size: The admin can select the preferred widget size based on the storefront layout requirements.
Language: The admin can define the language displayed in the Turnstile widget or allow automatic language detection.
Custom Error Message: This option allows the admin to configure the message displayed when Turnstile verification fails.
Disable Submit Button Until CAPTCHA Passes: When enabled, this setting keeps the submit button disabled until users complete the Turnstile verification successfully.
Load Mode: This setting allows the admin to choose how the Turnstile widget loads on the page, helping balance performance and user experience.
Lazy-load Delay (ms): The admin can define the delay, in milliseconds, before the widget loads when using lazy loading. Increasing the delay can reduce the impact on the initial page load.
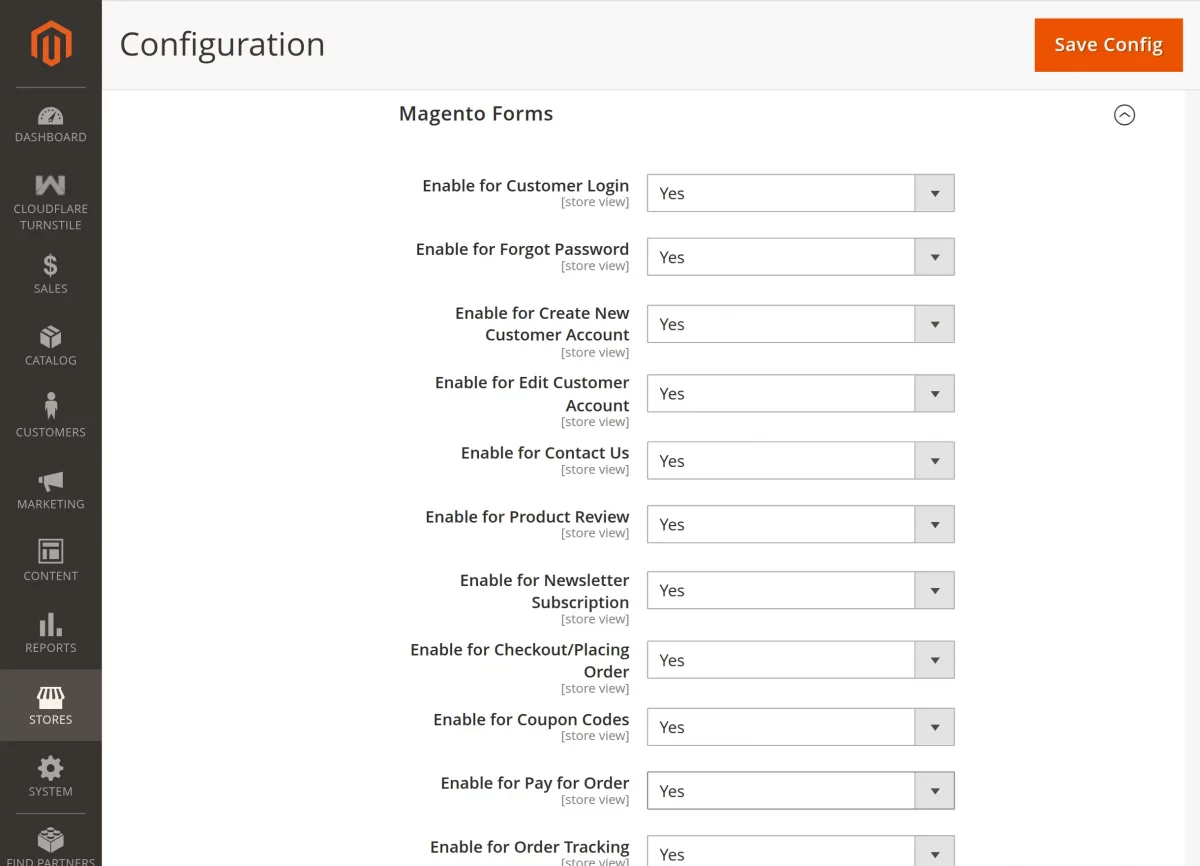
Magento Forms
The admin can set permission for various storefront visibility of Cloudflare Turnstile.
Like Customer Login, Forgot Password, Create New Customer Account, Edit Customer Account, Contact Us, Product Review, Checkout/Placing Order, and Coupon Codes.
Checkout Rules
Checkout Rules: The Checkout Rules section allows the admin to decide when Cloudflare Turnstile validation should run during the checkout process.
Apply Checkout CAPTCHA for Guests Only: Enable this option to require Turnstile verification only for guest customers during checkout.
while allowing registered customers to proceed without additional validation.
Apply Checkout CAPTCHA for Logged-in Customers Only: Use this setting to apply Turnstile validation exclusively to customers who have signed in to their accounts before checkout.
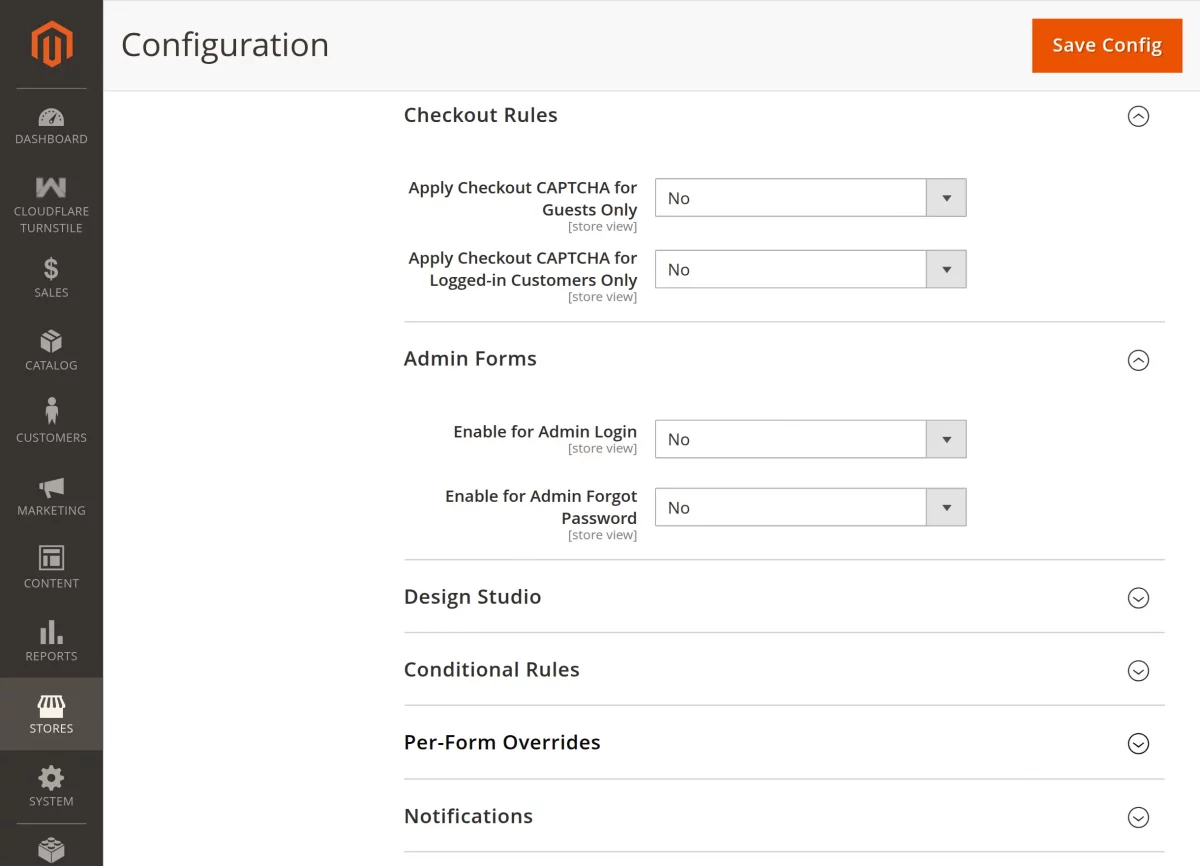
Admin Forms
The Admin Forms section allows the admin to secure Magento backend authentication forms using Cloudflare Turnstile.
Enable for Admin Login: When enabled, administrators must complete Turnstile verification before accessing the Magento admin panel.
Enable for Admin Forgot Password: This option adds Turnstile protection to the admin forgot password form to prevent automated reset requests.
Design Studio
The Design Studio section allows the admin to customize the appearance of the Turnstile widget to match the storefront design.

Wrapper Alignment: The admin can choose the alignment of the Turnstile widget within the form layout.
Margin Top (px): This setting defines the top spacing around the widget.
Margin Bottom (px): This option controls the bottom spacing below the widget.
Padding (px): The admin can specify the internal spacing within the widget container.
Border Color: Use this setting to define the border color of the widget so it aligns with the overall storefront theme.
Background Color: This setting allows the admin to define the background color of the widget wrapper.
Border Width (px): This option determines the thickness of the border surrounding the widget.
Border Radius (px): Adjust the border radius to create either sharp edges or rounded corners for the widget container.
Box Shadow: This setting allows the admin to apply a shadow effect around the widget container.
Custom Label Text: The admin can define a custom label to provide additional context or instructions to users.
Label Text Color: This option controls the color of the custom label text.
Helper Text: The admin can add helper text to guide users during the verification process.
Helper Text Color: This setting allows the admin to customize the color of the helper text displayed with the widget.
Conditional Rules
The Conditional Rules section allows the admin to define when Cloudflare Turnstile validation should apply based on customer behavior, location, and request patterns.
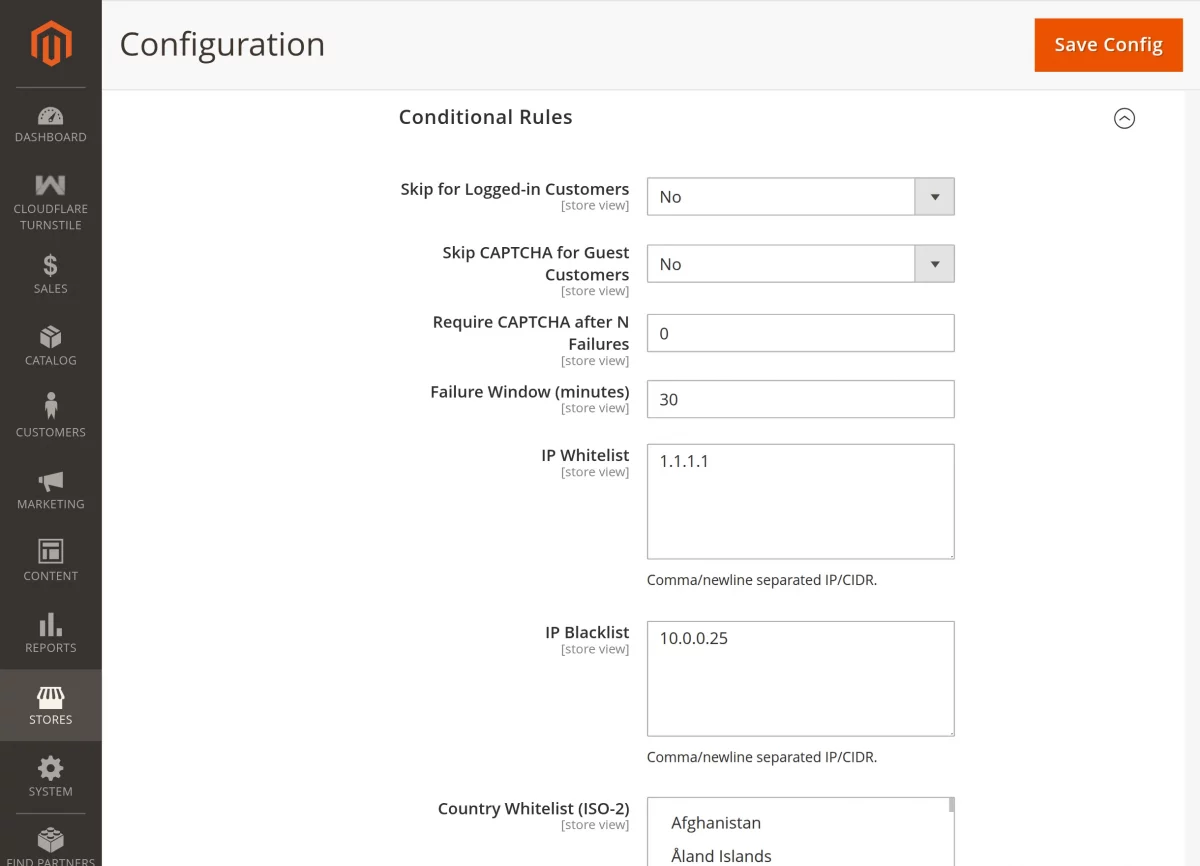
Skip for Logged-in Customers: Enable this option to bypass Turnstile verification for customers who have signed in to their accounts.
Skip CAPTCHA for Guest Customers: This setting allows guest visitors to access protected forms without completing Turnstile verification.
Require CAPTCHA after N Failures: The admin can specify the number of failed attempts after which the system starts enforcing Turnstile validation.
Failure Window (minutes): This option defines the time period during which the extension tracks failed attempts before applying the configured failure threshold.
IP Whitelist: The admin can add trusted IP addresses or CIDR ranges that should bypass Turnstile verification.
IP Blacklist: Use this setting to block specific IP addresses or IP ranges and enforce validation for requests originating from them.
Country Whitelist (ISO-2): The admin can select countries that are exempt from Turnstile validation based on their ISO-2 country codes.
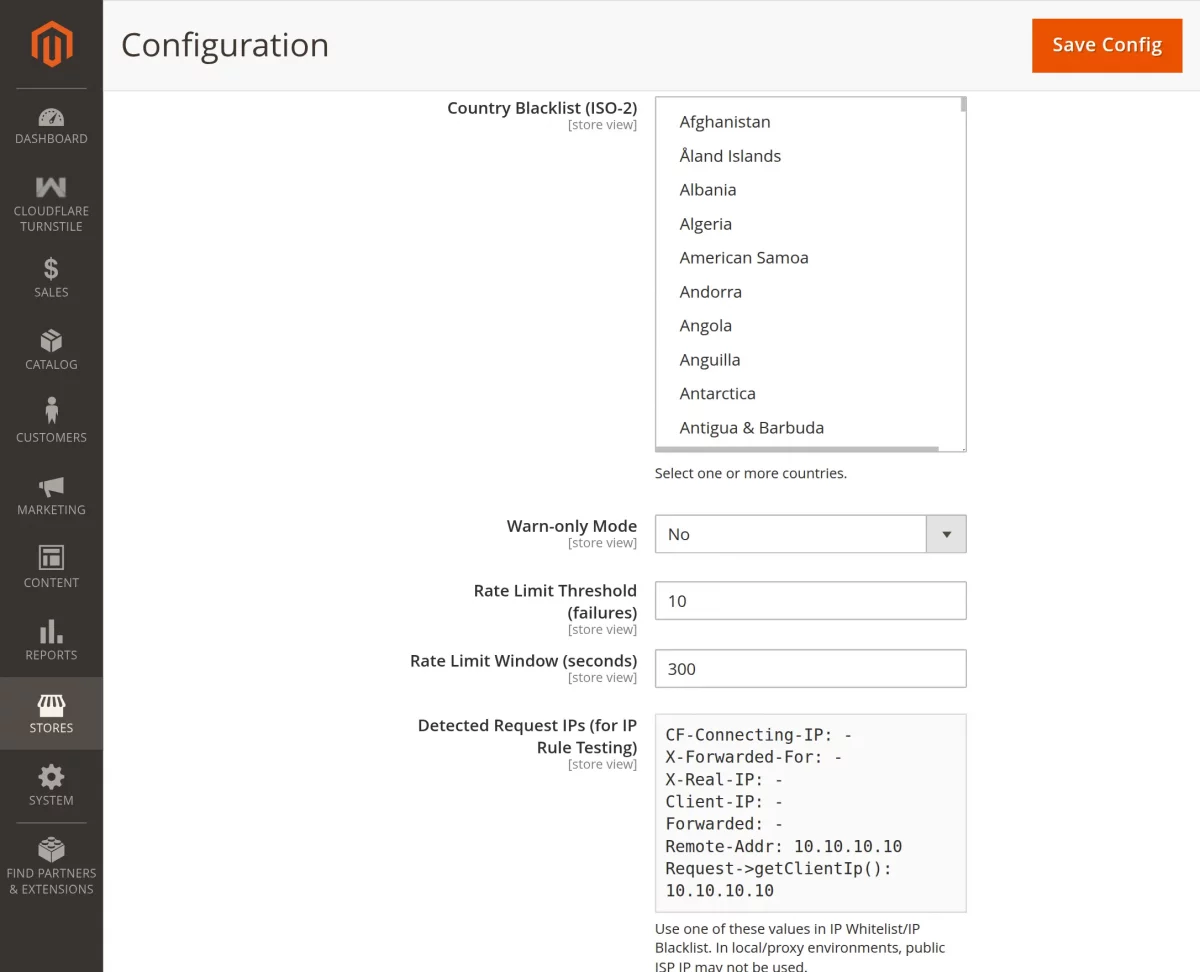
Country Blacklist (ISO-2): This option allows the admin to apply validation rules or restrictions to visitors from selected countries.
Warn-only Mode: Enable this option to log validation failures without blocking form submissions. This mode is useful for monitoring and testing configurations before enforcement.
Rate Limit Threshold (failures): The admin can define the maximum number of failed verification attempts allowed within the specified rate limit window.
Rate Limit Window (seconds): This setting determines the duration, in seconds, during which the extension evaluates failed attempts against the configured threshold.
Detected Request IPs (for IP Rule Testing): This field displays the IP information detected from incoming requests, helping the admin test and verify IP-based rules accurately.
Blocked Username Settings
The Blocked Username Settings section lets the admin block specific usernames and email addresses from submitting protected forms.
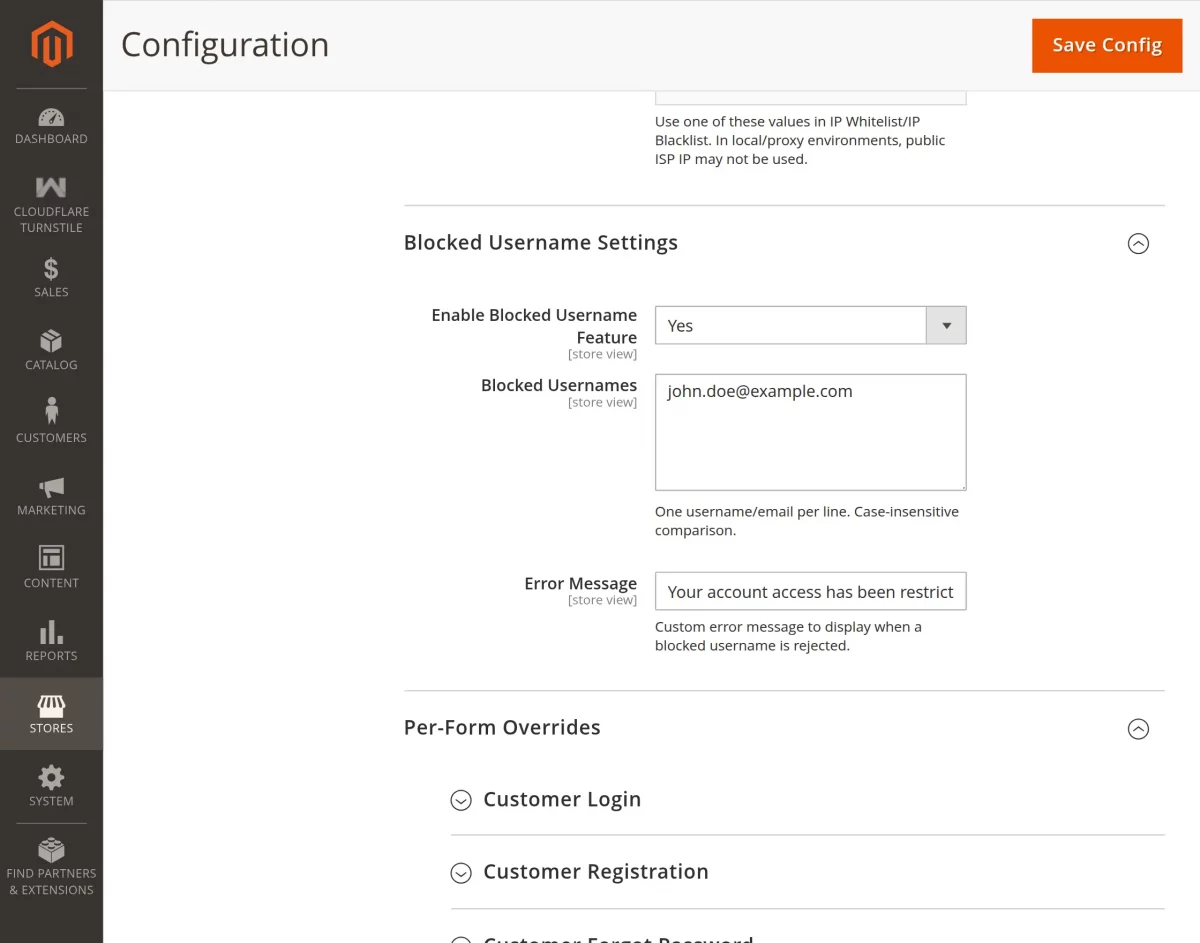
Enable Blocked Username Feature: Enable or disable blocked username validation for the selected store view.
Blocked Usernames: Enter one username or email address on each line. The module compares entries without considering letter case.
Error Message: Set the message that appears when the module blocks a username or email address.
Per-Form Overrides
The Per-Form Overrides section allows the admin to customize Turnstile settings for individual forms without modifying the global configuration.
This provides greater flexibility by enabling different forms to use their own appearance and messaging preferences.
You can configure Turnstile settings for the following sections:
- Customer Registration
- Customer Forgot Password
- Customer Edit
- Contact Us
- Product Review
- Newsletter
- Checkout / Place Order
- Coupon Code
- Pay for Order
- Track Order
- Multi-address Create Shipping Address
- Multi-address Place Order
- Admin Login
- Customer Login
The following example demonstrates the available settings using the Customer Login section. The same configuration options are available for all supported forms listed above.
Customer Login
Customer Login
The Customer Login section allows the admin to override the default Turnstile settings specifically for the customer login form.
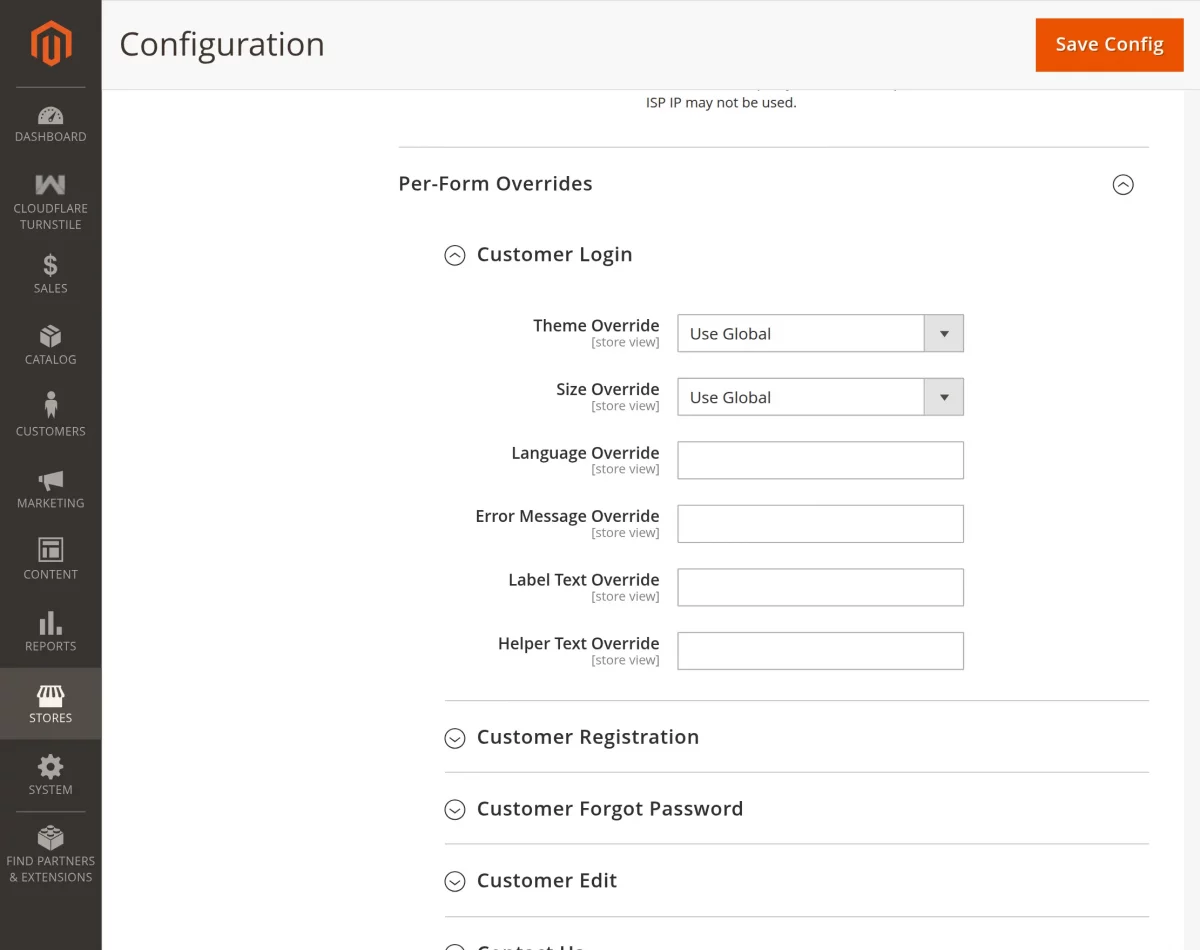
Theme Override: This setting lets the admin apply a different Turnstile theme to the customer login form instead of using the global configuration.
Size Override: The admin can choose a custom widget size for the customer login form to suit the page layout.
Language Override: This option allows the admin to display the Turnstile widget in a different language for the login form.
Error Message Override: The admin can configure a custom validation message that appears when Turnstile verification fails on the login form.
Label Text Override: Use this setting to define a custom label that provides additional instructions or context to customers.
Helper Text Override: This option allows the admin to display helper text to guide users through the verification process.
Notifications
The Notifications section allows the admin to monitor Turnstile activity and receive alerts about verification events through logs, email reports, and webhooks.
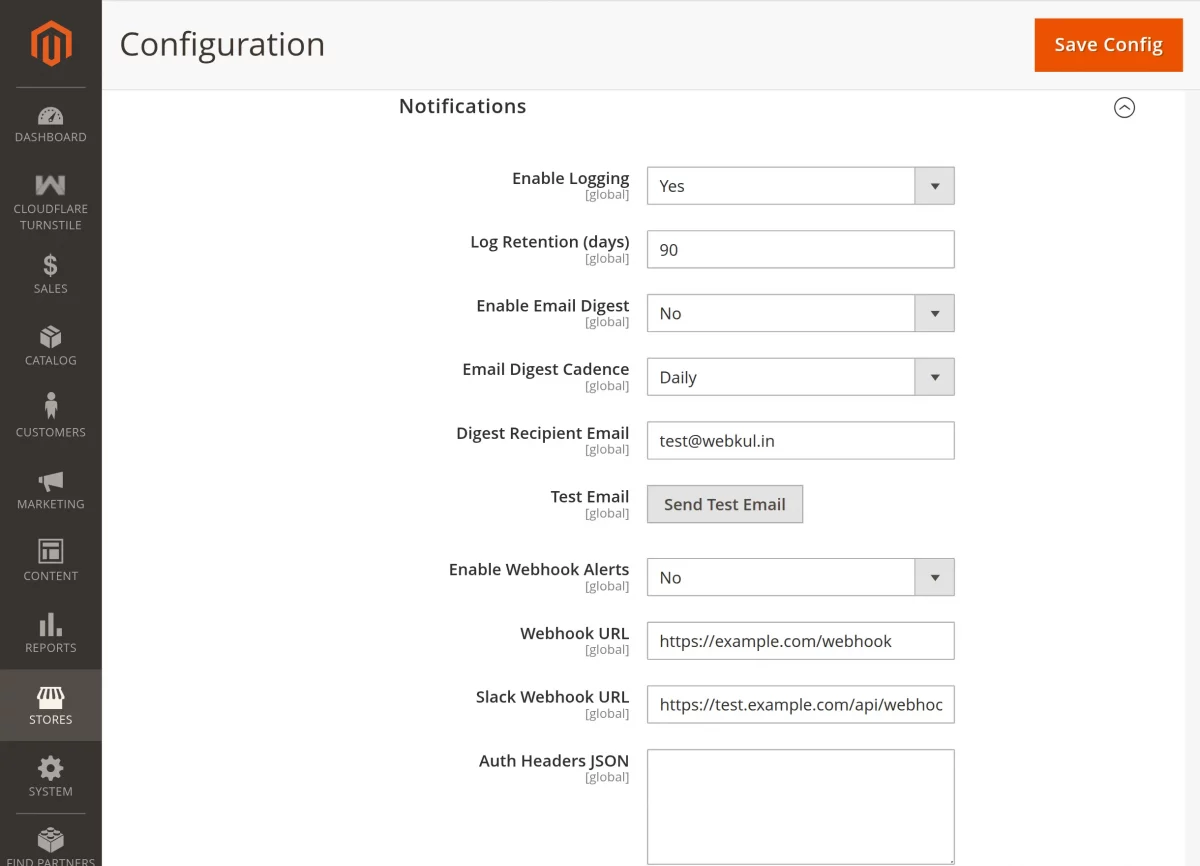
Enable Logging: Enable this option to record Turnstile validation events and maintain an audit trail of verification activity.
Log Retention (Days): Specify how many days the system should retain log records before automatically removing older entries.
Enable Email Digests: Turn on email digests to receive periodic summaries of Turnstile activity and security events.
Digest Frequency: Choose how often the system sends email reports, such as daily or weekly.
Recipient Email: Enter the email address that will receive the Turnstile activity summaries.
Test Email: Furthermore, use this button to verify that the email configuration works correctly and that the system can deliver notifications successfully.
Enable Webhook Alerts: Enable webhook notifications to send Turnstile events to external systems in real time.
Webhook URL: Enter the endpoint URL where the system should send webhook notifications.
Slack Webhook URL: Provide a Slack webhook URL to receive Turnstile alerts directly within your Slack workspace.
Auth Headers JSON: Add authentication headers in JSON format to secure webhook requests sent to external services.
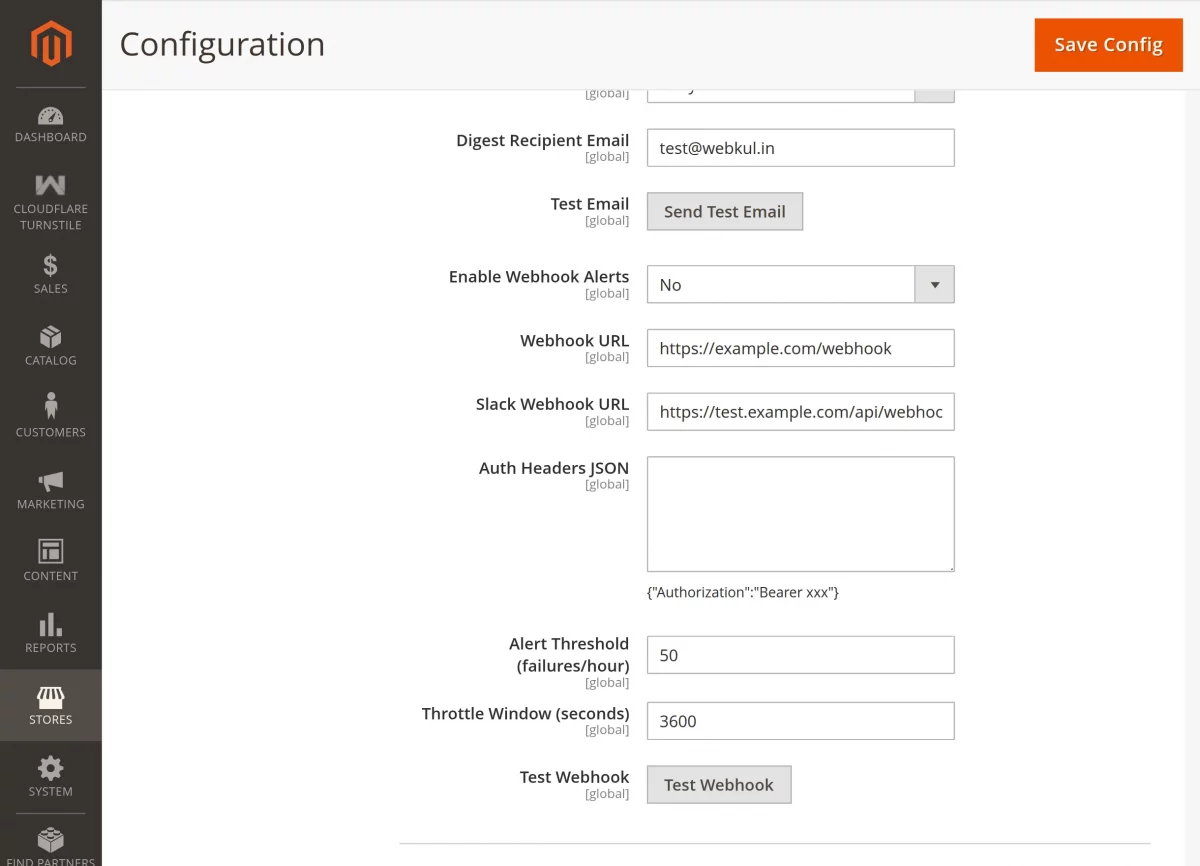
Alert Threshold: Define the number of failed verification attempts that must occur before the system triggers an alert.
Throttle Window (Minutes): Specify the time window used to group events and prevent excessive notifications.
Test Webhook: Finally, use this button to confirm that the webhook configuration is correct and that notifications can be delivered successfully.
Emergency Recovery / Bypass
The Emergency Recovery / Bypass section allows the admin to generate a temporary recovery link for users who are unable to complete Turnstile verification.
The bypass applies only to the specified IP address and expires automatically after the configured time.
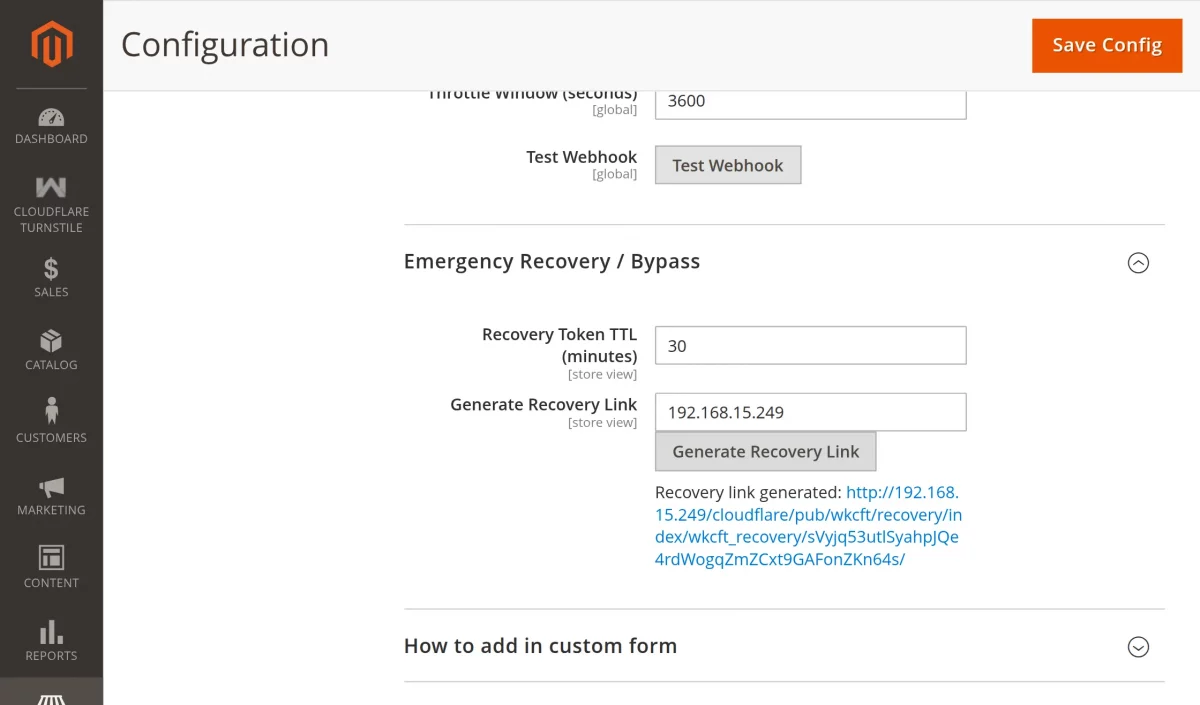
Recovery Token TTL (minutes): This setting allows the admin to define how long the recovery token remains valid. The same duration is applied to the temporary bypass after activation.
Generate Recovery Link: The admin can enter a user’s IP address and click the Generate Recovery Link button to create a secure, time-limited recovery URL.
IP-Specific Bypass: The generated recovery link grants temporary CAPTCHA bypass only for the specified IP address. Other visitors continue to follow normal Turnstile validation.
Single-Use Recovery Link: Each recovery link can be used only once. After activation, the system automatically invalidates the token to prevent reuse.
Automatic Expiration: The temporary bypass expires automatically after the configured TTL. Users must complete Turnstile verification again once the bypass period ends.
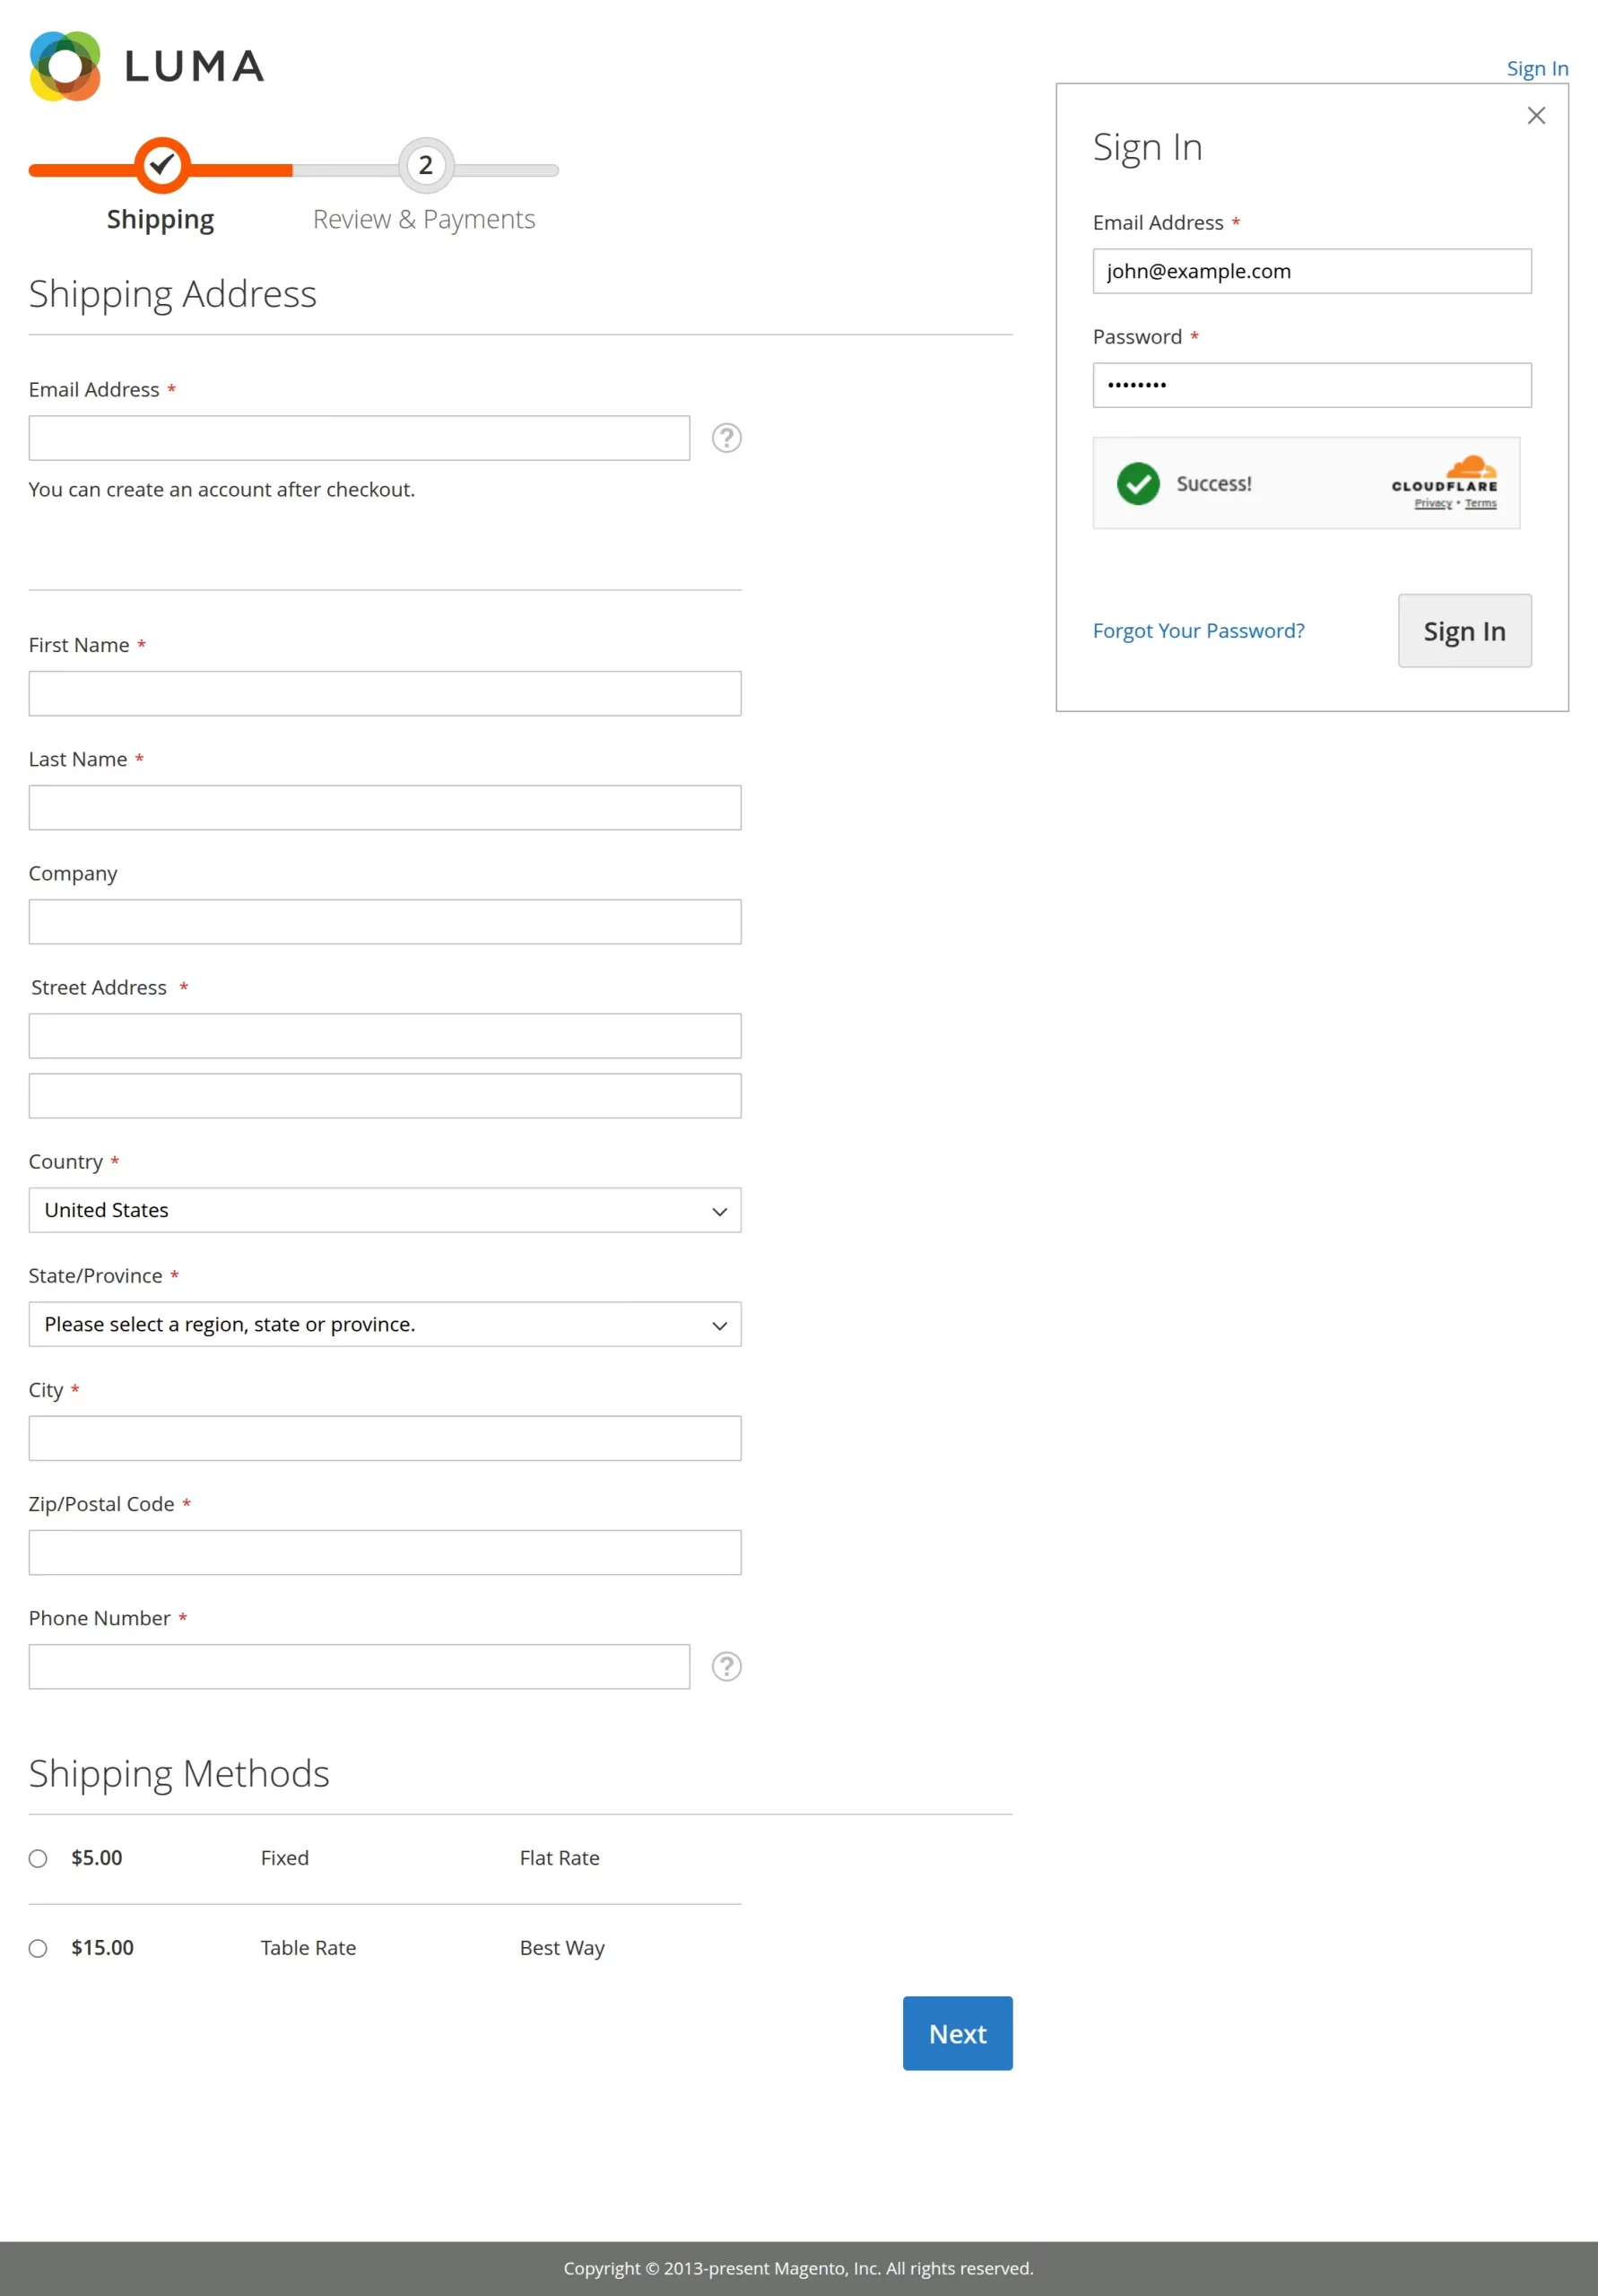
Emergency Recovery Link (Frontend)
When the customer opens the recovery link, the system validates the recovery token and the customer’s IP address.
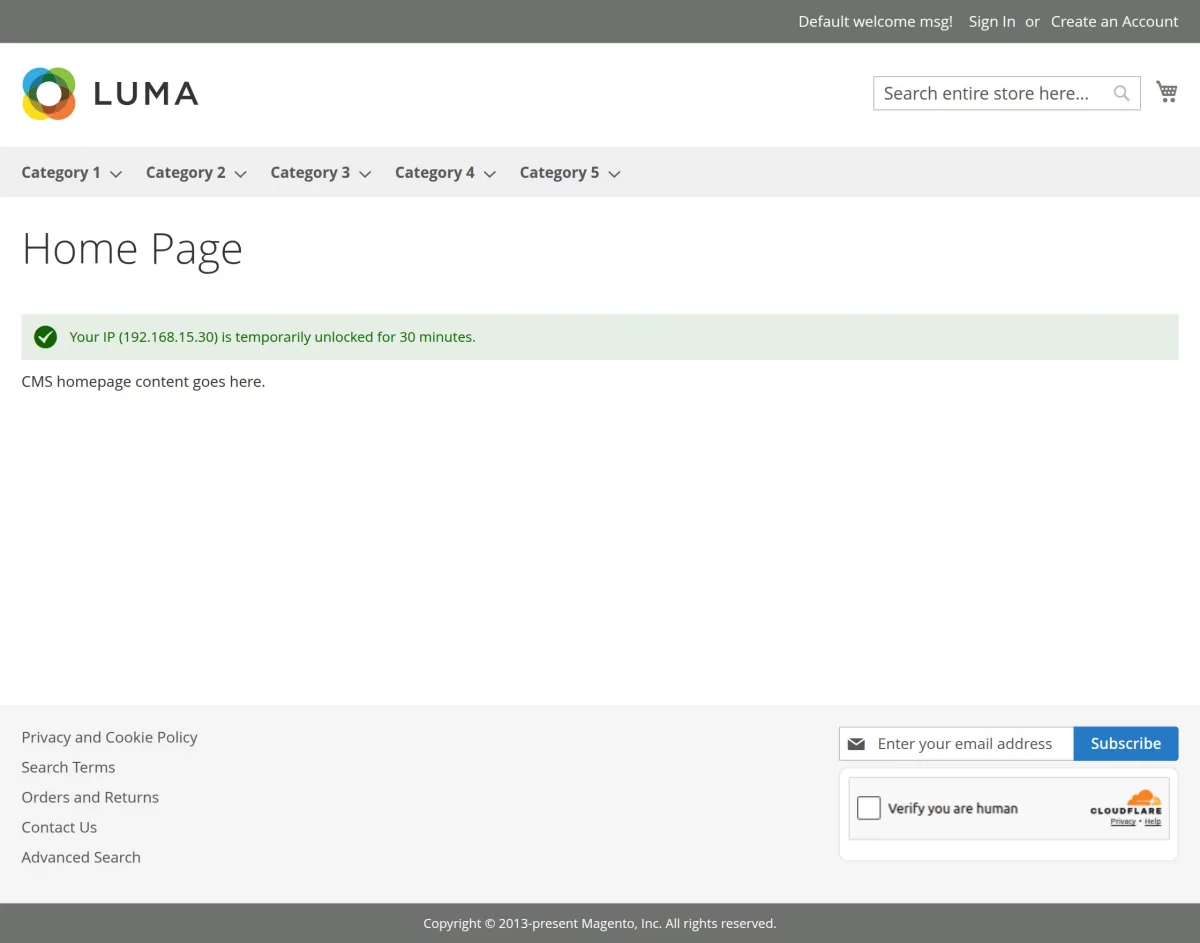
If both are valid, it activates a temporary CAPTCHA bypass for the configured duration.
The storefront displays a success message confirming that the customer’s IP address is temporarily unlocked.
The customer can continue using protected forms without Turnstile verification until the bypass expires.
If the recovery link is invalid, expired, already used, or opened from a different IP address, the system rejects the request and displays an appropriate error message.
After the bypass period ends, the system automatically restores normal Turnstile verification for the customer’s IP address. No additional action is required from the customer.
How to add in custom form
Cloudflare Turnstile can be added in any custom form by entering the below-mentioned code in any reference block or container of the layout.
Add using a reference block (This is for the code end).
<block class=”Webkul\CloudflareTurnstile\Block\Turnstile” name=”productreviewcloudflarecaptcha” after=”-” > </block>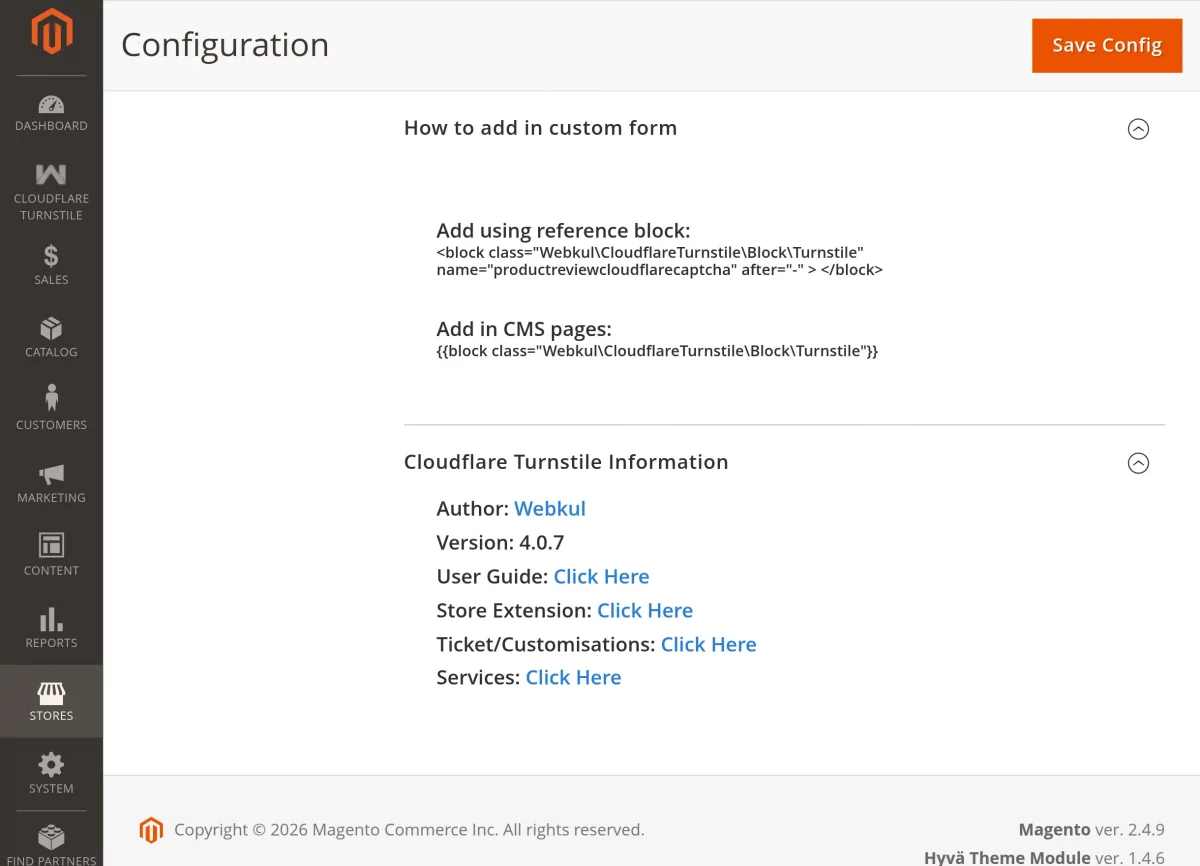
Cloudflare Turnstile can be added in any custom form by entering the below-mentioned code in CMS pages.
Add in CMS pages:
{{block class=”Webkul\CloudflareTurnstile\Block\Turnstile”}}
Cloudflare Turnstile
After the successful installation and configuration, the Cloudflare Turnstile menu option becomes visible to the admin.
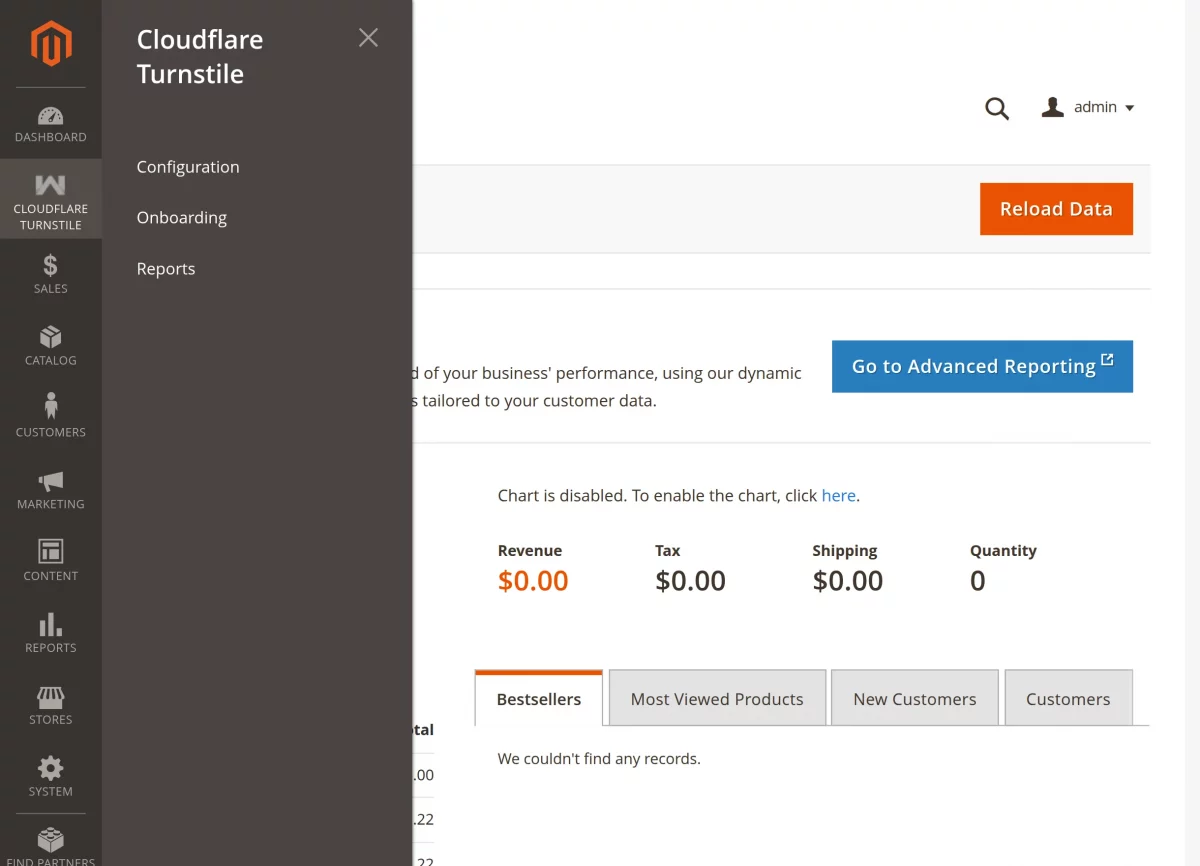
Here, the admin has the following options to configure and manage Cloudflare Turnstile operations across the store –
- Configuration
- Onboarding
- Report
Onboarding
The Turnstile Onboarding simplifies the setup process by guiding the admin through three quick steps.
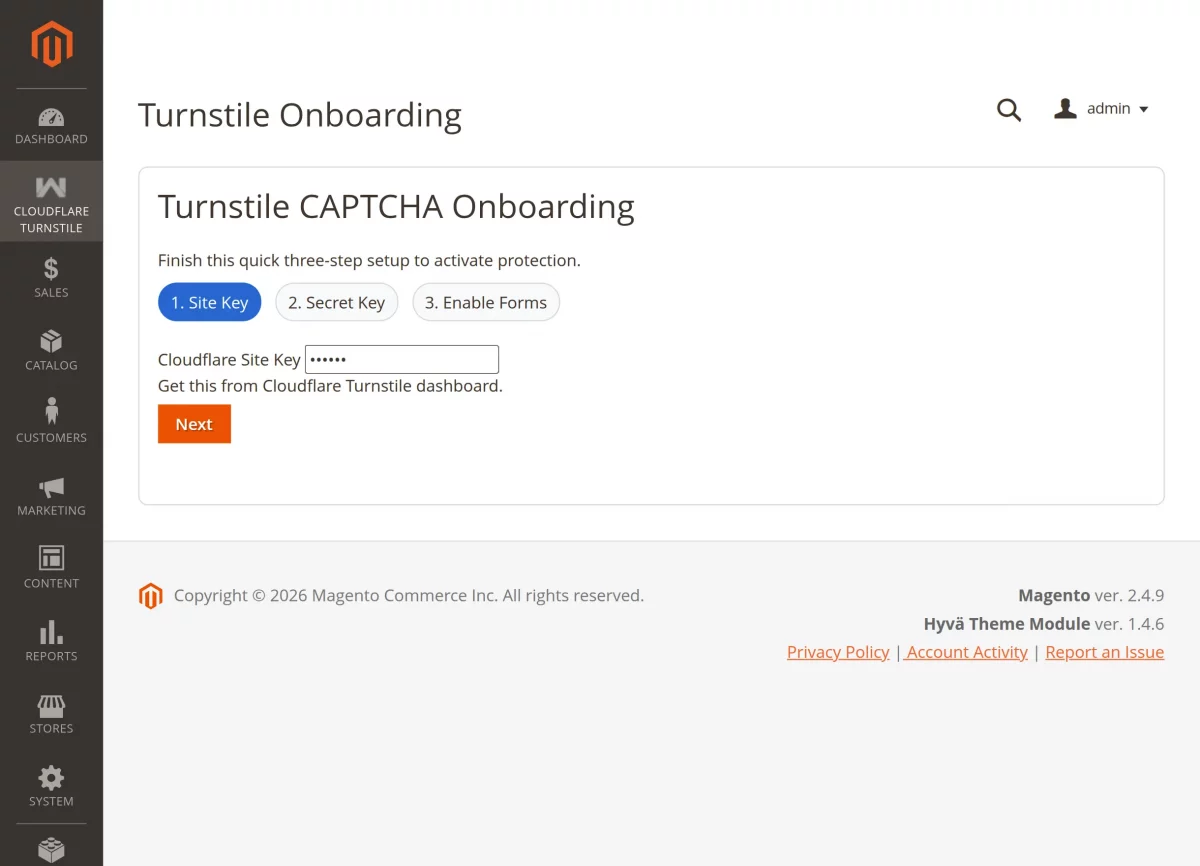
Site Key: Enter the Cloudflare Site Key and click Next to continue.
Secret Key: Provide the Cloudflare Secret Key, then click Next to proceed.
Enable Forms: Select the forms you want to protect and click Save and Finish to complete the setup.
Once the onboarding process is complete, the extension displays the “Onboarding saved” success message, confirming that the configuration has been saved successfully.
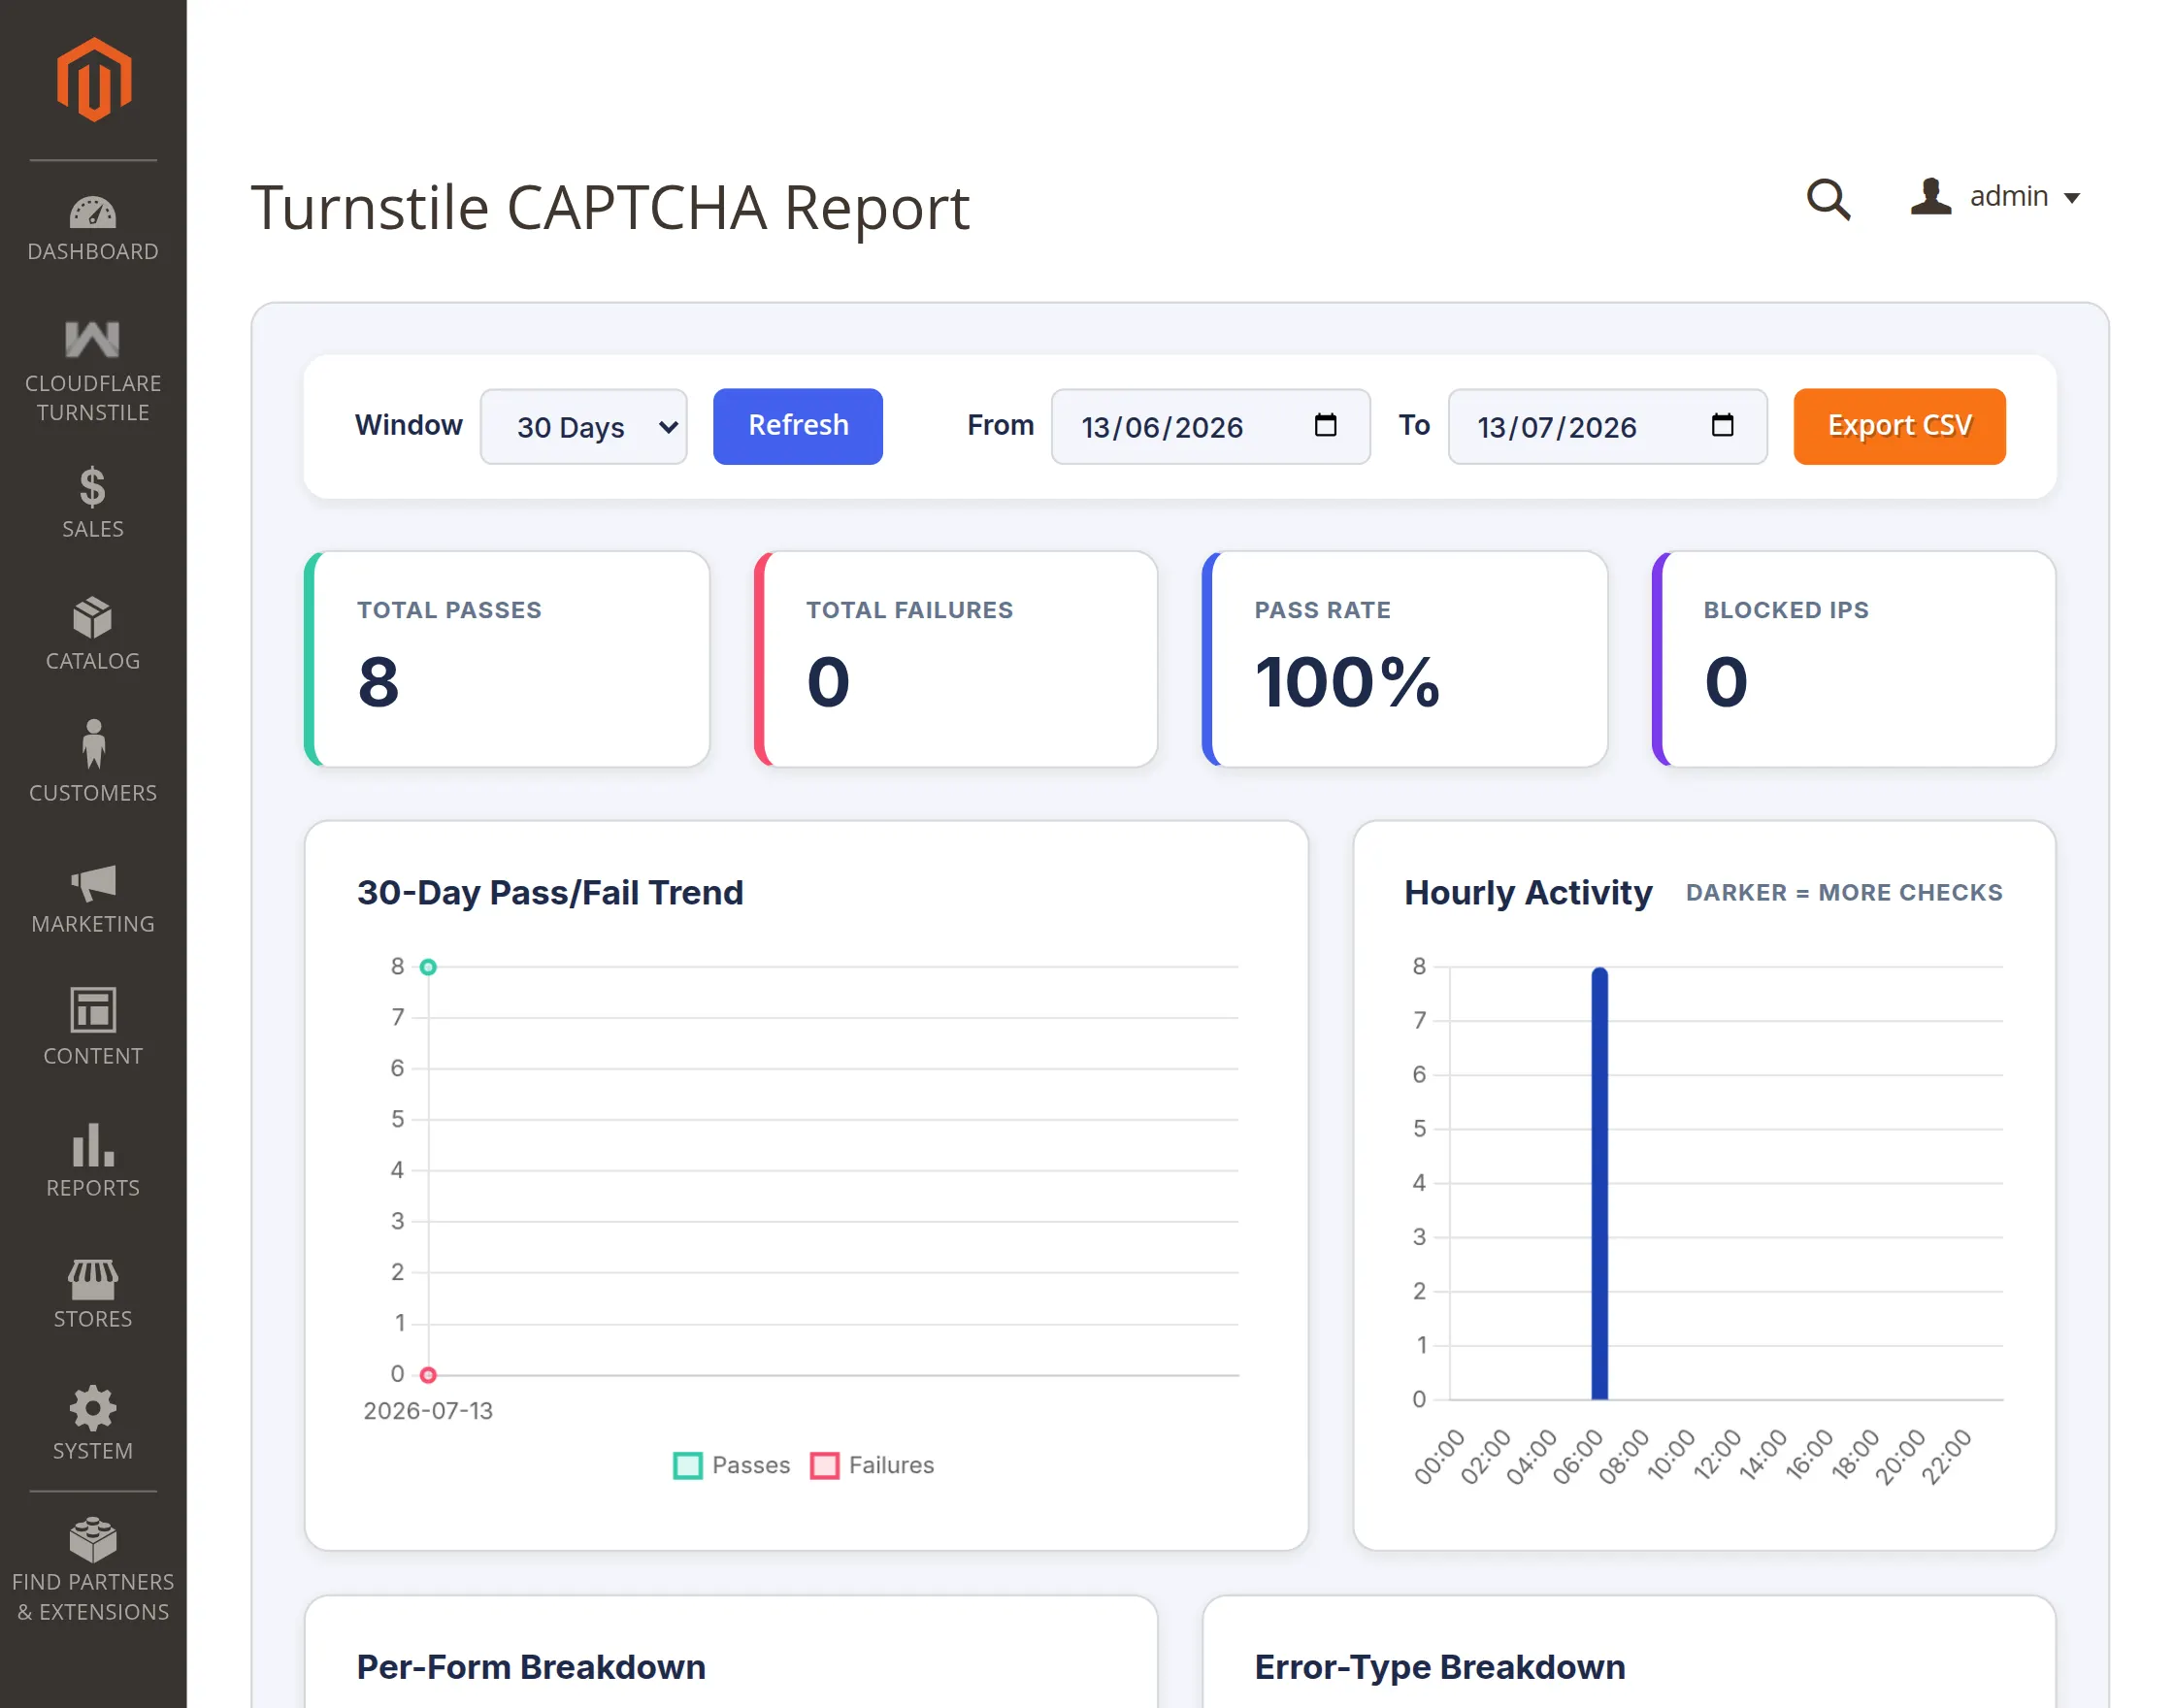
Reports Dashboard
The Reports Dashboard helps Magento 2 store administrators monitor Cloudflare Turnstile CAPTCHA activity from a single page. It provides real-time insights into verification requests, failed attempts, protected forms, and suspicious traffic.
Navigate to: Cloudflare Turnstile → Reports
The dashboard includes interactive reports, charts, and tables to help you analyze CAPTCHA performance and improve store security.
Filter & Export
Use the toolbar to customize the displayed data.
- Window – View reports for the last 1, 7, 30, or 90 days.
- Refresh – Reload the latest verification statistics.
- From / To – Select a custom date range.
- Export CSV – Download verification logs for further analysis.
Dashboard Summary
The top section displays four key metrics:
- Total Passes – Successful CAPTCHA verifications.
- Total Failures – Failed verification attempts.
- Pass Rate – Overall CAPTCHA success percentage.
- Blocked IPs – Number of unique IPs with failed requests.
These metrics provide a quick overview of your store’s CAPTCHA performance.
Reports & Analytics
The dashboard includes the following reports:
Pass/Fail Trend
Displays daily successful and failed CAPTCHA verifications, making it easy to identify unusual traffic or attack patterns.
Hourly Activity
Shows verification activity by hour, helping you understand peak traffic and high-risk periods.
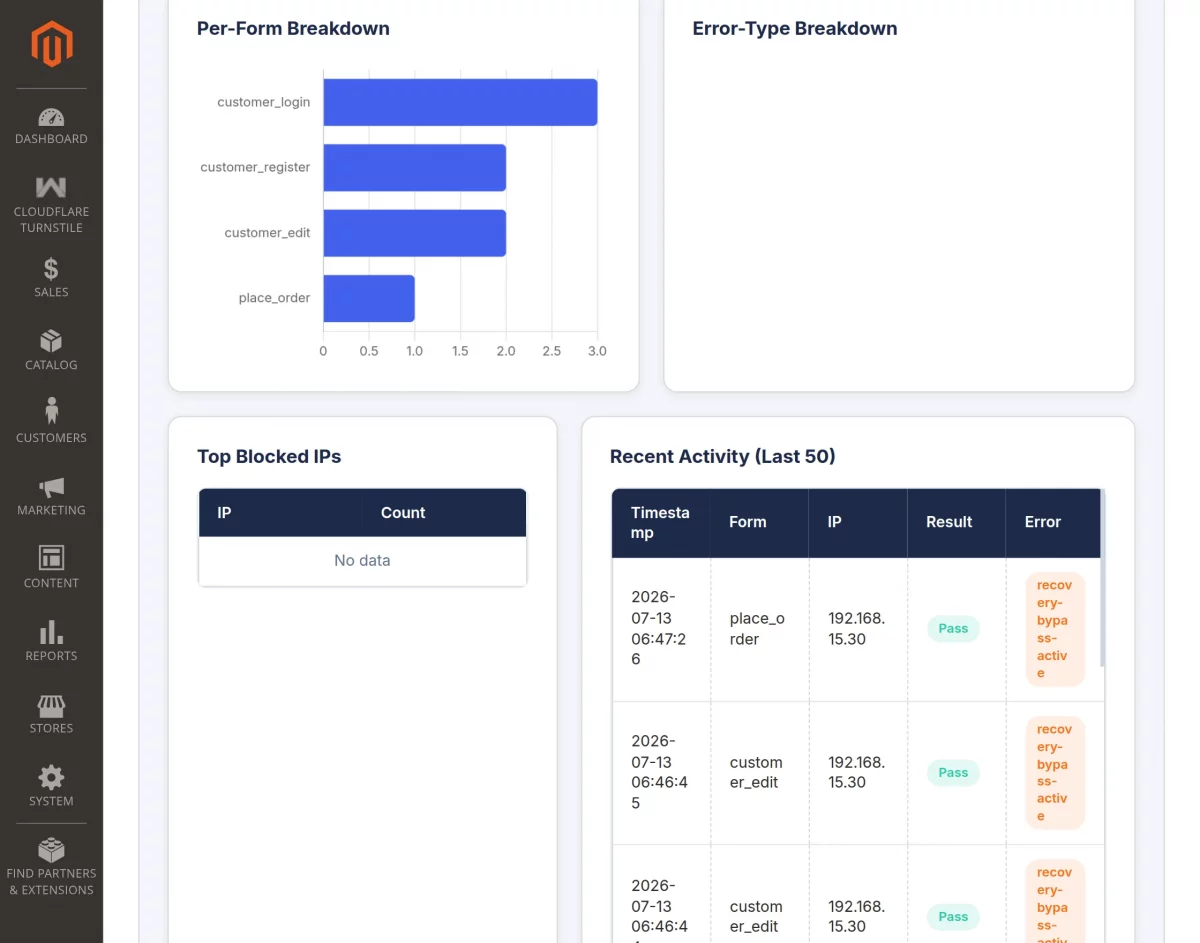
Per-Form Breakdown
Lists protected Magento forms based on verification count, allowing you to identify the most frequently used forms.
Error-Type Breakdown
Displays common Cloudflare verification errors, making it easier to troubleshoot failed CAPTCHA requests.
Top Blocked IPs
Shows IP addresses with the highest number of failed verification attempts to help identify suspicious traffic.
Recent Activity
Provides the latest verification logs, including the timestamp, form, IP address, verification result, and error status for quick troubleshooting.
Frontend Workflow
Turnstile will display on the storefronts selected by the admin while configuring the module settings.
Customer Login Page

Customer Registration Page

Checkout Page
On the checkout page, Cloudflare will display two places one for payment and one for coupon codes.

Checkout Page Sign in
Upon adding the product to the cart without signing in, when the customer proceeds to checkout and enters their registered email address, Cloudflare will be displayed.
Similarly, it will be displayed on various pages to provide a hassle-free experience to the customers.
Cloudflare Turnstile CAPTCHA for Guest User
Now store guest users can also use Cloudflare Turnstile CAPTCHA during their checkout.
Note: For using Cloudflare Turnstile CAPTCHA guest users then from the backend “Allow Guest Checkout” option should be “No”.

Website Analytics
In the Cloudflare account, you can check the analytics of your website like challenges issued, visitor solve rate, and API solves rate.
On clicking the website link, the dashboard will open where you can view analytics.

Challenges Issued: This means the number of times the widget has been displayed on the website.
Visitor Solve Rate: Percentage of users who have seen the widget and completed it.
API Solve Rate: Percentage of users who have completed the widget and then performed the action on the page successfully like logging in on completing the registration.
Support
That’s all for the Magento 2 Cloudflare Turnstile module.
If you have any questions, suggestions, or customization requests, feel free to contact us at [email protected] or submit a ticket at webkul.uvdesk.com.
Please explore our Magento Development Services and Quality Magento 2 Extensions.
Current Product Version - 4.0.7
Supported Framework Version - 2.0.x, 2.1.x, 2.2.x,2.3.x, 2.4.x

Be the first to comment.