Aramex Shipping is one of the best shipping providers in the world. Thus, it is fast, reliable, and trusted by millions of customers around the globe.
Aramex is the most recognized brands among merchants all over the world. It customization services aids multiple business owner in regard to the shipping service.
It is a UAE based shipping organization, which deals in express delivery and logistics services express delivery and logistics services.
Aramex Shipping is one of the best shipping providers in the world. Thus, it is fast, reliable, and trusted by millions of customers around the globe.
For the Magento 2, we have created an add-on called Magento 2 Aramex Shipping.
So, by installing this add-on, the admin will be able to provide the Aramex Shipping method to the customers for shipping the goods.
Features of Aramex Shipping
- It will allow the admin to enable or disable the Aramex Shipping method.
- The admin will be allowed to set the Aramex shipping method name that will be shown on the front side.
- The admin can add COD rates with this shipping method.
- The code is fully open and easy to use.
- Shipping will be calculated by using the Aramex Shipping API’s.
- The admin can generate the Aramex Shipping label.
- The admin can add the methods allowed for shipping.
Installation of Aramex Shipping
Customers will get a zip folder and they have to extract the contents of this zip folder on their system. Thus, the extracted folder has an src folder, inside the src folder you have the app folder.
You need to transfer this app folder into the Magento2 root directory on the server as shown below.

Hence, after the successful installation, you have to run these commands in the Magento2 root directory.
First command-
php bin/magento setup:upgrade
Second Command –
php bin/magento setup:di:compile
Third Command –
php bin/magento setup:static-content:deploy
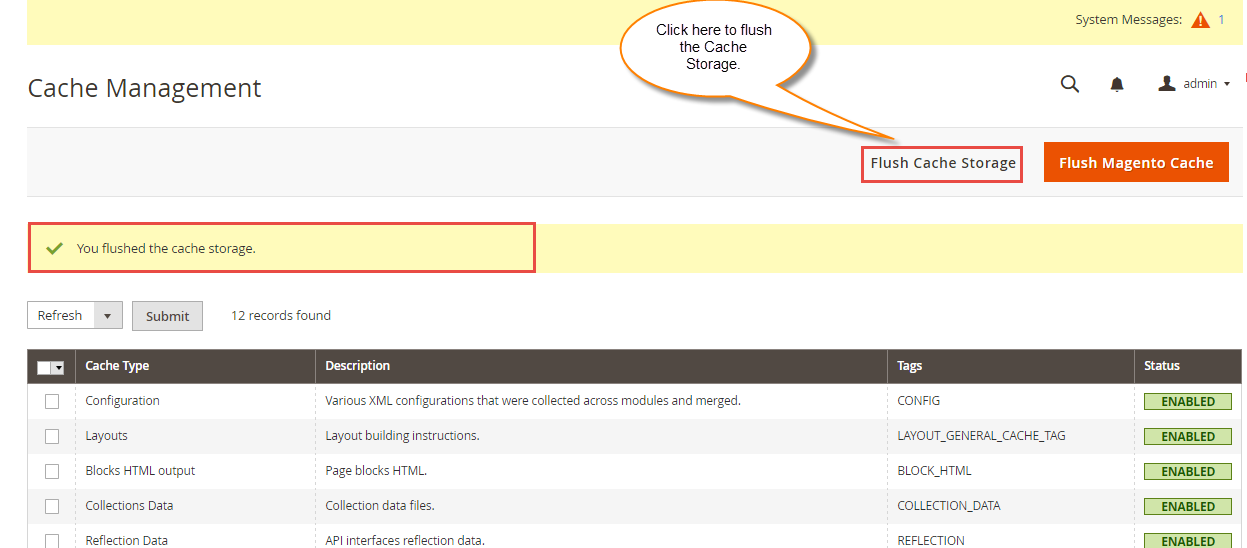
So, post running the commands, you have to flush the cache from the Magento admin panel by navigating through->System->Cache management.
Aramax Shipping- Account and Pricing Details
Thus, the merchant in order to add the payment gateway to the website they must have their account at Aramex end from here. They need not pay any special price for the same.
However, the only fee required here is for shipping the order to the customer. Thus, here the cost depends on the distance between the source(merchant address) and destination(customer address).
To see the respective cost details the merchant can check the same here- Aramex Shipping Rates.
How to get Aramex Credentials?
To get the Aramex credentials for configuring the module, you can check the steps below or visit this- Link.
- Email Aramex sales representative and cc –
[email protected]
Tell Aramex you need to integrate Aramex Shipping Services API and Rate Calculator API. - Aramex will provide Aramex Developer guides, and two separate sets of credentials for sandbox and production environments:
Account Number,Username,Password,Account PinandAccount Entity
Configuration Aramex Shipping
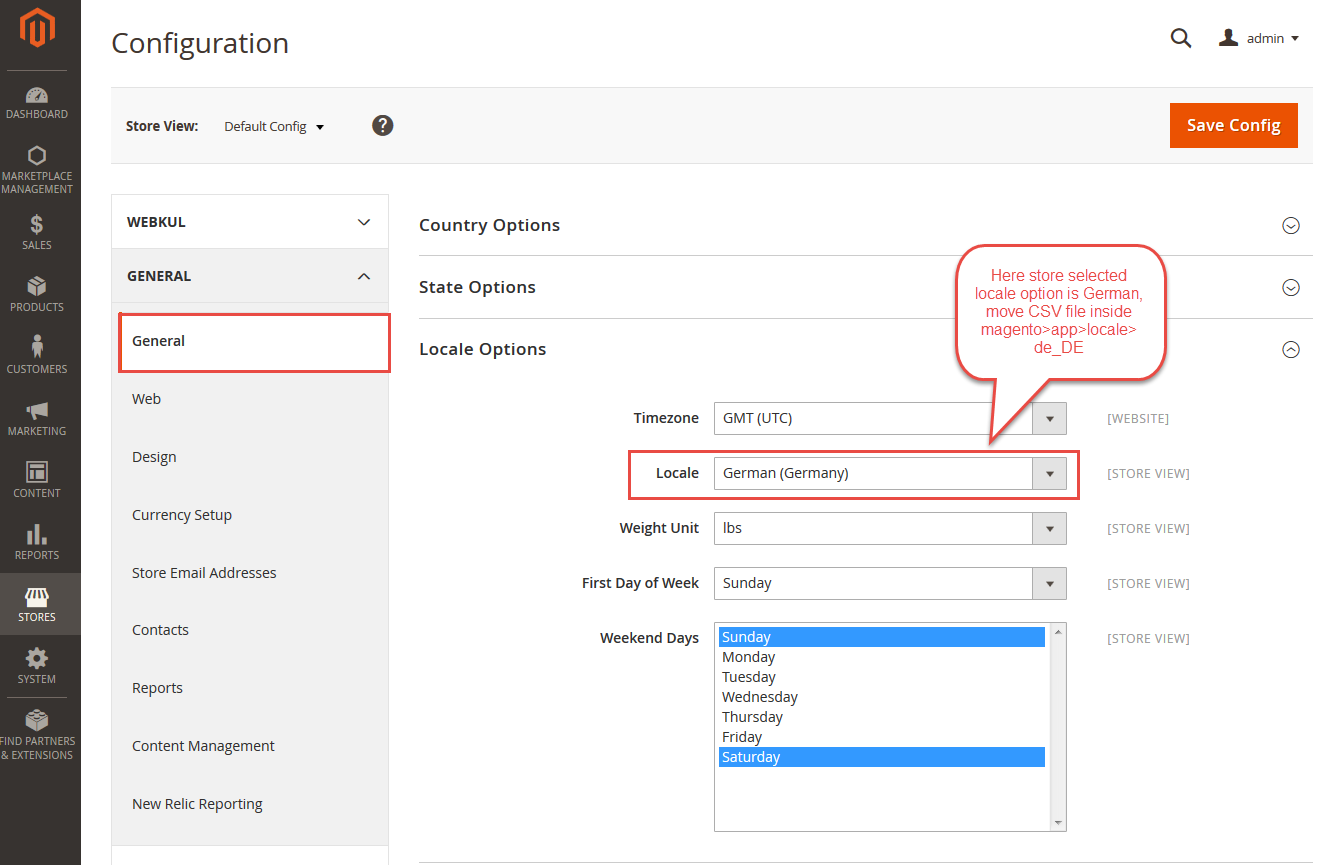
For the multilingual support, the admin will navigate through Store->Configuration->General ->Locale Options.
Henceforth, select the locale as German (the language into which the admin wants to translate his store content).
Translation of Aramex Shipping
If a user wants to translate their module from English to German. Henceforth, they need to follow the path app/code/Webkul/Aramex/i18n in their unzipped Magento2 Aramex folder.
Therein one can get a CSV file with the name “en_US.csv”.
Now they will rename that CSV as “de_DE.csv” and translate all right side content after the comma in the German language.
So, after editing the CSV, save it and then upload it to the path app/code/Webkul/Aramex/i18n where they have installed Magento2 on the server.
So, the module will get translated into the German Language. It supports both RTL and LTR languages.
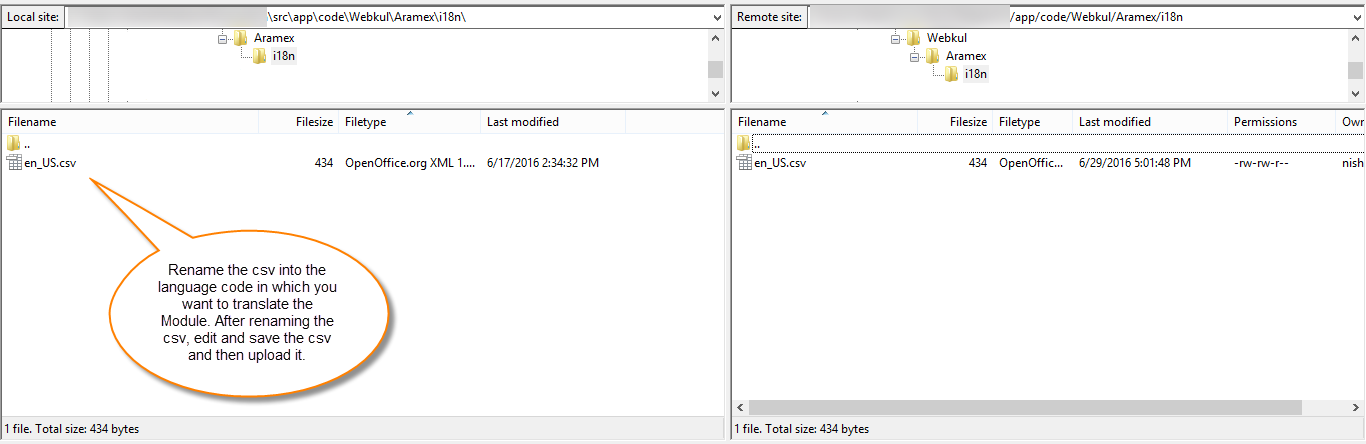

Thus, the user can edit the CSV like the image below.

Admin Configuration
After the successful installation of the module, the admin will have to configure the module.
Hence, the admin will have to fill in all the details for the proper functioning of the module else it might not work.
So, the admin has to fill in all the details by navigating to Store> Configuration> Sales> Delivery Methods.


Store Information
So, the admin can add the store information by navigating to Store> Configuration.

Here, from the General tab, the admin can click on General to fill in the Store Information. Thus, post filling the Store information click on the Save Config to save the details.

Here, the admin can-
- Enter the Store Name
- Add the phone number of the store
- Provide the details for the operation hours of the store
- Enter the country of the store
- Enter the Region/ state of the store
- Input the Zip/ Postal code of the store
- City of the store
- Store street address
- Enter the street address line 2 of the store
- VAT number of the store.
Hence post entering and making selections for all the fields in the configuration settings for this module, the module is all set to be used by the customers.
Front-end
After the setup, the customer can easily use this shipping method for their purchases.
Thus, when any buyer adds the product to the cart then there will be an option to fill up the zip/postal code.
Henceforth, then shipping methods and prices will be displayed on the cart page like this screenshot.

After clicking on the “Proceed to checkout” the customer will be redirected to the checkout page, here the customer will have to select the shipping method for their purchases.

After selecting the Aramex shipping method customer will click next to select the payment method and review the order.
Thus, on the order review page, the shipping method will be displayed like this and with the cost of shipping.

By clicking on place order the order will be placed.
**Note: The shipping rate for Aramex Shipping rates are calculated based on the weight of the product(s) and origin address of the admin.
Admin Order Management
Now the Admin views the order from “Sales > Order” and the admin can generate invoices for the ordered products, generate shipment for the order of the products.
However, the admin can notify the customers by sending them emails, cancel/hold the order, and even edit/reorder the product order.

Invoice
After viewing the order the admin will create the Invoice for the order. However, the invoice post creation is visible in the invoices section of the side panel.
Here, the invoice will contain all the shipping information and the cost of shipping for that particular order.

After creating the Invoice, the admin will create the shipping for the order. So, you can refer to the below screenshot to understand it in a better way.

The admin post submission of the shipping can click on the Shipment Option. Here the admin can Track the shipment, Create shipping Label, Print Shipping Label, and Show Package.
So, the admin can even Send the tacking details to customers from here.
Create Shipping Label
The admin click on this option to open a window to enter the packaging.

Thus, in this, the admin will add following details like-
- Type– Here the admin will specify if the Package is the document type of or not.
- Customs Value– Here the packaging charges will be mentioned.
- Total Weight– The weight of the package is written here.
- The admin will mention the dimension of the product in length, width, and height.
Then the admin can click on the ‘Add selected Product(s) to Package’, which will enable a list of products. The admin can select a product as per choice and click on the Save button.
Remember the Save button here will enable only when to Add the selected product(s) to Package is enabled.
Print Shipping Label
The admin can print the Aramex Shipping label as shown below in the screenshot.

Show Packages
The admin can click on this option to view the details of the package.

The admin can also track the shipment as default Magento as shown below.
![]()
Aramex COD is Enabled
Now let’s see how this shipping method will work when Aramex COD is enabled from the backend.
Note- The COD method will be supported in the national region only.

On the checkout page, the customer can view the shipping method like the image below. So, for Aramex COD, the customer has to select any of the Aramex Shipping Methods.

Thus, at the checkout page, the customer can view the Payment Information like the image below.

The rest of the process for the order management will be the same and it is described above.
Batch Printing Of Shipping Labels
The shipping label can be printing is done collectively to save the merchant time. Thus, for this, the store owner needs to view the list of orders for which the invoice is generation has taken place.

Now, the admin can select the orders for which Batch printing of shipping labels or slips needs to be printed.
Henceforth, the admin can now click on the Print shipping label to accomplish the action.

Thus the admin will be able to get a list of slips or labels in the form of a single PDF.


That’s all for the Magento 2 Aramex Shipping still have any issue feel free to add a ticket and let us know your views to make the module better http://webkul.uvdesk.com/.
Current Product Version - 4.0.2-p1
Supported Framework Version - Magento 2.0.x, 2.1.x, 2.2.x,2.3.x, 2.4.x

We don’t have enough information to create shipping labels. Please make sure your store information and settings are complete.