If you are having a brick-and-mortar business and also selling products online. Then, POS is a must-have feature for your e-commerce business. The point of Sale (POS) refers to a system where the store owner can create the order from his store using the POS and the order will be generated in the Magento. The Point of Sale module enables store owner to sell the Magento products in the retail stores.
Using Magento POS Native App Builder now the store owner can easily create the order from his/her store using the POS app from his/her tablet device. With the help of this App, merchants can manage their inventory and customers. The App can work in both online and offline mode. In offline mode, all the orders, and transaction are saved locally. When the internet is available for use, then the user can easily synchronize the offline data to the online data. The App is very useful for increasing the overall revenue by having online stores along with the physical stores.
Please Note:
- Point of Sale System For Magento (POS) module is required to build this app, so please purchase it separately if you haven’t.
- After the purchase of application, we will provide the PDF which contains the details like the logo, name of the organization, banner etc. You need to fill in the details and submit back to us.
- Magento POS Native App is supported to work on tablet devices of 7-inch minimum (and above) screen size.
What is the need for POS mobile app?
Having a mobile app for your POS is great as it provides the power to use from anywhere. As these days a mobile app is far way better than that your web applications as it offer better user experience and improved usability. It also has quick and flexible navigation and app page loading. That’s why at a rapid pace, the need and dependency on mobile applications are increasing.
Considering the convenience and benefits of a mobile application Webkul has now created a mobile application for your POS – Magento POS Native App Builder.
Features
- It also works in offline mode or in poor internet connection.
- Synchronize offline data to online data when the internet is available.
- Can view offline mode orders.
- Can add a product to the cart by clicking on the product.
- Can add products to the cart by SKU and Barcode Scanner(using camera).
- Can hold a cart for later checkout or product addition.
- The salesperson can Add New Customers.
- Real-time synchronization.
- Easy transaction process.
- Centralized Inventory Management for Magento Online Store and POS outlet.
Please Note-
- The Magento POS connects only to the Printer, whereas it doesn’t connect directly with the cash drawer and card swapping machine.
- There is no external barcode reader for the android app, barcode is scanned using the camera.
POS Front End
The salesperson can easily Login the POS System (fronted) by using the Username(email address) and Password which is created by Admin.
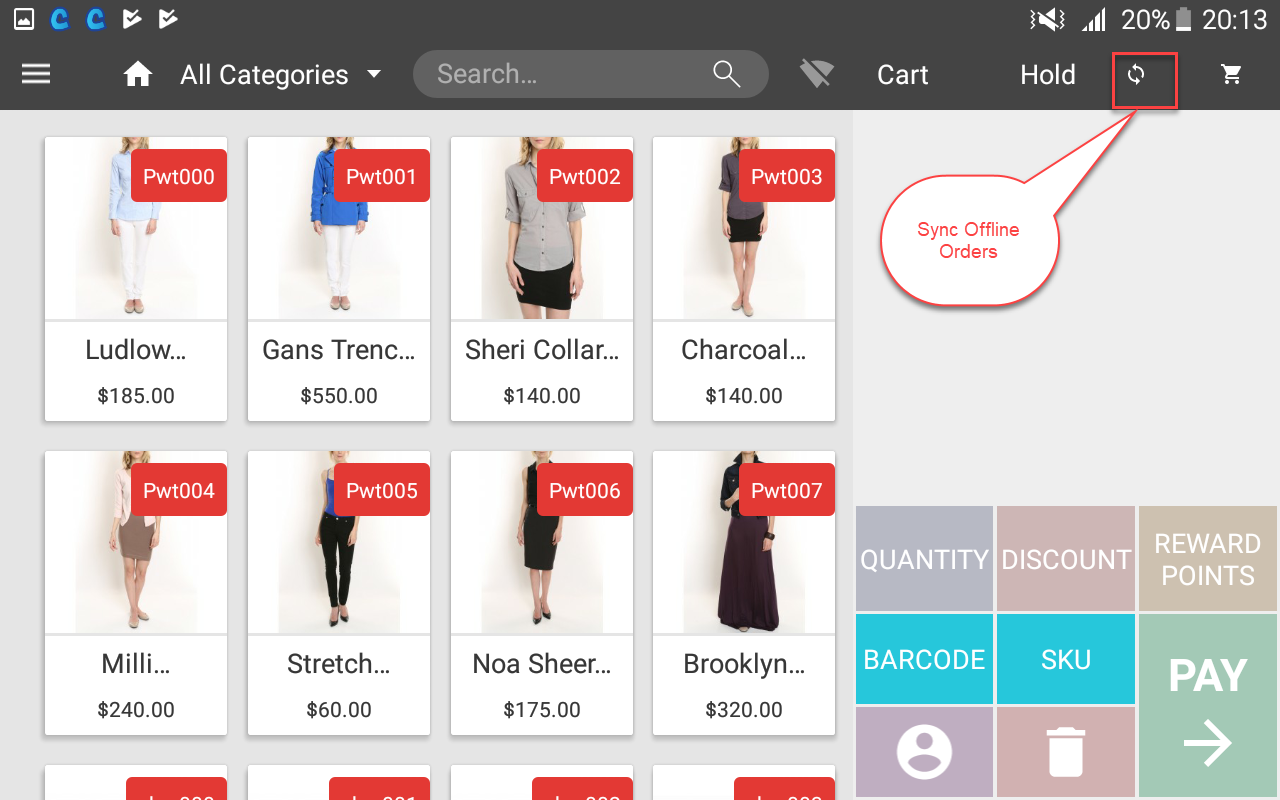
After Sign in, the salespersons will be redirected to their POS panel. The below image shows the POS panel of a salesperson.

- The POS panel shows all the products in the default category. The salesperson can change the category to view the product category wise.
- Salesperson POS menus for sales management like Orders, Orders on hold, and Offline Orders.
- Product Search for searching the product by Name. Here the user can type in the name by taping on the text field. This enables the keyboard. After the keywords(or product name) is written the sales agent can tap on the search icon in the text area or search icon in the keyboard.

- Offline/Online mode indicator. The POS can work in both online and offline mode. The wifi icon shows the internet connection for online mode and internet disconnection for offline mode.
- Hold icon can be used for holding a cart for later checkout or product addition. The held cart can be continued for processing by the salesperson.
- Synchronize button icon to synchronize offline data to online data when the internet is available.
- The salesperson can view offline mode orders by navigating to Offline Orders in the POS menu.
- The cart icon shows the count of the products present in the cart.
- The salesperson can add a product to the cart by clicking on it. The number of clicks on the product is the number of unit of the products added to the cart.
- Cart area has all the product with quantity detail. The salesperson can directly delete the whole cart via the delete button.
- The salesperson can use the camera of the device to add products to the cart. The camera of the device could be activated clicking on Barcode button.
- The salesperson can add products to the cart by product’s SKU.
Adding Products To Cart
The salesperson can add products via multiple methods. The products can be added by clicking on the products, by product SKU, and through Barcode (via device camera).
The salesperson can add products by clicking on the products. The number of clicks on a product is the number of units of that product added to the cart.
- The salesperson can view the products category wise by choosing a category from the category select drop down.
- Product search is for searching for a product by typing the name in the search area.
- The complete cart can be deleted by Delete button. But, for deleting a particular item, the salesperson needs to just swipe the particular product to the left from the cart.
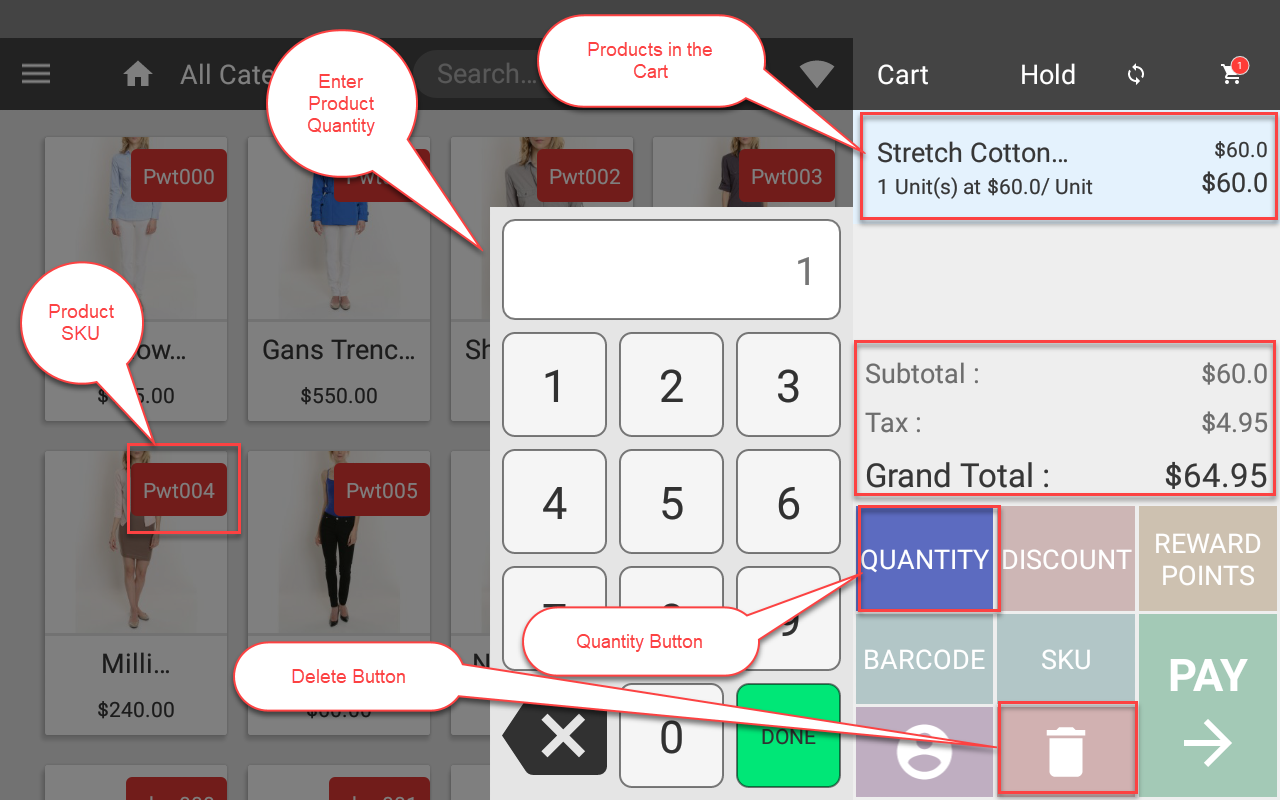
- The Products are shown in the cart with details like the name of the product, unit of product, price per unit and the total price of the product by adding all units price.
- The salesperson can see the subtotal and grand total price of the cart.
- The salesperson can change the quantity of a product by selecting the product and clicking on the “Quantity” button icon. The salesperson can give the required quantity and save it by clicking on the “Done” button.
The salesperson can add products to the cart by scanning the barcode of products.

- After clicking on “Barcode” icon, the device camera will get open. Scan the product’s barcode from the camera then the product will be added to the cart.
But if the scanned product has product options(custom options & configurable products) like color, size etc. Then, a dialog box appears and the agent first needs to select the products option and the product gets added to the cart. - Unit of product in cart increase with number scan of a product.
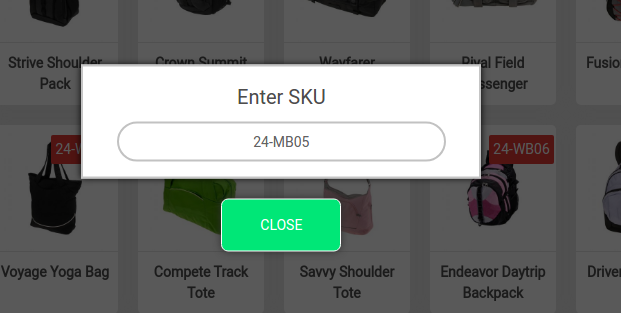
The salesperson can add products to the cart by their SKU.

- On clicking the SKU button a popup screen appears, through which the salesperson can add products to the cart.
- The salesperson will enter the product’s SKU and press enter to add the product to the cart.
- Unit of product in cart increase with number times the SKU has been entered.
Add Customer
After all the required products of a customer has been added to the cart, the salesperson can choose or add customer for which the order has to be made. For this, click on Add customer icon.
The salesperson can choose a customer from the registered customer list. The salesperson can search registered customers by name.
- If a customer is not registered to the store then, the salesperson can add customer by clicking on “Add Customer” icon.


- First Name of the customer.
- Last Name of the customer.
- Email-Id of the customer.
- The telephone number of the customer.
- Street Address of the customer
- Street Address 2 is a much detailed street address.
- City name of the customer.
- Zip/Postal Code of the customer’s location.
- Country name of the customer.
- State of the customer.
- Lastly, the salesperson will click “Continue” to save the customer details and continue the checkout process.
Completing Orders
For Completing the orders, the salesperson will first select the customer and then proceed further.
- If a customer is registered then, the salesperson can search for the customer by typing his/her name from the list of displayed results and then click on Pay button.
- If a customer is not registered then, the salesperson will add that customer using Add Customer icon.
- After this, click on “Continue“.

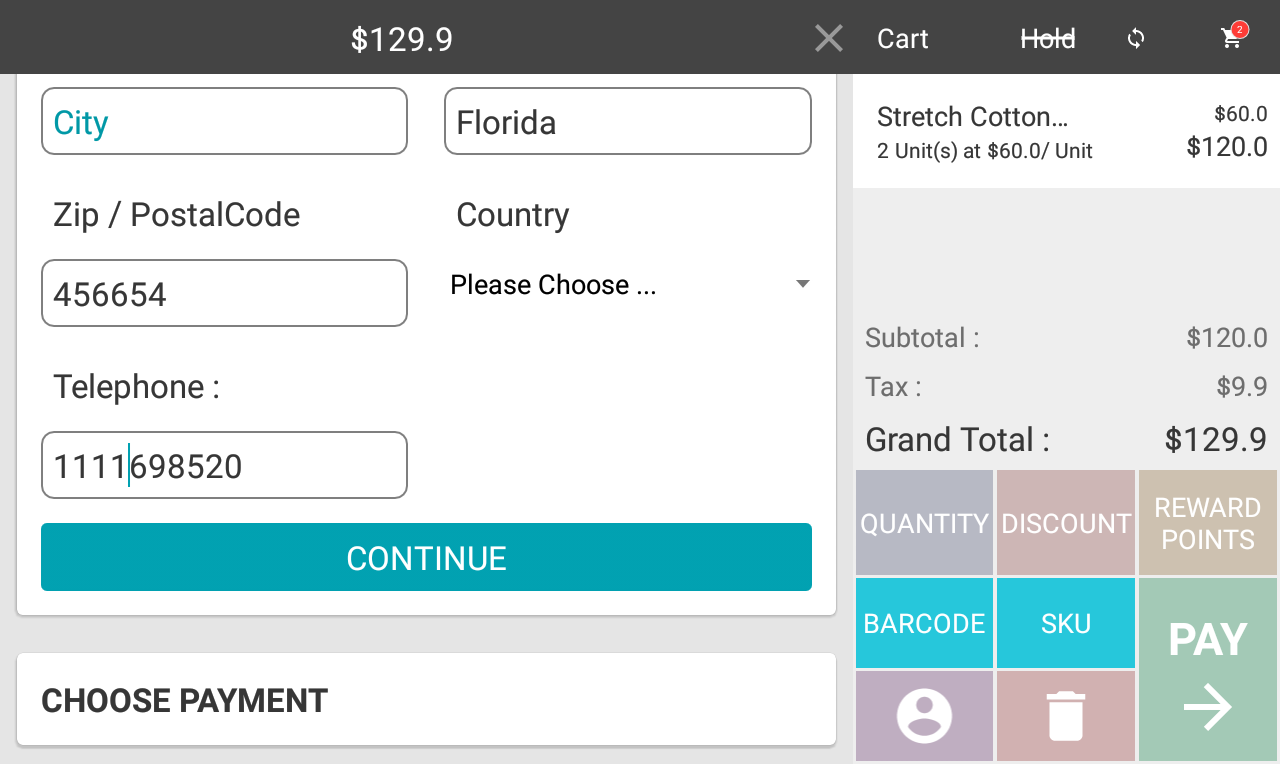
- The place order page shows the name of the customer and the Billing Information.
- The salesperson can add a new address of the customer by clicking on the drop-down icon in the Billing Information section. Here, you can review customers address and if required you can add the new address by clicking on “New Address“, then a page related to the address details will open.
- And then choose the Payment method.
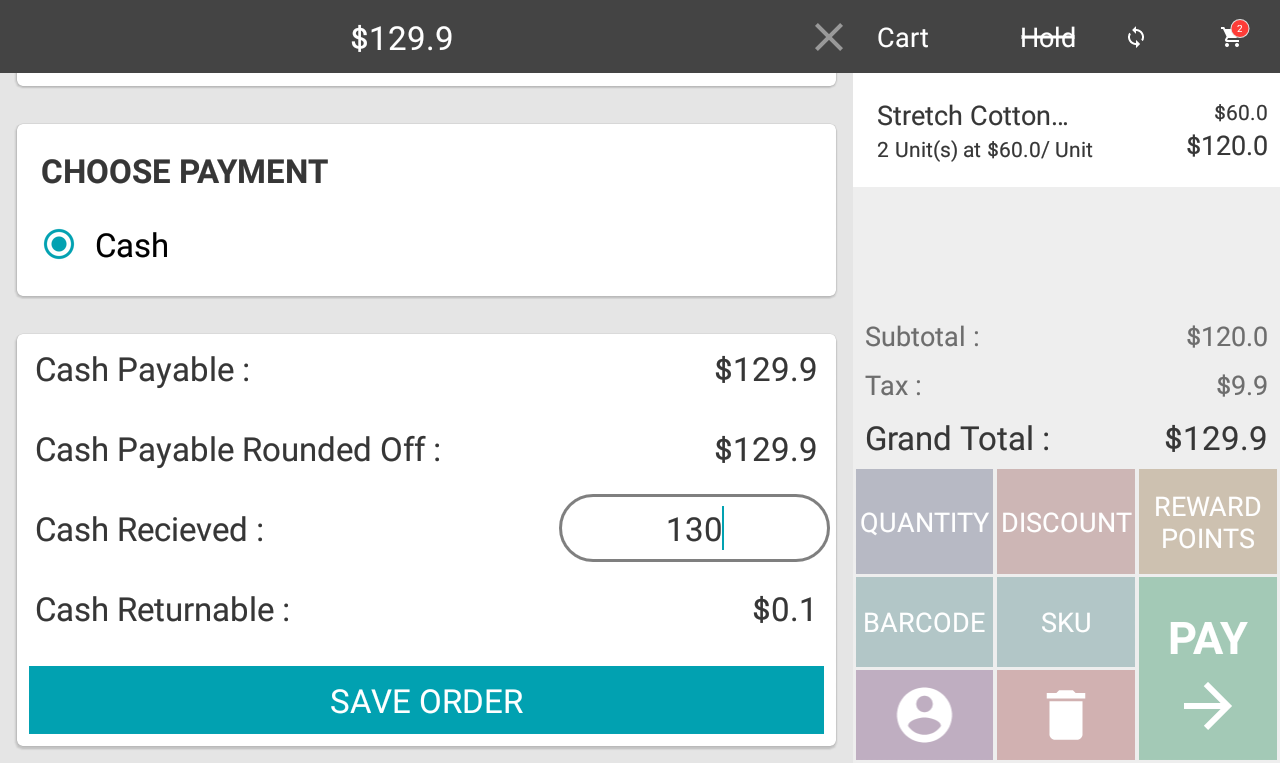
- Cash Payable is the total amount that the customer needs to pay(Total amount of products in cart + Taxes), Cash Received is the amount paid against the total amount. The cash received should either be equal or more than the cash payable amount. If the cash received is more than cash payable then the customer will get back the extra “cash returnable” amount.
- Lastly, the salesperson will click on Save Order to place the order and generate the receipt of the order
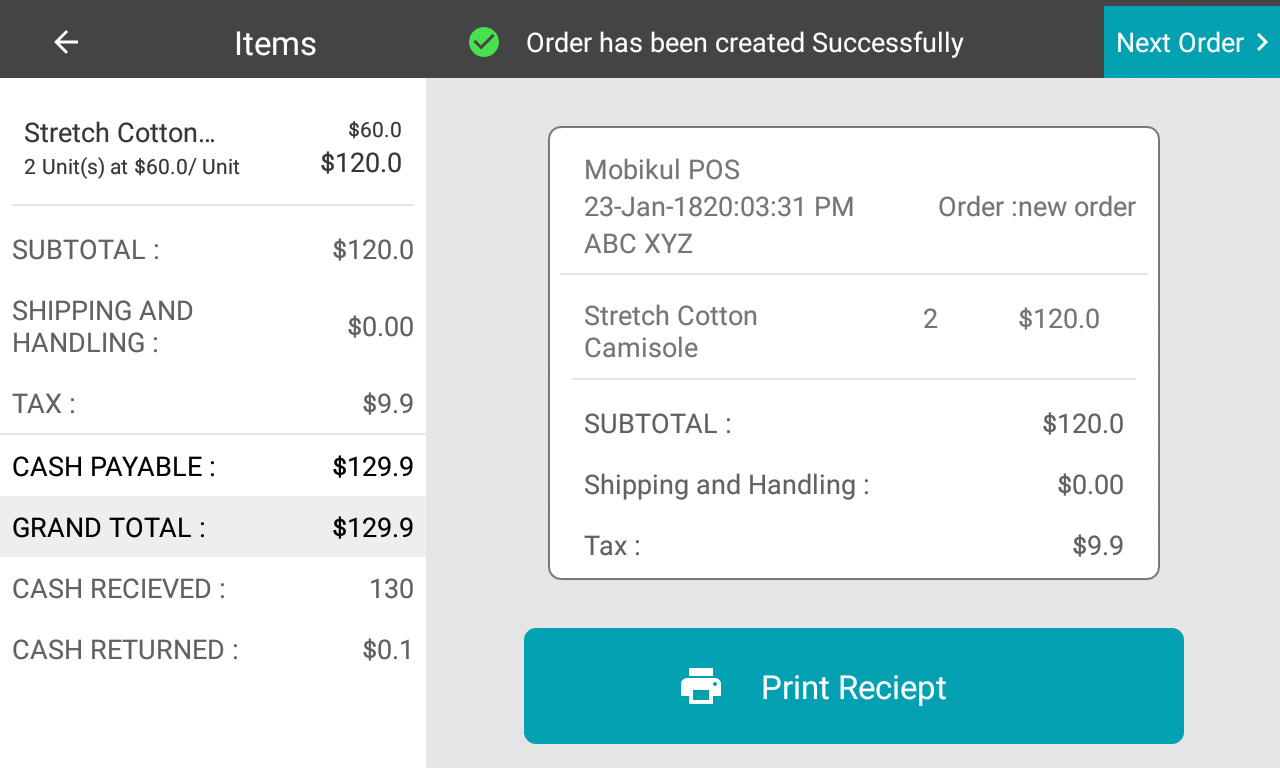
- The salesperson can print the receipt of the order or move to Next Order.
Note: The default application only supports Cash Payment method as the mode of payment.
Order On Hold
The salesperson can put the cart on hold for the later processes and can continue to process on the held cart when required. The salesperson can put a cart on hold by clicking on “ Hold” icon situated on the right side of the header.

- The salesperson can navigate to the “Order on Hold” through POS menu icon -> Order on Hold.

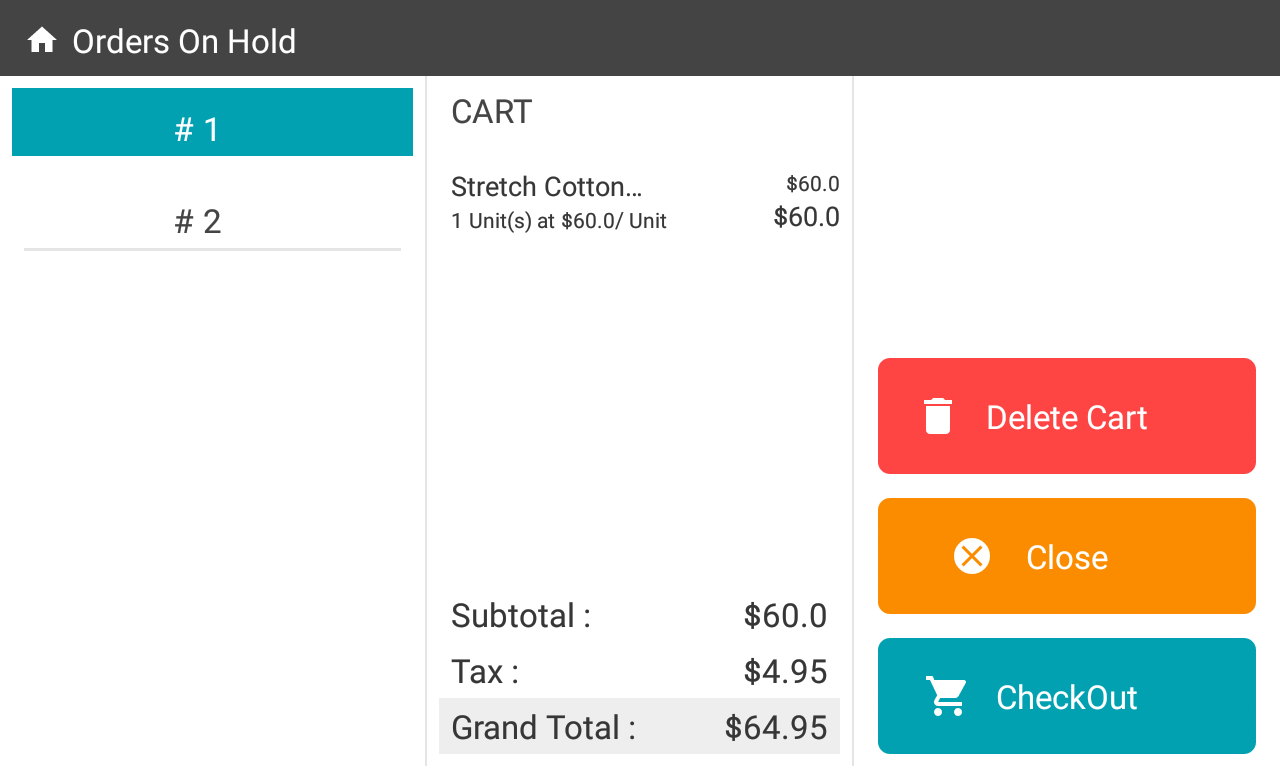
After Clicking on the “Orders On Hold” tab the salesperson will be redirected to the orders on hold page.
- List of orders on hold.
- Order Details including the product information along with the price and grand total.
- The salesperson can Delete Cart from the hold order list.
- The salesperson can exit the “Order on Hold” section by clicking on the Close button.
- The salesperson can Checkout the hold order to continue the further processes.
Orders
The salesperson can check the orders by navigating through POS menu -> Orders.

This will navigate the salesperson to the Order List page as per the below image.

Here the salesperson can:
- View the complete list of the orders including all the online and offline orders.
- Easily distinguish the offline and online orders because the offline orders will have an offline icon.
- Order Detail of each order.
- Customer Details like name and address.
- Payment method detail.
- Print Receipt button to print the receipt of the order.
ONLINE ORDER:

OFFLINE ORDER:

The salesperson can even sync the offline orders by clicking on the Sync Order button.
Offline Orders
The salesperson can check the offline orders by navigating through POS menu -> Offline Orders.

This will navigate the salesperson to the Offline Order List page as per the below image.

Here the salesperson can:
- View the complete list of the offline orders.
- Offline Order Detail of each order.
- Customer Details like name and address.
- Payment method detail.
- Print Invoice button to print the invoice.
- Sync Order button to synchronize the order to online orders and data.

The salesperson can also sync offline orders by Sync icon on the home page.
However, this sync icon can sync the product, categories, and other details in POS. It acts like global sync of POS.
Printer Settings
The salesperson can set a printer from here, this is a one-time setting which needs to be done. For this, Salesperson needs to click on the Printer Settings tab as per the below image.

The SalesPerson needs to select the printer from which he/she wishes to receive the printout.

However, the on the selection of EPSON POS Printer option, the sales agent will get a list of EPSON Printer as below-
- Target– This will contain IP address of the printer.
- Printer Series-The sales agent can enter the 9 alphanumeric characters which denote the printer.
- Language- The language in which printing could be done.
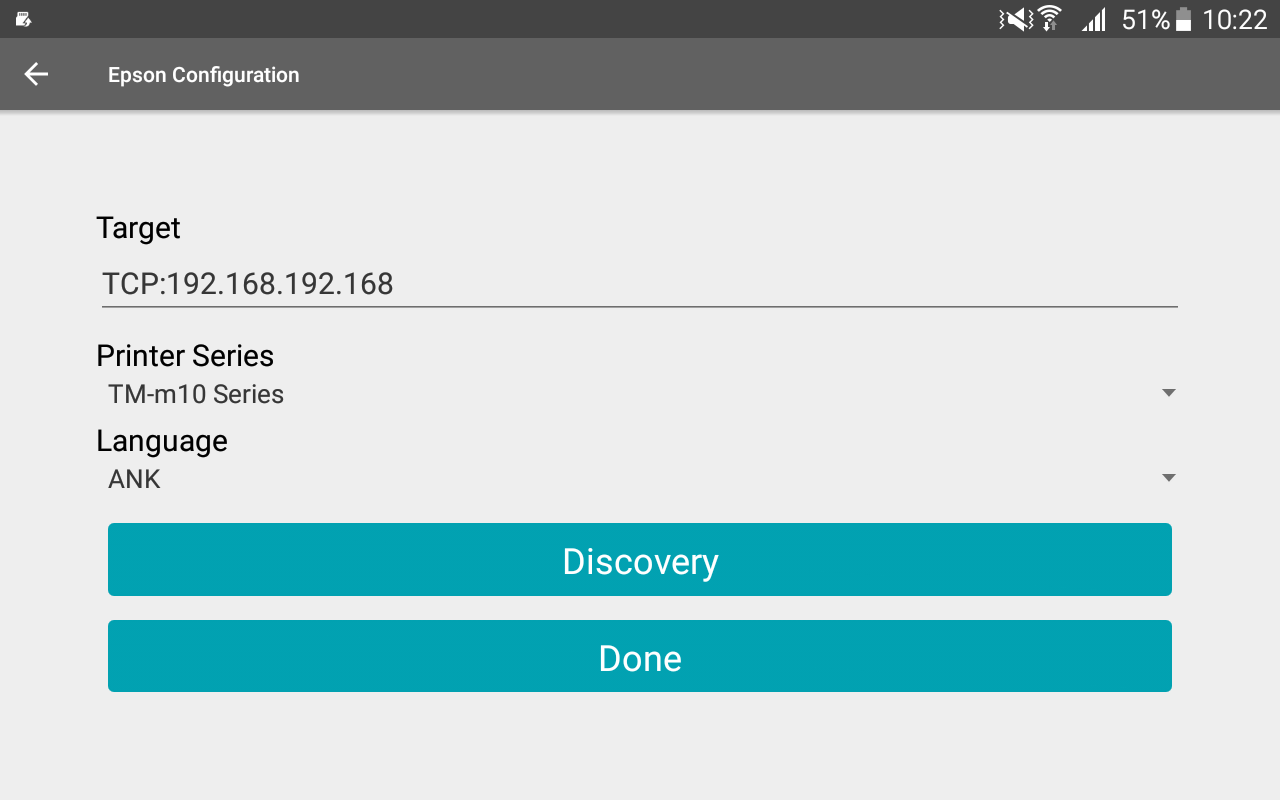
The sales agent can even click on the Discovery button to connect to nearby printers. After clicking on the Discovery button, a list of all the available Epson printers will be available. The salesperson can select a printer that he wants to connect. After selecting the printer, the above mentioned fields will be auto filled. Lastly, the sales person needs to press the Done button to save the settings.
For any query or doubt, Please add a ticket at https://webkul.uvdesk.com/
Current Product Version - 1.06
Supported Framework Version - Android 4.4 and above

Be the first to comment.