Using the Magento Marketplace Seller Product Exchange module, Magento marketplace sellers will now be able to exchange their products amongst themselves.
Note: To use the Magento Marketplace Seller Product Exchange, you must have installed the Magento marketplace in the first place. This module is an add-on of the Magento marketplace module.
Note: The exchange can only be applied to Simple and Configurable product types.
Features Of Magento Marketplace Seller Product Exchange
- Exchange of Seller products for Magento Marketplace.
- Only Sellers can raise an Exchange request.
- Exchange request history with sellers pagination.
- Exchange request view with products.
- In-built Self-pickup free shipping method for sellers.
- Seller to Seller conversation with mail.
- Status updates Notification on emails.
- Products can be selected with quantity and options (if any).
- Admin can allow sellers for the exchange of their products.
- Exchange link is shown at the Category, Product, Seller Profile, Seller Collection Page.
- Email notifications will be sent for – Exchange Product Request, Exchange Product Request Approval, New Message Alert, Ship package Notification, and Exchange Completed.
Installation Of Magento Marketplace Seller Product Exchange
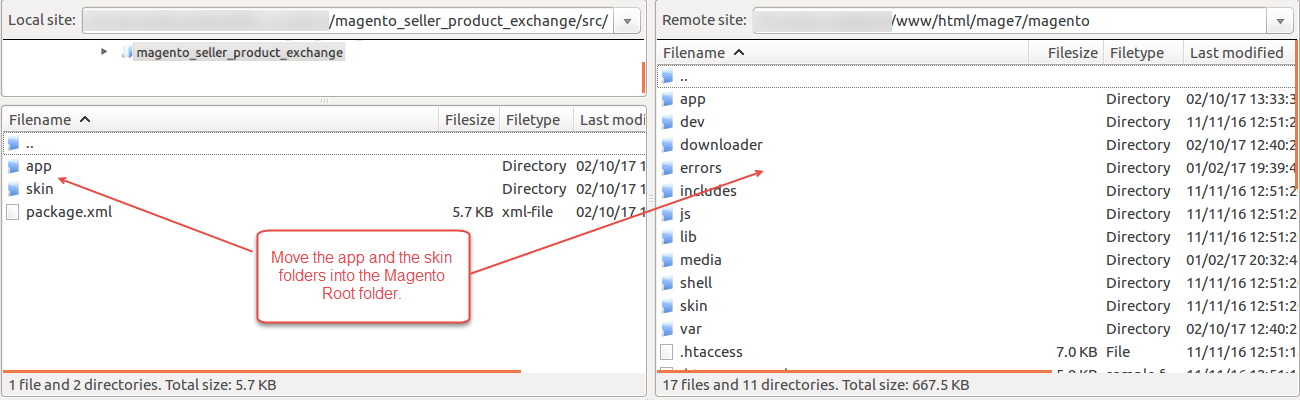
After you have downloaded the module zip file, installation is super easy. You will have to move the app and skin folder into the Magento root folder.
After moving both the folders, flush the cache from the Magento admin panel by navigating through -> System->Cache management.

Module Translation For Magento Marketplace Seller Product Exchange
After the module installation, the user will unzip the folder and tap on the src folder. Inside that folder, you will find the app folder. Tap on the app folder and you will get locale and inside that, you will find the language folder in the English language as en_US.
Now follow the same path and open the locale folder where you have installed the Magento Marketplace and go inside the locale folder and create a new folder and name with the language for which you want to convert your module content. Now edit the translate.csv and then upload to your server inside the locale folder.

Admin Configuration Of Magento Marketplace Seller Product Exchange
After the successful installation of the module, to configure the module for use the admin will navigate through System->Configuration->Marketplace->Marketplace Exchange Product Setting as per the below snapshot.

Here, the admin has two options to choose from –
- Allow Sellers to Manage Exchange for their Products.
If the admin chooses “Yes” for this setting, the sellers will be able to manage their product exchanges else if the admin selects “No” then the sellers will not be able to manage their product exchanges.
While adding a new product or editing an old product you will get an option – “Allow the exchange for product“. If you will select this option as “Yes“, then the exchange will be available and visible to the other seller but not to yourself. Also, if the option is set to “Yes” then the exchange links will be visible else they will not appear.
- Allow Sellers To Self Pickup.
If the admin has selected “Yes” for this setting, the seller will get an option to self-pick-up the product exchanges. Selecting “Yes” will also bring up the “Title for Self Pickup” that needs to be entered by the sellers.
Seller End – Workflow Of Magento Marketplace Seller Product Exchange
If the admin has set the setting “Allow Sellers to Manage Exchange for their Products” to “Yes“, then the sellers will be able to see the menu option for the exchange as per the below snapshot.

While adding a new product or editing an old product you will get an option – “Allow the exchange for product“. If you will select this option as “Yes“, then the exchange will be available and visible to the other seller but not to yourself.

After you have added the exchange to the product, now when the other sellers of the marketplace see the product they can see the option of exchange on the Product page, Category Page, Profile Page, and the Seller collection Page.
Product Page:

Category Page:

Profile Page:
After going to the seller Profile page, the other sellers will be able to see the “Exchange Now” for the products on which the seller has added the exchange option.

Collection Page:
After going to the seller collection page, the other sellers will be able to see the “Exchange Now” for the products on which the seller has added the exchange option.

To exchange the product, the seller who wants the exchange will click the “Exchange Now” option that is available on the product, category, seller collection page as shown below in the snapshot.

Clicking the ‘Exchange Now‘ option will bring up the “Exchange Product Form” as shown below in the snapshot.

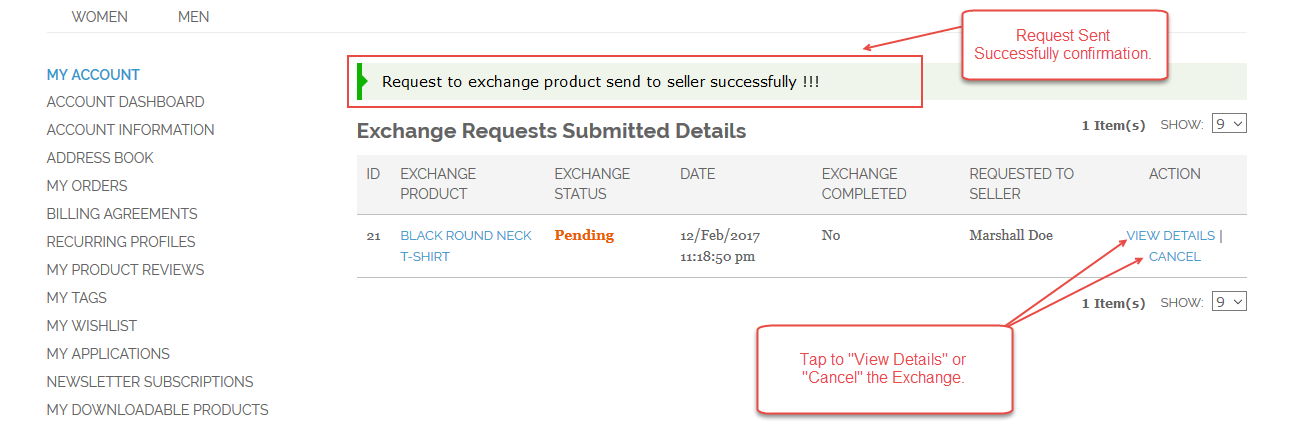
After selecting your product that you want to exchange, tap to calculate the amount. If there is any additional information that you need to send, you can type it in and then click the “Submit Request“. After tapping the submit request option you will see a confirmation that the request has been sent to the seller as per the below snapshot.
A New Exchange Product Request email will be sent to the other seller –

Tapping the “View Details” option will bring up the exchange details and tapping the “Cancel” option will cancel the exchange request as shown below in the snapshot –

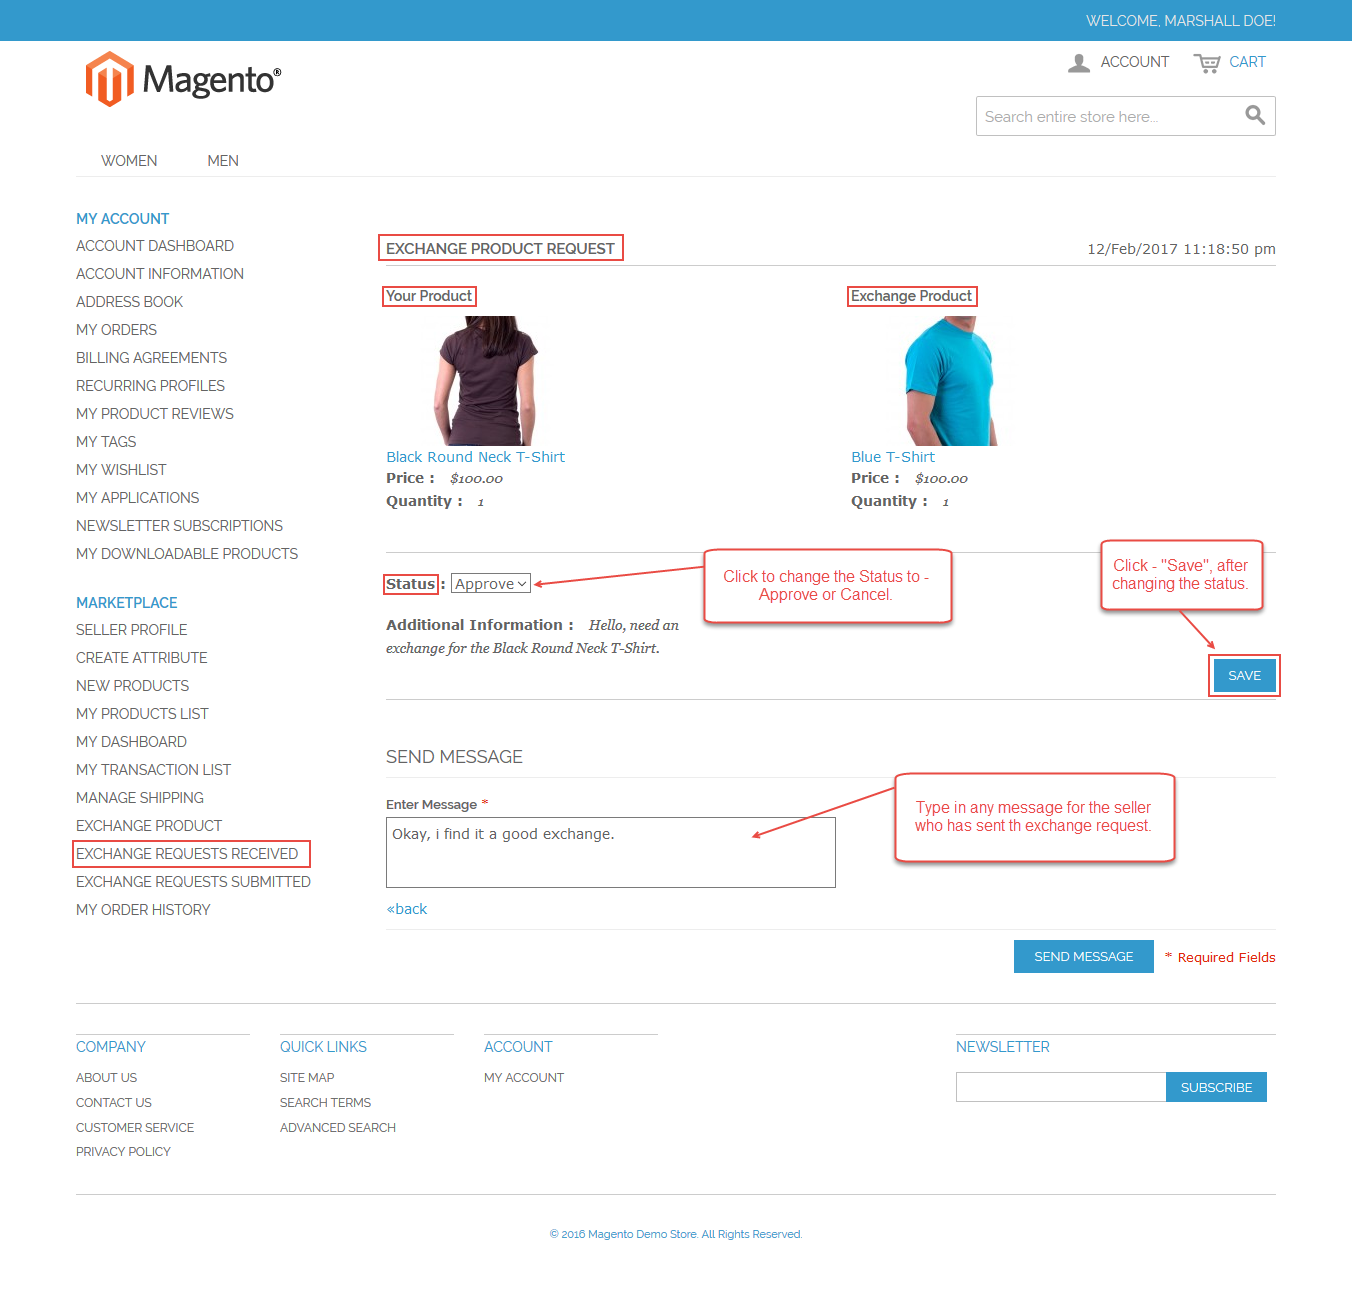
The seller to whom you have sent the exchange request will find this exchange request under his account menu option “Exchange Requests Received” as shown below.

After tapping the View Details option in the above image, you can see the exchange details, change the exchange status to – Approve, Pending, or Cancel. After changing the status as per your requirement, click the save option to save the changes as per the below snapshot.
After selecting “Approve” and then clicking the “Save” option, you will see a confirmation message as per the snapshot below.

An email for Product Approved will be sent to the other seller –

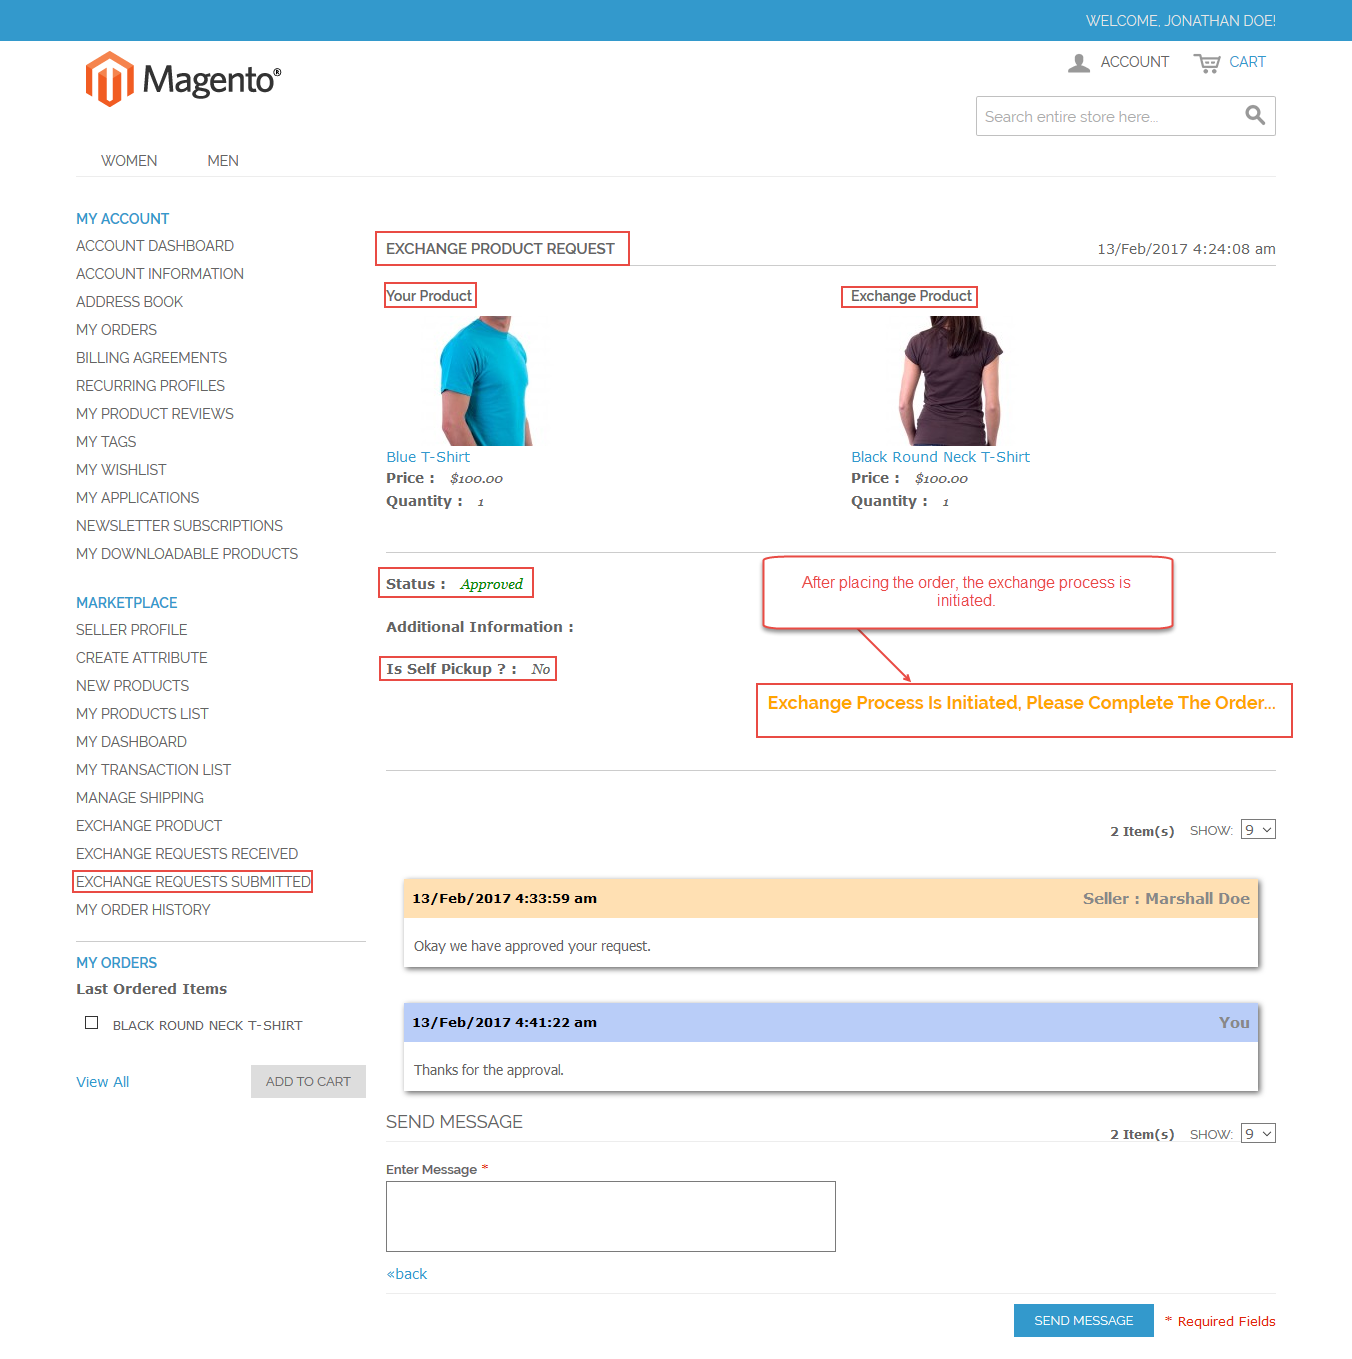
Now the seller who had initiated the exchange request will navigate to his account menu option – “Exchange Requests Submitted“. Here the seller will click on the “View Details” option to see the details of the exchange. Also, the sellers can exchange messages among themselves.
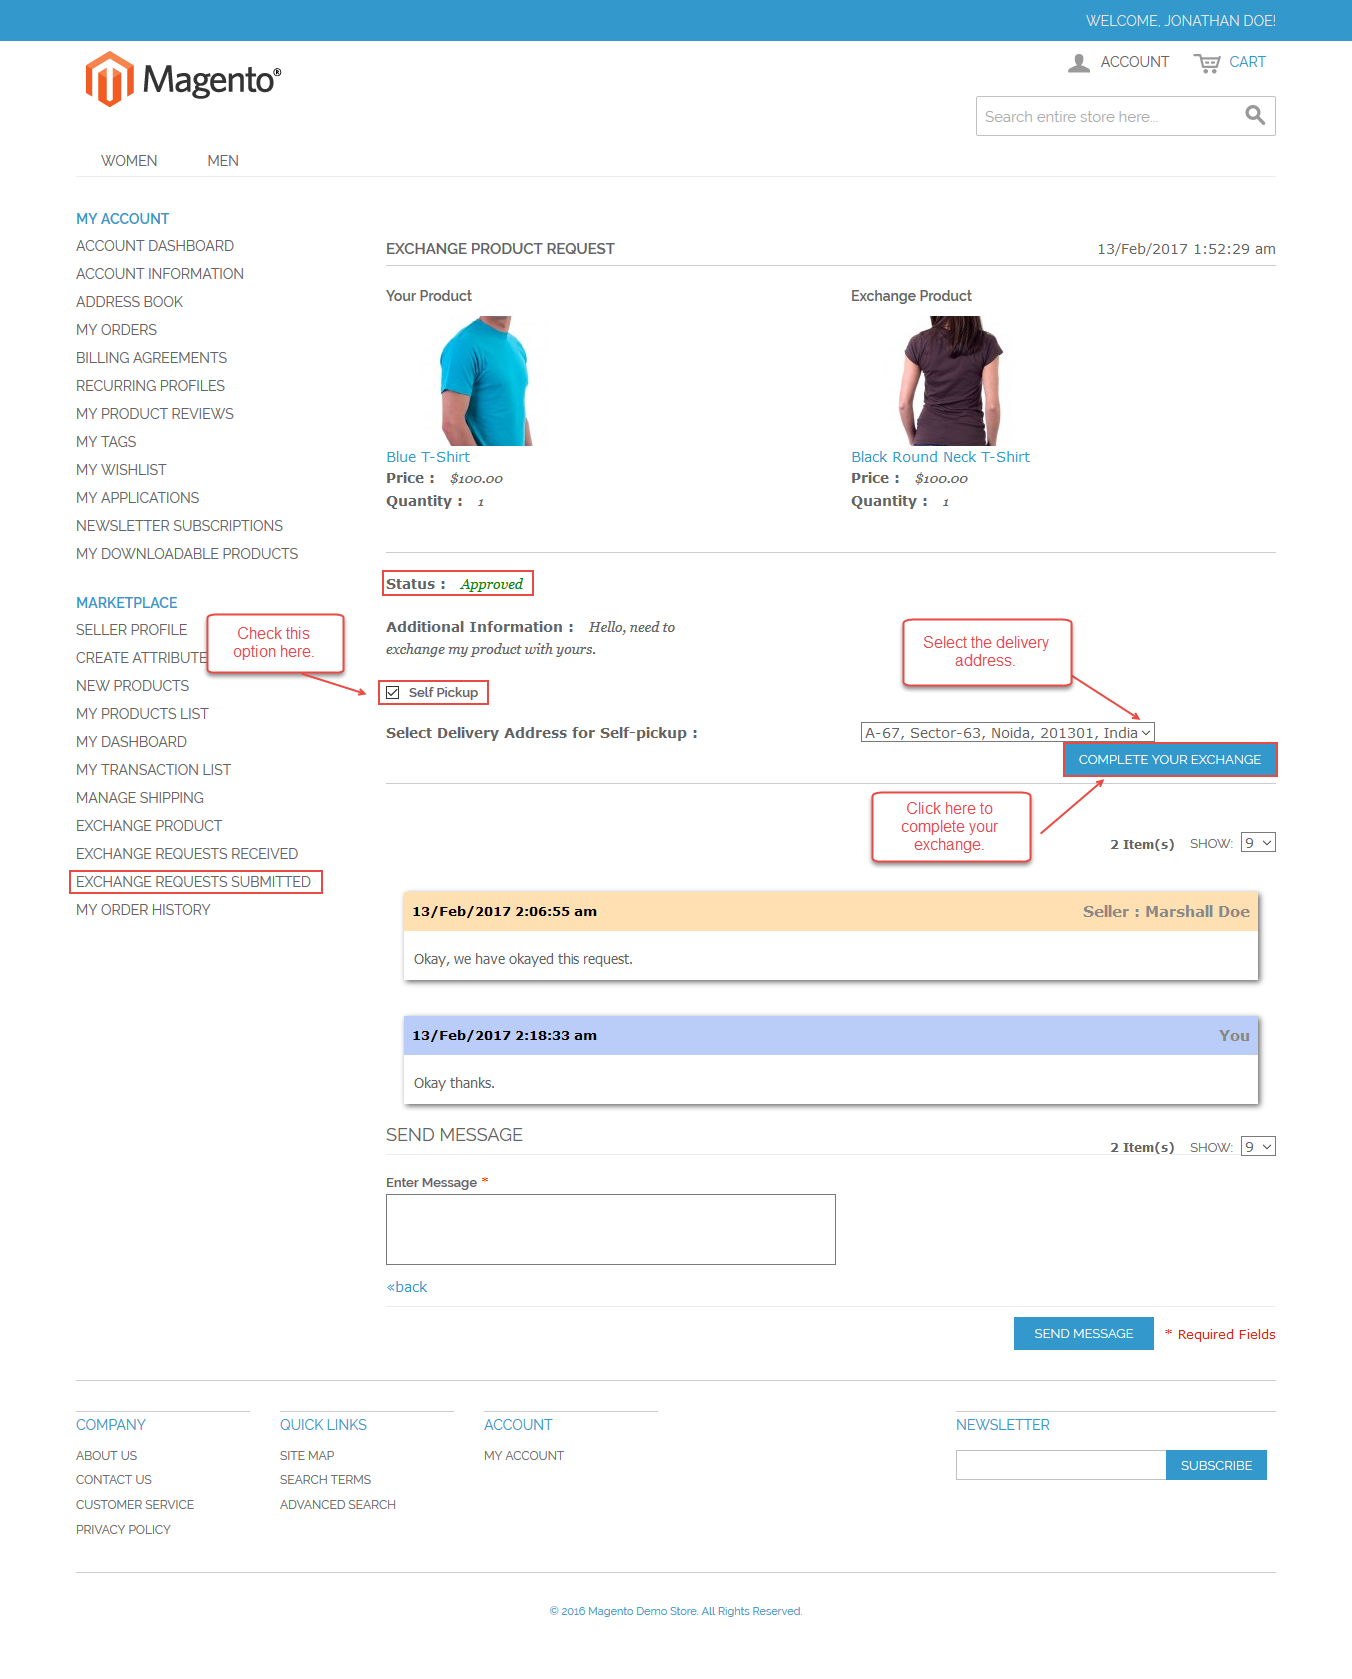
If the status of the exchange is “Approved” then the seller can see an option “Complete Your Exchange” to complete the exchange.

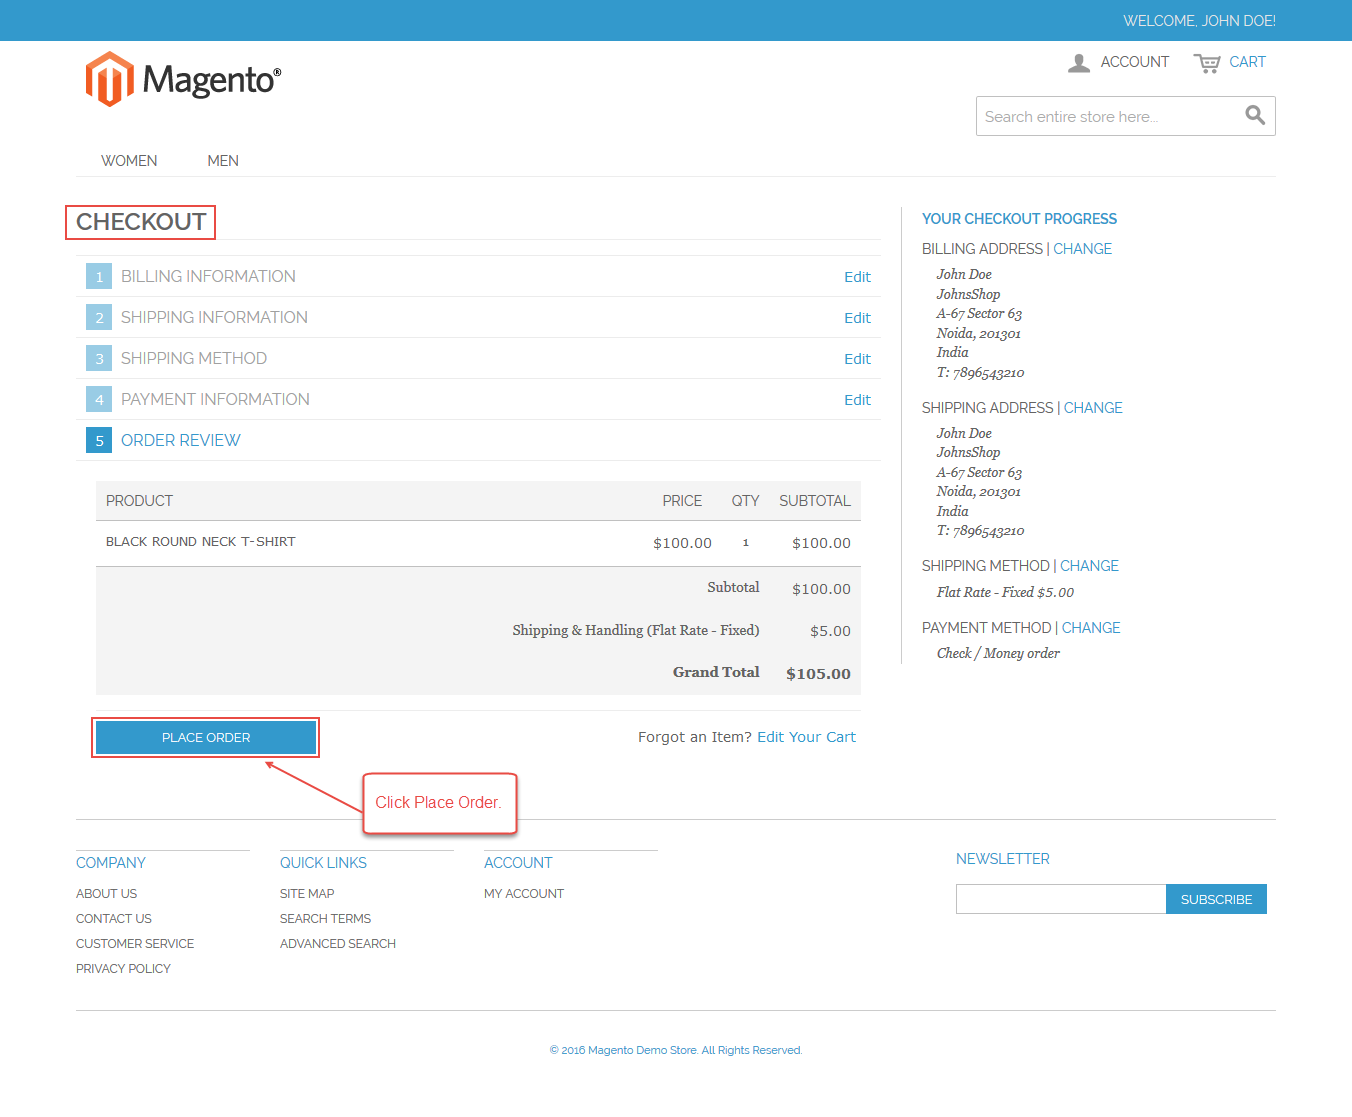
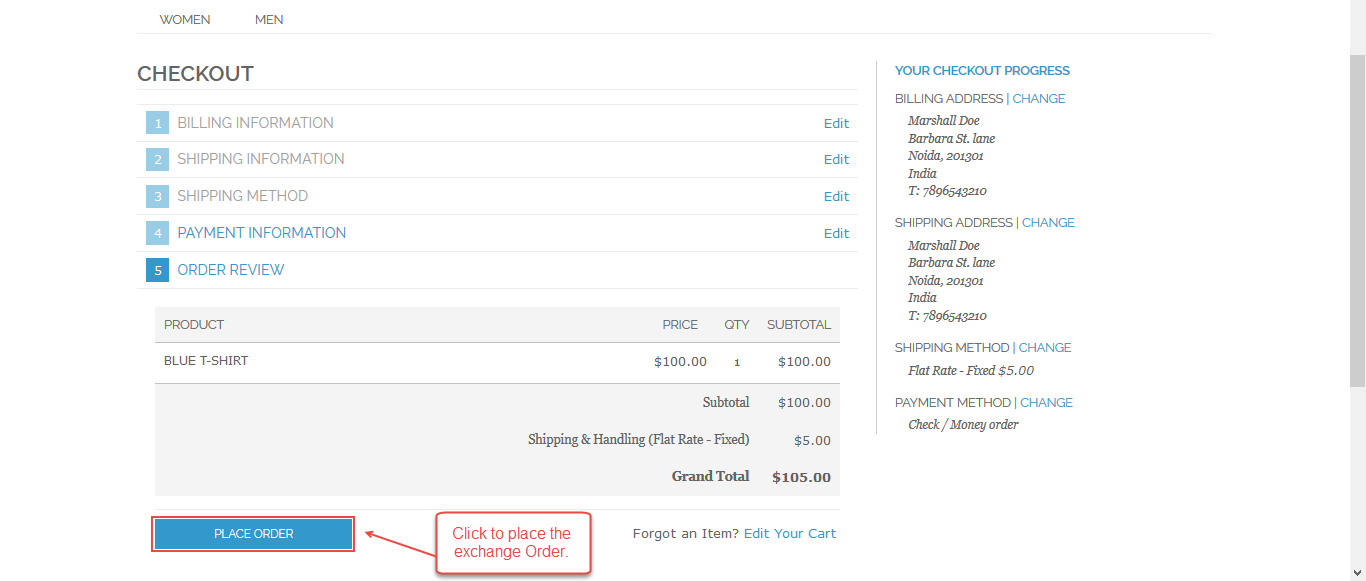
After clicking the “Complete Your Exchange” option, the seller will be directed to the checkout page where he will fill in all the details. Lastly, the seller will click the “Place Order” option to place the order for the product as per the below screenshot.
Now the seller will have this page under Exchange Request Submitted –
Now the other seller with the exchange product will also complete the exchange by following the same steps. The seller goes to his “Exchange Request Received” and taps on the “View Details” option as per the below screenshot.

After clicking the View Details, exchange product request page will open up. Here the seller will now click the “Please Complete Exchange” option to complete the exchange as shown below.

After clicking the Order number or the “Please Complete Exchange” you will be redirected to the shipment generation page. Here you have to generate the shipment. Only after both sellers generate the shipments, the exchange will be completed.

After tapping the please complete exchange, the seller will be redirected to the checkout page where the seller after filling in the required information will click the “Place Order” option to complete the exchange process.
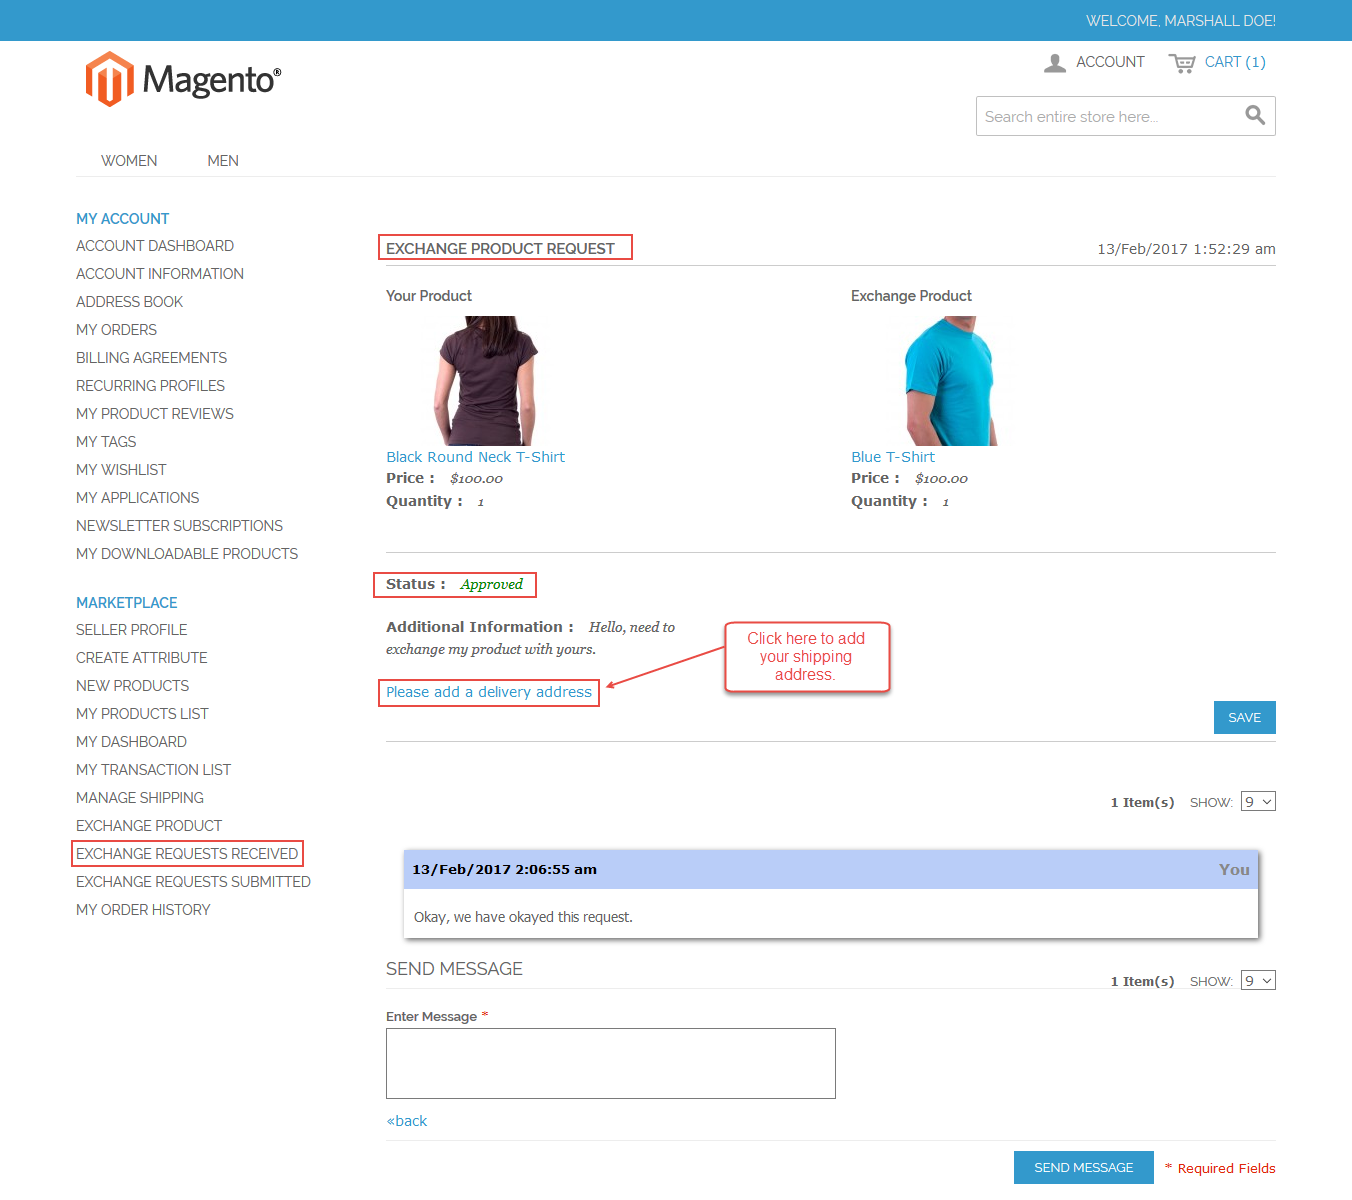
If the admin has set the self-pickup to “Yes“, then it’s important that both the sellers should have saved their store address else the self-pick will not work. Also, the admin will set the title for the self-pickup that will be visible to the sellers. In this case, the notification email will be sent to both the sellers.

Now when the seller submits the exchange product request he can see his submitted request under his account menu option “Exchange Requests Submitted” as per the below screenshot.

Now, this request will arrive under the account menu option “Exchange Request Received” of the other seller as shown below.

After clicking on the view details for this exchange request, the seller can approve or cancel this request and send messages to the seller.

Now, as the admin has set the self-pickup as “Yes“, it is required that both the sellers must have saved their address in the first place. if the seller has not set the address then he will see an option to add the address as shown below in the snapshot.
Now the seller who had initiated the exchange will go to the exchange request submitted option under his account menu. Here the seller will check the option – “Self Pickup“, then select the delivery address and lastly click the “Complete your Exchange” option to complete the exchange and that’s it no need to go for the checkout in this case.
The other seller will also follow the same procedure and will check the option – “Self Pickup“, then select the delivery address and lastly click the “Complete your Exchange” option to complete the exchange. After the exchange is successful, you need to generate the shipping on both the seller ends to complete the exchange.
Seller1:

Seller2:

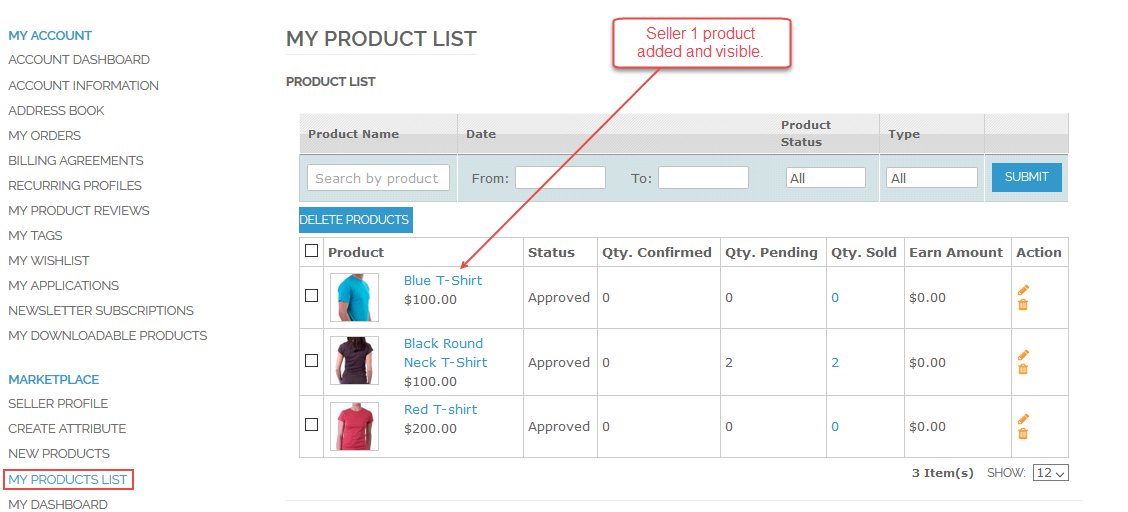
After the exchange request is completed on both the ends, the admin will have to enable the exchanged products from the backend. After that, the products will be enabled and the products will be swapped in the respective seller product lists as shown below.
Seller1 Requested an Exchange:

Seller2 Added an Exchange To his Product:
That’s all for the Magento marketplace Seller Product Exchange If you still have any issue feel free to add a ticket and let us know your views to make the module better at http://webkul.uvdesk.com/
Current Product Version - 1.0.0
Supported Framework Version - 1.4.x.x, 1.5.x.x, 1.6.x.x, 1.7.x.x, 1.8.x.x, 1.9.x.x

Be the first to comment.