Introduction
The Magento 2 (Adobe Commerce) Sell on Instagram Shop module lets the store owners feature their products on Instagram by tagging multiple products in their Instagram shop posts and stories. Eventually, sell to more customers present on the Instagram community by leveraging the features of Instagram Shop and Magento 2.
Exhibit a diverse product gallery from which customers can make a purchase by visiting the storefront and let people make selections and discover, explore your product options and catalogue with Instagram shoppable posts.
With more than one billion monthly active users, your customers and millions of guest users are already on the Instagram community. Simplify the process of marketing and feature products on your Instagram Shop.
Check the configuration of the plugin in the overview video below –
Features
- Use product tagging to feature the Magento 2 store product on the Instagram shop.
- Manually enable or mass setup the customer redirection to the product page of the store or else customers will reach directly to the checkout page.
- The admin can automate the product feed CSV or generate it manually as well.
- The admin can generate the product CSV feed periodically.
- Set cron to schedule the product feeds CSV generation frequency.
- The start time of the CSV generation can be set by the admin.
- The admin can give the required prefix for all of its Instagram Shop products.
- Discard or Include all the out of stock products to be synced while generating the product feed CSV.
- Mass assigned the Products to be featured on Instagram and their Google Product Categories for the products synced from the Facebook shop.
- Map the Facebook attributes with the required available Magento 2 store product attributes for your Instagram Shop.
- The module supports all of the product types including Simple, Configurable, Downloadable, Grouped, Virtual, and Bundle.
- The Instagram shop will fetch Special prices imported from the Facebook shop.
Note:
- To enable Instagram shop you must have a business account approved from Instagram.
- Your account must be approved for Instagram Shopping to feature products in posts and stories.
Module Installation
Firstly, customers will get a zip folder and they have to extract the contents of this zip folder on their system. Secondly, the extracted folder has an src folder, inside the src folder you have the app folder.
Further, the admin needs to transfer this app folder into the Magento2 root directory on the server as shown below.

After the successful installation you have to run these commands in the Magento2 root directory:
First command –
php bin/magento setup:upgrade
Second Command –
php bin/magento setup:di:compile
Third Command –
php bin/magento setup:static-content:deploy
Fourth Command –
php bin/magento indexer:reindex
Right after that flush the cache from Magento admin panel by navigating through->System->Cache management as shown below.

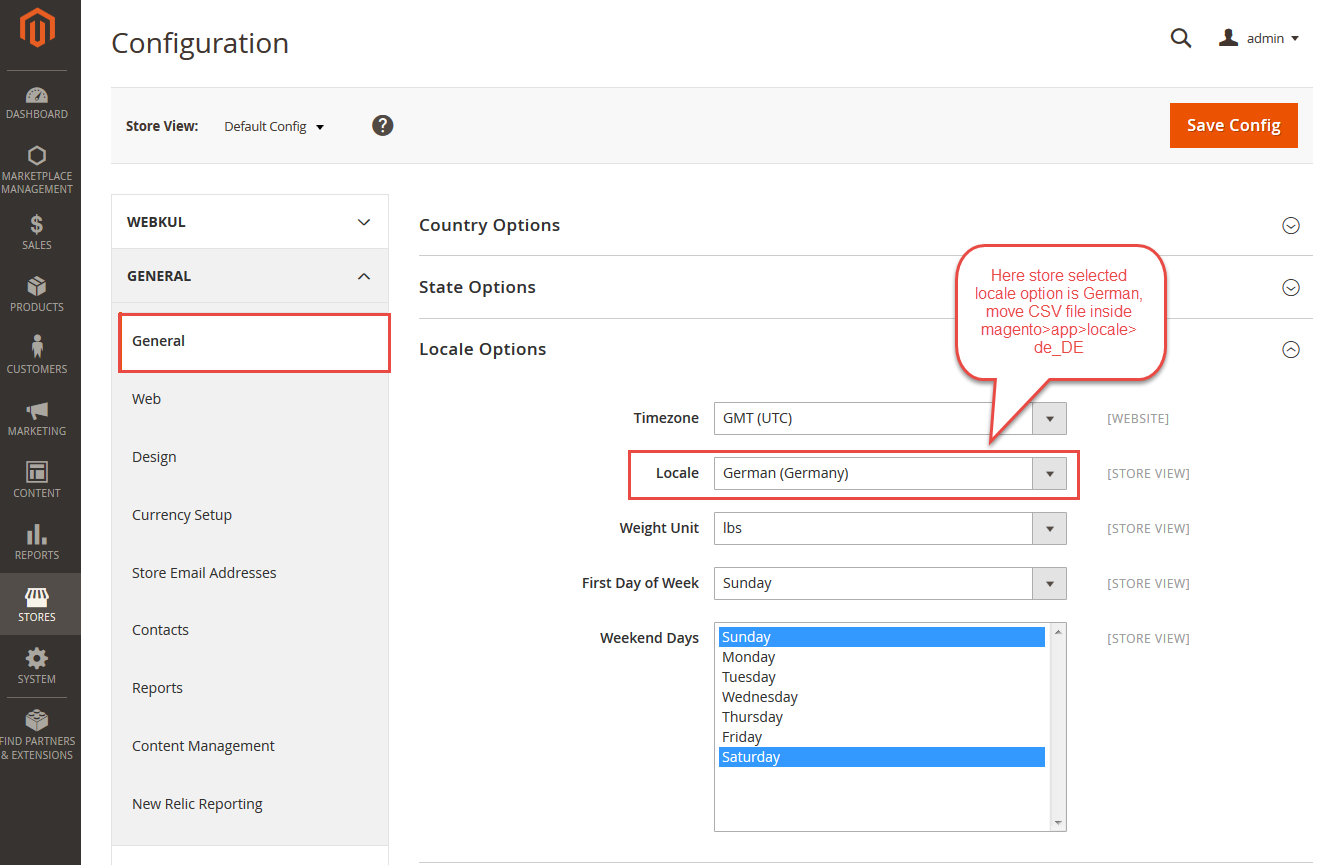
Configuration of Multi-Lingual
The admin will navigate through Store > Configuration > General ->Locale Options and select the locale as German (the language into which the admin wants to translate his store content).
Language Translation
If you need to do the module translation, please navigate the following path in your system. app/code/Webkul/FacebookShop/i18n. Open the file named en_US.CSV for editing as shown in below screenshot.

Once you have opened the file for editing, replace the words after the comma(,) on the right with your translated words.

After editing the CSV file, save it and then upload it to the same path app/code/Webkul/FacebookShop/i18n. The module will be translated into your desired language. It supports both the LTR and RTL languages.

Module Configuration
To enable product features on your Instagram Shop. Right after, the successful installation of the Facebook Shop module for Magento 2, the admin can configure the module from the back-end.
Firstly, go to Store > Configuration > Facebook Shop as shown below:

Facebook Shop Configurations

Allow Periodic CSV Generation : Using this option the admin can generate the product feed CSV periodically.
If, the admin set this field as Yes. then as a result, admin further needs to give below inputs as well.
Cron Frequency : The admin can set the frequency for the periodic CSV generation as Daily, Weekly, and Monthly from the dropdown.
Opening Time : Enter the precise opening time i.e the starting time of the CSV generation for the set cron frequency.
Rather, the admin can also set this field as No. where,

Generate CSV Manually : The admin can click here to Generate CSV Manually having the product feed data. Further, below message appears once the admin hits the button.

Products Configurations

Prefix for Fb Products – The admin can add the prefix to the products which are listed on the Instagram shop.
Allow Out of Stock products to appear on Facebook Shop – The admin can allow the out of stock store products to appear on Facebook and Instagram Shop.
Default Google Product Category for products – In this field enter the default Google product category for the products.
Default Google Product brand for Products – Enter the default product brand name for the Instagram products.
Click here to see the google taxonomy sheet Google Taxonomy with Id(s).
Product Details for Instagram Shop Featured products
Go to, Catalog > Products.

Now, either open a existing product in Edit mode or while adding a new product as well.

Scroll to Facebook Shop settings as shown below.

Steps to Authorize Product for Instagram Shop
Allow On Facebook Shop –The admin has to enable/disable this option to feature the particular product on the Facebook/Instagram Shop.
Redirect to Product Page – If the admin wants the customer to visit the product page before buying them, then they can enable this option else the customer gets redirected to the checkout page.
Product Condition – Select the product condition.
- New
- Refurbished
- Used
- Used Fair
- Further, Used Good
- In addition, Used-Like New
Gender – Select the gender from the drop down menu.
- Male
- Female
- Unisex
Above field basically describes the gender section for whom the product is made for.
Google Product Category – Here the admin can enter the related product id based on Google Product Taxonomy.
By default, it fetches the Google Product Category for the product which is set by the admin under the configuration.
Brand – Enter the brand name of the product.
Note-
- Along with the above details, the product description is also required.
- The Redirect to Product Page option will not appear while creating or editing the Grouped or Bundle products. As in both the cases, the customer need to visit the product page to choose the associated products.
Once, the admin enters the necessary details for the product, click the Save button. As a result, the product is enabled to appear on the Instagram Shop.

The admin can also enable the products in bulk for the Instagram Shop.
For that, the admin needs to select the required products from the checklist and click on the Change Facebook status as Enable under the Actions button.
Similarly, Enable/Disable the product in bulk to redirect the user to Magento 2 store products or to the cart page of the store, if disabled.
Manage Instagram Shop

To manage your Instagram Shop from the admin panel firstly, go to.
Assign Google Product Category for Instagram Shop
Moreover, the admin can assign the Google Product Categories to the products which are enabled on the Instagram shop/Facebook Shop.

For mass assignment of the category. Select the enable products from the product list. Once, the admin selects the product, then enter the Google Product Category as shown below:

As a result, “Category has been successfully assigned to the products” confirmation message appears.

Manage Attributes Mapping
Some of the Facebook attributes are not available in default Magento 2. So, the admin can create those attributes from the back-end and map the same with the Facebook attributes.

For mapping those attributes, the admin needs to click on the Add Mapping button.
Further, pick the required Facebook Attributes and then map it with the respective Product Attribute from the Product Attribute drop-down list.

Click on Save.

Edit Mapping
Similarly, to edit an existent mapping click View button under the Action column and edit.

Feed CSV Logs Details
The admin can see all the product feed CSV file under the Catalog Feed CSV Logs. Under this list, they can see all the manual and scheduled generated CSV files.
The admin can see the log added every time the product CSV gets generated, with the details like Triggered By, Log Message, Created At, CSV path, Status, and the Added Products.

Note:
Images and additional images on a product can be only imported to Instagram shop feed via https URL.
If the URL will be HTTP, then the product will appear on the shop with blank images (default FB image icon)
How to set up the catalog feed on Facebook?
To set up the catalog feed on Instagram, Go to the Facebook business manager. Click the Business Manager and from the menu, click Catalogues.

After that, for adding the Catalogues, the admin needs to click on the Add button and then Create a new catalogue.
After which a popup will appear. Here they need to enter the Catalogue name and select the Type from the drop-down.

Now, the admin needs to Add people and set permissions and then click on the Assign button.

For adding the products to the Catalogue, the admin needs to click on the Add products button.

In the section Add Products to Your Catalog, the admin needs to select the Use Data Feeds option.

After that, the admin can upload the data feed file.

From here, the admin can Select Upload Method.
- Set automatic file upload schedule
- Upload file manually
Automatic Product CSV file upload
For scheduling the automatic file upload, the admin needs to select Set automatic file upload schedule as shown below.

Here, the admin needs to enter the Data feed URL. If the data feed URL is password protected, then they need to enter the login details of the same.
Then, the admin can select when they want to automatically upload their inventory data from the URL. Available options are Hourly, Daily, Weekly.
After entering all the necessary details, click on the Start Upload button to schedule an auto-update of the product feed CSV.
Manual uploading of the Product CSV
For manually uploading the file, the admin needs to select Upload file manually as shown below.

Then, the admin needs to upload the file under the File Upload. In the below image a file is already added.
Now, the admin needs to click on the Start Upload button to start uploading the product on the Facebook shop.

Once all the products are uploaded on Facebook Shop, the admin can see the upload session as below:

The admin can also see all the data sources with their name, source type, status under a list as shown below.

From here, the admin can also add more products by clicking on the Add Products button. Also, they can upload the feed file to update.
Special Price Imports to the Facebook/ Instagram Shop
The customer can see all the special prices of the products on the Facebook/ Instagram Shop and this extension supports special price imports to Facebook/Instagram shop.

From here, the customer can click on the product and see the details of the product as shown in the image below:-

The admin can see all the product details in the CSV file, such as special price, Id, description, etc.

How To Link Facebook Shop With Your Instagram?
By the help of this module you can easily showcase up your Facebook shop products on your Instagram. For that you need to link up your catalogue with Instagram.
So for that after log-in up with your Facebook account you need to open up the https://www.facebook.com/analytics.

From here you need to click on the “Catalouge Manger” option which will redirect you the catalogue you have on Facebook with products.

Now in order to set up the Instagram shopping you need to click on Set up Instagram Shopping option after selecting the desired catalouge for products.

Now its time to connect your Instagram Profile with Facebook shop by clicking on “Connect Profile” so you can access your Facebook catalouge on Instagram.

After making your Instagram business profile you can able to see the profiles you have connected to link Facebook catalouge & even can add new from here as well.
How to Create a Business Account on Instagram
Transform your existing account into an Instagram business account as described below.
- Within your Instagram profile go to Settings > Account section.


- Further, select Switch to Professional Account and click Continue.


- Select a suitable category that describes your business here we have chosen E-commerce Website click next.
- Answer Are You a Business? with selecting the Business option and click next.


- Further, you can connect your Facebook page or can skip the process.


Setup Instagram Shopping
As you have your Facebook store live you are eligible for Instagram Shopping feature and you can set up Instagram shopping only if you have a business account as well.
- Go to Settings > Business


- From where you can click Set up Instagram Shopping and follow the necessary steps. it might take a few days to get approval from Instagram.

Once you get your approval now you can see a new option Shopping, tap on the same and select a product catalogue imported from Facebook.


Create Shoppable Instagram Posts
- While adding a new Instagram post featuring your product image. Click Tag Products.
- After which you can select the required product from the Catalogue to tag into your post.


You can edit the Product tags and are visible as shown below.

Product View on Instagram
Here is an illustration to show how tagged products feeds look like on Instagram.

The customers can tap on View Products and check all the tagged products in the post.

Similarly, you can also tag your Magento 2 store products in your Instagram stories and reels as shown below.


The customers can even click on View Shop button to view the complete list of imported products.

By clicking on the product tags in the post the customer will be able to view the complete product details with description and product pricing.

View on Website Tab
In order to purchase a product, the customers can click on the View on Website button. From there, based on the admin configuration the customers will directly reach.
Magento 2 Store Product Page
If the admin has enabled redirect to product page option.

Magento 2 Cart Page
If the admin has disabled the redirect to product page option.

That’s all for the Magento 2 (Adobe Commerce) Sell on Instagram. If you still have any questions regarding the module please create a support ticket by clicking here or send an email to [email protected].
Explore the Adobe Commerce Cloud development services by Webkul. Also, check other quality Magento 2 extensions.
Current Product Version - 4.0.0
Supported Framework Version - 2.0.x, 2.1.x, 2.2.x, 2.3.x, 2.4.x

Be the first to comment.