Magento 2 Point of Sale System gives a liberty to store owners to have an online store along with multiple physical stores.
Also, the physical stores will have their own POS panels for customer and sales management.
The admin for each physical store can create multiple sales agents. As soon as the admin creates a sales agent from the back-end, they get an email containing login details of the POS.
Moreover, the POS system can work in both online and offline modes.
Moreover, you can print the Logo Status, Rule Character, and Logo Image over the order invoice via a thermal printer. You can check the POS Thermal Printer.
Watch the video tutorial below to understand POS Extensions for Magento 2 workflow:
Features – Magento 2 (Adobe Commerce Cloud)Point of Sale
- Create multiple physical outlets for his/her online store and associate products with them.
- Assign multiple cashiers to the POS outlet.
- The admin can force log out of the cashier POS account.
- The sales agents get the login details of the POS through email.
- Separate Panel for a sales agent for sales management.
- The admin can print barcode slips.
- Add the Invoice logo from the admin panel configuration setting.
- The admin can assign inventory to the outlet on the basis of sources.
- Inventory assignment to the outlet on the basis of all products and categories of the source.
- Default customer and address assignment to the outlet.
- A new customer can add from the Sales agent POS panel.
- Easy real-time synchronization of sales and transactions.
- The products can be added to cart in three ways- on clicking the product, through SKU and Barcode Reader.
- The agent can Put the POS in Full-screen mode.
- The POS easily operates in offline mode as well to provide better processing.
- The Sales agent can hold an order for later check-out processes.
- Agents can change among multiple languages and currencies.
- The cashiers can view the cash drawer for computing the profit generated in a day or days by them.
- The cashiers can print the order receipt with the help of a printer.
- A cash drawer can connect to your printer to open after printing the sales receipt.
- The sales agent can even file the return and generate cash memo for the product(s).
- Cashiers can update the product stock after the product return.
New Features
- POS agents can refresh the whole product list and the category list.
- The sales agent can add the POS to the homepage as PWA.
- The sales agent can even refresh the individual products instead of refreshing the whole product list.
- Admin can create the custom payment methods label for POS that will be printed in receipts and invoices.
- Admin can edit the static content for the POS orders email – Subject and static content.
- The cashier can search the customer by phone number at POS end.
- Admin can view Cashier and Outlet Reporting includes details like revenue, tax, shipping, quality.
Please Note-
- Do not use the default source while working with the POS. Always create one stock and two sources. Among them, one is for POS and the other is for the website (frontend).
- Supported product types- simple, virtual, configurable, downloadable, bundle, and grouped.
- The Magento POS connects only to the Printer, and barcode reader, whereas it doesn’t connect directly with the cash drawer and card swapping machine.
- POS requires a browser to work on it.
- POS supports 7.5 screen size minimum.
- Signature field is required.
- Only stock assigned to the main website sales channel will be available on the POS page.
Server Requirements for Installation
Before installing the Magento 2 Point of Sale, make sure your server meets the required specifications.
Proper server configuration ensures smooth installation, reliable performance, secure communication, and uninterrupted operation of the POS application.
To install and run the POS system successfully, your server must satisfy the following requirements.
1. Open and Publicly Accessible Ports
POS Headless Application and Socket Server communicate through dedicated ports. These ports must be publicly accessible.
Required Ports
- Port 3000
- Port 3001
- Port 3002
Ensure these ports are not blocked by:
- Firewall rules
- Cloud security groups
- Hosting provider restrictions
- Network security policies
Allowing access to these ports enables proper communication between the POS application and connected devices.
2. Node.js and NPM Version Requirements
POS application is built on Node.js. Install the following versions before deployment.
Minimum Requirements
- Node.js v22 or later
- NPM v10 or later
Using the latest stable releases is recommended to improve compatibility, security, and overall application performance.
3. Install PM2 Process Manager
PM2 is recommended for managing the POS application in production environments.
PM2 provides several operational benefits, including:
- Automatic restart if the application crashes.
- Background process management.
- Real-time log monitoring.
- Startup script generation after server reboot.
- Improved application uptime and reliability.
Installing PM2 helps keep the POS services running with minimal manual intervention.
4. Accessing the POS Application
After installation, the POS application is available on the default Node.js port.
Default URL
http://your-domain.com:3000
For a cleaner and more user-friendly URL, configure a reverse proxy so the POS can be accessed as:
https://your-domain.com/pos
Supported Web Servers
Reverse proxy configuration is supported (but are not limited to) with:
- Apache
- Nginx
- LiteSpeed
- OpenLiteSpeed
This setup is typically handled by your hosting provider, DevOps team, or system administrator.
If you would like our team to configure the reverse proxy, root-level server access will be required to update your web server configuration.
5. Configure a Dedicated POS Subdomain (Optional)
For larger deployments, you can host the POS application on a dedicated subdomain.
Example
https://pos.your-domain.com
Using a separate subdomain offers several advantages:
- Better application isolation.
- Easier deployment and maintenance.
- Simplified server management.
- Improved scalability for future growth.
Many production environments prefer this deployment method.
6. Enable SSL (HTTPS)
For production websites, install an SSL certificate on the domain or subdomain hosting the POS application.
HTTPS provides:
- Secure communication between the POS system and server.
- Encrypted customer and transaction data.
- Improved browser trust.
- Better SEO rankings.
- Compliance with modern security standards.
Always use HTTPS instead of HTTP in live environments.
POS System Installation Checklist
Before starting the installation, verify that your server includes:
- Open ports 3000, 3001, and 3002
- Node.js v22+
- NPM v10+
- PM2 installed and configured
- Reverse proxy configured (optional but recommended)
- SSL certificate enabled
- Optional dedicated POS subdomain for production deployments
Meeting these requirements helps ensure a secure, stable, and high-performance POS installation.
Installation-Magento 2 Point of Sale
The extracted folder has an src folder, inside the src folder you have the app folder.
Now, they need to transfer this app folder into the Magento 2 root directory on the server as shown below.

After the successful installation, the users have to run the following commands on the Magento2 root directory:
composer require mpdf/mpdf
php bin/magento setup:upgrade
php bin/magento setup:di:compile
php bin/magento setup:static-content:deploy
php bin/magento indexer:reindex
php bin/magento cache:flush
php bin/magento queue:consumers:start pos_reindex_run &
php bin/magento queue:consumer:start stock.update.webhook.consumer &
Language Translation-Magento 2 Point of Sale
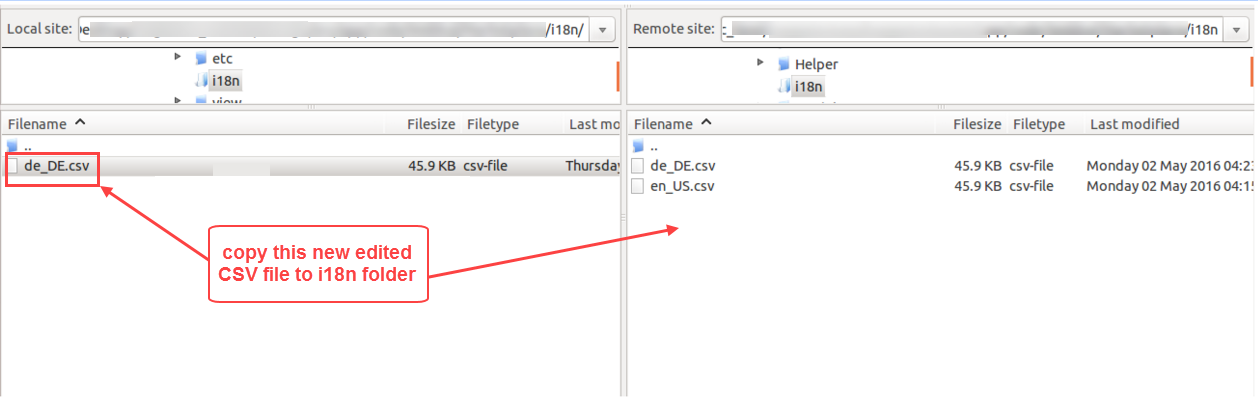
For module translation, navigate to the following path in your system app/code/Webkul/Pos/i18n/en_US.csv.
Open the file name en_US.CSV for editing as shown in the below screenshot:

Then replace the words after the comma(,) on the right in the file with your translated words.

After editing and translating the CSV file, the users need to save the translated file name according to your region language and country code such as – de_DE.CSV.
Followed by uploading the translated file to the same folder from where the users have obtained it.
Thus, module translation is completed.
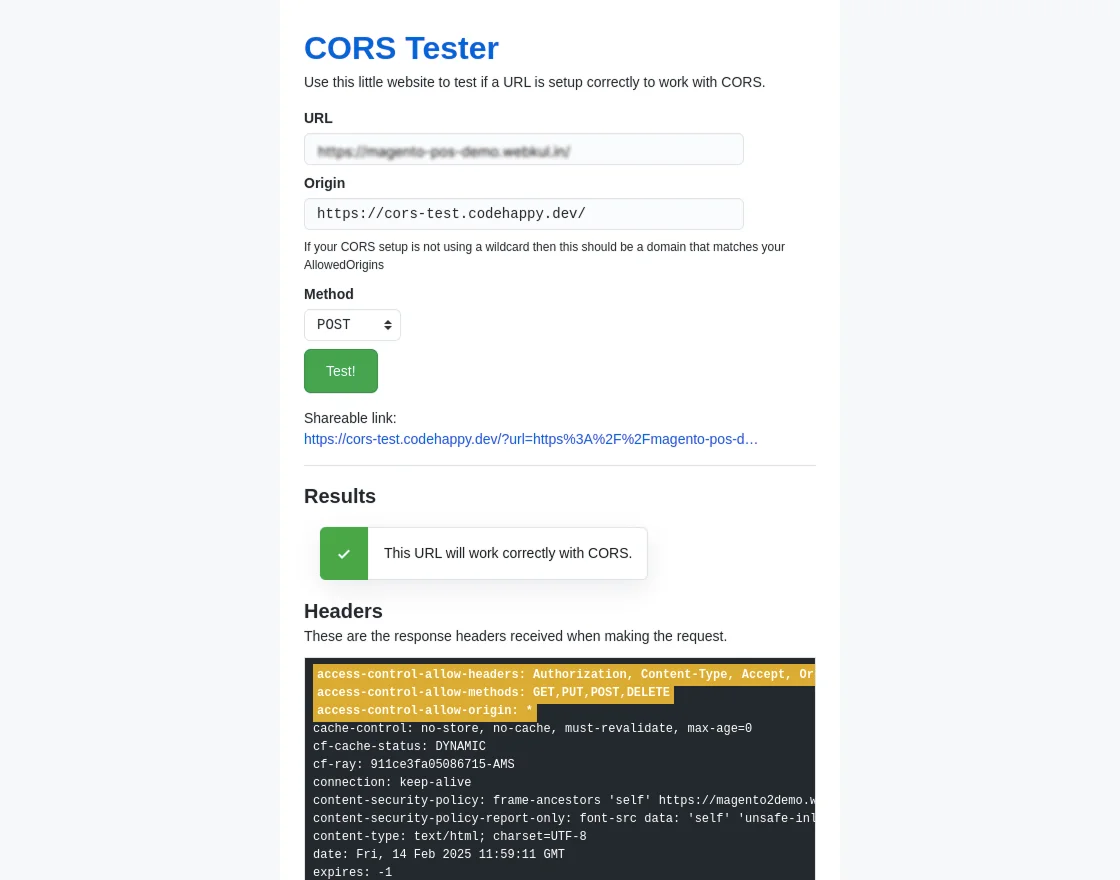
You must allow Request Origin as well as Request headers to make it work with the POS theme. Please follow the below instructions.
# For Apache
Header set Access-Control-Allow-Origin "*"
Header set Access-Control-Allow-Headers "Accept, Content-Type, POS-TOKEN, Store"
Header set Access-Control-Allow-Methods: "POST, OPTIONS"
# For Nginx
add_header 'Access-Control-Allow-Origin' '*';
add_header 'Access-Control-Allow-Headers' 'Accept, Content-Type, POS-TOKEN, Store';
add_header 'Access-Control-Allow-Methods' 'POST, OPTIONS'
Note – You can test if a URL is setup correctly to work with CORS.
Headless Theme Installation
Prerequisites
Node >=22.0.0
NPM >=8.1.0 OR YARN >=1.22.0
Customers can install the theme via two methods:
- Vercel
- Manual Installation
1. Vercel
Vercel is the native Next.js platform, designed to enhance the Next.js experience. It is the best way to host the next js (framework).
You can import the Git Repository from GitHub, GitLab or BitBucket.
Login using Git, you can also log in with your email but need to link with Git. Now follow the steps mentioned below for logging in:
1: Go to Vercel Dashboard and click on Add New.

2: Select a Git provider to import an existing project from a Git Repository.

3: Now click on the import option as mentioned below in the snapshot:

4: Here you have to enter the environment variables with their values, which you will get after extracting the zip file in the .env.template.

5: Once you click on deploy you will get the URL from Vercel also you can manage your domain from Vercel > Settings > Domain.

After clicking on POS, You can check the project Dashboard as mentioned below in the snapshot:

2. Manual Installation
NextJS Configuration
Customers will receive a zip folder containing the application files. Extract the contents of the zip folder on your system.
After extraction, locate the NextJs folder and move it to the directory where you want to install the application.
Setup Env
Duplicate the env.template file and rename it to .env.
Now update the following values in the .env file:
MAGENTO_URL=https://magento-url.com/
IMAGE_DOMAIN=magento-url.com
APP_URL=http://localhost:3000/
MODE=test
WEBSOCKET_URL_INTERNAL=localhost
WEBSOCKET_PORT_INTERNAL=3002
WEBSOCKET_SECURE_URL_INTERNAL=magento-url.com/ws
HTTPS=false
TOKEN_ROTATION_INTERVAL=1
Then run the command of build and start.
npm install OR yarn install
npm run build OR yarn build
npm run start OR yarn start
It will serve on a 3000 port to your server for eg: http://localhost:3000/. 
You can access POS by using your-serverip:3000 and also you can ask your server team to map your 3000 port to any dedicated domain.
Socket Server Configuration
Navigate to the socket-server folder inside the NextJs directory.
Locate the env.template file inside the socket-server folder.
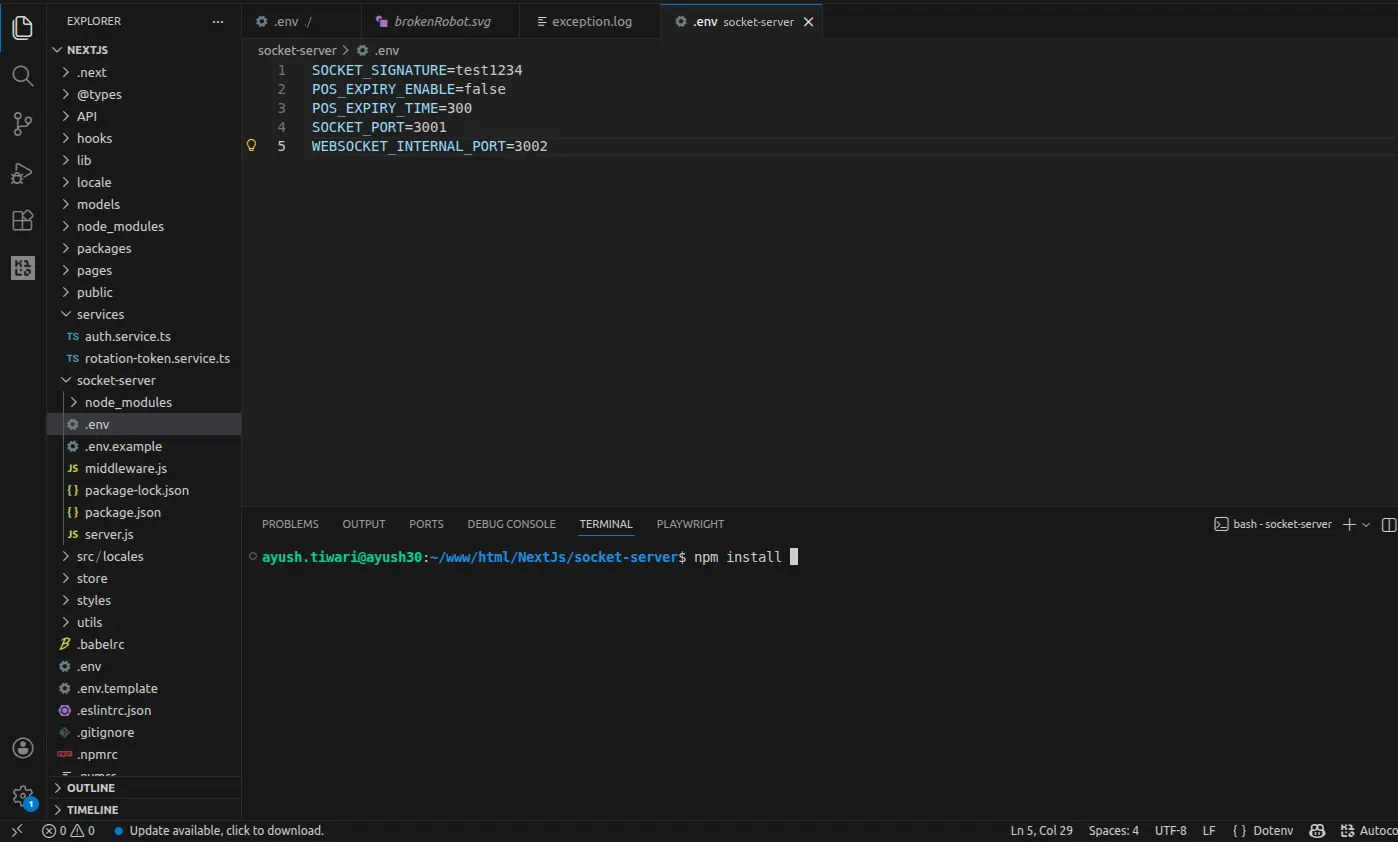
Duplicate the env.template file and rename it to .env. Then open the .env file in a code editor or text editor.
Now update the following values in the .env file:
SOCKET_SIGNATURE=test1234
POS_EXPIRY_ENABLE=false
POS_EXPIRY_TIME=300
SOCKET_PORT=3001
WEBSOCKET_INTERNAL_PORT=3002
Run the following command via the terminal:
npm install OR yarn install
npm run start OR yarn start
Note
- For Vercel installation, NextJS is configured via Vercel, while the socket server must be configured separately on the server.
- For manual installation, run npm install or yarn install in both the
NextJsandsocket-serverfolders. - In case you want to change the value of any of the messages then open the locale folder go to message.po file inside en.
- Enter the value in msgstr in respective to the msgid.
Starting via Launch Script
For quick setup and execution, you can use the provided launch script.
Navigate to the NextJs directory, provide execute permission to the launch.sh file, and run the script using the following commands:
chmod +x ./launch.sh
./launch.sh
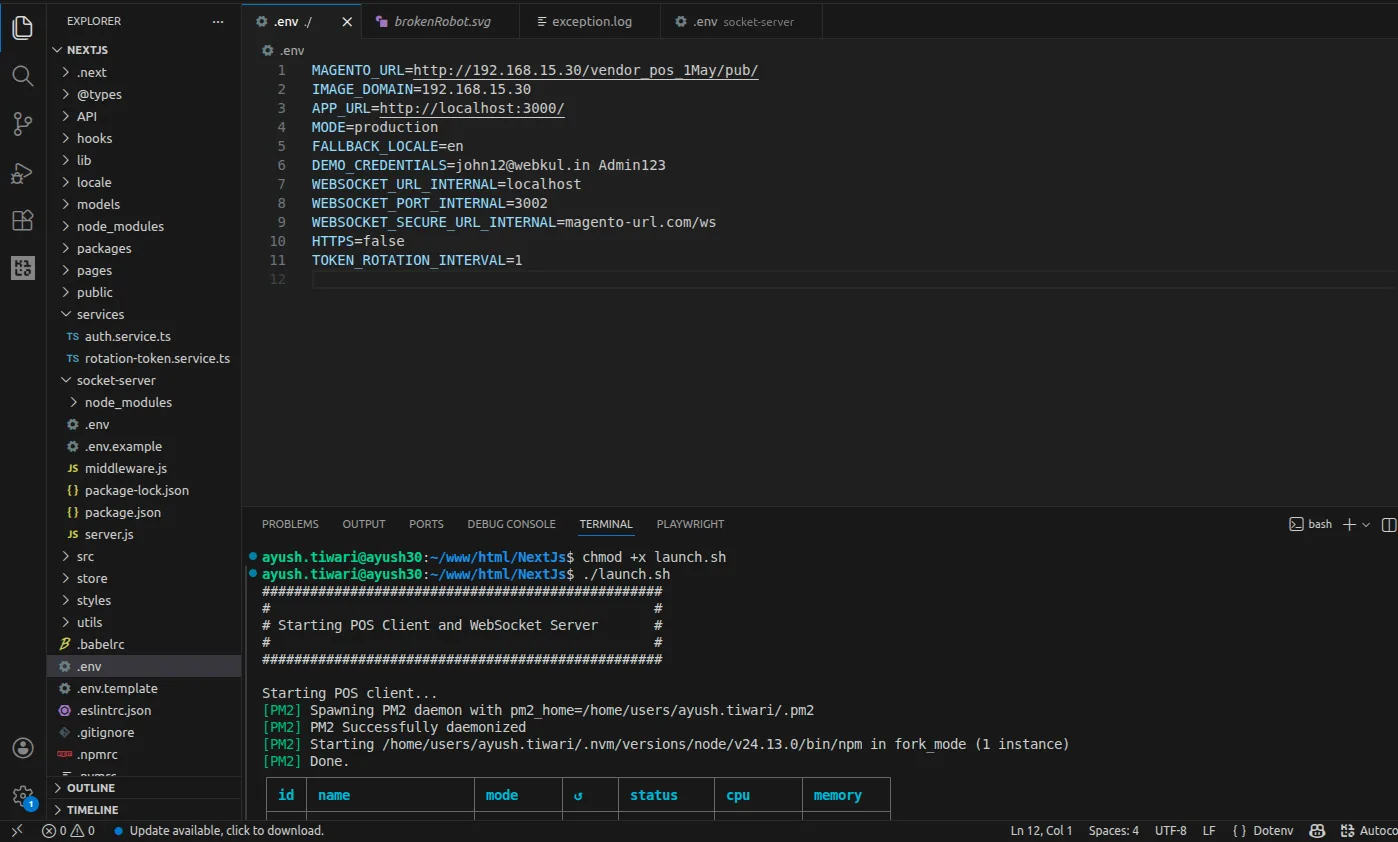
Note: The launch.sh script is used to run both services — the NextJS frontend and the socket server — using PM2, which is a Node.js process manager.
Before using the launch script, make sure PM2 is installed globally using the following command:npm install -g pm2
To use the launch.sh script:
- Install dependencies in both the
NextJsfolder and thesocket-serverfolder. - Create the NextJS production build using the build command.
- Run the
launch.shscript to start both services together.
Alternatively, you can start both services separately by using the npm run start command inside their respective directories.
Module Configuration
After the installation of the Magento 2(Adobe Commerce) Point of Sale module, the admin can configure the module settings.
By navigating to Stores > Configuration > Webkul > POS as per the below image:
POS Configuration

Here, the admin can:
- Enable Offline Mode- The admin can give the cashiers the privilege to do the transactions in offline mode by enabling this option.
- Product Page Load Size: Set the number of products to load while POS initialization.
- Enable Cashier Single Login: Enable the single cashier login by selecting “Yes” else choose
- Choose attribute for Barcode: choose the product attribute for barcode scanning.
- POS logo: Upload the logo that you want to display for your POS.
- Frontend URL: Enter the frontend URL.

POS Default Address
- Enable: Enable the default address by choosing Yes.
- Country: Select the Country from the dropdown.
- Region/State: Select the Region/State from the dropdown.
- ZIP/Postal Code: Enter the ZIP/Postal code.
- City: Write the name of the city.
- Address: Add the address on Street Address and Street Address Line 2.
POS Token Setting
- Expiry Enable: Set the expiry enable by choosing Yes or No.
- Signature: Admin can enter the signature as it is required.
PWA Configuration
The POS system can also be used as PWA i.e. Progressive Web Application.
For managing the configurations for the same, the admin will navigate to Stores > Configuration > Webkul > POS > PWA Configuration.

Here, the admin will manage the following details regarding the application:
- Name: The admin will provide the complete name of the application.
- Short Name: The admin will provide the short name of the application.
- Icons: The admin will provide the application icons of different sizes that include –
(48 x 48), (72 x 72), (96 x 96), (144 x 144), (168 x 168), (384 x 384), and (512 x 512). - Splash Background Color: The admin will add the hex code of the splash screen background color.
- Theme Color: The admin will enter the hex code of the app theme.
Email Template Configuration
The admin is responsible for sending the sign-in details to the cashier.
For sending the mail the admin will manage the email template by navigating to the Stores > Configuration > Webkul > POS > Email Template Configuration.

POS Cashier Credentials Email Template: The admin will enter the email template that will be sent to the cashier
POS Order Email Template: The admin can set the POS order template.
After setting up the fields, the admin can click on Save Config.
POS Payment
The admin can create the custom payment methods label for POS that will be printed in receipts and invoices.
For creating the custom payment method navigate to Stores > Configuration > Sales > Payment Methods.

Magento 2 Point of Sale Management
The Source & Stock
Before discussing the POS Management, first let’s discuss, How to manage the source & stock in POS.
We shall see how we can make use of the Multi-Source Inventory or MSI feature to manage the inventory within the Point Of Sale system.
In the POS system, for each outlet, we have to select the option “Source“. This source will be created by navigating through Stores>Inventory>Sources and clicking the Add New Source button.

Manage Source:
If we are selling products from multi-location like California, New York and others then we will need to create sources for each inventory location.

Here we have to fill in the following details about the new source like

- Give Name to the source.
- Give a specific code for the source.
- Enable or Disable the source
- Set latitude & longitude for the source.
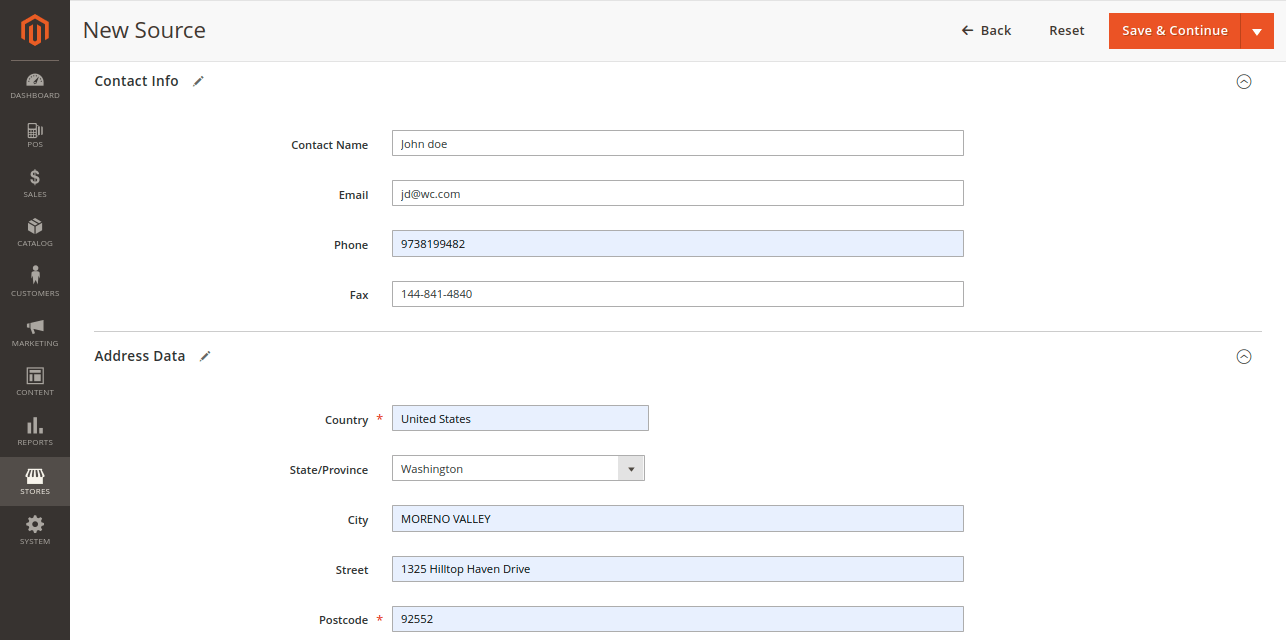
- Add contact details like name, email id, phone no & fax.
- Select the Country of source.
- Can select City, street & post code.
Manage Stock:
Here we will need to create stock for each channel (Magento Websites, if there are multi-website configure in your Magento).
So that we can assign sources(from where we are selling our products) for each channel.
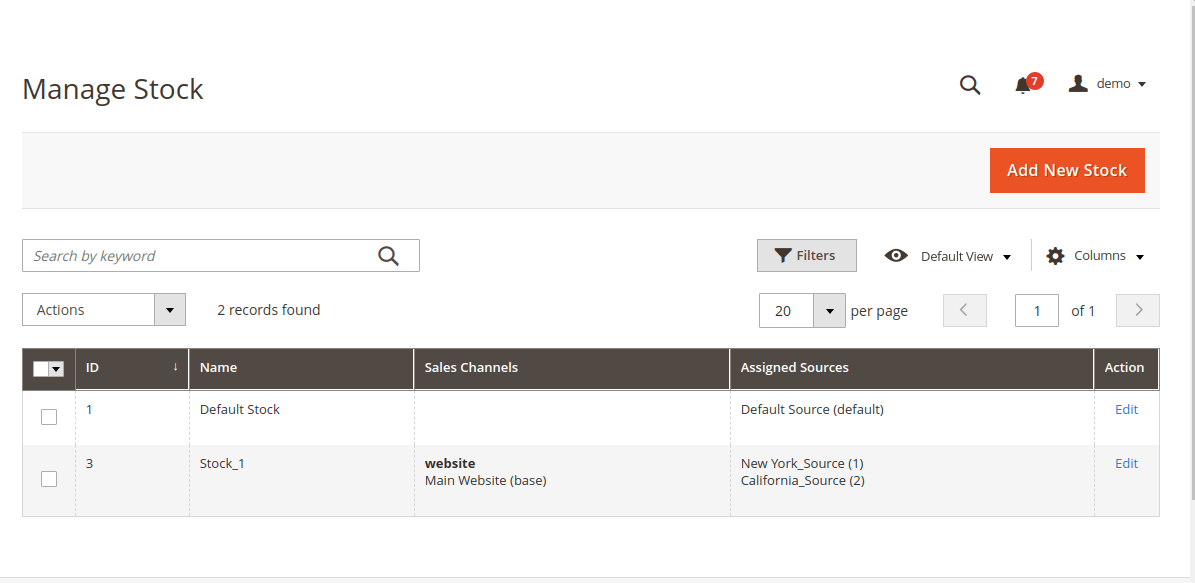
After this, we can assign the stock to the product by navigating to the edit product page and clicking the Assign Sources button.

Now, the admin can manage the POS module by navigating to POS panel as per the below image.

Thus, the admin can view several menu options to manage the POS module.
Add / Manage Outlets
Note:- Before creating the outlets, you must need to create sources as per need.
Under this section, the admin can add and manage an any number of outlets.

Here, the admin can:
-
-
- View the complete list of the outlets.
- Delete/Disable/Enable the selected outlets from “Actions” drop-down.
-

- Edit the existing outlets.
- Add a New Outlet to the store.
Thus, for adding the new outlet, the admin will click on Add New Outlet button which navigates the admin to the Outlet Information which will have four sections:
Outlet Information:
Here, the admin has to enter the values into the following fields:
Outlet Name- The admin can decide the name of the outlet.
Select Source- From here, the admin can select the source for the outlet which is already created by the admin explained above.
Product Assignment Basis- The admin can assign the products to the outlet in two ways;
Category-based, All Products based.
- If the admin selects the product assignment basis as Category based, then the admin needs to select the categories from the source, which they want to associate with the outlet before saving the outlet.
For reference, check the below image:

- In the case of selecting All Products base, all products from the source will get synced to the POS outlet.
The admin can also see all associated products as per the below image:

Set Default Customer- Select Yes to set the default customer for the POS frontend or else No.
If the admin selects this option as Yes, then they need to add default customer and address before saving the outlet.

Outlet Address- Enter the address of the outlet. The address section has an HTML edit option and tools.
Status: The admin can enable or disable the outlet.
Add/Manage Cashier (Sales Agent)
The admin can add/manage cashiers by navigating through:
POS -> Add/Manage Cashier
- The admin can delete/enable/disable the selected cashiers from the “Actions” drop-down.
- Mass selection check-box for selecting all the cashiers at once for deleting/enabling/disabling cashiers.
- Cashier check-box for deleting/enabling/disabling cashier.
- The Edit button is for viewing/editing cashiers.
- Add New Cashier helps with adding a new cashier for an outlet. The admin has to fill some fields under Cashier Information to add a new cashier.

Image- The admin can upload an image of the cashier.
First Name- The first name of the cashier can enter here.
Last Name- Here the admin can enter the last name of the cashier.
Email Address/Username- The admin can enter the email or the username of the cashier.
Contact No.- The admin can enter the contact number of the cashier.
Password- This field is for entering the password of the cashier account.
Confirm Password- This field is for confirming the cashier’s password.
Sort Order- Here the admin can enter the sort order for the cashier.
Outlet- The admin can choose the outlet for which the cashier account is being added.
Status-The admin can enable or disable the cashier’s account.
Thus, tap on Save Cashier button.
POS Orders
To view, the complete list of POS orders, the admin needs to navigate through POS > POS Orders.
Henceforth, the admin can view the separate section for POS orders.

Thus, the admin can view the complete order details by clicking on View Order.
POS Order column in Sales Order Grid
The admin can check POS order Grid under Sales->Orders.

Cashier Force Logout
The admin can logout any cashier from the backend. For this, the admin will navigate to POS > Cashier Manager.
After that, the admin will select the cashier for logging them out.
Further, under the Action tab, the admin will select the Force Logout Cashiers.

With this, the admin can logout the cashier even from the admin end. This can be useful when the cashier forgots to logout their POS system or some other conditions may occur.
Cashier Reporting
The details include the Reporting date, Initial Amount, and Final Update.

We can “view” the report details:

Outlet Reporting
The outlet reporting details include Revenue, Tax, Shipping, and Quantity. Both the ordered and the amount can view as per the below image:

Amount:

Print Barcode Slip
Firstly, the admin can print the barcode slips by navigating to the Catalog > Products
On the product listing page, the admin needs to select products for which Barcodes need to print.
Thus, the admin can select Print Barcode Slip from the action drop-down list.

Henceforth, after selecting the Print Barcode Slip from the action button, the barcode slips get generated.
Front-End Point of Sales Panel
In the case of installing the theme through Vercel, it will provide the POS URL automatically.
If you want to do it manually, then install the theme and it will deploy to port 3000 of your server.
#vercel deployment For, e.g., https://your-vercel-url.com/

#mannual installation For, e.g., http://localhost:3000/ OR http://server-ip:3000/
Thus, the user can easily log in to the POS System (frontend) by using the Username (email address) and Password, which is created by Admin.
NOTE: – If the POS is logged in by any user, then all front-end pages will redirect to the POS-END.

Henceforth, after Signing up, the Sales Agents will be redirected to their POS panel as per the below image.

- POS menu is for sales management like Customers, Cashier, Orders, Reports and Refresh.
- Product Search is for searching the product by Name and SKU.
- Hold Cart icon can be used for holding a cart for later checkout or product addition.
- The cart icon shows the count of the products in the cart.
- The sales agent can add a product to the cart by clicking on it. The number of clicks on the product is the number of units of the products added to the cart.
- Cart area has all the products with quantity detail. The sales agent can directly delete products from the cart.
- The sales agent can use a barcode reader to add products to the cart by enabling Barcode Reader input via the Barcode button.
- The cashier can add products to the cart by the product’s SKU.
- The Low Stock indicator on the product will indicate that the product quantity is low.
Add products to cart
The sales agent can add products via multiple methods:
- By clicking on the products.
- Through the product SKU.
- By a barcode reader.
Add Products By Clicking on Products
- The sales agent can add products to the cart by simply clicking on the products.
- The number of clicks on a product is the number of units of that product added to the cart.

- The sales agent can view the products category-wise by choosing a category.
- Product search is for searching a product by name or SKU.
- The products in the cart can be deleted by the Delete Product icon button present on each product shown in the cart.
- The Products are shown in the cart with details like the name of the product, unit of product, the price per unit and, the total price of the product by adding all unit’s prices.
- The cashier can see the subtotal and grand total price of the cart.
- The sales agent can change the quantity of a product by selecting the product and clicking on the “Quantity” button icon.
- The agent can give the required quantity and save it by clicking on the “Done” button.
- Also, the sales agent can directly delete the whole cart by the “Delete Cart” button.
Adding Products By Barcode Reader/SKU
The sales agent can add products to the cart by scanning the barcodes of the product through a barcode reader or by entering the SKU of the product.
Please Note: The barcode reader must be attached to the sale agent system for adding the products to the cart via the barcode option.

- The Barcode icon button is for enabling the input from the barcode reader to add a product to the cart.
- The cashier needs to click on the “Barcode/SKU” icon that will open a pop-up. In this, the cashier can either enter a barcode through a scanner or type the product SKU.
- However, after entering the SKU, the cashier can click on “Proceed” to add a product to the cart and then on the “Close” button to disable the pop-up.
- The unit of product in the cart increase with the number of a scan of a product or SKU entered.
Customer Management by Sale Agent
Once all the products of customer requirements are inside the cart, the sales agent can choose/add the customer for which the order has to be made.
The sales agent has to click on Choose/Add customer icon.
- The sales agent can choose a customer from the registered customer list. They can search for registered customers by name.

- If a customer is not registered to the store then, the agent can add the customer by clicking on the “Add Customer” icon.

- First Name of the customer.
- Last Name of the customer.
- Email-Id of the customer.
- The telephone number of the customer.
- Enter the Password.
- At last, the agent will click “Add” to register the customer.
Customer details:
The sale agent can view the customer details with include email and phone number as per the below image:

The sales agent can also edit the details or delete the customer.
Completing Order
After the customer has been added to the cart for creating an order, the agent will complete the order by placing the order to generate the invoice.
- If the customer is registered, then select the customer from the registered customer list and click on the “Pay” button. After clicking the button, the Place Order page will appear on the screen.
- If the customer is not registered, then, the agent will add the customer and click on “Continue” to register the customer and redirect to the Place Order page.

- The “place order” page shows the name of the customer and add a new customer, the salesperson can add a new customer by entering the details.
- The Grand Total is the total amount of products in the cart.
- Add the payable amount to the cart.
- After entering the amount click on Confirm Payment and proceed.
- The sales agent can allow its customers to pay either via Cash or through Card.
- If chosen a card then you have to enter the card details and then can pay the amount.

- Lastly, the agent will click on Confirm Payment to place the order and generate the invoice. The agent can print the invoice or move it to the next order.

Discount-Magento 2 Point of Sale
The admin can enable a discount in the back-end as a price rule which will be applied at the time of checkout.

The sales agents can also give a coupon code or discount on the product to the customer.
For providing the coupon code to the customers, the sales agent needs to follow the steps below:
- The agent has to select the product and add it to the cart.
- After that, the agent has to click on the product in the cart.
- Right after that, the Coupon Code button at the bottom, click on it for enabling the coupon benefits.
- The agent can also add a Discount by clicking on the discount button at the bottom.
- Now, the agent can enter the Discount value.

Thus, in this way, the agent can provide a coupon code or discount on the products.
Note: The discount value entered by the agent must be less than the price of the item.
Cashier
Close Counter
As the sales agents Sign in, they check the cash amount in his Cash Drawer. After checking, the amount is submitted initially just after the Sign in.
- The Credit amount is the amount taken by the agent from the customer against the payable amount of an order.
- The Debit amount is the return of extra money as a change to the customer.
- Balance is the net amount added to the cash drawer after debit and credit.
- Opening Amount is the starting balance amount in the cash drawer.
- Total Cash Sale is the sum of all transactions conducted using cash as the payment method.
- Total Other Payment Sale is the combined value of sales made using payment methods other than cash.
- Expected Amount in Drawer denotes the anticipated sum of money at the beginning or end of a shift, ensuring the accuracy of transactions.
- Closing Drawer by clicking on this you will close the counter if you want to close it.

Today Cash
Today’s sale reflects the total amount of money earned from everything sold or done in the business per day or today.
- Opening Drawer Amount is the initial sum of cash placed in the cash register at the beginning of a shift or business day.
- Cash Sale refers to transactions where payment is made immediately in cash for goods or services.
- Other Payment Sale involves transactions where payment is made using methods other than cash, such as credit cards or digital wallets.

Sale History
Sale history is a record of past transactions, showing what items were sold, when, and for how much. The sales agent can also check at what time the store was closed.

Orders
Order on Hold
- The sales agent can put the cart on hold for later processes and can continue to process the held cart when required.
- The agent can put a cart on hold by clicking on the “Put cart on hold” icon visible on the right side of the full-screen button.

- On clicking the cart on hold button, the salesperson will get a pop-up that will be asking about a custom note for the particular order.
- The pop-up note is meant to recognize the order when there is a long queue of customers.

- The agent can navigate to the “Order on Hold” through the POS menu icon -> Orders -> Order on Hold.

Thus, after Clicking on the Order on Hold tab the agent will be redirected to the orders on hold.
- List of orders on hold.
- Order Details including the product information along with the price and grand total.
- The agent can Resume the held order to continue the further processes.
- The agent can Remove the Cart from the held order list.
- Clicking on the Resume button, there will be a pop-up for the confirmation, click on proceed.

After clicking on proceed agent will redirect to the main page where the hold cart product will display in the cart, from there the agent can proceed with the payment part.

Order History
The sales agent can check the orders by navigating through the POS menu -> Orders.

- List of the orders including online and offline orders.
- Order detail of each order.
- Customer details like name and address.
- Date and time of the order.
- Payment method detail.
- Return
Return Orders
The cashier can return the order by clicking the Order Return button on the order placed.
The cashier can select the products which need to be returned by the customer and then click on “Create” and finalize the Return.

Note- The return process can be accomplished in only online mode.

Thus, the salesperson can click on the credit memo button to view the credit memo.

Offline Orders
The cashier can even process a transaction in offline mode, this is a beneficial feature for the areas where internet connectivity is weak.
Also, the sales agent can view all the transactions in offline mode by following the navigation POS menu> Orders> Offline Orders.

The cashier can view all the offline orders. These orders can get auto-synced.
Alternatively, the cashier can sync an order manually by clicking on the Sync Order button at the top of the page.
Once synced, the order will be added to the list of orders.

After clicking on the sync button there will be a pop of syncing the Retail Point of Sale and it will sync the orders.
Reports
Gross revenue is the total income a business earns before deducting any expenses.
Order provides a comprehensive overview of customer transactions and purchases.
Average Order Revenue is the typical amount of money earned from each customer transaction.
Average Item Value represents the typical worth of products sold per transaction.
Net Revenue is the income remaining after subtracting all expenses and deductions.
Discounted Offers is the special promotions that provide reduced prices for products or services.

Refresh POS Store
This helps in refreshing the POS Store, any changes done by the admin in the backend are reflected on the front.

Multi-currency support
The salesperson can change the currency according to the requirements, from the backend panel clicking by clicking on POS at the menu bar and then in the Outlet Information.
Whichever store option is selected according to that by default currency will change accordingly.

Frequently Asked Questions
Ques-1- How to associate additional(or custom) attributes to the Barcode in Magento 2 Point of Sale?
–>>The POS store owner can now easily associate the barcode with other attributes in Magento 2 Point Of Sale. It allows the Physical store owner with ease in managing the barcode.
Note– Remember here at a time that only one attribute will be associated with the barcode.
For this, the admin needs to create the attribute as per default Magento.
Here, one needs to remember that the attribute is Unique and Comparable on the storefront must be set to ‘Yes’.
The admin can find the ‘Unique Value‘ field in ‘Advanced Attribute Properties‘ which must be set as ‘YES‘.

Then the admin needs to go to StoreFront Properties in the side panel. Where Comparable on Storefront is set to ‘YES‘.
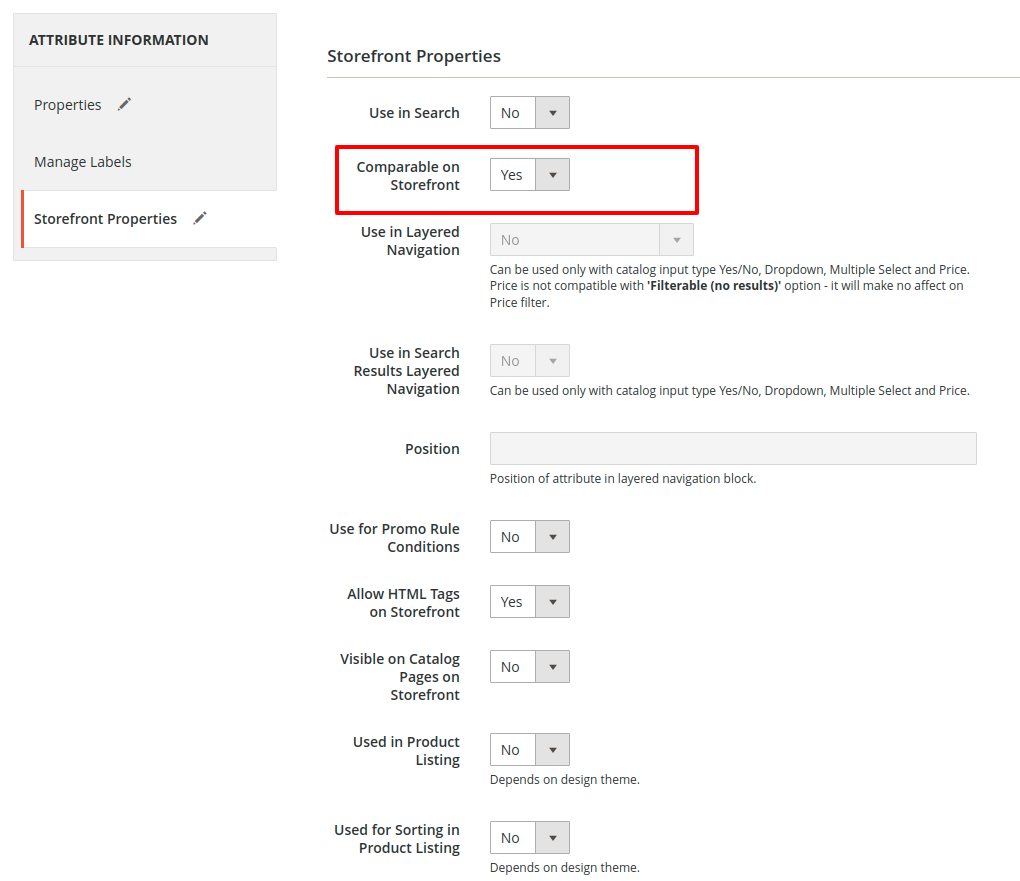
This will allow the attribute to be visible on the POS configuration as in the below screenshot.
Magento 2 Point Of Sale as PWA
The cashiers or sales agent can also use the POS as a Progressive Web Application in order to use it in a seamless and better manner.
The Cashier can easily add the POS on the homepage as any other mobile application.
For this, the cashier will view the pos in the browser. Then click on the Add To Homescreen button under the three-dot at the top right corner.
After that, the cashier needs to provide the Name of the Application and then need to confirm the next popup to add the PWA as shown in the image below:

 The cashier will then be able to see the Application on the home screen as shown in the image below:

Add To Desktop
The POS system can also be added to the desktop home screen. By following the process shown below:
First, the cashier will click on Add To Home screen icon near the search bar. After that, click on the install button.

The installation will take some seconds only and the PWA will be visible on the desktop home screen as shown in the image below.

Thus, that is all about the Magento 2 (Adobe Commerce Cloud)Point of Sale extension.
Still have any issues feel free to add a ticket and let us know your views to make the module better https://webkul.uvdesk.com/.
Also, check our complete Magento 2 extensions list.
Current Product Version - 5.1.5
Supported Framework Version - Magento 2.0.x, 2.1.x, 2.2.x,2.3.x, 2.4.x

24 comments
As per your query –
Is your pos extension provided in open source format? though your pos is developed well, my boss will want something minor but important to him feature. could i modify myself?
-> Yes, it is an open-source module. You can modify the POS as per your needs by modifying the code.
For any further queries please write an email at [email protected]
Thank you
Yes, the module supports bundle products.
Yes, the code is customizable at your end but kindly check the Support Policy- https://store.webkul.com/support.html/.
However, we like to inform you that we do provide a customization service(paid). This will personalize the product and transform it as per your requirements.
Thanks and Regards.
To implement the required feature in this module, extra efforts will be required. Please drop us a mail at [email protected] with your complete requirement so that we can assist you accordingly. Thanks
Thanks
– Given permission to appropriate folders
– Cache cleared
Anything else which I missed?
If you are facing any issue with the module then please mail us at [email protected] and we will for sure assist you. Thanks
Currently, the required feature to track the commission of POS agent and to provide daily, monthly also yearly sales reports including commission and chargeback is not available in this module. If you want all the above features to be implemented on the POS then this will require extra efforts from our end. Please mail us at [email protected] with complete requirements so that we can assist you accordingly.
Thanks & Regards,
Webkul Team
Currently in this POS module, the POS agent can check and export the daily report by going through the”Cash Drawer” as shown in the shared link: https://prnt.sc/s91s6t
For further queries, you can mail us at [email protected] and we will for sure assist you.
Thanks & Regards,
Webkul Team
1] The list of products in the POS , not same as list in the magento 2 products.
2] How to remove the mandatory fields from customer form.
3] The Amount of Discount not appear in POS and not in Receipt.
4] Search about customer phone number.
5] when sync from POS we get this error {Invalid shipping method.}
6] there is No “next order” button after “Place Order”.
thanks & Regards,
1] The list of products in the POS , not same as list in the magento 2 products.
– You can assign products to your created outlets via – Category based or All Products based.
2] How to remove the mandatory fields from customer form.
– You can reach out to our support team at [email protected] so that they can assist you with this.
3] The Amount of Discount not appear in POS and not in Receipt.
-After the cashier has applied the discount as fixed or percentage it’s reflected in the invoice as well.
4] Search about customer phone number.
-The cashier can add a new customer will all the required details.
5] when sync from POS we get this error {Invalid shipping method.}
-Get back to us at [email protected] so that we can assist you with the issue.
6] there is No “next order” button after “Place Order”.
-yes, after placing an order the cashier can tap the next order button at the top to take the next order.
Currently, the asked feature(does it handle customer group pricing?) is not available. We are working on the same and it would get updated in a while. For any further information on the same get back to us at [email protected] so that our support team can assist you in a much better way.
For information related on purchasing the application, you can just email us at [email protected] and can ask your requirements there.
1. The Magento POS connects only to the Printer, and barcode reader, whereas it doesn’t connect directly with the cash drawer and card swapping machine.
-> So when we choose POS pay as credit card, there is no connection with swapping machine and we have to manually handle the payment process such as enter total mount, it is right?
2. You can divide the catalog for Web and POS separately
-> If I choose yes, all inventory will be synced between POS and Magento. If I choose NO, the main inventory is still on Magento, no inventory synced, it is right?
3. I do not see the full outlet setting s(http://prntscr.com/l6n9ei), from the demo (http://prntscr.com/l6na0q). Which one will be the newest version when we use it?
4. Where I can set discount rules for POS?
Thank You
Regarding your first question:
Yes, you have to handle the payment process manually. As you have to select the payment option firstly like
By cash or By Credit/Debit card. Then separately on the card swapping machine you have to enter the product total & after the successful transaction, the outlet cashier can provide the invoice to the customer which is generated.
Regarding your second question
– Yes, if you chose the option as ” No ” then the whole inventory will be for website only.
Regarding your third question.
– https://prnt.sc/mdp43k You can find the screenshot of newest version in this link.
Regarding your Fourth question
-The admin can enable discount in the back-end as a price rule which will be applied at the time of checkout.
For further information, you can just email us at [email protected]