Bagisto SaaS Table Rate Shipping gives every tenant its own table rate shipping rules inside a single multi-tenant store.
Each company builds its supersets, superset rates and shipping rates from its own back-end. Moreover, one tenant never sees another tenant’s shipping data.
Tenants can also import rates from CSV files. Consequently, product weight, zip code ranges and alphanumeric postcodes all become usable shipping conditions.
This module layers multi-tenancy on top of Bagisto Table Rate Shipping. Therefore, the base extension supplies the screens while this package scopes the data.
Features
- Tenants add shipping rates in bulk using a CSV file for table rates.
- Furthermore, each tenant creates sub-methods for Table Rate Shipping.
- Tenants build their own Super Shipping Sets from the tenant panel.
- Superset codes stay unique per company, so two tenants may safely reuse the same code.
- A priority setting decides whether Shipping Rates or Superset Rates take precedence.
- Shipping cost is calculated from the cart price through Superset Rates.
- Additionally, shipping can be calculated from the postcode and the product weight.
- Ship to Applicable Countries restricts the method to selected countries only.
- Shipping rates populate automatically during the checkout step.
- Moreover, tenants export a sample shipping CSV file from the back-end.
- Table Rate Shipping supports alphanumeric zip codes as well as numeric ranges.
- Tenants confirm orders and record a tracking number while creating a shipment.
- Finally, invoices and shipment records open directly from the order view.
Installation
Note:
Please follow the Bagisto SaaS Table Rate Shipping README for the installation process exclusively. Do not follow the base Table Rate Shipping README.
Requirements:
- Bagisto: v2.4.9
- Bagisto Saas: v2.4.9.1
- Bagisto Table Rate Shipping: v2.4.9.0
First, unzip the respective extension zip. Then merge the “packages” folder into the project root directory.
Next, go to the composer.json file in the root directory and add these lines under ‘psr-4’:
"Webkul\\TableRate\\": "packages/Webkul/TableRate/src",
"Webkul\\TableRateSaas\\": "packages/Webkul/TableRateSaas/src"
After that, open bootstrap/providers.php and register both service providers:
Webkul\TableRate\Providers\TableRateServiceProvider::class,
Webkul\TableRateSaas\Providers\TableRateSaasServiceProvider::class,
Order matters here. Both entries must sit after SAASCustomizerServiceProvider, and the SaaS provider must follow the base one.
Note: modern Bagisto versions handle the Vite configuration automatically. Finally, run the commands below to complete the setup:
composer dump-autoload
php artisan tablerate-saas:install
The installer runs the base Table Rate migrations first, then this module’s migration, and clears the caches afterwards.
-> now execute the project on your specified domain.
Multi-Tenancy and Data Isolation
This module exists for one reason: keeping every tenant’s table rate data private. Therefore, isolation runs at the database level rather than in the interface.
During installation the migration adds a company_id column to the three Table Rate tables. Consequently, every superset and every rate belongs to exactly one company.
Each record is stamped with the current company as it is created. Similarly, every read is filtered back to that same company automatically.
The grids follow the same rule. As a result, a tenant opening Supersets sees only its own rows, never the rows of a neighbouring store.
Per-Company Superset Codes
On a single-tenant store a superset code must be globally unique. However, that rule breaks down once many companies share one installation.
This module replaces the global unique index with a composite one on code and company. Two tenants may therefore both use a code such as EXPRESS without any clash.
Step-by-Step: Confirm Tenant Isolation
- Sign in to the first tenant’s admin panel with that company’s admin account.
- Navigate to Table Rate Shipping >> Supersets and create a superset.
- Next, sign out and sign in to a second tenant’s admin panel.
- Open the same Supersets grid on that second tenant.
- Notice that the first tenant’s superset never appears in the list.
- Finally, create a superset there using the same code to confirm codes are per company.
Super Admin: Module Information
The super admin panel also lists this module. Specifically, it appears under Configure >> Sales >> Shipping Methods on the super side.
The screen below shows exactly what the super admin sees after installation:-
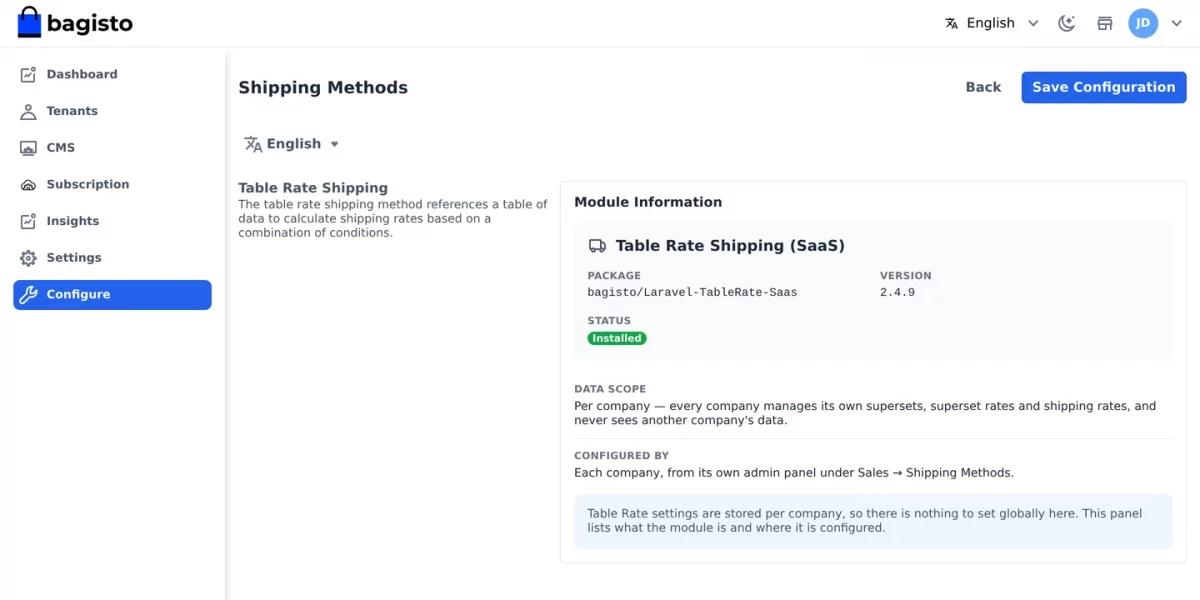
That panel stays read-only by design. Moreover, it carries no input fields at all, so the Save Configuration button changes nothing here.
What the Panel Shows
- Module – the display name of the installed extension.
- Package – the composer package name, useful while auditing an installation.
- Version – the installed module version.
- Status – a badge confirming the module booted correctly.
- Data Scope – a reminder that every record belongs to one company.
- Configured By – the exact place where the real settings live.
Why There Are No Fields Here
The super admin configuration stores its values globally, without any company attached to them.
Table Rate settings work the other way round. Each value belongs to one company and is written against that company only.
Editable fields on this screen would therefore shadow tenant data that nothing ever reads back.
Consequently, the panel simply documents the module and points the super admin towards the tenant panel.
Step-by-Step: Open the Module Information Panel
- Sign in to the super admin panel on the primary SaaS domain.
- Navigate to Configure >> Sales >> Shipping Methods.
- Locate the Table Rate Shipping entry in that group.
- Review the module name, package, version and status shown there.
- Finally, switch to a tenant panel whenever a value actually needs changing.
Laravel eCommerce SaaS Table Rate Shipping:-Tenant Management
After a successful installation, the tenant finds Table Rate Shipping under Configure >> Sales >> Shipping Methods.
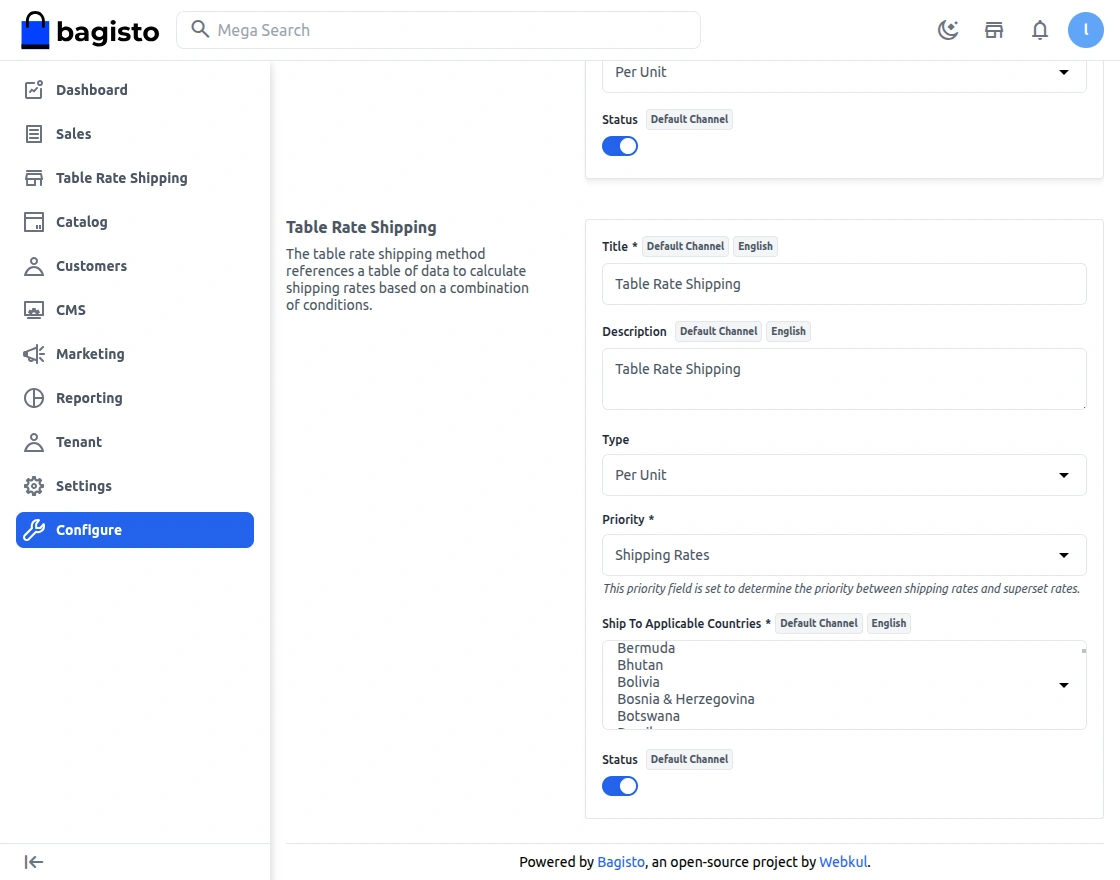
Title:- Provide the name for the shipping method.
Description:- Provide the description shown on the checkout page.
Type:- The tenant selects between Per Unit and Per Order.
Priority:- This field decides whether Shipping Rates or Superset Rates take precedence.
Ship to Applicable Countries:- The tenant picks the countries where this method stays available.
Status:- The tenant activates or deactivates the method from this field.
Note: Table Rate Shipping cannot be enabled alone. Therefore, keep Flat Rate or Free Shipping enabled as well.
Step-by-Step: Configure Table Rate Shipping
- Log in to the tenant admin panel.
- Go to Configure >> Sales >> Shipping Methods.
- Open the Table Rate Shipping section.
- Enter the Title and Description shown at checkout.
- Choose the Type and then the Priority.
- Select the countries under Ship to Applicable Countries.
- Switch Status on, keeping Flat Rate or Free Shipping enabled too.
- Finally, click Save Configuration.
Afterwards, the tenant manages the rates through the Table Rate Shipping menu, as shown below:-

Add Super Set
To begin, the tenant clicks the Add SuperSet button.
Consequently, the following page appears:-

Here the tenant fills in the general settings:
- Code: Set the code of the superset. Notably, this code only needs to be unique inside the tenant’s own store.
- Name: Enter the name of the superset.
- Status: Select to activate the superset.
Lastly, the tenant saves the record with the Save SuperSet button.
Step-by-Step: Add a Superset
- Open Table Rate Shipping >> Supersets in the tenant panel.
- Click the Add SuperSet button.
- Enter a Code and a Name for the set.
- Then set Status to active.
- Click Save SuperSet to store the record.
- The new superset appears in the grid, already tied to the current company.
The grid below lists every superset. Moreover, selecting one lets the tenant update or delete it from the drop-down.

Superset Rates
After adding the Superset Methods, the tenant adds Superset Rates under the matching section.

Clicking the Add Superset Rate button opens the following page.

Here the tenant fills in the superset rate details:
- Price From – Set the minimum cart price for this shipping set.
- Price To – Set the maximum cart price for this shipping set.
- Shipping Type – Choose Fixed to enter a price, or Free to allow free shipping.
- Superset Methods – Select the superset from the drop-down.
- Status – Activate or deactivate this individual rate.
Step-by-Step: Add a Superset Rate
- Go to Table Rate Shipping >> Superset Rates.
- Click Add Superset Rate.
- Enter Price From and Price To for the cart range.
- Pick the Shipping Type, then enter a price for Fixed.
- Select the parent superset under Superset Methods.
- Finally, save the rate and confirm it in the grid.
Example of Table rate Super-set:-
Consider two sellers, X and Y, holding products P1 and P2 respectively.
Both sellers keep a superset named “Quick delivery”. Additionally, both products fall inside the configured shipping price range.
A customer now adds P1 and P2 to the cart and moves to checkout. Consequently, “Quick delivery” appears as one shipping method.
The shipping cost is then the sum of the shipping price of P1 and P2.
Shipping Rate
The tenant can upload Table Rate Shipping rows as CSV. First, download the sample file from the Import button.

After clicking Import, the pop-up below appears.

The CSV below drives the shipping rates. Every field is mandatory, and the grid above mirrors the file as a table matrix.

IS Zip Range (Numeric Zip Code) – Select “1” for a numeric zip range, otherwise select “0” for an alphanumeric code.
Zip Code (Alphanumeric Zip Code) – Enter the alphanumeric code when the numeric option stays off.
Conversely, enter the numeric zip code whenever the “Numeric zip code” option is enabled.
Note: Country Code must follow the official ISO-2 (alpha-2) two-letter country codes.
Step-by-Step: Import Shipping Rates
- Open Table Rate Shipping >> Shipping Rates.
- Click Import, then download the sample CSV file.
- Fill every column, using ISO-2 codes in the country column.
- Set IS Zip Range to 1 for numeric ranges, or 0 for alphanumeric codes.
- Upload the finished file through the same Import pop-up.
- Finally, review the imported rows in the grid.
Each imported row is stamped with the current company. Therefore, a CSV upload never leaks rates into another tenant’s store.
Table Rate Shipping:- Customer Management
Once the tenant finishes the configuration, the customer can select the Table Rate Shipping method during checkout:-
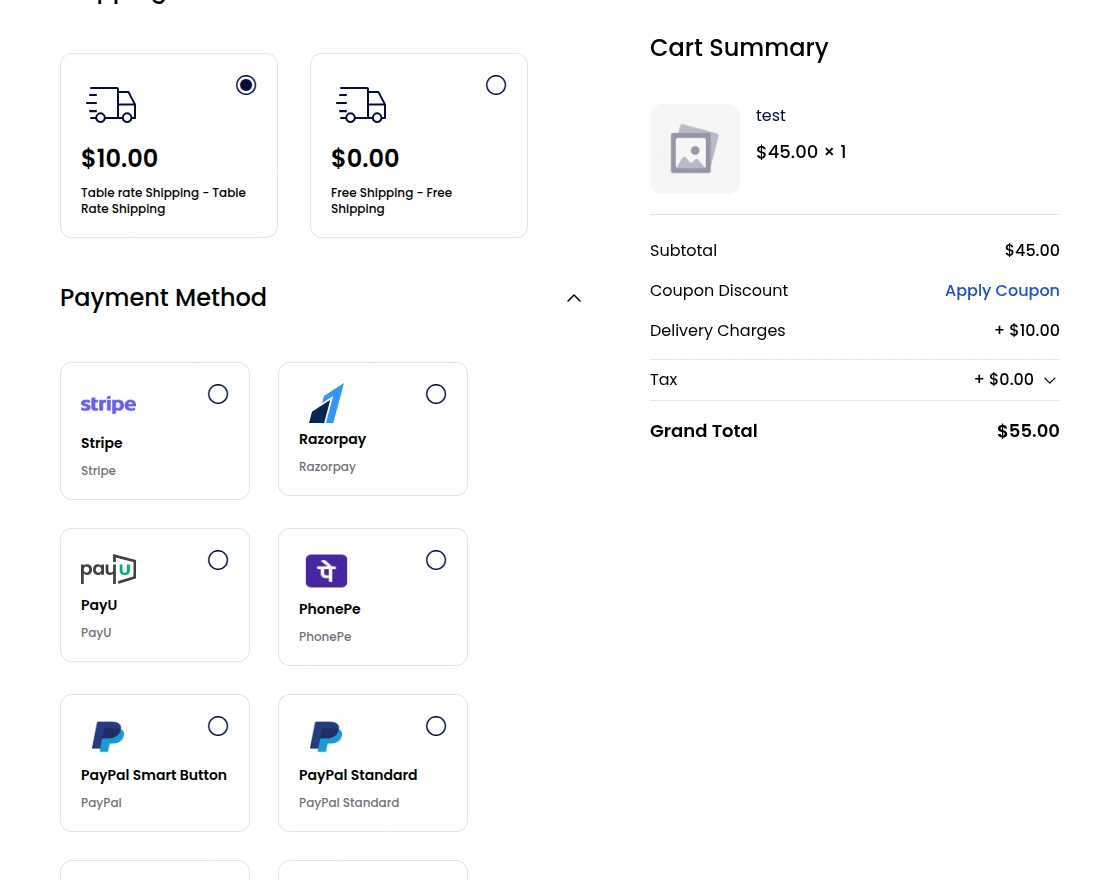
Note: In Laravel eCommerce Table Rate Shipping, the rate is calculated from the product weight and the delivery zipcode.
Next, the customer clicks the Place Order button.

The order is now placed successfully, as the image above shows.
Afterwards, the customer can review their order details inside their account, together with the total shipping charges.

Step-by-Step: Checkout with Table Rate Shipping
- Add a shippable product to the cart on the tenant storefront.
- Proceed to checkout and enter the shipping address.
- Then choose Table Rate Shipping from the shipping methods.
- Review the calculated rate for the entered postcode and weight.
- Select a payment method and click Place Order.
- Finally, open My Account >> Orders to see the shipping charge.
Tenant Orders Management
The tenant manages orders from the tenant panel under Sales >> Orders, where every order is listed:-

Clicking the arrow icon opens the details of any order:-

Moreover, clicking the Invoice button generates the page shown below:-

Enter the quantity to invoice, then click the Create Invoice button.
Next, the tenant clicks the Ship button to create a shipment.

While creating the shipment, the tenant enters the Carrier Name and Tracking Number.
Additionally, the tenant selects the inventory source and enters the quantity to ship.
Then click the Create Shipment button.
Now the tenant can see the status of all orders, as the image below shows.

The tenant reviews every invoice by clicking the Invoices option shown below.

Similarly, the Shipments option lists every shipment raised by that tenant.

Step-by-Step: Invoice and Ship an Order
- Open Sales >> Orders in the tenant panel.
- Click the arrow icon on the order you want to process.
- Click Invoice, enter the quantity, then click Create Invoice.
- Next, click Ship on the same order.
- Enter the Carrier Name and Tracking Number.
- Select the inventory source and the quantity to ship.
- Finally, click Create Shipment and check the updated status.
Support
That covers the user guide for Laravel eCommerce SaaS Table Rate Shipping in Bagisto.
For any queries or doubts, reach out to us at [email protected].
You can also raise a ticket at our HelpDesk System.
Additionally, the official Bagisto developer documentation covers the core shipping concepts in depth.
Please explore our Laravel Development Services and quality Bagisto Extensions.
Current Product Version - v2.4.9.0
Supported Framework Version - Bagisto v2.4.9.0

Be the first to comment.