Laravel eCommerce Amazon S3 Extension provides users to store static files and media content on the Amazon S3 bucket and retrieve them directly from the S3 bucket, with on-the-fly cache image generation, background synchronization, and a one-click asset migration tool.
We have also included the functionality to set an expiration header and serve cached images with ETag-based browser revalidation.
Amazon S3 (Simple Storage Service) is a cloud storage service offered by AWS (Amazon Web Services).
Using the module, the store admin can upload downloadable products, media files, product content, images of all Laravel product types from their local disk to the Amazon S3 server.
Note:
- A customer must have an Amazon AWS account to access the Amazon S3 services. From this link, users would be able to register here.
- To understand how to get started with Amazon S3, just click here.
Features
- Support all Bagisto product types.
- All media files (product images, description media, editing images, etc.) are stored and retrieved from the Amazon S3 bucket.
- Flexible settings to configure the module.
- Uploads only the single original image to the S3 bucket instead of separate small, medium, and large copies, keeping bucket storage low.
- Generates cache image sizes (small, medium, large) on the fly from the S3 original and stores them in a local cache for fast serving.
- Cached images are served with an ETag and revalidated by the browser, so a changed image is picked up immediately.
- One-click background synchronization of all local media files to the S3 bucket, processed in chunks with already uploaded files skipped.
- One-click “Move Assets to Local” action that pulls every file back from the S3 bucket into local storage with the same folder structure.
- Live progress bar with percentage and processed/total file count for both Synchronize and Move operations.
- Direct /storage URLs fall back to the S3 bucket when the local file is missing, so removing the local public folder does not break images.
- Validates AWS credentials and bucket before any Synchronize or Move operation, with clear error messages.
Installation
Unzip the respective extension zip and then merge “packages” folders into the project root directory.
Open the composer.json file and add the following line under the ‘psr-4’ section:
"Webkul\\AWSIntegration\\": "packages/Webkul/AWSIntegration/src"
Also open the bootstrap/providers.php file add the following line under the array:
Webkul\AWSIntegration\Providers\AWSIntegrationServiceProvider::class,
Run these commands below to complete the setup
composer dump-autoload
composer require league/flysystem-aws-s3-v3
php artisan optimize:clear
Goto config/app.php file and add following after 1st line
use Illuminate\Support\Facades\Facade;
Goto config/app.php file and add following at end
'aliases' => Facade::defaultAliases()->merge([
'Storage' => Webkul\AWSIntegration\Storage::class,
])->toArray(),
That’s it, now just execute the project on your specified domain.
AWS Account Creation
- Go to AWS Sign-up and create a new AWS account.
- Log in to your AWS account at AWS Console.
- Search for S3 in the AWS services search bar and open it.
- Click Create bucket, enter a unique bucket name, select your region, and uncheck “Block all public access”. Click Create bucket.
- Go to IAM under Security, Identity & Compliance. Click Users then Create user.
- Enter a username, click Next, then select Attach policies directly. Search for AmazonS3FullAccess, check the box, and click Next.
- Review and click Create user. Copy the Access Key ID and Secret Access Key displayed on the success page.
Admin Configuration
The admin can customize the module settings after installing the extension by going to Configure > AWS Integration in the Bagisto Admin Panel, as seen below:

Open the Bagisto Admin Panel and fill in the following information under the General tab.
- Allow files to save on Amazon: If you wish to save the file on the Amazon server, Click the icon; otherwise, leave it blank.
- Access Key ID: Enter the access key that you’ll get after creating an IAM User.
- Secret Key: Enter the secret key that you will receive after the creation of the IAM User.
- Bucket Name: Insert the name of the Amazon bucket you have created in the S3 account.
- Region: Select the bucket’s region which you specified when you created the bucket in your S3 account.
- Bucket URL: Bucket can also be accessed by using this URL.
Go to Dashboard after clicking the save button in the right top corner.
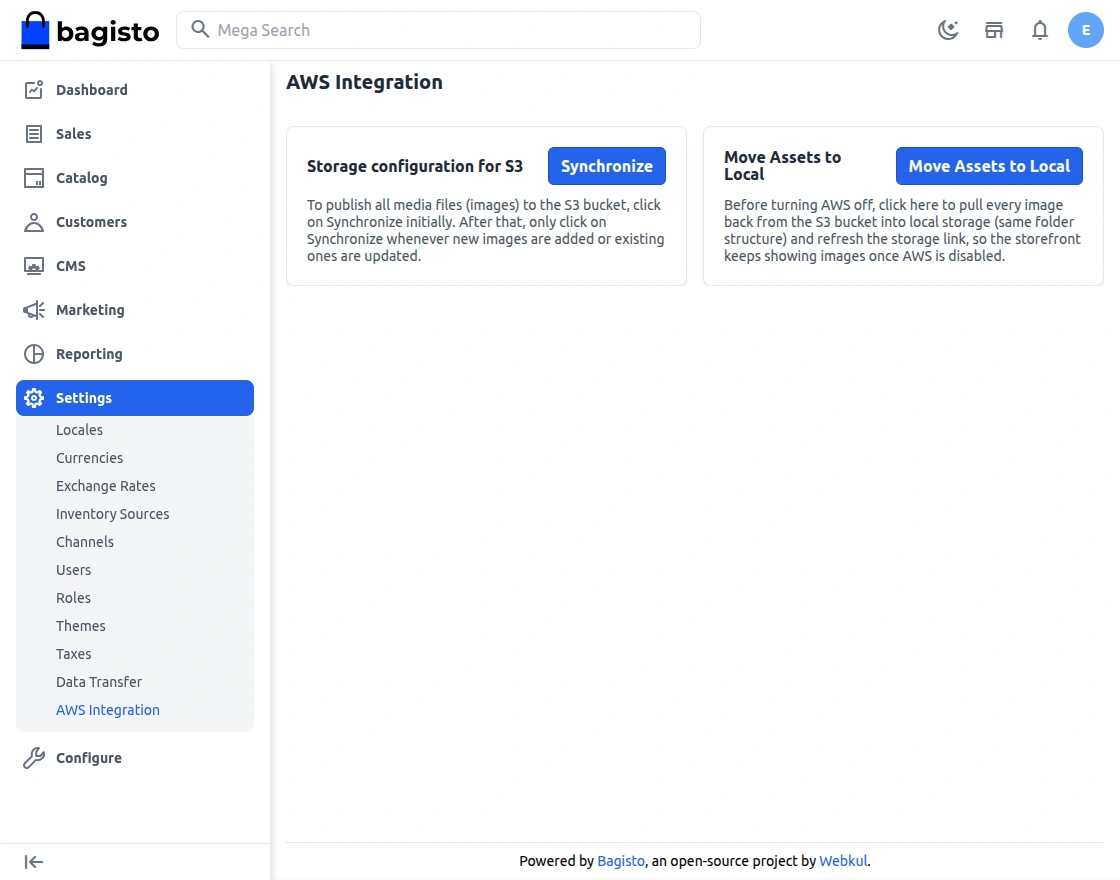
Click the Settings -> AWS Integration button in the left bottom corner. Now, click the Synchronize button to start background synchronization of all media files to the S3 bucket. A live progress bar will display the percentage and processed/total file count.
Before disabling AWS, use the Move Assets to Local button to pull all files back from the S3 bucket into local storage, ensuring the storefront continues to display images.
Finally, after successful synchronization, you will receive a success message.
Support
So, that was much about the User Guide of Laravel eCommerce Amazon S3 Extension for any queries or doubts reach out to us at [email protected]. You can also raise a ticket at our HelpDesk System.
Please explore our Laravel Development Services and Quality Bagisto Extensions.
Current Product Version - v2.4.4
Supported Framework Version - Bagisto v2.4.4

Be the first to comment.