Installation of joomla on ubuntu is little tedious and if you follow the simple rule as in windows you will get error in installing the sample data. so here we go,
Step by step tutorial:
I am assuming that in your linux Apache,Mysql and php is working fine if u are a newbie follow the instructions below
Installing Apache:
open the terminal and type the following command
sudo apt-get install apache2
if you are login from the user account it will ask for the password after interning the password apache will install automatically, For testing purpose wether apache is running or not open the browser and type http://localhost .It will surely show “it works”.
Installing PHP:
open the terminal and type the following command
sudo apt-get install php5 libapache2-mod-php5
if you are login from the user account it will ask for the password after interning the password PHP will install automatically.After the PHP installation restart the apache web server
sudo /etc/init.d/apache2 restart
For testing purpose weather php is running or not make a php file in “/var/www” (folder path) ‘test.php’ open the php file using any editor im using gedit so open as
gedit test.php
and type simple save the file and open the browser and type http://localhost/test.php and it will show the php information.
Installing Mysql:
open the terminal and type the following command
sudo apt-get install mysql-server
it will install the mysql automatically now create password for the mysql root user open the terminal and type mysql so now u r in the mysql console .To create password type
SET PASSWORD FOR ‘root’@’localhost’ = PASSWORD(‘yourpassword’);
here ‘yourpassword’ is your password and u can put anything on password.
Installing PHPMYADMIN:
open the terminal and type the following command
sudo apt-get install phpmyadmin
during the installtion it will ask about the web server and mysql password choose apache as web server and type your mysql password . now open apache.conf file using
gedit /etc/apache2/apache2.conf
and add this line to apache2.conf
Include /etc/phpmyadmin/apache.conf .
now restart the apache sudo /etc/init.d/apache2 restart
Test for phpmyadmin:
open your browser and just type http://localhost/phpmyadmin it will open the phpmyadmin SO now your system is ready for the joomla installation
Joomla Installation:
Extract joomla in “var/www”(Folder path) now open the bowser and type http://localhost it will show the joomla folder as below
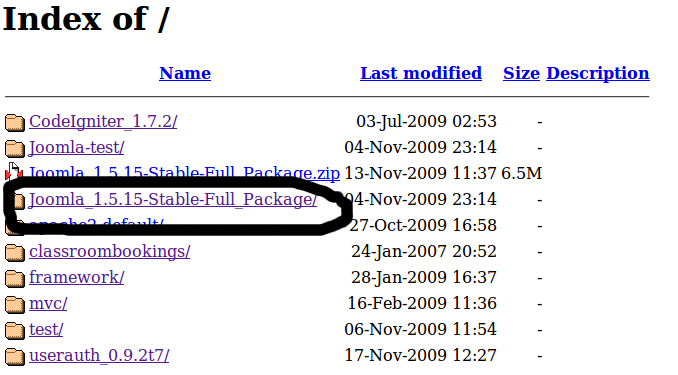
just click on the joomla folder it will ask about the language select the language and click on next button now the main thing came as the image describes

Dont bother about the warning just click on the next button and follow the instructions as joomla installation in windows at the end a textbox will appear just copy the text from the textbox and create the file “configuration.php” and copy the whole text to this file and save this file in “var/www/joomlafolder” and follow the instructions .
I am very sure that this tutorial will help you in the joomla installation for any quesries just drop a mail in my mailbox or just put a comment . Enjoy 🙂

Be the first to comment.