Facebook Messenger Chat for WooCommerce provides an easy and interactive sales experience to the customers.
The customers can chat with the admin of a site vice-versa through facebook messenger.
The best thing an e-commerce site can offer its customers is that they don’t have to walk into the store.
At the same time, it is also essential to keep in touch with the customers and engage with them.
This can easily be accomplished by using the Facebook Messenger Chat for WooCommerce.
The admin creates the Page ID and the App ID, and selects a domain of the page where the admin wishes to display the messenger.
The messenger icon shall display in the frontend. One needs to login to the messenger and start a conversation.
Therefore, it has become quite easier for e-commerce sites to reach out to a large number of customers through Facebook Messenger Chat plugin.
It is the most feasible way to drive traffic to a site and generate revenue.
We provide a production version of the plugin. If you want a development version then you can get it at an additional cost. Please contact [email protected] for it.
Watch the below video tutorials to understand the plugin workflow :
Features
- Admin can chat live via facebook messenger.
- Admin can display the messenger icon on all the frontend pages such as my account, cart page, etc.
- A color for the messenger icon can be chosen by the admin.
- A feasible way to engage with the customers.
- Client handling is much easier.
-
The admin can choose which pages the messenger pop-up should not appear on.
Installation
The user will get a zip file which needs to be uploaded in the “Add New” menu option in the WordPress admin panel.
Thus, For this login to WordPress Admin Panel and in the Dashboard hover your mouse over the “Plugins” menu option select the “Add New” option.

After that, the user will see an option on the top of the page that is “Upload Plugin”, click the option to upload the zip file.

On clicking the “Upload Plugin” option, the user will see a “Choose File” button. Click on the button to browse for the zip file as per the image below.

After browsing the file, click on the “Install Now” button so as to install the plugin as per the snapshot.
Once the user installs the plugin, a message “Plugin installed successfully” displays and an “Activate Plugin” is visible to activate the plugin.
However, The user needs to click on the “Activate Plugin” button to activate the plugin.

Obtaining the Page Id
In order to set the configurations of the module, the admin needs to fetch the Page ID and the App ID from Facebook.
Thus,given few easy steps to obtain the Page ID from Facebook.
1:
- The user needs to log in to Facebook by simply entering the login id and password.
- In the Home Page, on the left corner, the user will have to navigate through Explore > Pages as shown in the image below.

2:
- On clicking the Pages tab, it redirects the user to ‘Liked Pages’ page where an option “Create Page” is given.
- The user can click on “Create Page” as shown, so as to create a new page.

3:
- Under “Create a Page” the user will have to choose ‘Page Category’, as in the image below the user has chosen “Business or brand.”

4:
- On clicking the Get Started button after choosing the Page Category, it redirects the user to the “Create a Page” page.
- The user can go forth and add the “Page Name” and choose a “Category” from the dropdown list.
- In the image below the user adds the Page Name as “Woo Webkul” and chooses the Category as “App Page” from the dropdown list.
Note – The category name must be “App Page” while creating a page.

5:
- On clicking the “Upload a Profile Picture” as shown in the image, the user can add a profile picture which best links or associates with the page.
- Similarly, a cover picture can be uploaded by the user for the page.
 6:
6:
- The page which the user creates will display as shown in the image below.

7:
- The user can find the Page ID by navigating through About > Page ID, as shown in the image below.
- The admin can use this Page ID for the module configuration.

Obtaining the App ID
Step 1:
The user needs to login to the facebook developers page by hitting the following link.
In the “facebook for developers” page, the user will come across an option My Apps as shown.

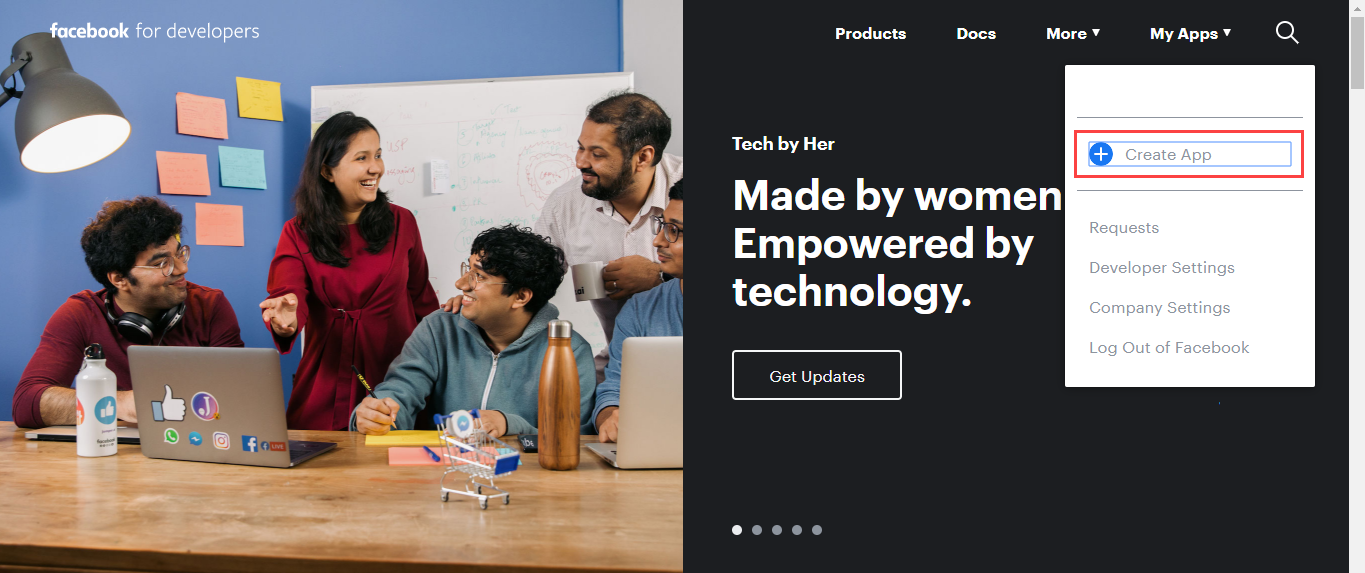
Step 2:
As the user clicks on the My Apps option, a drop-down pop up appears, where the user can tap on the Create App, so as to create a new app id as shown in the image below.
NoStep 3:
By clicking the Create App tab, a pop up appears as shown in the image below.
The user will have to enter the “Display Name” and “Contact Email” and simply click on the Create App ID.

Step 4:
The APP ID for the page Woo Webkul is created as shown in the image below.

Step 5:
Now, under “Settings > Advanced > App Page” user can select an existing page or can create a new page as well.
Here, we have selected our existing page “Woo Webkul”.
Note – The name of the page should contain the name of the app, and the page must be in the “App Page” category. We can make the required changes in the app name or in the page name to fit this criteria.

Step 6:
- The user will have to open the created page.
- In the image below, on the right corner of the Woo Webkul page, the Settings option is available.

Step 7:
- On clicking the Settings tab, the user will encounter an option Advanced Messaging.

- Here, navigate through Whitelisted domains.
- Under White-listed domains, the user needs to add the domain of the page on which the messenger icon shall display on the frontend for the customers.
Module Configuration
The admin can add configurations for WooCommerce Facebook Messenger Settings in the admin dashboard by clicking on the Facebook Chat Messenger tab.

The admin can configure the Facebook Messenger settings as follows:
App Id: Admin obtains the App Id from the Facebook for developers page.
Page Id: The admin obtains the Page ID from Facebook.
Theme Color: The admin chooses a color from the color palette for the messenger’s theme.
Welcome Message: A message, which shall display as the customer logs in to the messenger.
Logged Out Message: A message will display after the customer logs out of the messenger.
Enable/ Disable: The admin can choose to enable or disable the plugin.
Exclude Page: The admin can choose which pages the messenger pop-up should not appear on.
Frontend Workflow
The user can log in to the frontend and view the messenger icon on the right-hand bottom corner as shown in the image below.
The customer will have to log in to the messenger so as to start a conversation as shown in the image below.
As the customer clicks on the Log into Messenger tab in the above image, it redirects the customers to the messenger login.
The customer can enter the credentials for the messenger. The messenger chat box opens and the customer can start off the conversation as shown in the image below.
Note: The Messenger shall display in the frontend only on the pages which the admin configures under the White-listed Domain section.

Not only text messages, but the customers can also send images to the admin using the facebook messenger chatbox as shown in the image below.
The customer can also share doc files using the Facebook messenger chatbox as shown in the image below.

Facebook End
Customers can see the messenger icon, after clicking on the icon, a pop-up will appear. In the pop-up, the customer can write their query.

Customers can log in as a guest as well and can discuss their queries with the admin. The admin can revert on the query of the customers mentioned below in the snapshot:

That’s all for the Facebook Messenger Chat for WooCommerce. If you still have any issues, feel free to add a ticket and let us know your views on our Webkul Support System.
Current Product Version - 1.0.1
Supported Framework Version - WooCommerce: 8.2.1, WordPress: 6.3.2

Be the first to comment.