E-commerce has become an essential part of our lives. Easyship has led to an increase in demand for shipping services.
From groceries to clothes and electronics, we can purchase almost everything online.
However, shipping can be a complex and time-consuming process, especially for small and medium-sized e-commerce businesses.
Considering these traits, Webkul is here with a new feature app called Easyship in Multivendor Marketplace App.
PLEASE NOTE-
- The Easyship feature app is available only with the Multivendor Pro Plan. Moreover, you need to enable the Shipping Add-on for FREE from the ‘Feature Apps’ section of the app.
- Also, Access to Shipping requires your Shopify store to be on the plan that supports Real-Time Carrier-Calculated Shipping.
How to Enable Easyship in Multivendor Marketplace App?
The Easyship feature app is available for both Rate Calculation and Fulfillment.
To activate this feature in your app, simply navigate to the “Feature Apps” section of the Multivendor Marketplace admin panel and activate it from there.

After accessing the “Feature Apps” section, you will see a list of available feature apps. Scroll down to find the feature,
then click on theEnable button to activate it in your multivendor marketplace app.

After clicking on Enable button, you need to click on Agree button to proceed with approving the feature app’s charges.
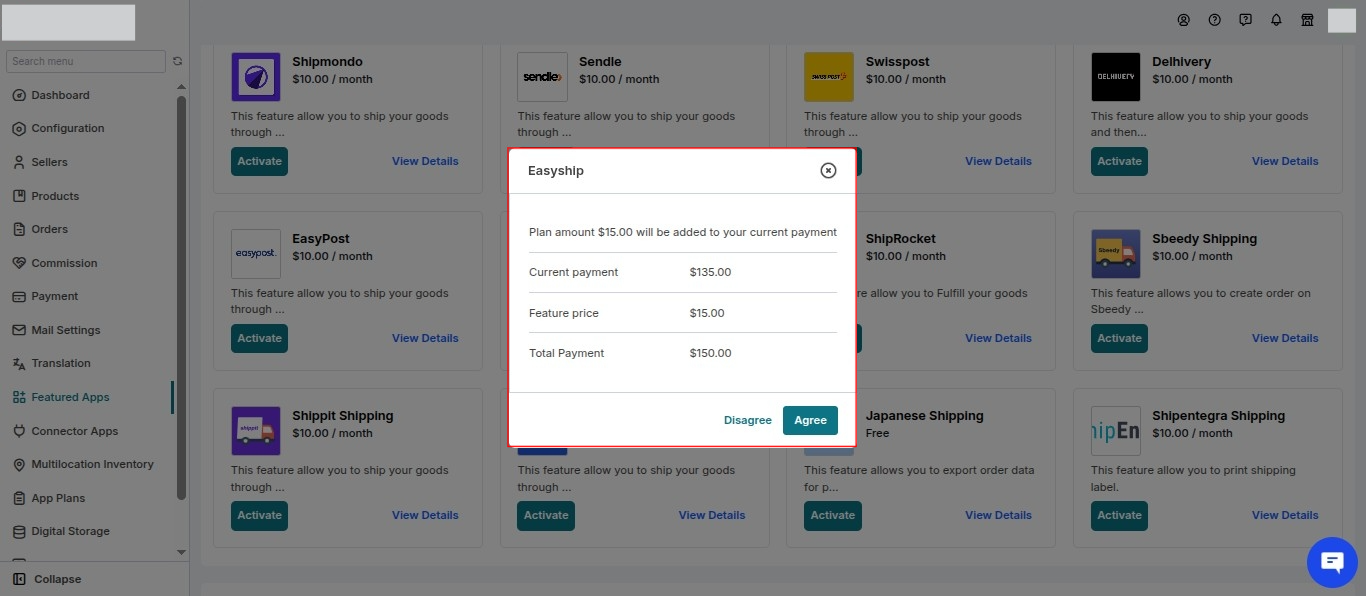
You can easily approve the charges by simply clicking on the “Approve” button in Shopify.

With the help of these steps, you can easily enable the Easyship feature within your Multivendor Marketplace App.
Configuration: Admin’s End
In order to activate this feature, the admin must follow these configuration steps:
- Navigate to Configuration >> Shipping Methods

In this section, the admin can select Easyship as a shipping method by enabling it for the sellers to ship their goods.

Once enabled, you will get the option to configure the Easyship settings.
Easyship Configuration
Now, navigate to Configuration >> Admin Easyship Configuration. You need to configure the below-mentioned details as per your requirement and save them.

USAGE AS: Configure how you want to use the Easyship shipping for the sellers. Either it’s for Fulfillment only or for Both(Shipping and fulfillment).
ALLOW SELLER TO CONFIGURE THEIR OWN EASYSHIP ACCOUNT: In case you select fulfillment, you can let sellers add their details & fulfill instead of yourself adding the details.
Admin’s End:

Seller’s End:


EASYSHIP ACCESS TOKEN: Here, you need to enter/paste the access token provided by Easyship.
For getting an access token from Easyship, please follow the below steps:
- Open your Easyship account, navigate to New Integration, and scroll down the page to the bottom.
- Click on API Integration.

The below page will appear, from here copy the Access Token and paste it into the Easyship configuration(EASYSHIP ACCESS TOKEN).
NOTE: Make sure to select all the checkboxes of Scopes by editing it.

SHIPPING LABEL COST BEARED BY: Configure if the admin or the seller will bear the shipping cost.
WEBHOOK REGISTER FOR EASYSHIP SHIPPING: You need to add this webhook URL to your Easyship account to manage shipping labels and shipment status.
For doing this, follow the below steps:
- Go to your Easyship account
- Navigate to Webhooks
- Click on Add new webhook

By clicking on add new webhook, the below popup page will appear, here you need to select-
- shipment.label.created
- shipment.tracking.status.changed
Add/paste the webhook URL in the given field, i.e., Webhook Endpoint URL and click on Create button.

In this way, the webhook will get added to your Easyship account.
Make Shipping Address and Phone Number Mandatory
To use this feature add-on, the admin needs to make the Shipping address and phone number mandatory at the time of checkout.
To do this, You need to go to Shopify Backend > Settings > Checkout > Under Form Options, make the Shipping address and phone number as Required.

Configuration: Seller’s End
The sellers will also get the option to enable Easyship shipping from the Shipping Configuration menu of their seller panel.

The sellers can set the Easyship shipping as default option, and also can disable the shipping.
When adding or editing products, sellers have the option to select the desired shipping method.

GLOBAL CONFIGURATION:- In case, the sellers need to configure the shipping parcel details, this can be done from the Global Shipping Configuration.
Need to configure Width, height, length, girth, and weight.
SHOPIFY STORE FRONTEND:- After entering their information, the customer will be able to select a shipping method that has been configured in the backend.

FULFILLING THE ORDER:- During the order fulfillment process, sellers have the option to select and review the shipping services and corresponding rates.

While fulfilling the order, seller can also Cancel Fulfillment and Create Pickup Request.

To create a pickup request for an order, follow these steps:
- Open the order that you want to create a pickup request for.
- Click on “Actions” next to the shipping method and below the tracking number.
- Select “Create Pickup Request” from the dropdown menu.
- A new popup titled “Create Easyship Pickup Request” will appear.
- Click “Check Available Dates” and choose a suitable date and time.
- Finally, click “Create Pickup Request” to complete the process.


In this way, sellers can easily create a pickup request.
To check other Shipping Services integrated with the App, Click Here!
Thank you for taking the time to read our blog. To stay up-to-date with our latest articles, please stay connected with us.
Need Help?
If you require any further assistance or have any questions, please don’t hesitate to raise a ticket at https://webkul.uvdesk.com/en/.
Alternatively, you may contact our support team at [email protected] for prompt and reliable assistance.
We appreciate your support and hope to continue providing valuable content in the future. Thank you again for reading our blog.

Be the first to comment.