We have updated a new feature in the multivendor app that allows sellers to create draft orders for customers.
The draft order is created manually by the seller on the seller panel before it is finalized and completed by a customer. It’s often used when a customer wants to place a custom order.
When accepting orders over the phone, or for creating invoices. Once the draft order is ready, it can be sent to the customer for payment or the store owner’s completion directly.
How to create a draft order?
In the Multivendor Marketplace App, sellers can create draft orders on behalf of their customers directly from their dedicated panel:
Admin Panel
To allow sellers to create draft orders, the admin needs to first enable the “Allow seller to create draft order” setting.
Once enabled, sellers will have the option to create draft orders on the seller panel.
To allow sellers to create draft orders, follow these steps:
- Navigate to the Multivendor Marketplace Admin Panel.
- Go to Configuration.
- Select Orders Configuration.
- Find and enable the option labeled “Allow seller to create draft order”.


Once enabled, sellers will be able to create draft orders from the seller panel.
Seller Panel
Sellers can create a draft order from their seller panel by following these steps:
- Go to the Order Section: Access the “Order” section in the seller panel.
- Click on Draft Order: Select the “Draft Order” option.
- Choose Create Draft Order: Click on “Create Draft Order” to start the process.


The order detail page will open then the seller has to fill in the details:

Products:
To create a draft order, start by selecting the products you wish to include from the product section. You can choose multiple items for the draft order, selecting from your available inventory.

If you need to add items that are not currently listed in your inventory, use the “Add Custom Item” option.
This option is available on the order details within the draft order setup, allowing you to include custom or special items not found in your product listing.

If you want to apply tax to this item, check the box labeled “Item is taxable.”
If your item is a physical product, check the box labeled “Item is a physical product.” You may optionally enter the item’s weight.
If your item is not a physical product, you can proceed directly to add the product.

Store Pickup / Delivery Selection
If the Store Pickup feature is configured for the selected product, the seller will see additional fulfillment options while creating the Draft Order.
Based on the product configuration, the seller can choose Store Pickup, Delivery, or both options (if available).
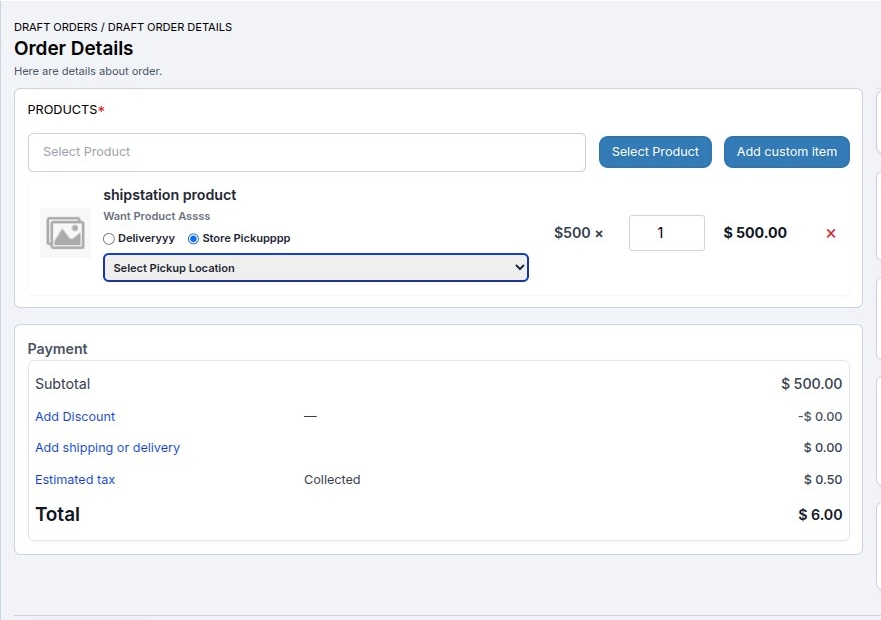
The selected option will be added to the Draft Order as a line item property.
Payments:
Subtotal: This section calculates the subtotal amount based on the products added to the draft order.
Add discount: When you add a product to a draft order, all eligible discounts will be automatically applied to the selected product. Once marked ticked for automatic discount.

Add Shipping or Delivery: Through this option, the seller will be able to add the Shipping amount and the name of the Shipping.

Estimated tax: Tax will automatically calculated based on what the admin has set up on the Shopify end.
Total: The total amount will be calculated as per the price of selected products, applied discounts, Shipping cost, and estimated tax.
For example:
If a product costs $100, applies a $10 discount, adds $1 in shipping charges, and includes $8 in estimated tax, you calculate the total amount as follows: $100 – $10 + $1 + $8 = $99.
Send Invoice: If the seller wants to send an invoice to their customer, they should check the box labeled “Send Invoice”.

Allow discount codes at checkout
Using this option, when a seller creates a draft order for a customer, a link will be sent to the customer’s email address.
Upon opening the link to pay for the order, the customer will have the opportunity to enter a discount code on the checkout page.

Note: The seller can also add any note they wish to convey to their customer in the seller note.
Customer
On clicking on the Customer field, the seller will get two options “Create Customer” and “Search Customer”.

To create a draft order for an existing customer, use the “Search Customer” feature. Enter the customer’s email address to locate and select them from the list.

To create a draft order for a new customer, select the “Create Customer” option. This will open a form where you can enter all the necessary details for the new customer.
After filling out the information, click “Create Customer” to save the new customer. Once you create the customer, the system will automatically select them and display their details.

Tag
The seller can add relevant tags related to the product in this field while creating the draft order.
Collect Payment
When a seller creates a draft order for their customer, after saving the draft, they can click on “View” to access the order details.
From there, they will have the option to collect payment and reinvoice. The seller can update the payment status as collected, and these updates will sync with the Admin Panel.
Additionally, the seller can send an invoice for the payment to the customer. The Admin will be able to view the payment details in the Orders section of the Admin Panel.

Add Custom Item
We’ve introduced adding Custom item feature in the Seller Draft Order.
This allows sellers to manually enter a custom product name, set the price and quantity, mark the item as taxable, and specify whether it is a physical item or not.
This enhancement provides greater flexibility when creating draft orders.


Need Help?
If you have any questions or encounter issues, please open a ticket at http://webkul.uvdesk.com/ or send an email to [email protected].
Thank you for reading this blog!

Be the first to comment.