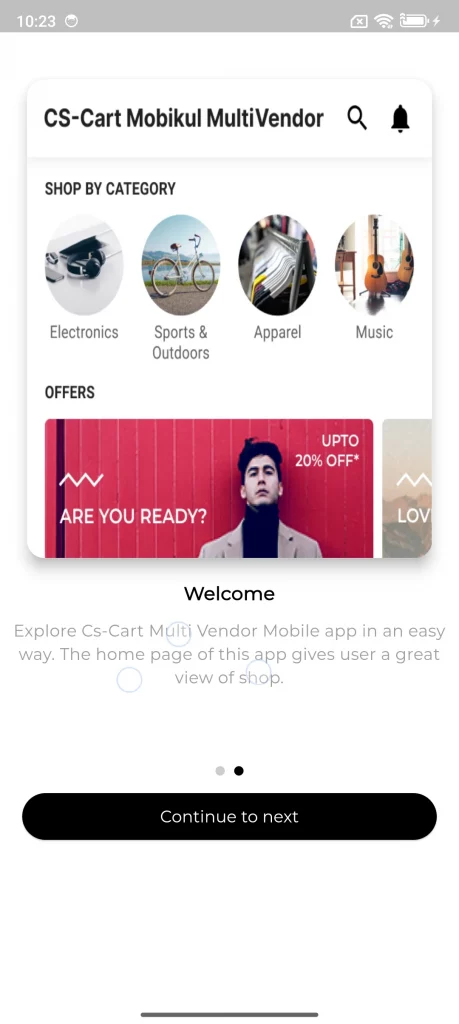
CS-Cart Multivendor Mobile App helps businesses of all sizes grow and succeed in the mobile commerce market.
Built with Flutter, this native mobile app delivers high performance and a seamless user experience for e-commerce stores.
Developing a mobile application often requires significant time and investment.
This solution provides a cost-effective, fully functional, and visually appealing mobile app tailored to meet user expectations.
Check the video mentioned below for an overview of the frontend of this mobile application:
Check the video mentioned below to understand the backend configuration settings of this mobile application:
Features
- Well integrated with CS-Cart Multi-vendor and Multi-store.
- Supports homepage layout configuration.
- Supports storefront-wise homepage layout configuration.
- Allows the admin to configure featured categories.
- Enables featured vendor configuration.
- Supports homepage banner configuration.
- Allows configuration of featured products.
- Supports catalog search configuration.
- Enables the admin to mark products as new.
- Supports product search using tags.
- Allows theme color customization.
- Supports product comparison functionality.
- Enables order return and refund features.
- Supports product search using barcode scanning.
Benefits
- Increases relationships and loyalty by reinforcing the store.
- Benefits sell through exposures across mobile devices.
- Moreover, strengthen the connectivity with on-the-go customers.
- Well-supportive in terms of accessibility, immediacy, and reachability.
- Be noticeable and visible every time on the user’s mobile device.
- In addition, avail the benefits of the creation of direct marketing channels.
- Helps in improving customer involvement.
- Besides this, it ensures ease of accessing e-commerce sites via mobile.
Credentials for Firebase
In the Firebase section, the admin must create an account to obtain the FCM (Firebase Cloud Messaging) details.

- Create an account on Firebase.
- Google FCM Project ID: You will get the Project ID of the Firebase app after creating a new app for the Firebase Cloud Messaging.
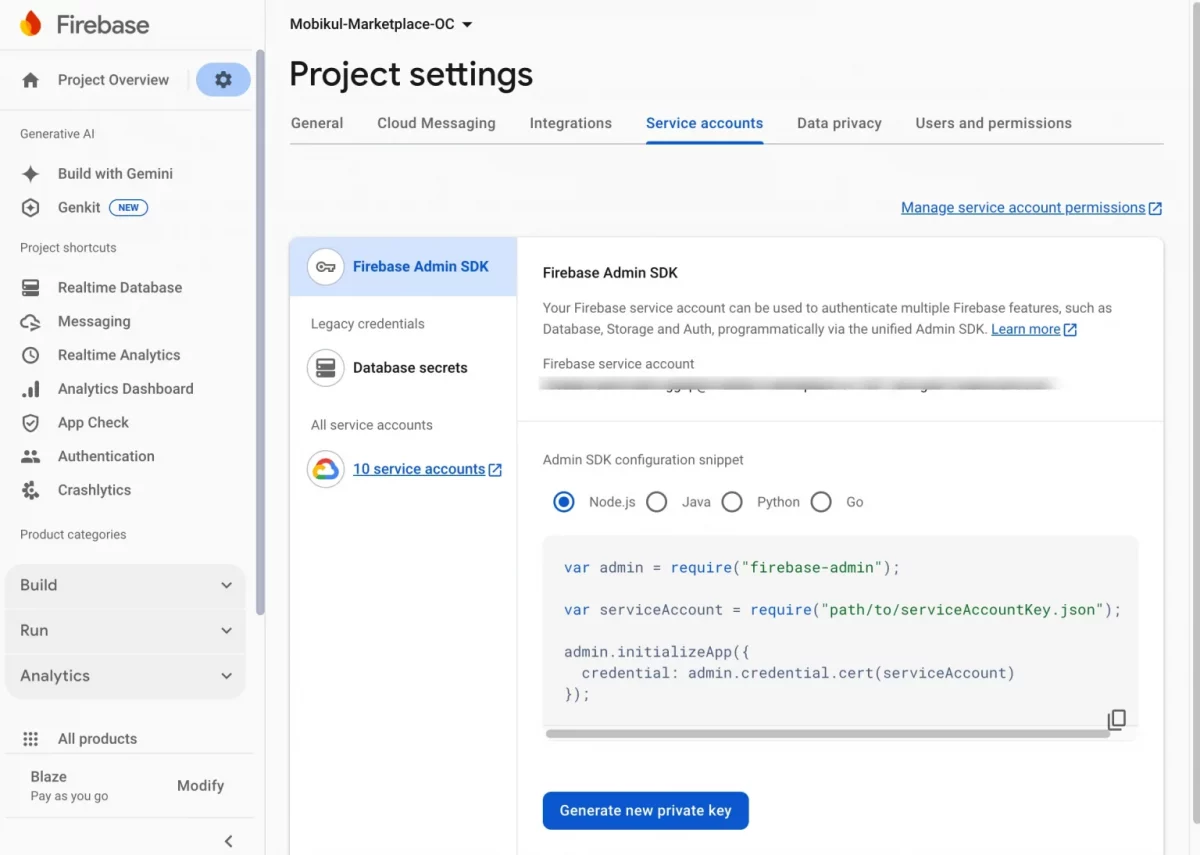
- Click on the generate new private key button in the service account section to download the JSON file.
Installation
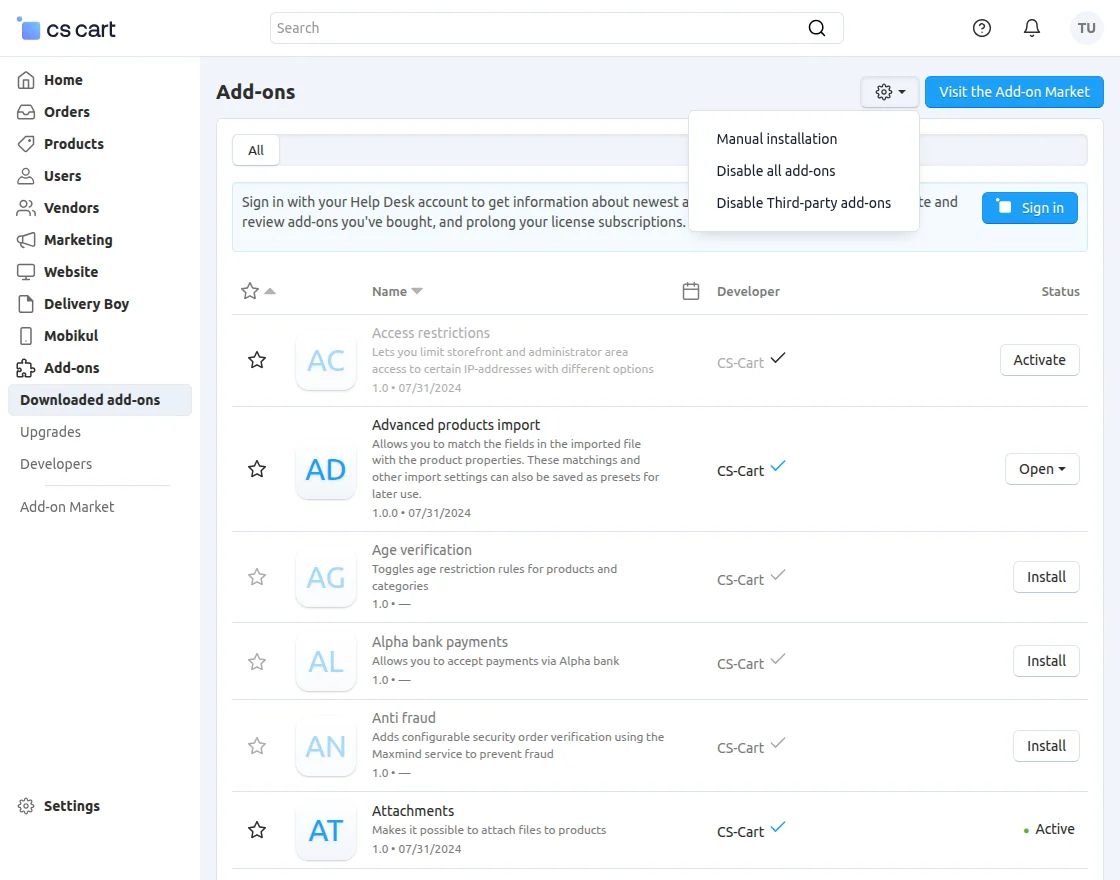
After downloading the CS-Cart Mobikul add-on, you’ll get one zip file and a relevant User Guide manual doc. Read it carefully for proper configuration.
Go to Manage Add-ons, and click on “Manual Installation” as shown below in the snapshot.
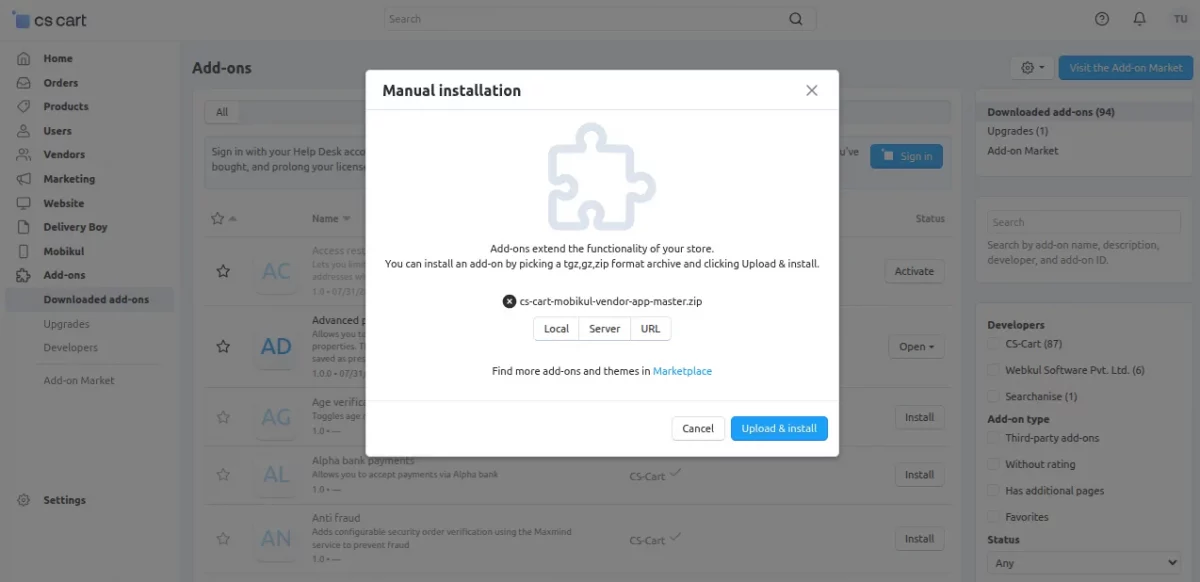
Click on “Local” to browse the zip file, and then click on “Upload & Install” as shown below in the snapshot.
Library installation
Navigate to both locations using the terminal:
1. app/addons/mobikul/lib/googleOauth
2. app/addons/mobikul/lib/phpFastCache
composer update
Add-on Configuration
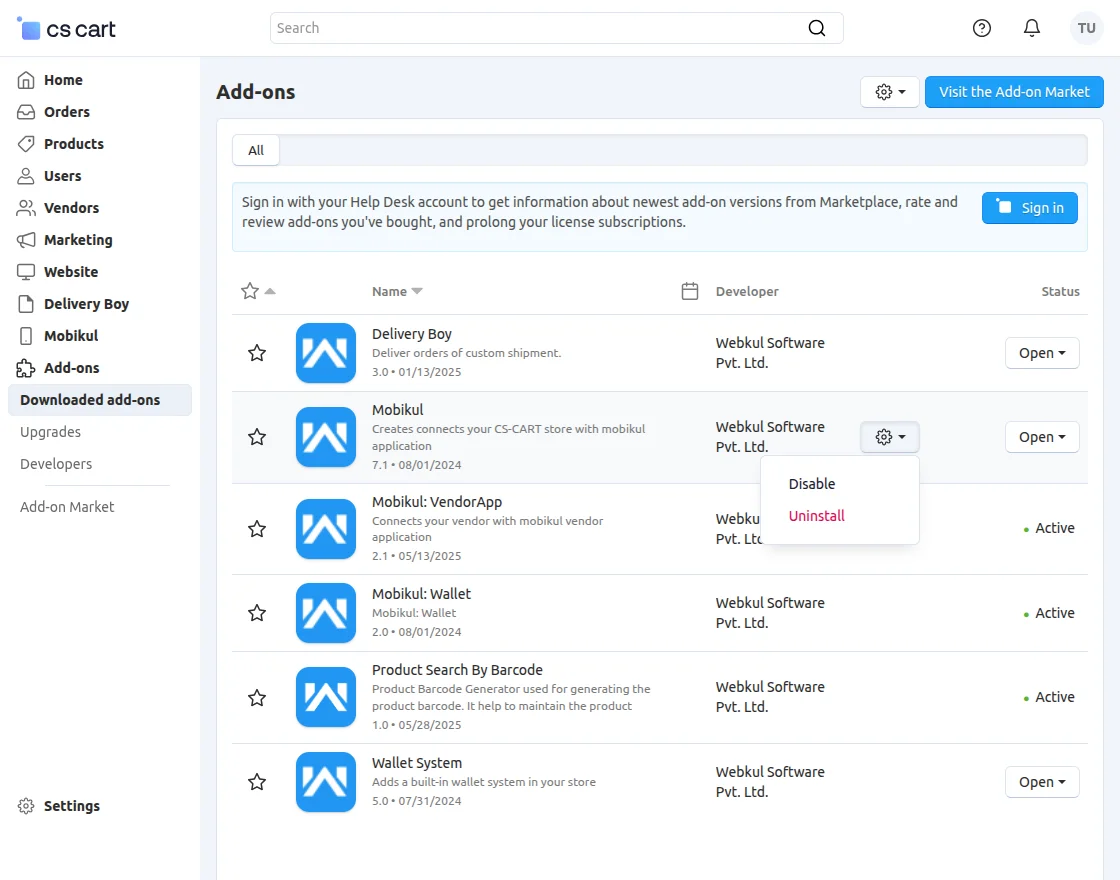
After installing the add-on, you will find CS-Cart Mobikul in the list of available add-ons. We will then configure the settings.
Click on “settings” to enable, disable, install, or refresh.
Make sure the add-on is activated, as shown in the snapshot below.
Module Configuration | Admin
To configure the module, go to the Add-Ons >> Developers >> Webkul Software Pvt Ltd. >>Mobikul >> Settings >> General.
Fill in all the required information to continue.

- Google FCM Project ID: Enter the Project ID from the Firebase app.
- Google FCM Private Key: Upload JSON file.
- Email: Enter the email address.
- Api Key: Enter the API Key.
- Enable Cache: When enabled, the app clears cached data at set intervals to maintain performance and updated content.
- Cache Time: Enter the time interval (in minutes) after which the app should automatically clear the cache.
Application:
Please fill in all the required information to proceed.
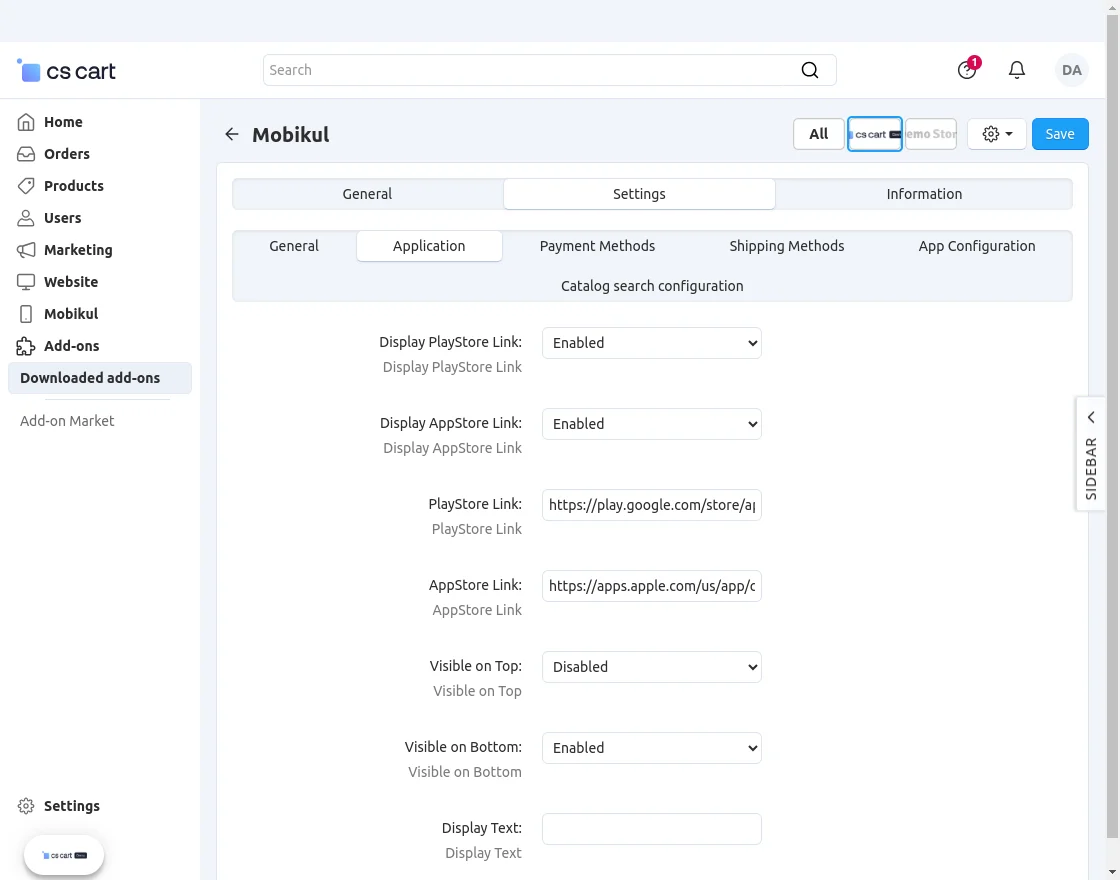
- Display the Play Store link:
If the “Display Play Store Link” option is enabled (visible on the web storefront), and a URL is provided in the Play Store Link field, it will direct users to the respective app on the Play Store. - Display the App Store link:
When the “Display App Store Link” option is activated (visible on the web storefront), a URL is entered into the App Store Link field. It will result in a redirection to the corresponding app on the App Store. - Enter the Play Store link.
- Enter the App Store link.
- Set the visibility on the top or bottom of the website as required.
- Display Text:
The entered text will be visible on the front of the Play Store and App Store buttons on the web storefront.
Storefront View:
When customers open the storefront, they will see the app link, allowing them to download the app from the Play Store or App Store.
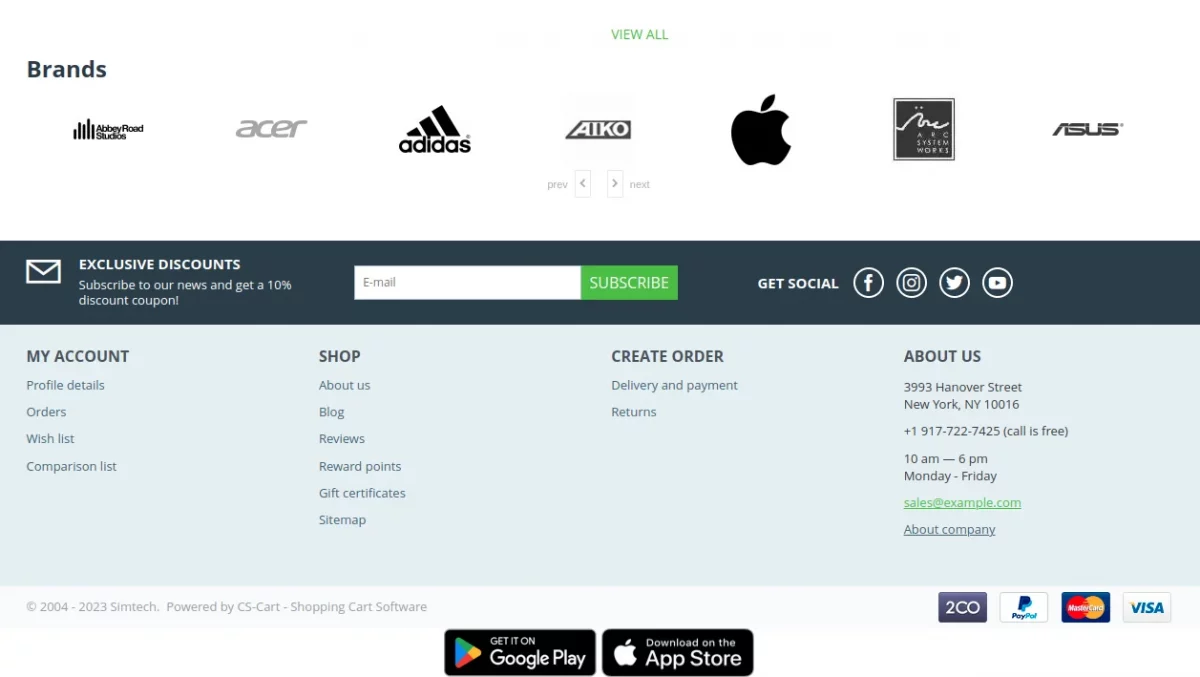
The web storefront view will closely resemble the images shown, providing customers with a clear preview of the interface.
Payment Methods:
Select the preferred payment method you would like to use to complete your purchase.
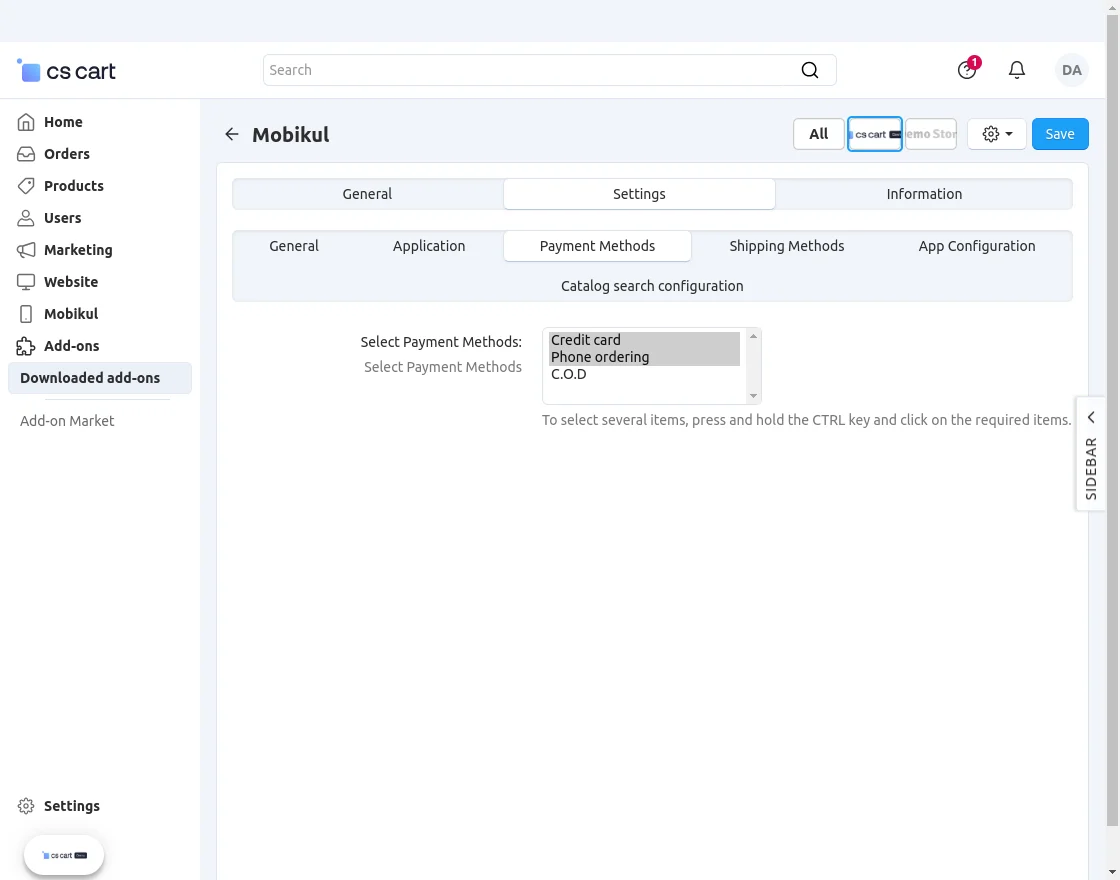
- Select payment methods: The payment methods selected by the admin will be visible on the app end.
Shipping Methods:
Choose the desired shipping option you want to use for delivering orders.
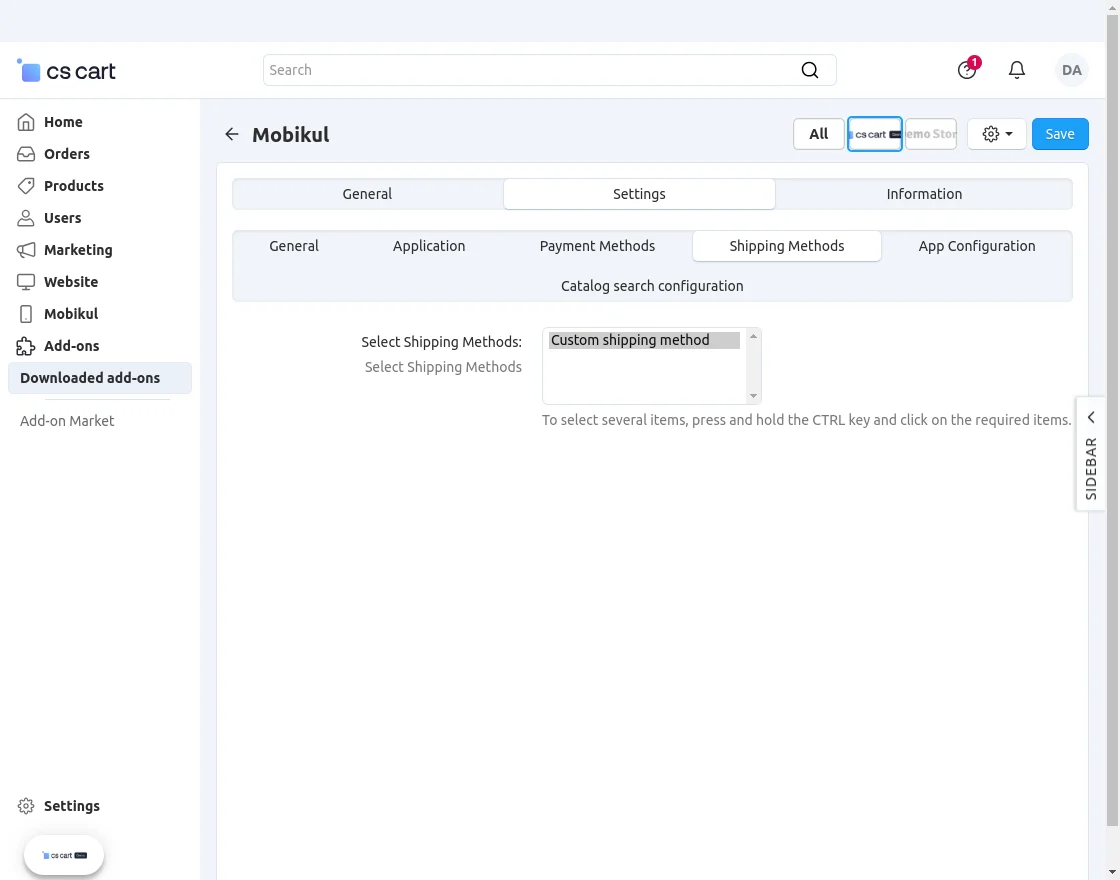
- Select Shipping Methods: Choose the preferred shipping method that you want to use for delivering the products.
App Configuration: The admin can also manage the category views by selecting – Default Category View and Tab Category View.
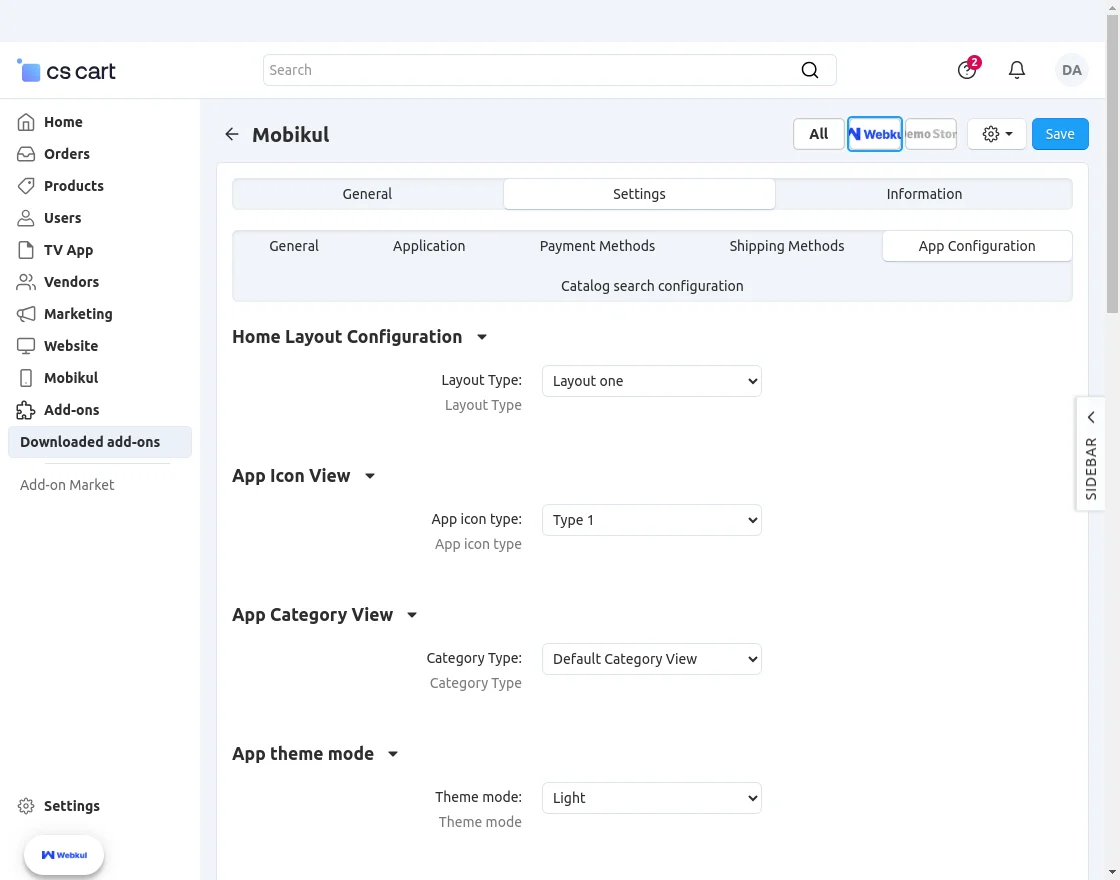
Default App Category View:
Default App Category View
App Theme Mode

The admin can also make the settings for –
- Light mode Theme Configuration
Here, the admin can set the –
- App Button Color
- App Theme Color
- Button Text Color
- Theme Text Color
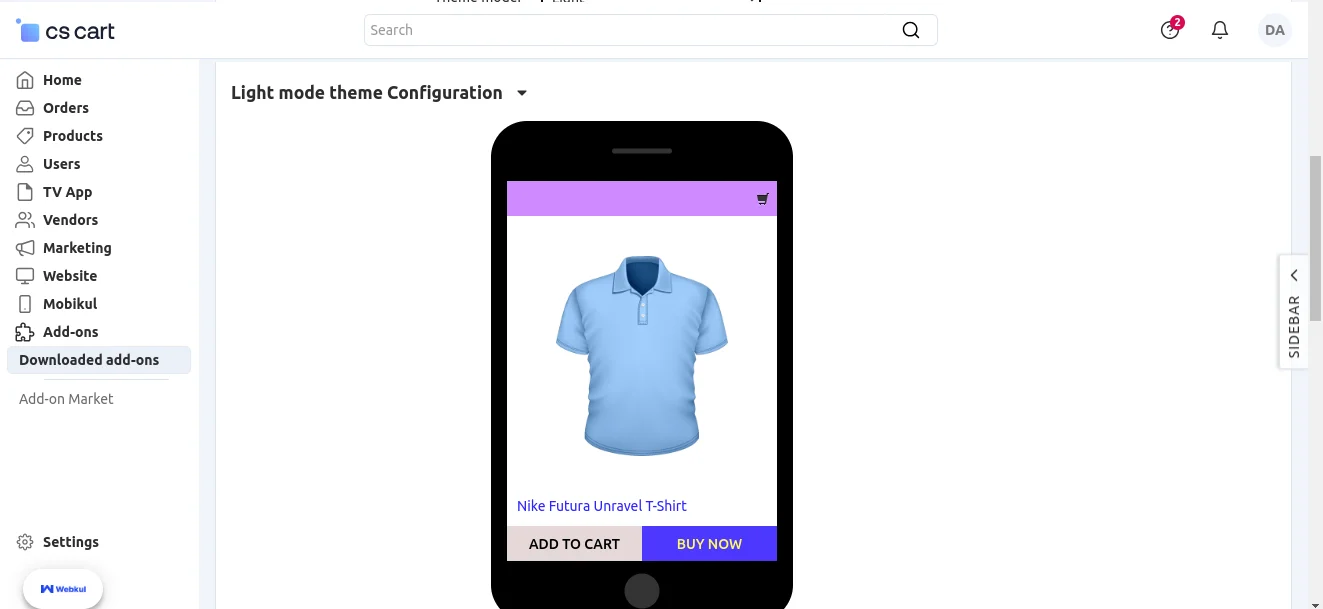
Light Theme:
Light Theme
Apart from that, the admin can make the settings for –
- Dark Mode Theme Configuration
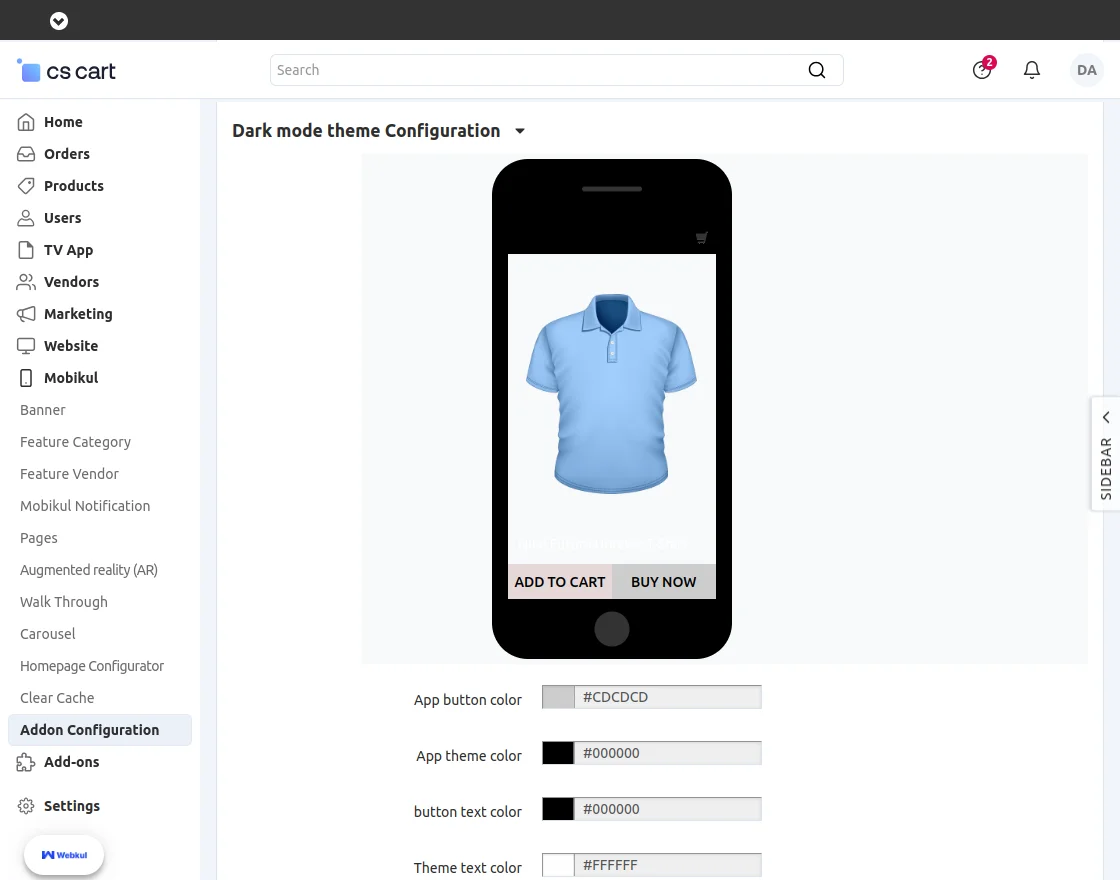
Here, the admin can set the –
- App Button Color
- App Theme Color
- Button Text Color
- Theme Text Color
Dark Mode:
Dark Mode

Catalog search configuration:
Here, the admin can configure the search page settings for product searches:
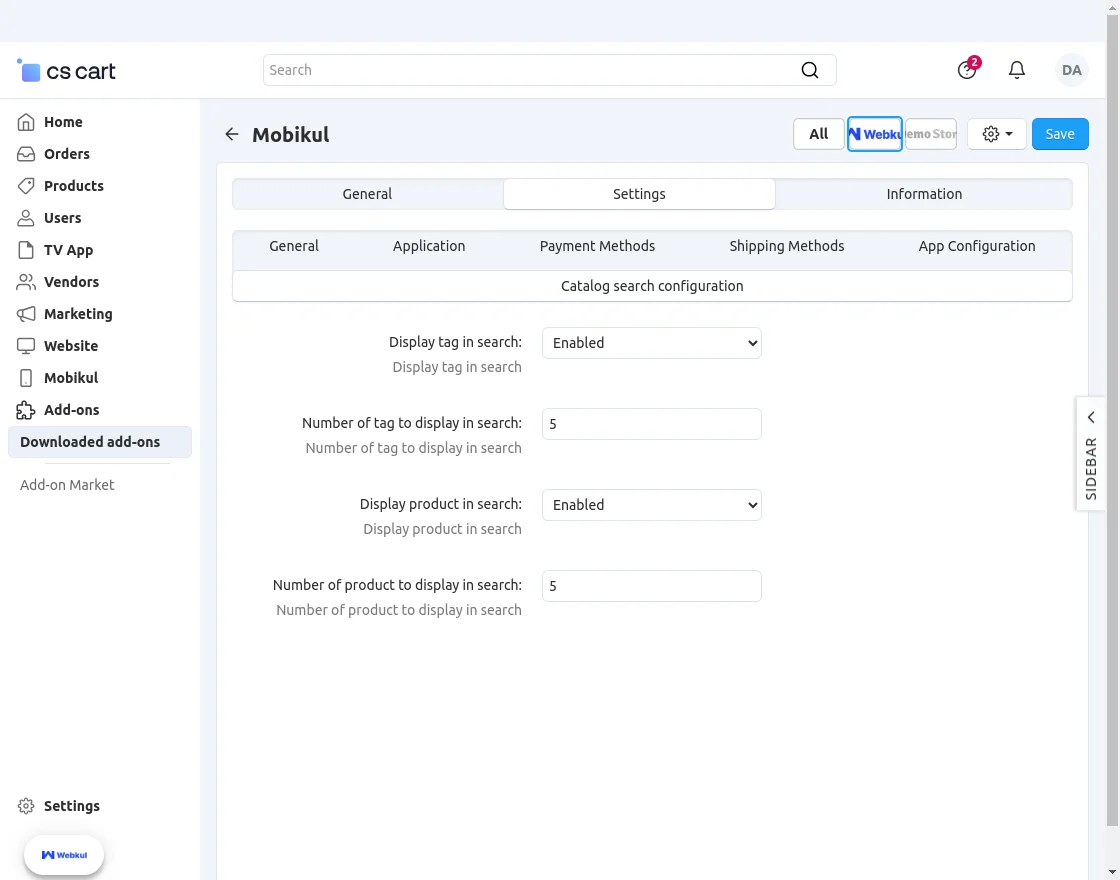
- Display tag in search: Enable or disable the visibility of tags on the search page.
- Number of tags to display in search: Set the maximum number of tags appearing in the search results.
- Display product in search: Enable or disable the display of products in the search results.
- Number of products to display in search: Configure the search results displayed when a customer searches for a product.
Product settings :
The admin can access the mobile app settings in Product > Product Settings > Add-ons > Mobikul.
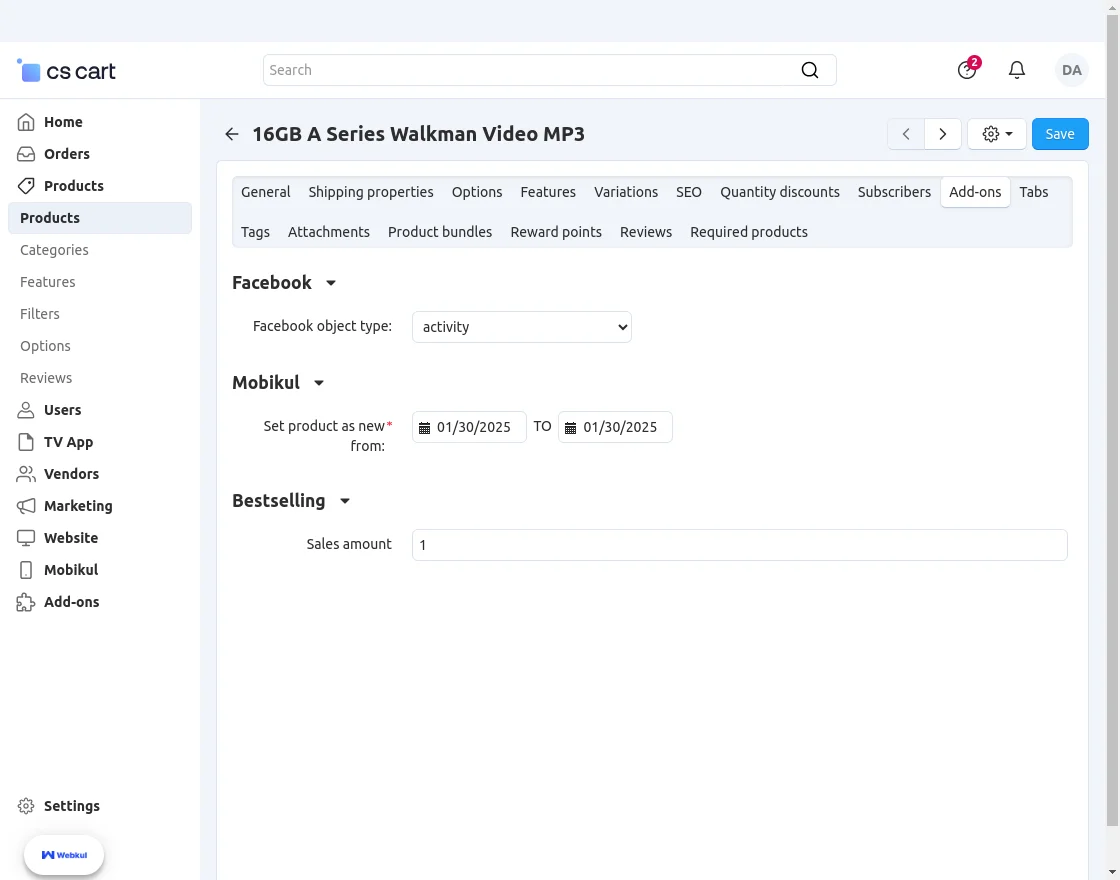
Here, the admin will configure the product settings for Mobikul:
Set Product as New: When a new product is added, a “New” tag will automatically appear in the top corner of the product.
Mobikul – Management Options
To manage Mobikul features, navigate to the Mobikul section.
The Mobikul section allows the admin to manage banners, notifications, and other app features.
Let’s go through each of the sections one by one:
Banner:
The admin can configure banners by navigating to Mobikul >> Banners in the panel.
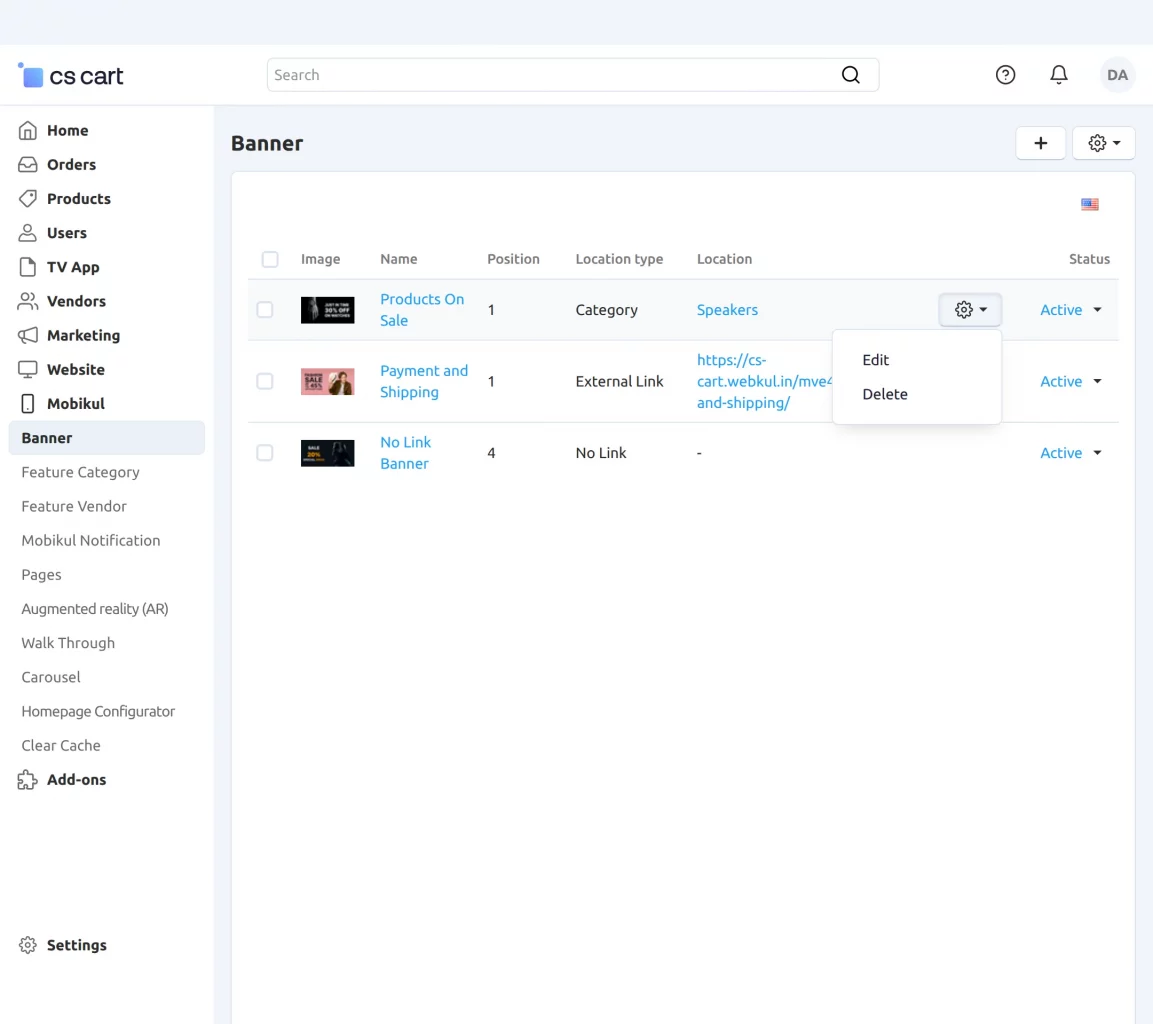
This section allows the admin to add, edit, or delete banners.
Tap the “+” icon on the top right-hand corner to add a new banner, which opens the banner setup section.

- Banner Name: Enter the name of the banner.
- Banner Type: Select the type of banner.
- Position: Specify the display position of the banner.
- Banner Image: Upload the banner image.
Featured Category:
To manage categories, navigate to Mobikul >> Feature Category.
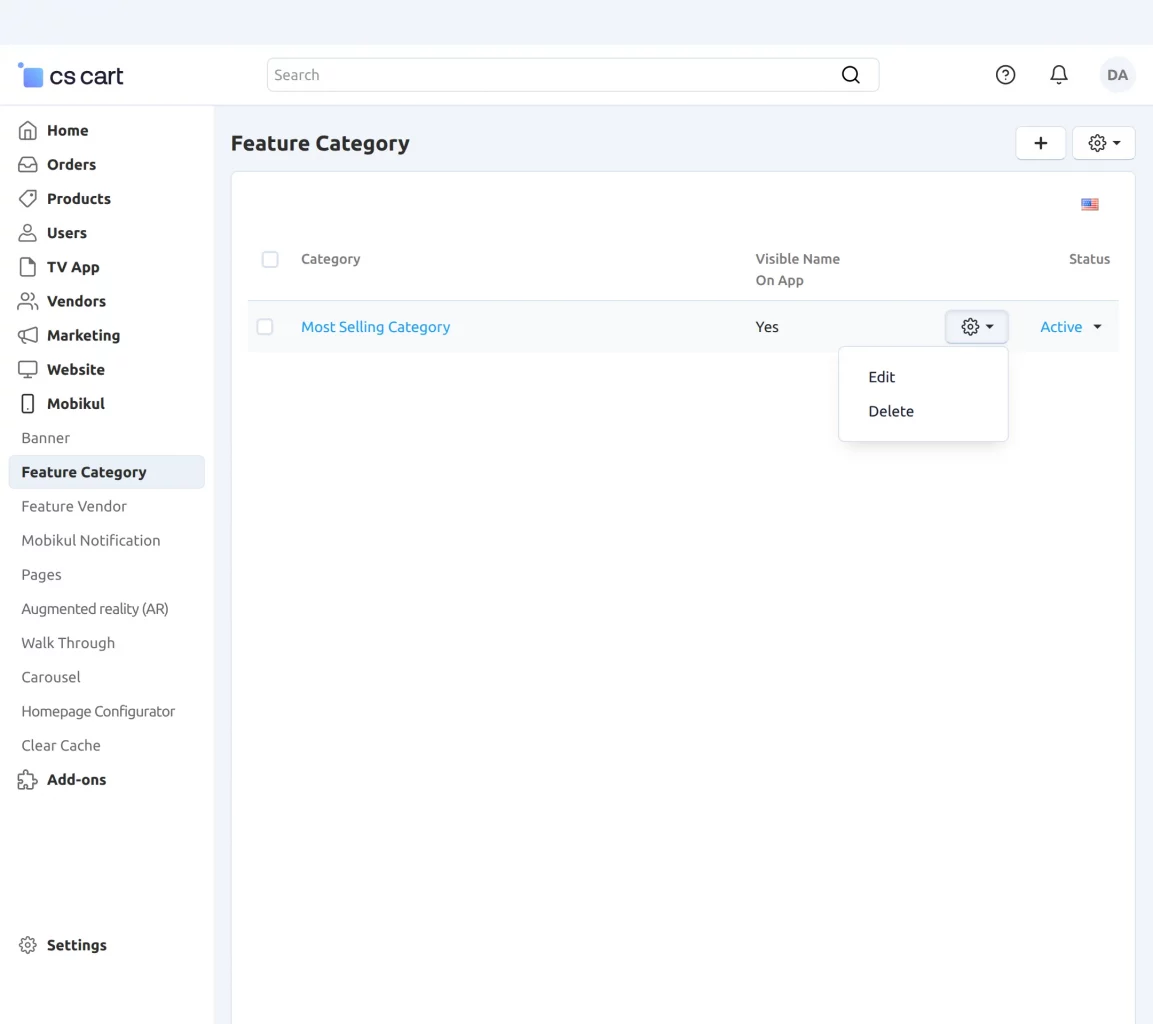
This section allows the admin to manage featured categories by adding, editing, or deleting them.
Add New Feature Category:
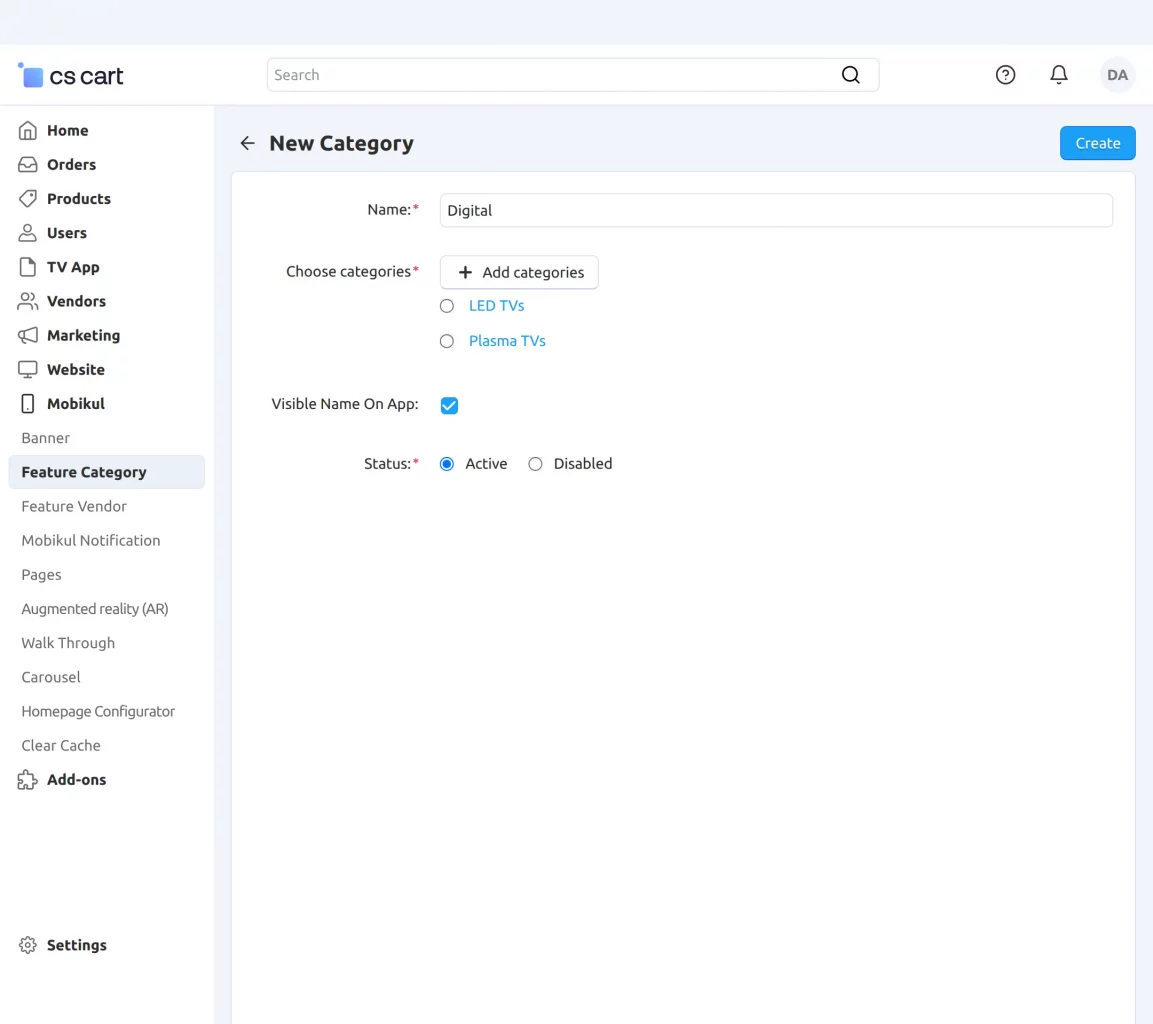
- Name: Enter the category name.
- Choose Category: Select the category.
- Visible on the App: Choose whether the category should be visible on the app.
- Status: Set the status to Active to enable the category.
Notification:
The admin can manage app notifications by navigating to Mobikul >> Mobikul Notification in the panel.
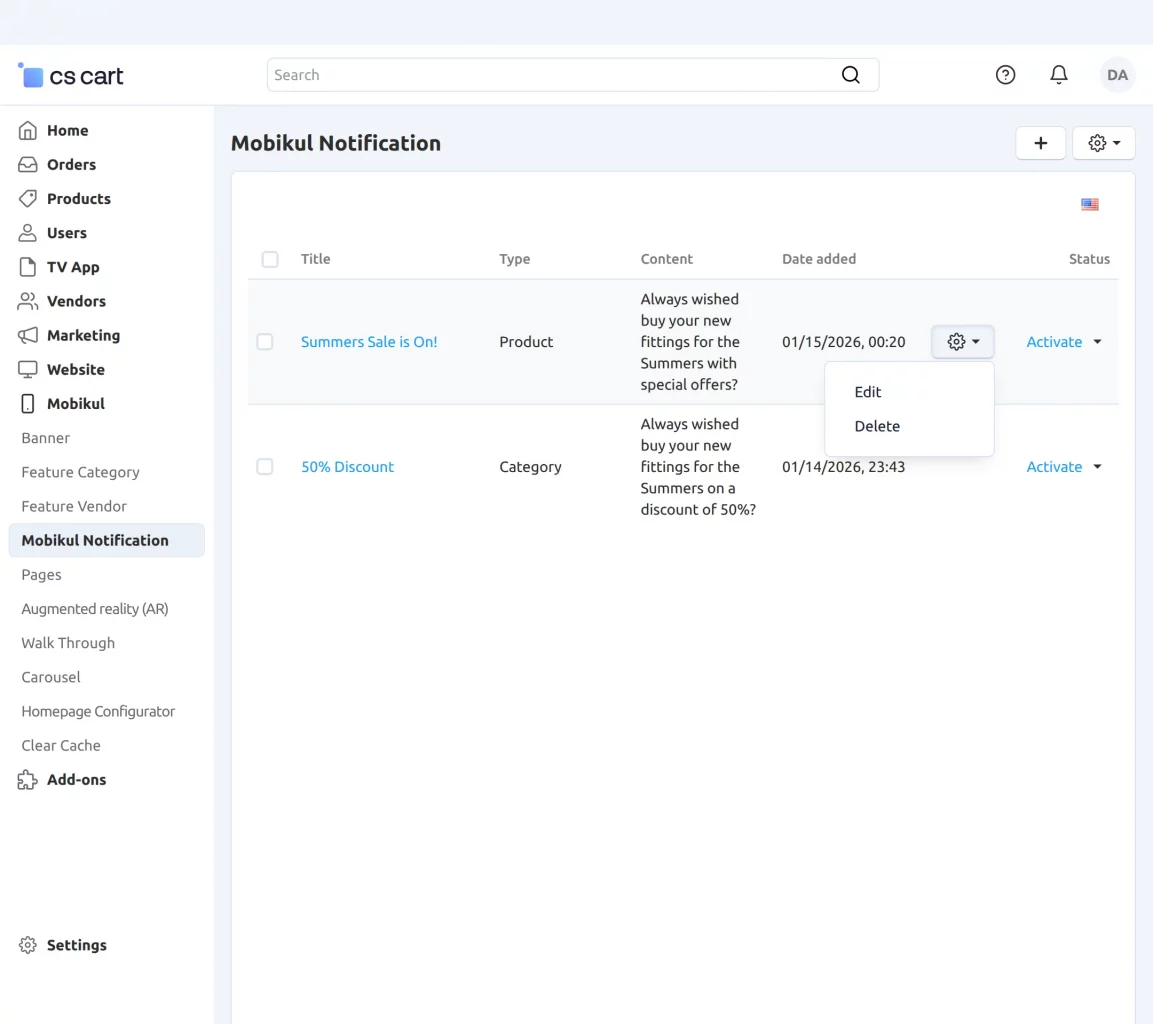
This section allows the admin to create, update, or delete notifications as needed.
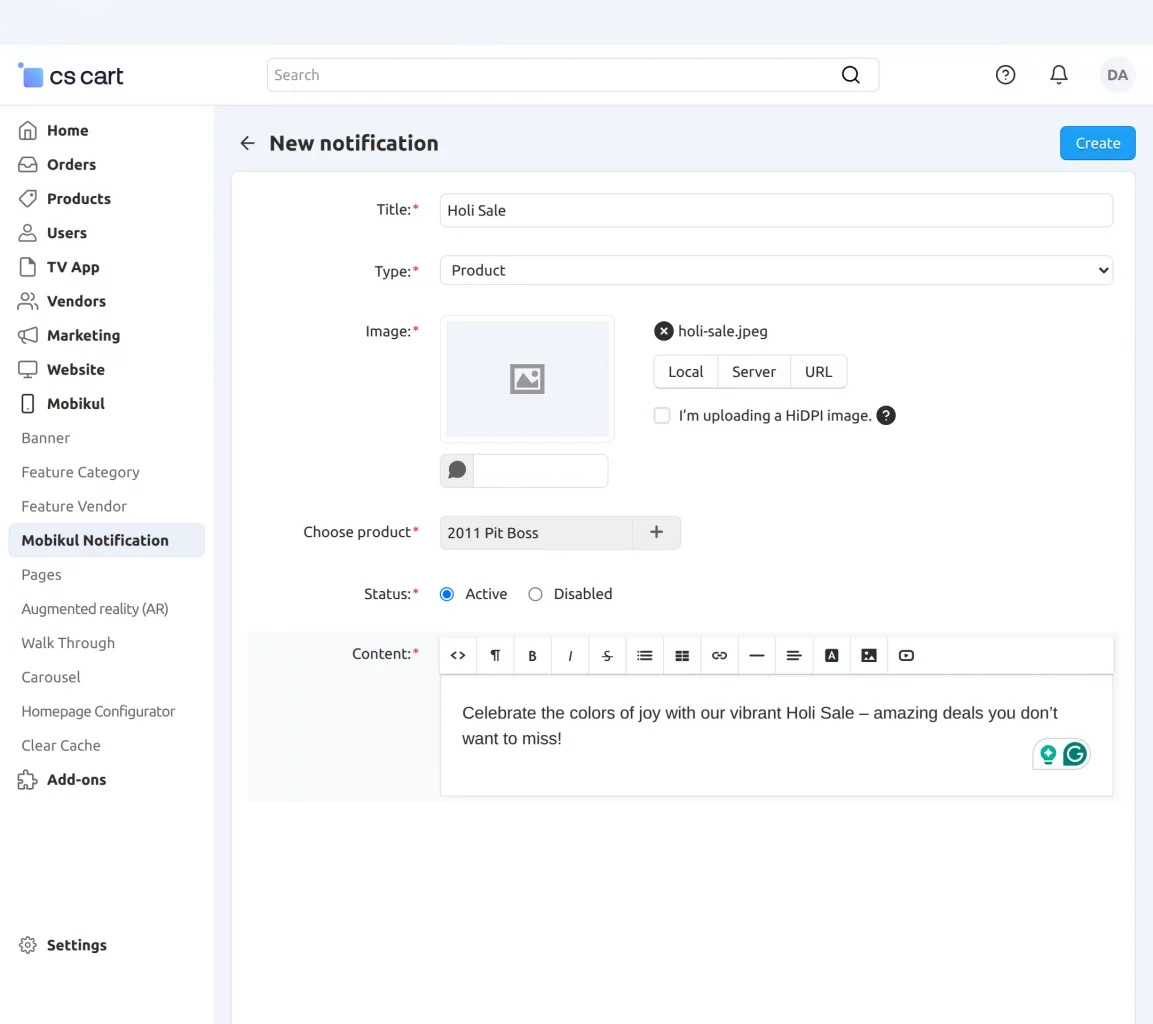
- Title: Enter the notification title.
- Type: Select the type of notification.
- Image: Upload an image to display with the notification.
- Content: Write the main message or details of the notification.
Pages:
Navigate to Mobikul >> Pages to view, edit, or manage all your pages.
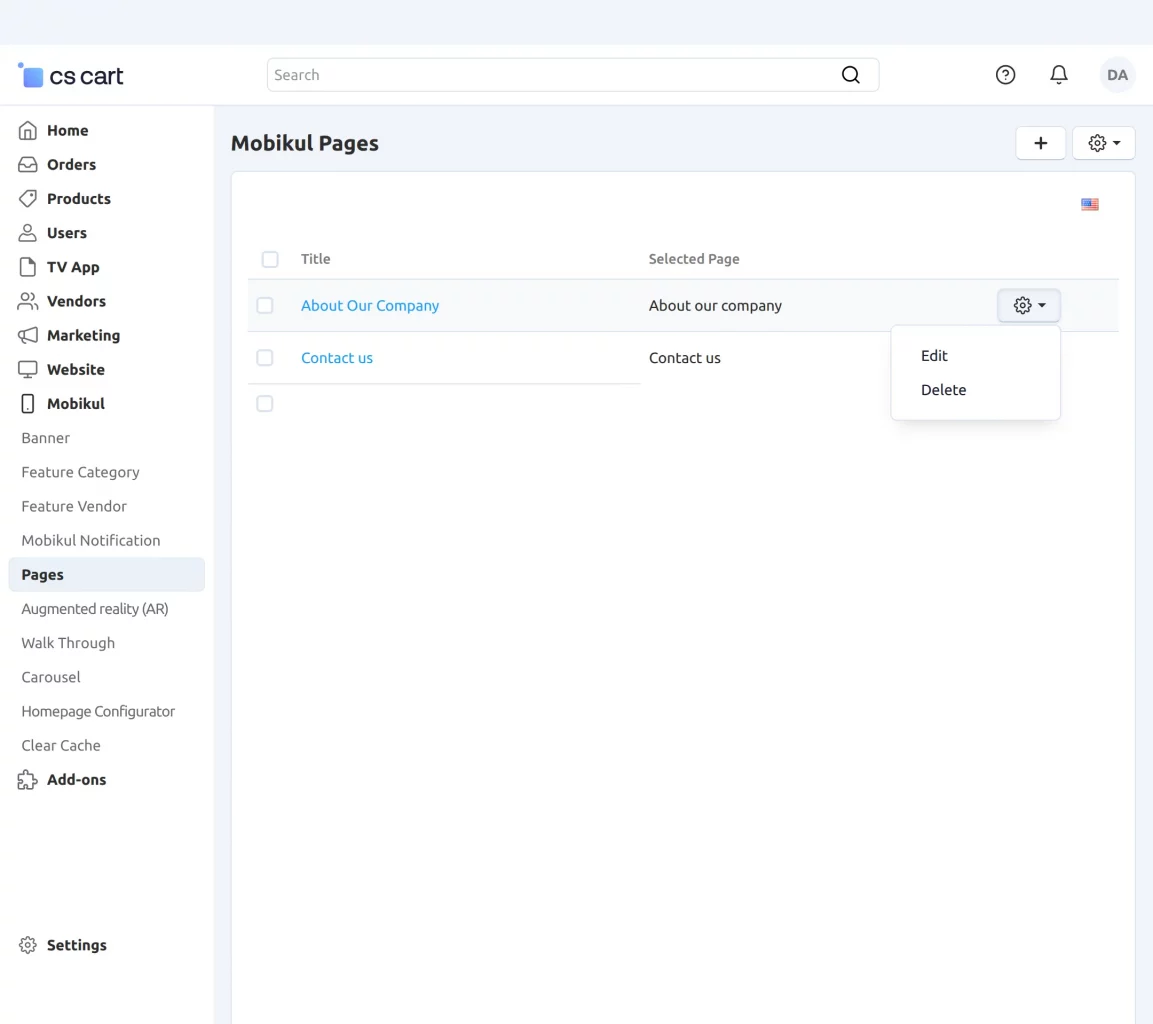
From this section, you can add, edit, or delete pages.
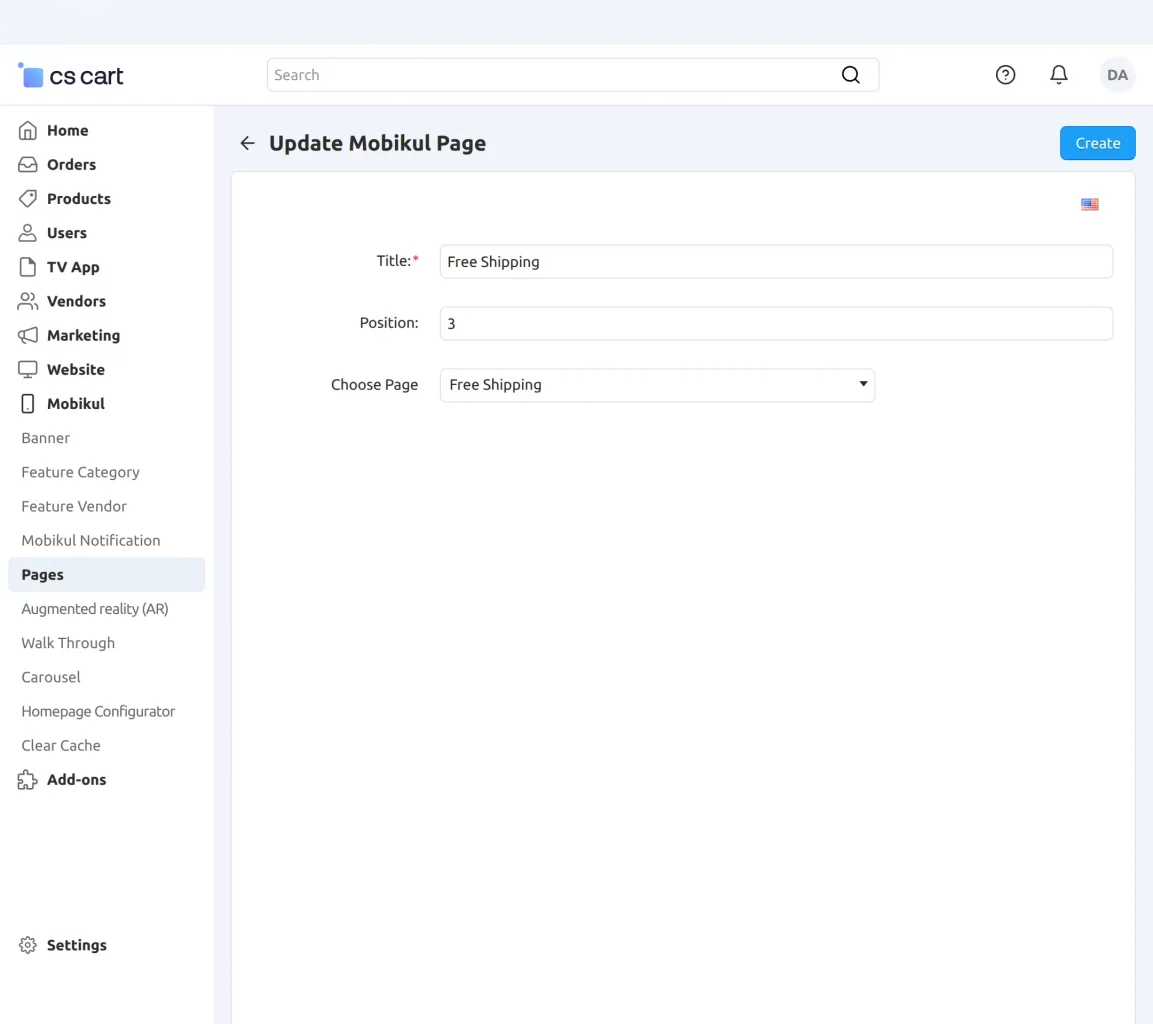
- Title: Enter the title of the page
- Position: Select the position for the page.
- Choose Page: Pick the page you want to link.
Augmented Reality:
Navigate through Mobikul-> Augmented Reality as per the snapshot below.
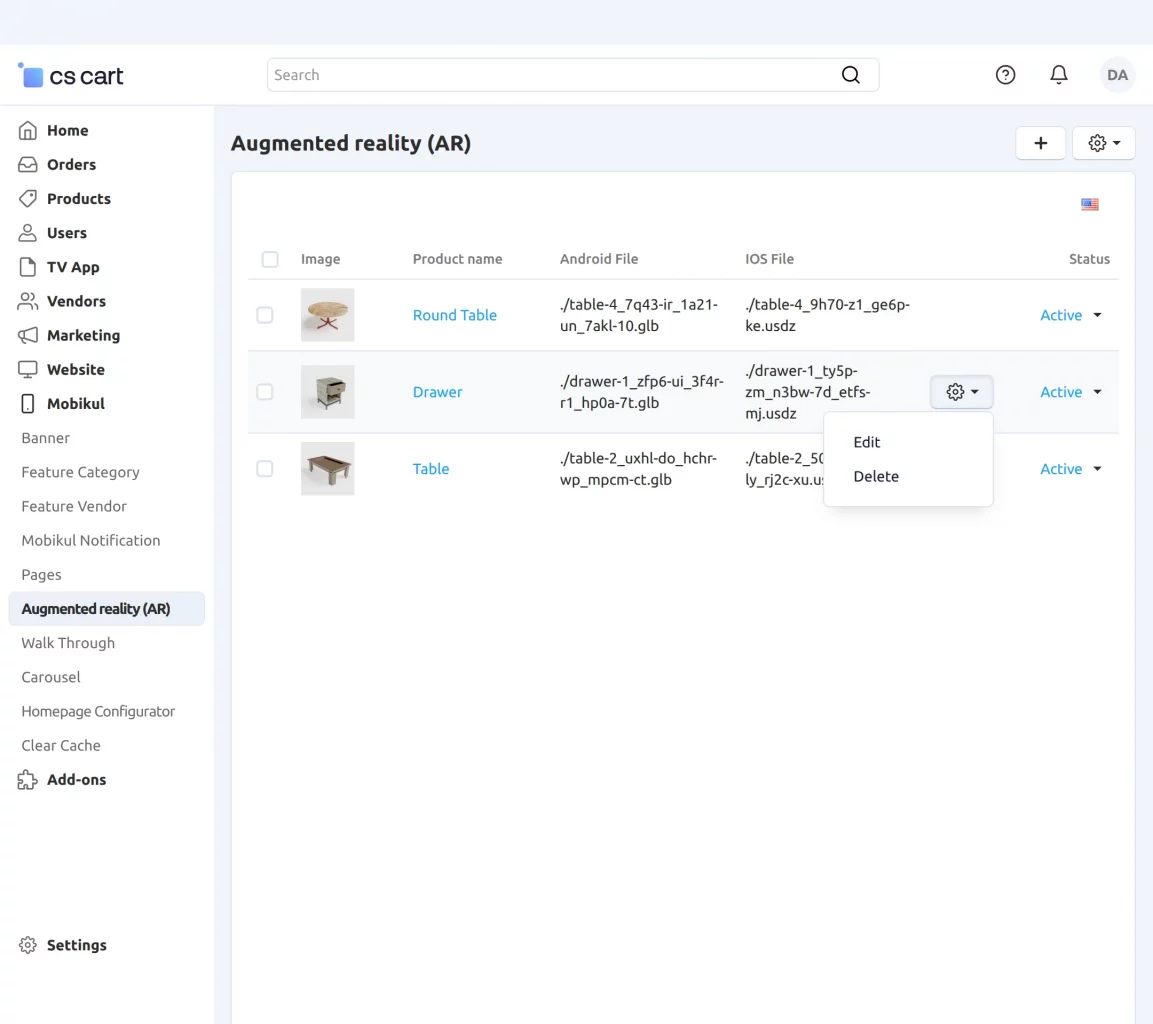
From this section, the admin can add, edit, or delete augmented reality content.
Add new Augmented Reality:
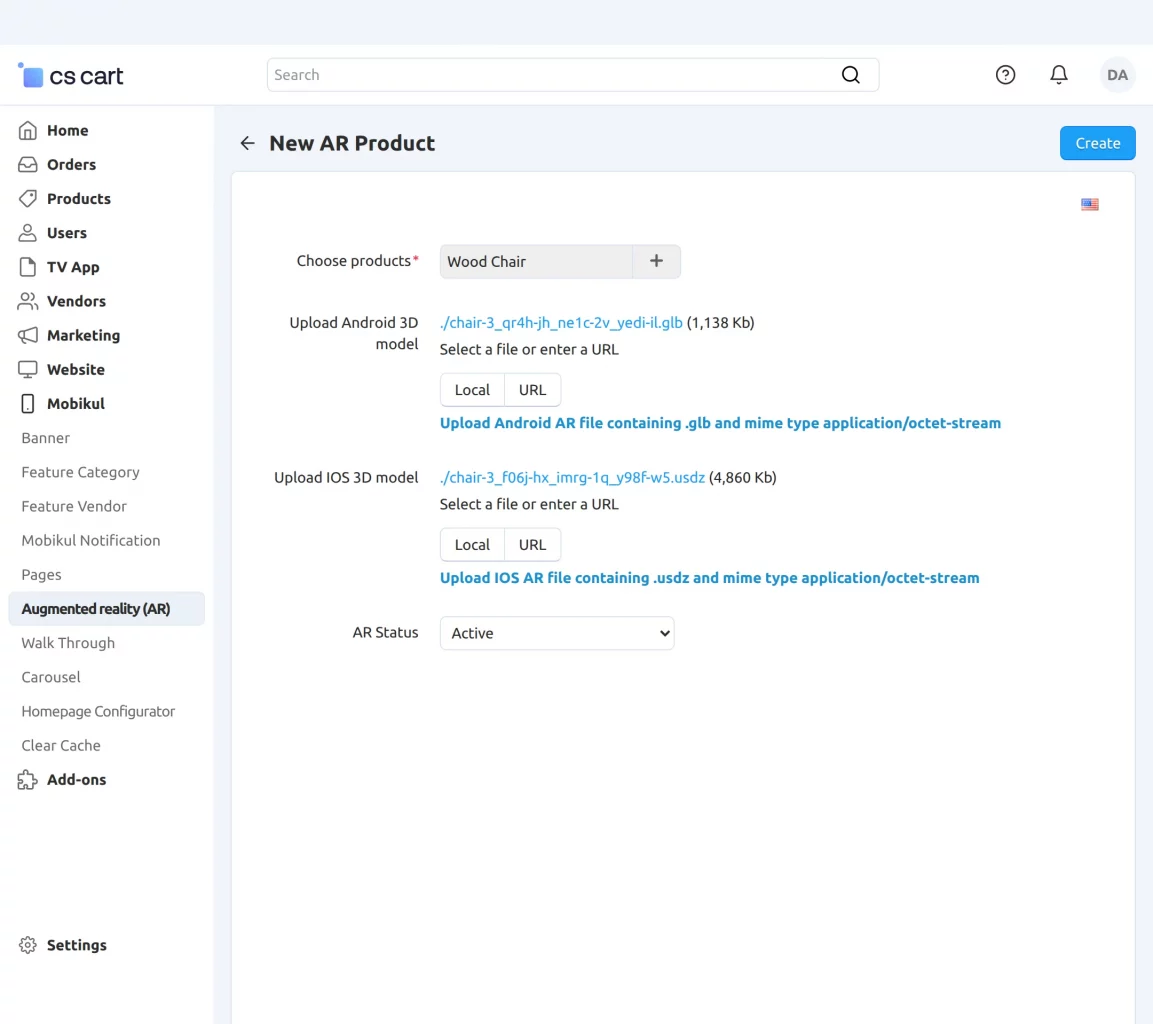
- Choose Products: Select the products to enable Augmented Reality (AR) view.
- Upload Android 3D Model: Upload the 3D model for Android devices in GLB format using the Android File section.
- Upload iOS 3D Model: Upload the 3D model for iOS devices in USDZ format using the iOS File section.
- AR Status: Enable or disable the AR functionality for the selected products
Walkthrough:
Navigate to Mobikul → Walkthrough to manage the walkthrough effectively.

From this section, you can edit, add, or delete walkthrough steps.
Add Walk-through:
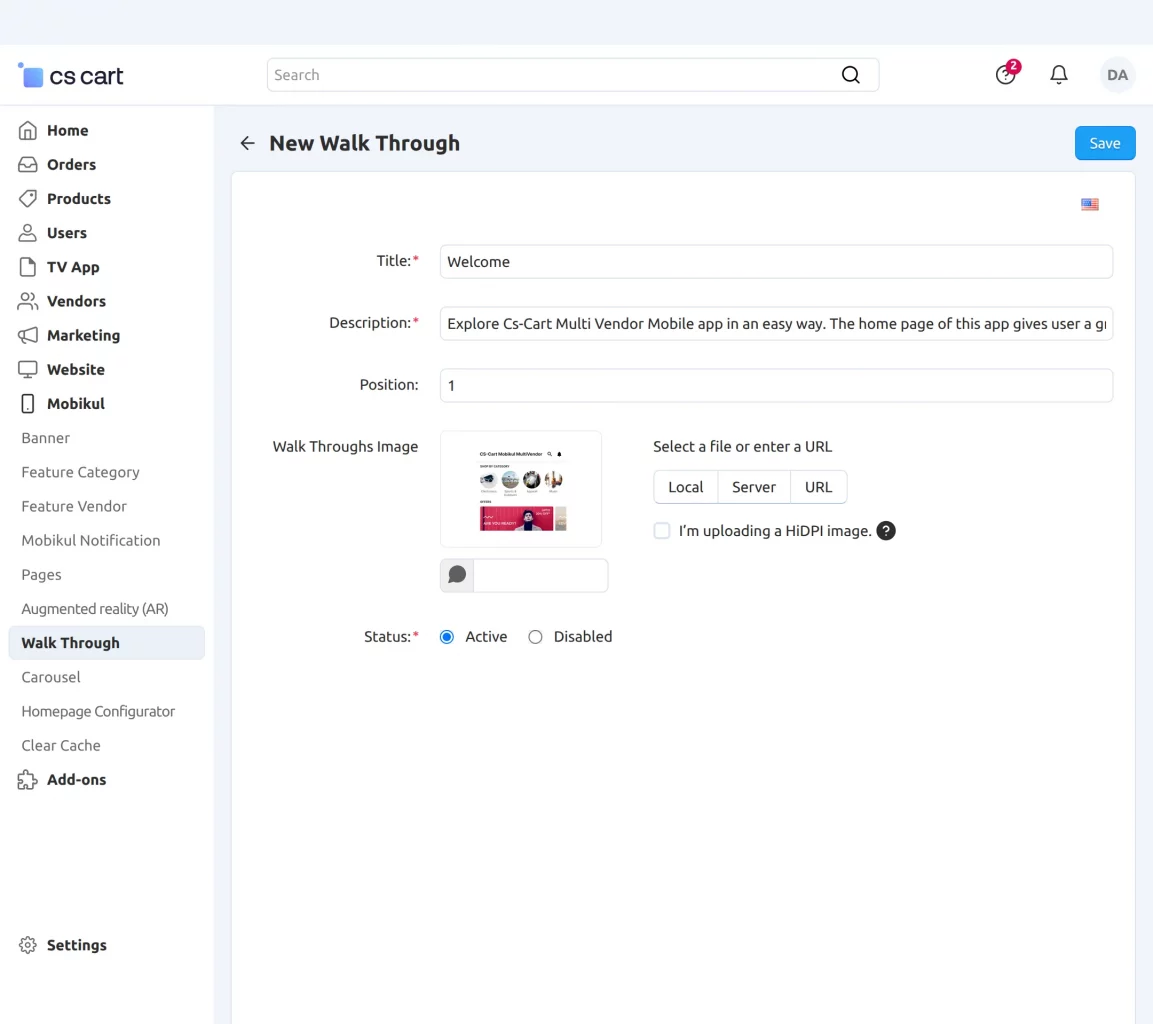
- Title: Enter the title of the walkthrough.
Description: Enter a description for the walkthrough. - Position: Define the position where the walkthrough appears in the app.
- Walkthrough Image: Upload an image for the walkthrough.
- Status: Select the walkthrough status.
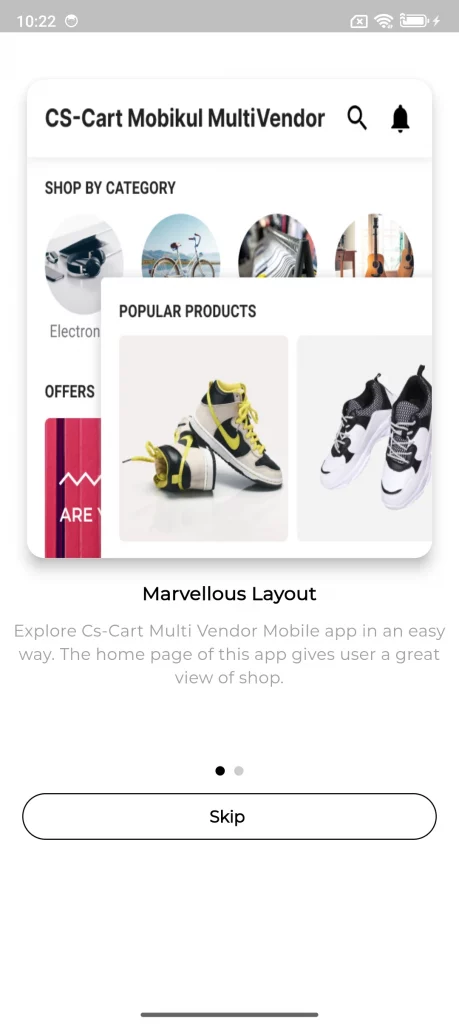
This is how the walkthrough will appear on the mobile app:
Carousel:
Here, the admin can create multiple carousels using products and images as required.
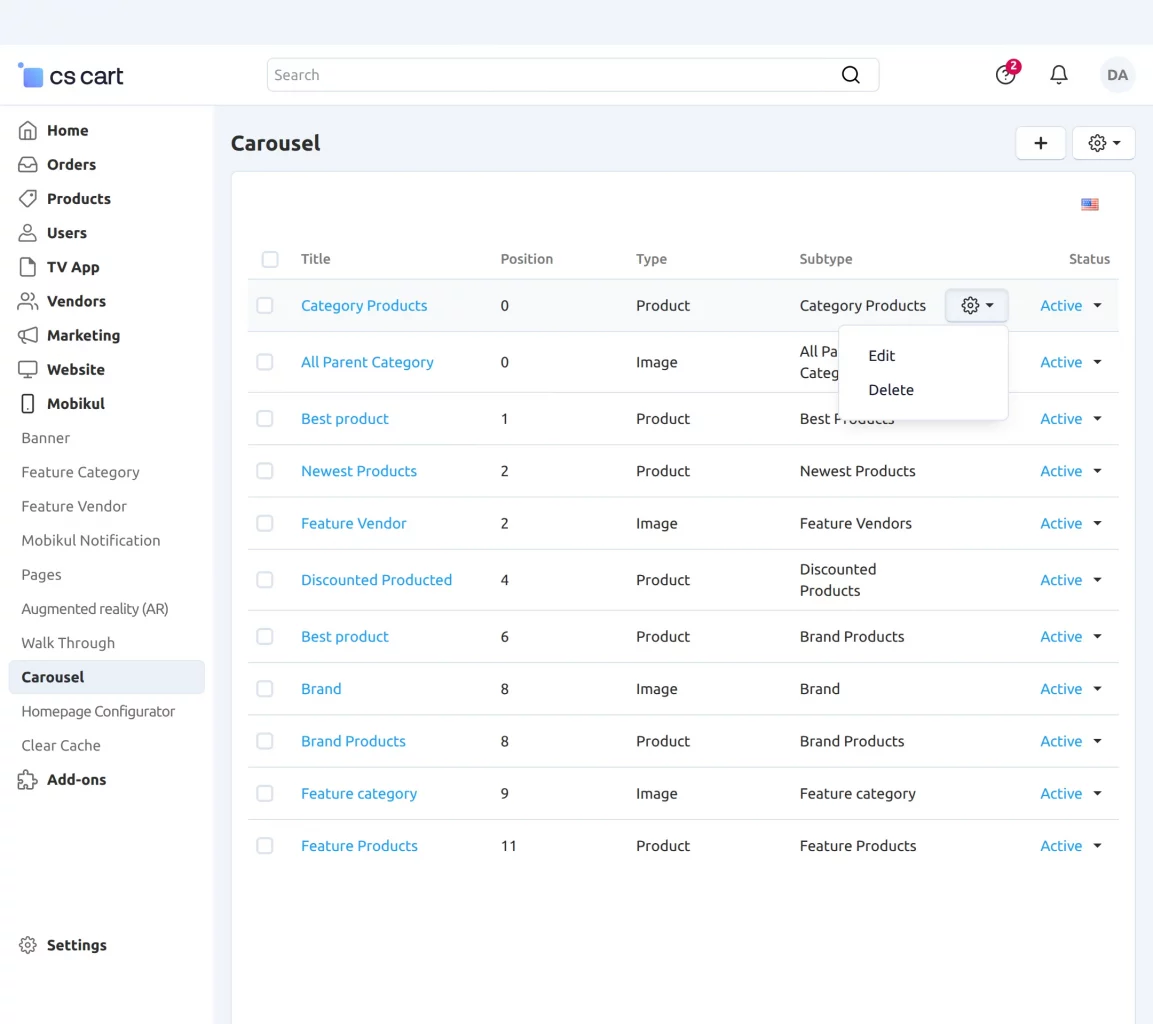
Add Carousel:
The admin can create multiple carousels using products and images as required.
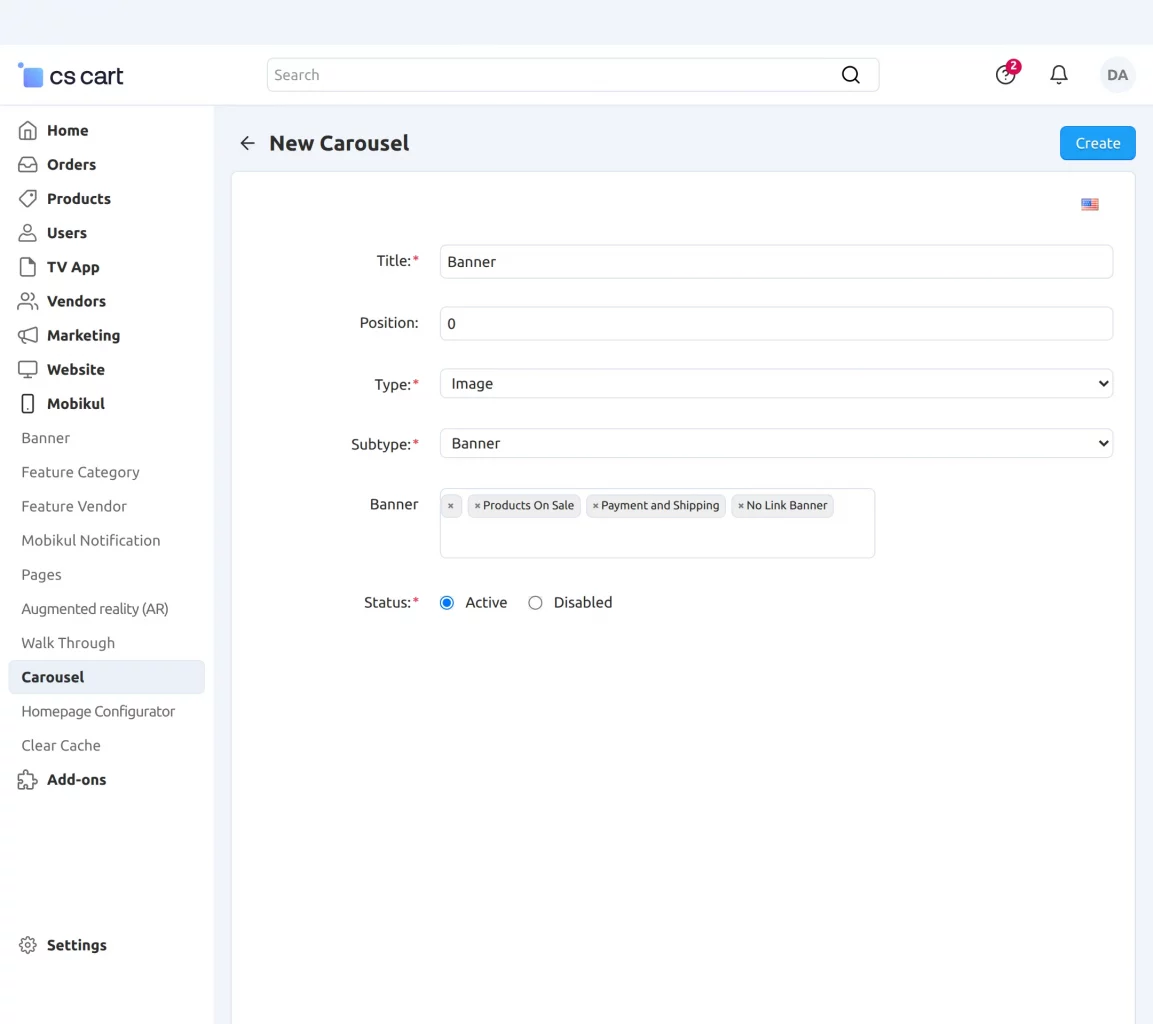
- Title: Enter the title for the carousel.
- Position: Set the display position of the carousel.
- Type: Select the carousel type as either image or product.
- Subtype: Choose the carousel subtype based on the selected type.
- Status: Enable or disable the carousel.
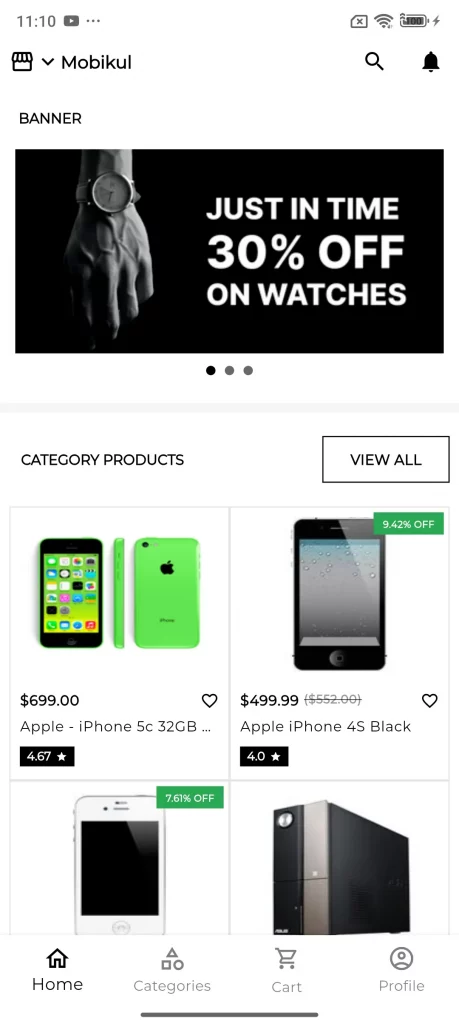
The carousel will be visible in the mobile app as per the snapshot below.
Home Page Configurator:
Navigate through Mobikul->Homepage Configurator.
The admin can manage the sorting of the category carousels present in the mobile app.
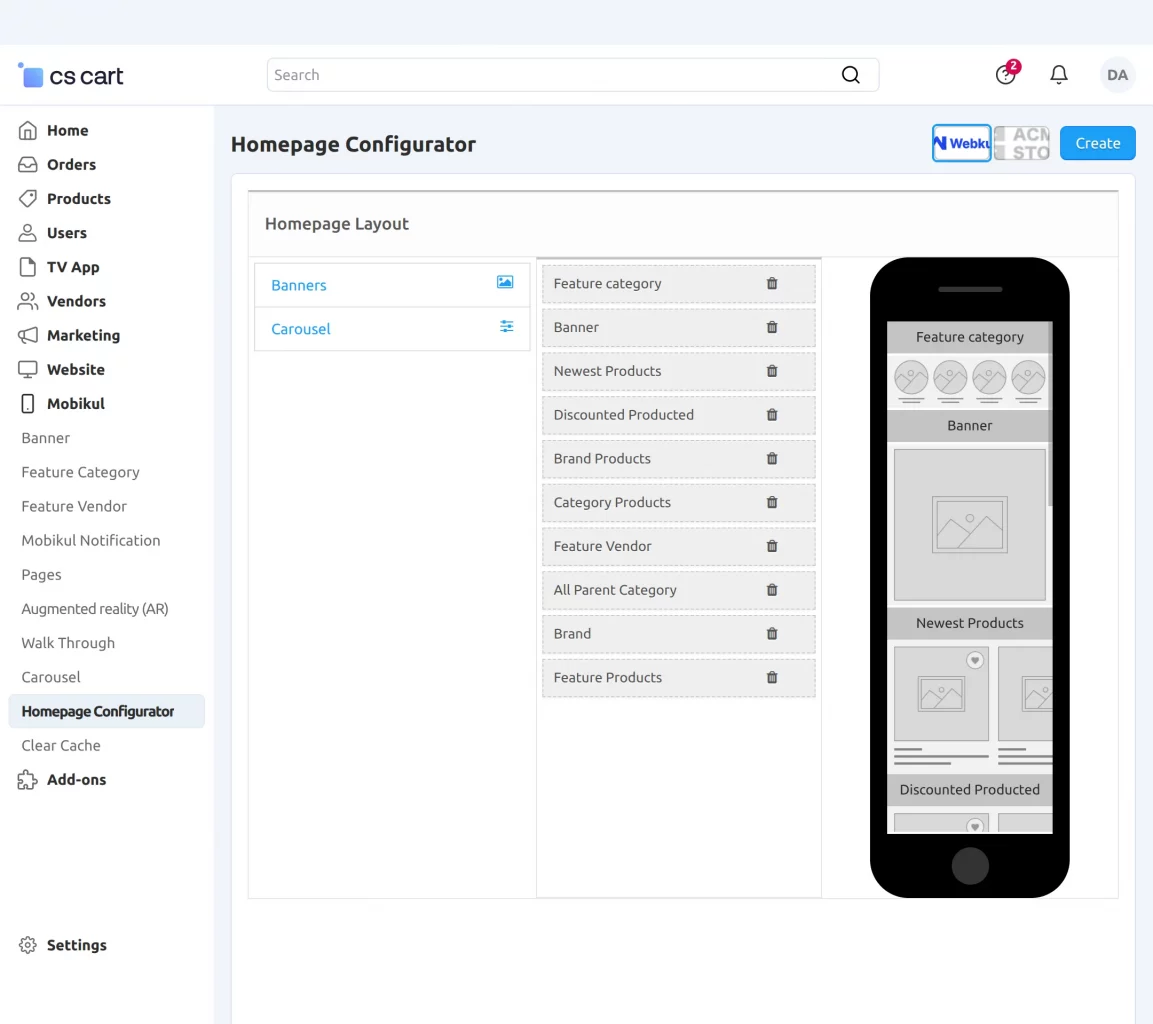
Then the admin can change the position by easily dragging the category and dropping it to the desired position.
Clear Cache Memory
If the changes you’ve made don’t appear on the page, try clearing the cache. To clear the cache, navigate to Mobikul>>Clear Cache.
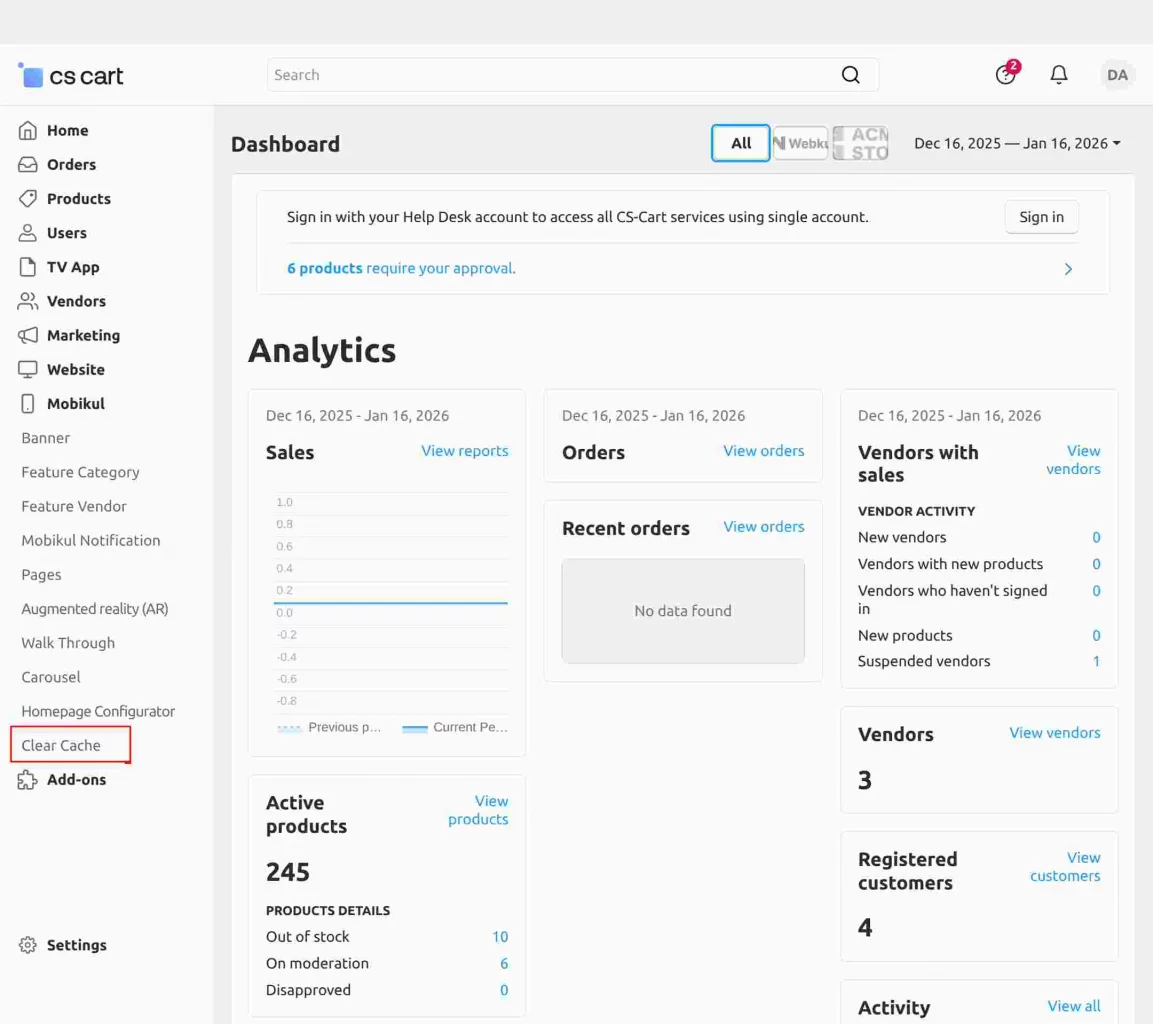
Clear the cache to ensure the system loads updated scripts, styles, and templates.
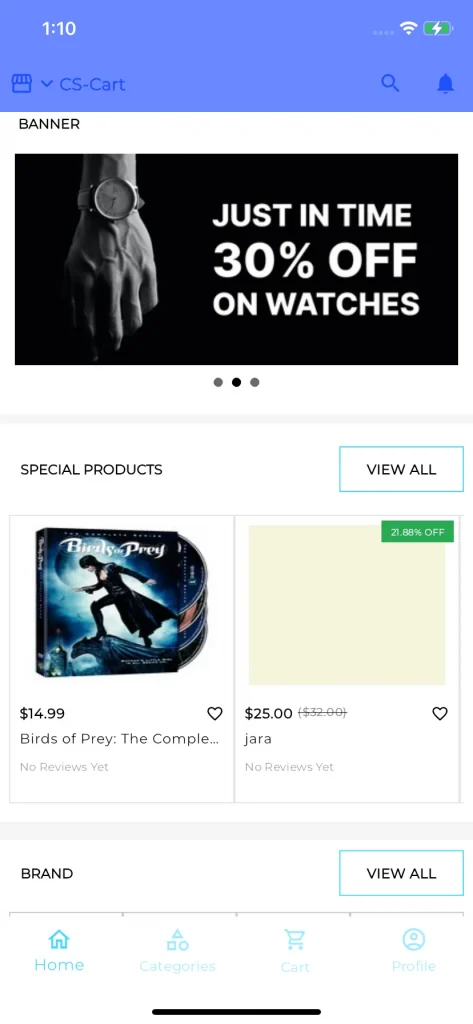
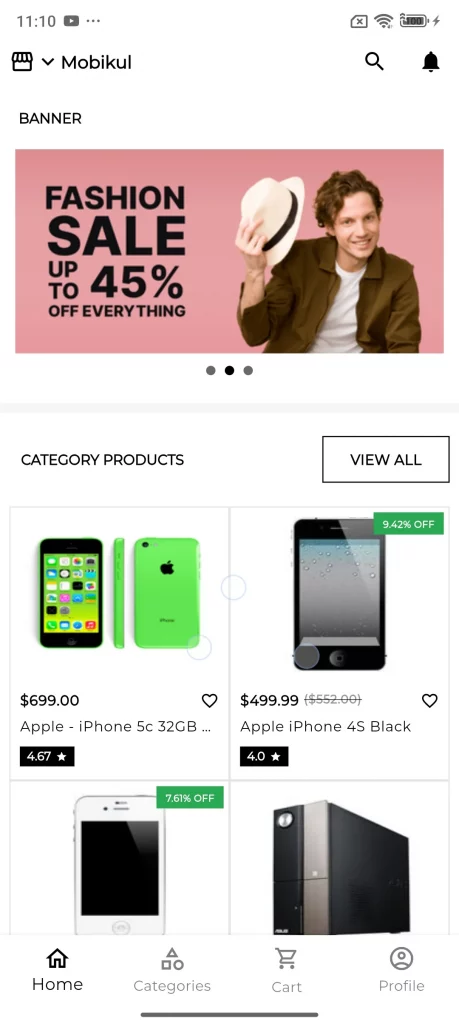
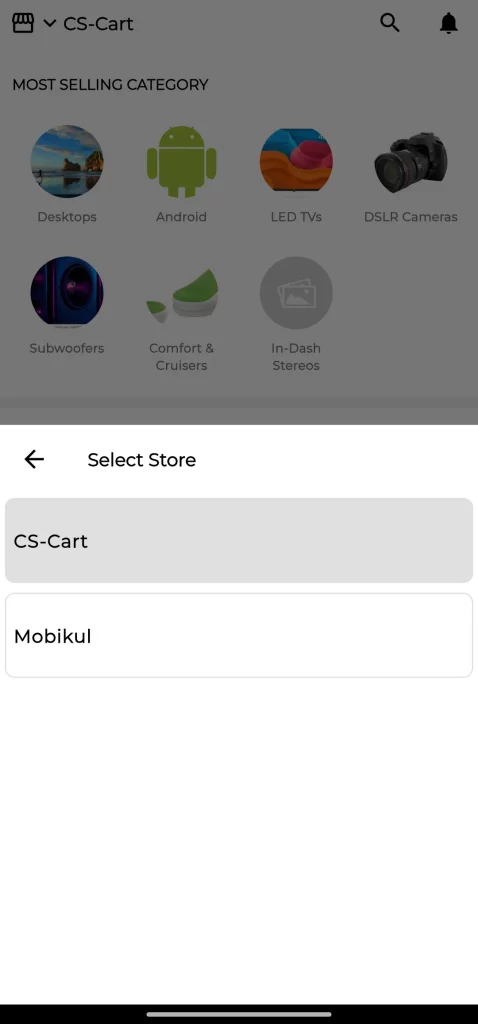
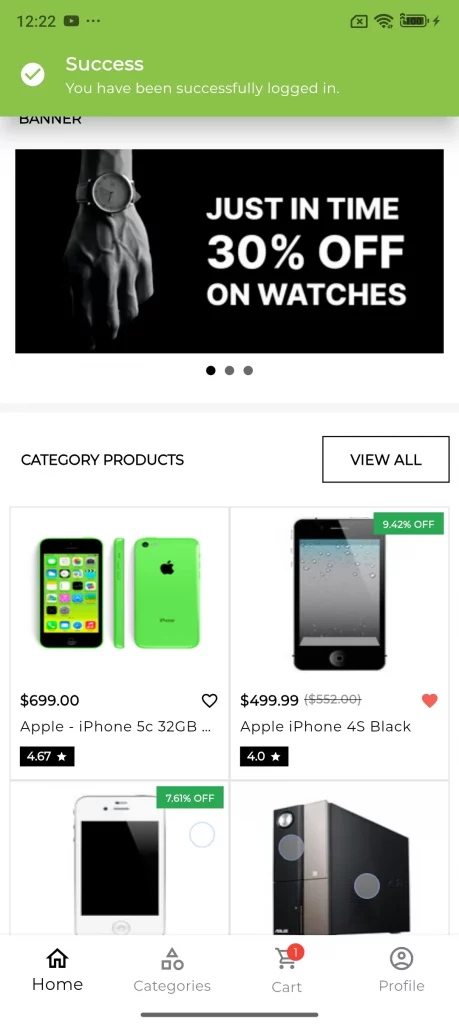
Home Page View
On the frontend, customers can select a store to browse its products and offerings while viewing the sliders and carousels configured by the admin from the backend.
The homepage displays all sections according to the configuration defined in the homepage settings.


Search View
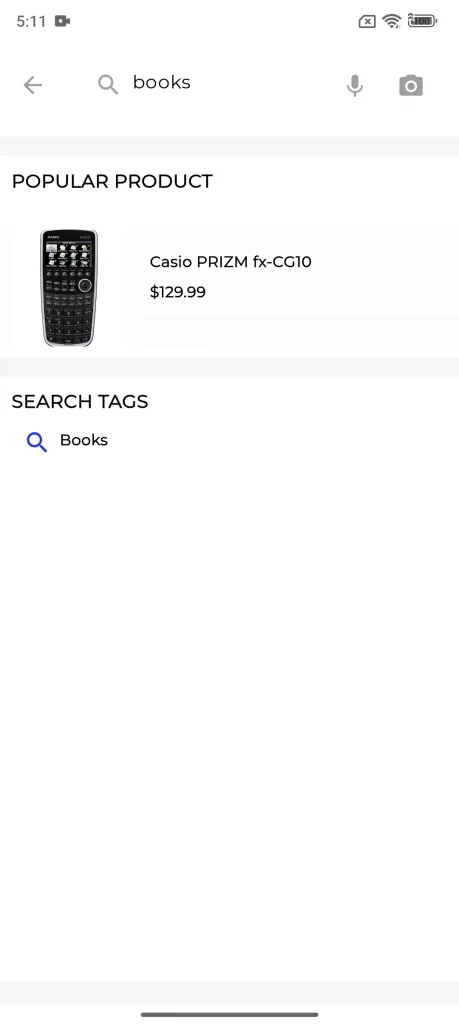
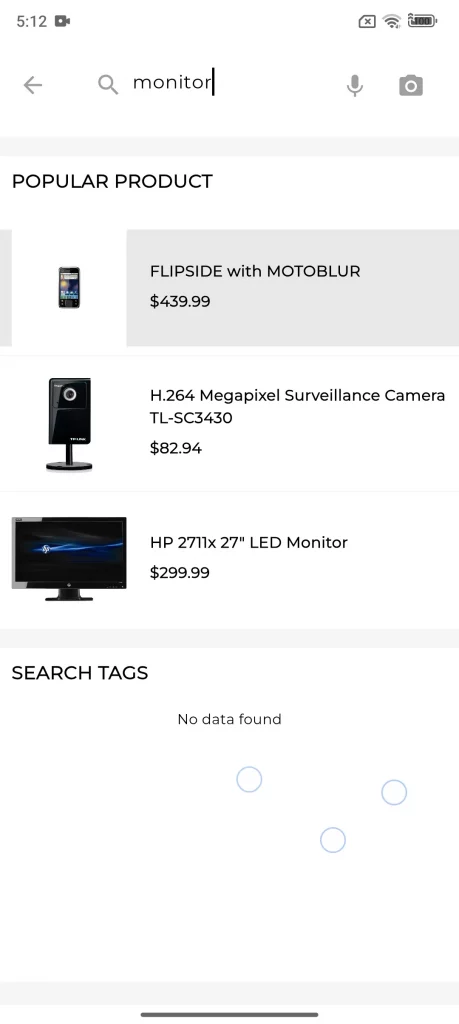
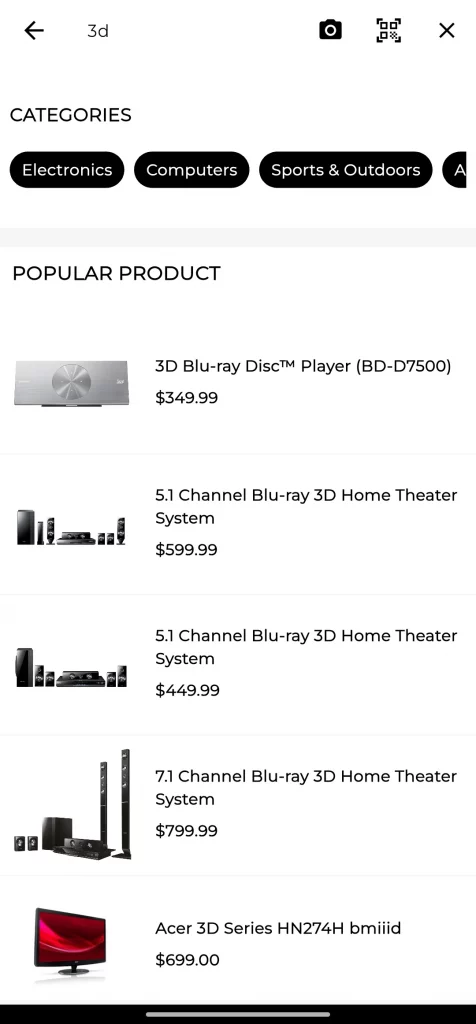
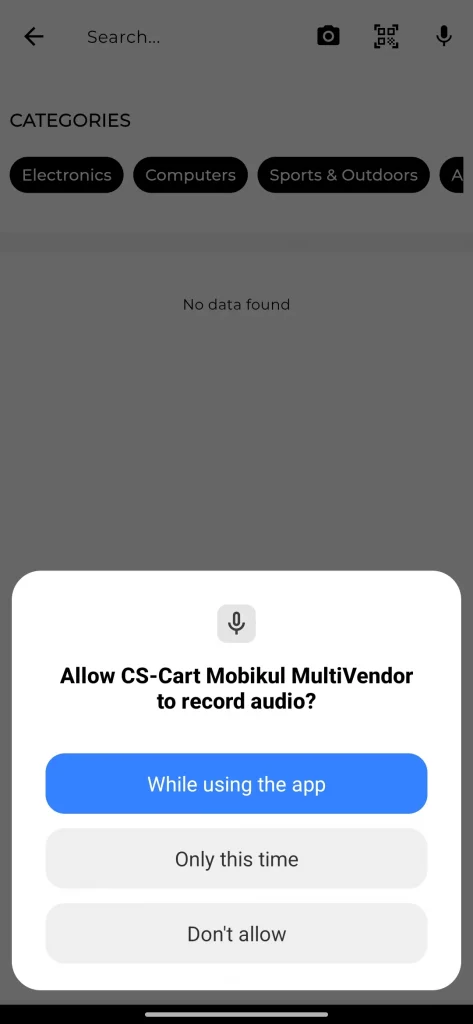
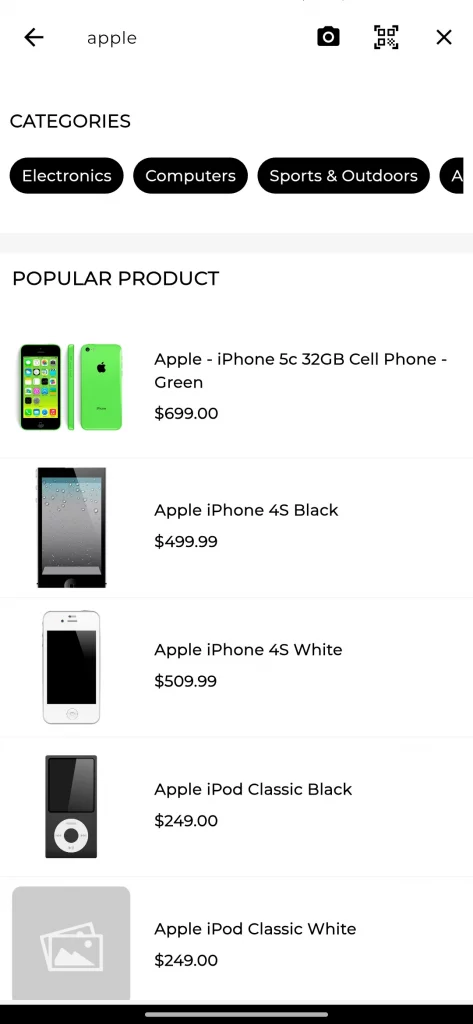
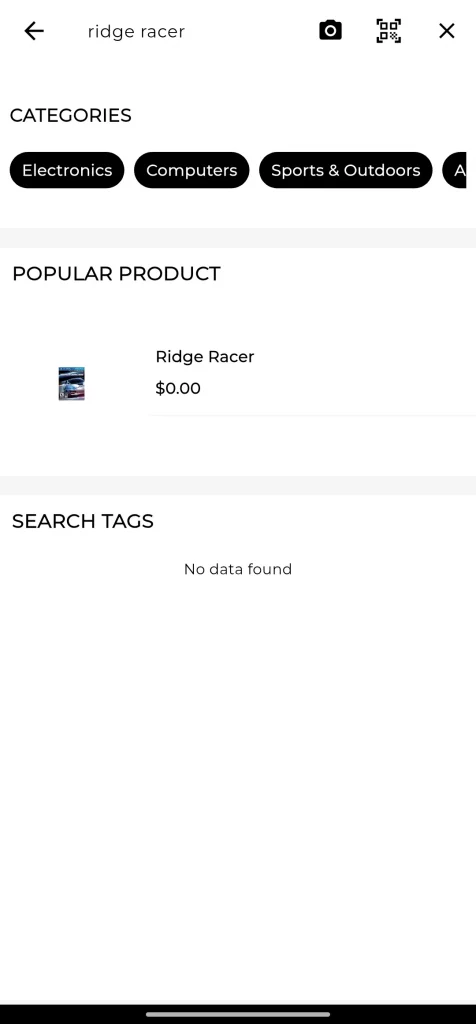
The customer can search for a product by specifying the keywords. Auto-suggestion is also here. The customer can also search with voice.
Search via Image – Here, the search is done by image. The app learns about the desired product through image detection or text detection.
Scan with Text – Here, the app user can search the product by allowing the scanning of the text on an object. Currently, text detection works for the English language only.
Scan with Text
Search by Barcode
Customers can search for products using a barcode.
Search By Barcode
Explore CS-Cart Search by Barcode to learn more about its features and functionality.
Product Page View for the Customers
Customers can view a product by clicking on any item within a category.
On the product detail page, customers can see the product image, specifications, description, reviews, price, and vendor details.
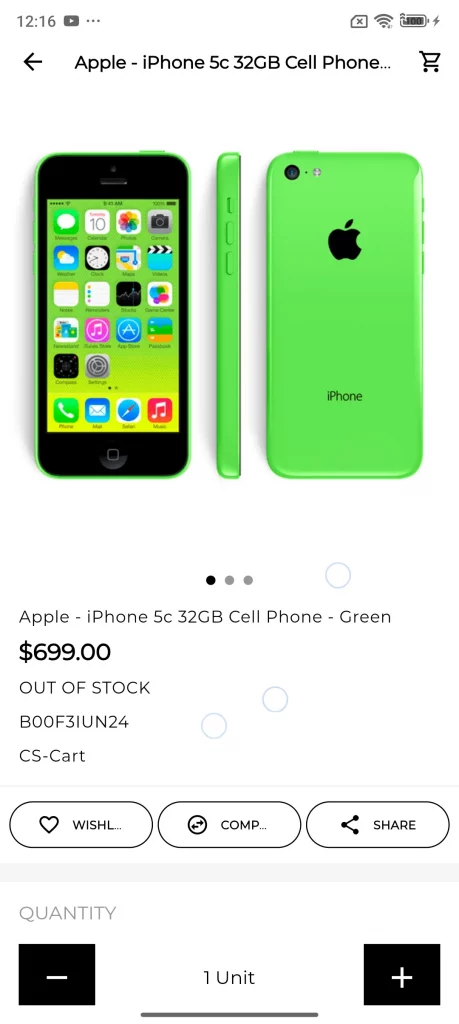

If the customer clicks on the vendor name, they will be redirected to the vendor’s profile page.
Customers can make checkout without login through “Checkout As Guest,” and customers redirect to the checkout page
Navigation Drawer
Under the navigation drawer, the customer can access their account, see the orders, and wishlist.
Navigation Drawer
Sign In/ Sign Up
The customer can sign in and sign up for his accounts through the app. So, the Sign In/ Registration page can give the customer the options as-
- Sign in with your email address
- Create An Account
App Sign In/ Sign Up
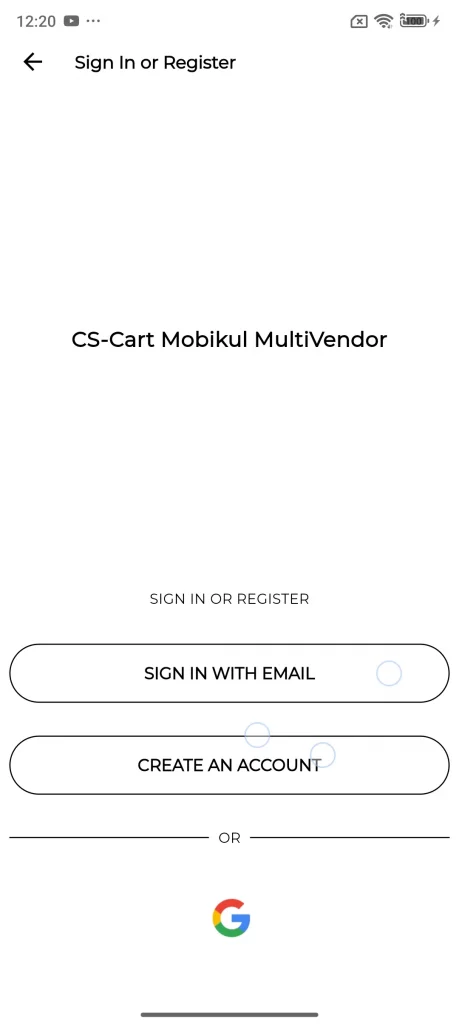
Please note – Social Login is a separate paid feature. It is not included in the base mobile app, as visible in the image:
Sign Up- Create An Account
Create Account

The customer can register for their account by filling in only the email, password, and confirming password fields, and then completing the checkout process.
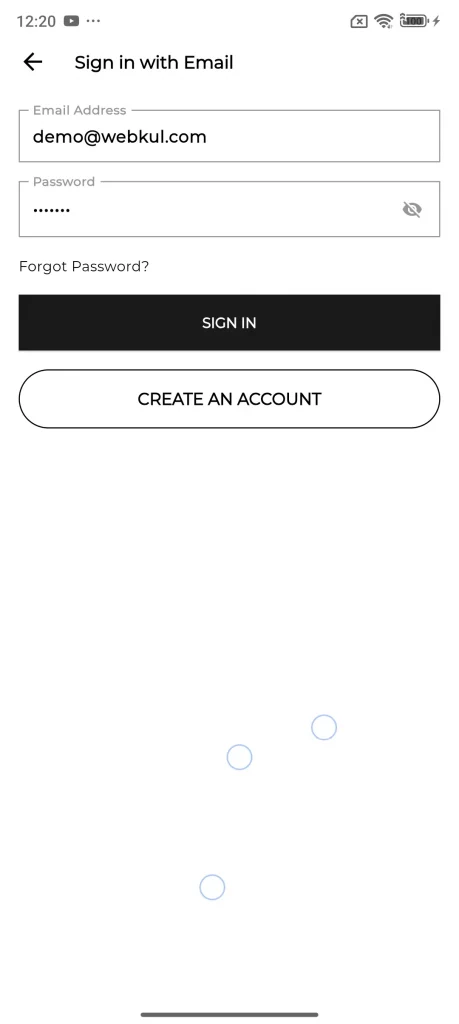
Sign in
Post-registration, the customer can log in via the mail id and password that was mentioned at the time of registration.
Here, on this screen, the customer can even select the ‘Forgot Password’ option.
After signing in customers have the option to “add a fingerprint for login” option.
Post login, our navigation drawer will contain- Here, the customer can use the feature of All in One drawer. All in one drawer will provide the category view and the account view.
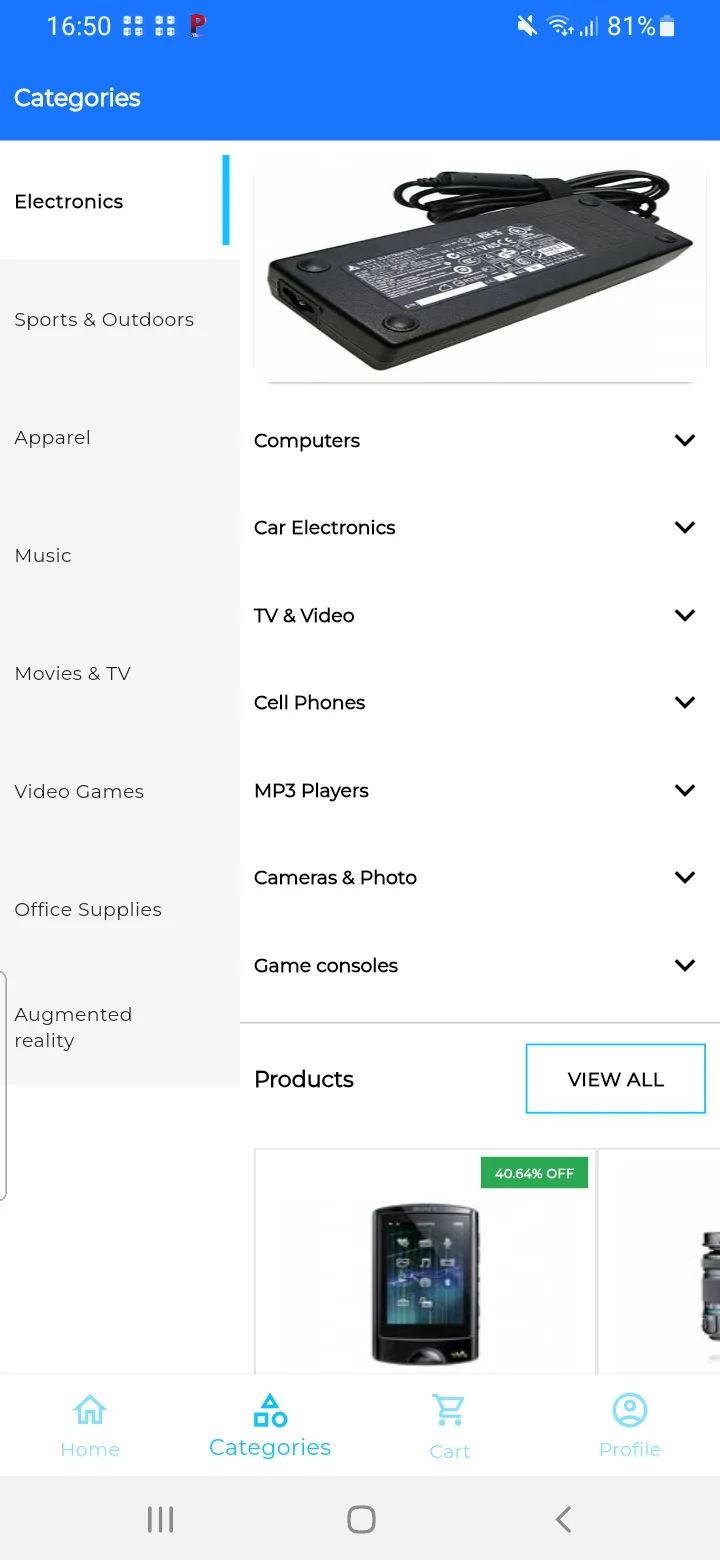
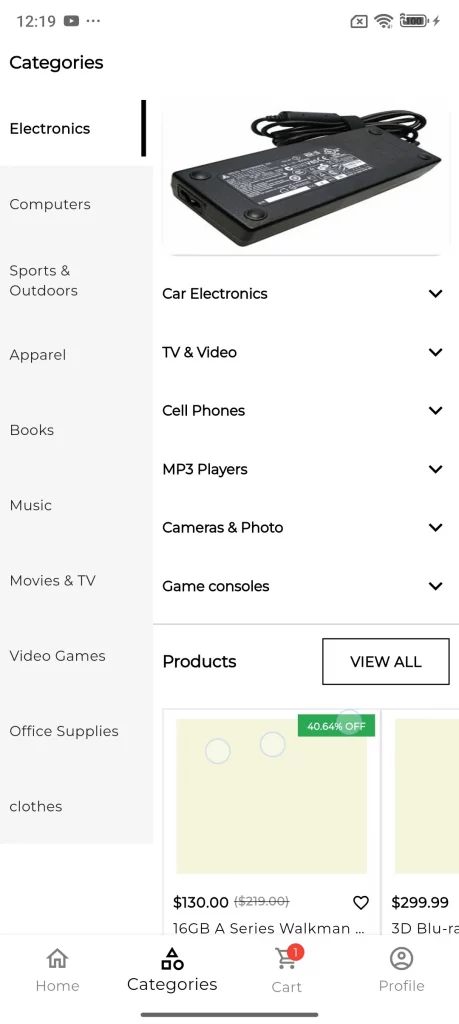
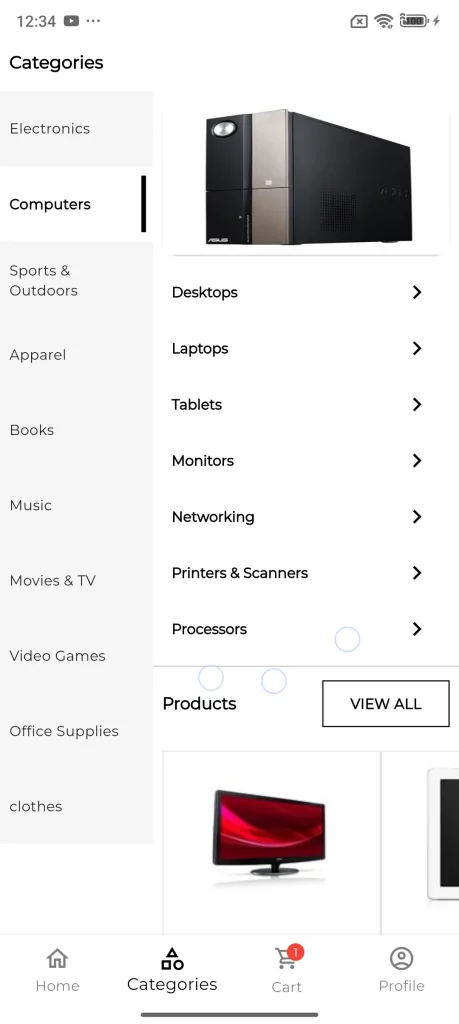
Category View:
Access categories by tapping the Category option at the bottom of the app.
After clicking on the parent category, the customer can see the list of subcategories. Where the customer can go for the product according to their choices.
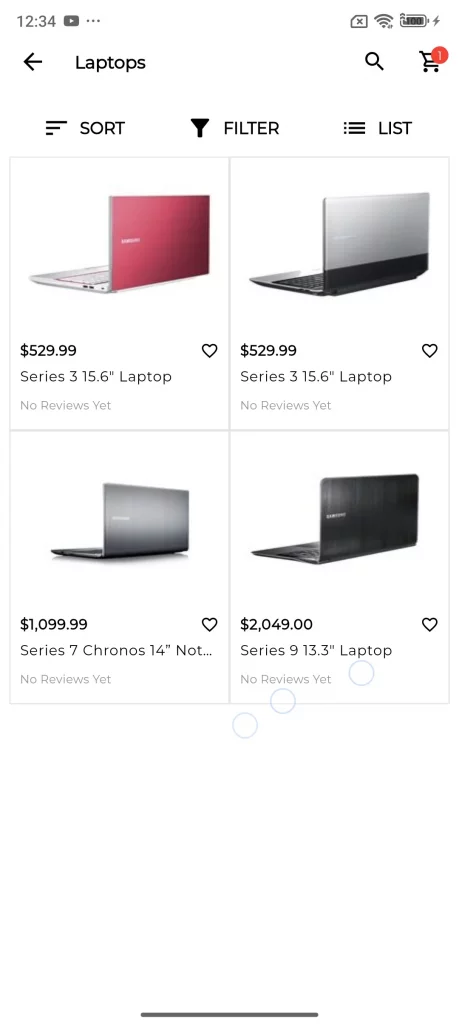
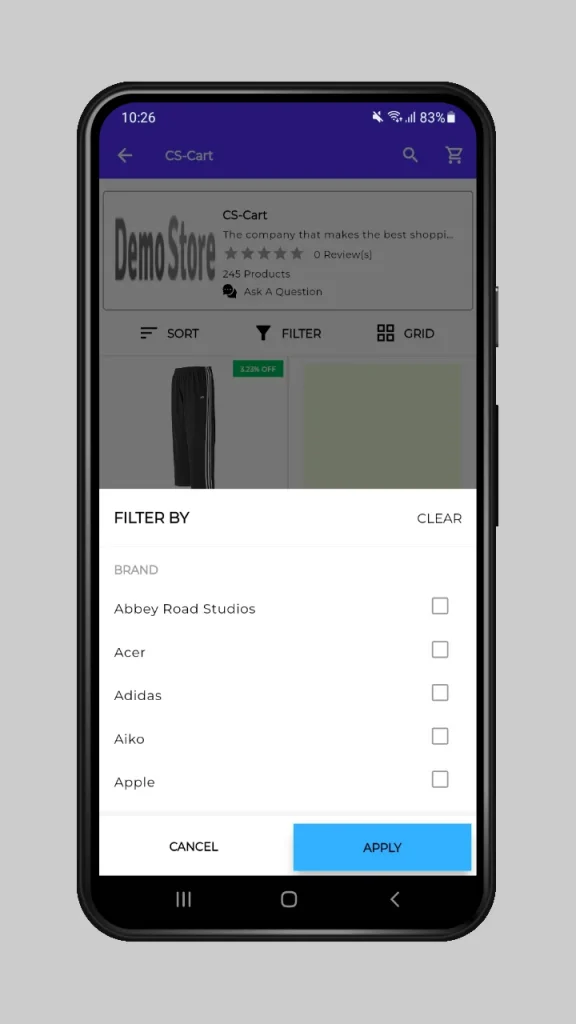
Filter and Sort By: Customers can apply the filter according to their needs on the category page.
Also, there is a facility to sort the products. Products can be sort by alphabetically, pricing, popularity, and newest item.


List and Grid View: Products can be viewed as both a grid and a list. The customer can change the view of the product after the grid or list button.


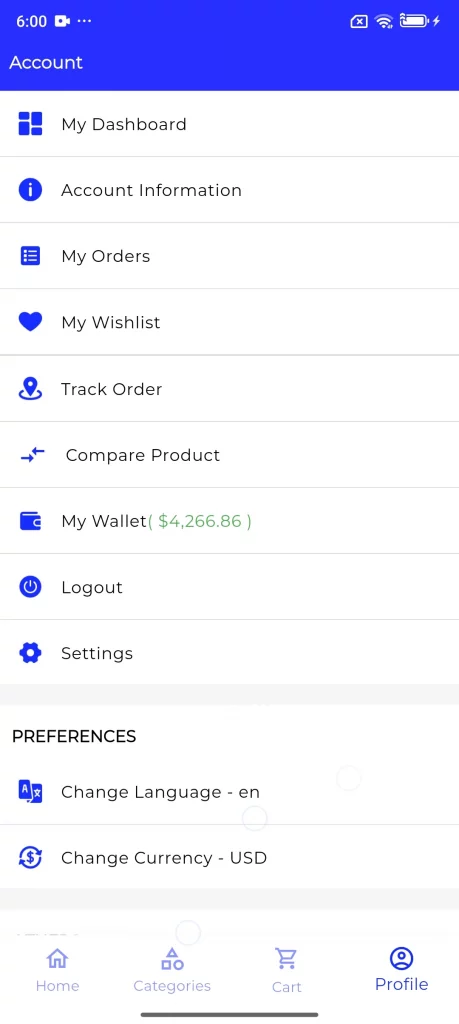
My Dashboard:
Customers can manage their addresses, orders, and wishlist from the My Dashboard section or through the navigation tab.
They can access any option by selecting the corresponding tab.


My Orders
Customers can view their orders under the “My Orders” tab. The customer can view all the orders created for the store. A single order can also be viewed by the customer.


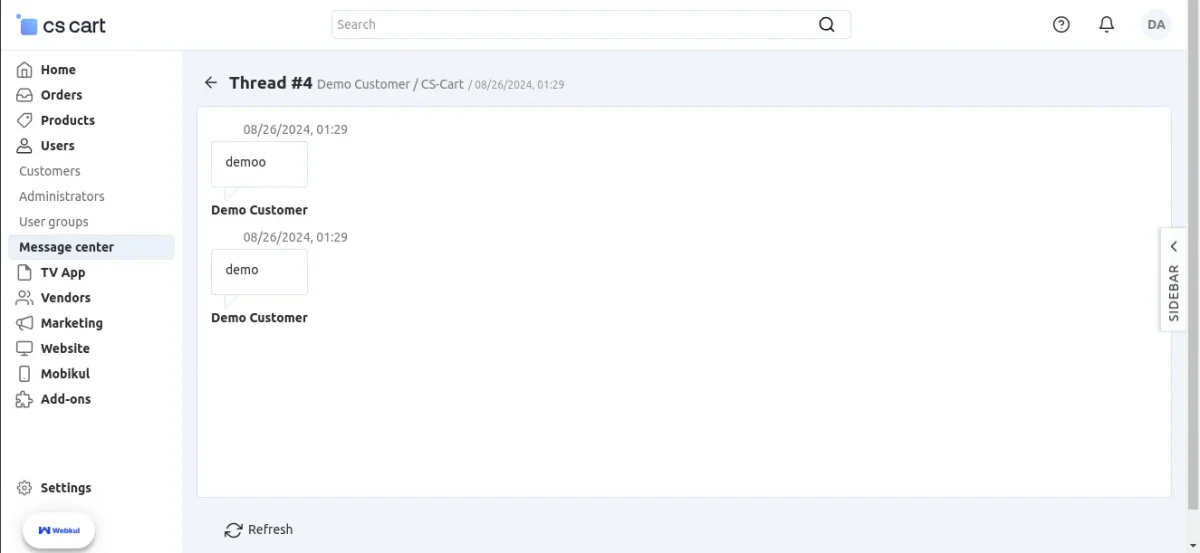
The customer can click on Start Communication to conversate on orders.


After that, the admin can check customer messages in the order details in the admin panel.
My Wishlist
The customer can make their wishlist for the product. A Wishlist button will appear on all products.
The customer can see their wishlist product under the “My Wishlist” section. The customer can remove the wishlist product from there.
Wishlist

Track Order
The customer can track their orders under the “track order” section in the navigation tab. Customers need to enter their order email id or order number and submit.
Track Your Order

Notifications
The notification tab can be seen in the navigation drawer. Customers can set notifications for selected products related to any offer and price reductions on products available in-store.
Notification

My Account
My account link can be seen in the navigation drawer. Under my account, the customer can see their account information, like billing address, shipping address, and mailing list.
The customer can also see their profiles. A user can have multiple profiles, like an official profile and a home profile.


Message Communication section
Customers can initiate communication directly from the Order Details page. As can be seen in the chat icon in the right corner of the order detail, the customer can initiate a chat.
After that, the admin can check customer messages in the order details in the admin panel.

All Vendor
The customer can see the All Vendor link under the “Navigation Drawer”. After clicking on this link, the customer can see all vendor list.
When the customer clicks on a vendor, can see the contact information of the vendor, the shipping address of the vendor, and the description of the vendor.
The customer can also view the products of the selected vendor.


Customers can apply the filter according to their needs on the category page. Also, there is a facility to sort the products.
Products can be sort by alphabetically, pricing, popularity, and newest item.

Products can be viewed as both grid and list. The customer can change the view of the product after the grid or list button.
Language
Customers can switch the app language based on their preferred language.
Under the profile icon, they can see the language bar, where they can change the language.


Currency
Customers can change the currency in the app.
After changing the currency, the app updates all data according to the selected currency.

Checkout
The customer can check out for his purchases. At the checkout page, the customer can apply the coupon code, remove or update their cart. The checkout process is divided into the following steps.
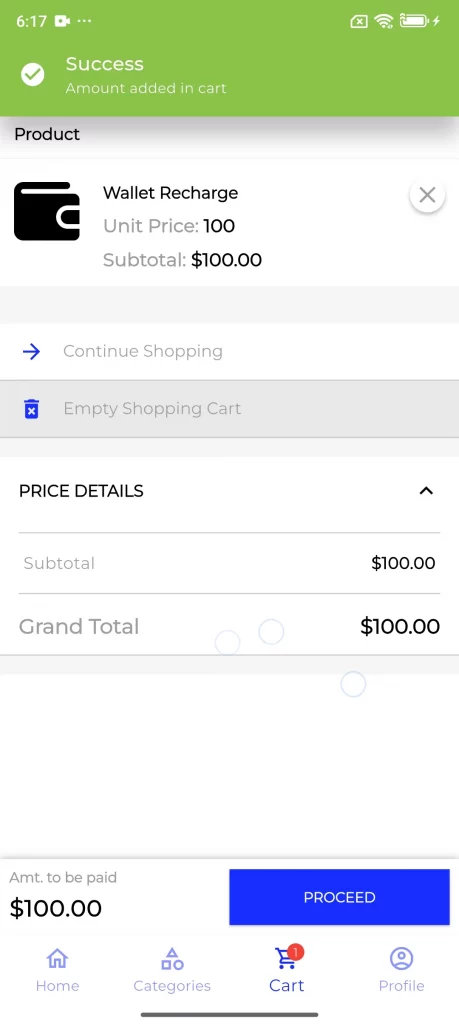
Add to Cart:
The customer can see the Add to Cart button on the product page. After clicking on the “Add to Cart” button, will receive a message “The product was added to your cart”.
After that, the customer can proceed to the next step of checkout using the CS-Cart Multivendor Mobikul Mobile App.


Billing and Shipping Address:
Under this section, customers can select their profile as main, home, and business. They also have the option to select “Are shipping and billing addresses the same?”
Billing and Shipping Address

Shipping Options & Payment Method Selection
All the shipping methods will be shown in this section. Customers can choose the shipping option here. Shipping guidelines are also shown in this section. Then, after that, select the payment method.


Billing Options:
Under this section, customers can select the billing method for the order. After successfully placing the order, they can see a popup on “Congratulations! Your order has been successfully place”.
The customers can view the order details from here and also continue their shopping.
Billing Options

Delete Account
Under the navigation bar, customers have the option to “Delete Account“.
If customers want to delete their account, they can click the tab and delete the information displayed on the screen.
Delete Account

The customer confirms their password after that pop-up will ask them to confirm if they press ok customer’s account is permanently deleted.
GDPR Compliance
The app is fully compliant with policies set by the EU under GDPR.
The following points must be considered here to make the GDPR compliant-
- Privacy By Design- The design of the Mobikul app is such that it takes care of app users’ data. It abides by Article 23, that an app must only hold and process data that is absolutely necessary.
- Direct Consent- Under the GDPR, it must take user consent for collecting or sharing the user’s data. The terms and conditions are not pre-checked, and the app user can read the complete content before agreeing to them.
These conditions are clearly visible and transparent to the app user.
The app has GDPR enabled on multiple pages in our application- Register, Submit Reviews, Profile Page, Checkout, and Order Communication.
These pages are the ones having the personal data of the app user which we ensure the app uses the safety of their data.
The admin can check the box for the above-mentioned page settings to make it visible on the app front end.
Note- Here, we have integrated the CS-Cart default GDPR extension in the application.


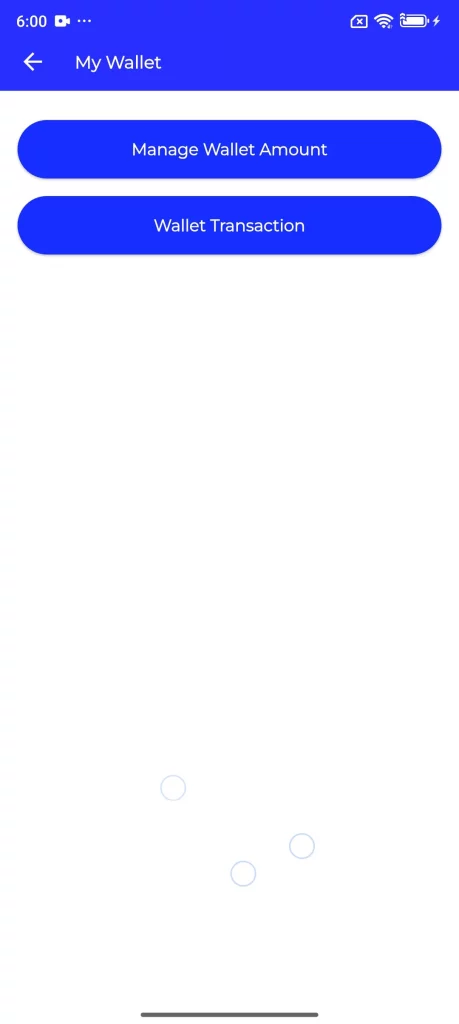
Wallet System:
The wallet system allows customers to manage their wallet balance and use it for purchases within the app.
NOTE: To use the wallet system functionalities, you need to purchase our Wallet System add-on.
The wallet system follows the default functionality provided by the add-on.
Check the wallet system to learn more about its features and functionality.
Workflow of the wallet in the application:
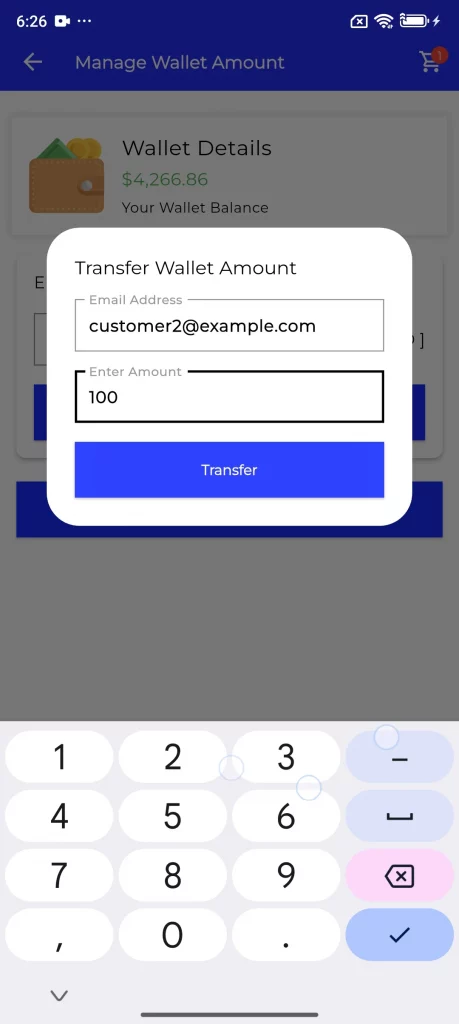
Customers can utilize their wallets for seamless transactions for online purchases and money transfers.
Add Money to Wallet.
Additionally, customers can add funds to their wallet via the “Add Money” section.
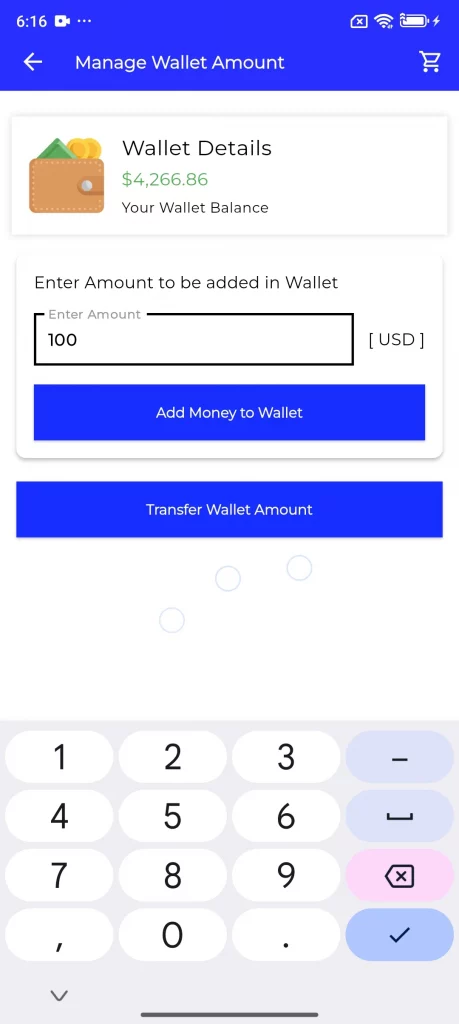
Money Transfer Amount
Customers can transfer funds to other users through the wallet transfer option. They can also view transaction details using the Wallet Transaction feature.
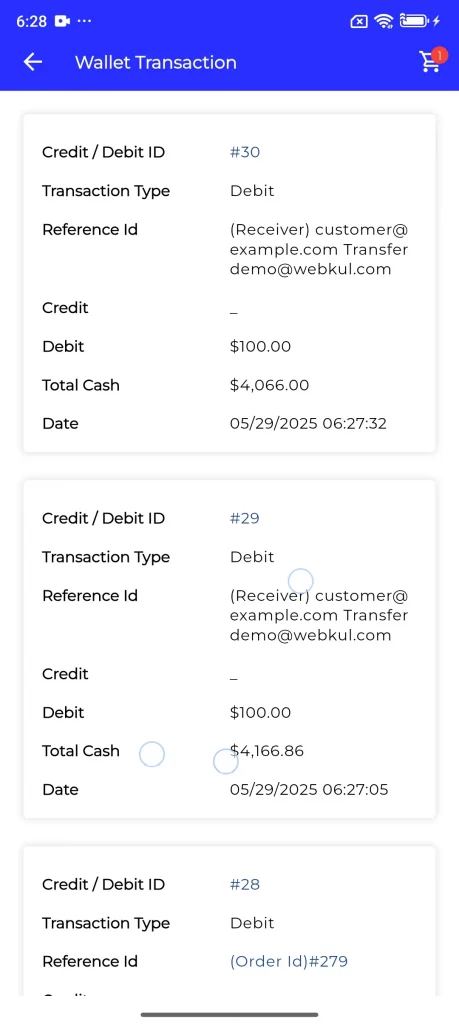
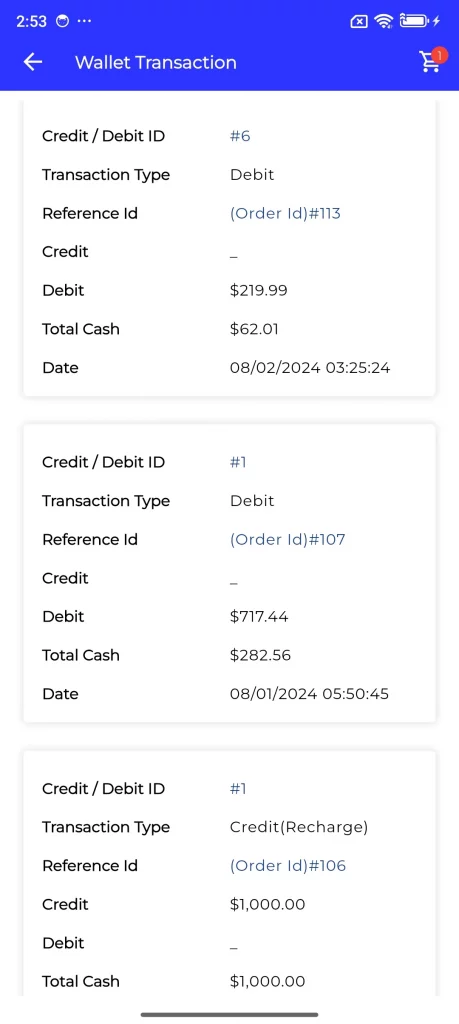
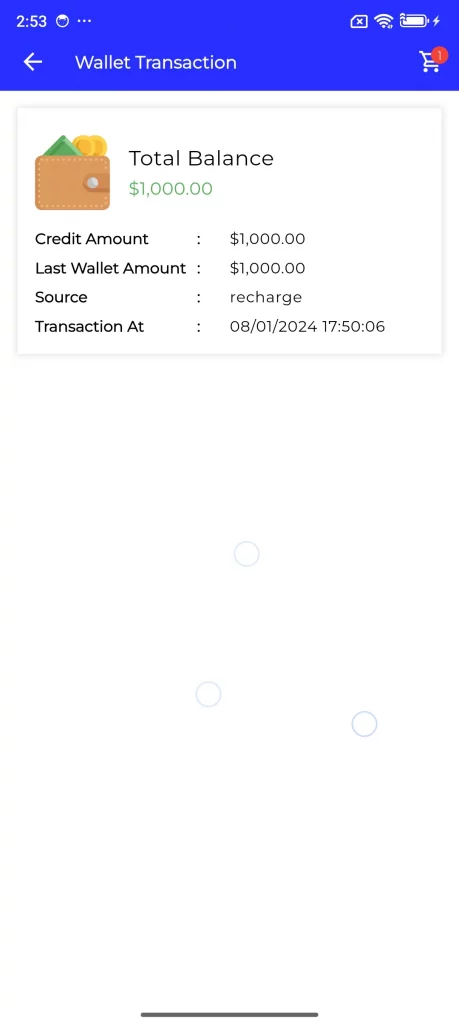
Hence, customers can use the CS-Cart Multivendor Mobikul Mobile App wallet for online transactions with multiple options.
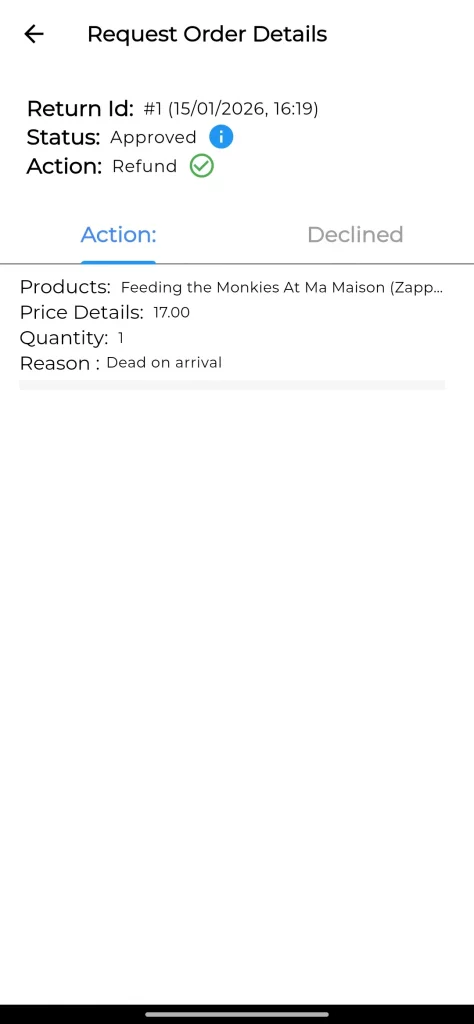
Return Request
Customers can easily return completed orders and request a replacement or refund through the mobile application.
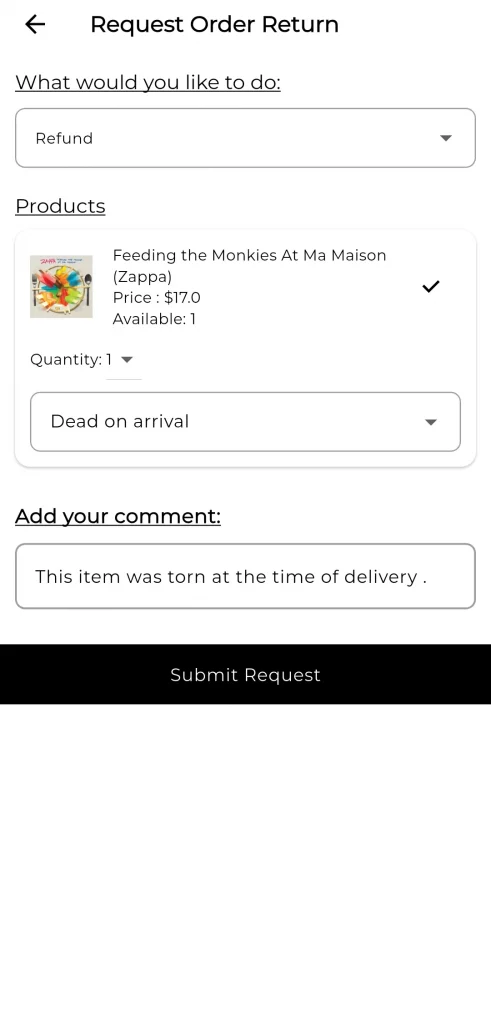
Note: To manage return requests, the admin must have the RMA add-on installed.
The admin can manage customer return requests from Orders >> Return Requests in the admin panel, as per the default functionality of the RMA add-on.
Workflow of the Return request in the application:
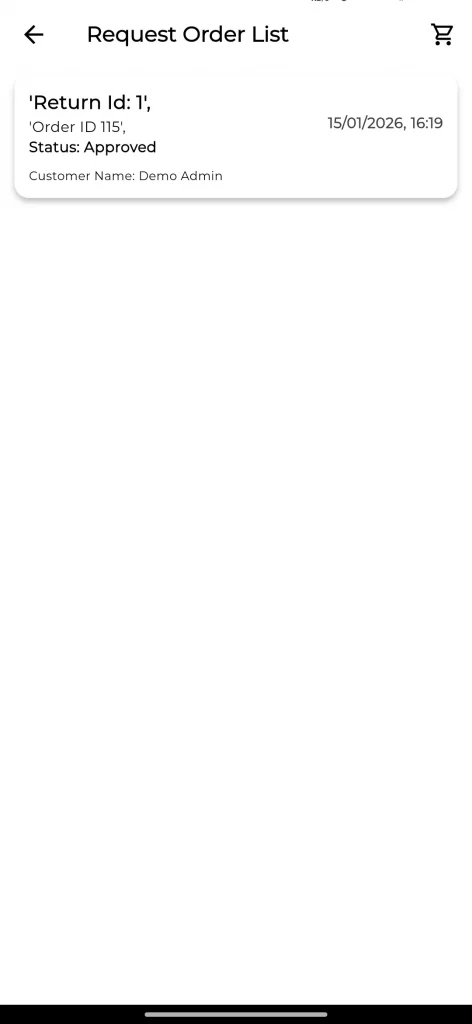
The app allows customers to view detailed information about their order return requests from Profile >> Return Requests.
Invoice
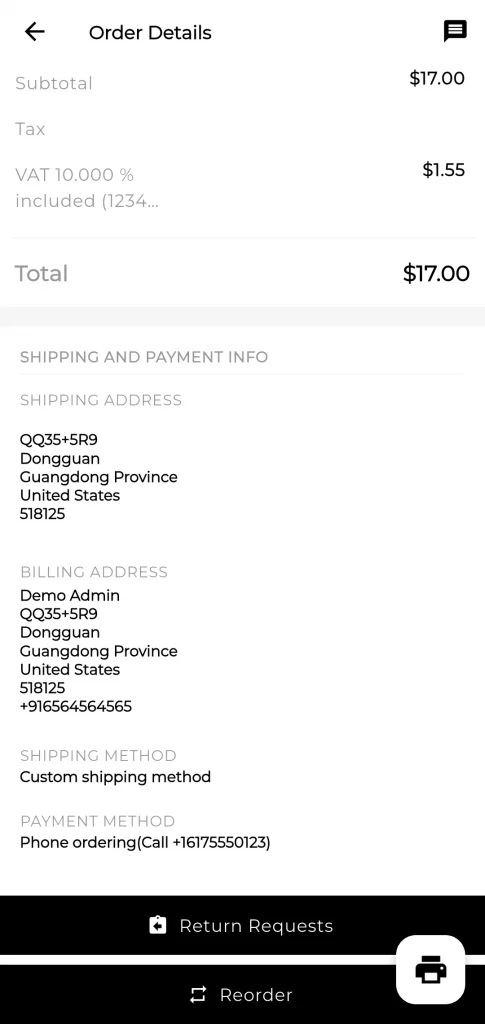
Customers can easily download order invoices directly from the order details page.
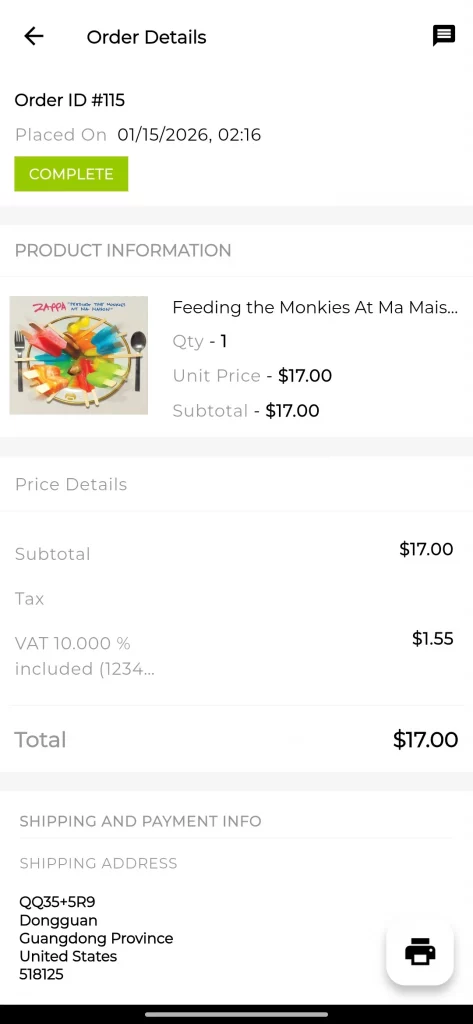
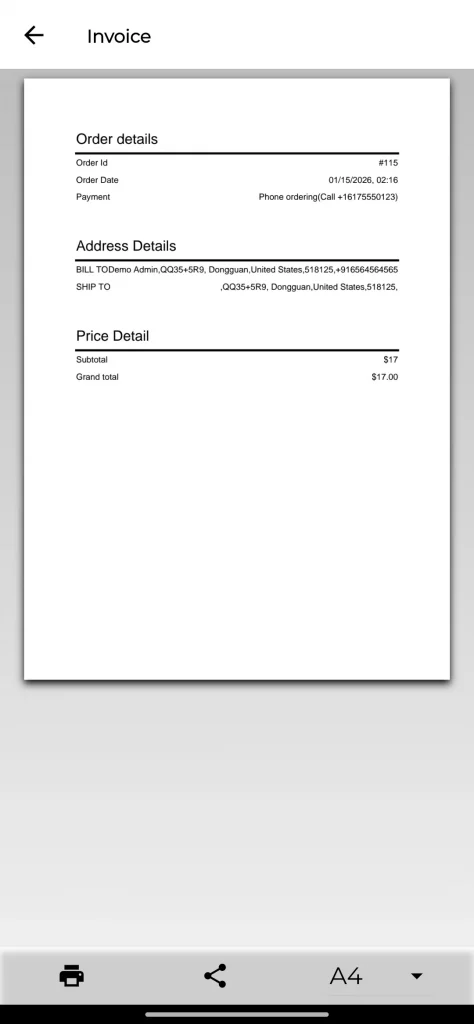
From here, customers can download or share the invoice.
Support
If you have any questions, suggestions, or customization requests, feel free to contact us at [email protected] or submit a ticket at webkul.uvdesk.com.
Explore our premium-quality CS Cart Extensions to enhance your store functionality.
You can also explore our CS-Cart Development Services and Quality CS-Cart add-ons.
Current Product Version - 7.1
Supported Framework Version - Version 4.16.x, 4.17.x, 4.18.x,4.19

2 comments
We do provide one payment integration-free with our Mobile App purchase. We can integrate the Stripe Payment Method with your mobile App. The Stripe Payment method must work on your website to integrate with the mobile app.
You can check out the following link for more details:
https://mobikul.com/features/major-payment-gateways-supported/