Amazon Connector for Magento 2 integrates the Amazon store with Magento 2 store.
This module enables the store owner to import products, stock, and orders from the Amazon store to Magento 2 store.
Applications for sellers that your organization self-authorizes and makes available only to itself.
Also, the store owner can also export his products from Magento 2 to the Amazon store.
Magento 2 (Adobe Commerce) Amazon connector performs real-time updates of the synchronized product price and quantity on the Amazon store.
The store owner can also connect multiple Amazon stores with the Adobe Commerce store.
Note:
- This module will work for professional seller accounts at Amazon seller central only.
- This module is based on Amazon Selling Partner API (SP-API).
- The Amazon Connector module also works with Adobe Commerce Cloud Edition.
- Also, to manage shipment fulfillment you have to buy a separate module Amazon MCF (FBA) for Magento 2
Check a brief overview of the Amazon connector plugin configuration –
Features-Amazon Connector for Magento 2
- Synchronize the Magento 2 products to Amazon and vice versa using Amazon connector.
- The admin can create multiple price rules to update the price of the synchronized products automatically.
- Import Amazon orders to Magento 2 store.
- Admin can set a default category for the imported products in the Adobe Commerce store.
- Set default quantity and weight values for imported products in the Magento 2 store.
- Revise the changes for the product’s price and quantity occur in Magento 2 store, the results will reflect on the Amazon store.
- Admin can import Simple as well as Configurable product types.
- Admin can export simple and configurable product types.
- While importing the product from Amazon the admin can choose the status of the products.
- Admin can map Amazon product attribute to Magento product attribute.
- It imports the product information, including the base image, name, price, and quantity, along with the product.
- Can import multiple images of the Amazon imported product to the Adobe Commerce store.
- It exports the product information, including SKU, price, images, and quantity, along with the product.
- Set the default store view and order status for the imported order in the Magento 2 store.
- The admin can manage the imported orders through Amazon seller central account only.
- It imports orders from the Amazon store with statuses of shipped, unshipped, and partially shipped into the Magento 2 store.
- The admin can connect multiple Amazon Accounts.
- Synchronized Amazon product work like Magento products.
- Admin can fetch the order between the desired date range.
- Automatically fetches the orders via cron, and if the order items do not exist in Magento, it automatically creates them.
- Automatically updates the exported product status via cron.
- Admin can export Magento products as FBA products at Amazon.
- Admin can update Magento product as FBA product at Magento.
- The attribute mapping will work only in the case of exporting products from Magento to Amazon.
Installation – Amazon Connector for Magento 2
Customers will get a zip folder then they have to extract the contents of this zip folder on their system.
Once the customer extracts the folder it has an src folder, inside the src folder you have the app folder.
After that, you need to transfer this app folder into the Magento2 root directory on the server as shown below.

After the successful installation, you have to run these commands in the Magento2 root directory.
First Command
php bin/magento setup:upgrade
Second Command
php bin/magento setup:di:compile
Third Command
php bin/magento setup:static-content:deploy
Fourth Command
composer require guzzlehttp/guzzle:*
Fifth Command
composer require league/csv:^9.5
Sixth Command
composer require spatie/array-to-xml:*
After running the commands, you have to flush the cache from the Adobe Commerce admin panel by navigating through->System->Cache management as shown below.

Multi-Lingual Configuration
For Multilingual support, please navigate to Store>Configuration>General >Locale Options. then select your desired language from the Locale option.

Language Translation
Similarly, if you need to do the module translation, please navigate to the following path:
Navigate in your system app/code/Webkul/AmazonMagentoConnect/i18n.
Open the file named en_US.CSV for editing as shown in the below screenshot.

Once you have opened the file for editing. Replace the words after the comma(,) on the right with your translated words.

After editing and translating the CSV file, you need to save the translated file name.
According to your region language and country code such as – de_DE.CSV.
Then upload the translated file to the same folder from where you have obtained it.
Now your module translation is complete.

How to Create or Obtain the Required Credentials for the Amazon Connector Module
1. Registering as a developer
You must register as a Selling Partner API developer before you can register your Selling Partner API application.
The way you register as a developer varies slightly depending on the type of application that you create. We will use the following:
- Private seller applications. Applications for sellers that your organization self-authorizes and makes available only to itself.
You must be a primary account user to complete registration.
To register as a developer (for private seller applications)
Use the following steps to complete the Developer Profile.
- Sign in to Seller Central using the credentials that you want to associate with your developer account.
- In the Partner Network menu, click Develop Apps. The Developer Central page appears.
- If you have not yet completed a Developer Profile for your selling account, choose Proceed to Developer Profile. Otherwise, choose View profile.
- Complete the developer registration form.
- Enter your Contact Information.
- Enter Data Access details.
— From the Data Access dropdown, choose Private Developer: I build application(s) that integrate my own company with Amazon Services APIs. - Select the Roles that apply to your organization. For more information about Role definitions, refer to Roles in the Selling Partner API.
- Enter your Use Cases.
- Enter your Security Controls.
- Check the box confirming that you have read and agree to the aggrement and policies.
- Choose Register.
- After you complete the Developer Profile, Amazon will evaluate your information and create a case with next steps. It may ask you to provide additional information or documentation.
Note:
- By default, you have to select the roles: Brand Analytics, Product Listing, Pricing, Amazon Fulfillment, Buyer Communication, Buyer Solicitation, Selling Partner Insights, Finance and Accounting, Inventory and Order Tracking.
- If you want to import the buyer information and shipping address with the orders, then you must have access to customer’s Personally Identifiable Information (PII). To access buyer information and/or shipping address information, you need approval for the required roles. These are:
- Direct-to-consumer shipping. Required to access shipping address information.
- Tax remittance. Required to access buyer information.
- Tax invoicing. Required to access buyer information.
2. Checking the status of your request to register as a developer
After you have submitted your request to register as a developer, Amazon evaluates the information provided and approves or denies your request.
If denied, you can address the reason for the denial and then resubmit your Developer Profile.
The following procedures show you how to check the status of your request to register as a developer
It depends on the type of application you want to create.
To check the status of your request (private seller applications)
- Sign in to Seller Central with the credentials that you used when you registered as a developer and navigate to Develop Apps.
- On the Developer Central page, follow the instructions in the Your developer registration is under review banner. The banner will change to reflect the status of your application.
3. Registering your application
The way you register your application varies slightly depending on the application type. We will register applications for
- private seller applications. Applications for sellers that your organization self-authorizes and makes available only to itself.
The following procedures show you how to register your application.
To register your application (for private seller applications)
- Sign in to Seller Central using the credentials that you used to register as a developer.
- In the Partner Network menu, click Develop Apps.
The Developer Central page appears.
3. Click the Add new app client button.
The App registration page appears.
4 . Complete the form.
4. Viewing your application information and credentials
After you register your application you can view information about your application, as well as your Login with Amazon (LWA) credentials. Here, we have used :
- private seller applications. Applications for sellers that your organization self-authorizes and makes available only to itself.
The following procedures show you how to view your application information and credentials, depending on the application type.
To view your application information and credentials (for private seller applications)
- Sign in to Seller Central using the credentials that you used to register as a developer.
- In the Partner Network menu, click Develop Apps.
The Developer Central page displays information about your application(s).
3. Click View under LWA credentials for the application you want.

Your LWA client identifier and client secret for that application appear. You will need these credentials in module configurations: App Client ID from Seller Central, The corresponding Client Secret
5. Authorizing Selling Partner API applications
Private applications for sellers: Applications that are available only to your organization. You can authorize these applications using the following method:
Self authorization
When you create a private application for your own organization you can self-authorize it to access your account information.
Before doing this you must register as a developer and register your application.
You can self-authorize your application in draft status; there is no reason to publish a private application.
To self-authorize your application (seller application)
- Sign in to Seller Central using the credentials that you used to register as a developer.
- In the Partner Network menu, click Develop Apps.
The Developer Central page appears.
3. On the Developer Central page, for the application that you want to authorize, select the arrow next to Edit App, and then select Authorize
The Authorize application page appears.

Note. If your selling partner account is merged with accounts in other regions, you will see an Authorize app button for each of your merged accounts.
4. On the Authorize application page, choose Authorize app for each selling partner account that you want your application to access.
The Marketplaces column indicates the marketplaces in which an account is active.
A Login with Amazon (LWA) refresh token appears each time you choose the Authorize app.
If you choose the Authorize app multiple times, a new refresh token is generated each time.
Generating a new refresh token does not invalidate previous refresh tokens.
Note:
1. Keep this LWA refresh token as this will be used in module configuration: Refresh Token
Rotating your application’s LWA credentials
This topic describes the process for rotating your application’s LWA credentials (client secrets).
As of February 6, 2023, You must rotate your Login With Amazon (LWA) credentials (client secrets) for all applications every 180 days.
If you do not update your LWA credentials before your target rotation date, your application will lose access to SP-API.
For details, please check the Amazon sp API docs: https://developer-docs.amazon.com/sp-api/docs/rotating-your-apps-lwa-credentials
Module Configuration-Amazon Connector for Magento 2
After the installation of the Amazon Connector, you can configure it by navigating through->Store>Configuration>Amazon Connector.
Product Settings:
- Default Attribute Set: Use it to create product attributes related to the Amazon category as default.
- Assign Attribute to all Attribute Sets: If yes, the new Amazon category-related product attributes will also get assigned to all available attribute sets.
- Product Description With HTML: The admin can allow a product with HTML description content.
- Only Required Attributes for Product Export: If set as ‘Yes’, only required category attributes will be allowed in Category Attribute Mapping and Export.
- Identifier Type for Product Export: The admin can choose an identifier type for product export.
Mapping Info
Marketplace-wise Default Account: Here, select the marketplace-wise default account by tapping the Add button as required.
Note – First, set up the Amazon accounts. Then, you have to map the default accounts to be used with respective marketplaces.
The mapped account will be used as default while fetching some common data for that marketplace like category attributes using the Amazon API.

Manage Amazon Accounts – Admin End
After successful configuration, the admin can add Amazon account credentials. The admin can navigate to “Amazon Magento Connect > Manage Amazon Accounts” for managing and adding Amazon Accounts.

After clicking on Manage Amazon Accounts, the following page will open showing an Amazon accounts list with the Store Name, Amazon Marketplace, and Seller ID.

Here, the admin can:
- Edit – edit the Amazon account details by clicking on this link.
- Delete – remove the existing Amazon account from the list.
- Add Amazon Seller Account – add/create a new Amazon account.
Add Amazon Seller Account
After clicking on “Add Amazon Seller Account“, the admin will navigate to the New Amazon Account page.
Here, the admin will enter :
- Store Name: Enter the store name and this will not be changed once got saved in the Magento 2 store.
- Attribute set: Select the attribute set for the imported product.
- Marketplace: Select the Marketplace from the drop-down list.
- Enter the Seller ID(Merchant Token), App Client ID from Seller Central, Corresponding Client Secret, and Refresh Token which the admin has received while generating the credentials on the Amazon Seller Central account.
- Customer PII Access: Choose yes or no if your developer profile has access to customer Personally Identifiable Information.
- AWS Account Id: The admin will enter the AWS Account ID of user.
- Access Key of AWS IAM user: The admin will enter the access key of AWS IAM user.
- Secret Key of AWS IAM user: Here the admin will enter the secret key of AWS IAM user.
Once the admin clicks on the “Save and Continue Edit” button, the following options become visible as per the below image.

Amazon General Configuration
- Default Category: Select the Default Category of Magento 2 store for assigning to Amazon products.
- Default Store View – Select Default Store View of the Magento 2 for order syncing.
- Product Create: Select the product creation type such as “with variation” or “without variation”.
- Default Website: Select Default Website.
- Price Rule Applicable For -Select the product sync type either the Import or Export option for which you want to apply the Amazon Price Rule. If it’s selected for Import Products then will work in a reverse manner for Export Products or vice versa.
For Example –
Suppose the “Amazon Price Rule Applicable For” is set to Import Products.
As per the price rule, the price value of the imported products will get increase by value 10 more.
But the price value of the exported products will be reduced by value 10.
- Shipped Order Status – Select the order status for Amazon orders in Magento.
- Unshipped Order Status – Select the order status for Amazon orders in Magento.
- Partially Shipped Order Status – Select the order status for Amazon orders in Magento.
- Update Inventory on Order Import- If yes, the inventory of products will also get updated on Magento for orders imported from Amazon.
- Export Product Image –
- Get All Images Of Product – If this option is selected as a Yes, then you will get all of the images of the product. If the option is selected as a No, in that case only one image would get fetched.
- Product Deleted From Catalog – , then the product will also be deleted from the Magento catalog.
- Default Qty – Default quantity will be assigned to the product when Amazon product does not have quantity.

Configure Notification
Step 1 . Grant Selling Partner API permission to write to your SQS queue:
To receive notifications you must grant Selling Partner API permission to write to your SQS queue click here
After granting permission you need to enter the queue name in the field of Amazon
Account Information >> SQS Queue Name
Step 2 . Create a destination:
The Admin needs to Create a Destination.
Step 3 . Create a subscription:
The Admin needs to create a Subscription.

Managing the Configure Notification Feature
Admin can easily manage the configure notification functionality, it can be enabled by setting the option Update Inventory on Order Import to ‘YES’ and can be disabled using the ‘NO’ option.

Import Product From Amazon | Amazon Connector for Magento 2
The admin can import the desired products from the Amazon store to their Magento store.

To import products from the Amazon store, the admin will click on Import Product From Amazon tab as per the image.

Here, the admin will:
- Select Import Product: There is an option available where the admin can import products as per their status over Amazon.

Admin can choose All products to import, Active products or Inactive products to import from Amazon.
- Generate Report Id: This creates the seller’s account report which is used to send a request to import the products from the Amazon store.

- Import Product From Amazon: when clicking on “Import Product from Amazon”, the temporary product data is created and stored in Magento 2 database.

- Create Imported Product: It is used to create/adds the imported products to Magento 2 store.

Admin can check the imported products by navigating to the store’s product category set as the default category for the imported products from Amazon during module configuration.

How to Change Default Category of the Imported Products
The admin can change the default category of imported products. For this, the admin will click on Import Product From the Amazon tab as per the image.

To change the default category of the imported products, the admin will do the following:
- Select one or more than one product from the imported products list.
- Select Assign to Category option from the Actions drop-down list. This will display the Category field and Submit button beside the Actions drop-down list.
- Select the desired category from the Category drop-down list.
- Proceed further by clicking on the Submit button.

The admin can check the newly assigned category of the product by navigating to the category assigned to it.
NOTE:
- It imports the product information, including the base image, name, price, and quantity, along with the product.
How to Change the Fulfillment Channel of Products
The admin can change the Fulfilment Channel of the imported products. For this, the admin will click on Import Product From the Amazon tab as per the image.

In order to change the Fulfillment Channel of the imported products, the admin will do the following:
- Select one or more than one product from the imported products list.
- Select Update as FBA To Amazon or Update as FBM To Amazon option from the Actions drop-down list as per the requirement.
- Proceed further by clicking on the Submit button.

As per the above image, the product’s Fulfillment Channel will be updated.
Notes:
- The product information like SKU, price, and quantity get imported along with the product.
- A cron is set for this module. So, for the auto status update of exported products, the admin has to configure the cron on the Magento 2 server. This will automatically update the status of exported products whether the products are exported to the Amazon store successfully or not.
- For exporting products, the unique identification code of products must pre-exist in Amazon’s seller central catalog, newly assigned unique identification codes to products may not be exported.
Import Order From Amazon
In order to import the orders from the Amazon store, the admin will click on Import Order From Amazon tab as per the image.

Here the admin will:
-
Import Order from Amazon:
when clicking on the “Import Order from Amazon” button, an Amazon Order Range page will open as per the image.

In addition, the admin can enter the date and time range. Proceed by clicking on the submit button and the temporary order data is created and stored in Magento 2 database.
After that, an Attention notification will appear on the screen below.

-
Create Imported order in Store:
The system uses it to create or add imported orders to the Magento 2 store.

After that, the system generates a list of the imported orders, including details such as Amazon Order ID, Order Status, Sync Date, and Purchase Date.

The admin can check the details of imported orders by navigating to Sales>Orders.
But the admin cannot manage the imported orders from the Magento 2 store
Thus, admin cannot create an invoice, shipment, cancel the order and make a refund.
The admin can manage the imported orders through Amazon seller central account only.
Note –
- A cron is set for this module. So, for auto-synchronization of orders, the admin has to configure the cron on Magento 2 server. This will automatically import the orders from Amazon store to Magento 2 store after every one hour.
- The admin will not get any email notifications for any order placed on the Amazon store for the admin products. However, the admin needs to check those orders normally by navigating to Sales > Orders after importing them.
Export Product To Amazon
The admin can export the Magento store products to Amazon shop. To do so, the admin will click on the “Export Products To Amazon” option under Amazon Account Information.

In order to export the products to the Amazon store using the Amazon connector, the admin will:
- Select the products which the admin wants to export to the Amazon store.
- Then select the “Export as FBA To Amazon” or “Export as FBM to Amazon” option from the “Action” drop-down list.
- If selected as “Export as FBA To Amazon” then the product will be exported as FBA (Fulfillment by Amazon) product.
- If selected as “Export as FBM To Amazon” then the product will be exported as FBM (Fulfillment by Merchant) product.
- Proceed further by clicking on the “Submit” button which gets visible when selecting any of the options from the “Action” drop-down list. This will navigate the admin to the “Run Profile” page as per the image.

Once the execution is completed, the admin will click on “Back” button to navigate back.
Then, the admin will go to his Amazon seller central account page and navigates to INVENTORY>Manage Inventory.
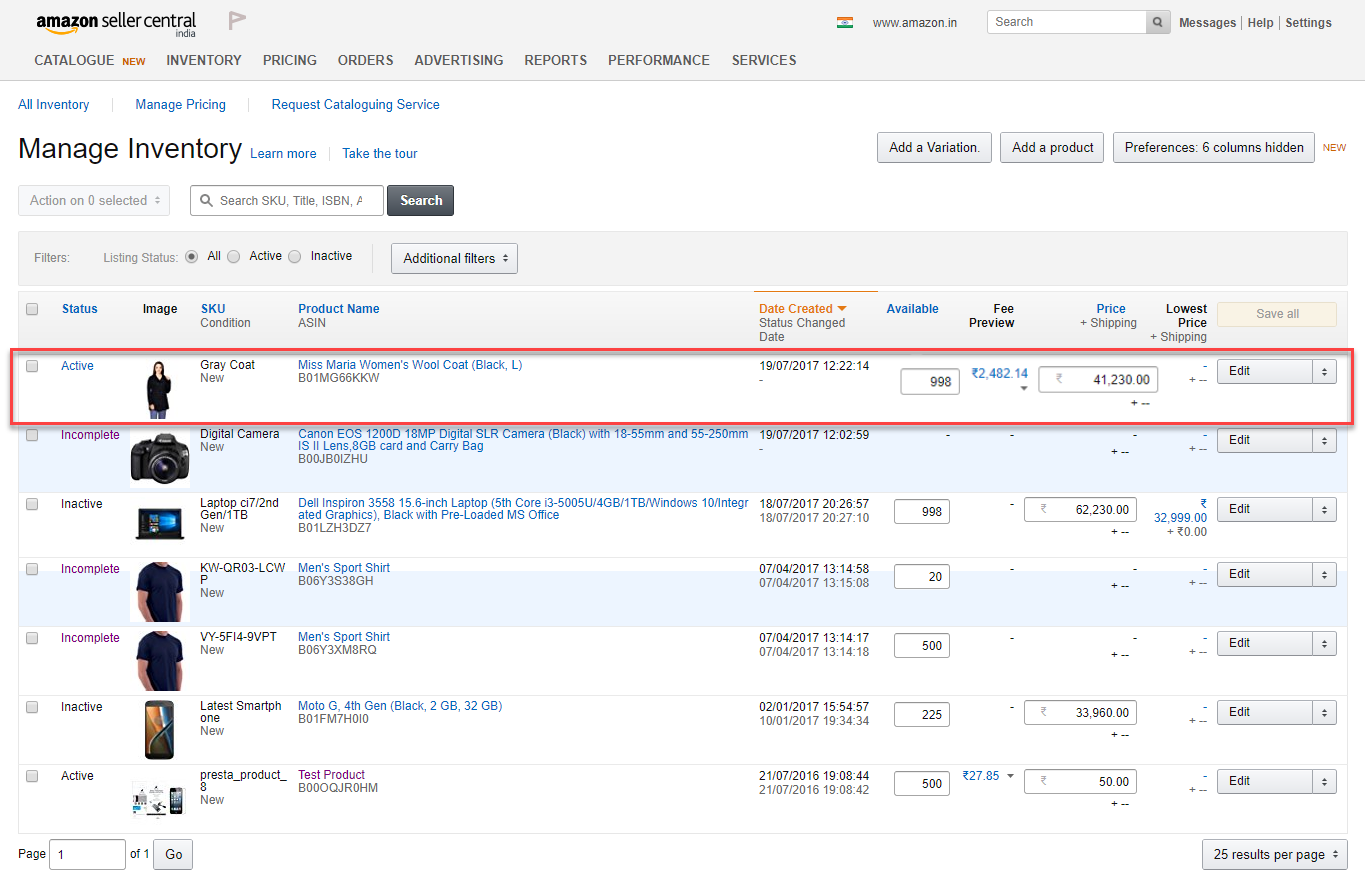
Here, the admin can check the exported product after 15 minutes because the process of exporting products takes 10-15 minutes to reflect the exported products on the Amazon store.
In addition, the admin can click on the “Edit” button to edit the product details.
Notes:
- It exports the product information, including SKU, price, and quantity, along with the product.
- A cron is set for this module. So, for the auto status update of exported products, the admin has to configure the cron on the Magento 2 server. This will automatically update the status of exported products whether the products are exported to the Amazon store successfully or not.
- To export products, the unique identification code must already exist in Amazon’s Seller Central catalog; newly assigned unique identification codes cannot be exported.
Define Values for Mapped Attributes
After completing the category attribute mapping, you will need to assign values to the corresponding mapped attributes.

Note: The product will be assigned to the same category that has been mapped to the corresponding Amazon category.

Manage Product Price Rules-Amazon Connector for Magento 2
The admin can easily update the price of the synced products automatically. For this, the admin needs to create the Price Rules by navigating to Amazon Magento Connect > Amazon Product Price Rules.

After clicking on Manage Product Price Rules, the following page will open showing the Price Rules list.
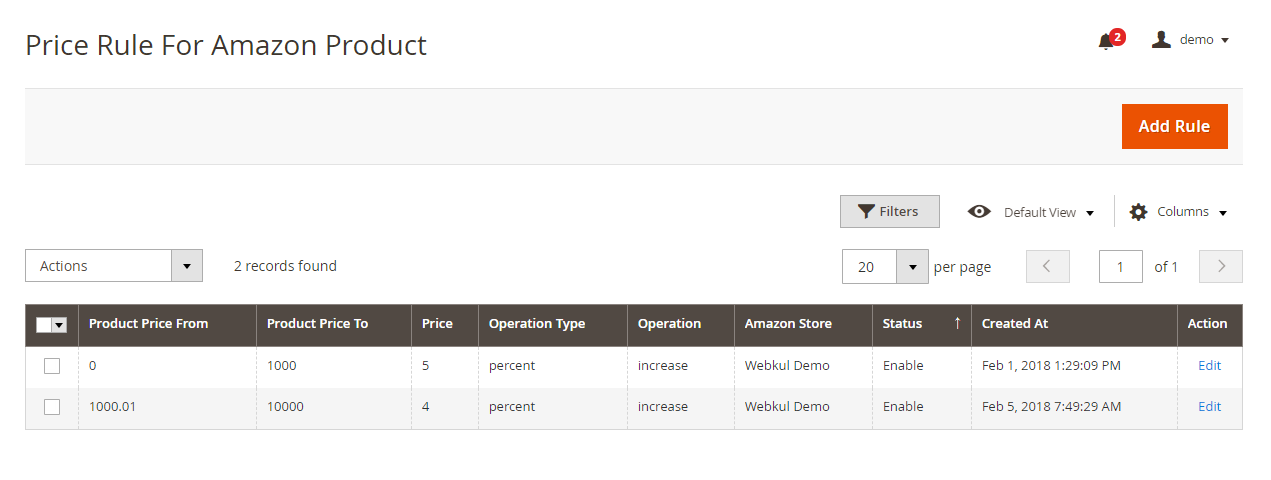
Here, the admin can:
- Edit – edit the Price Rule details by clicking on this link.
- Delete – remove the existing Price Rule from the list.
- Add Rule – add/create a new Price Rule.
Add Rule
After clicking on “Add Rule“, the admin will navigate to the New price rule page as per the below image.

Here, the admin will:
- Product Price From – Select the minimum price for the price rule to be active from.
- Product Price to – Set the maximum price for the price rule to get inactive.
- Operation Type – Select the operation type as fixed or percentage.
- Operation – Select the operation as increase or decrease.
- Price – Enter the amount.
- Amazon Store – Select the store.
- Status – Enable/Disable the price rule.
HOW WILL IT WORK?
Suppose the price of the synchronized product is 100 and admin has configured –
- Operation Type: Percentage
- Operation: Increase
- Price: 10
Then 10% of 100 will be added to the original price of the product ie; (10 % 100) + 100 = 10+100 = 110.
Else if the Admin has configured –
- Operation Type: Fixed
- Operation: Decrease
- Price: 10
Then 10 will be decreased from the original price of the product ie; (100-10) = 90.
Map Attribute with Amazon-Amazon Connector for Magento 2
Under “Amazon Magento Connect > Attribute Map” the admin can map the “Amazon Product Attribute” with the “Magento Product Attribute”.

By clicking Attribute Map the following page will be open for attribute mapping.

The admin selects the “Amazon Product Attribute” from the dropdown, then selects its corresponding “Magento Product Attribute.”

Category Map-Amazon Connector for Magento 2
Under “Amazon Magento Connect > Category Map” the admin can map the “Amazon Parent Category” with the “Magento Category”.
By clicking Category Map the following page will be open for category mapping.

Here, by clicking “create mapping” a new page will open. Hence, the admin selects “Amazon Marketplace” from the dropdown, which then displays the respective “Amazon category.”
After that, the admin can select the “Amazon parent category” from the dropdown and then its respective “Magento category”.

After that, click on the save mapping button.

The admin can map the Magento Store Attribute Related To the Amazon Field for the export of products to Magento.

Add Products-Amazon Connector for Magento 2
While adding a new product to the Magento store, the admin will see a new tab “Amazon Product Identifier”.
Here, the admin can select any unique identifier from the drop-down list as per the requirement.
Next, the admin provides a genuine Unique Identification Code to use when exporting Adobe Commerce products to the Amazon shop.
The admin also fills in the relevant values for attributes mapped to Amazon fields.

Check the Status of Listed Products and Feed
Admin can monitor both the feed status and the status of listed products on the Amazon store, as shown below.

That’s all for the Amazon Connector for Magento 2 If you have any queries regarding the plugin, please contact us at Webkul Support System.
You can also check our complete Magento 2 extensions.
Current Product Version - 4.1.3
Supported Framework Version - Magento 2.0.x, 2.1.x, 2.2.x,2.3.x, 2.4.x

Be the first to comment.