Akeneo Queue Manager allows the store owner to manage the entire queue list of import, export, and quick export jobs.
The admin can easily identify job details through – job name, job code, connector name, and status of the job.
The admin can even delete any job if it is not required or if the job is not in a running state. This extension works with multiple connectors.
Clicking the stop button on the job queue will immediately terminate the job without going through the stopping step. The user can stop a running job, but cannot change its status afterward.
Check a brief overview of the module –
Basic Requirement
- Akeneo Queue Manager module works with Akeneo 3.0.x, 3.1.x, 3.2.x, 4.0.x, 5.0.x and 7.0.x.
- This module is compatible with the Akeneo community and Enterprise(Flexibility) edition.
- If you want to use this extension on Akeneo EE Serenity mode, please contact us.
- For the Akeneo installation, your Akeneo server should meet these system requirements.
Features
- Manages the list of export/import jobs.
- Shows the details of a job like a job name, code, connector, and status of the job.
- Works with multiple connectors.
- Provide permission to view the jobs on the grid list.
- Shows the list of jobs that are in pending state or in running state.
- Provide permission to delete jobs on the grid list.
- Show all the user by whom the job has been executed
- Can delete a job if the consumer is not assigned to the job.
- Show all the status types of job execution.
- Support for Akeneo version 3.x 4.x, 5.x and 7.x.
Installation
Two different types of module installation processes are available for the module.
- Composer Installation
- Manual Installation
Installation using Composer Installation
Before beginning the composer installation.
1: Get the ACCESS KEYS [Create a support ticket]
2: In Akeneo composer.json, add our repository as well as the installation script.
For Akeneo 7
{
  "scripts": {
        "post-update-cmd": [
           "vendor/webkul/jobqueuemanagerbundle/src/Webkul/JobQueueManagerBundle/install/config.sh COMPOSER=true NO_DOCKER=true"
        ],
        "post-install-cmd": [
           "vendor/webkul/jobqueuemanagerbundle/src/Webkul/JobQueueManagerBundle/install/config.sh COMPOSER=true NO_DOCKER=true"
        ],
        "post-create-project-cmd": [
          "vendor/webkul/jobqueuemanagerbundle/src/Webkul/JobQueueManagerBundle/install/config.sh COMPOSER=true NO_DOCKER=true"
       ]
   },
  "repositories": [{
    "type": "composer",
    "url": "https://akeneorepo.webkul.com/"
  }]
}
3: Use composer to install the extension.
composer require webkul/JobQueueManagerBundle
4: Complete the authentication form.
5: Send a Message of Success
6: Delete your browser’s cache.
Manual Installation for Version 7.x
- After unzipping the appropriate extension zip, merge the “src” folder into the akeneo project.
- From the PIM directory, run the following command over the NO-DOCKER Instance.
./src/Webkul/JobQueueManagerBundle/install/config.sh COMPOSER=false NO_DOCKER=true
- After that, run the command below over the PIM directory’s DOCKER instance.
./src/Webkul/JobQueueManagerBundle/install/config.sh COMPOSER=false NO_DOCKER=false
Manual Installation for Version 4.0.x to 5.0.x:
Please follow these steps for installing Akeneo Queue Manager module in your Akeneo PIM platform.
1 – Unzip the respective extension zip then merge the “src” folder into akeneo project root directory.

2 – Goto config/Bundles.php then add line:

Webkul\JobQueueManagerBundle\JobQueueManagerBundle::class => ['all' => true],
in return array.
3 – Copy the “config” folder into akeneo project root directory for routing.

4 – Run this command after ssh to your akeneo server by the terminal.
php bin/console ca:cl --env=prod && php bin/console queue-manager:setup:install
5– If you are using php-fpm. Then you need to restart the php-fpm services and apache web server.
For Akeneo 5
sudo service php-fpm7.4 restart
For Akeneo 4
sudo service php-fpm7.3 restart
Docker Installation Command :
For Akeneo 5
alias docker_php='docker-compose run -u www-data --rm php php';
alias docker_yarn='docker-compose run -u node --rm node yarn';
docker_php bin/console cache:clear --env=prod;
docker_php bin/console pim:installer:assets --symlink --clean --env=prod;
docker_php bin/console d:s:u --force;
docker_yarn run webpack;
docker_yarn run update-extensions;
docker_yarn run less;
For Akeneo 4
alias docker_php='docker-compose run -u www-data --rm php php';
alias docker_yarn='docker-compose run -u node --rm node yarn';
docker_php bin/console cache:clear --env=prod;
docker_php bin/console pim:installer:assets --symlink --clean --env=prod;
docker_php bin/console d:s:u --force;
docker_yarn run webpack;
docker_yarn run less;
Manual Installation for Version 3.x
Please follow these steps for installing Akeneo Queue Manager module in your Akeneo PIM platform.
1 – Unzip the respective extension zip then merge the “src” folder into akeneo project root directory.

2 – Goto app/AppKernel.php then add line.

new Webkul\JobQueueManagerBundle\JobQueueManagerBundle(),
3 – Goto app/config/routing.yml then add these lines at top of file Syndication: resource:

wk_queue_route:
  resource: "@JobQueueManagerBundle/Resources/config/routing.yml"
  prefix: /
4 – Run this command after ssh to your akeneo server by the terminal.
php bin/console ca:cl --env=prod && php bin/console queue-manager:setup:install
5 – If you are using php-fpm. Then you need to restart the php-fpm services and apache web server.
sudo service php-fpm7.2 restart
Common Issues After Installation
It might happen that even after proper installation, upon opening your Akeneo admin dashboard, you see a loading screen. In that case, do check for the following solution:
- Webpack Installation: If you get the below error

Uninstallation for version 7
- From the PIM directory, run the command below over the NO-DOCKER Instance.
./src/Webkul/JobQueueManagerBundle/uninstall/uninstall.sh COMPOSER=false NO_DOCKER=true
- Run the command below over the PIM directory’s DOCKER instance.
./src/Webkul/JobQueueManagerBundle/uninstall/uninstall.sh COMPOSER=false NO_DOCKER=false
Akeneo Queue Manager – Workflow
After installing the module in Akeneo on the left side of the dashboard there will be an icon Webkul job queue manager.

Create Product In Akeneo
To create a product in Akeneo, go to navigate to Products then click the Create button. Now, you need to choose the product type – as Product or Product Model.
Product – Select this type for creating simple and virtual products.
Product Model – Select this type for creating a configurable product with variations.

Now enter the required SKU, choose a family, then click the Save button.
Product Family – A family is a set of attributes that will be the same for all products belonging to a family. The product family represents products type, imposes product information structure and defines the list of attributes for a product that it belongs.

Product List
After creating the product in Akeneo you can check the product list. You will found all the product list created by you or exported from any channel.
Create Jobs
After that to export the products, first of all, you need to create the Export Profile. Therefore, navigate to Exports -> Create Export Profile as per the below image.
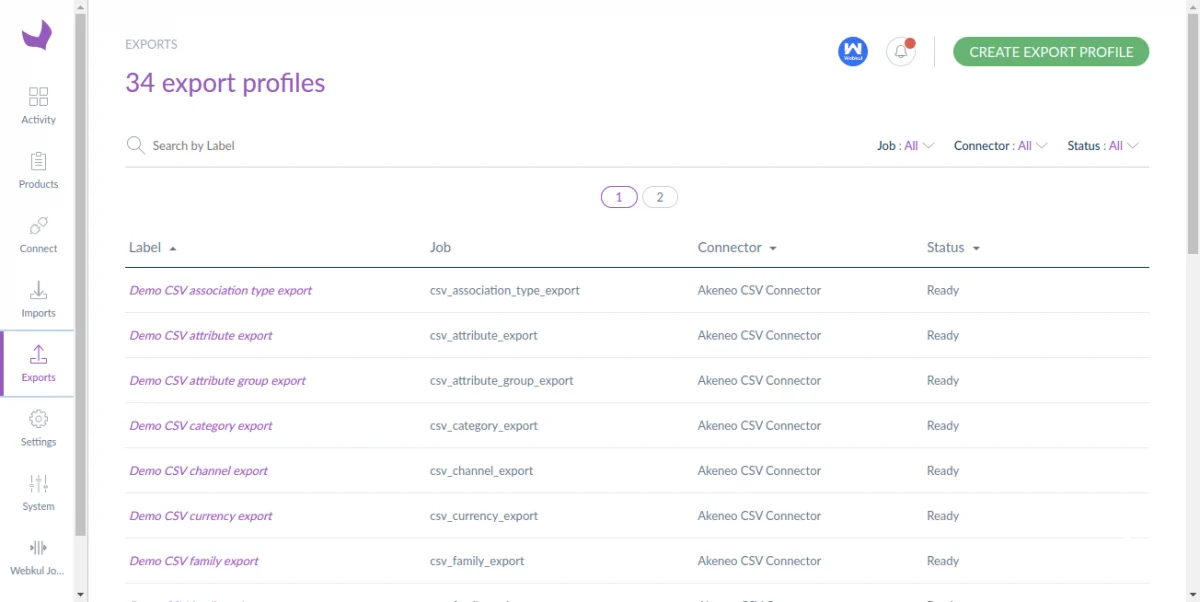
This will redirect you to the Export Profile page. Therefore, you will enter a unique code, label, then select a job profile.

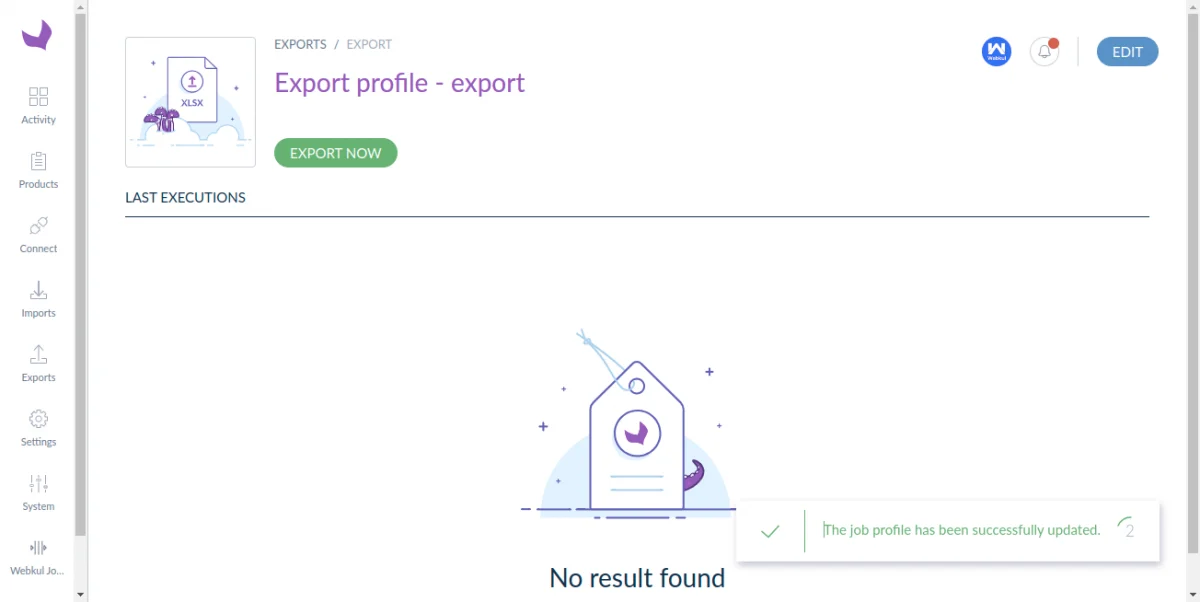
Export Now
After creating the export profile, click on the Export button as per the below image.
Queue Manager
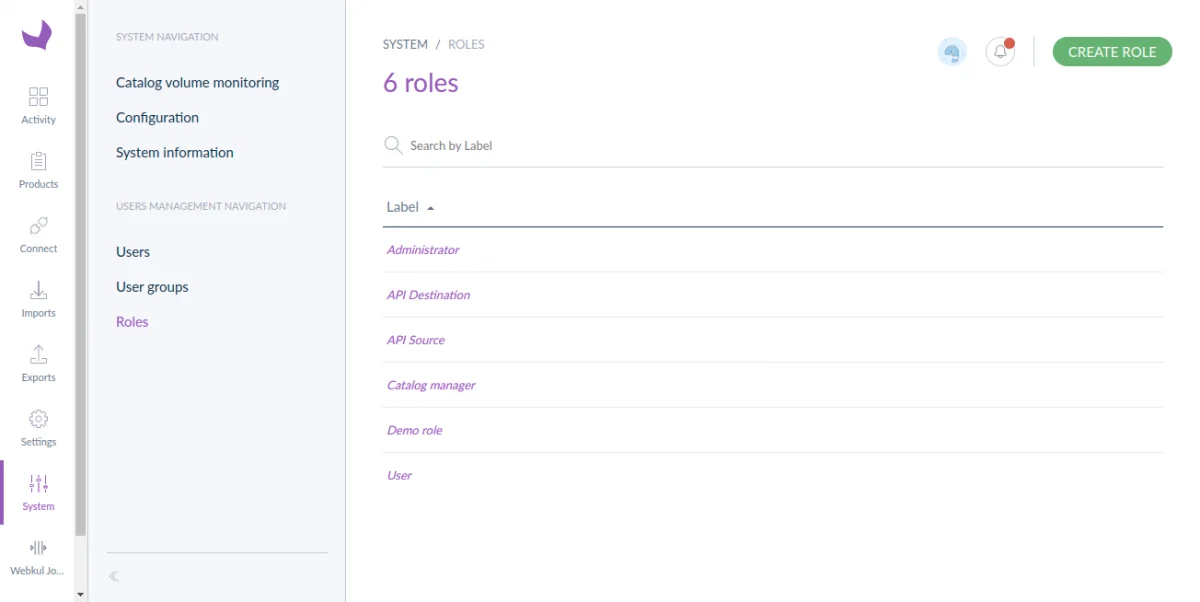
To provide the permission to view and delete the jobs on the grid list. You need to give permission to the users.
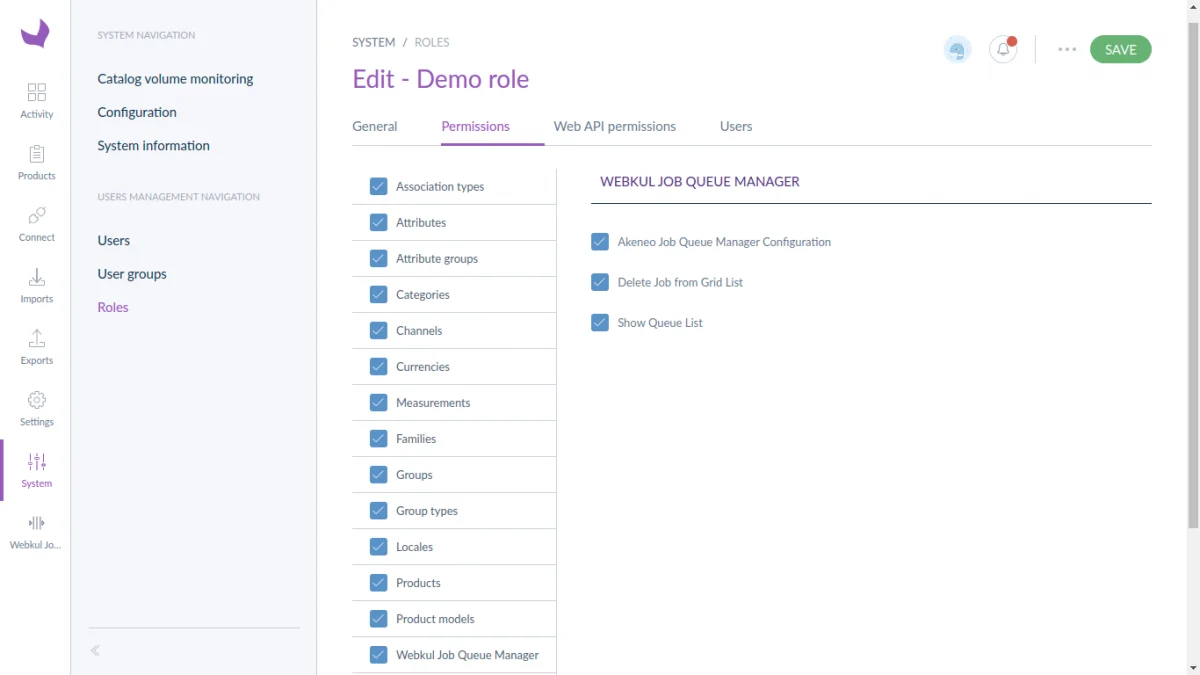
For that you need to navigate to System>>Roles. Then create new role and the allow the permission.
- Delete Job from Grid List – Click on the check box to delete jobs on the grid list.
- Show Queue List – Click on the check box to view the queue job list on the grid list.
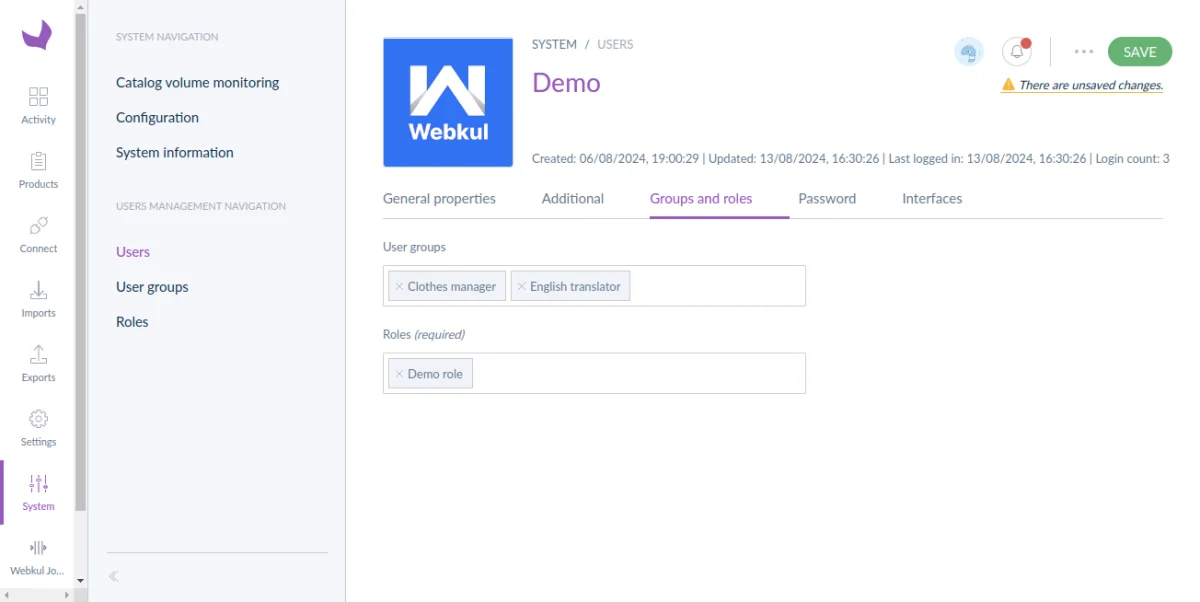
After that navigate to System>>Users then select the user to allow the permission.
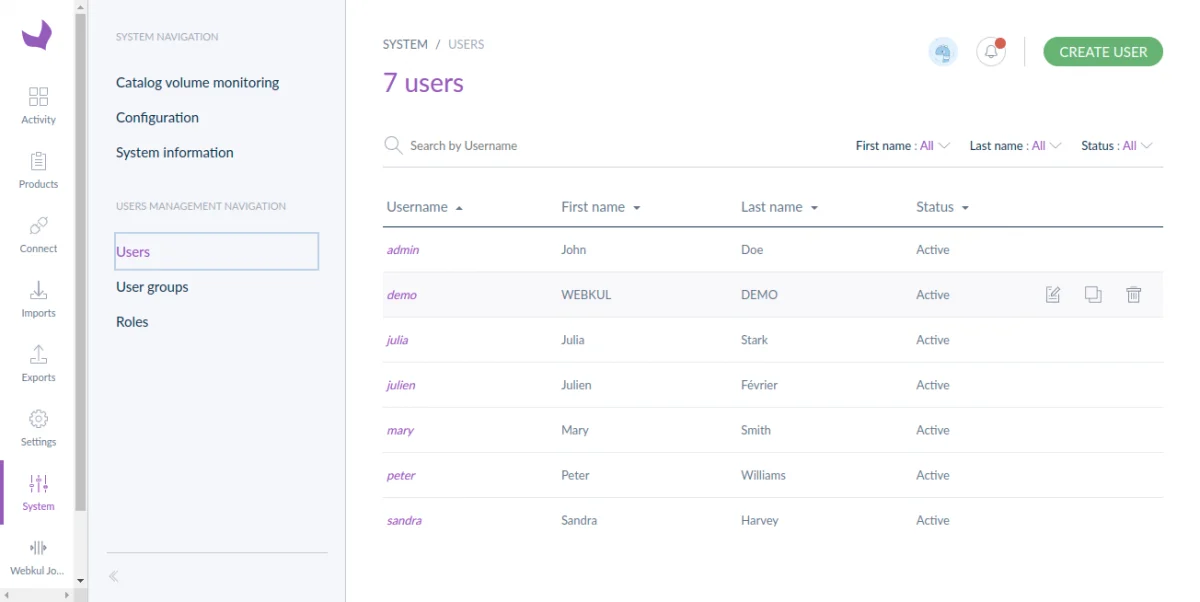
Then click on the tab Group and roles select the role to allow the user for the permission.
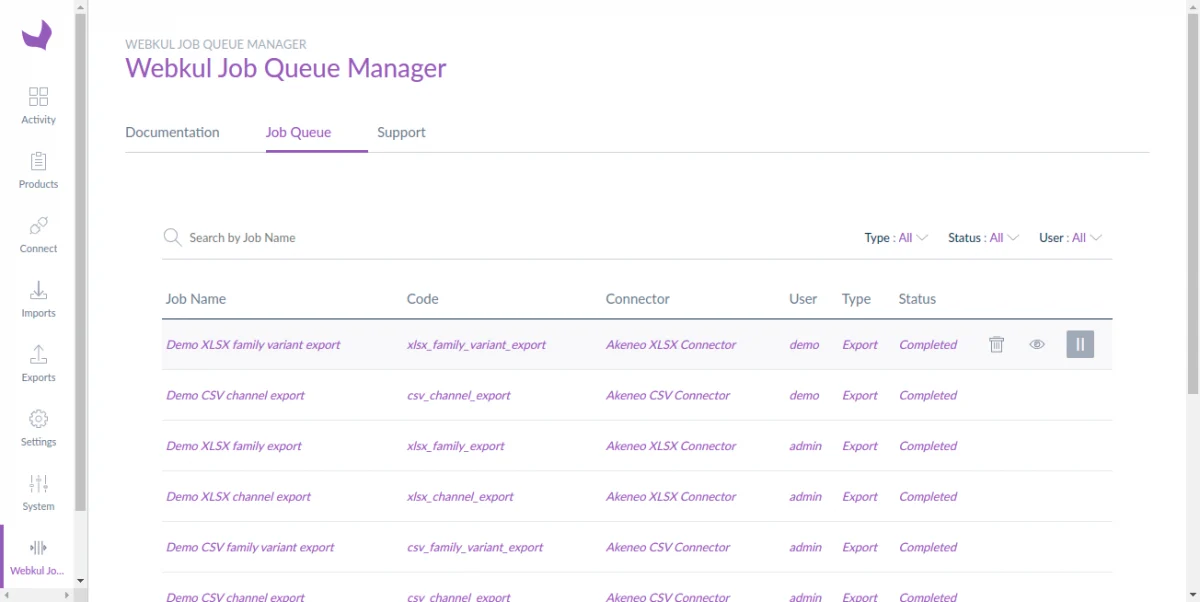
After that to check the execution of the export process in the Akeneo Queue Manager into Akeneo then navigate to Webkul job queue manager>Job Queue.

Then you can delete any completed job if it is not required or if the job is not in running state by the delete button.
So, that was much about the User Guide of Akeneo Queue Manager for any queries or doubts reach out to us at [email protected]. You can also raise a ticket at our HelpDesk System.
Please explore our Akeneo Development Services and Quality Akeneo Extensions.
Current Product Version - 3 to 5 || 2.0.0 and Akeneo 7 || 3.0.0
Supported Framework Version - 3.0.x, 3.1.x, 3.2.x, 4.0.x,5.0.x & 7.0.x

Be the first to comment.