Advanced Layered Navigation For Magento 2(Adobe Commerce) helps to easily search/filter the required products using the product attributes thereby optimizing the filtering of the products within the store.
The Magento 2 Layered Navigation allows the users to add multiple attributes at a time and their values as required. The users can also make use of the price bar to filter the products based on the selected price range.
Also, Magento 2 Layered Navigation extension is Ajax-based so the users need not wait for the page to reload.
Watch the below video tutorial to understand the Magento 2 layered navigation extension workflow:
Features
- Ajax-based filter helps the customers to view the results without page reload.
- The plugin works for the category and search pages.
- Attribute display can be either set as a vertical or horizontal view by the admin.
- Users can choose multiple attributes and attribute values at a time for filtration.
- In order to filter the desired product, choose multiple Attribute Options, and Attribute Types (Drop-down, Multiple select, Swatch & Price) as required.
- The current selection is displayed directly in the search box.
- For filtration, product ratings can be used.
- The customer can choose the Magento 2 layered navigation multiple select checkbox options at a time to filter the products.
- In the available carousel filter by any attribute (Like brands).
- Make attributes available for layered navigation directly from the grid.
- Add a carousel filter base of category for layered navigation.
- The customer can apply the Magento 2 Layered Navigation category filter for the child category.
- Make use of the price bar for a user-defined range search.
- Magento 2 Layered Navigation extension helps in keeping the previous state of the browser.
Installation
- You will get a zip folder.
- Extract the contents of this zip folder locally.
- Navigate within the src folder to find the app folder.
- Now transfer this app folder into the Magento 2 root directory on the server.

Now, you have to run these commands within the Magento 2 (Adobe Commerce Cloud)root directory.
First command – php bin/magento setup:upgrade
Second Command – php bin/magento setup:di:compile

Third Command – php bin/magento setup:static-content:deploy

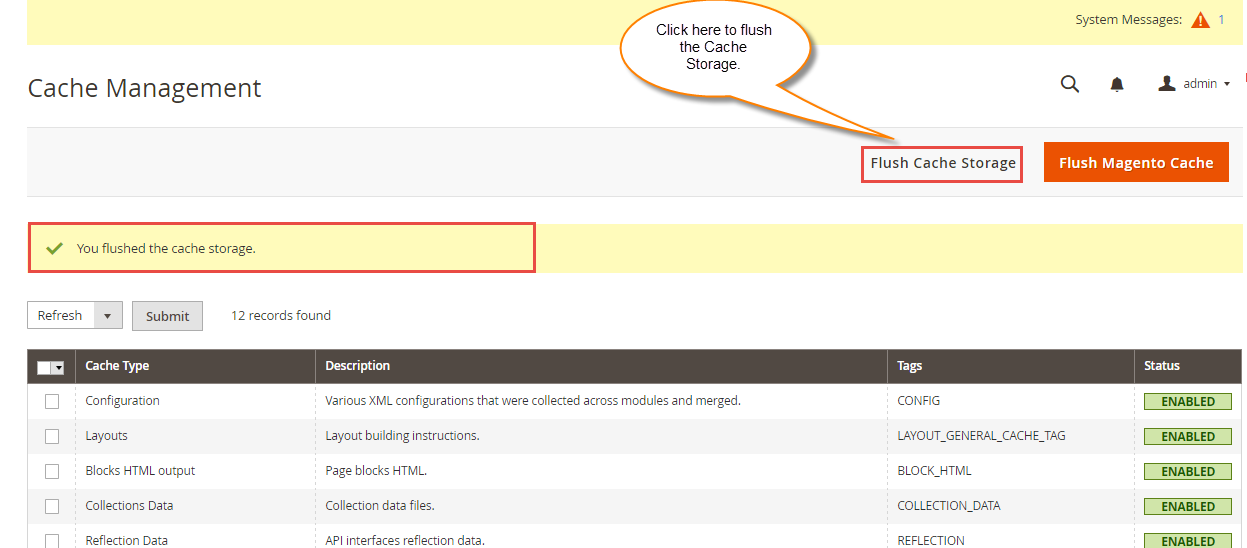
Hereafter, flush the cache from the Magento admin panel. To do so, navigate through ->System->Cache management.
Multi-Lingual Configuration
Language Translation
For the module translation, in your system navigate via app/code/Webkul/AdvancedLayeredNavigation/i18n. Here, open the file named en_US.CSV to edit.

After opening the file, replace the words after the comma(,) on the right with your translated words.

After the above step, now save the csv file and then upload it to the same folder and the translation is done.

Module Configuration Settings
To configure the module settings, navigate through Stores->Configuration->Webkul->Advanced layer Navigation.

Here the admin will configure the settings –
- Filter by Ratings:
Choose this option as Yes to allow the customers to filter the products according to ratings(customer) else select No. - Carousel Filter:
Set this option as Yes to filter by attributes of your choice else select No. - Background color:
Set the color for the carousel background. - Border Color:
Set the color for the carousel border. - Image Width:
Within the carousel, set the image’s width.
Admin Management
Create Attribute –
For adding the product attributes, the admin will navigate to Stores > Attributes > Product.
After clicking on the “Product” sub-menu option, it redirects the admin to the Product Attributes page as shown in the image below.
The admin will the attribute listing on the Product Attributes page.
Also, the admin can add a new product by simply clicking on the “Add New Attribute” button as shown below.
On clicking the “Add New Attribute,” will redirect the admin to the New Product Attribute page.
The admin will have to configure the settings under the following tabs-
- Fill in the details for the attribute Properties,
- Then set the Labels under Manage Labels for the attribute, and
- Lastly, set the Storefront Properties for this attribute.
Properties tab
The admin can click on Properties, that opens up the Attribute Properties section.
The admin can fill in the basic settings such as Default Label, Catalog Input, Manage Options details, Advanced Attribute Properties, etc. as shown in the image below.


The next tab is Manage Labels, under which the admin can manage the titles of the attributes, for Default Store View and Test Store View.
The last configuration tab is the Storefront Properties.
The admin can configure the settings such as Use in Search, Visible in Advanced Search, Comparable on Storefront, Use in Layered Navigation, etc. 
Another section of the Storefront Properties tab includes details such as Use of Promo Rule Conditions, Visible on Catalog Pages on Storefront, Used in Product Listing, Display Type.
Under Display Type, the admin can either choose Vertical View or Horizontal View.
Under storefront properties set “Yes” for the “Use in Search“, “Use In layered Navigation” options, and then click the save button to save the configuration.
After saving the attribute, you can search the attribute to check if it’s saved or not.
Now, to add this created attribute into an attribute set, navigate to Stores->Attributes->Attribute Set.
Here, select the attribute set(we have selected the default) in which you want to put this newly created attribute. After this, just drag and drop this attribute under the product settings as shown below in the snapshot.
Assign Attribute to Product –
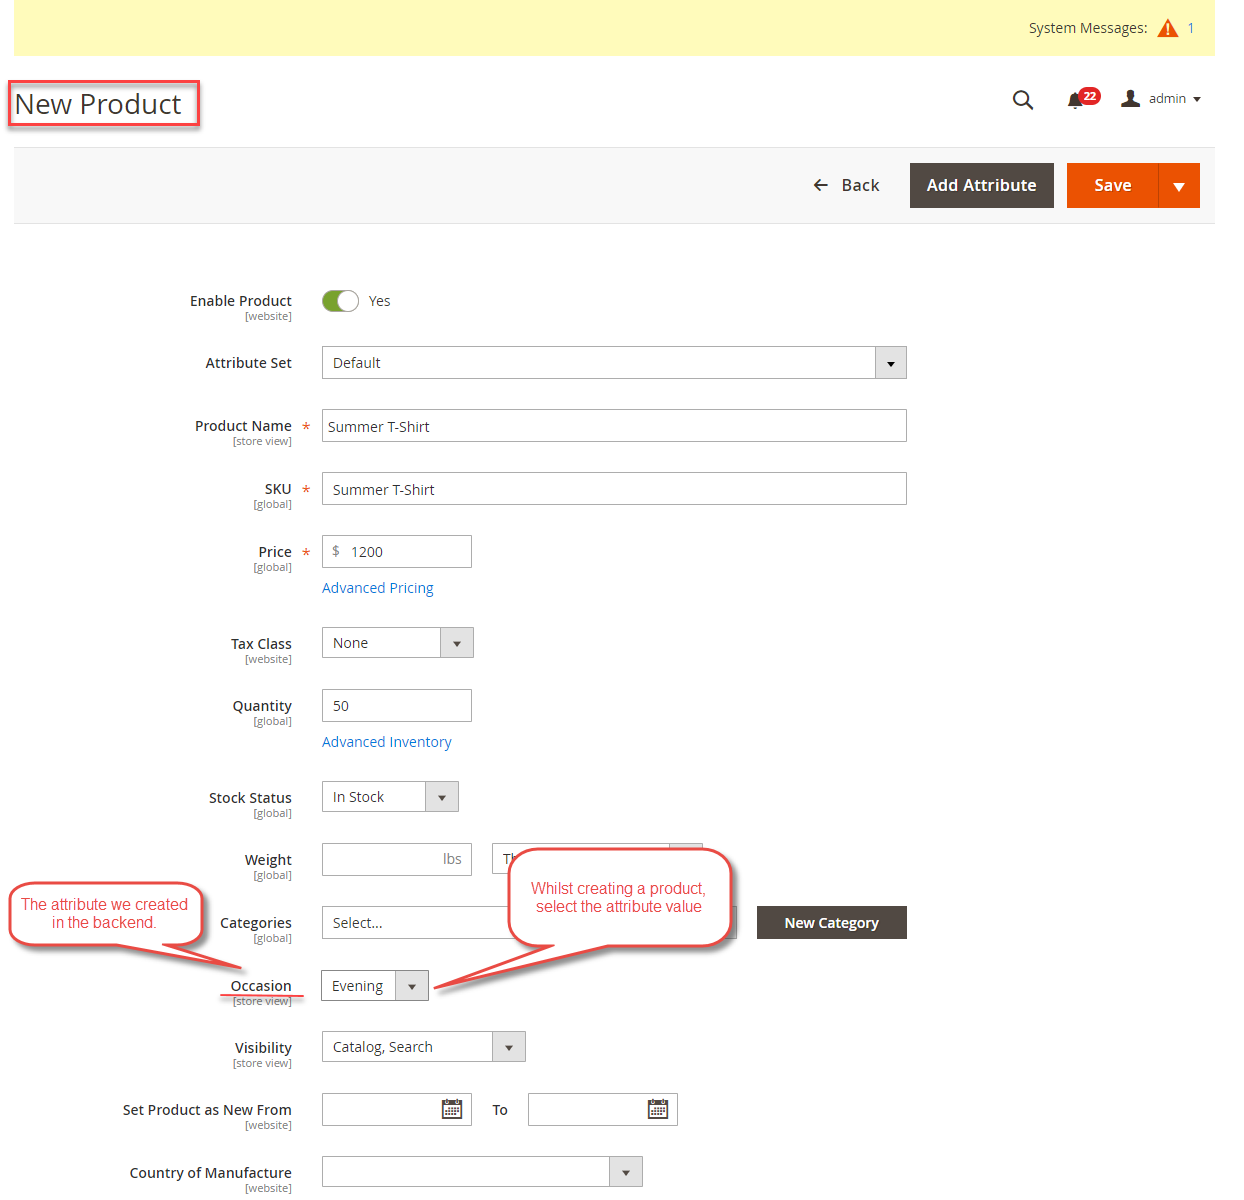
Here, you can assign the created attribute to the products. To add this attribute to a product, go to the add new product page, and then for the created attribute select the attribute value then save the product after that.
This attribute will be visible on the advanced layered navigation at the front end and you can filter it.
Make Attribute Available for layered Navigation:
The admin can easily provide the customers with the product attributes which can be used for layered navigation.
To do so the admin needs to navigate through Stores->Attribute->Product.
Here, whichever attribute you want to make available for the layered navigation just check that and from the Actions drop-down select Use in Layered Navigation and then select Filterable(with results) and hit the Submit button after that.

At the store frontend, the customers will find the assigned attributes for use in the layered navigation for filtering the products.

Enable Filter by any attribute (Like brands) in the carousel :
To enable this option admin needs to navigate through Advanced Layered Navigation-> Carousel Filter
Note:- Admin can choose only the “Dropdown” type attribute for the carousel filter.

Now, the admin can set the Title, Attribute, Category & Enable the module accordingly from the General tab.
From the Options tab, the admin can set the images for the “values of the attribute” for the carousel as shown in the image and then click on the Save button.

Admin can add the products to the desired category with the appropriate attribute option according to the product.
Now, the customer can see the carousel images to filter the result on the category page.

By selecting the desired attribute (color) from the carousel customer will get the filtered result mapping with the selected attribute.
Workflow Frontend
By Magento 2 layered navigation, customers can now search the product with a user-defined price range filter that is based on Ajax so you don’t need to wait for the page reload.
The buyers can filter multiple attributes at a time without removing previous ones.

Filter by Ratings:
If this option is enabled by the admin, then the customers will be able to filter the products by customer ratings.

Also the Magento 2 Layered Navigation extension has different filter collection Types like – Multiple select, Drop-down, Swatch & Price .

Magento 2 layered navigation extension also supports Attribute Options i.e you can see & select from multiple select checkbox options that is been created for the specific attribute on the catalog storefront page to search for your specific product.

Here you can select Magento 2 layered navigation multiple select checkbox options of specific attributes and can see current selection directly in the below screenshot.
Filter by Category –
The customer can apply the Magento 2 Layered Navigation category filter for the child category also.
Also, the customer can now select the multiple sub-categories of a child category to filter the products according to the selected sub-category.
The customer can select multiple sub-categories by clicking on the check button and filter the products accordingly.

Advanced Layered Navigation on Search Page
The customers can use the ajax based filters on the search page as well.
Advanced layered navigation is available everywhere in the store.
The customers can type a word in the search box and filter the results according to their preferences such as size, color, category.
Advanced Layered Navigation: Horizontal View and its Backend Settings
In addition to this, Magento 2 layered navigation allows a Horizontal View of the Layered Navigation.
The admin will have to set a few configurations in the backend first for displaying the attributes as a horizontal view.
For that, the admin needs to navigate to Stores > Attributes > Product. This redirects the admin to the Product attribute page as shown below.
Further, the attributes, that the admin wishes to display as the horizontal view, from the given list must be chosen.
For that, the admin will have to select the attributes, navigate to Actions, and choose Display Type as shown in the image below.
In doing so, another textbox appears, where the admin needs to select the View Horizontal option and click on submit.
Likewise, the attributes will display as Horizontal View (such as Size, Color, Material, New) on the category pages in the frontend for the customers.
Please Note:
- The Price attribute will always display as Vertical View.
That’s all for the Magento2 Advanced Layered Navigation Extension. Still have any queries then create a ticket at our helpdesk system webkul.uvdesk.com
Current Product Version - 4.0.1
Supported Framework Version - Magento 2.0.x, 2.1.x, 2.2.x,2.3.x, 2.4.x


2 comments