Prestashop Google Tag Manager: Tags are snippets of code that are added to a site and used to gather unique information about visitors and their on-site behaviours.
Manually assigning the tags to web pages and managing them can be a tedious and time-consuming process.
Integrate Google Tag Manager with your Prestashop store to easily manage and deploy the marketing tags without the need to change the code.
Google Tag Manager is a code management system that allows you to add, update, and manage tags easily and quickly.
Simply place a small snippet of code in your Prestashop store to connect it to the Tag Manager Servers.
Whenever an event like product view, customer sign-in, category page load, etc occurs on your store, the triggers are evaluated based on the events and the tags will fire accordingly.
Multiple other events can also be configured as explained further in this user guide.
Note
- Prestashop Google Tag Manager module is compatible with PrestaShop multi-store feature.
- The module is compatible with the standard classic PrestaShop theme. All the events are compatible with the classic PrestaShop theme. For purchase events, we use the default confirmation page.
- Starting on July 1, 2023, standard Universal Analytics properties will stop processing new data. To maintain your website measurement, you’ll need a Google Analytics 4 property.
- Google Universal Analytics (GUA) has been deprecated. So, the module does not support this feature now.
Features of Prestashop Google Tag Manager
- Easily Configure the Google Tag Manager within your Prestashop store.
- The Module works for all the products on various store pages – Product page, Category page, Cart page, Order page and other product listing pages also.
- Track standard events like Product View, Category View, Add to Cart, Customer Sign in, customer profile update, contact form submission, and orders placed.
- Track multiple other events such as view product listing, product sharing, adding product to wishlist, select product, view cart, remove from cart, begin checkout, etc
- Implement Facebook Meta Pixel using Google Tag Manager to measure and optimise the results of your Facebook advertising.
- Implement Microsoft Universal Events Tracking Tag to track Microsoft advertising.
- Include tax, shipping, and discount deductions to the order total while sending to Google Tag Manager.
- Check and download Google Tag Manager (tags and triggers) sample container files.
- Import tags in bulk using sample container files.
- Add code snippets of Google Tag Manager in your Prestashop store.
- Enable or disable sending of data on Google Tag Manager.
- Track and check analytics of your Prestashop store on Google.
- Also, measure your eCommerce conversion rate with customer shopping and checkout behavior from the Google Analytics dashboard.
- Prestashop Google Tag Manager module supports Google Analytics 4 (GA4).
How to Install Prestashop Google Tag Manager
- Firstly, go to the module manager in the back office and click on ‘upload a module’.
- After that, drag and drop the module file or select the file from the system.
- In this way, the module installation will be successful.


Prestashop Google Tag Manager Configuration
After the installation of the module, you need to configure it.
Configuration Settings
Under the configuration settings, the admin:
- Has to specify the Tag ID that he obtained after creating a container in Google Tag Manager account.
- Needs to enter the Tracking ID (Measurement ID) they got from Google Analytics account.
- Can choose to show consent banner on the front end.

Consent banner
If enabled, then a banner will display on the front end asking for customer’s consent for tracking their data.

After saving the configuration settings, the admin can configure the events they want to track.
Events Settings
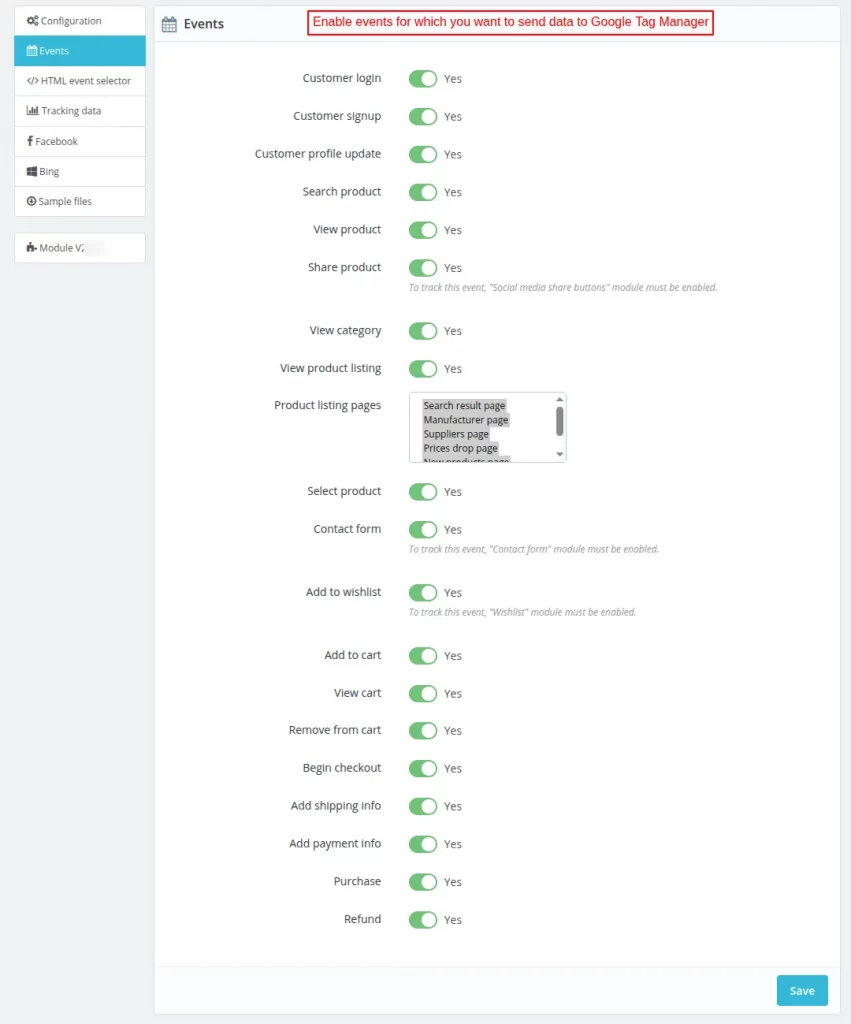
Under Events tab, the admin can decide which data they want to send to Google Tag Manager.
- Customer Data – Tracks the event when a customer login creates an account on the store, or update profile. The admin can view customer’s ID, name, and email ID when he sign in on the store.
- Cart Data – Tracks the event when a customer adds a product to the cart, removes a product from cart or proceeds to checkout. View details of the product added to cart and cart details such as cart ID and cart price on Google Tag Manager.
- Order Data – Track the event when someone orders a product on the store. View details of products purchased and details such as payment and shipping method used for placing order.
- Product Data – Track the event when someone visits the product page, search a product, share product via social platforms, view product listing or selects a product. View details such as product ID, name, price, and category on Google Tag Manager.
- Category Data – Track the event when someone visits the category page. View category ID, category name, and the parent category on Google Tag Manager.
- Purchase Data – Track the events when someone purchases a product, adds shipping or payment. Also track event for refund.
- Add to wishlist – Track the event when a customer adds product to the wishlist. Please note that in order to track this event, PrestaShop Wishlist module needs to be enabled.
- Contact form – Tracks the event when someone submits the contact form.
HTML event selector Settings
The module uses the predefined classic theme’s html element selectors to trigger the events.
If you are using any custom theme which has different elements instead of default selectors then you need to define the replacement of element selectors shown in the below screenshot.

Tracking data
By default, the module sends product price without including tax and shipping amount to Google Tag Manager.
If you want to include tax, shipping, and discount deductions to the order total and send to Google Tag Manager, you can configure under the tracking data tab.
The admin can choose to implement Facebook Meta Pixels tags using Google Tag Manager.
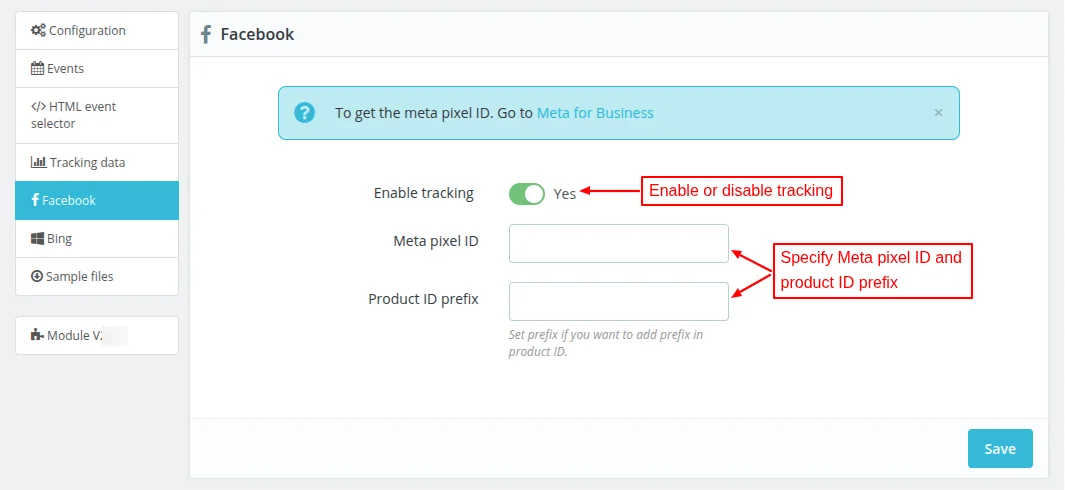
Add Meta pixel to Google Tag Manager account to measure and optimize the results of your Facebook advertising.
Bing
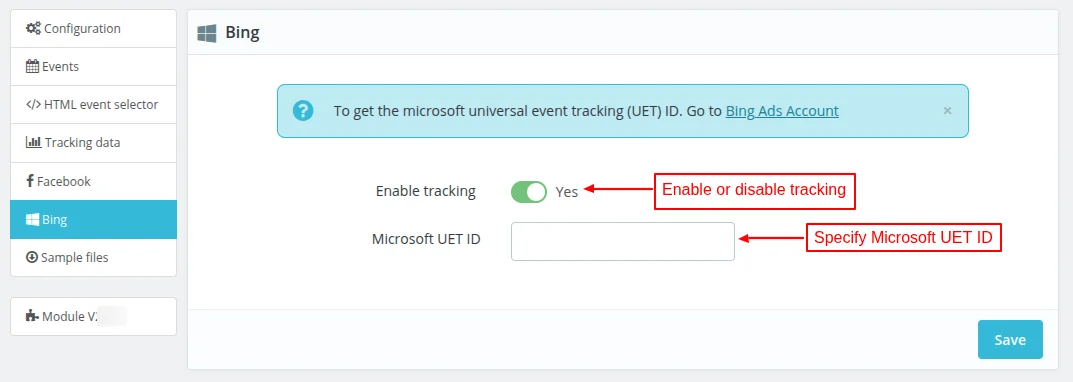
The admin can track advertisements on Microsoft using Google Tag Manager.
Sample Files
Admin can check sample container files of the google tag manager (tags and triggers) and download it.

Admin can use the sample container files to import tags in bulk instead of creating them one by one.
To import tags go to Tag Manager > Admin > Import Container :


How to get the Tag ID?
To obtain the tag Id you must first create an account (Signup is free) at Google Tag Manager.
Now, after going to this link follow the below steps:
- Click on “Create Account” button.

2. Enter the account name as per your requirement.

3. Now specify the container name, select where to use the container and then click on Create button.

4. On clicking the create button, a popup appears on the screen where you have to click on the Yes button to confirm Google Tag Manager Terms of Service.

5. Now the screen that appears, here you will see the tag Id on the top menu bar. You need to put this tag ID in the back office configuration to connect your website to tag manager servers.

Also, you can view the tag ID under Accounts.

Deploy Google Analytics And Other 3rd Party Tag With Google Tag Manager
Using Prestashop Google Tag Manager, you can deploy Google Analytics and other 3rd party tags with Google Tag Manager.
To configure and deploy Google Analytics with Google Tag Manager, you need a Google Analytics tracking ID.
For example, we are using the Google Analytics tag to configure it with Google Tag Manager.
Note: To configure other 3rd party tags, there must be a tag Id.
Here we used the Google Analytics measurement id to configure the Google Analytics with Google Tag Manager.
How to get the Tracking ID or Measurement ID?
In order to get the tracking ID, you need to sign in to your Analytics account.

Under Account creation, enter account name and click on next button.

Now, under Property creation, specify the property name, select time zone, currency, and click on next.

Now, under Business details, select industry category, business size, and click on next.

After selecting the business details, you need to select relevant topics under Business objectives and click on next.

Now accept Google Analytics Terms of Service to proceed.

Now, choose a platform from where you want to collect data.

Go to Admin > Data Streams and click on ‘Create stream’ button.

Under Web stream details, you can view measurement id.

After successfully creating an account, it may take some time before property starts collecting data.

How to add a new tag?
From Google Tag Manager, click on the “Add a new tag” button as shown in the below image-

Now enter the name of the tag and click on “Tag Configuration” to configure the tag as shown in the above image-

On clicking the “Tag Configuration” button, a new slide will open from where you can select the tag type.

Now, you can configure the tag and choose the “Track Type” accordingly from the different tracking type – Page View, Event, Transaction, Social, Timing, Decorate Link and Decorate Form.
Also, admin can configure the Google Analytics Setting.
Now, by clicking on “Enable overriding settings in this tab” enter the Google Analytics “Tracking ID” here.

Also, you can choose a trigger to make the tag fire or can also add a new trigger by clicking Add a new tag>triggering.
Note: You can configure fields to set in the GA4 Configuration tag to set parameters (e.g., measurement ID) that need to remain consistent across all events on a page.
GA4 Event tags inherit the parameters of the GA4 Configuration tag.
Events View – Google Tag Manager
Easily add code snippets of Google Tag Manager to the Prestashop store and track, check the Analytics for the store.
Various events displayed on Tag Manager
Product Data
When a user visits the product page, it is visible under Data Layer in the Tag Manager.

Order Data
Whenever a customer orders a product from your store, the data layer shows the details of the product ordered as well as shipping and payment method.

Cart Data
When a customer add multiple products to the cart and then go to the View Cart section, the data layer displays the details of the products within the shopping cart.

Customer Data
Whenever the customer login to the store it is visible in the tag manager. The customer personal details such as name and email id are displayed in the data layer.

Category Data
Whenever a category page is loaded, the category details such as category ID, category name, and parent category are displayed in the data layer of Google Tag Manager.

Similarly, admin can view the data for all the events enabled in the module configuration including
- View product listing
- Select product
- View cart
- Remove from cart
- Begin checkout
- Add shipping info
- Add payment info
- Full or partial refund events
Cart Data: Add to cart

Ecommerce Conversion Rate
Now, on the analytics dashboard, you can also view the shopping behaviour & the checkout behaviour of your customers.
Data display format on Google Analytics 4

This was all about Prestashop Google Tag Manager Module. I hope this document will help you in checking the functionality of the module in a better way.
Also, do let us know about your views in the comments.
Support
“For any kind of technical assistance or query, please raise a ticket at http://webkul.uvdesk.com or send us a mail at [email protected]“
Also, please explore our Prestashop development services and vast range of quality Prestashop addons.
Current Product Version - 2.0.1
Supported Framework Version - 9.x.x, 8.x.x, 1.7.x.x

Be the first to comment.