PrestaShop PayTabs Payment Gateway integrates the PayTabs payment solution into your PrestaShop store, enabling merchants to accept secure online payments.
The module includes a comprehensive subscription management system that allows admins to create and manage subscription plans, automate subscription renewals, and save customer payment cards.
Easily process refunds for the orders placed via PayTabs payment gateway right from the back office.
Customers can view, pause, resume, or cancel their subscriptions from their account dashboard.
NOTE: PrestaShop PayTabs Payment Gateway is compatible with the PrestaShop Multi-store feature.
Features of PrestaShop PayTabs Payment Gateway
Payment Gateway Features
- Adds PayTabs payment gateway to the PrestaShop store.
- Supports Sandbox (Test) and Production (Live) modes.
- Supports multiple payment form types: Redirect to PayTabs hosted payment page, Embedded iFrame checkout, Pay by Link.
- Option to save customers’ card details for future payments.
- PayTabs payment method is available for both subscription products and normal product purchases.
Subscription Management Features
- Create and manage subscription plans from the back office.
- Create subscription plans by setting plan name, description, amount, and selecting currency.
- Flexible billing configuration: Repeat terms (billing cycles), Repeat period (daily, weekly, monthly, etc.), Repeat interval (“Repeat Every”)
- Configure automatic subscription renewals using a Cron URL.
- Create orders automatically in the back office when subscriptions renew.
- Option to include product price + subscription plan price during checkout.
- Send automatic subscription renewal emails to customers.
- Ability to hide subscription plan information on product pages.
- Enable, disable, edit, and delete subscription plans.
Product Subscription Features
- Assign subscription plans to products.
- Assign plans to specific product combinations.
- Option to disable one-time purchase and sell products as subscription-only products.
- Customers can remove subscriptions directly from the cart.
Customer Features
- Dedicated My Subscription section in customer accounts.
- Customers can view subscribed products, subscription frequency, subscription period, and subscription status.
- Customers can pause, resume, or cancel subscriptions.
- Dedicated PayTabs Cards section to view saved payment cards.
- Customers can view and delete saved card details.
Admin Features
- View all subscribed customers from the back office.
- Monitor subscription details including subscription plan, product, quantity, next renewal date, and last renewal date.
- Admin can pause, resume, or cancel subscriptions.
- View a list of transaction done via PayTabs.
Refund Features
- Process refunds directly from the PrestaShop back office.
- Supports full refunds.
- Supports partial refunds.
How to Install PrestaShop Tap Payment Gateway
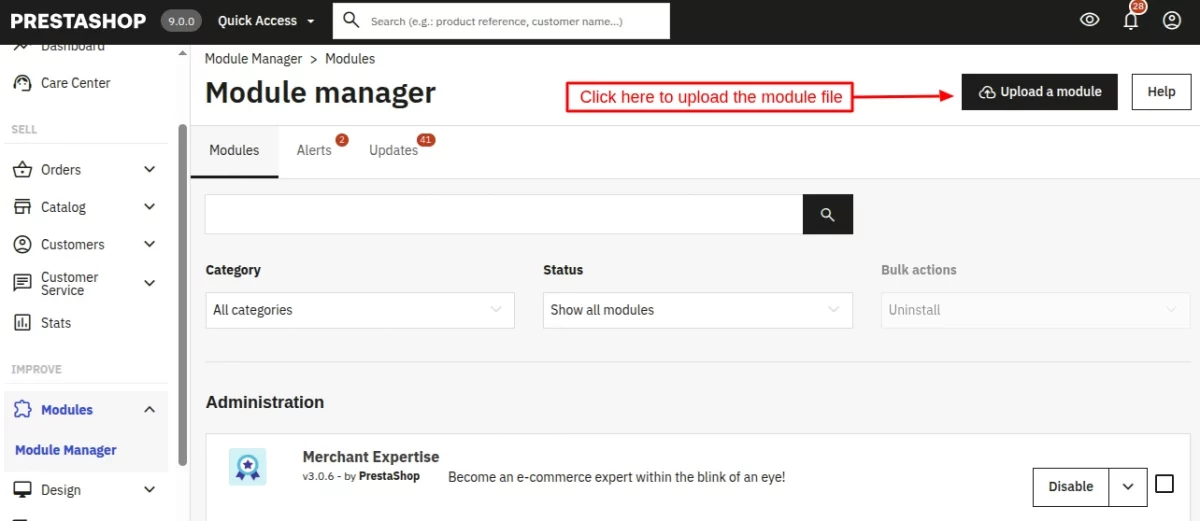
- Firstly, go to the module manager in the back office and click on ‘upload a module’.
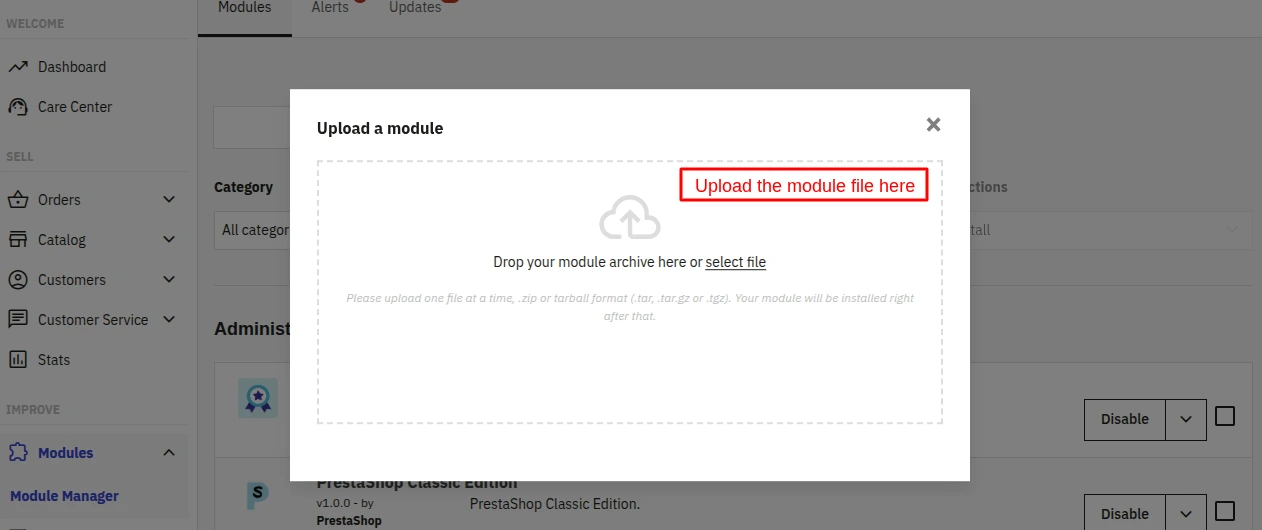
- After that, drag and drop the module file or select the file from the system.
- In this way, the module installation will be successful.
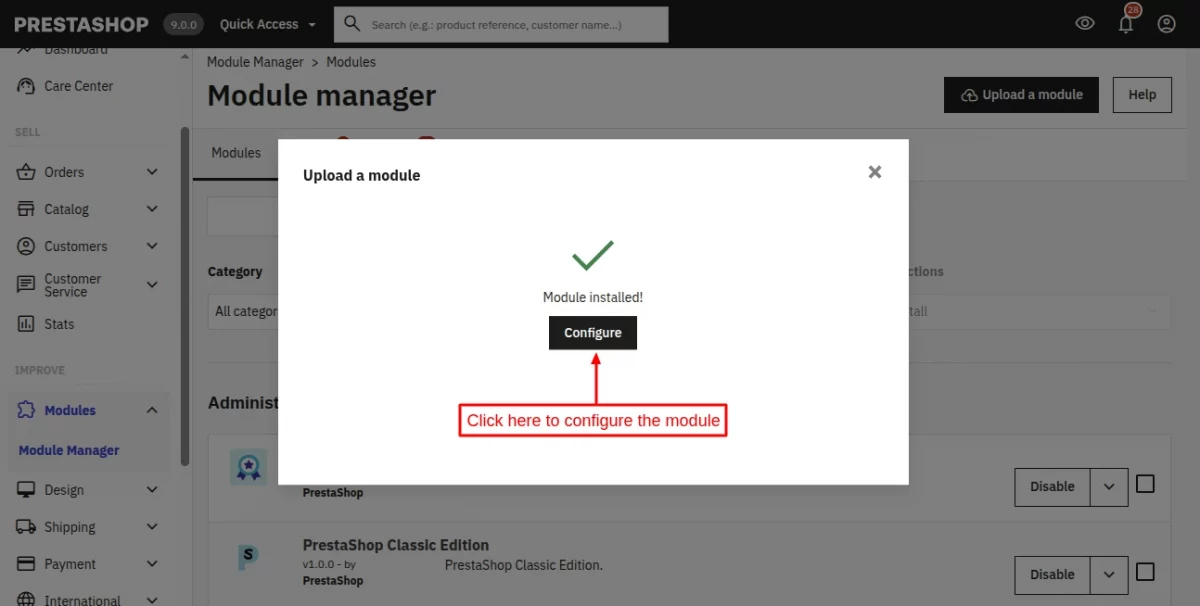
After the successful installation of the module, a few new tabs get available in the PrestaShop back office.
From these tabs, the admin can configure module settings, create & manage PayTabs subscription plans, view transactions done via PayTabs, and more.

PayTabs Payment Gateway Configuration
The module configuration is divided into two sections:
- General Settings
- Subscription Settings
Let’s discuss them one by one.
General Settings
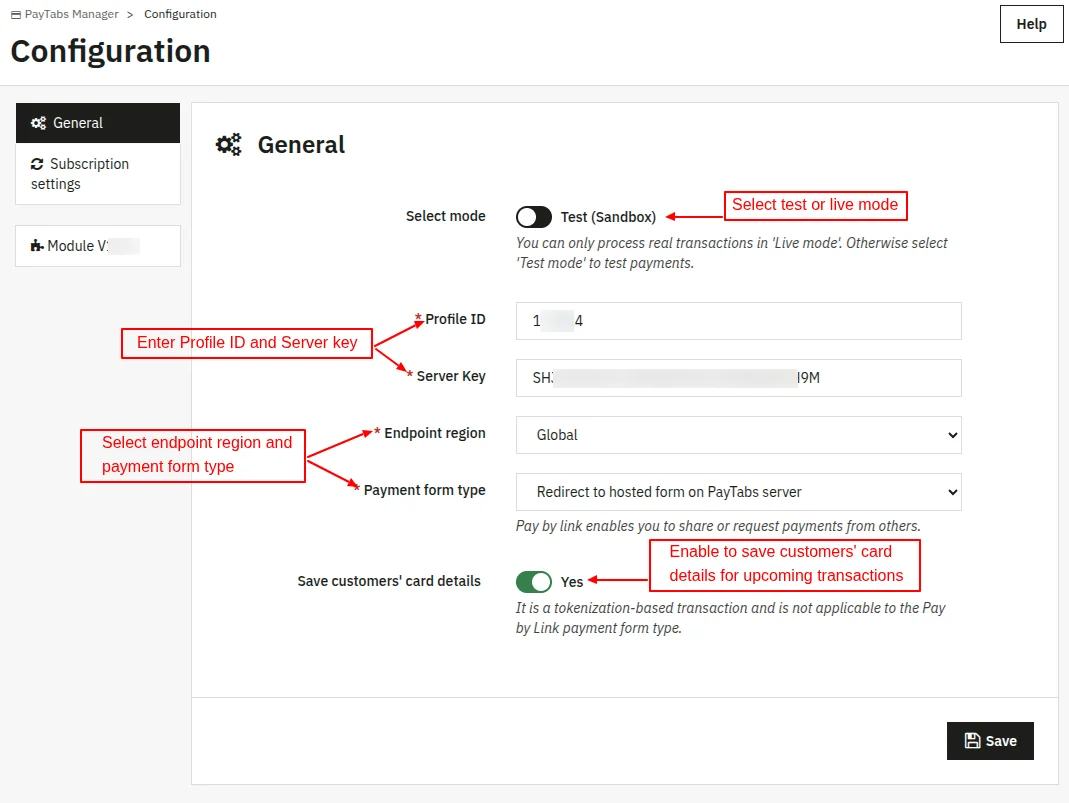
Select mode: The admin can choose to use the module in test (sandbox) or live (production) mode.
Profile ID: A unique numeric identifier assigned to a specific merchant profile under your PayTabs account. It tells the gateway which merchant account should process and receive the transaction.
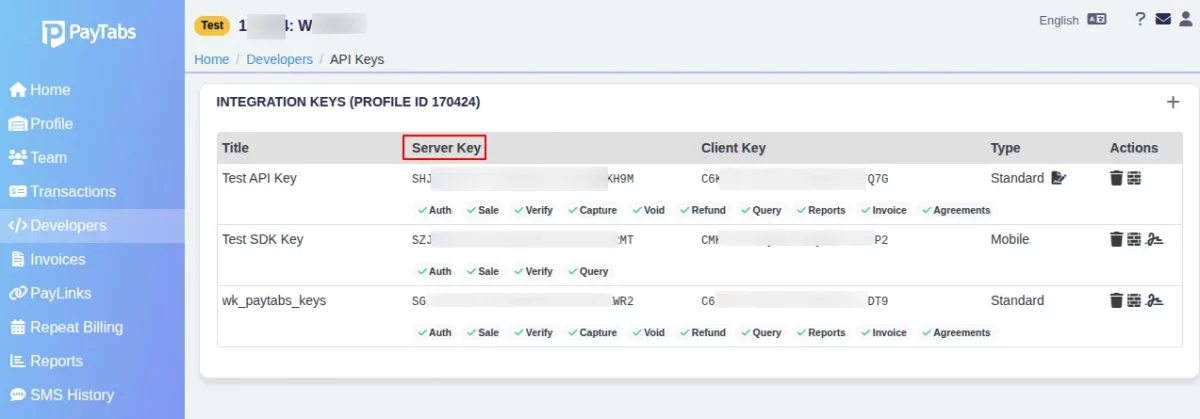
Server key: A long alphanumeric string used as a secure password. It authenticates backend API calls and SDK requests so PayTabs can securely verify that the transaction originated from your website.
Endpoint region: This is geographical location of server hosting your merchant account. Setting the correct region routes your API calls to the proper server instance and ensures regional compliance.
Payment form type: Here, the admin can select the payment form type that determines how customers will enter their payment details during checkout.
There are three payment form types:
- Redirect to hosted form on PayTabs server: When the customer clicks Pay, they will redirect from the store to a secure payment page hosted by PayTabs.
- iFrame payment form integrated into checkout: The PayTabs payment form will display inside an embedded frame (iFrame) on the checkout page. Customers remain on the website while entering their payment details.
- Pay by link: This payment form type involves sending payment requests to customers outside the normal checkout flow.
Save customers’ card details: If enabled, the customer’s card details are saved for future transactions. Please note that this feature is not applicable to the Pay by Link payment form type.
How to Get Profile ID and Server Key
To obtain the profile ID and server key, you need to create an account on PayTabs.
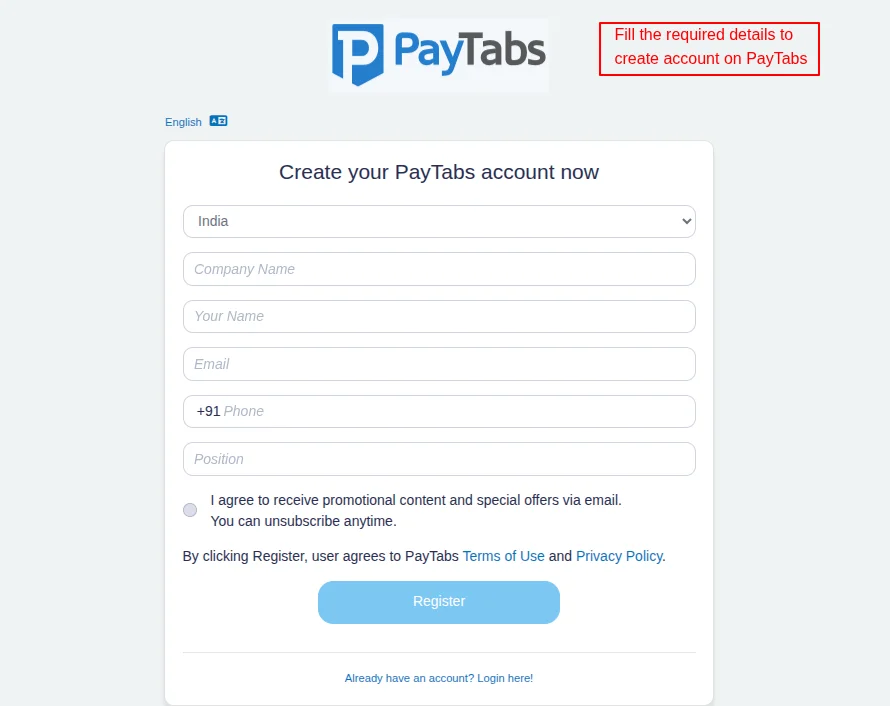
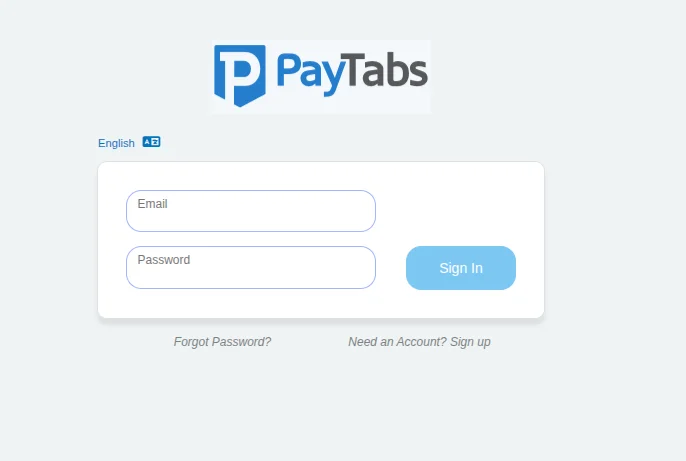
If you already have an account on PayTabs, log in to your account using your email and password.
Once logged in, go to the profile section. Here, you will find the profile ID.

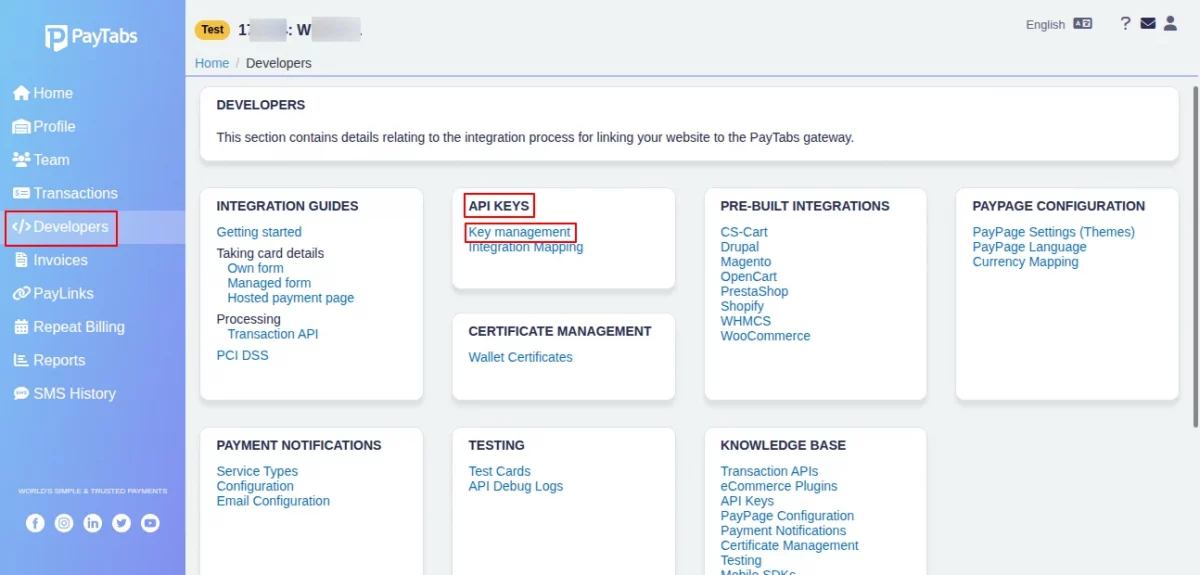
To obtain the server key, navigate to Developers > API KEYS > Key management.
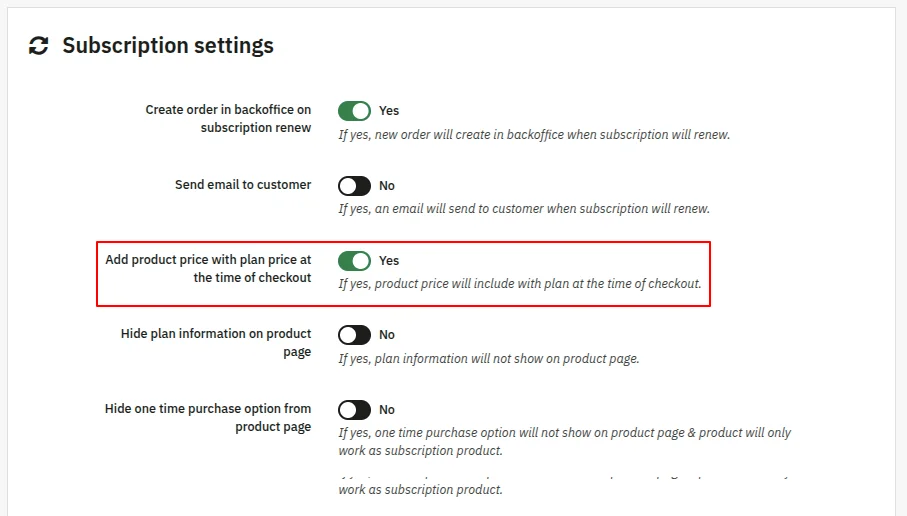
Subscription Settings
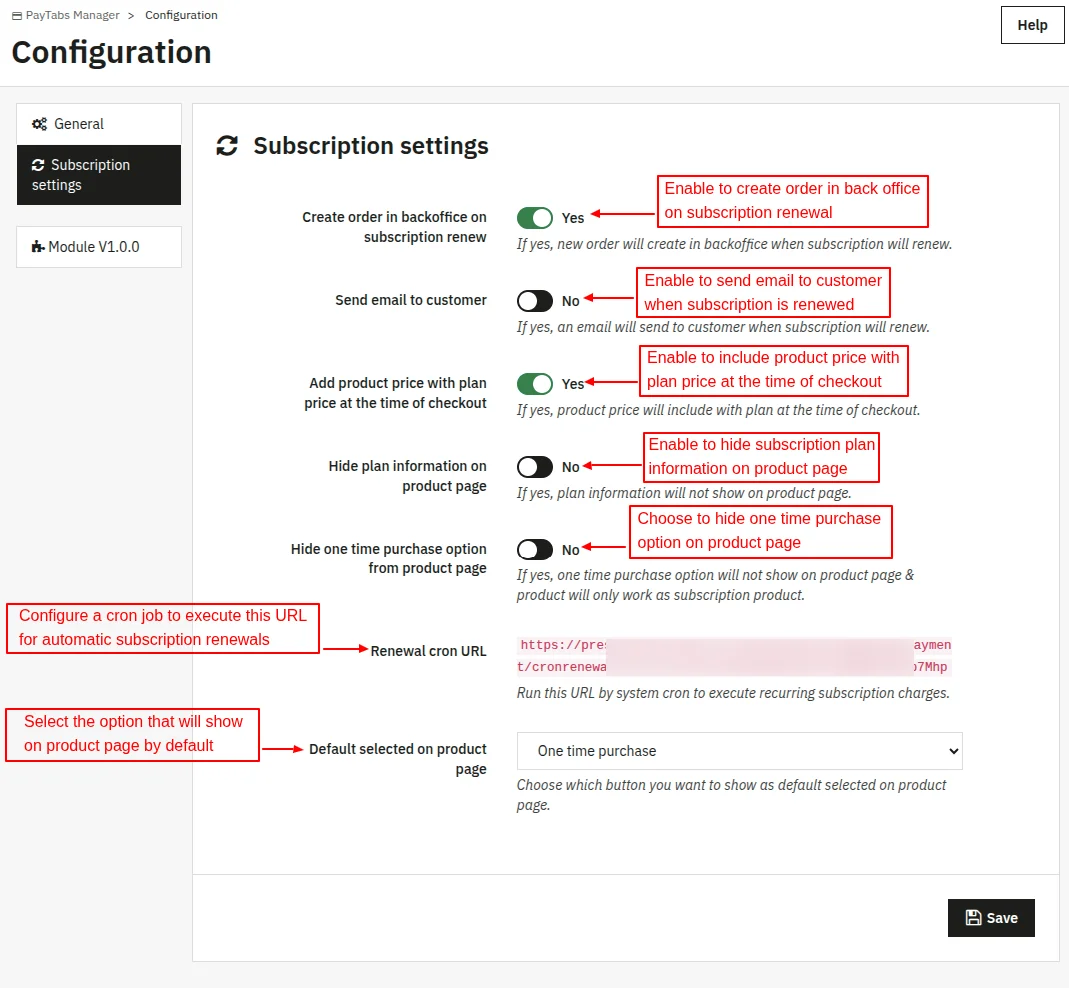
- Create order in backoffice on subscription renew: If enabled, then a new order will be created in the back office whenever the subscription is renewed.
- Send email to customer: Enable this option to send email notifications to customers when their subscription is renewed.
- Add product price with plan price at the time of checkout: If enabled, then product price will be included with plan price at the time of checkout. If disabled, then customers will be charged only the subscription plan price at checkout.
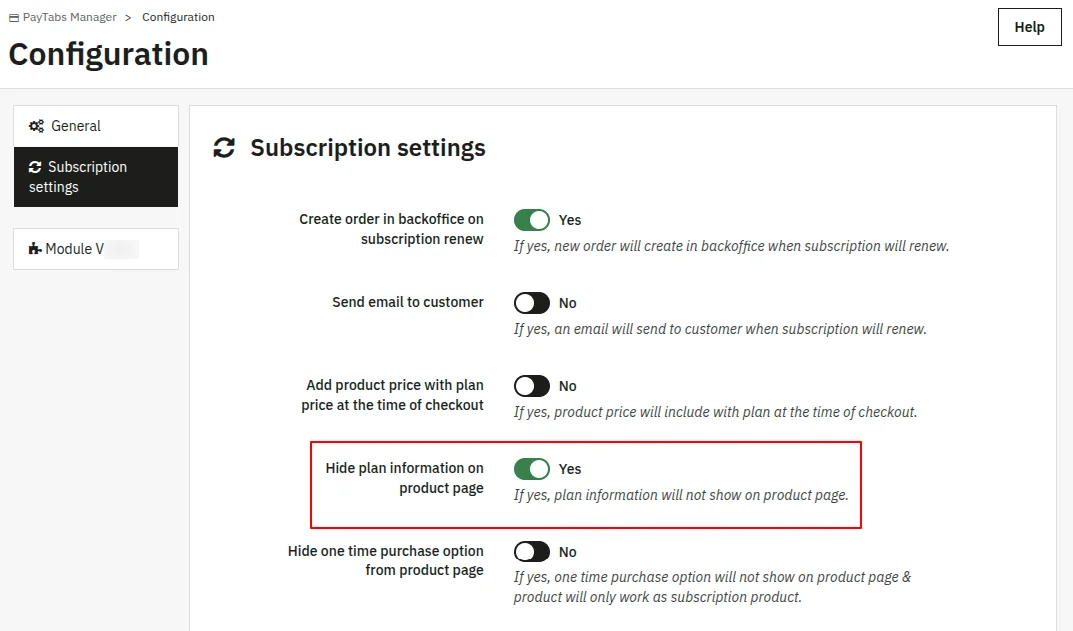
- Hide plan information on product page: Enable this option to hide subscription plan information on the product page.
- Renewal cron URL: Configure a cron job to execute this URL for automatic renewal of subscriptions.
- Default selected on product page: Select whether you want to display one time purchase or subscribe option on the product page.
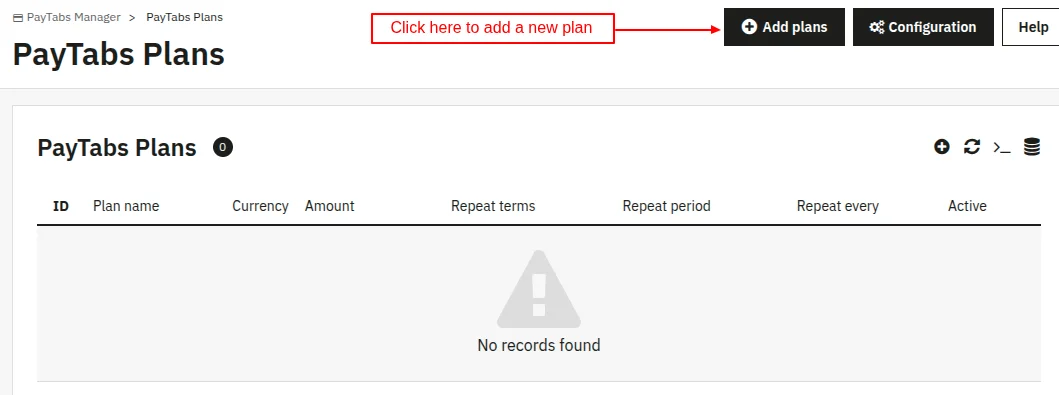
PayTabs Plans
To create a new subscription plan, click on the “Add Plans” button.
After clicking on the button, the following page will open. Fill in the details to create a new plan.
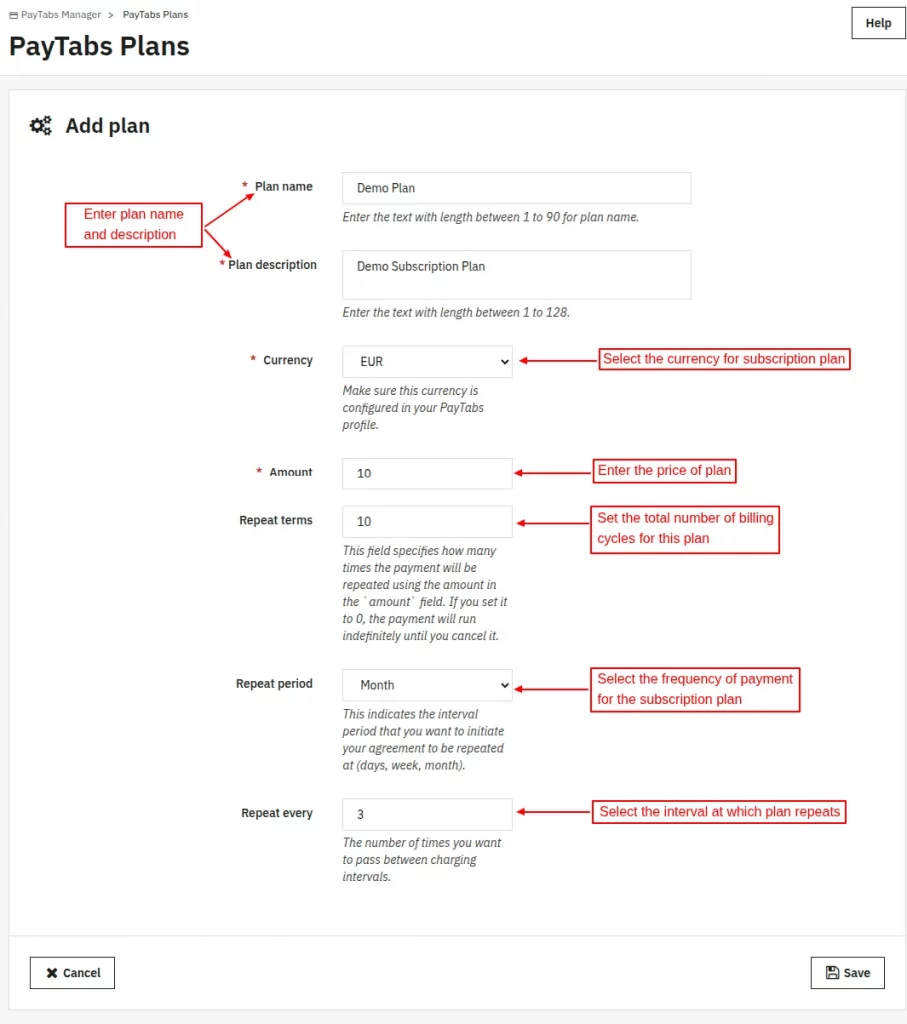
- Plan name: Enter the name of the subscription plan.
- Plan description: Enter plan description.
- Currency: Select the currency of the plan
- Amount: Set subscription plan amount.
- Repeat terms: Here, the admin needs to specify the total number of billing cycles for the subscription plan.
- Repeat period: Here, the admin has to select the frequency (daily, weekly, monthly, etc) of the subscription plan.
- Repeat every: Specify the interval at which the plan repeats.
Let’s understand the meaning of repeat terms, repeat period, and revery every fields with the help of an example.
Suppose the admin has:
- Set 10 in repeat terms
- Selected monthly in repeat period
- 3 in repeat every
This means that every 3 months, the subscription plan will be renewed for 10 billing cycles. The time period of the subscription plan will be 30 months.
Once added, the admin can view the plan under the ‘PayTabs Plans’ tab.
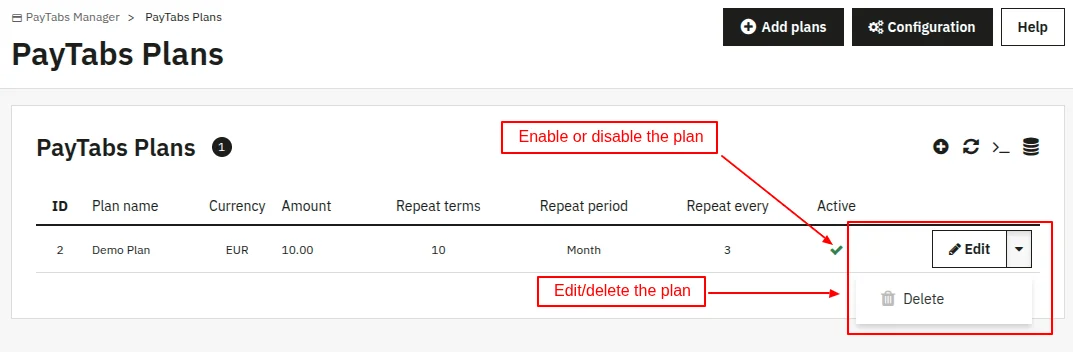
From the PayTabs plans list, the admin can enable, disable, edit, or delete the plan.
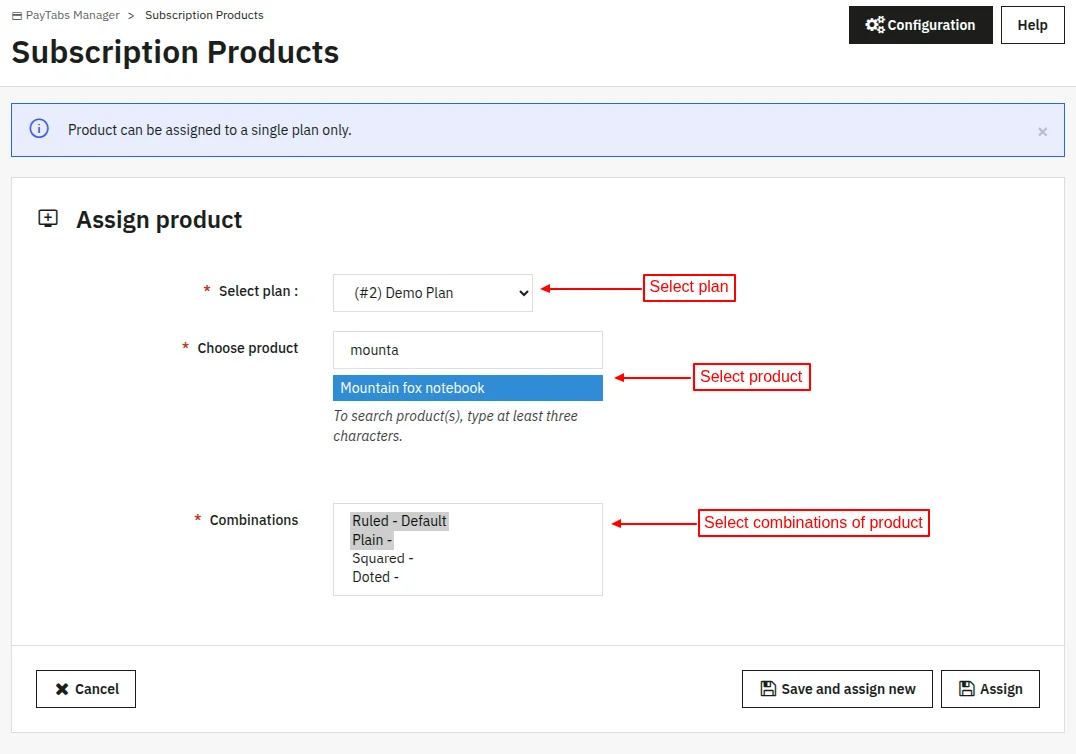
Assign Products to Plan
Under the Subscription Products tab, the admin can assign products to the plan.
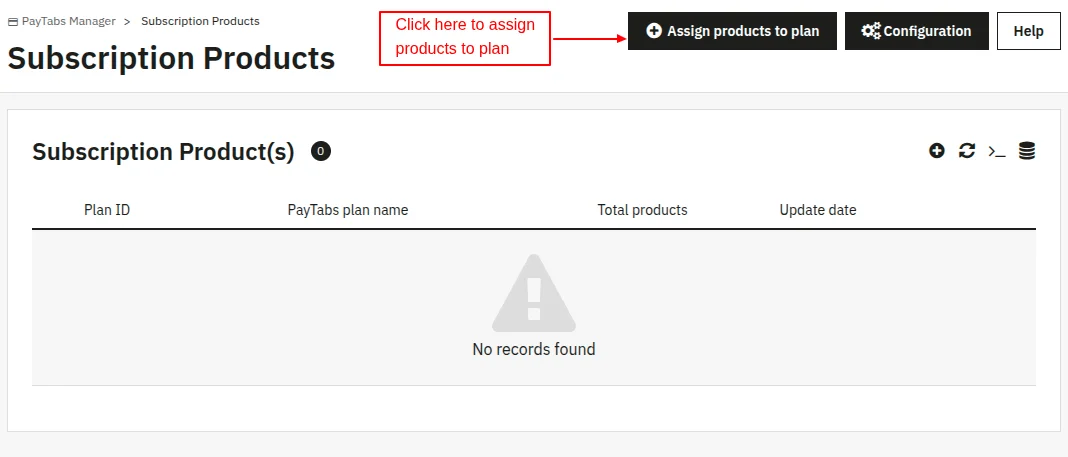
To assign a product to a plan, the admin needs to:
- Select the subscription plan
- Choose the product to which they want to assign the plan.
- Select the combination(if it exists) of the product on which the plan will be active.
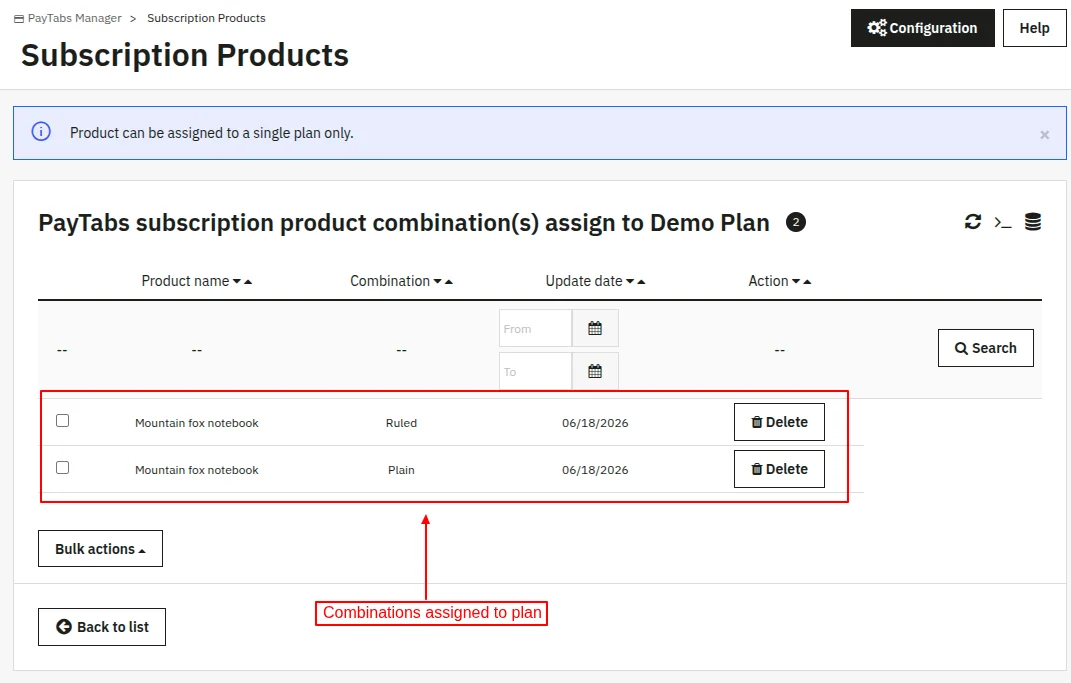
Once assigned, the admin can view it under “Subscription Products”.

Click on the ‘View’ button to see the product assigned to the plan.

Click on the ‘View’ button to see combinations assigned to the plan.
Customer End Flow
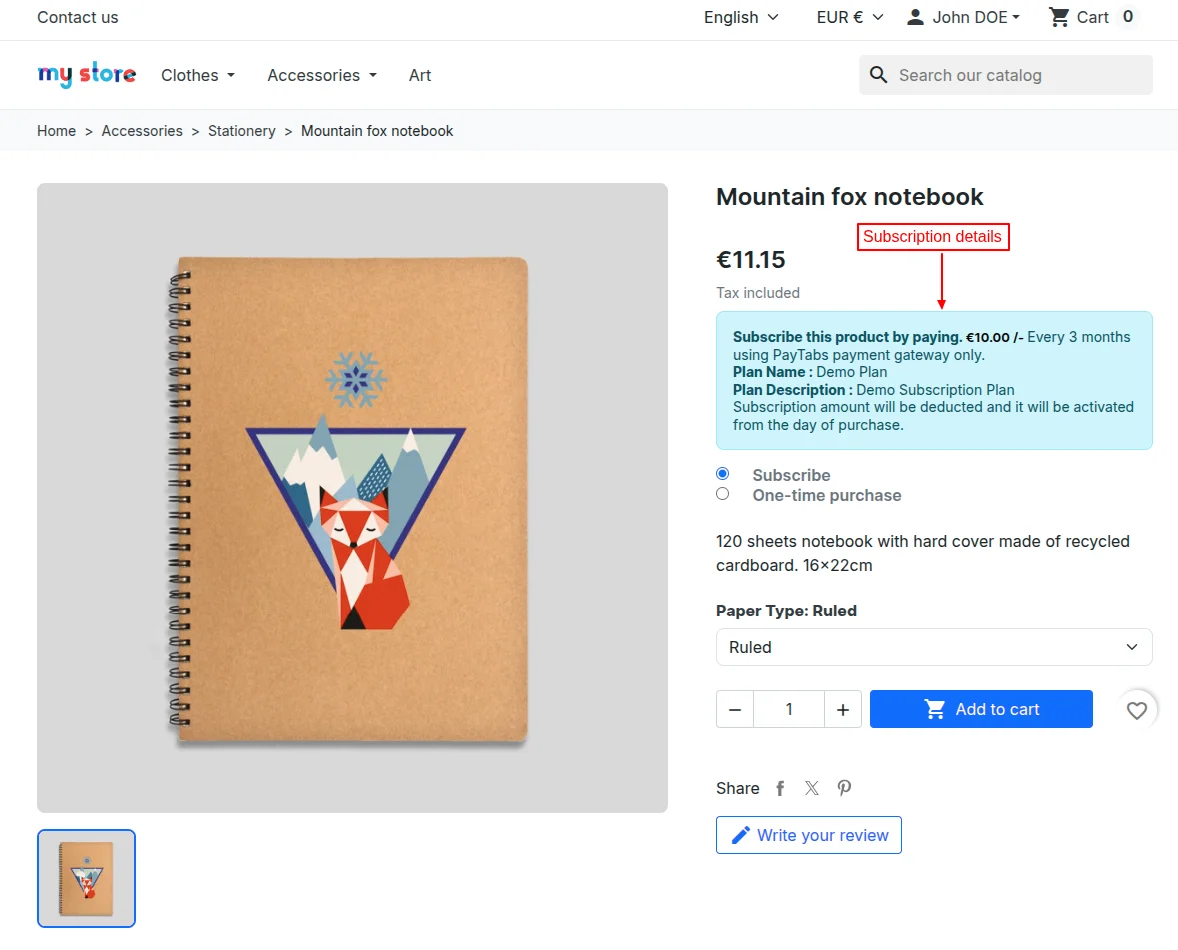
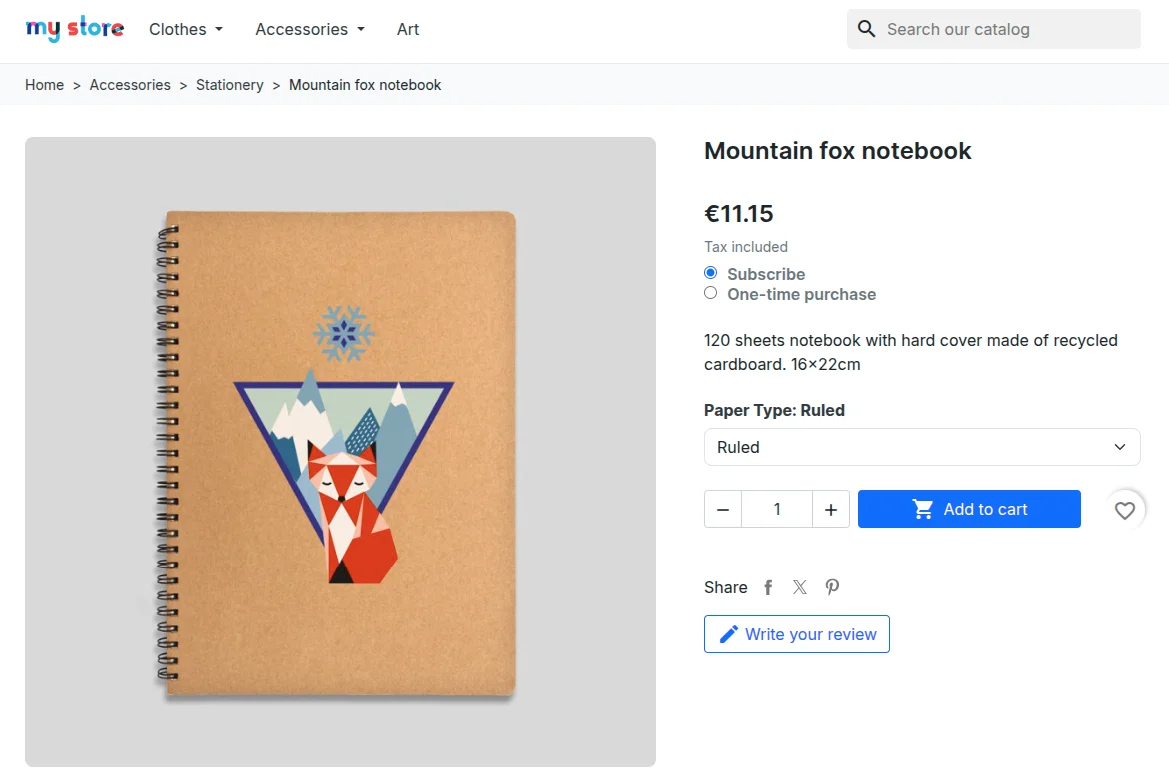
The customer can view the subscription details on the product page.
Hide plan information on product page
If enabled by the admin from the back office, the subscription plan information will not display on the product page.
Front View
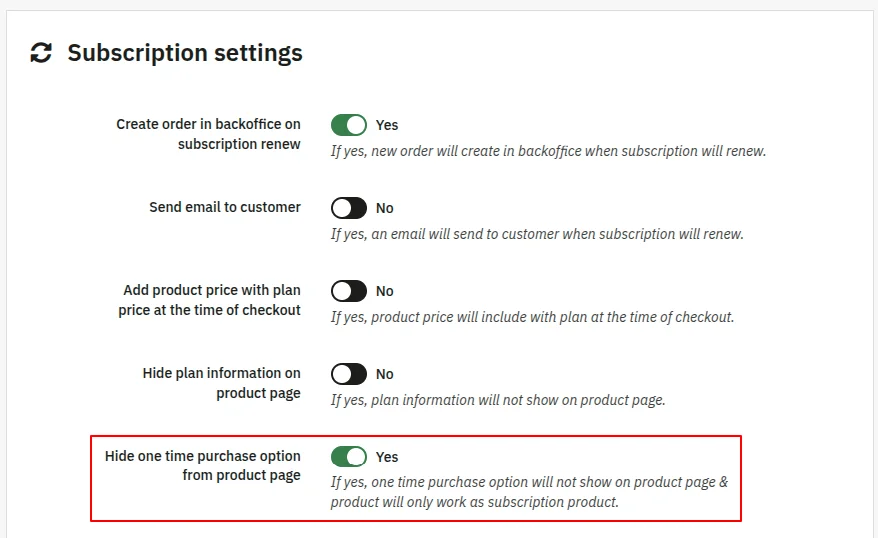
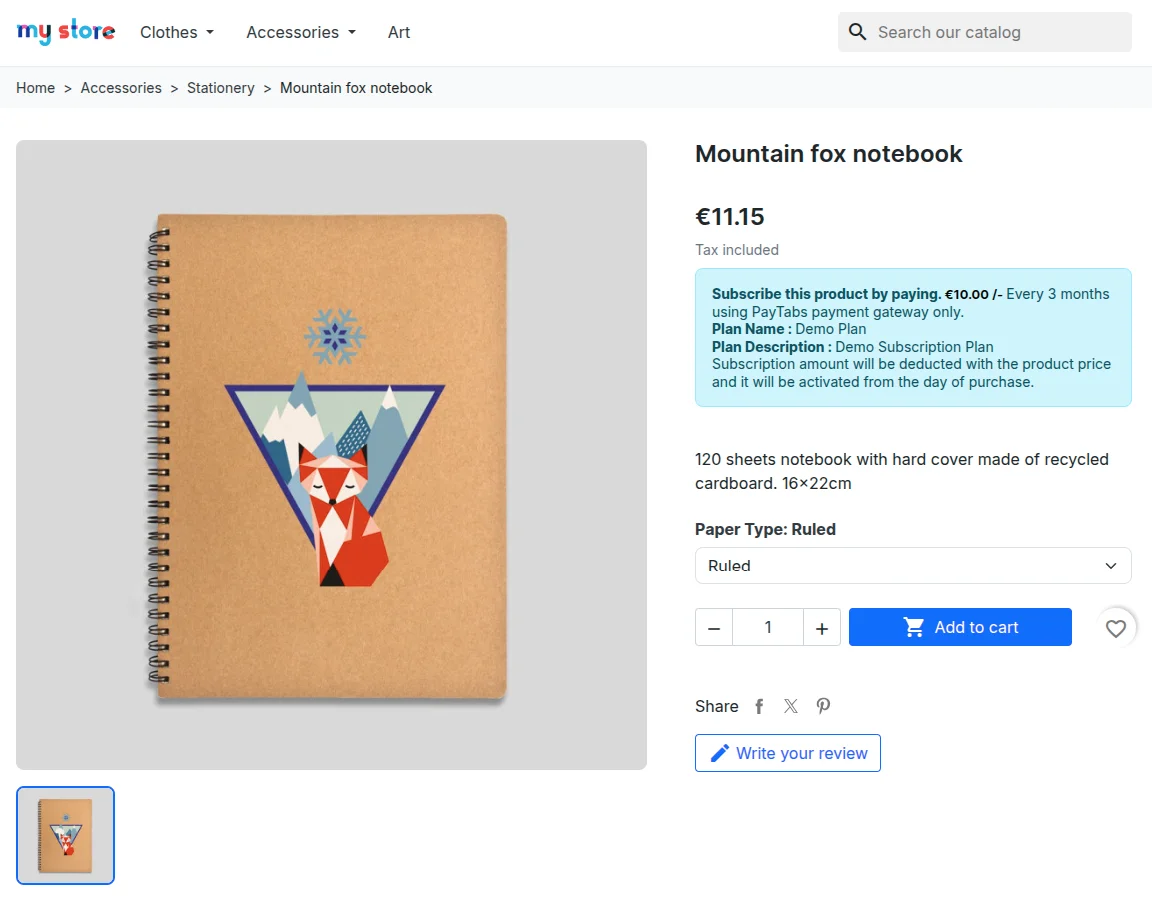
Hide one time purchase option
If enabled, then one time purchase option will not display on the product page and the product will work only as subscription product.
Front View
After selecting the subscribe option when customers add a product to the cart, they can view the ” Remove subscription” option on the cart page.
They can remove the subscription from the product by clicking on this option.

Now, on the checkout page, a customer will get an option to pay via PayTabs.
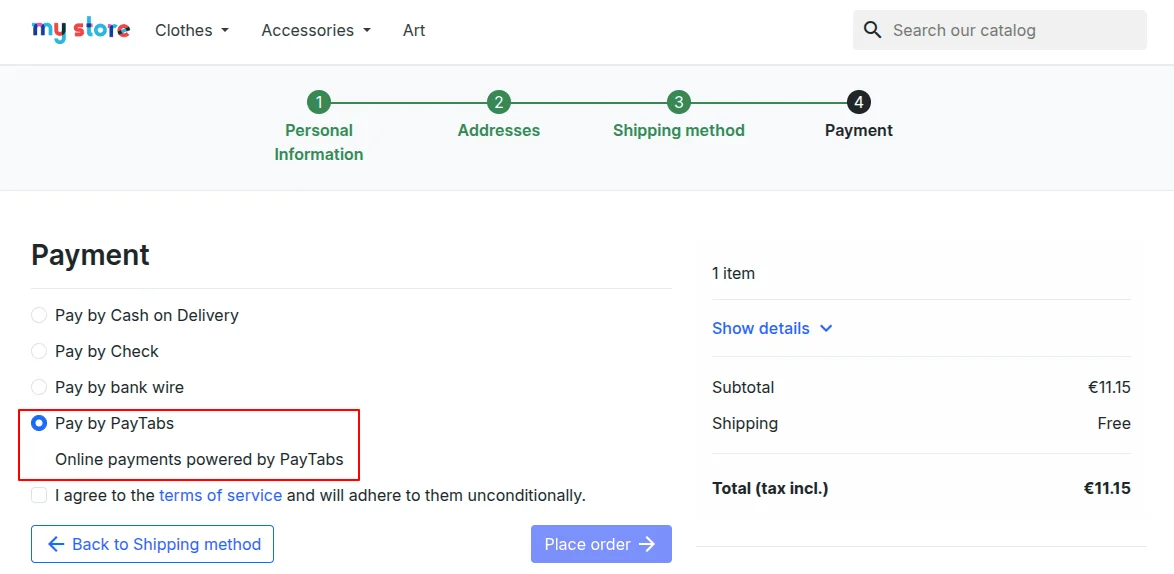
Payment form type
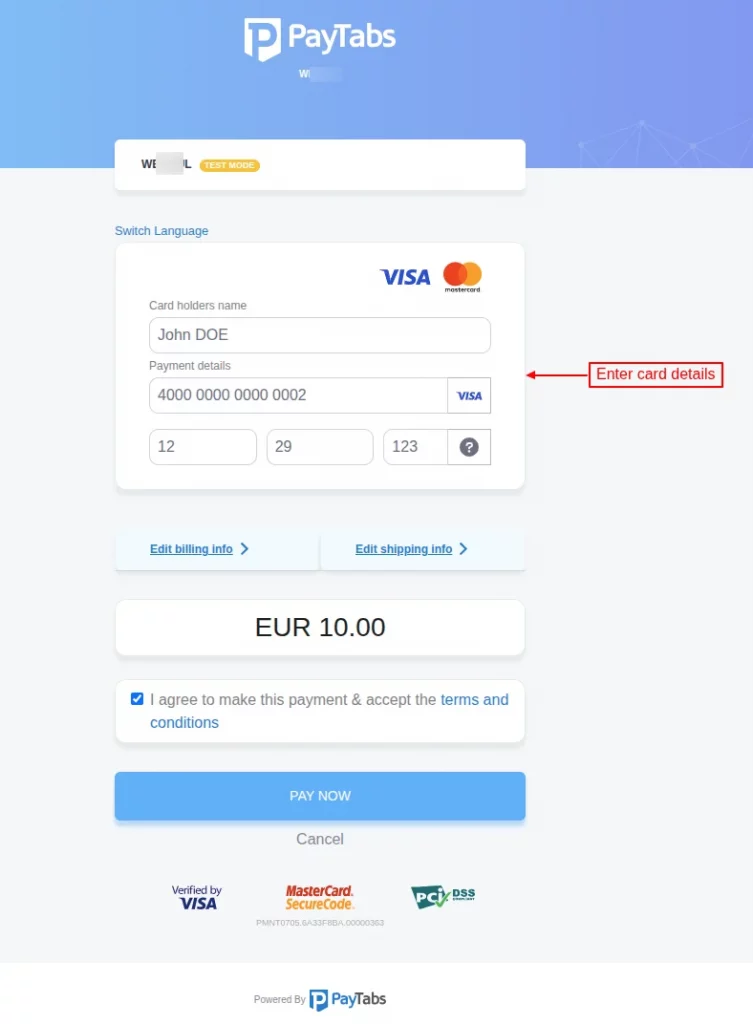
If the admin has selected “Redirect to hosted form on PayTabs server” in payment form type field under general settings, then the customers will be redirected to the payment page hosted by PayTabs.
Here the customer can enter the card details and complete the payment.
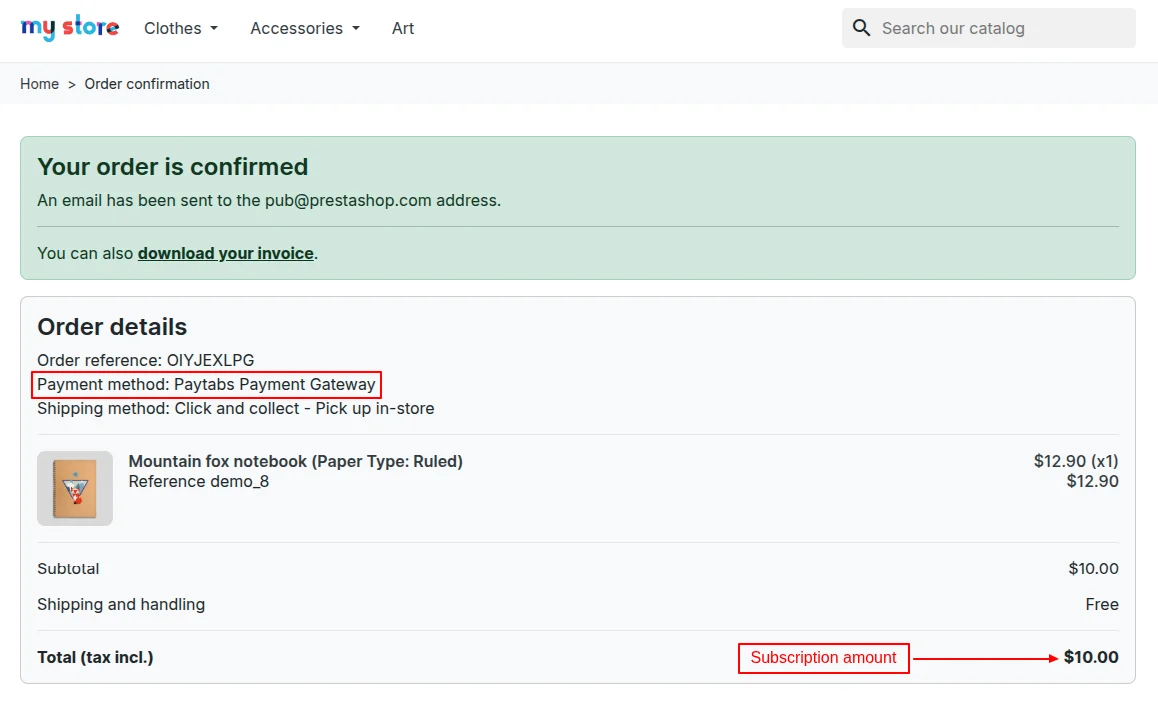
Once the payment is completed, the customer gets redirected to the order confirmation page. Here the customer can view payment method and subscription amount.
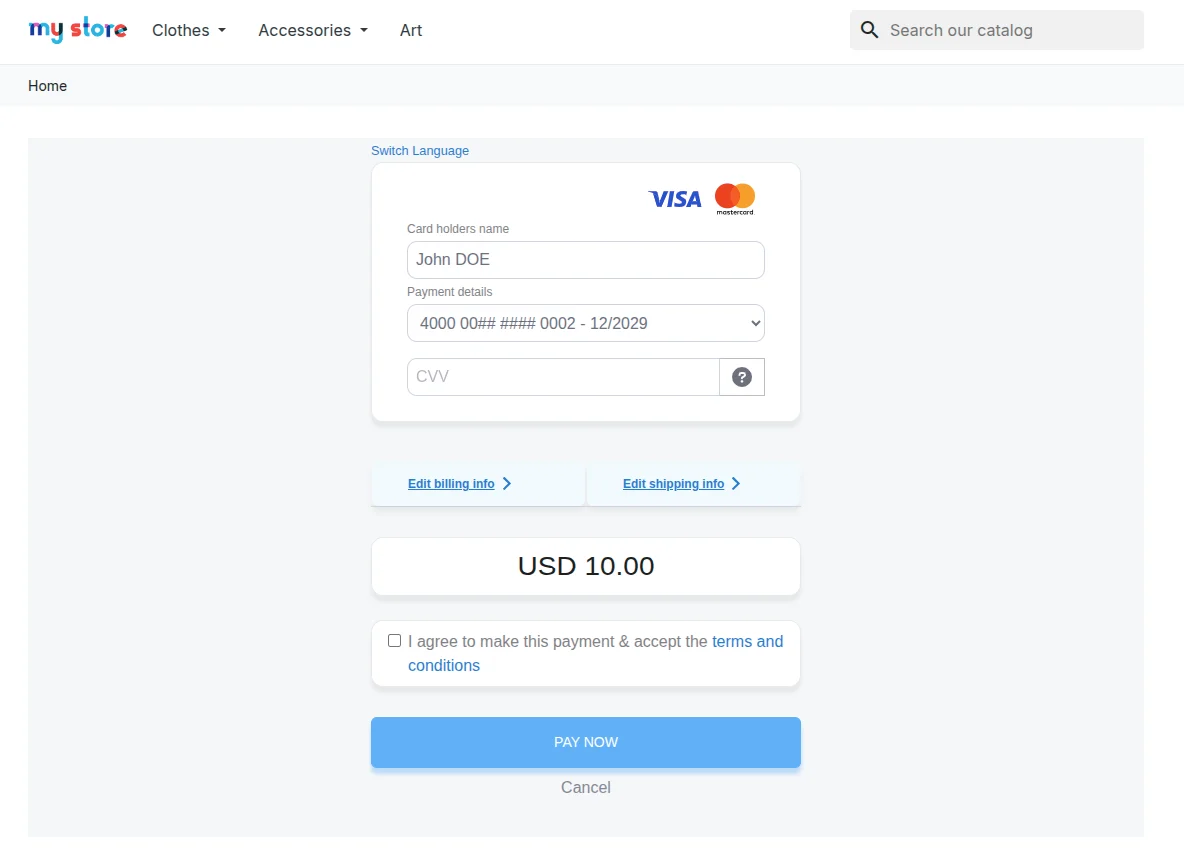
If selected “iFrame payment form integrated into checkout”
The PayTabs payment form will display inside an embedded frame (iFrame) on the checkout page, and customers remain on the website while entering their payment details.
If the admin has selected “Pay by link” in the payment form type field, then on clicking place order button, a popup appears on the page where customers can view the payment link.
Customers can share this link and request payment from others.

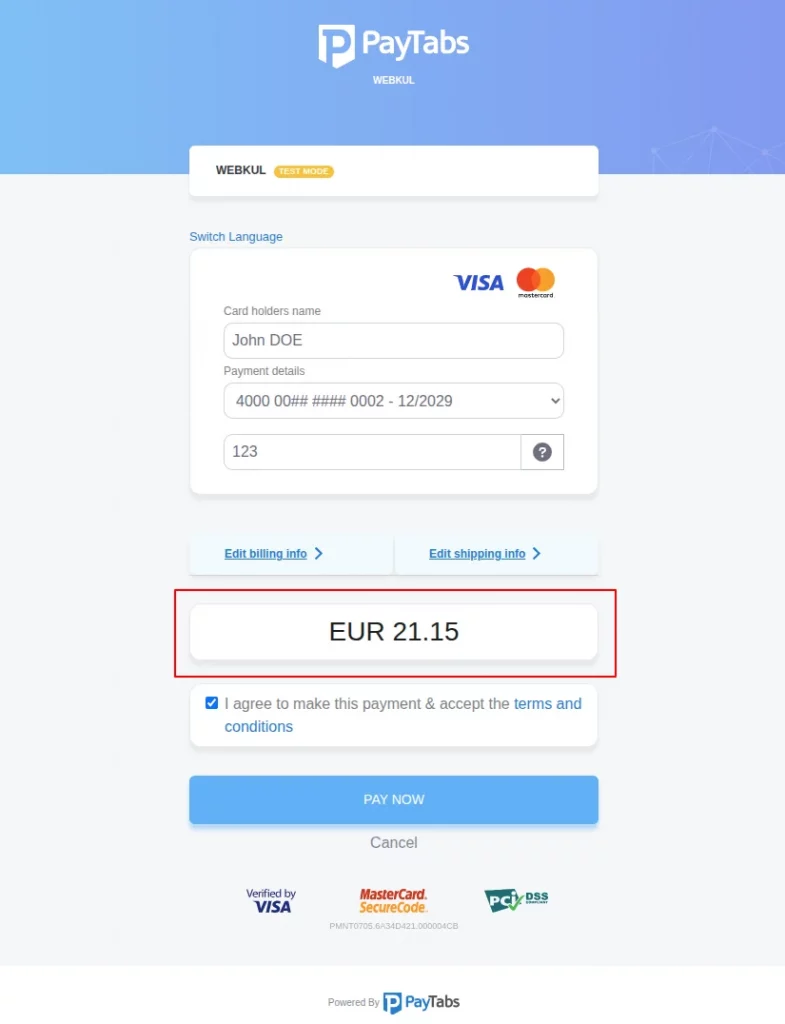
Add product price with plan price at the time of checkout
If enabled, then the product price will be included with the subscription plan price at the time of checkout.
Suppose the price of a product “Mountain fox notebook” is €11.15, and the subscription amount is €10.
Now, if a customer subscribes to a product, the product price i.e €11.15 will be added to the cart when the customer subscribes to a product, and the customer has to pay €21.15.
The PayTabs payment gateway will also be available for normal product purchases.


Customer Account
After the successful installation of the module, two new sections, PayTabs cards and My subscription, become available in the customer’s account.

My Subscription
Under this section, customers can view a list of products they have subscribed to.
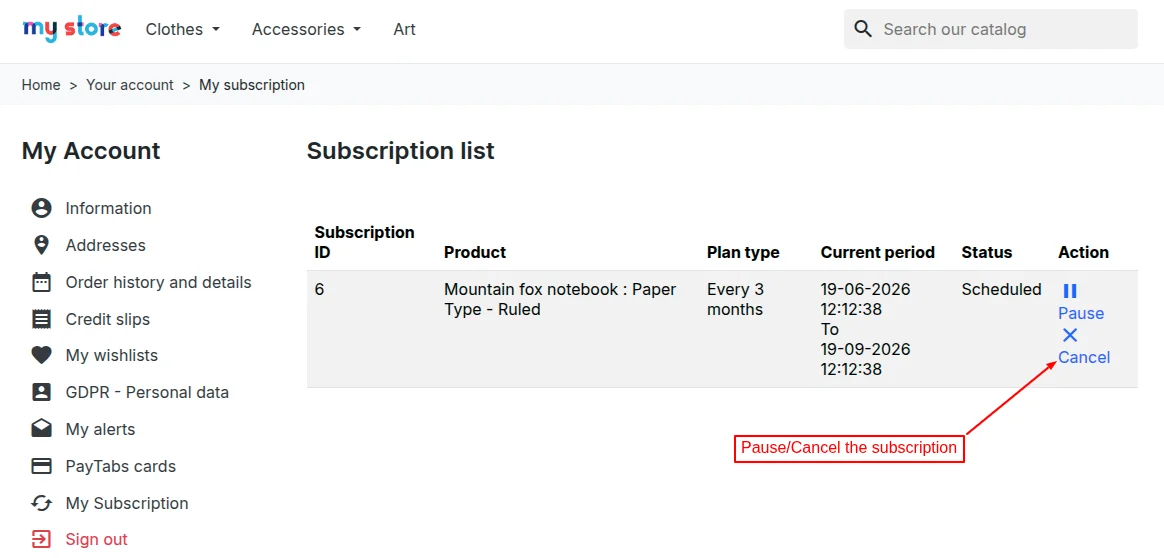
Under the Subscription list, customers can view product name, subscription frequency, subscription period, and status of the subscription.
Also, customers can pause, resume, or cancel the subscription.
On clicking the pause button, a popup appears on the page asking for confirmation to pause the subscription.
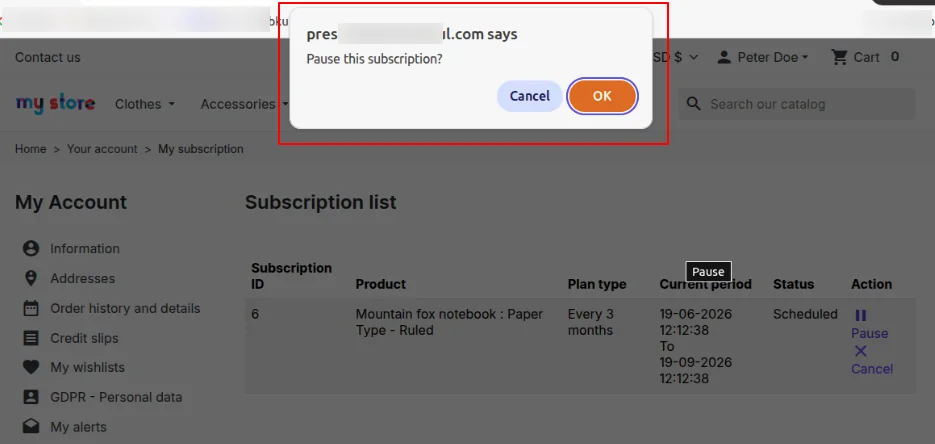
When the Ok button is clicked, the subscription is paused.
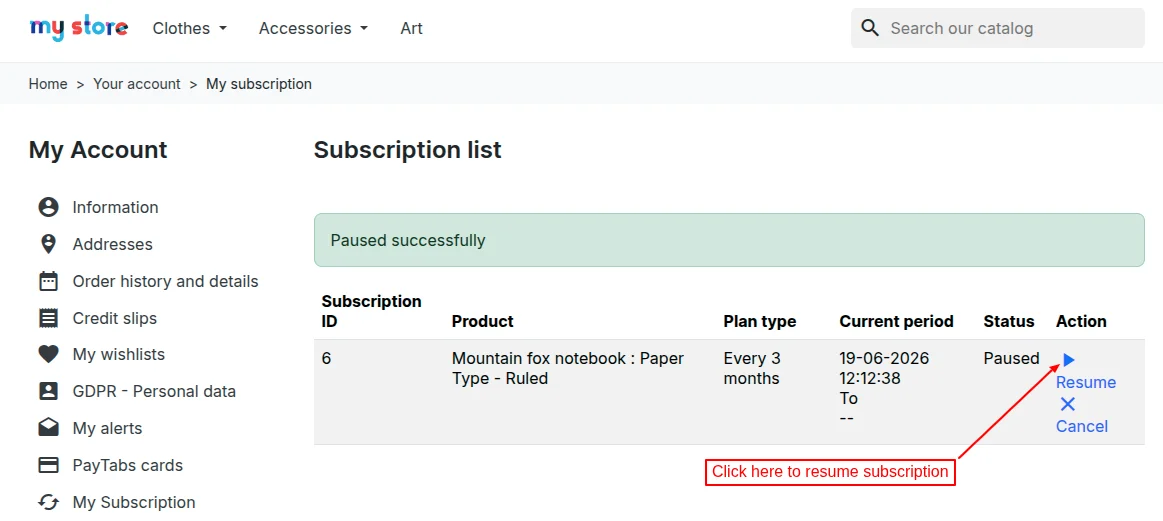
Once paused, the customer can resume subscription by clicking on ‘Resume’
PayTabs Cards
Under this section, customers can view the card details saved on the website.
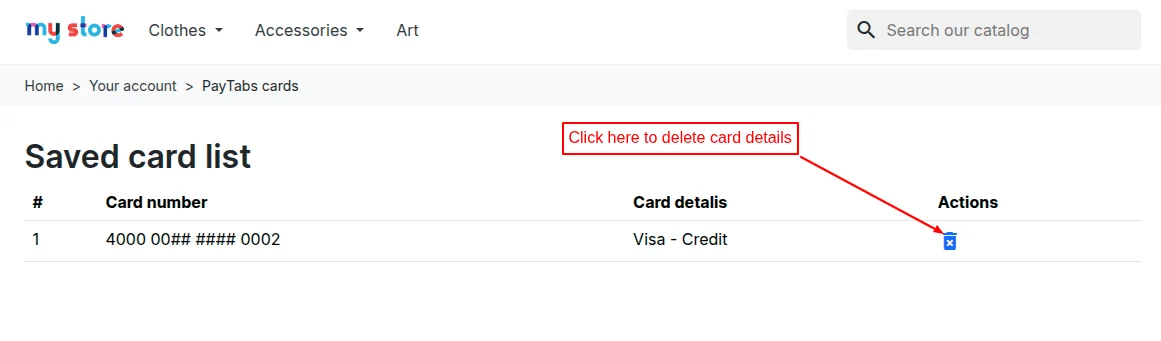
Also, customers can delete the card details.
Customers – Admin End
From the back office, the admin can view a list of customers who have subscribed to the products using the PayTabs payment gateway.

Under Customers, the admin can view:
- Subscription plan name
- The product to which customers have subscribed.
- Quantity of products subscribed.
- Next renewal date
- Last renewal
- Subscription status
Also, the admin can pause the subscription and resume or cancel it if the subscription is paused by the customer.
PayTabs Transactions
Under this tab, the admin can view a list of transactions done via the PayTabs payment gateway.

Click on the ‘View’ button to see complete transaction details and process a refund.

Refund Process
PrestaShop PayTabs Payment Gateway module allows the admin to refund the order amount. The admin can choose to refund the full or partial amount to the customer.
Refund full amount
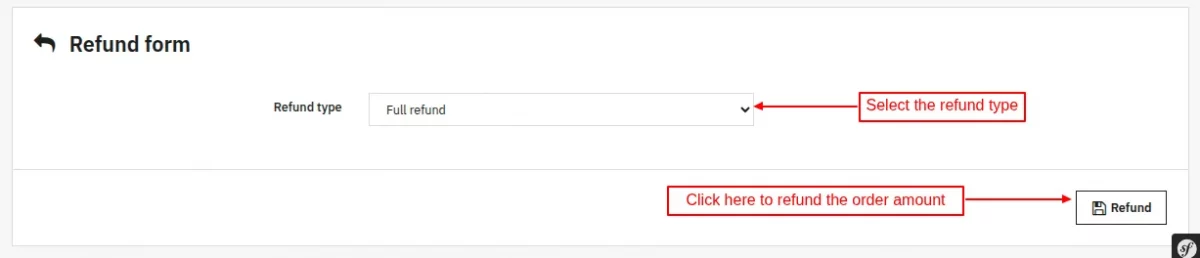
Once refunded, the refund status gets changed.

Partial Refund

Once refunded, the admin can view the refund details on PayTabs Transactions page.

This was all about the PrestaShop PayTabs Payment Gateway module.
I hope this document will help you in checking the functionality of the module in a better way. Also, do let us know about your views in the comments.
Support
For any kind of technical assistance or query, please raise a ticket or send us a mail at [email protected]
Also, please explore our Prestashop development services and vast range of quality Prestashop addons.
Current Product Version - 1.0.0
Supported Framework Version - 9.x.x, 8.x.x, 1.7.x.x

Be the first to comment.