Multi-Vendor Hyperlocal Marketplace Plugin for WooCommerce focuses on reaching out to a crowd of a particular area or around that area.
This helps to study the temperament and needs of the locales better hence this would be an add-on benefit for any business.
When planning to establish an e-commerce store, one should focus on targeting a specific mass.
However, if the focus is laid on a discrete part of anything, one can achieve extremely productive results.
Multi-Vendor Hyperlocal Marketplace Plugin for WooCommerce is based on a similar concept.
Using this plugin, users can aim to provide services, completely on the basis of a local approach
Note: Multi-Vendor Hyperlocal Marketplace Plugin for WooCommerce is an add-on to WooCommerce Multi-Vendor Marketplace Plugin.
Furthermore, The user must first install WooCommerce Multi-Vendor Marketplace to make use of Multi-Vendor Hyperlocal Marketplace Plugin for WooCommerce.
Watch the video tutorial below to understand the extension workflow:
Features
- An excellent way to reach out to a generic crowd to provide exquisite services.
- In the admin panel Shipping rates on the basis of the distance and the weight can be created.
- The admin creates ship rates on behalf of the sellers.
- CSV files to create shipping rates can be uploaded by the admin.
- The admin adds radius, distance, and weight units.
- The seller can add its origin in the seller panel.
- Sellers can add shipping rates through CSV files.
- Customers can enter a location and buy products from the nearest seller’s store.
- The customer can change the location simply by clicking on the Navigator icon.
- The admin can configure single seller checkout or checkout with multiple seller products.
- Admin can restrict access to the shop and category pages to customers.
- Enable/disable the module from the admin backend panel.
- Managing admin products is available at the admin end.
Note: Kindly note with this plugin only the paid APIs will work.
Installation
The user will get a zip file that needs to be uploaded in the “Add New” menu option in the WordPress admin panel.
For this login to WordPress Admin Panel and in the Dashboard hover your mouse over the “Plugins” menu option select the “Add New” option.

After this, the user will see an option on the top of the page that is “Upload Plugin”, click the option to upload the zip file.

On clicking the “Upload Plugin” option, the user will see a “Choose File” button. Click on the button to browse for the zip file as per the image below.

After browsing the file, click on the “Install Now” button so as to install the plugin as per the snapshot.

Once the plugin is installed, the user can see a “Plugin installed successfully” message and an option to activate the plugin. The user needs to click on the “Activate Plugin” button to activate the plugin.

Configuring Google API Key
To configure this module, you will need a geolocation API key.
Hence, You can get this API using the following steps :
- Go to: https://console.cloud.google.com
- Login in and navigate through API’s and Services > Credentials.

2. Create a project here


Then the user can click on the New Project to create a new API.
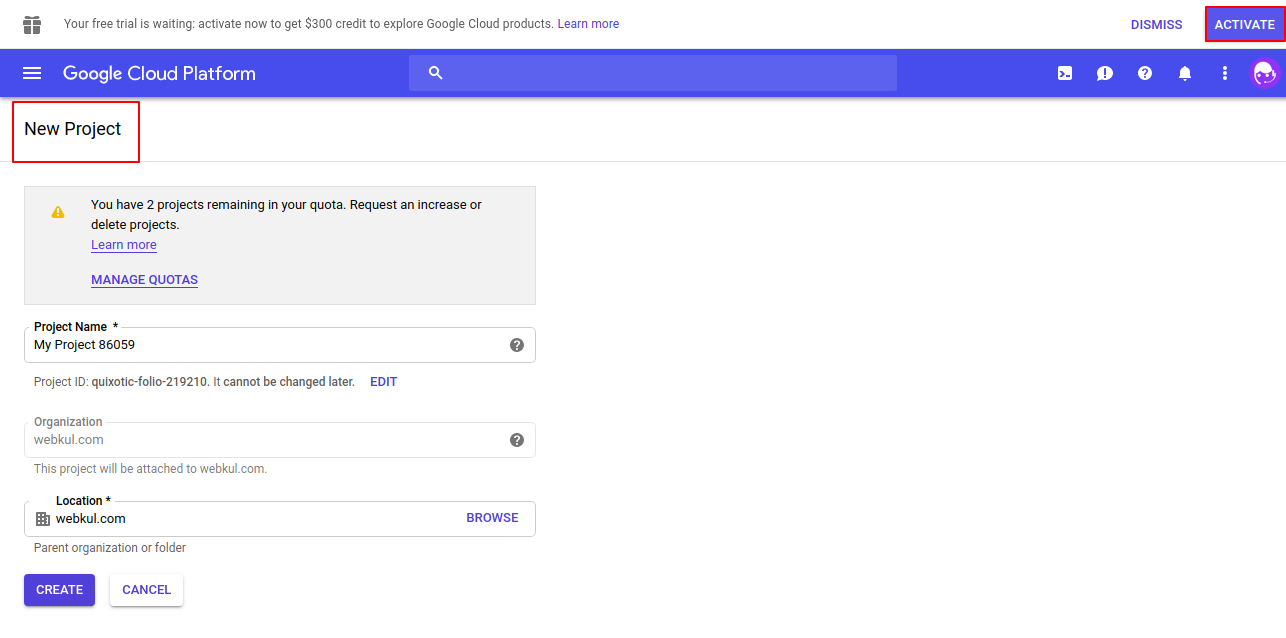
The configurations for the new project can be set as shown in the image below.
4. Select ‘API key’ from the list and click on ‘Create Credentials.


5. Credentials created.
So this is how the geolocation API key can be obtained and used to configure our module.
6. After, generating the Geolocation API Key successfully now you need to navigate to the library option.

Furthermore, under the library option for the Maps API click on the view all option to view all the APIs related to Maps.

Therefore, you need to enable the mentioned APIs one by one that are Distance Matrix API, Geocoding API, Geolocation API, Maps Embed API, Maps JavaScript API & Places API.

Back End Configuration
The admin configures the settings for the Marketplace Hyperlocal System at the backend.
On clicking the ‘Configuration’ option of “Woo Marketplace Hyperlocal”, the admin can set the required details for the user.

Shipping will be applied according to the owner of the product, irrespective of Marketplace “Applicable Shipping Methods.”
The admin can configure the Hyperlocal System as per the needs –
General Settings :
Google API Key – Configures the Google API Key.
Heading for Location – Set a title that appears at the seller’s end to enter the location.
Radius Unit – Set the unit, either Mile or Kilometer, to tabulate the radius.
Radius – The admin can select the radius.
Location Icon Direction: Set the positioning of the location icon by choosing an option from the dropdown list.
Restrict Shop and Category Pages – The admin can enable to restrict the shop and the category pages by the customer.
Allow Single Seller Checkout – Here, the admin can enable the single seller checkout for the seller. When enabled, customers can checkout with single-seller products only.

Admin Origin :
Set Default Address – Set a default address for the user.
Select Address Type – The admin can select the address type based on the City, State/ Province, Country, Street/ Locality.
Latitude: The latitude is automatically set as soon as the location is set by the admin.
Longitude: The longitude is automatically set as soon as the location is set by the admin.
Admin End Workflow
Admin needs to enable the Hyperlocal Shipping and add the title as well. For that navigate to WooCommerce > Settings > Shipping > Hyperlocal Shipping.

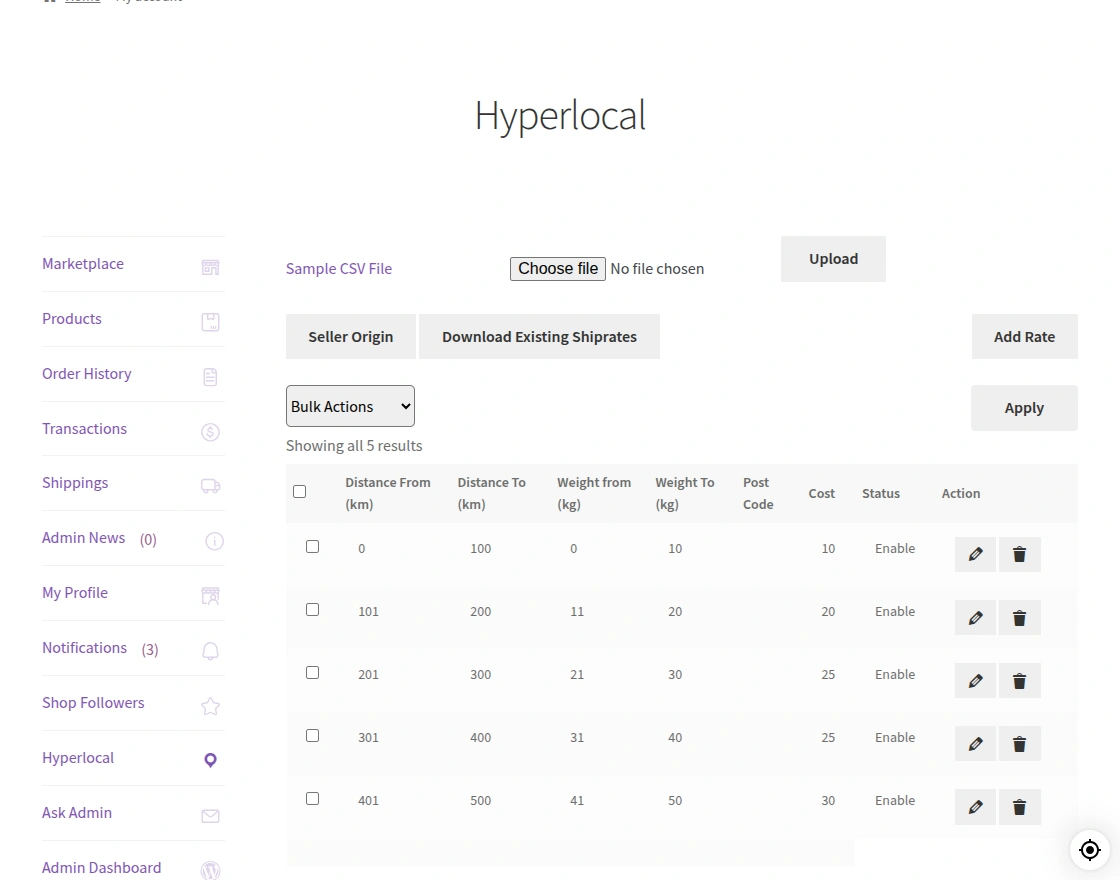
After the configuration and enabling of the plugin, the admin can manage the Ship Rates List as shown in the image below –
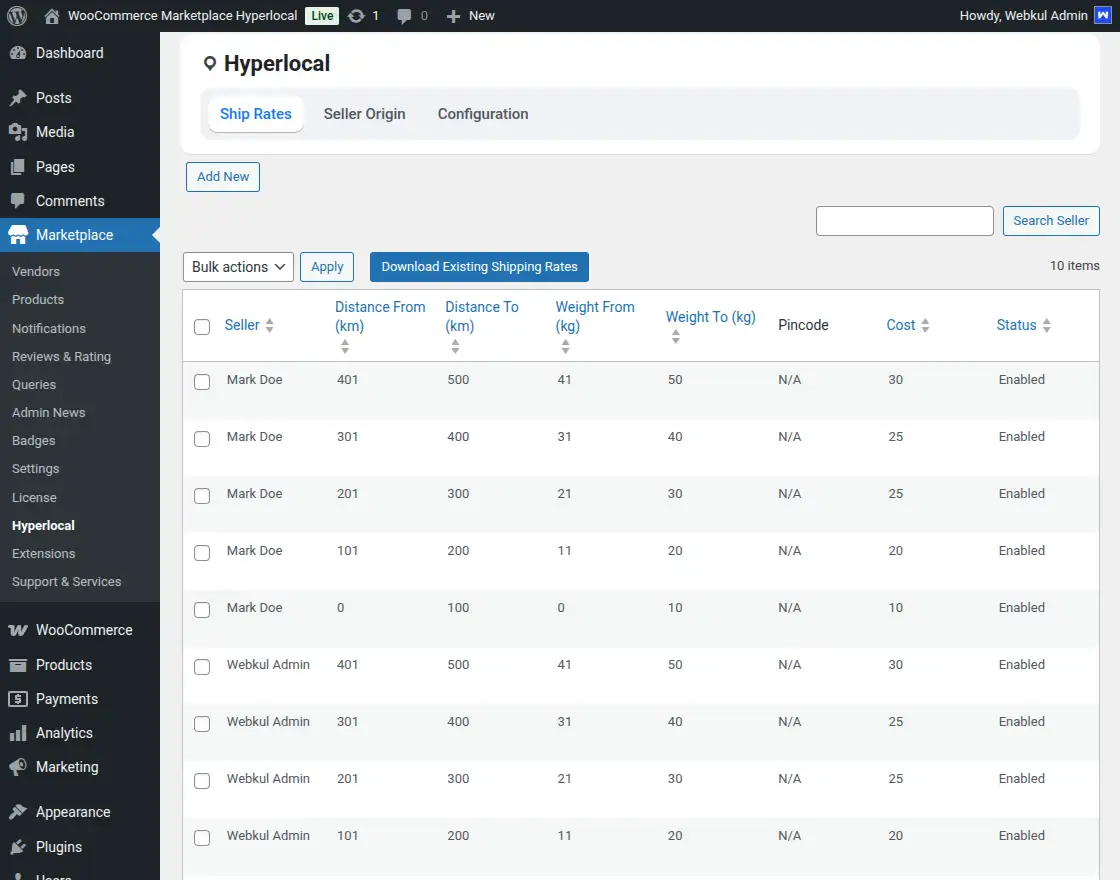
Here, the admin can manage, view, add new ship rate lists, and download existing shipping rates.
Hence, To create a new ship rates list, the admin can click on the “Add New” button and create the new ship list –
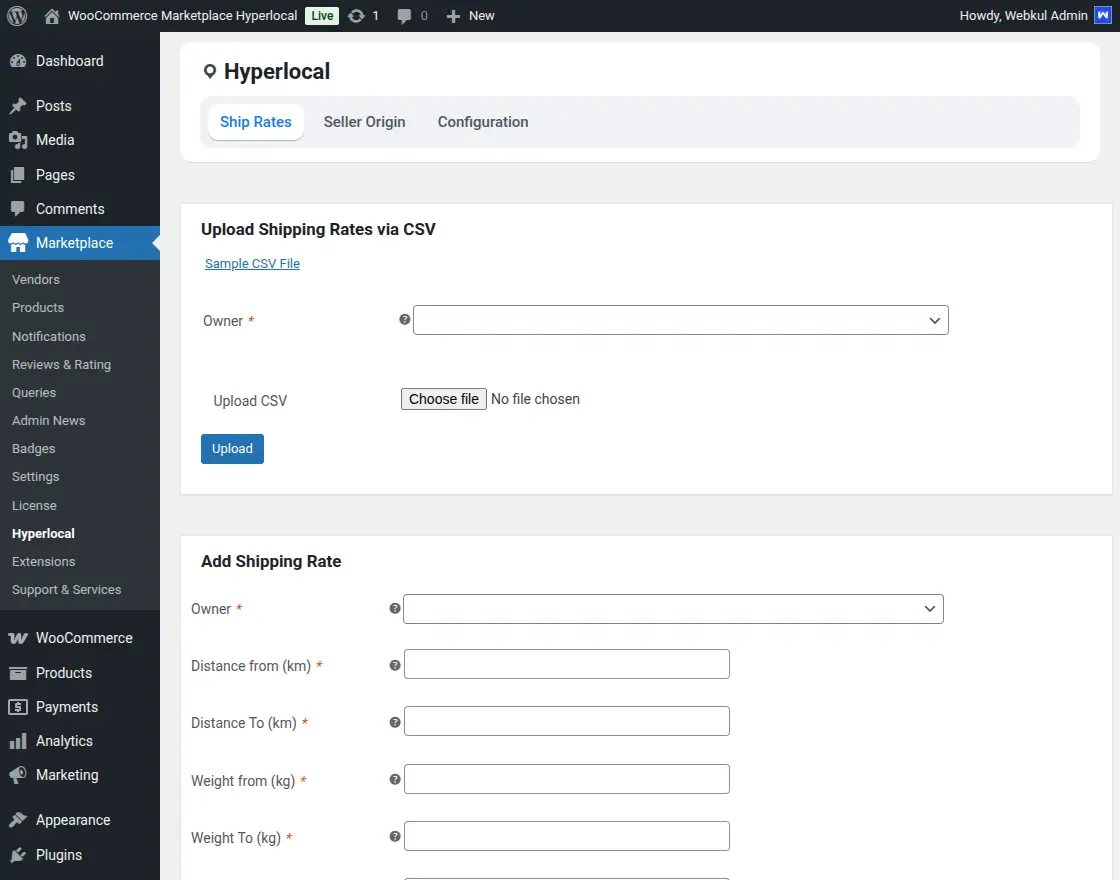
The admin configured the ship rate settings as follows:-
The admin can select the Owner/ Seller from the list, and even the admin can upload the CSV to create the shipping list.
Owner: The admin can select the owner/ seller from the available list.
Distance from Origin: The initial value for the distance which is to be covered while shipping the product.
Distance To: final value for the distance which is to be covered while shipping the product.
Weight from: The initial value for the weight of the product which will be out for shipping.
Weight To: The final value for the weight of the product which will be out for shipping.
Pincode: Enter the pincode details.
Cost: Set the cost as per the distance and the weight of the products.
Status: Enable or Disable the status of the shipping rate.
Here the admin can manage the Seller Origin and check the status enable disable as mentioned in the snapshot below:
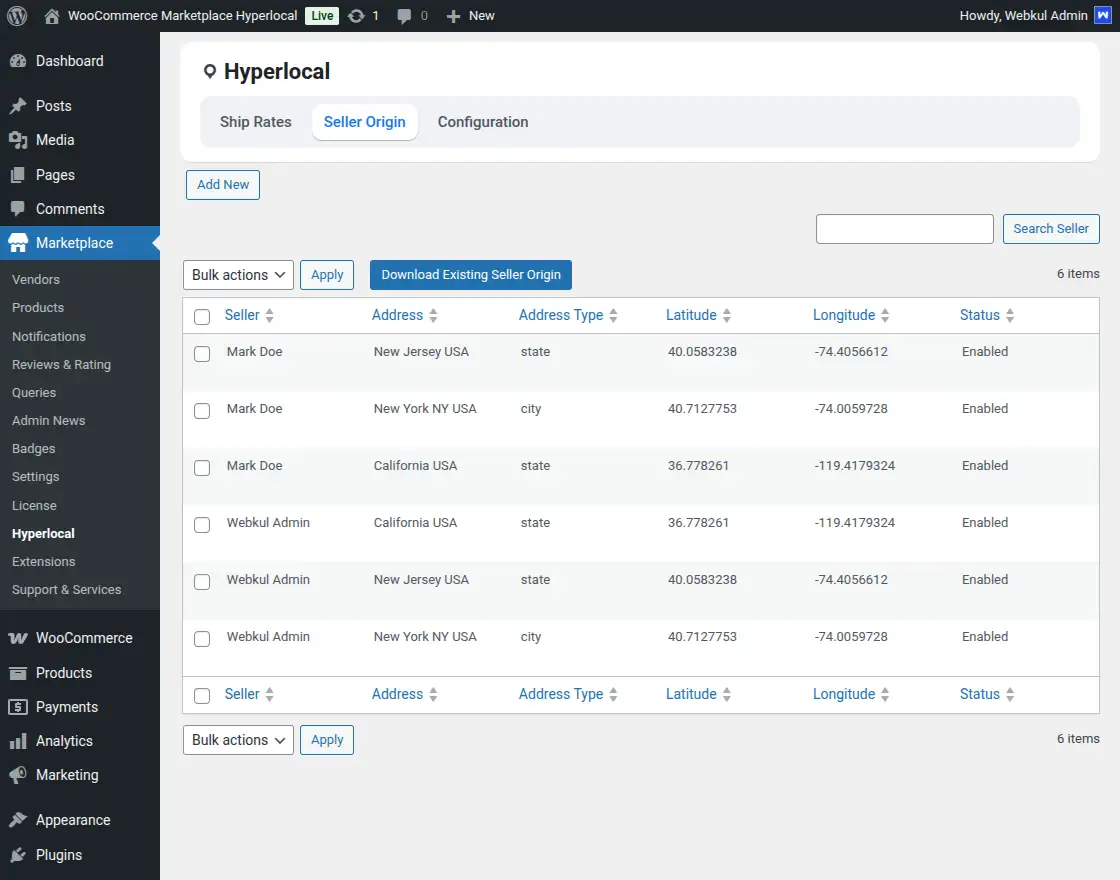
To add a new Seller Origin, click on the Add New option and create the new Seller Origin.
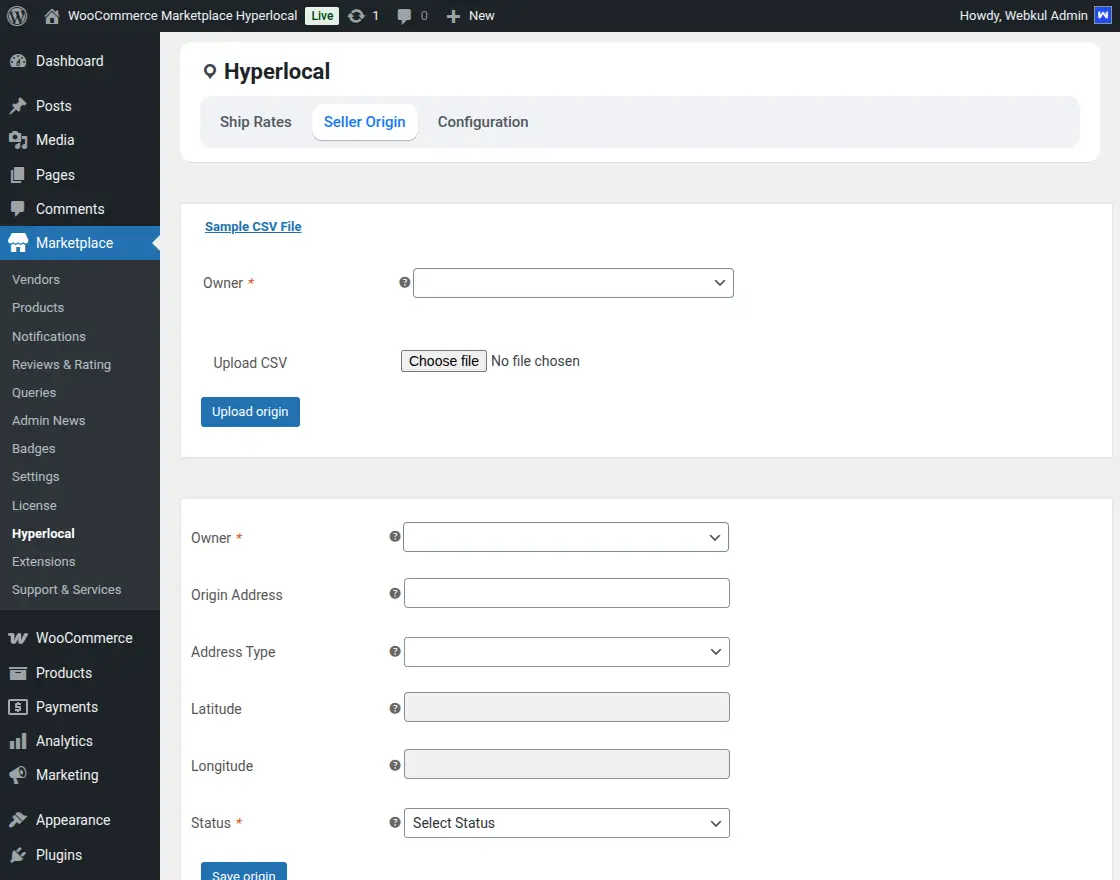
The admin can select the owner from the drop-down option and upload the CSV file for adding the origin list.
Owner: Select the owner for the shipping rate from the drop-down options.
Origin Address: Add the seller’s origin address.
Address Type: Select the address type from the drop-down.
Latitude: Enter the shipping area latitude.
Longitude: Enter the shipping area longitude.
Status: Select the status as enable/disable from the drop-down.
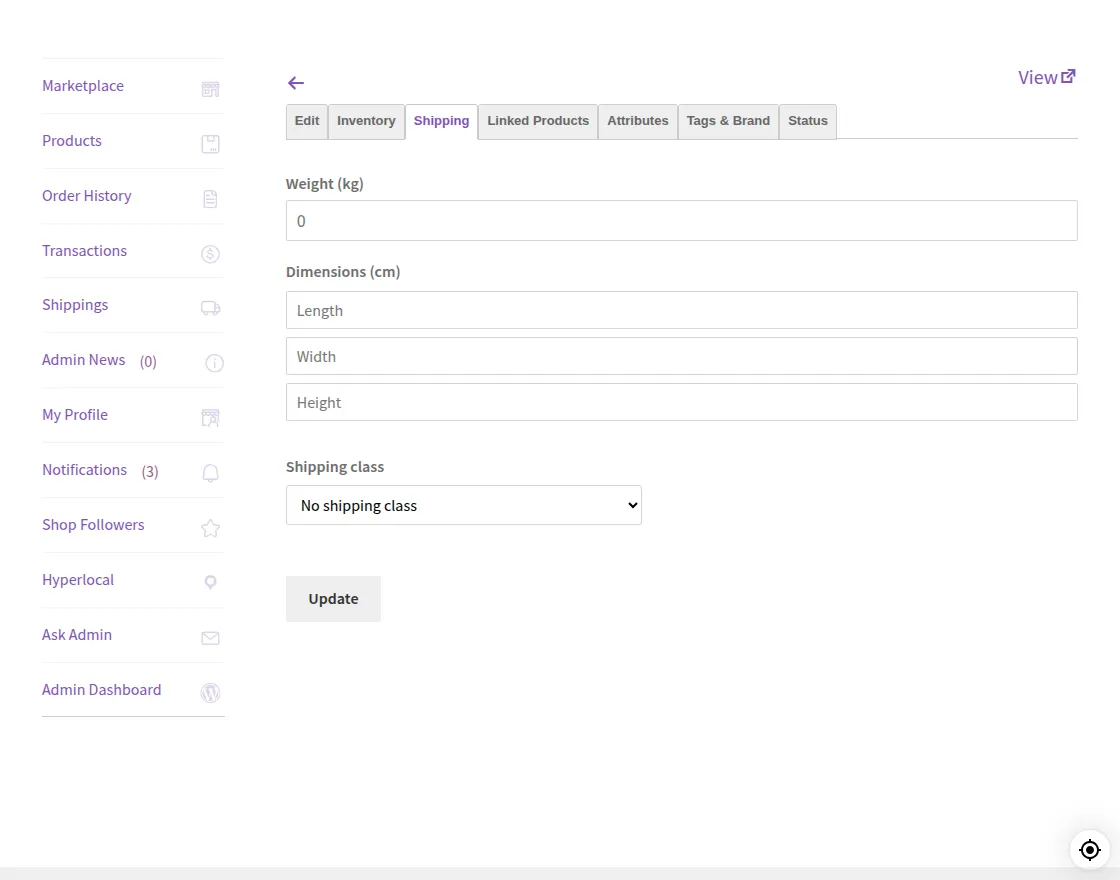
Add Weight to the Products:
For adding weight to the particular product go to Products, add new or edit the existing product:

Edit any of the products and click on shipping as mentioned in the below snapshot:

From here the admin can add the weight and dimensions and after adding all the details click on save.
Seller End Workflow

After that, In the seller panel, under the Dashboard options, the “Hyperlocal” option is present and the seller can configure the settings for Multi-Vendor Hyperlocal Marketplace Plugin for WooCommerce.
Under the “Hyperlocal” option, a seller can set their Shipping Rate, and Add New Shipping Rate.
Furthermore, the seller can also add the shipping rates by uploading the CSV. To add shipping rate click on the Add Rate.
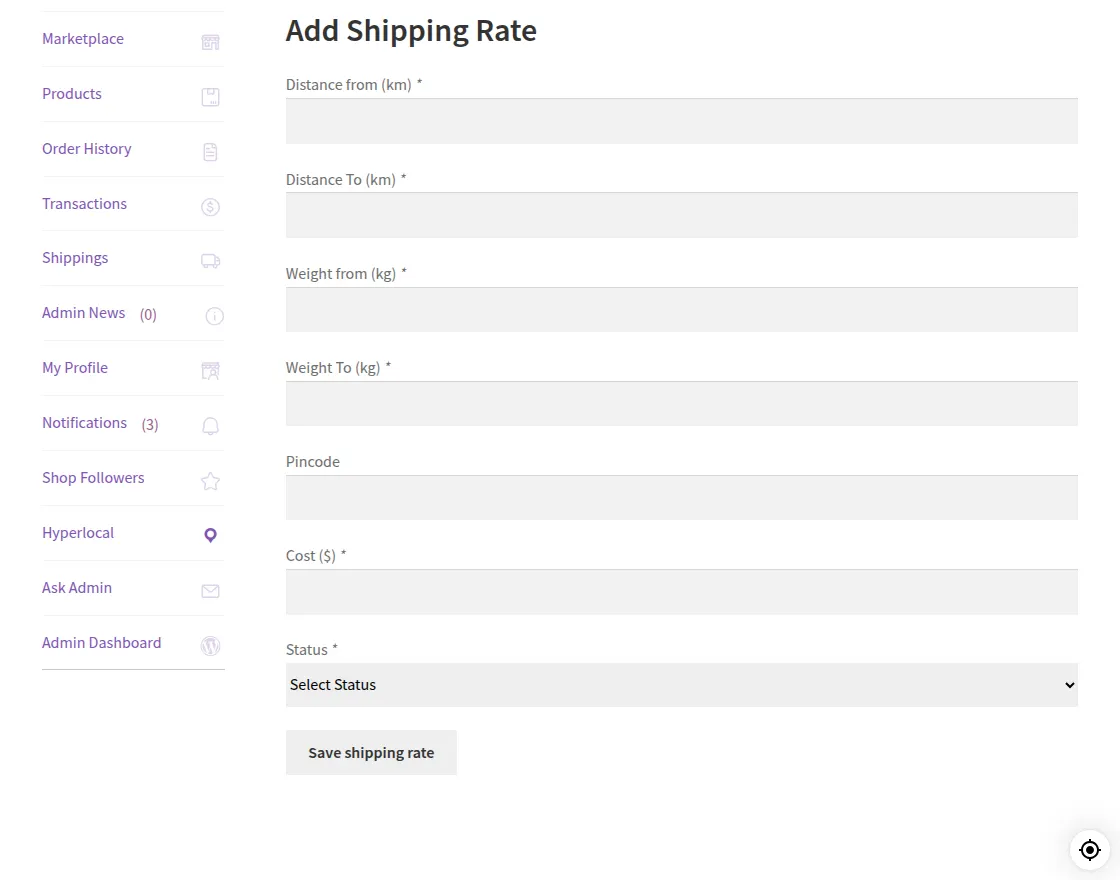
Distance from Origin: The initial value for the distance to cover while shipping the product.
Distance To: final value for the distance to cover while shipping the product.
Weight from: The initial value for the weight of the product which will be out for shipping.
Weight To: The final value for the weight of the product which will be out for shipping.
Pincode: Enter the pincode number.
Cost: Set the cost as per the distance and the weight of the products.
Status: Enable or Disable the status of the shipping rate.
The Seller can manage the seller origin by clicking on the seller origin option, in the below snapshot the admin can add origin and rate.
By clicking on the Add Origin the seller can add the details for the new origin and can save it.
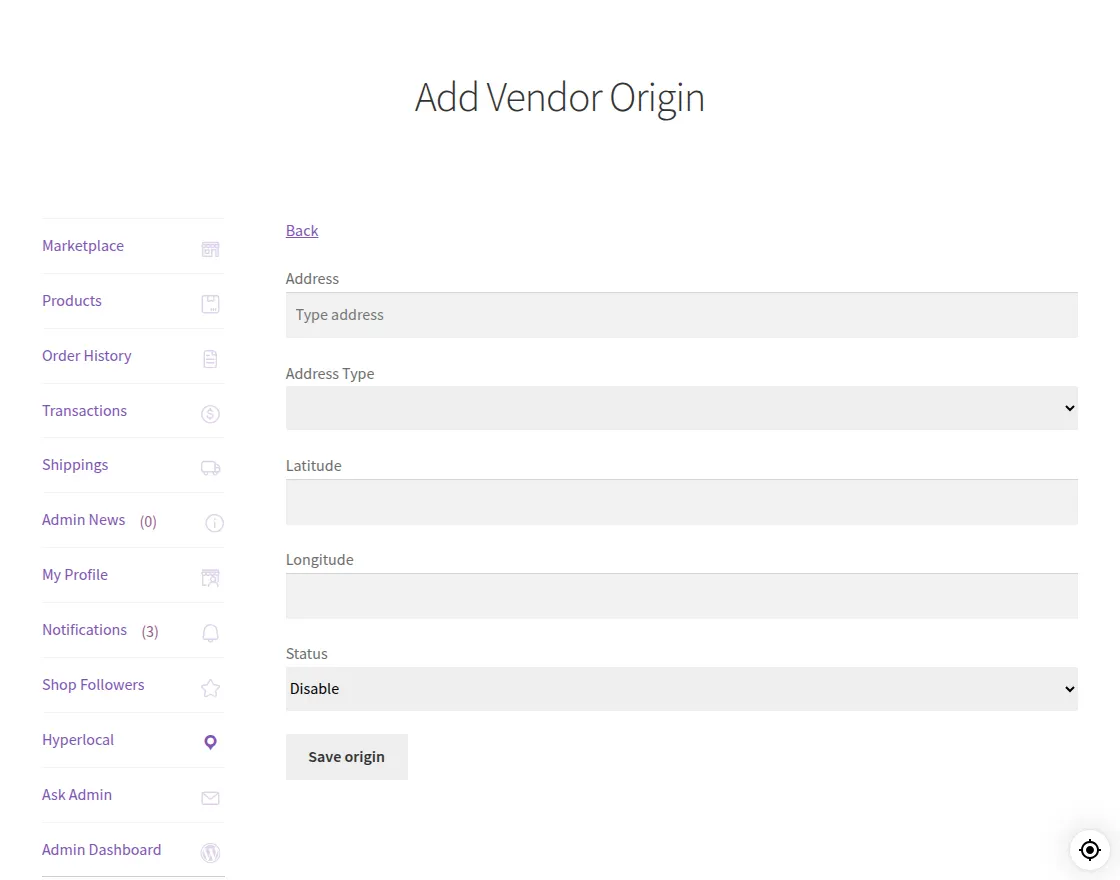
Moreover, the seller can sell in his street/Locality/city/state/country. For street/locality google Maps will auto-take longitude and latitude.
If a seller wants to sell across city/state/country then the seller will have to manually add long or latitude of the shop.
In this way, the seller can add and save their origin.
Add Weight to the Products:
To add the weight on a particular product, go to the products option and open all product lists, from here the seller can set the weight on an existing product or can add a new one.

When adding or editing the existing product, the seller can see the shipping option, click on the shipping option.
Enter the weight, dimensions then click on update. Like this, the Seller can add shipping details for a particular product.
Customer End Workflow
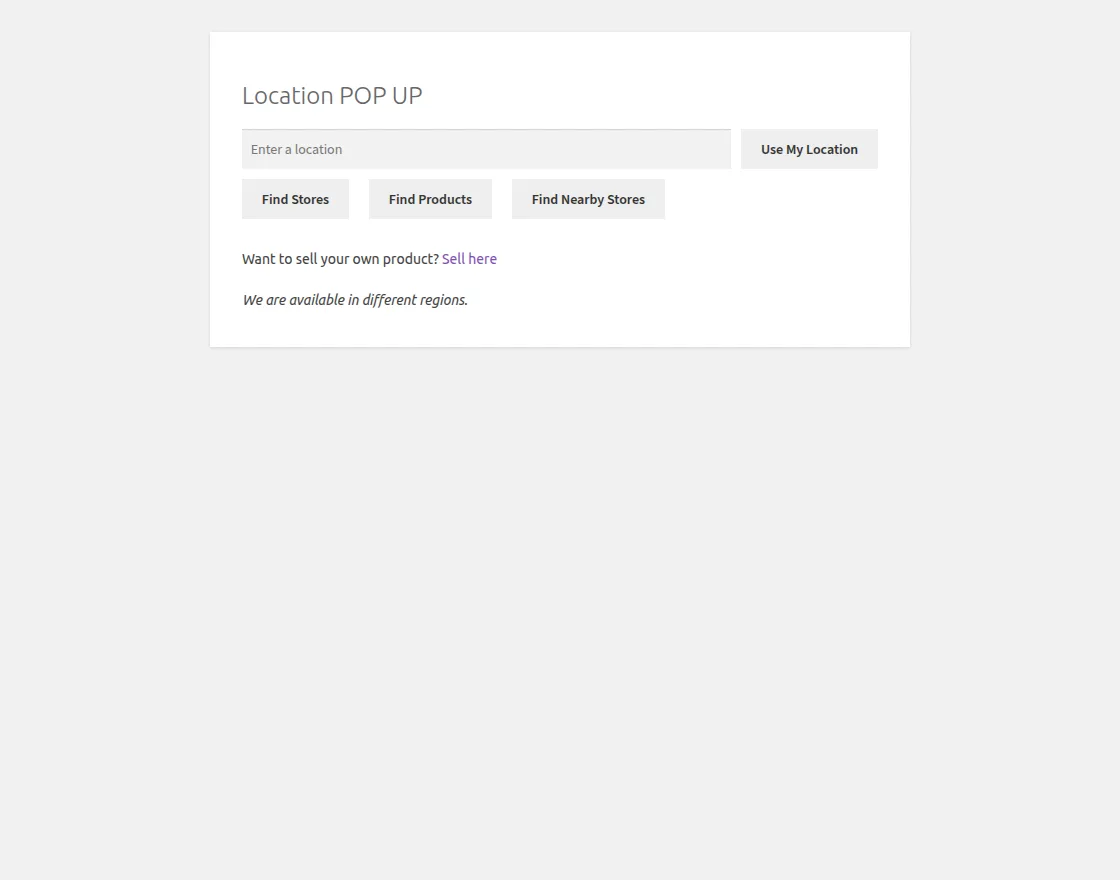
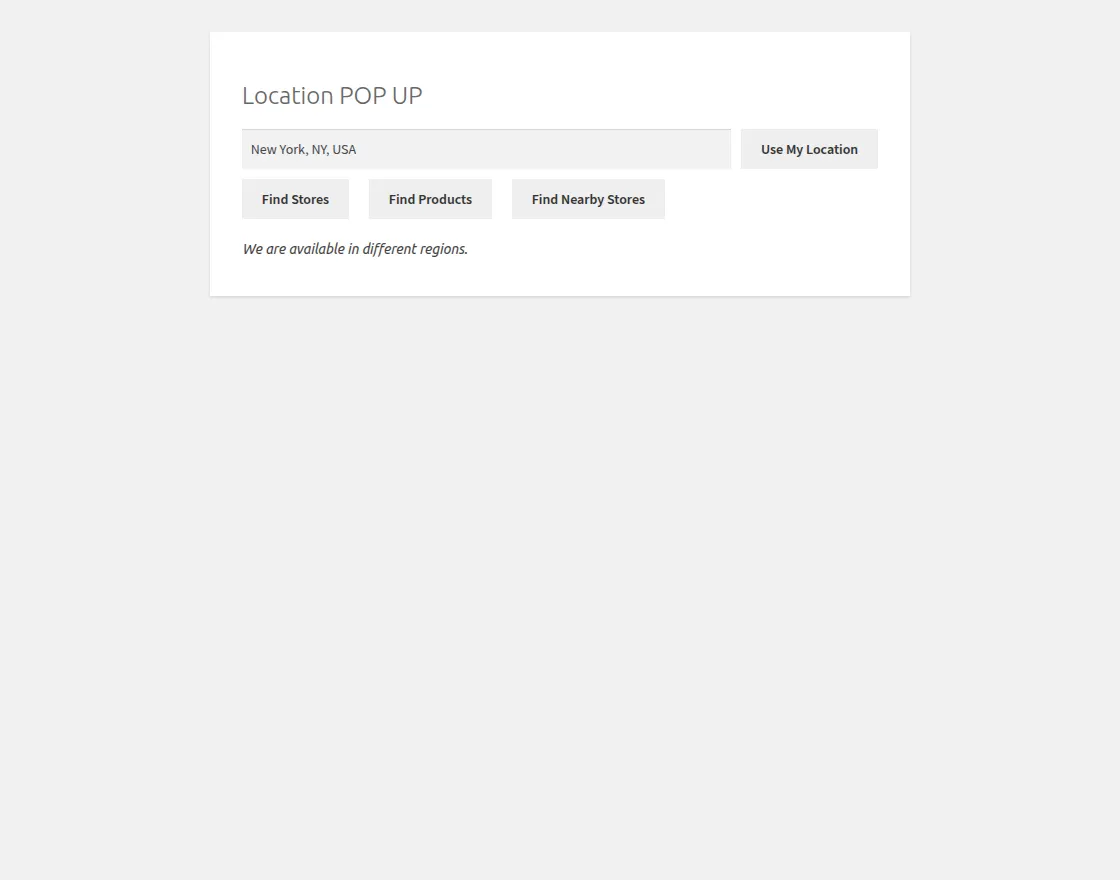
When the customer visits the website, a screen appears. The customer has to enter a location.
After adding the location, the customer can tap on the “Find Stores” button or “Find Nearby Stores” to locate nearby stores.
Furthermore, if customers hit the URL of the product, category, or shop as well, the customer needs to enter the location first.
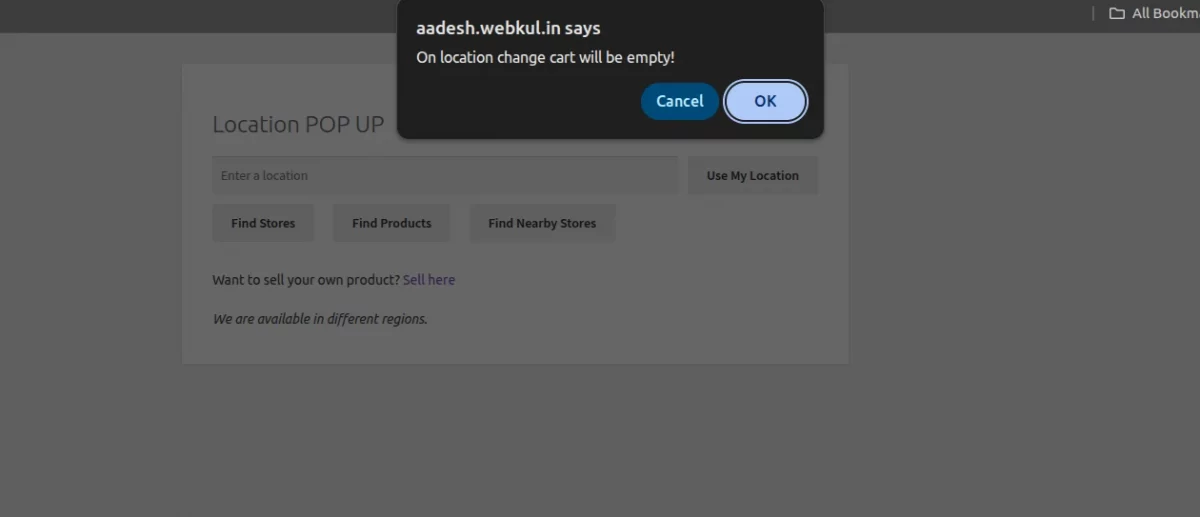
Moreover, a customer can change the location as well.
After that, On changing the location the customer will see a pop-up notification stating “On location address, change cart will empty”.
Hence, if there is any product in the cart then it will get removed from the cart then the cart will become empty on location change.
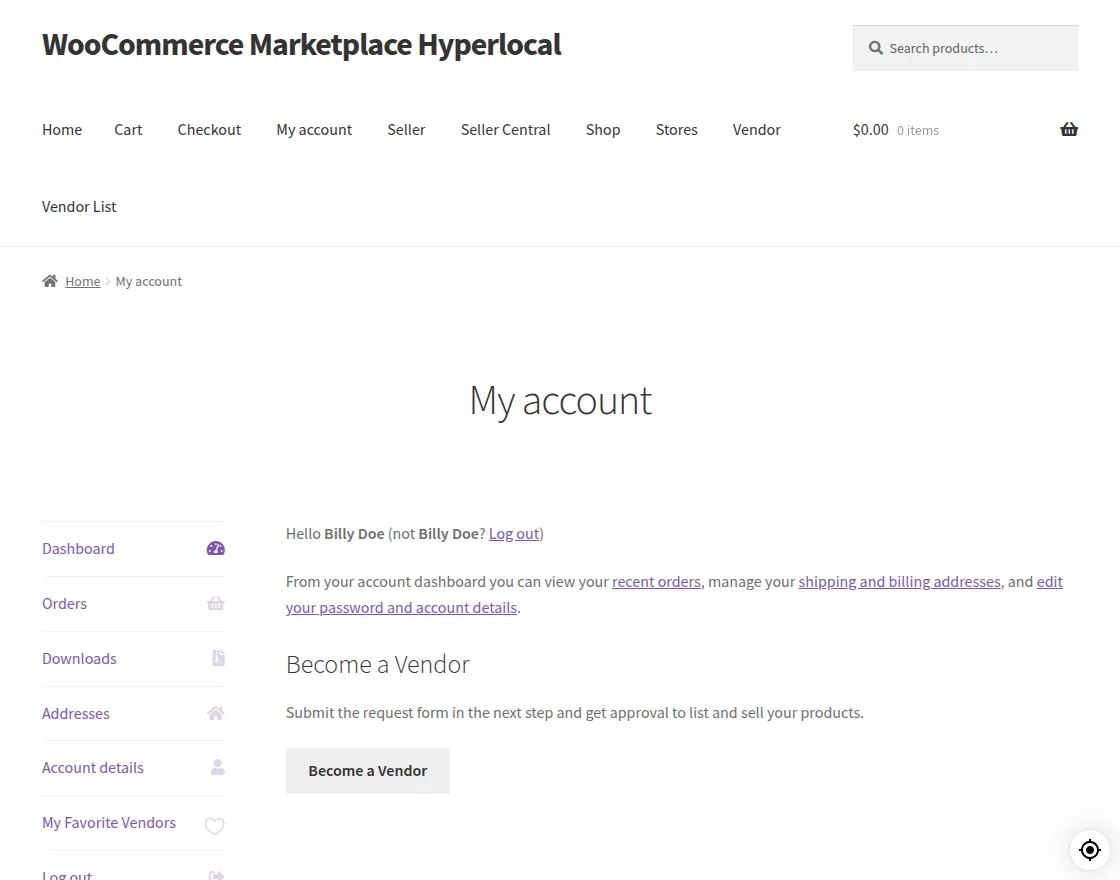
If a customer is logged-in, a current location selector icon will display to the customer.
The customer can use this icon to auto-detect the location of a customer –
Now, when clicked on this icon, it will show the current location of the customer by default as shown in the image below –
On the front-end, the customers can view the stores on the basis of the location.

After selecting the store, the admin can find the products that particular store as mentioned in the snaphot:
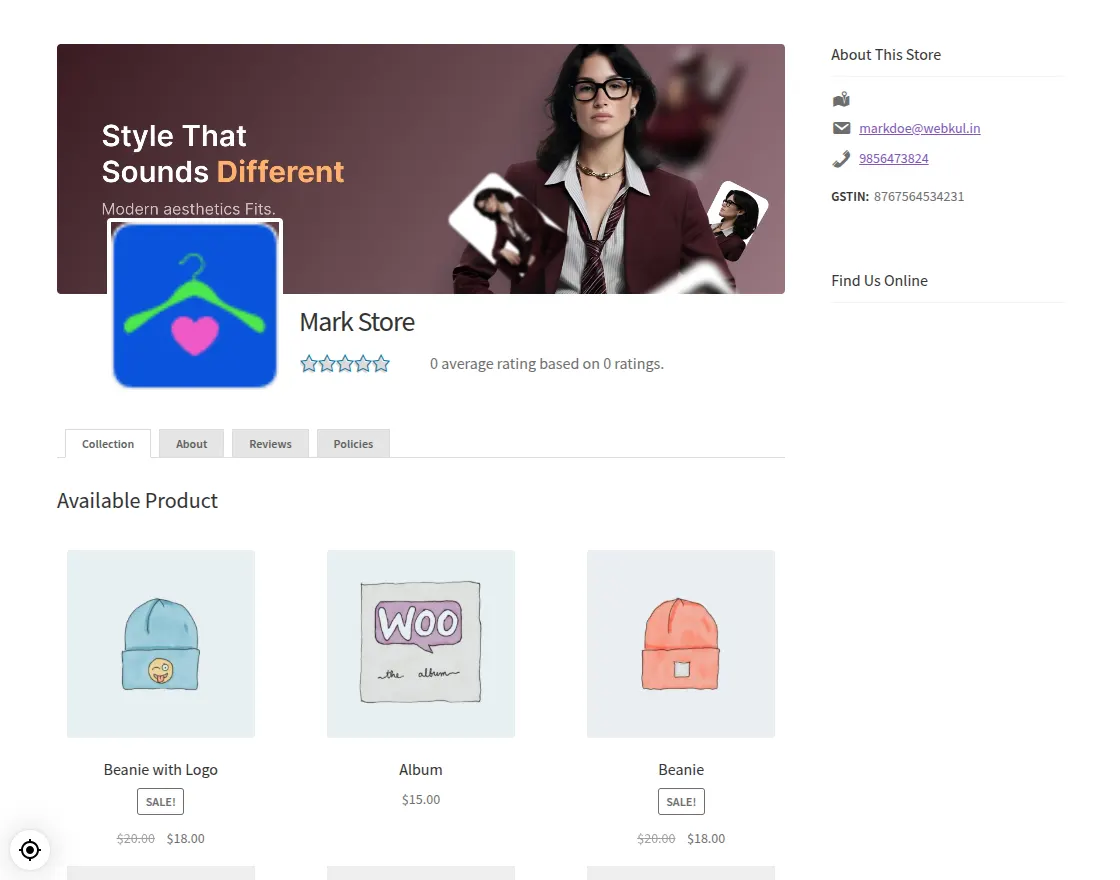
The customer can choose any of the products which the customer wants to purchase and can proceed to checkout.

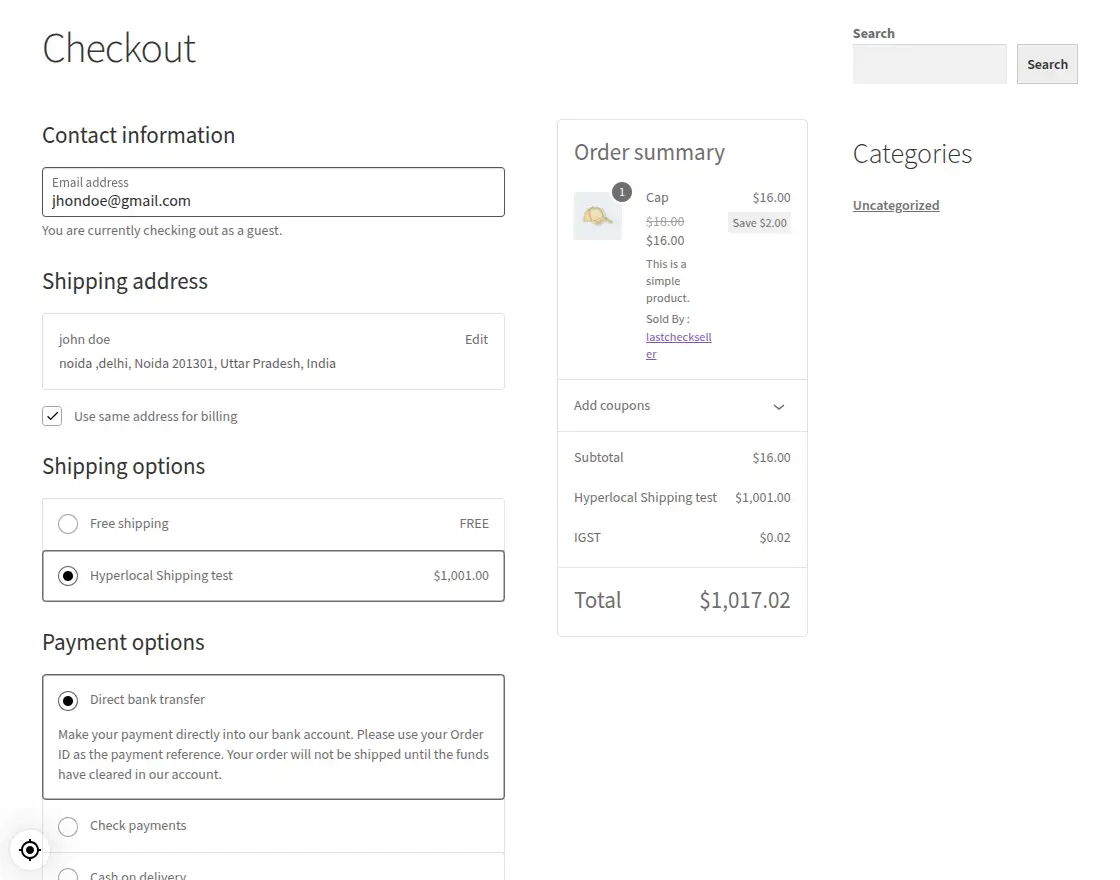
At the checkout page, the customer can check the shipping details, the store name which the customer had selected.
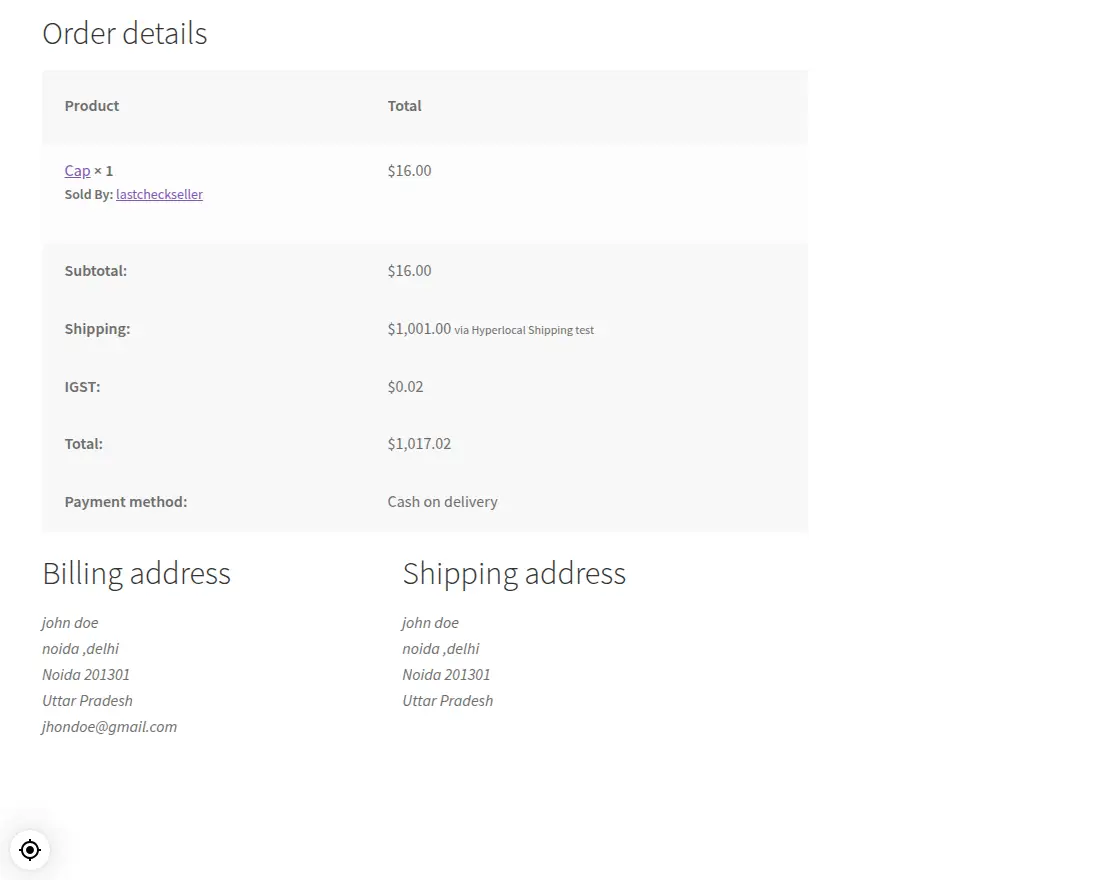
After placing the order, on the order page details, the shipping method will be mentioned along with the rest of the order details.
In conclusion, for the Multi-Vendor Hyperlocal Marketplace Plugin for WooCommerce.
If you still have any issues, feel free to add a ticket and let us know your views on our Webkul Support System. You may also check our quality WooCommerce Plugins.
Current Product Version - 1.5.0
Supported Framework Version - Wordpress : 6.9.4 ; WooCommerce : 10.7.0

5 comments
Greetings for the Day!
Thanks for going through the blog and dropping your query.
As of now, our Multivendor Marketplace does not support a multisite setup. If you wish to have this feature, we can always customize (paid service) it for you.
Please let us know your complete requirements regarding the same so that we can assist you further with this.
For further details or queries, please get back to us at [email protected]
Thanks and Regards!
Thanks for connecting with us!
Our plugins are developed over the default WooCommerce functionalities & as multisite is not a default WooCommerce feature so our marketplace also do not work with the same.
But if you are having some requirements related to the multi site kindly contact us [email protected]. So, we can assist you faster and better.
Thanks,
Team Webkul
Thanks for the query. Multi-Vendor Hyperlocal Marketplace Plugin for WooCommerce can be used for multiple sites but this plugin would not support third-party multi vendors plugins.
Meanwhile, it will work with Multi-Vendor Marketplace for WooCommerce.
For any other query, please get back to us at [email protected].
Thanks and Regards.