Opencart Salesforce Connector is an extraordinary module for synchronizing an eCommerce Opencart platform data to a Salesforce CRM platform. The user can easily synchronize orders, customers, products, and categories of the Opencart to the Salesforce CRM by the help of this module. This feature helps admin to manage their store data in a better way on Salesforce CRM and provide better customer service.
Features Of Opencart Salesforce Connector
- Synchronization of Opencart categories to Salesforce CRM.
- Admin has three option for syncing the categories – Parent, Child, and All Categories.
- Synchronization of Opencart products to Salesforce CRM.
- Admin can sync all products or the products will enable option.
- Synchronization of Opencart orders to Salesforce CRM.
- Synchronization of Opencart customers to Salesforce CRM.
- Admin can sync all customers or the enabled customers.
- When any modification is made, then the synchronize status button turns red.
- Admin can check leads and documents at Salesforce end in the real-time.
- In the Salesforce, the admin will create a directory where all the images of synced categories and products will be saved.
- In the Opencart Salesforce Connector Dashboard, admin can see all the recent activity related to the synchronization.
- Auto-sync orders, products, categories, and customers from Opencart to Salesforce CRM.
How to Configure
Module Installation
Installation of the module is very easy. You just need to drag your admin, Catalog, system & wk_salesforce folder files into the Opencart root folder and it will be installed.
You can also install the Opencart Salesforce Connector by uploading the zip & XML files through extension installer.
Now admin will go to Extensions > Modifications and then click on refresh button like the image below.
For Opencart 2.2.x.x & below versions, you need to navigate to Extension > Modules
Or
For Opencart 2.3.x.x & above, you need to navigate to Extension >Extension > Modules
After that, you can install and edit the Opencart Salesforce Connector like this way.
Salesforce Connector Configuration
Before editing the module, the admin will log in to salesforce account. The admin needs to generate “security token” from the Salesforce’s end which will be used while configuring the Opencart Salesforce Connector.
After receiving the token from the Salesforce, the admin will configure the module.
Connection Settings
Under the connection settings, the admin can configure the following sections as shown in the image below.
Status: The admin can set the status of the module as enable/disable.
Username: The admin can enter the username of the salesforce.
Password: The password for the respective salesforce is needed to be entered here
API Key: The admin needs to enter the Salesforce API key in the following section.
When all the information is saved, the admin can fill further fields which will appear under “Other Setting”.
Choose Folder – Select where images will be saved in the Salesforce after syncing from Opencart.
Price Book – Select where prices of the Opencart products will be saved after the synchronization.
Select Client Type – The admin can choose Partner or Enterprise as per the requirement.
Sync Slot Number – Select the number of records/items to synchronize at every sync.
Syncing Setting
The admin has to upload a WSDL file here to allow the syncing process. Click Upload New WSDL to browse and upload the file from your system. Then choose WSDL file and click Save.
Upload WSDL File
Click Add File to browse the WSDL file from your system. To use the original filename, tick the checkbox. Otherwise, rename the XML file and click Upload.
Opencart Salesforce Connector Management
After the module installation and configuration, admin can see the Salesforce Connector tab in the dashboard.
When admin login into their Salesforce account, then they will see this page. From here admin need to select the “eShopSync” option under the “app” menu.
Go to “eShopSync” app to check all the synchronized content menu.
Workflow of the module
Let’s see how category, product, order & customer are synchronized from Opencart to Salesforce.
First admin will select the options for synchronizing categories from the dropdown and only those categories will be synced with the Salesforce. If Admin selects “Only Parent Category” then all the parent categories will be synced. Also, If the admin selects “Only Child category” then the child category along with its parent category will be synced. If a Parent category does not have any child category then it will not be selected. In “All Category”, parent and its child categories get synced.
After the category synchronization, it will be displayed like this in the Opencart.
In the Salesforce, under the “Categories” tab, synced categories will be displayed like this.
When any modification is done on the synchronized category then Synchronize status button will turn red like the image below.
Admin will click on that red button and then that particular category will be synchronized with the Salesforce.
Sync Product
Here admin can select “All products” which will include all the products in the Opencart for the synchronization. In “Only Enabled Products”, products with enabled status will get synchronized. products with disabled status will not get synchronized.
After the product synchronization, products will be displayed in the Opencart like the image below.
In the Salesforce, synchronized products will be displayed like the image below.
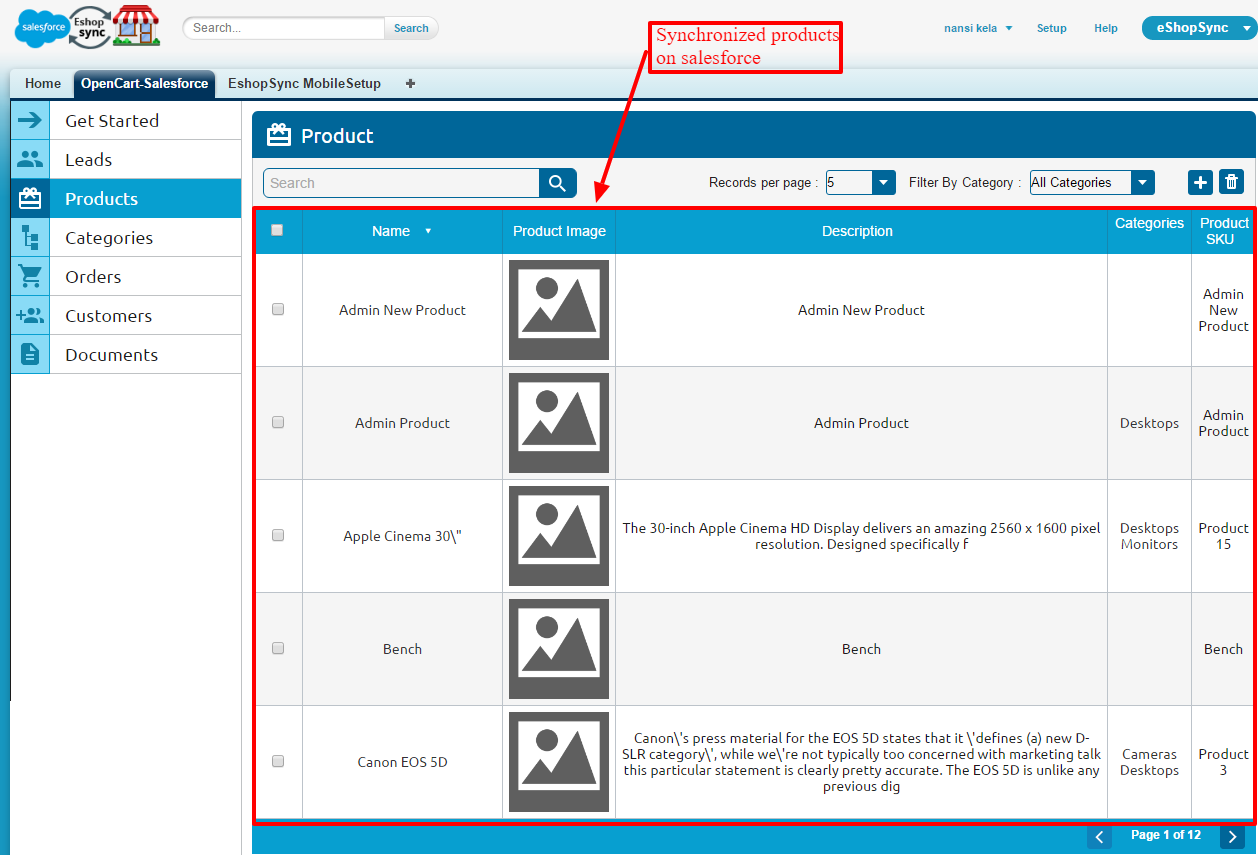
When you will click on any synced product, then you can see all the details about that product.
When any modification is done on the synchronized product then Synchronize status will turn red like the image below.
Admin will click on that red button and then that particular product will be synchronized again with the Salesforce.
Sync Customer
Admin can select “All Customers” which will include all the customers in the Opencart for the synchronization. In “Only Enabled Customer”, the customer with enabled status will get synchronized. Customers with disabled status will not get synchronized.
After the synchronization, admin can view “Synchronized Customers” in the Opencart like the image below.
In the Salesforce, under the “Customer” tab, you can see the synced customers from Opencart.
When you will click on any synced customer, then you can see all the information related to that customer.

Suppose any customer make any modification in their account details like updating their contact number or address, then the synchronizing status button will turn red. Admin will click on that button to synchronize that customer again with the updated information.

Sync Order
Admin will click on “Export Order” to synchronize orders from Opencart to Salesforce.
After the order synchronization, admin can view the list like the image below.

In the Salesforce, under the “Orders” tab, you can see the synchronized orders.
When you will click on any synced order, then you can see all the details associated with that order.
Here admin will select the directory created in the Salesforce from the drop-down. Under this directory ( created by the admin), all the Opencart images related to the categories and products will be saved at the time of Category and Products synchronization.
Leads are generated when any user sends a query by filling Contact Us form. But, this user should not be Opencart customer. In the Salesforce under the “Leads”, admin can view name, lead source, company and lead status. Admin can multi-select the leads and then delete them.
Please check the image below.
In the Salesforce, the admin can view the leads in the real time as shown in the below image.

When you will click on any lead, then you will be able to see all the details.
So like this we can synchronize the categories, products, orders and customers from the Opencart to the Salesforce.
Frequently Asked Questions
Q: What is the best way to test purchased connector file?
A: Data integrity is the main area of concern, we would recommend to install and test the connector sync features in Development site first by establishing the connection with Salesforce Sandbox. Upon successful testing, you may proceed to install the connector in Live site and Salesforce Production environment.
Q: What are the benefits of purchasing the connector along with Installation fees?
A: Purchasing connector along with Installation fees bring you into a comfort zone where you just need to share required details to initiate the installation process. Our concerned team will effectively proceed with the installation process as soon we get complete details and will get installed in 1-2 Working days.
Your trust and satisfaction is highly important to us and so your data will be completely secured.
Q: What will be covered under Installation fees?
A: We will install and setup Connector at Opencart end and get things ready to go situation for you. Installation of eShopSync For Opencart as well, in case it is not installed at Salesforce end.
We will sync a test record on each object to make sure that synchronization is working fine. Further, you may proceed with synchronization on your own.
Q: What are the required details mandatory to share for Installation procedure?
A: You need to share the following details to proceed with the installation and setup of the connector:
- Would be preferable to install in Development site first in connection with Salesforce Sandbox, so create a Dev site and share the details accordingly.
- Opencart Admin URL of the concerned site with login credentials.
- Salesforce login credentials
- SFTP/FTP Details such as Host Name, Port, User, and Password.
NOTE: Mandatory to share SFTP/FTP details and all of the concerned site such as Host Name, Port, User, and Password if we experience any issue while connector installation due to any plugin confliction.
Additional FAQs
Q: What are the conditions to pay Installation fees?
A: If you are stuck and having trouble while proceeding with configuration then you need to pay Installation fees along with required details to install and setup the connector properly.
To pay the Installation fees: Click Here
NOTE: We have already provided help links and video tutorials to install and setup the connector.
Q: When you can avail the benefits of free support?
A: Free support comes in the picture once the connector is installed and configured properly. If there is any issue while connector installation then it will fall under Installation process and will be treated as per Installation procedure.
In case, you have not paid the installation fees and want support to install and configure the connector then you need to pay the installation fees and must share the required details to initiate Connector installation procedure.
Q: What will be covered under Free 3 months of support availed with connector purchase?
A: Post successful connector installation and configuration, if you are experiencing any issue while data synchronization that would fall under free support.
You may find steps to resolve the issue under Frequently Asked Questions section as per error received. Else, you may create a ticket on the link mentioned under Support section with steps to reproduce and provide all required login details.
Q: What are the details mandatory to be shared to debug the issue?
A: You need to share the following details to investigate the issue:
- Opencart Admin URL of the concerned site with login credentials.
- SFTP/FTP Details such as Host Name, Port, Username, Password.
- Salesforce login credentials. Or, you may grant login access for Salesforce as well: How to Grant Login Access
NOTE: Mandatory to share SFTP/FTP details and all of the concerned site such as Host Name, Port, User, and Password if we require while investigation.
Q: What if you can’t share SFTP/FTP details or Login credentials of Opencart and Salesforce due to privacy/security concern?
A: Your data is highly secured with us and it is mandatory to share SFTP/FTP details and login credentials of Opencart and Salesforce while investigation on any issue. Without having complete details, we can’t proceed any further.
Q: Can you provide support on screen sharing sessions via any medium like Team Viewer/ GoToMeeting/ etc?
A: No, we don’t provide any support on any of screen sharing sessions like Team Viewer/GoToMeeting/etc. Hence, it is mandatory to share complete details to provide seamless support.
Q: What if you can’t share asked details on the support ticket to debug the issue and want a full refund?
A: In this case, the refund would be processed as per the Refund Policy: Check Refund Policy Here
Q: What are the other options to get support if you have privacy concern sharing Live Site details?
A: You need to provide a development environment (complete replica of the Live site) with the following details:
- Steps to reproduce
- Login credentials
- SFTP/FTP details such as Host Name, Port, User, and Password
We will debug the issue and provide proper resolution in the Development site. Upon successful testing, you can implement in Live site.
Support
- For any further query, Click To Create Ticket
- To know the feasibility of specific requirement: Request For Customization
- To view all our applications in Appexchange, go to Webkul Appexchange Apps
Current Product Version - 2.0.0.0
Supported Framework Version - 3.x.x.x

SyntaxError: JSON.parse: unexpected character at line 1 column 1 of the JSON data
OK
( ! ) Fatal error: Uncaught SoapFault exception: [sf:INVALID_TYPE] INVALID_TYPE: sObject type ‘webkul_es__wk_oc_categories__c’ is not supported. If you are attempting to use a custom object, be sure to append the ‘__c’ after the entity name. Please reference your WSDL or the describe call for the appropriate names. in D:PROJECTSopwk_salesforceSforceBaseClient.php:519
Stack trace:
#0 D:PROJECTSopwk_salesforceSforceBaseClient.php(519): SoapClient->__call(‘upsert’, Array)
#1 D:PROJECTSopwk_salesforceSforceBaseClient.php(519): SoapClient->upsert(Object(stdClass))
#2 D:PROJECTSopwk_salesforceSforceEnterpriseClient.php(142): SforceBaseClient->_upsert(Object(stdClass))
#3 D:PROJECTSopsystemlibrarysfconnectorloader.php(345): SforceEnterpriseClient->upsert(‘webkul_es__wk_c…’, Array, ‘webkul_es__wk_o…’)
#4 D:PROJECTSopsystemlibrarysfconnectorloader.php(221): SFConnectorLoader->sync_Category(Object(SforceEnterpriseClient), Array)
#5 D:PROJECTSopadmincontrollerwk_sfconnectorwk_product.php(423): SFConnect in D:PROJECTSopwk_salesforceSforceBaseClient.php on line 519