Magento Customer Partner for Simple Product
Magento customer partner(simple) module is quite flexible in functionality and works out of the box. This module allows you to convert your Magento store into proper sale purchase site. Here customers of the store can upload and sell their products too.
Installation of Customer Partner(simple) Module
Installation of the customer partner(simple) module is very simple after downloading the customer partner(simple) module from this URL http://store.webkul.com/Magento-Extensions/Magento-customer-partner.html unzip the customer partner(simple) zip. You will find the app and skin folder inside that. Move that app and skin folder into magento root as per the screenshot.
After moving both the folder flush the cache from magento admin panel. Under System > Cache Management.
Module Installation For Custom Theme
If you are using the custom theme then after module installation follows these steps carefully:
- Go to your FTP directory where you have installed Magento then find “app/design/frontend/default/default/template” folder and copy “customerpartner” folder and paste into “/app/design/frontend/your_theme_name/default/template” folder.
- Then copy “customerpartner.xml” file from “app/design/frontend/default/default/layout” folder and paste into “/app/design/frontend/your_theme_name/default/layout” folder.
- Go to “skin/frontend/default/default” folder,copy “customerpartner” folder and paste into “skin/frontend/your_theme_name/default” folder.
Magento Customer Partner(Simple) Configuration
After the successful installation of the Customer Partner(simple) module you will be able to see the configuration panel under system > configuration as per the below screen.
As per the above screen, you can see admin configuration parameters for customer partner. Let’s explain each parameter one by one.
Percent per product sale
Percent % per product sale is the global commission which seller needs to enter, this commission mechanism will be applicable for all the sellers. Let’s say as an example there is a seller S1 and his/her product(P1) price is 100 USD. So on the sale of product P1, seller will get 90 USD and admin will get 10 USD as commission.
Product Approval Required
Using this option admin can restrict automatic approval of the product. e.g if seller adds a product every time product will be moderated by admin, store owner can set YES or NO.
Partner Approval Required
Partner or seller approval is the same as product approval, during sign-up of seller if admin allows this option then user who will sign up in the store as a seller will convert into seller automatically. Store owner can set YES or NO.
Admin Email-id
Admin can enter their email id for receiving all notification.
Attribute Set ID
Attribute Set ID is the attribute set ID for your global catalog by default this is Default. That’s why in screenshot it is showing as default. Admin can select attribute set from the drop-down.
Customer Partner Sign Up
Seller sign up is very easy, user can sign up for seller using my account link and during sign up if they want to sign up as a seller then they need to choose YES else NO from drop down list as per the screenshot.
During the registration if you didn’t select “to be a partner” and want to be partner later, then under account information section you can apply to be the partner, please refer to the screenshot below.

Customer Partner Seller Panel Management
if the user has been approved as a seller then the customer partner block will display in my account section of the user as per the image.
You can see, there are four links to base customer partner module to manage seller profile and to add the product to store. Let’s proceed one by one.
Add New Products
Under this menu, seller can add their product with many attributes as per the Magento admin. Seller can enter the product name, description, short description, price, stock, weight and upload multiple images. Also, proper validation has been applied for seller product add screen with live ajax check for product SKU.
After successfully product addition (if in the module, admin product moderation is set NO then product will be approved automatically) seller can edit or delete the added product and can manage by their end using under my product list.
My Product List
Using this menu seller can manage their product like they can update their product, delete their product can track their product sales and can mange their stock as per the screenshot.
As you can see there is a Edit button which will show the Edit Product page for product added by seller as per the screenshot.

My dashboard
using seller dashboard seller can track his sales using interactive chart , recent orders and recent comments with total sales matrix.
Also seller can ask questions or doubt directly to the admin from My Dashboard.
Order History
Using this Order History seller can see their products order history. Order history comes with pagination as per the screenshot.
Magento Customer Partner admin management
After the successful setup of the customer partner module, admin will able to see new admin menu “Customer Partner” as per the below screen.
Manage Products
This menu is responsible for seller product management if from customer partner configuration panel (System > Configuration > Webkul) product approval is required then in this case every product added by seller need to be approved by admin. Product approval will happen from manage product menu as per the screenshot.
As you can see there is a prev button which will show the preview screen for product added by seller as per the image.
Manage Partners
This menu is responsible for seller management if from customer partner configuration panel (system > configuration > webkul) partner approval is required then in this case every seller need to be approved by admin as per the image.
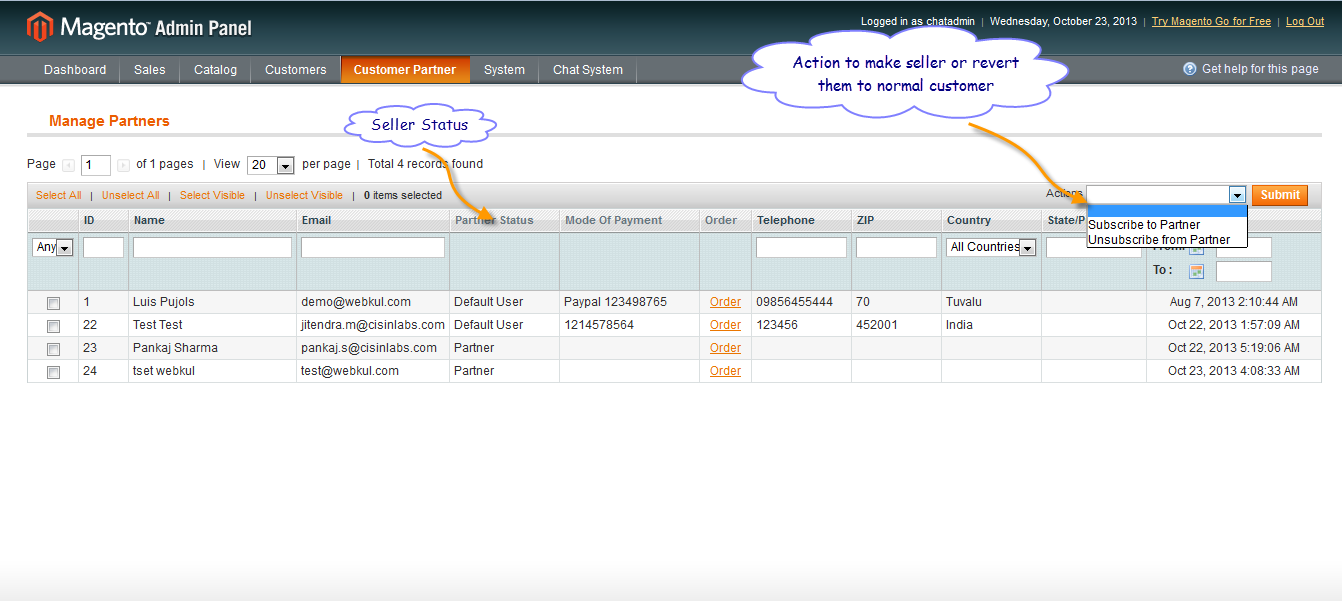
There is an action drop down menu by which admin can make pending customer to seller and visa versa.
You can see a column of order, when admin will click here it will display all the order of the that particular seller as per the screen.
By clicking any order admin can view the complete order of that seller.
Also mode of payment is the payment details added by seller from my account > seller information. It can be anything let’s say bank account number or paypal id where seller need payment from admin.
Manage Commission
Manage commission menu is responsible for all the commission management despite of global commission. There is an individual seller commission by which admin can set different different commission for different different sellers.
Pay Action
Pay action in grid will clear the payment for that particular seller. Let’s say Seller S1 has remaining amount 100 USD then after the pay button has been clicked that’s mean seller have already sent the payment. Now he / she is going to clear it (no actual payment with any payment gateway will happen here this link is for calculation only).
Commission
This column is for per seller commission display.

Be the first to comment.