WhatsApp Purchase Assistant for WooCommerce allows customers to purchase products directly through WhatsApp while providing a complete conversational shopping experience.
Moreover, this plugin integrates the WooCommerce store with the leading messaging service WhatsApp.
Now WooCommerce store owner can make the shopping process more convenient and quick for customers.
With this plugin, the admin can add the purchase on the Whatsapp button on the product list page, product view page, and cart page.
Even the admin can enable the checkout via WhatsApp to let the shoppers complete the purchase with the handiest App.
Moreover, the store owner can send custom notifications to the buyers when an order initiates any event either placed or cancelled.
Hence, purchase on the WhatsApp plugin advances the WooCommerce Store and provides a better shopping experience to your customers.
It also helps the admin to expand the sales channel and provide a user-friendly shopping tool “Purchase On WhatsApp”.
Note – Customer needs to add the WhatsApp number in the Phone Number Field for placing the order through WhatsApp.
Note – This module is now compatible with WooCommerce’s latest Cart and Checkout blocks and High-Performance Order Storage (HPOS) feature.
We provide a production version of the plugin. If you want a development version then you can get it at an additional cost. Please contact [email protected] for it.
Watch below Video & Understand the Purchase Using WhatsApp Plugin Workflow.
Features
- The admin can enable or disable the Purchase on WhatsApp button.
- The admin can customize the WhatsApp button label with custom text.
- The admin can hide the default checkout button from the storefront.
- The admin can configure reusable WhatsApp message templates directly from the WooCommerce admin panel.
- The admin can enable WhatsApp notifications for various order events and send personalized messages to customers.
- The admin can configure automated abandoned cart recovery reminders.
- The admin can automatically send post-purchase review request messages.
- The admin can enable coupon functionality, allowing customers to apply coupons during WhatsApp checkout with real-time order recalculation.
- The plugin uses a native WhatsApp Cart Parser for a seamless conversational checkout experience using JSON-based order payloads.
- Interactive WhatsApp buttons and List Picker templates simplify shipping and payment method selection.
- The live assistance webhook allows the chatbot to pause conversations and notify the admin when manual support is required.
- The Catalog Sync feature allows admins to synchronize products by selecting specific product categories.
- Centralized WooCommerce Logger integration provides easier debugging and activity monitoring.
- Improved international phone number formatting ensures reliable WhatsApp message delivery.
- Enhanced order mapping correctly associates every WhatsApp conversation with its corresponding WooCommerce order.
- This module supports all WooCommerce product types, and both registered and guest users can purchase through WhatsApp.
- Customers can initiate purchases directly from their WhatsApp account after clicking the Purchase on WhatsApp button.
- Customers receive WhatsApp notifications for order placement and cancellation.
- Customers can choose from the available shipping and offline payment methods during the WhatsApp checkout process.
Installation
The user will get a zip file which he has to upload in the “Add New” menu option in the WordPress admin panel.
For this login to WordPress Admin Panel and Under the Dashboard hover your mouse over the “Plugins” menu option which brings out a Sub-Menu and then select the “Add New” option.

Thereafter, you will see an option on the top of your page that is “Upload Plugin”, click the option to upload the zip file.

Afterwards clicking on the “Upload Plugin” option, below that you will see a button “Choose File” click on the button to browse for the zip file as per the snapshot below.

Thereafter browsing the file, click the “Install Now” button to install the plugin as per the snapshot.

Now when the plugin is installed correctly, you will see the success message and an option to activate the plugin. Click on “Activate Plugin” to activate the installed plugin.

Module Translation
To know how to translate the module, you can click here.
How to Setup the Twilio Account?
The store owners need to register themselves on Twilio to set up their account by undergoing the following steps.
Log In – Twilio Account
Moreover, if you already have a Twilio account, to log in enter your email id and further click over the Next button.

Sign Up – Twilio Account
To initiate your Twilio account. Now, enter your Name, Email and then set your password next click on the start your free trial button.

Therefore, as a result, a verification email sent to your registered email ID as shown below.

Now, verify your email by clicking on the Confirm your Email link enclosed within the mail.

Further, you need to enter your Phone number and click on the verify button.

Afterwards enter the verification code, that you have received on the number provided by you and then click on the submit button.

Thereafter, a pop-up will appear on your screen click on Confirm button to activate your sandbox account as shown below.

WhatsApp Sandbox Configuration
Furthermore, to initiate working (i.e build your WhatsApp bot) in the test environment the user needs to configure his/her sandbox inbound URL.
To be able to send and receive messages from the Sandbox to the Application. The store admin needs to go to the following web page.
- Send a message to the Twilio number with the verification code to join.

You will receive a confirmation text on your device as shown below.

- Send a One-Way Message.

- Two-Way Messaging.

Now after replying to the notification as shown above the user will have a 24-hour conversation window.

- Configure your sandbox.
Then In the below field WHEN A MESSAGE COMES IN the admin needs to paste the link https://storefront.com/wp-json/notification/whatsapp-bot and click on Save.
Now webhooks to this URL when a message comes in.


Note: To move into production using the Twilio API for WhatsApp, you need a WhatsApp Business Profile in conclusion, WhatsApp has to formally approve your account.
Generate Credentials
Just go to your Twilio project under the TRIAL dropdown menu as shown below.

You can view your ACCOUNT SID and AUTH TOKEN credentials, on the Dashboard section under your Project Name.

Module Configuration
To configure the module the admin navigate to the WhatsApp Settings Page in the side-bar menu at the admin panel.
As a result, The admin will get four tabs here as mentioned below.
Twilio Settings
Firstly, the admin needs to configure some basic settings associated with their Twilio account.
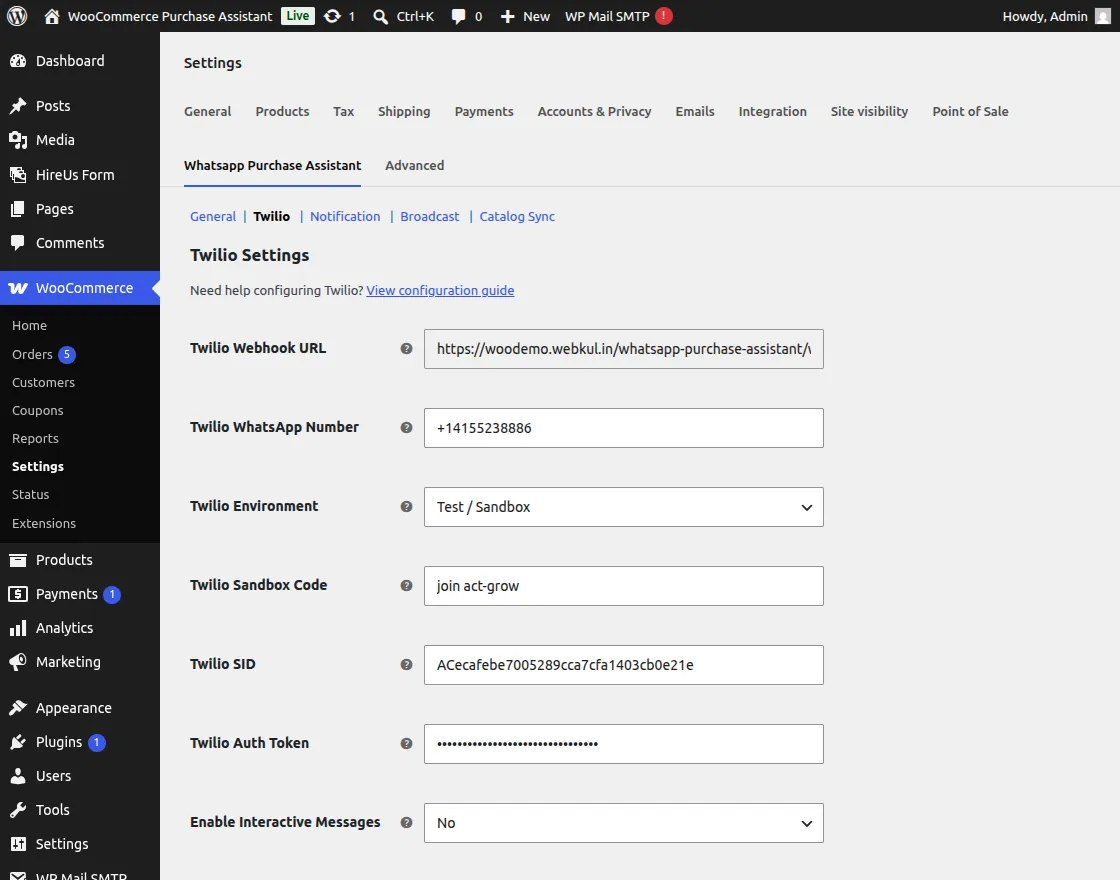
Here, the admin needs to give the required inputs for the below fields.
Twilio Configuration Guide
How to Configure Twilio for WooCommerce WhatsApp Purchase Assistant
Integrating Twilio with the WooCommerce WhatsApp Purchase Assistant allows you to send automated order updates, notifications, and customer support messages directly via WhatsApp.
Setting it up is quick and straightforward.
Step-by-Step Configuration
Save Settings in WooCommerce
Enter your Twilio WhatsApp Number, Account SID, and Auth Token in the plugin settings and save changes
Login to your Twilio Console
Visit Twilio Console and log in with your Twilio account.
Get Your Account SID and Auth Token
Copy the Account SID and Auth Token from your Twilio dashboard. These will be required to authenticate the connection with WooCommerce.
WhatsApp-Enabled Twilio Number
Obtain a WhatsApp-enabled Twilio number in the format: +1415XXXXXXX
Follow the WhatsApp Configuration Guide
Check the official documentation here: Twilio WhatsApp Docs. This ensures your number is properly activated for WhatsApp messaging.
Set Up the Receiving Endpoint URL
Configure your webhook endpoint in Twilio. This is where Twilio will send incoming WhatsApp messages to your WooCommerce store.

General View Page Settings
Now in this section, the admin can set the front-end view by giving inputs for the below fields.
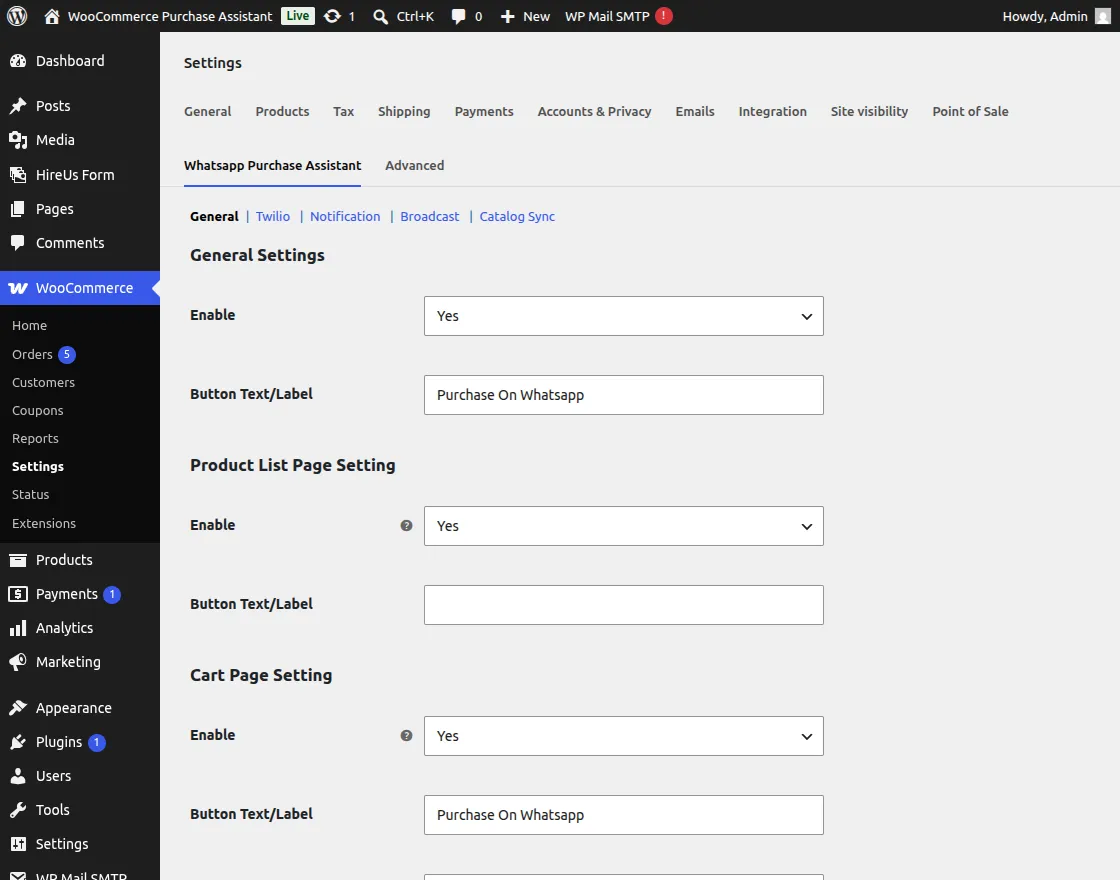

Enable – The admin can enable or disable the WhatsApp Widget to be displayed on the product view page.
Button Text/Label – The admin can enter a custom title for the Purchase on WhatsApp button text/label.
Product List Page Settings – Admin End
Enable – From here the admin can enable or disable the Purchase on WhatsApp button for the product list page.
Button Text/Label – Further, give a custom name to the WhatsApp Buy button.
Cart Page Settings – Admin End
Enable – From here the admin can enable or disable the Purchase on WhatsApp button i.e show the WhatsApp Widget on the Cart Page.
Button Text/Label – Give the required name to the WhatsApp Widget displaying on the cart page.
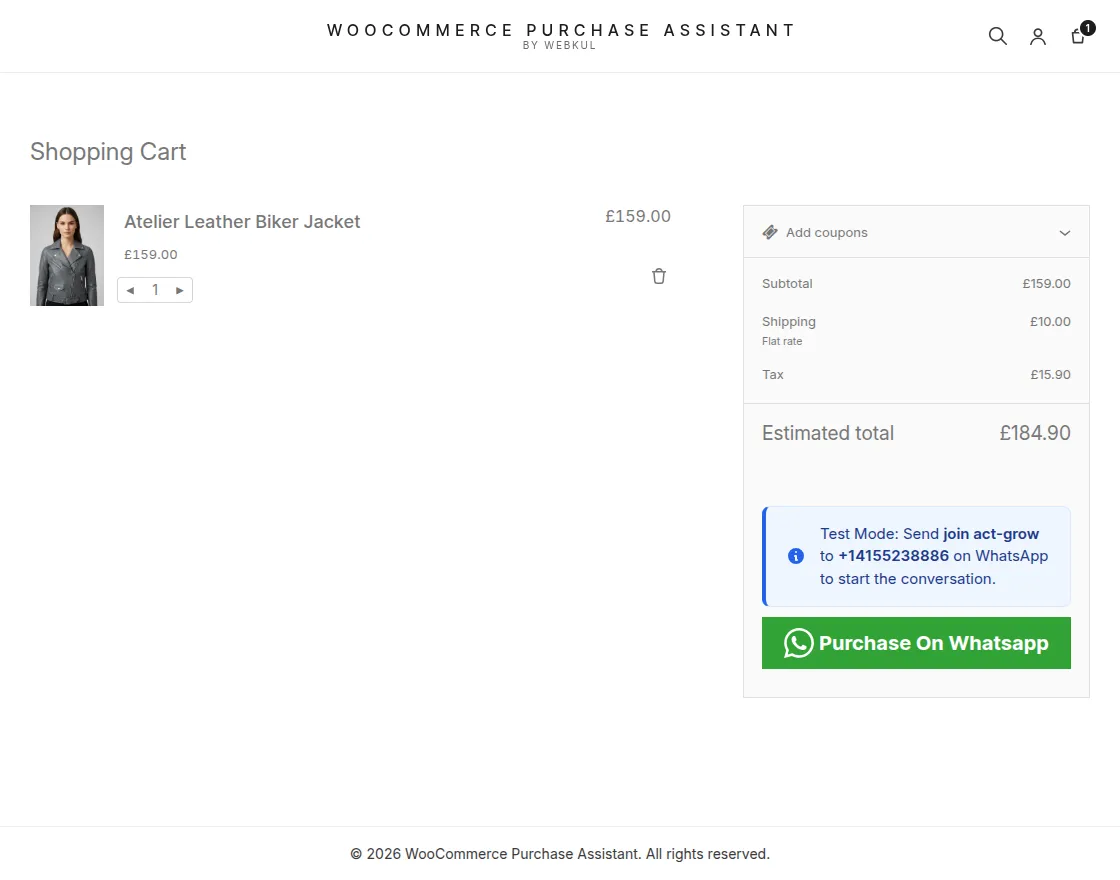
Hide Proceed to Checkout Button – Using this field you can hide or show the proceed to checkout button from the cart page as shown in the below images.
Notification
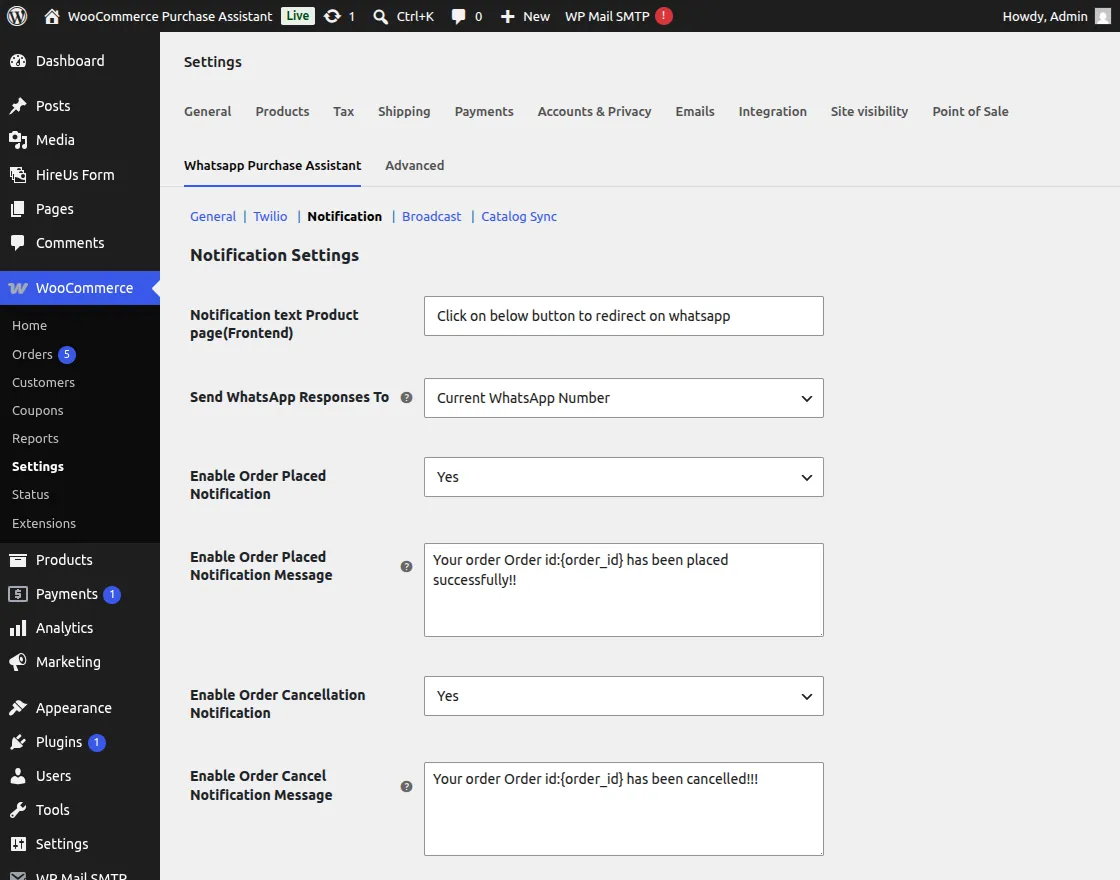
Broadcast
The admin can choose from a list of registered users or select all users, and then send them a broadcast message on their WhatsApp with an image and text caption.

The broadcast message will be shown on customers’ WhatsApp as shown below:

Catalog Sync
The Catalog Sync section allows the admin to generate a product feed and synchronize WooCommerce products with the Meta (Facebook & WhatsApp) Commerce Manager.
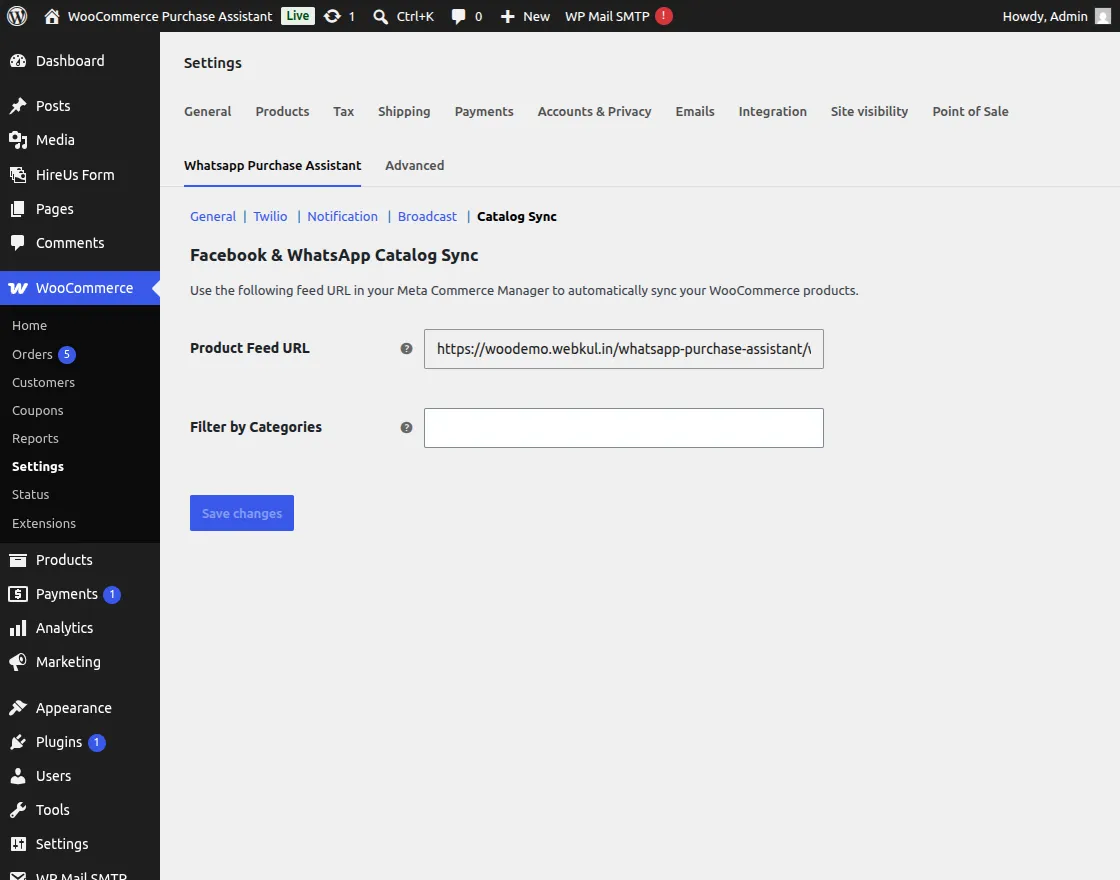
- Product Feed URL – Copy this automatically generated feed URL and add it to your Meta Commerce Manager to sync WooCommerce products.
- Filter by Categories – Select one or more product categories to include only specific products in the catalog feed for Facebook and WhatsApp.
Sync Products with Meta Commerce Manager
After configuring the Product Feed URL, you can connect your WooCommerce catalog with Meta Commerce Manager to automatically sync products for Facebook and WhatsApp Shops.
First, log in to your Meta Commerce Manager and navigate to Catalog > Data Sources.
Create a new data source and choose the Scheduled Feed option. Paste the Product Feed URL generated by the plugin, configure the update schedule, and save the settings.
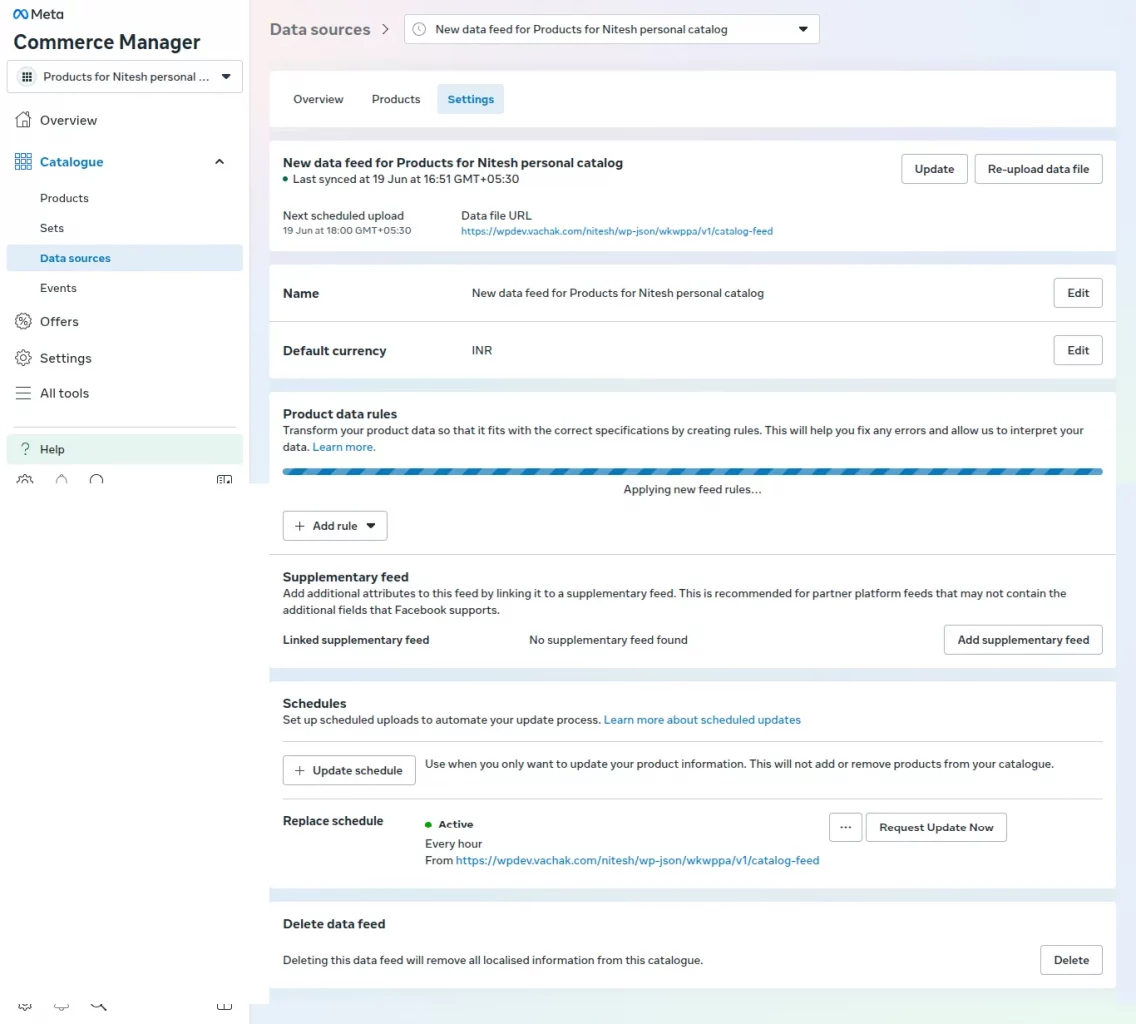
Once the feed is processed successfully, Meta automatically imports the selected WooCommerce products into your catalog.
Products Successfully Synced
After synchronization, navigate to Catalog > Products in Meta Commerce Manager to view all imported products.
The synced catalog displays product information such as product name, availability, price, variants, and the latest update time, making it easy to manage products across Facebook and WhatsApp Shops.
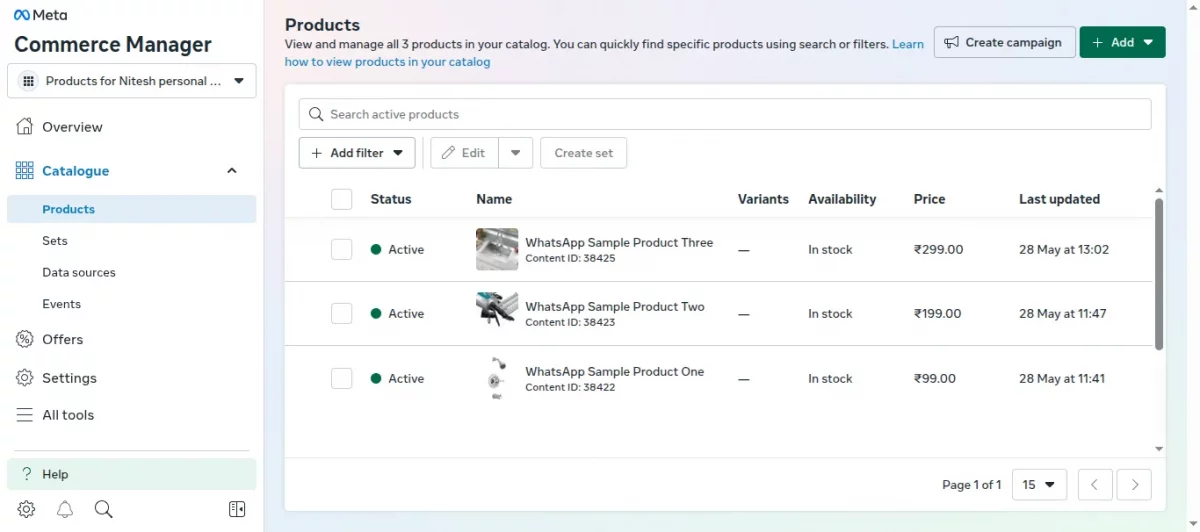
This automatic synchronization ensures that any updates made to your WooCommerce products are reflected in your Meta catalog according to the configured feed schedule.
Frontend
Product View Page
If the admin enables the purchase on the WhatsApp button the front-end view would be as shown in the below image.
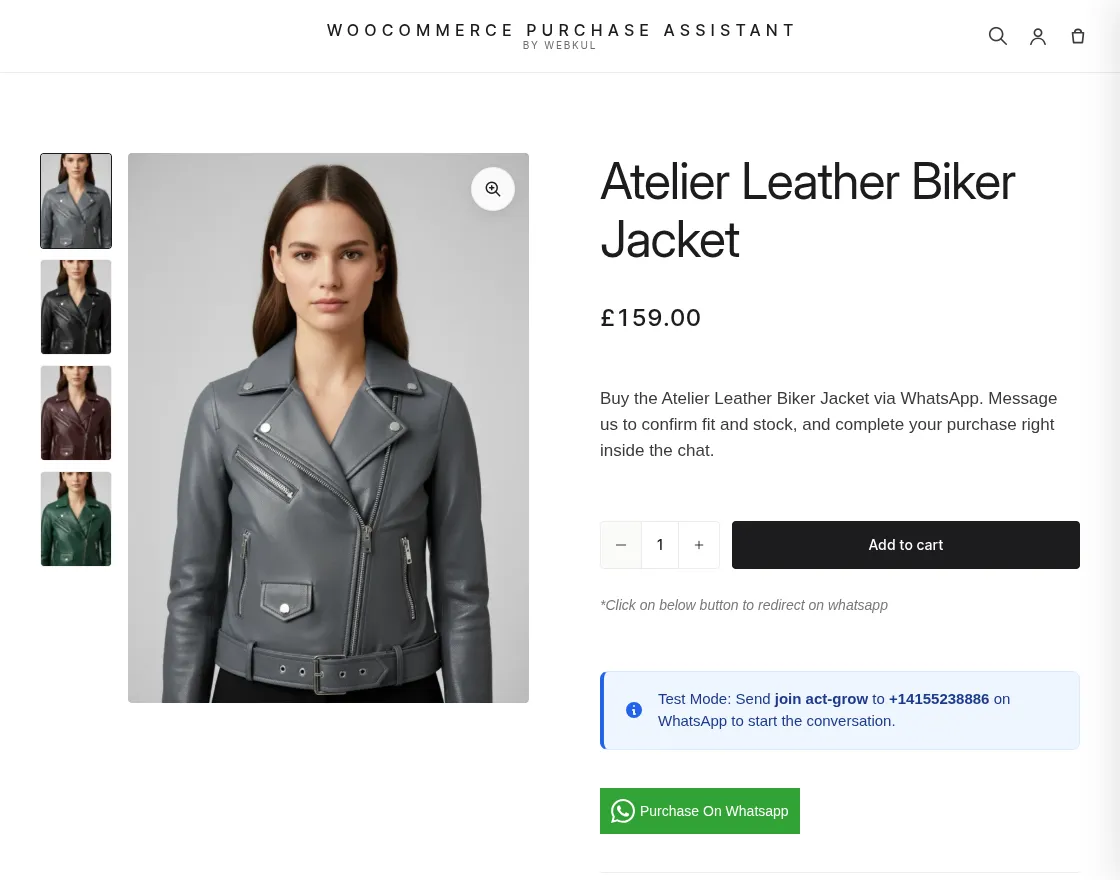
Similarly, if the admin disables the purchase on the WhatsApp button the customer can only proceed to place the order using the Add to cart button.
Product List Page
If the admin enables the purchase on the WhatsApp button the front end view would be as shown in the below image.
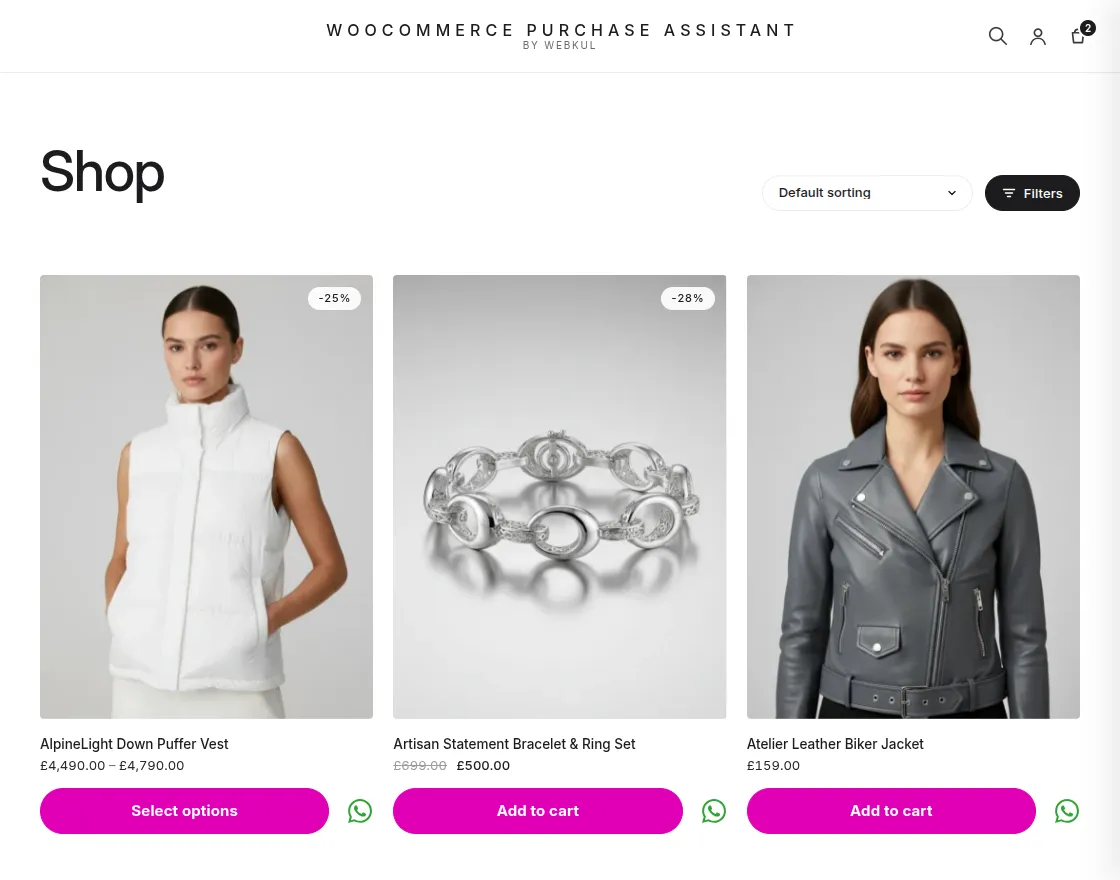
Similarly, if the admin disables the purchase on the WhatsApp button the customer can only proceed to place the order using the Add to cart button.
Hide the Proceed to Checkout Button
Firstly, add a product into the shopping cart and click on the view and Edit cart button.
If, the hide proceed to checkout button is enabled or set as Yes, the customers can purchase only via WhatsApp.
Display the Proceed to Checkout Button
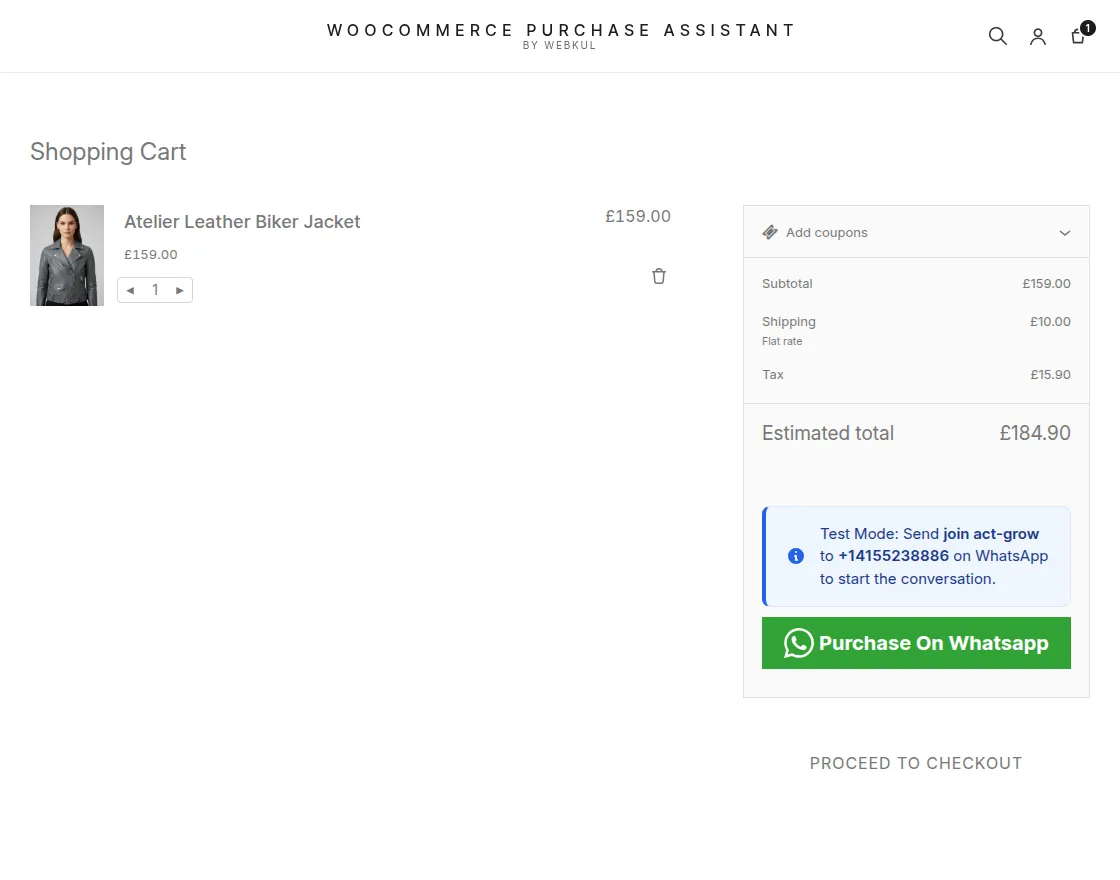
If, the hide proceed to checkout button is enabled or set as No.
Moreover, the purchase on the WhatsApp button on the front end is enabled too then the front end view would be as shown in the below image.
Purchase Using Whats App for Existing Users
The existing user needs to click on Purchase on WhatsApp and they are redirected to WhatsApp Web Application directly as per the below image.

Purchase Using WhatsApp for Guest User
When a guest user places an order a form popup appears. Now the guest user needs to provide a WhatsApp number along with other required details to complete the purchase process via WhatsApp.
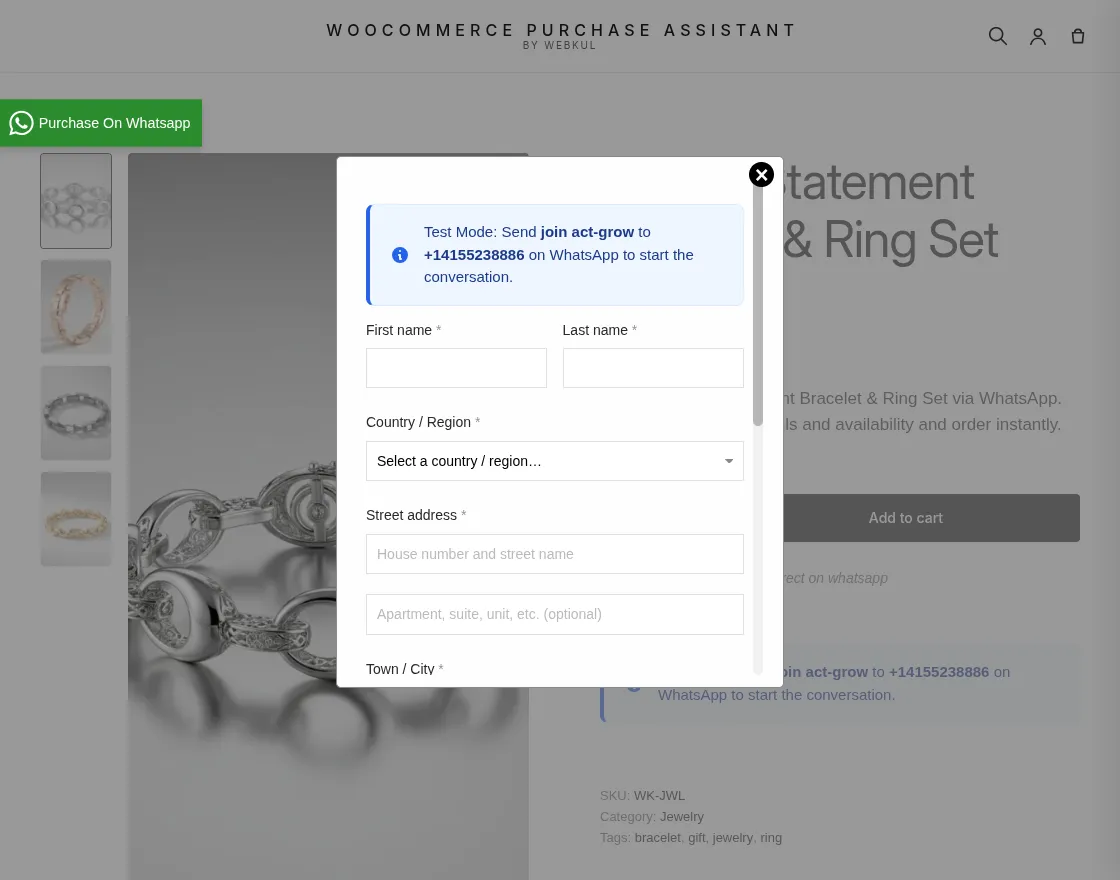
Moreover, the guest user is also required to add their First name, Last name, Country/region, address, Followed by Postcode, Town/City and Email address, then click Place Order.
WhatsApp Purchase Assistant WooCommerce – Order Workflow
To place the order the customer will be redirected to their WhatsApp web application as soon as they click the purchase on the WhatsApp button on the WooCommerce store.
Select Shipping Method
As a result, the customer will be provided with various Shipping Alternatives to select from.
Note: There is no shipping alternative provided for the virtual and downloadable product since they aren’t required to be shipped.
Now, to proceed with their order the customers can simply enter the number associated with the shipment of choice as shown in the above image.
Select Payment Method
The customers will be asked to select the Payment method that they wish to use from the given alternatives.
Note:
- By purchasing through the WhatsApp application the customer can opt to pay using an offline mode of payment only.
- Further, the customers are sent with the complete Order Summary on their WhatsApp web application as shown below.

As a result, as soon as the admin approves the order from their end the Customers are notified with the message Order has been placed successfully!
WhatsApp Notification for Order Cancellation
For any order cancellation (made by the admin end) the customer will receive a notification as shown below image.

Invalid Order Request by the Customer
If the customer sends an invalid request through WhatsApp, the plugin automatically replies with a default message, as shown below

Support
That’s all for the WhatsApp Purchase Assistant for WooCommerce Plugin.
For any kind of doubts or suggestions regarding the plugin kindly reach us at [email protected] or raise a ticket at our HelpDesk system.
Current Product Version - 2.2.1
Supported Framework Version - Wordpress - 7.0.0 WooCommerce - 10.9.4

Be the first to comment.