The PrestaShop Power BI Connector module integrates your PrestaShop store with Microsoft Power BI, enabling automated data synchronization for analytics and business intelligence.
Build dashboards, embed reports in Prestashop, and automate data refreshes without writing a single line of code.
What is Power BI?
Power BI is a business analytics tool by Microsoft. It turns raw data into interactive charts, graphs, and dashboards that help you understand how your store is performing.
Like orders by region, top-selling products, customer lifetime value, and much more.
Features of the module
- Azure OAuth 2.0 authentication with Client Credentials or Password grant
- 14 PrestaShop entities available for export: Orders, Order Items, Customers, Products, Product Combinations, Categories, Carts, Cart Rules, Taxes, Carriers, Order Slips, Payments, Inventory, and Shops
- Push Datasets creation in Power BI with automatic schema generation
- 7-step Setup Wizard for guided initial configuration
- Flexible sync modes: Manual, Scheduled (cron), and Live (hook-driven)
- Saved sync profiles for customized data sync workflows
- Visual Query Builder for custom data exports
- Import and embed Power BI reports and dashboards
- Configurable alert system for monitoring business metrics
- Unified logging system with CSV export
- Per-employee access control with granular permissions
- REST API endpoints for programmatic access
How to get credentials
- Register an app in Azure AD → get Client ID, Secret, Tenant ID
- Run the Setup Wizard → paste keys, authorize, pick a workspace
- Select data types → plugin creates tables and pushes rows in batches
- Build reports in Power BI → embed them back in Prestashop
Step 1 — Sign in to the Azure Portal
First, open your browser and visit https://portal.azure.com. Then sign in with a Microsoft account that has Azure AD admin rights.
If you do not have one, ask your IT admin to help. You can also sign up for a free Microsoft 365 Developer account at developer.microsoft.com.
Once you are in, type Azure Active Directory in the top search bar. Click the result.
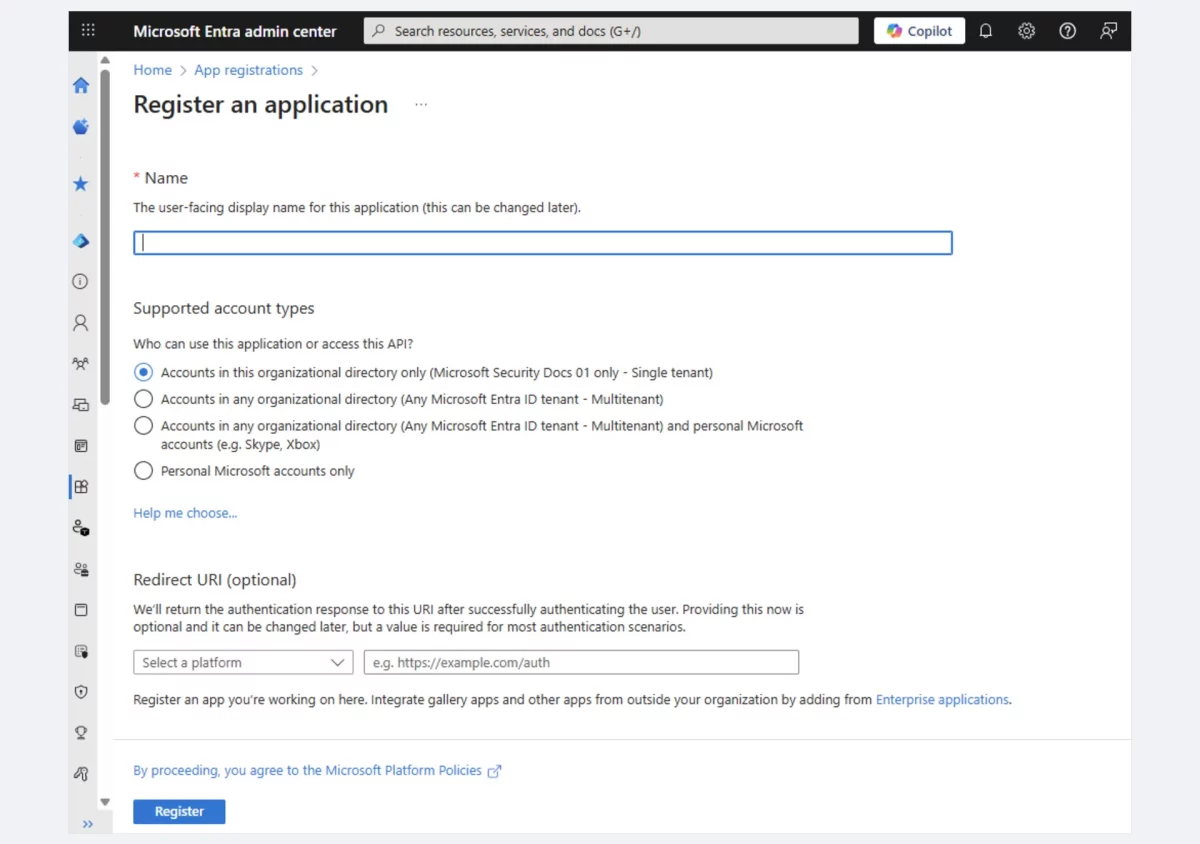
Step 2 — Create a New App Registration
Now you will tell Azure about the plugin. This is called an app registration.
- Inside Azure Active Directory, click App registrations on the left.
- Click + New registration at the top.
- Fill in the form like this:
| Field | Value |
| Name | Prestashop Power BI Connector (any name works) |
| Supported account types | Accounts in this organizational directory only (Single tenant) |
4. Click Register.
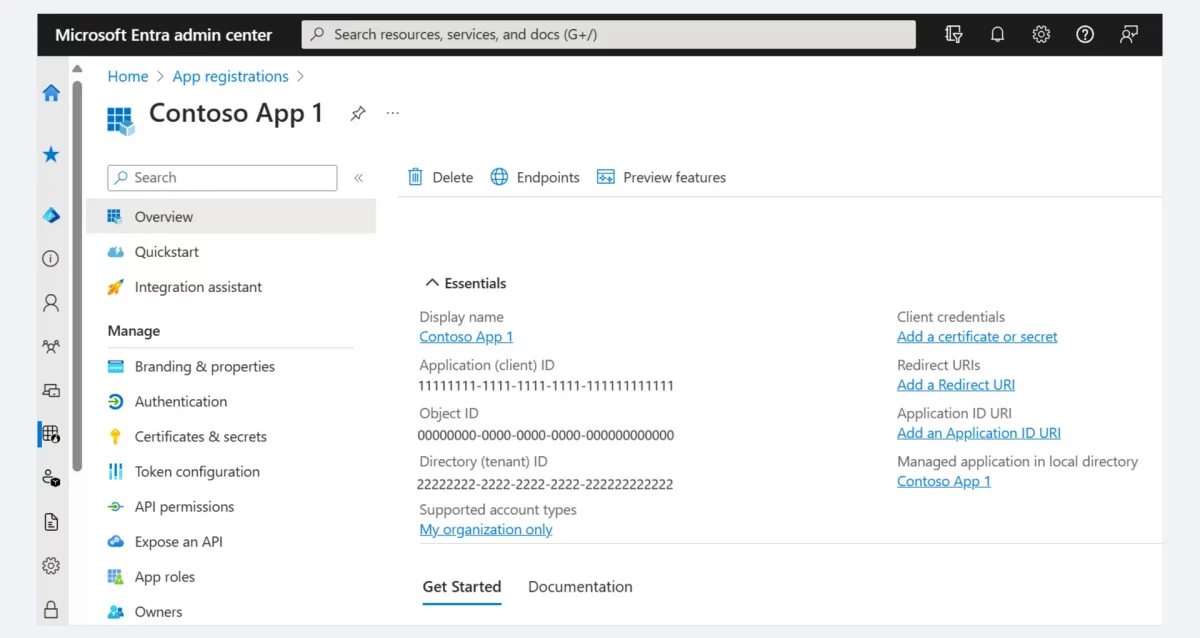
Step 3 — Copy the Client ID and Tenant ID
After you click Register, Azure shows you the app’s Overview page. Look for these two values and copy them now:
- Application (client) ID → this is your Client ID
- Directory (tenant) ID → this is your Tenant ID
Paste them into a safe place. You will need them in Step 2 of the Setup Wizard.
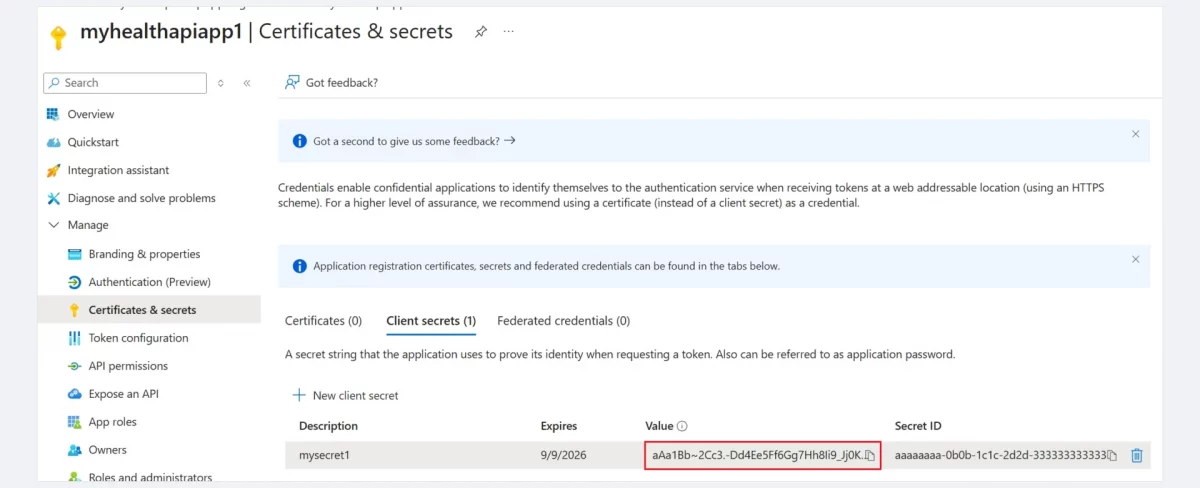
Step 4 — Create a Client Secret
Next, you need to create a secret. A secret is like a password for your app.
- On the left menu, click Certificates & secrets.
- Under Client secrets, click + New client secret.
- Give it a name, like
Prestashop Power BI Secret. - Pick an expiration date. 24 months is a good choice. Also, set a reminder so you can rotate it later.
- Click Add.
- Copy the
Valuecolumn right away. This is your Client Secret.
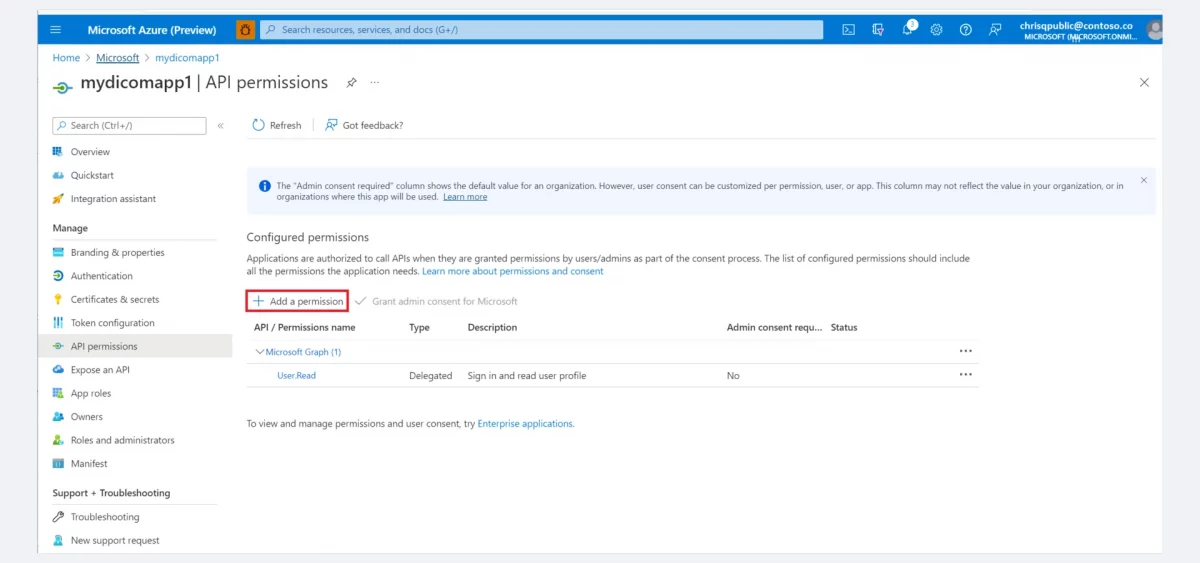
Step 5 — Grant Power BI API Permissions
Now you need to tell Azure which Power BI actions your app can take.
- On the left menu, click API permissions.
- Click + Add a permission.
- Pick Power BI Service.
- Choose Delegated permissions.
- Tick all five of these:
Dataset.ReadWrite.AllWorkspace.ReadWrite.AllReport.Read.AllDashboard.Read.AllContent.Create
- Click Add permissions.
- Back on the permissions screen, click Grant admin consent for [Your Organization]. Confirm with Yes.
After that, every permission should show a green check next to it.
Step 6 — Turn On ROPC (Optional but Handy)
ROPC stands for Resource Owner Password Credentials. It lets the plugin sign in on its own, without any browser redirect.
So you never have to log in by hand when the token expires. Scheduled sync also runs more reliably.
This step is optional. However, we strongly recommend it for production sites.
- On the left menu, click Authentication.
- Scroll to Advanced settings → Allow public client flows.
- Toggle it to Yes.
- Click Save at the top.
Step 7 — Turn On the Power BI API (If Needed)
Your Power BI tenant admin must also allow apps to call the Power BI REST API. This is a one-time change.
- Open https://app.powerbi.com and sign in.
- Click the gear icon → Admin portal → Tenant settings.
- Find Developer settings → Allow service principals to use Power BI APIs. Turn it on.
- You can scope it to a security group if you want more control.
- Click Apply.
You only need to do this once for your whole tenant.
Your Final Checklist
By now you should have all five values ready:
| Key | Where you got it |
|---|---|
| Client ID | App registration → Overview |
| Tenant ID | App registration → Overview |
| Client Secret (Value) | App registration → Certificates & secrets |
| Microsoft Email | The account you use for Power BI |
| Microsoft Password (optional) | Same account’s password (for ROPC) |
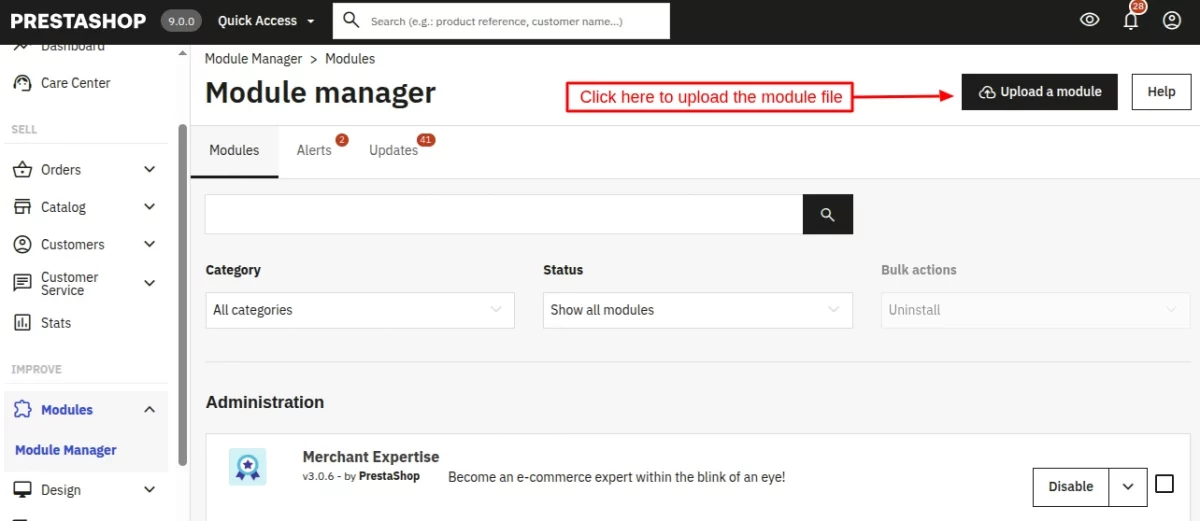
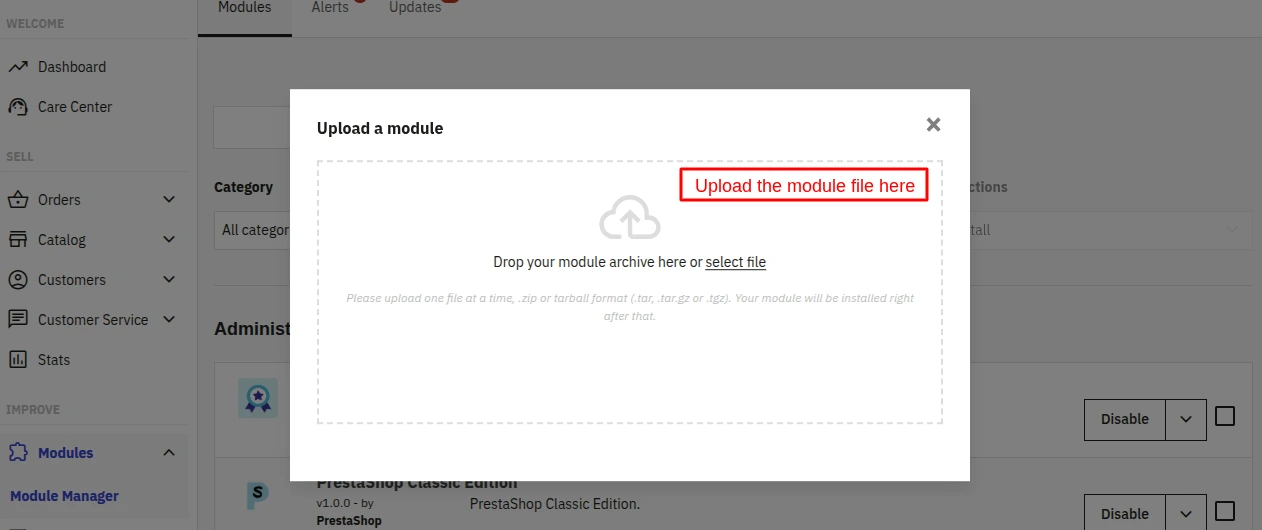
How to install the module
- Firstly, go to the module manager in the back office and click on ‘upload a module’.
- After that, drag and drop the module file or select the file from the system.
- In this way, the module installation will be successful.
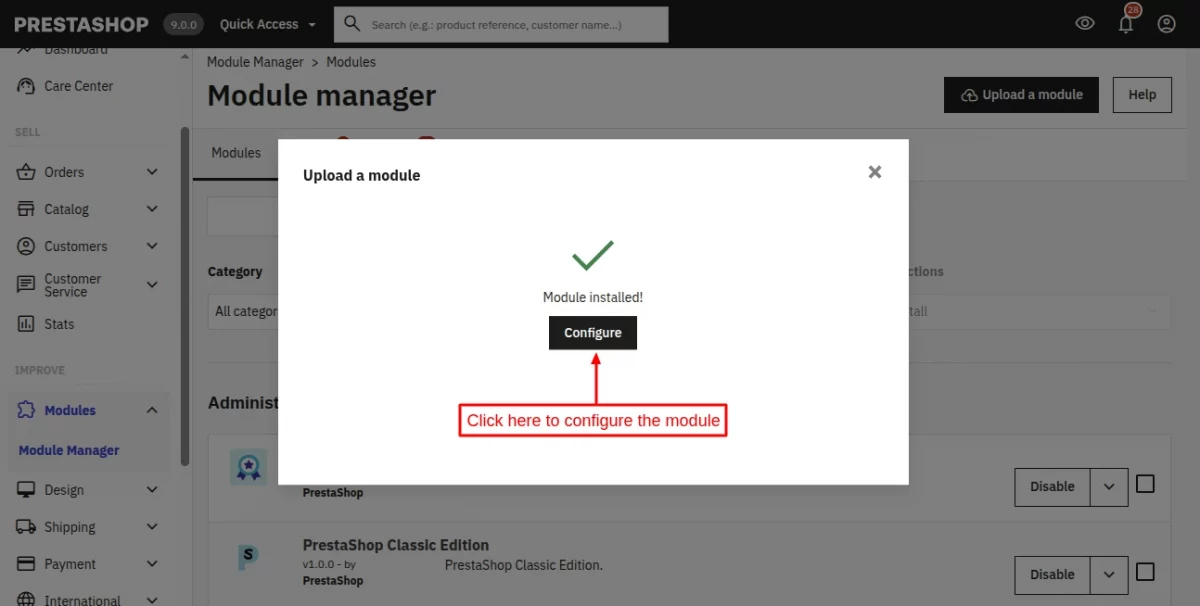
Module Configuration
After clicking on the configure button, the module will automatically redirect you to the “Settings” where the following tabs will appear.
- General
- Authentication
- Advanced
General
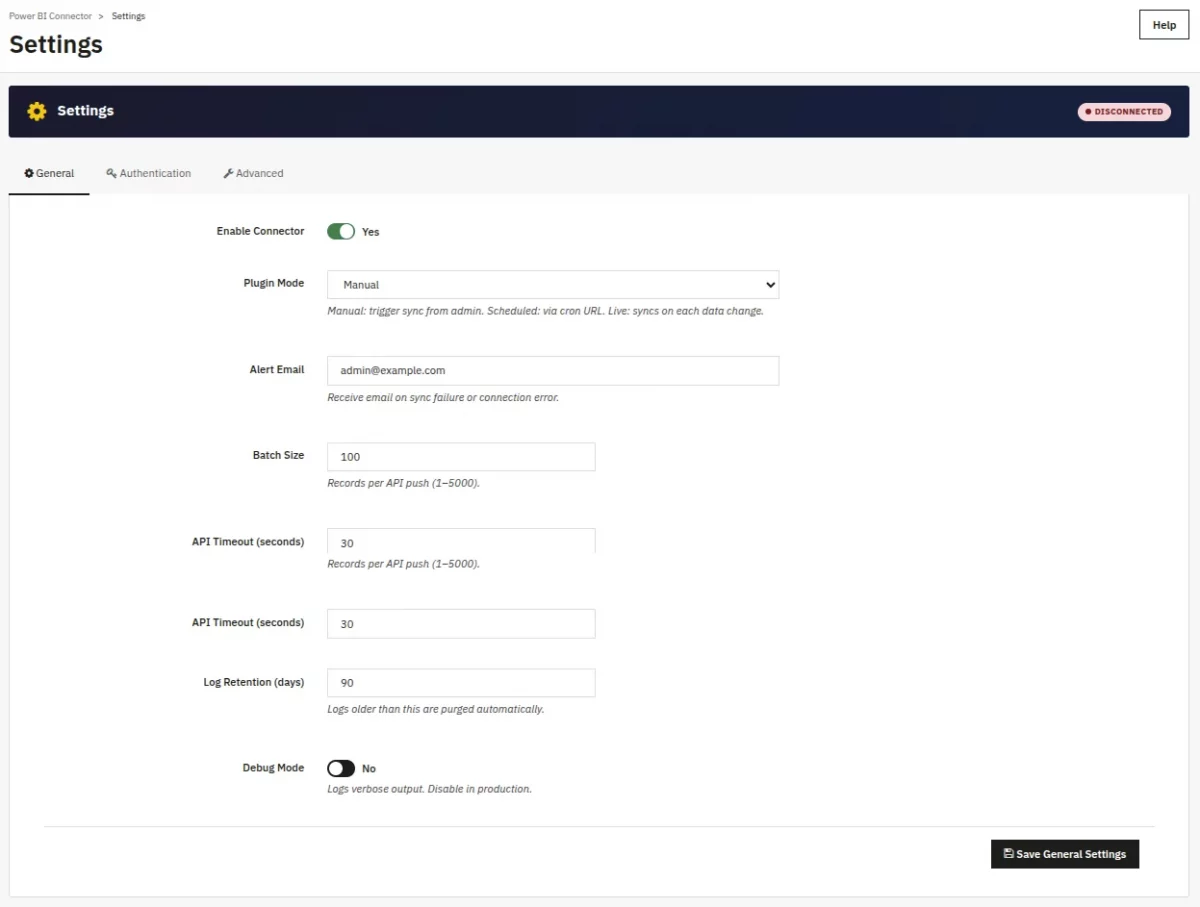
Controls module-wide operational settings:
- Enable Connector — Toggle module activation on or off
- Plugin Mode — Choose between Manual, Scheduled, or Live sync behavior
- Alert Email — Email address for receiving sync failure notifications
- Batch Size — Number of records per API push operation
- API Timeout — HTTP request timeout in seconds
- Log Retention — Automatic cleanup period for log entries
- Debug Mode — Enable verbose logging for troubleshooting; disable in production
Authentication
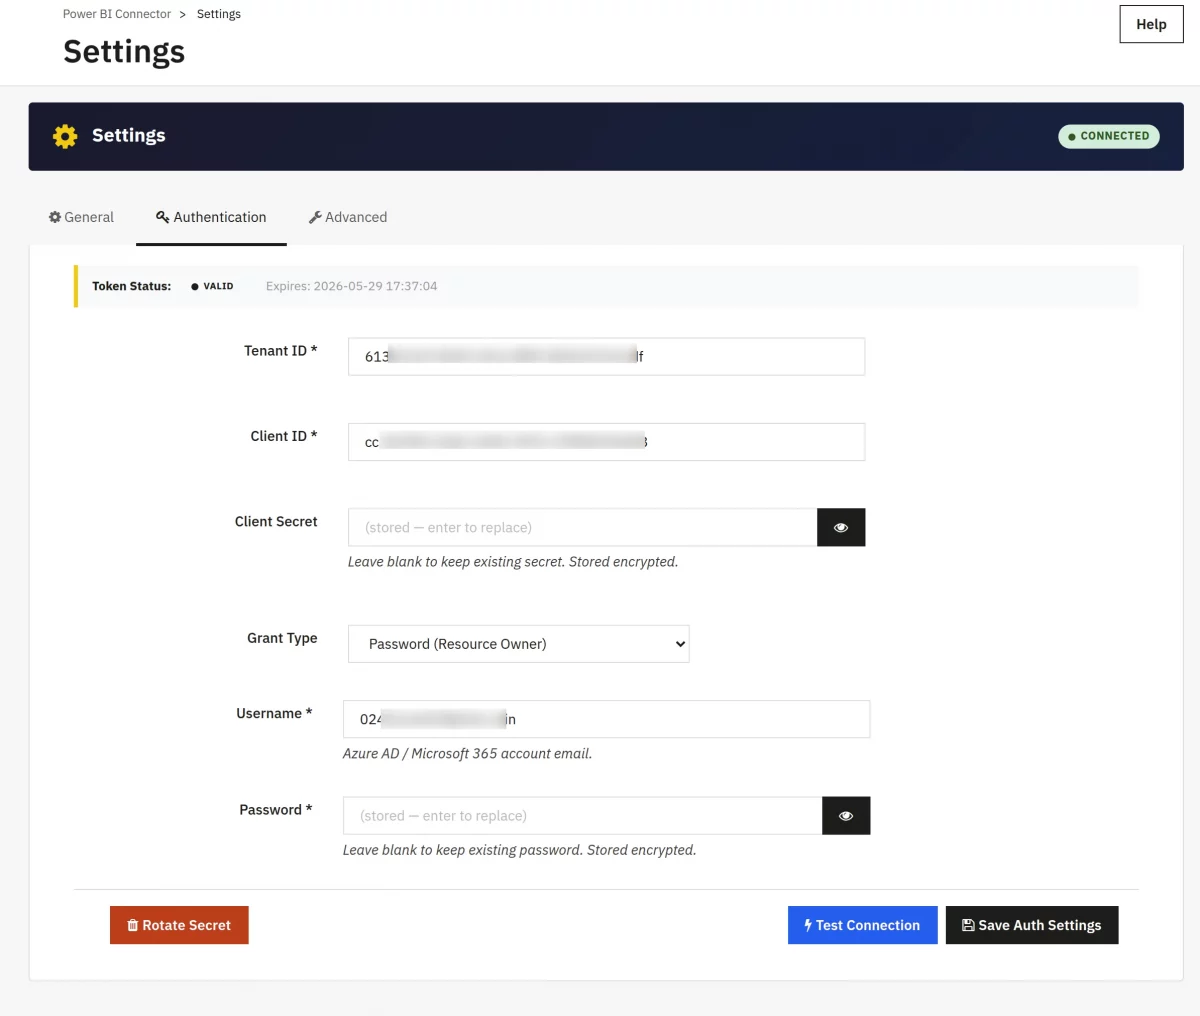
Configure Azure OAuth credentials to connect to Power BI:
- Tenant ID — Your Azure AD tenant identifier from the Azure portal
- Client ID — Application (client) ID for your Power BI app registration
- Client Secret — Encrypted application secret; leave blank to preserve existing
- Grant Type — Password (Resource Owner) for user licenses or Client Credentials for service principals
- Username — Azure AD/Microsoft 365 account email address
- Password — Encrypted password for the Power BI account
Advanced Tab
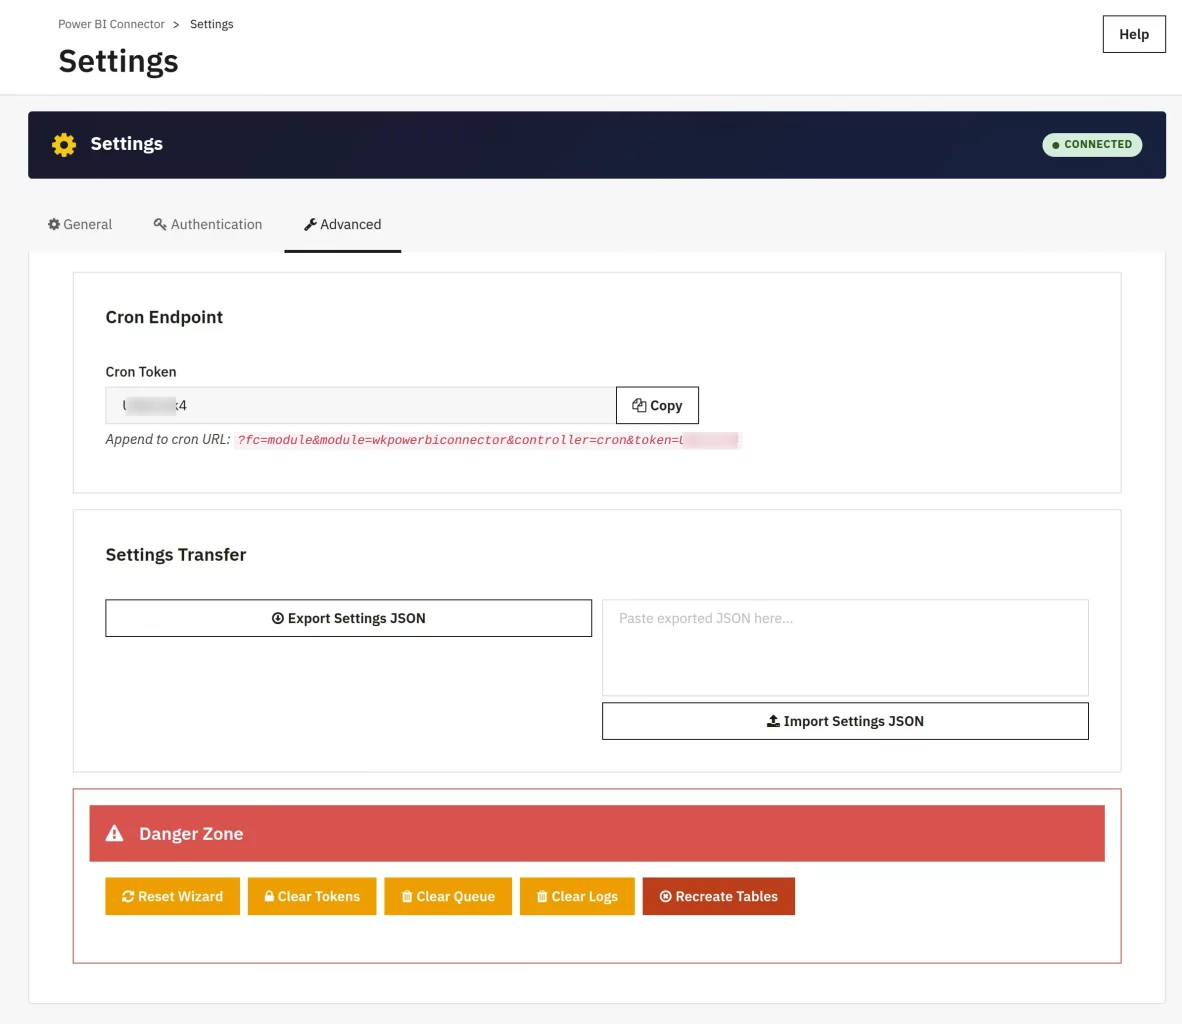
Advanced configuration and maintenance options:
- Cron Token — Security token for the cron endpoint; append to the scheduled sync URL
- Export Settings JSON — Download current configuration as JSON for backup or transfer
- Import Settings JSON — Upload JSON configuration to restore or deploy settings
- Reset Wizard — Return to step 1 to re-run the setup wizard
- Clear Tokens — Remove stored OAuth tokens; re-authentication required
- Clear Queue — Truncate pending sync items; use with caution
- Clear Logs — Delete all module logs permanently
- Recreate Tables — Drop and recreate all module tables; ALL DATA WILL BE LOST
The admin can also configure the module using the Setup Wizard option. However, for that, the admin must configure the Authentication tab in the module settings/configuration.
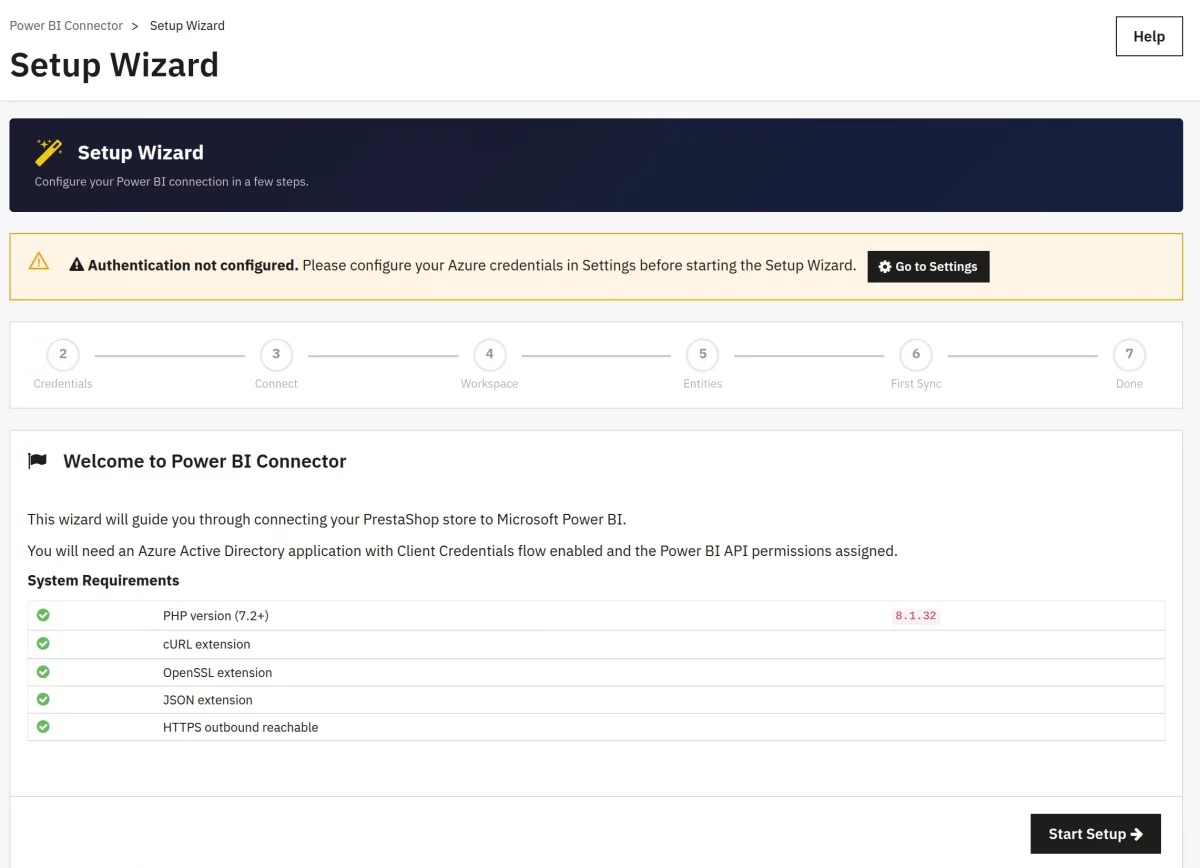
Setup Wizard
What it is
The Setup Wizard guides you through connecting the module to Azure and Power BI in 7 steps. You only need to complete it once.
Why use it
It is the fastest and safest way to configure all required settings. Skipping it and editing Settings manually is possible but not recommended for first-time setup.
Step 1 — Welcome
- Click Power BI > Setup Wizard in the left sidebar.
- Read the overview screen.
- Click Start Setup.
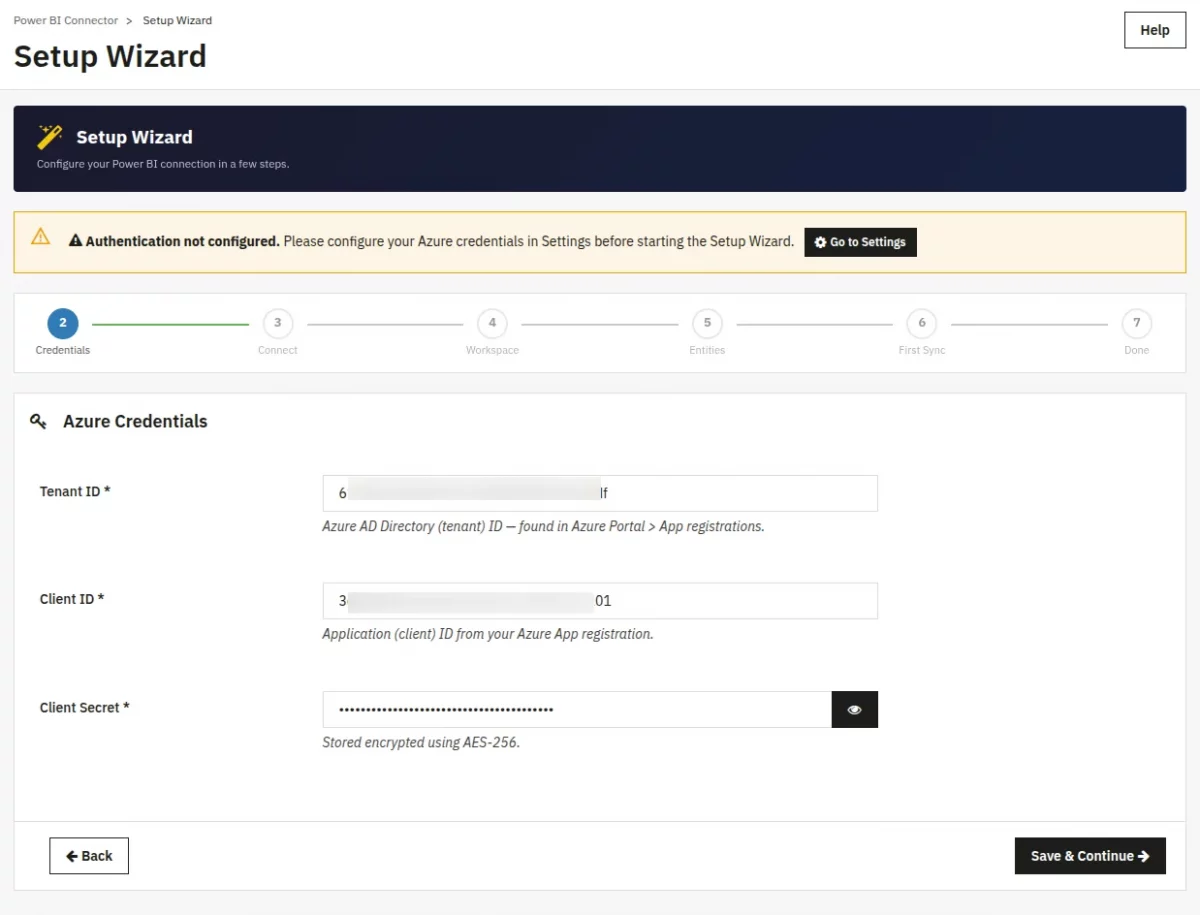
Step 2 — Azure Credentials
This step connects the module to your Azure App Registration.
- Enter your Tenant ID.
- Find it in the Azure portal: Azure Active Directory > Overview > Tenant ID
- Enter your Client ID.
- Find it in: Azure AD > App Registrations > Your App > Application (client) ID
- Enter your Client Secret.
- Find it in: Azure AD > App Registrations > Your App > Certificates & secrets > Client secret Value.
- Click Save & Continue.
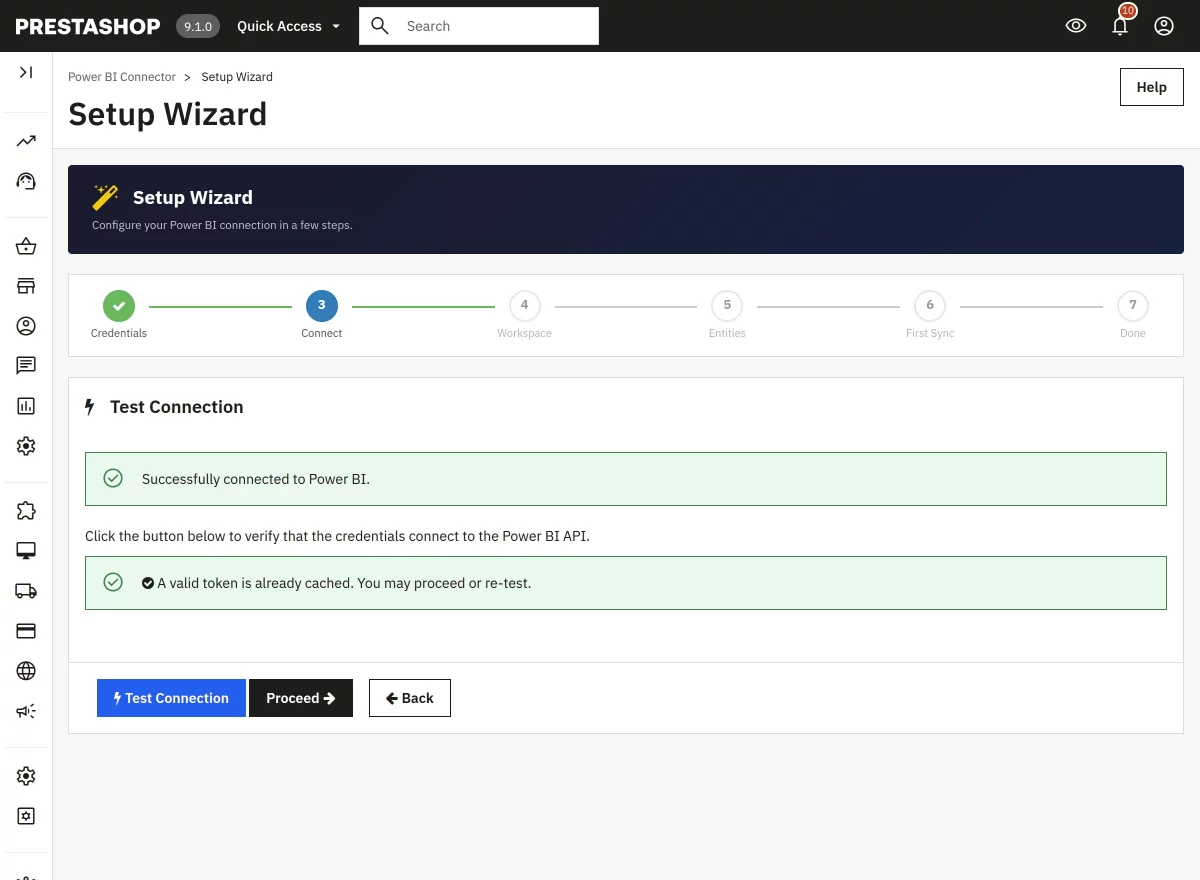
Step 3 — Test Connection
The module will attempt to contact Azure and Power BI using the credentials you entered.
- Click Test Connection.
- Wait a few seconds.
- If the result shows a green tick, your credentials are correct. Click Continue.
- If the result shows a red error:
- Double-check your Tenant ID, Client ID, and Client Secret for typos.
- Make sure your Azure App has the Power BI Service > Dataset.ReadWrite. All permissions granted.
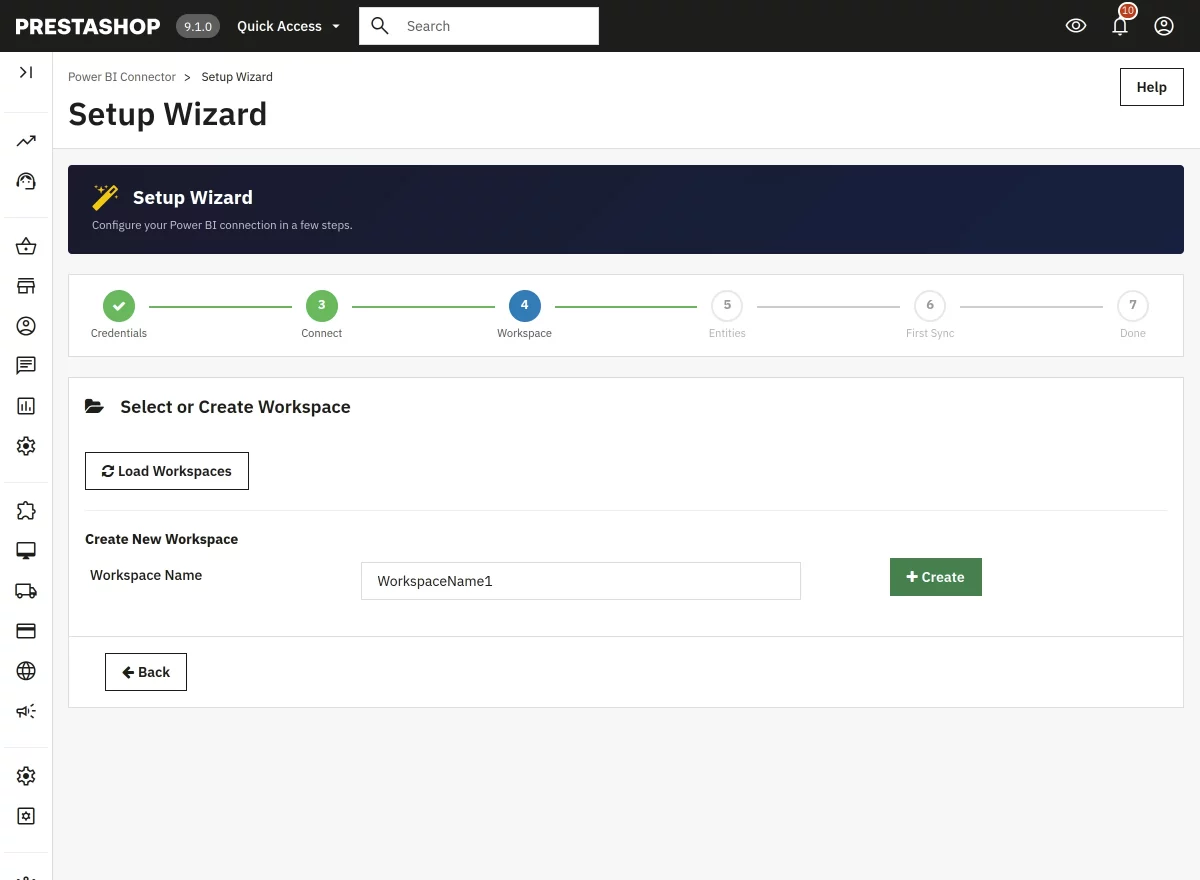
Step 4 — Workspace
A Power BI workspace is a container for your datasets and reports inside Power BI.
- The module will load your existing Power BI workspaces from your account.
- To use an existing workspace: Click on its name in the list, then click Select & Continue.
- To create a new workspace: Click Create New Workspace, enter a name, and click Create & Continue.
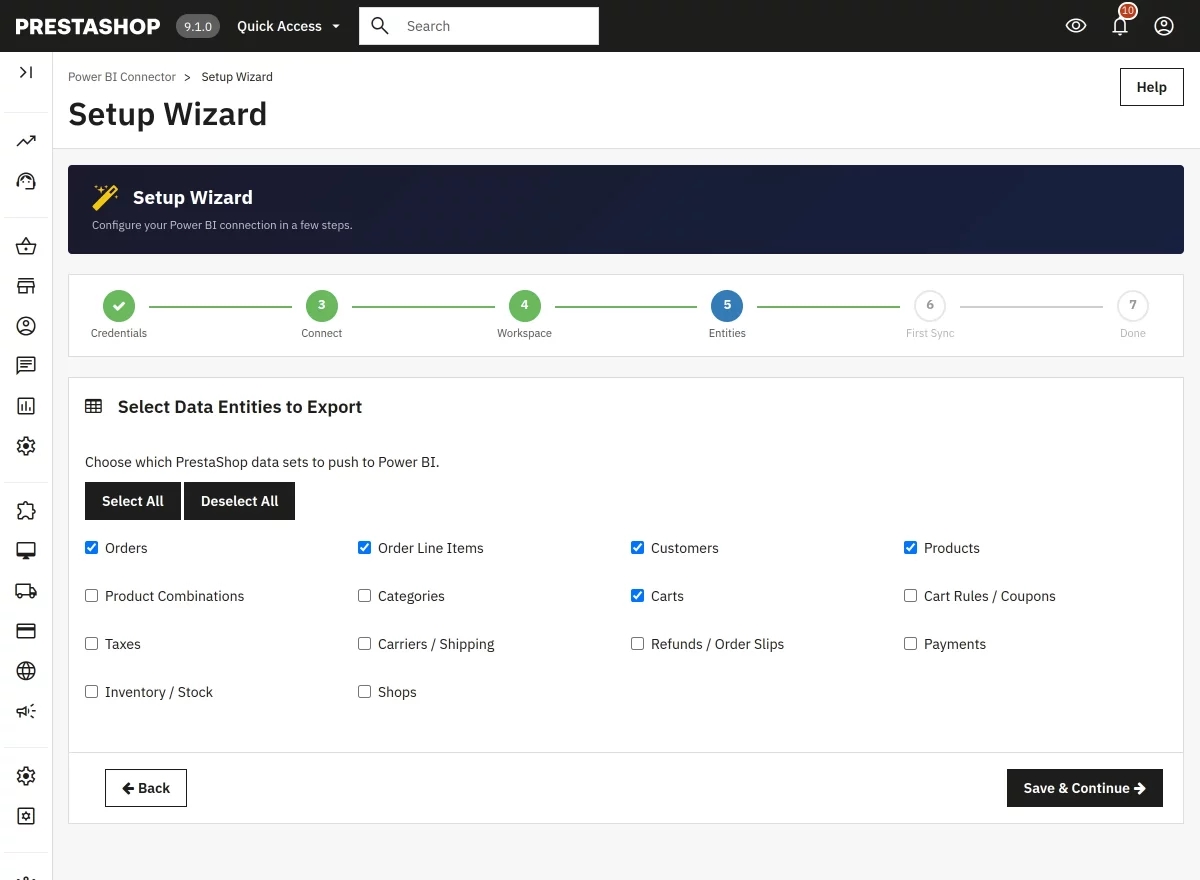
Step 6 — Entities
Choose which parts of your shop data to send to Power BI.
| Entity | What it contains |
|---|---|
| Orders | All orders, totals, dates, statuses |
| Order Line Items | Individual products per order |
| Customers | Customer names, emails, registration dates |
| Products | Product names, prices, categories |
| Product Combinations | Size/colour variants with stock levels |
| Categories | Category tree |
| Carts | All carts including abandoned |
| Cart Rules | Discount codes and vouchers |
| Payments | Payment method and amounts |
| Refunds / Order Slips | Credit notes / refunds |
| Taxes | Tax rule groups |
| Carriers | Shipping carriers |
| Inventory | Stock levels per product/variant |
| Shops | Multi-shop information |
- Tick the entities you want to export.
- Click Save & Continue.
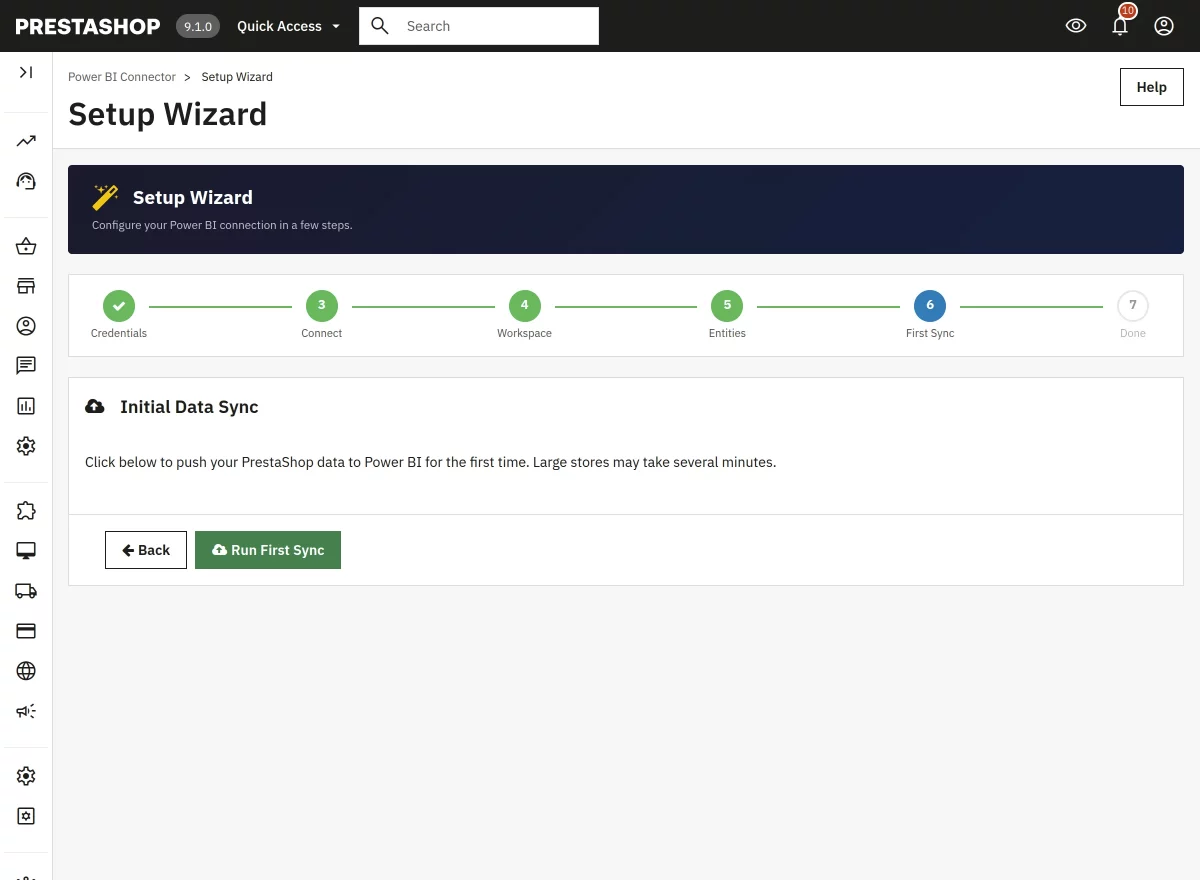
Step 6 — First Sync
After selecting the data entities that you want to export, click “Run First Sync” to push your existing shop data to Power BI immediately.
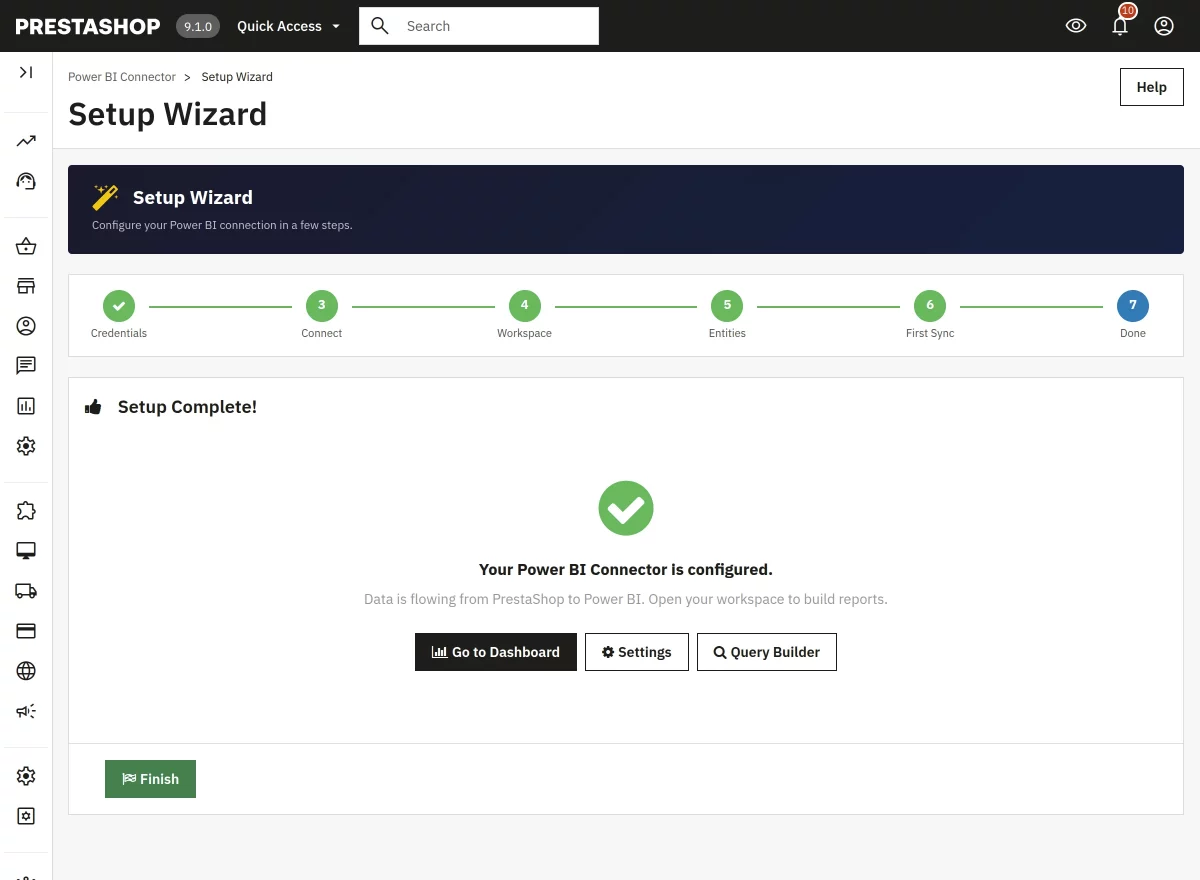
Step 7 — Done
Setup is now complete. You will be taken to the Dashboard.
Managing Power BI Connector from the Admin Panel
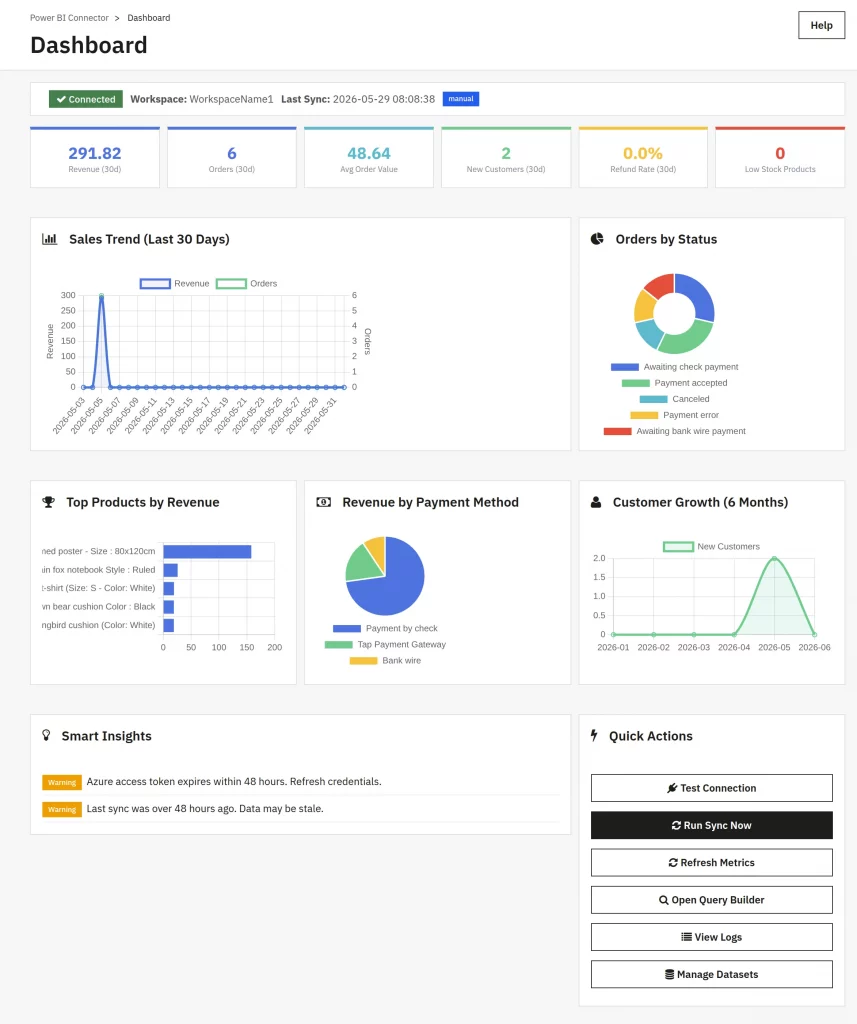
Dashboard
The Dashboard provides an overview of your connector status with KPI cards showing total sales, order count, and customer metrics.
Connection status is displayed with a badge. From here, you can run manual sync, refresh metrics, and navigate to other module sections.
Note: On the dashboard page, the data will display according to the data available on your Prestashop Store.
Workspaces, Datasets & Tables
The plugin gives you a full UI for managing the three Power BI objects that make up your data pipeline:
- Workspaces — containers for datasets & reports (created on the Power BI side)
- Datasets — schemas pushed into a workspace
- Tables — individual entity tables inside a dataset
Each of these has its own admin page. You can do everything here without opening Power BI Service.
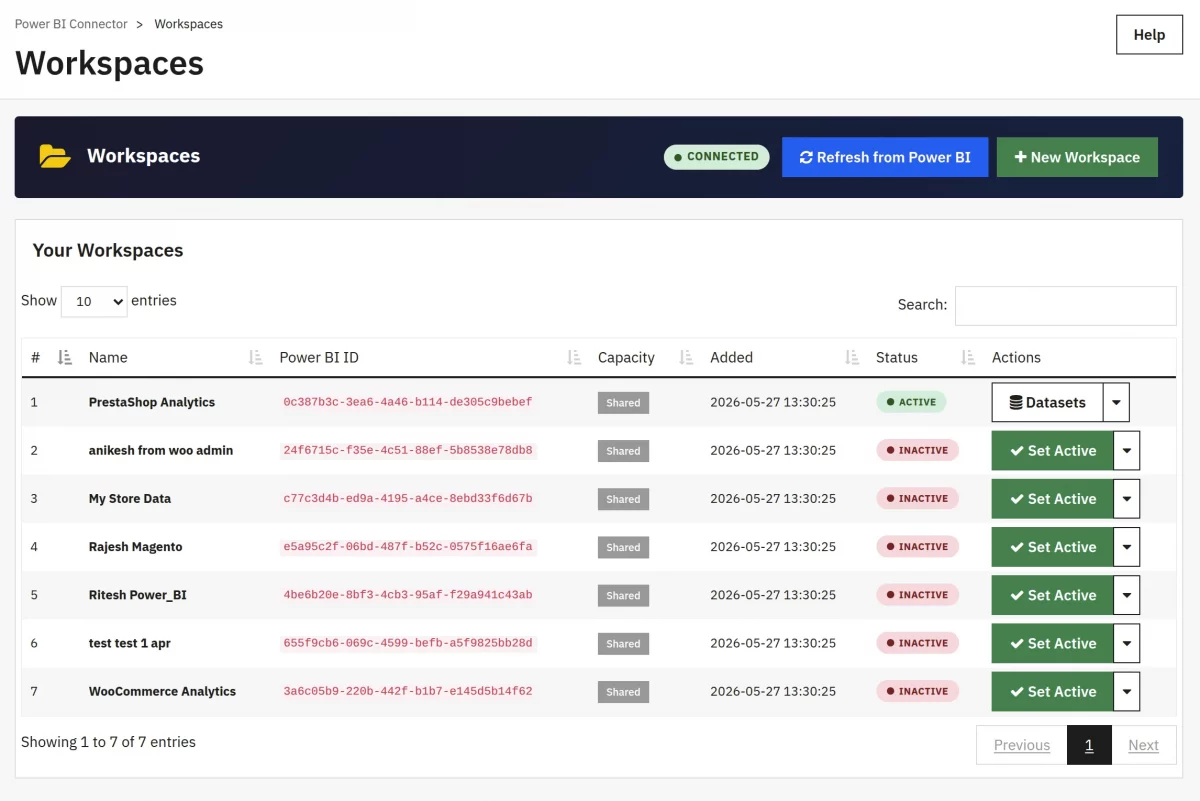
Workspaces
Now you can manage Power BI workspaces in your account. Import existing workspaces or create new ones.
Each workspace can be set as active to organize datasets. Only one workspace can be active at a time.
- Create Workspace — Enter a name to create a new Power BI workspace
- Import Workspaces — Fetch all workspaces from your Power BI account
- Set Active — Designate a workspace for data sync operations
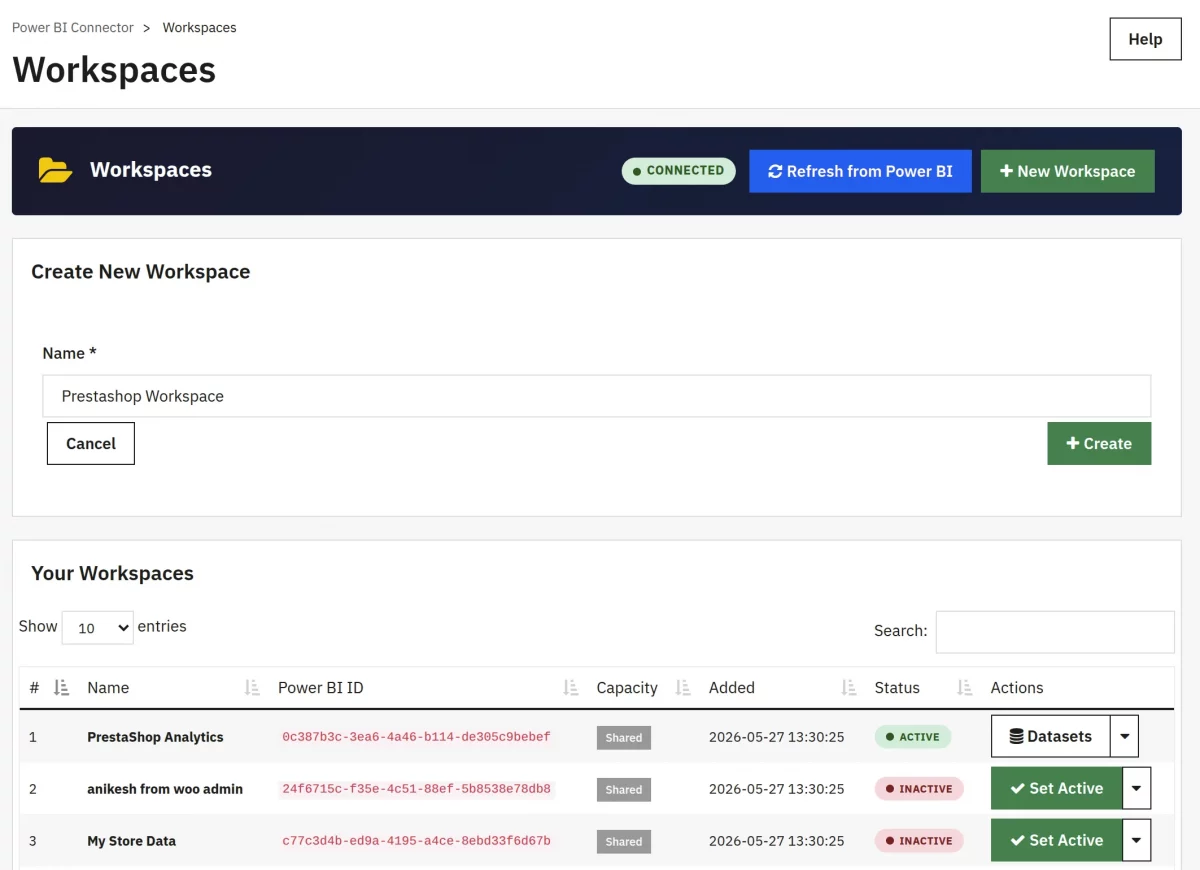
How to create a workspace
- Click Create New Workspace.
- Enter a name.
- Click Create.
- The new workspace appears in the list.
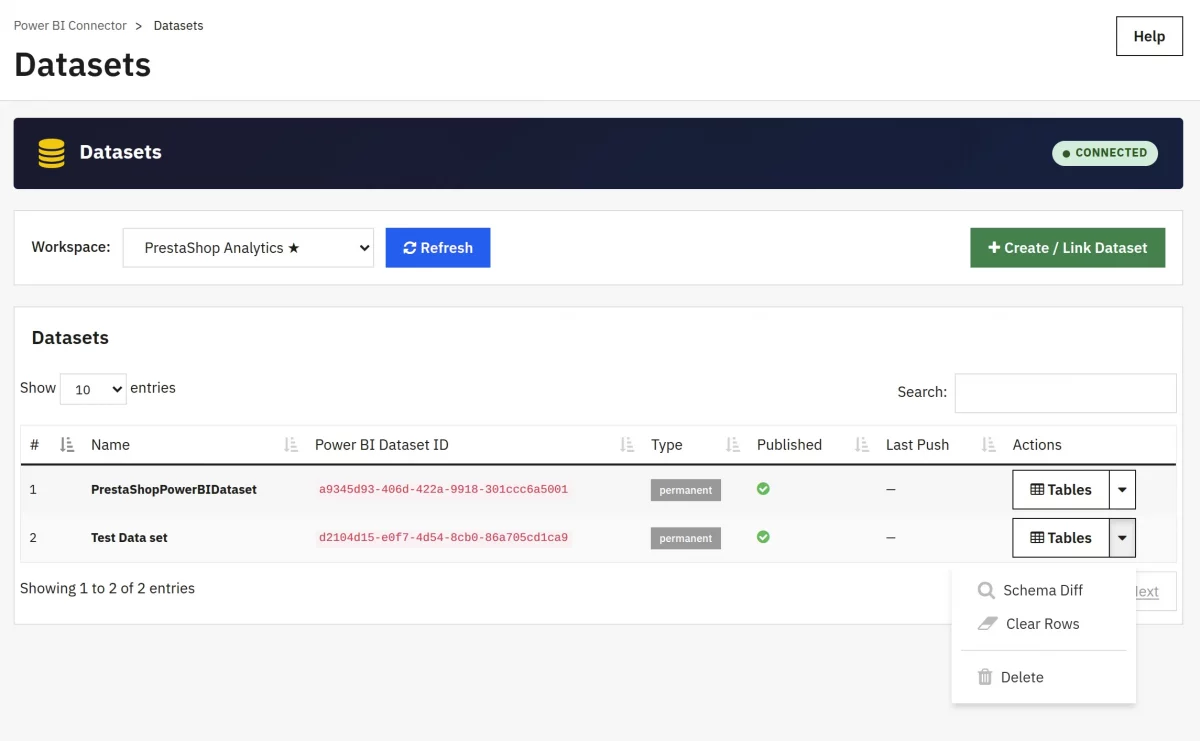
Datasets
A dataset is the Power BI object that contains one or more tables and the schemas for each.
The plugin normally creates one dataset per configured entity, but you can also create bundled datasets with multiple tables.
With the module, you can view and manage Power BI datasets within the active workspace.
Create new Push Datasets with automatic table schema generation based on selected entities, or list existing datasets.
- Schema Diff — Compare local entity schemas against Power BI tables
- List Datasets — Fetch and display datasets from Power BI
- Create Dataset — Generate a new Push Dataset with entity tables
- Clear Table Rows — Remove data from a specific table without deleting the schema.
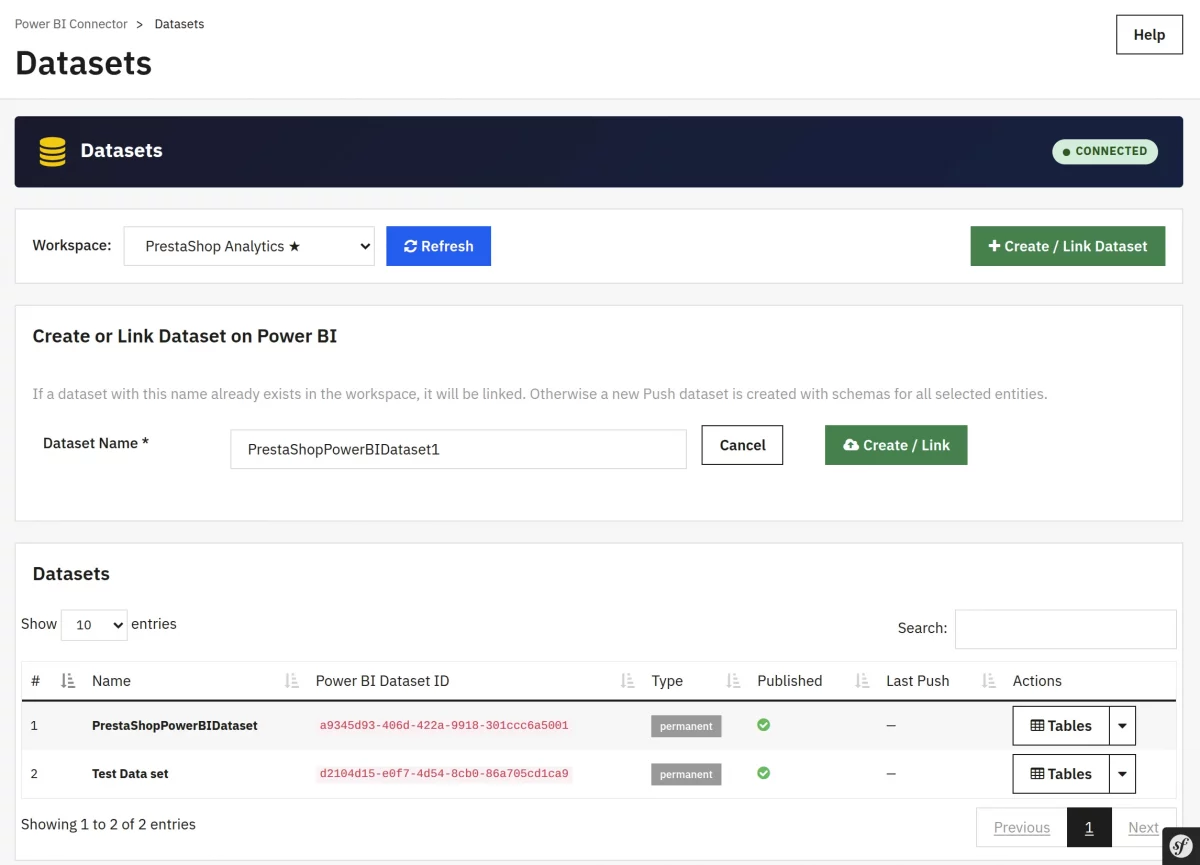
How to create a Dataset
- Click Create New Dataset.
- Enter a name.
- Click Create.
- The new dataset appears in the list.
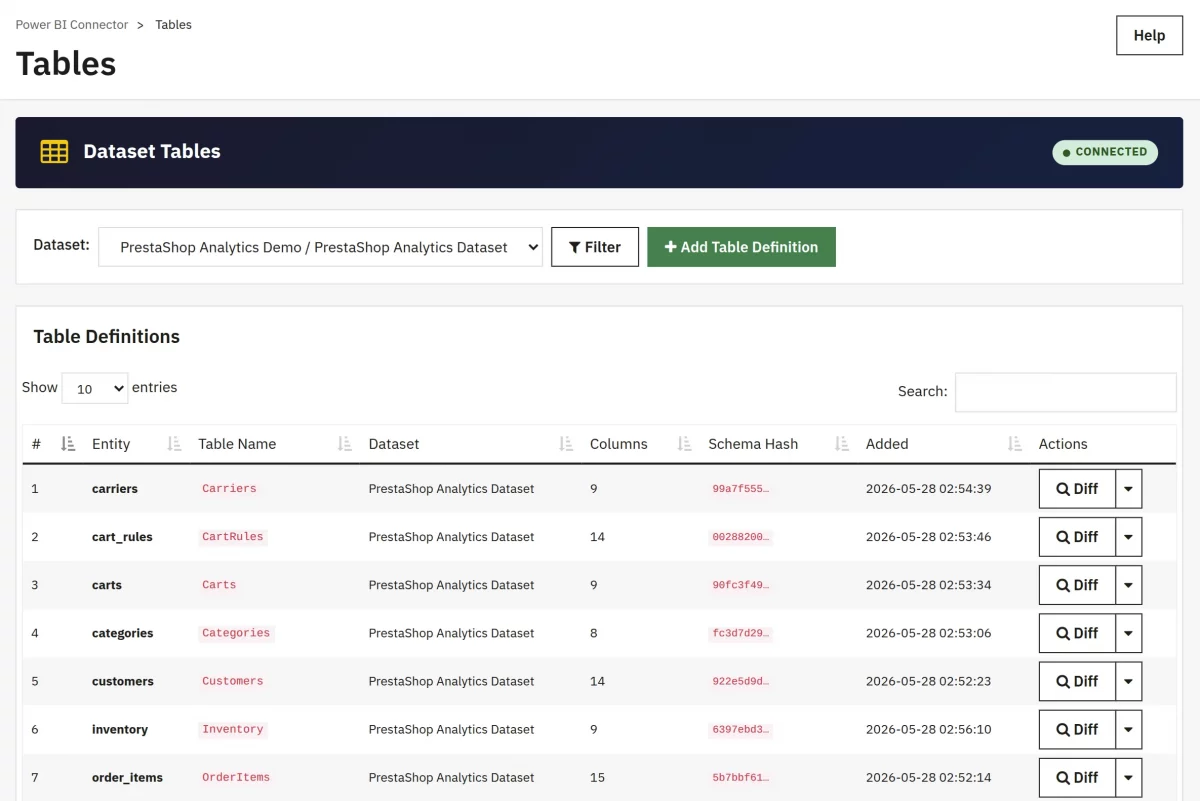
Tables
The Tables page lets you inspect and manage individual tables inside a dataset.
What it is
Each dataset contains one or more tables, one per entity (e.g. an Orders table, a Customers table). This section lets you manage those tables.
Why use it
Use Tables to inspect your column definitions, see how many columns are mapped, and clear table data if needed.
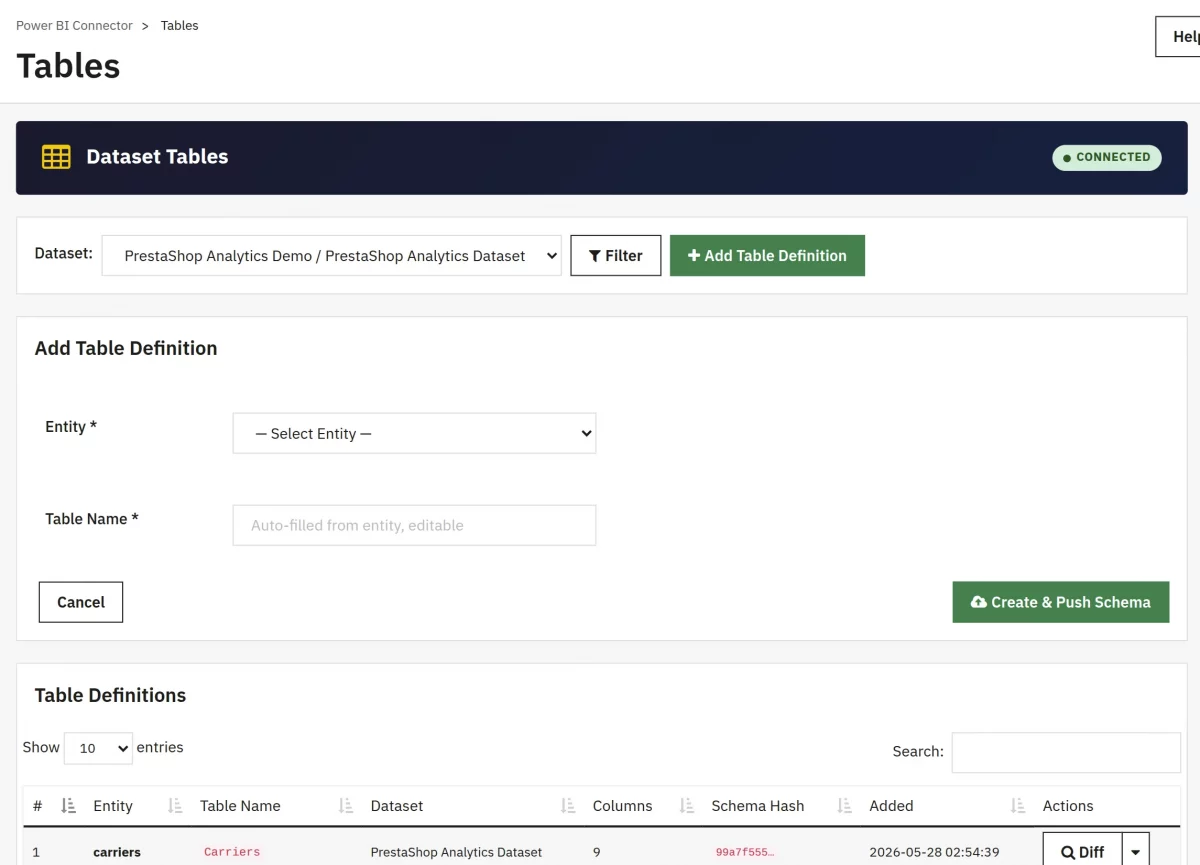
How to create a Table
- Click Add Table Definition.
- Select Entity and enter the Table name.
- Click Create & Push Schema.
- The new table appears in the list.
What you can do
- Clear Rows — Empty the table in Power BI without deleting the schema. Useful before a clean re-sync.
- Delete — To delete the table schema from Power BI.
- View Difference — Click on the “Diff” button to view the difference between the previous data and the current table schema.

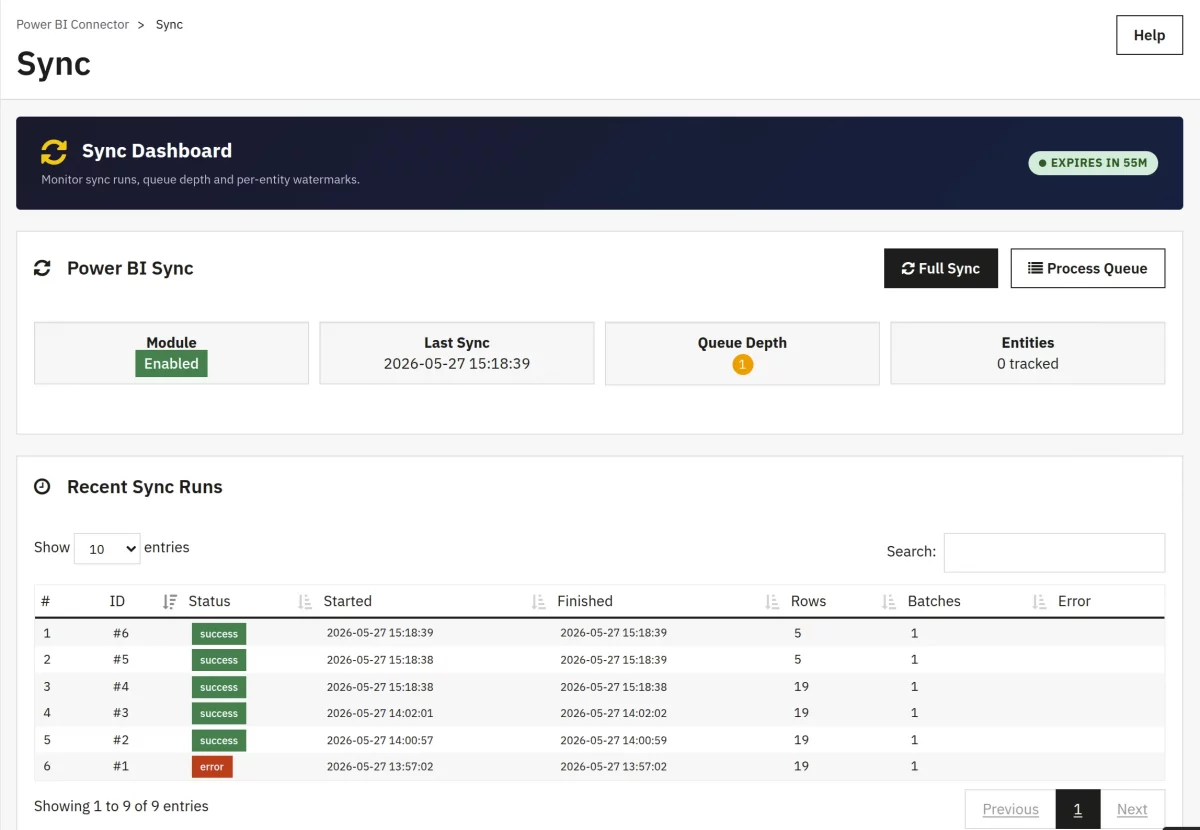
Sync
Monitor sync operations with the sync dashboard. View recent sync runs, watermark timestamps per entity, and queue depth. Trigger manual full sync or process the incremental queue.
- Full Sync — Execute full synchronization of all entities
- Process Queue — Process pending incremental update Sync
- View History — Check sync run status and error messages
Profiles
A Profile is a saved, reusable export configuration: entity + filters + field mapping + target dataset.
Profiles let you encapsulate different data-loading patterns and run them on demand or on a schedule.
From this tab, admin can create and manage saved sync profiles. Each profile defines a specific entity, dataset, sync mode, and filters.
Profiles can be duplicated, enabled/disabled, run immediately, or deleted.
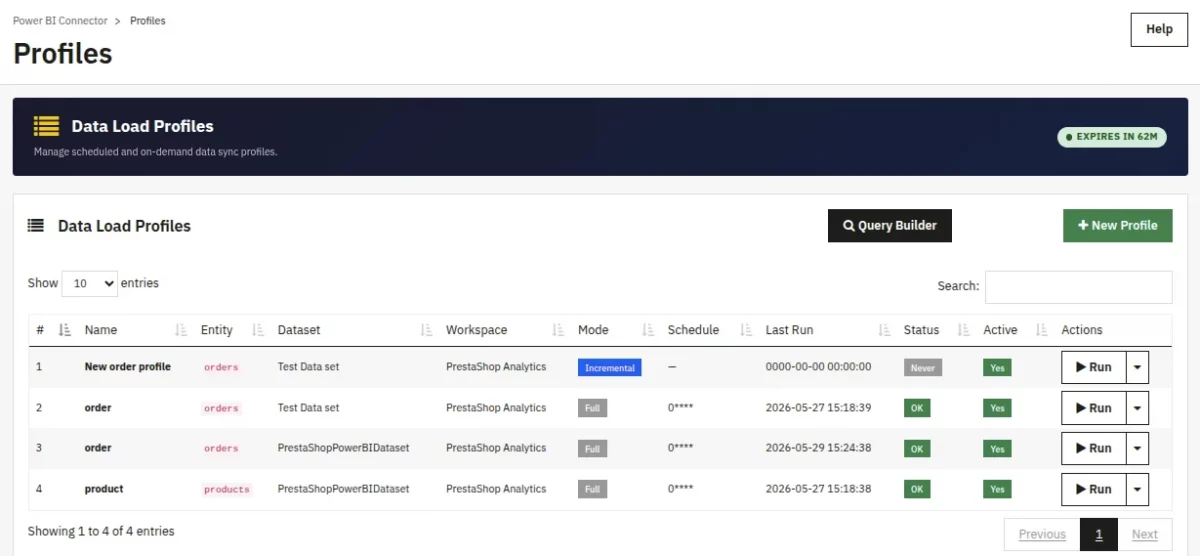
- New Profile — Create a profile from the Query Builder
- Run Profile — Execute sync for a specific profile
- Toggle Active — Enable or disable a profile
- View History — See previous sync runs for a profile
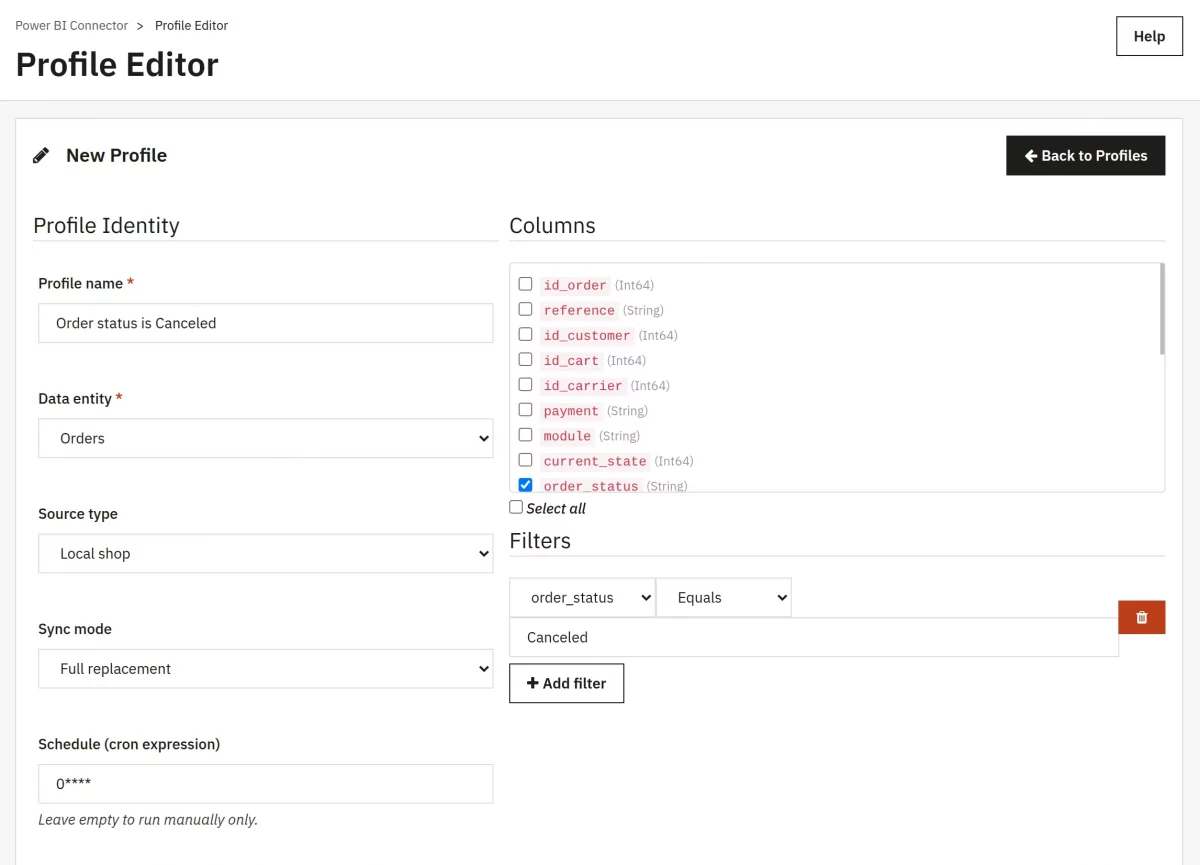
Create New Profile
Click + New Profile to create a new profile.
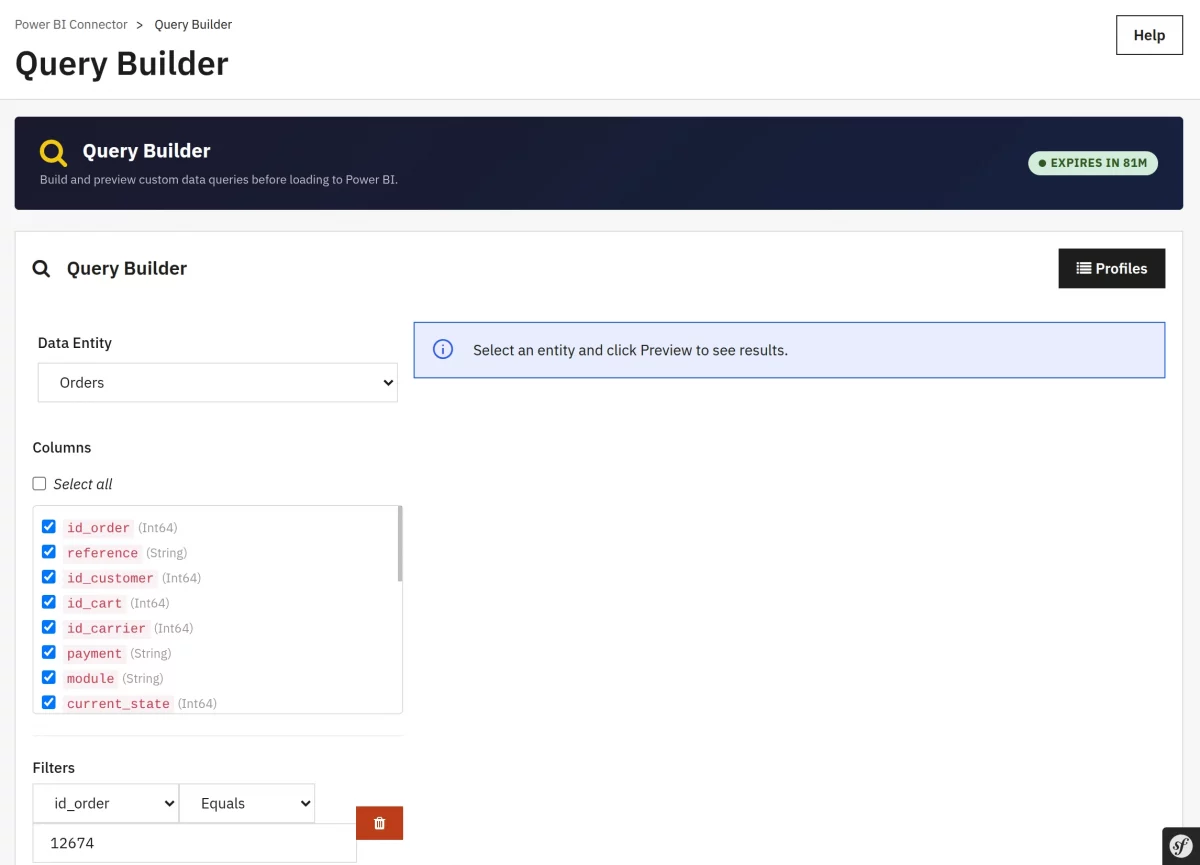
Query Builder
Build custom queries with visual tools. Select an entity, choose columns, add filter conditions, and test with preview. Queries can be saved and converted to sync profiles.
- Entity Selection — Choose from 14 available PrestaShop entities
- Column Picker — Select specific fields to include in export
- Filter Conditions — Add conditions for date ranges, values, or comparisons
- Preview — Test query results before saving
- Save as Profile — Convert query to an automated sync profile
Who is this for?
- Business users who want to build custom data extracts without writing SQL or PHP
- Analysts who need to prototype a dataset before committing to a full load profile
- Developers are testing new filter combinations
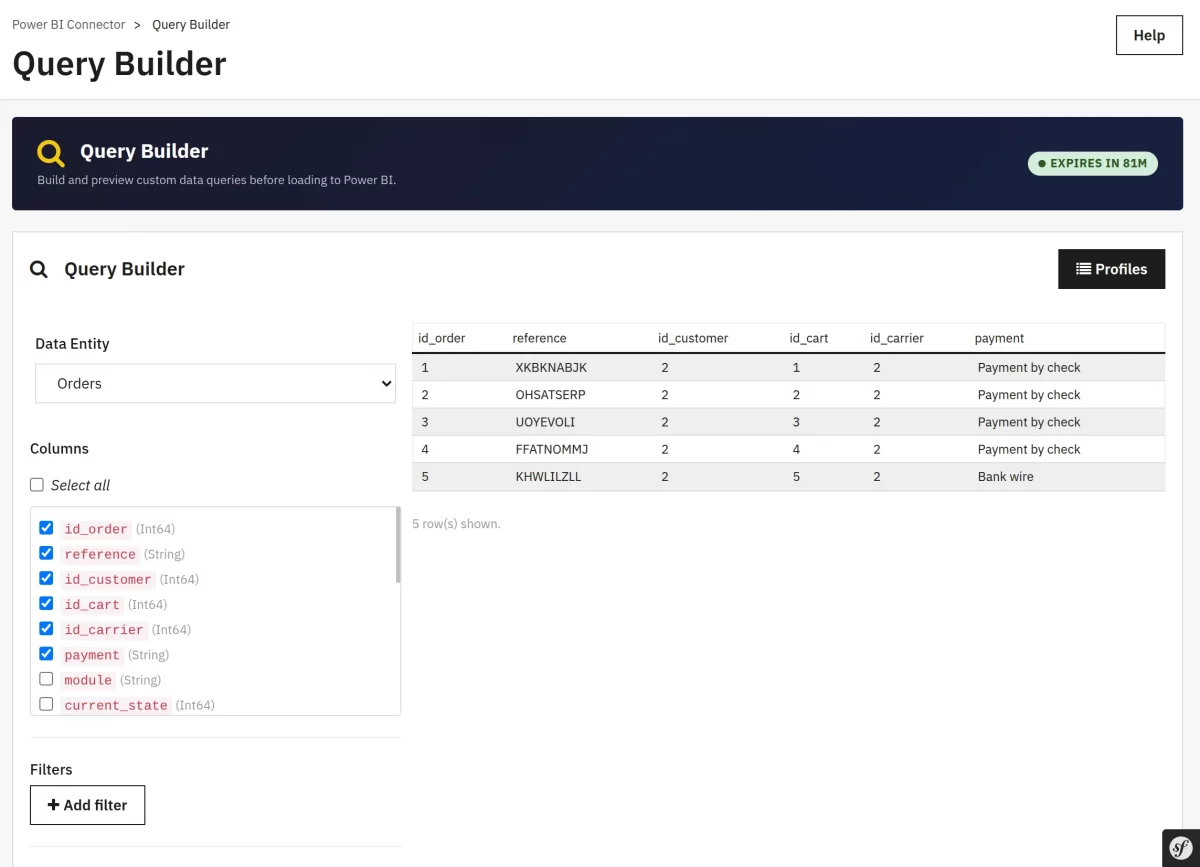
Step 1 — Select an Entity
The Entity Selector lists every registered Prestashop data type (Orders, Customers, Products, Refunds, etc.). Selecting one loads the complete list of available columns in the Column Picker.
Step 2 — Columns
Columns are grouped for easy navigation (e.g. for Orders: Order Info, Billing, Shipping, Financial, Dates, Meta). Use the search box to jump to a specific field.
Step 3 — Filters
Click + Add Filter. Each filter has three parts:
| Part | Description |
|---|---|
| Field | Any column in the selected entity |
| Operator | Equals, Not Equals, Contains, Greater Than, Less Than, Between, In List, Is Empty, Is Not Empty |
| Value | The comparison value — type depends on the field |
Step 4 — Sort
Choose a Sort Field and direction (Ascending / Descending). You can chain multiple sort fields.
Step 5 — Preview limit
Click Preview to execute the query against your local database and show the first 100 rows in a table.
Previews server-side and applies every filter — so the preview accurately reflects what will be pushed to Power BI.
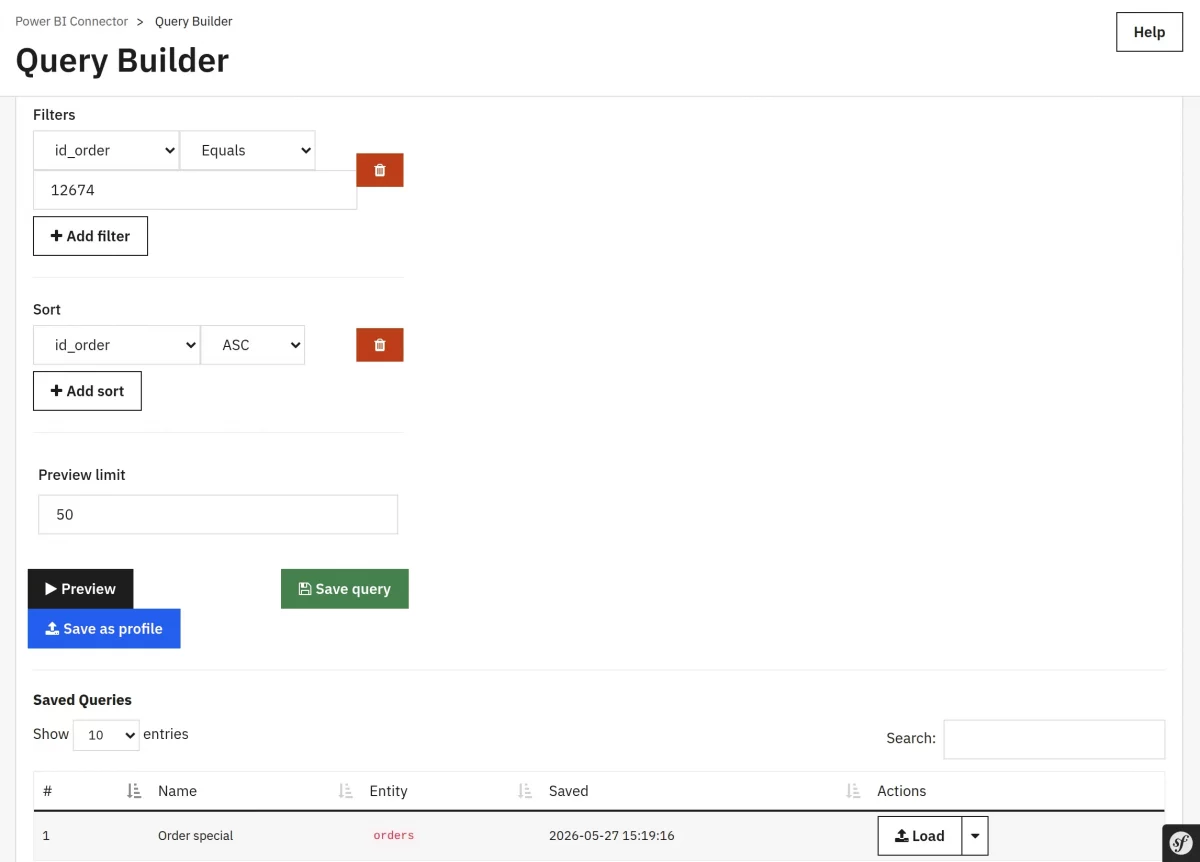
Step 6 — Save
After previewing, you have three choices:
| Action | Effect |
|---|---|
| Save as Profile | Saves the query as a reusable Profile by entering the profile name and Sync Mode. |
| Save Query | To save the query and display it in the saved queries list to edit it later. |
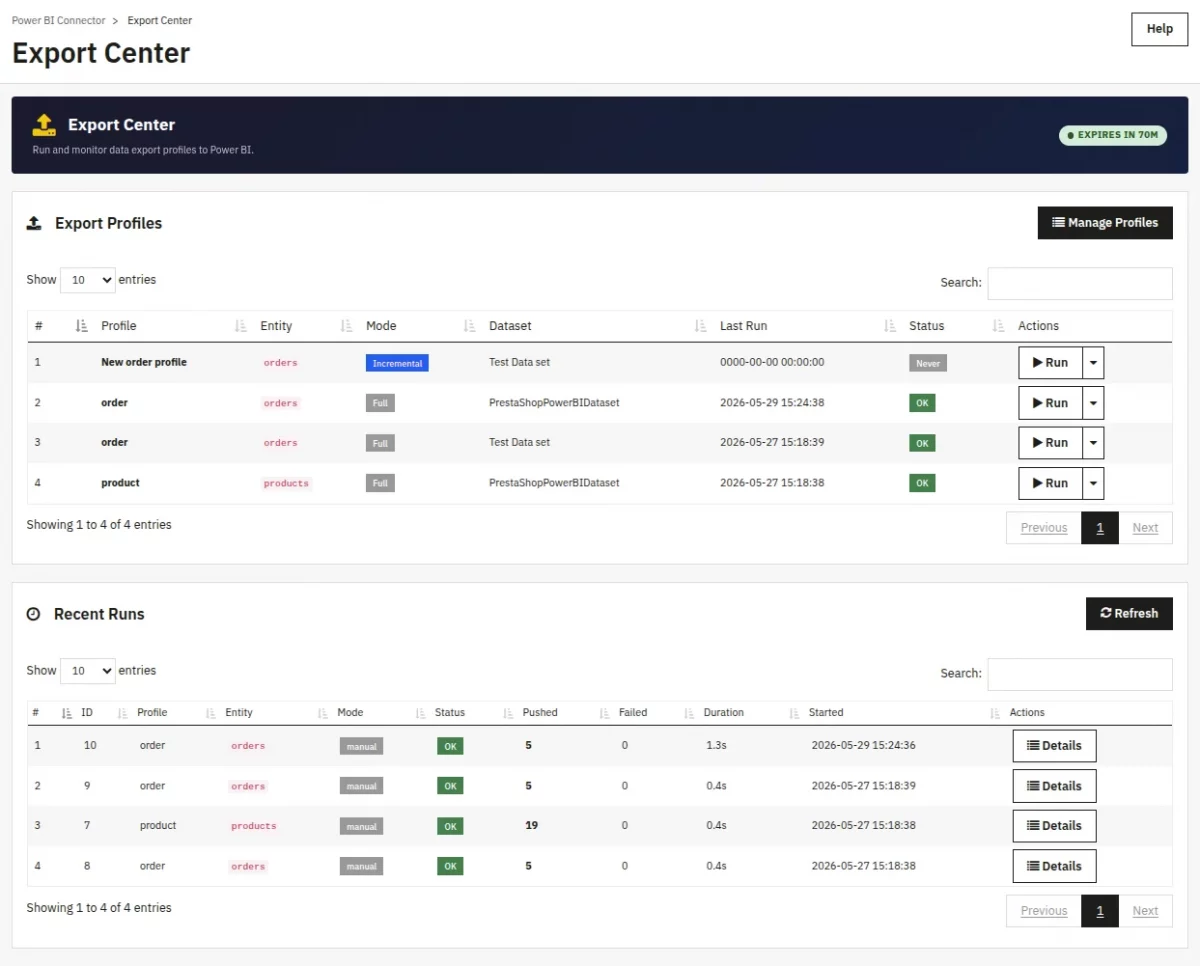
Export Center
The Export Center is the page where you orchestrate data pushes and see the real-time status of every export.
Where the Query Builder is for designing queries and Data Load Profiles is for saving reusable configurations, the Export Center is where you run and monitor them.
What you can do
- Run to export the saved profile on demand
- Cancel a running export
- View the execution log for any recent run
- Download log JSON
Reports
Import and manage Power BI reports and dashboards. Embed reports in admin popups or generate tokens for storefront display. Toggle active status to control visibility.
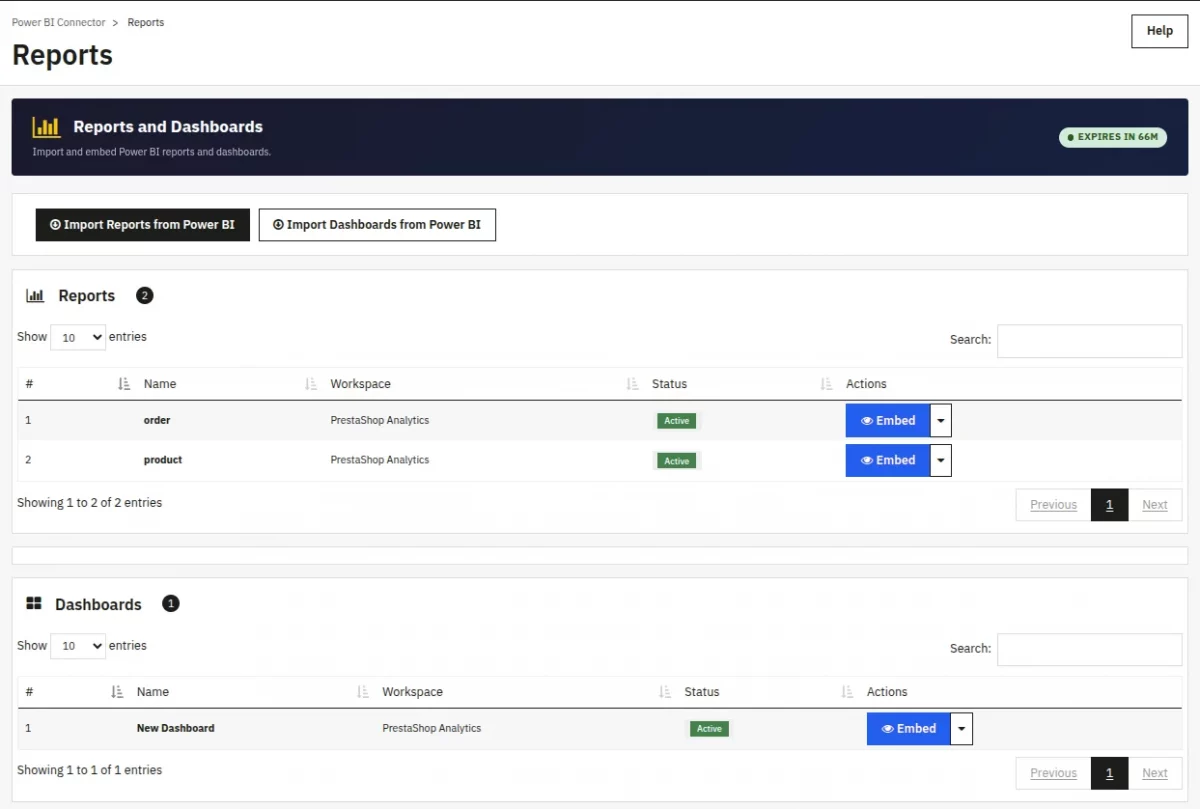
- Embed Report — Fetch reports from the active Power BI workspace
- Embed Dashboards — Fetch dashboards from the active workspace
- Copy Embed Link — Create a secure embed link for storefront display
- Open in Power BI — View report directly on powerbi.com
Embed Report

Alerts
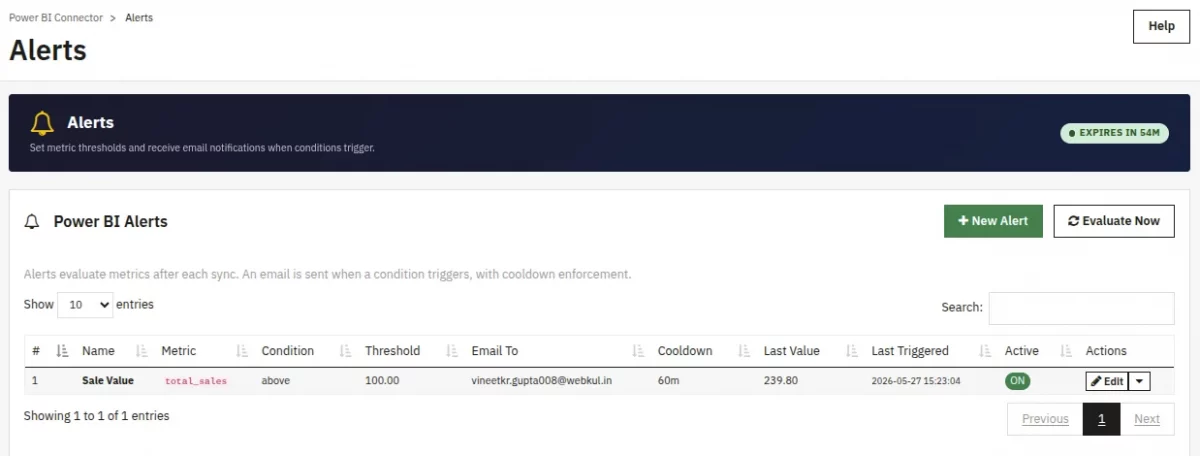
Configure threshold-based alerts for business metrics. Set conditions to trigger email notifications when values exceed thresholds.
- total_sales (30d) — Monitor revenue over 30-day period
- order_count (30d) — Track order volume trends
- avg_order_value — Monitor average basket size
- refund_rate — Watch for unusual return rates
- low_stock_count — Get notified of inventory levels
- sync_failure (24h) — Alert on failed sync operations
- data_freshness (days) — Monitor time since last successful sync
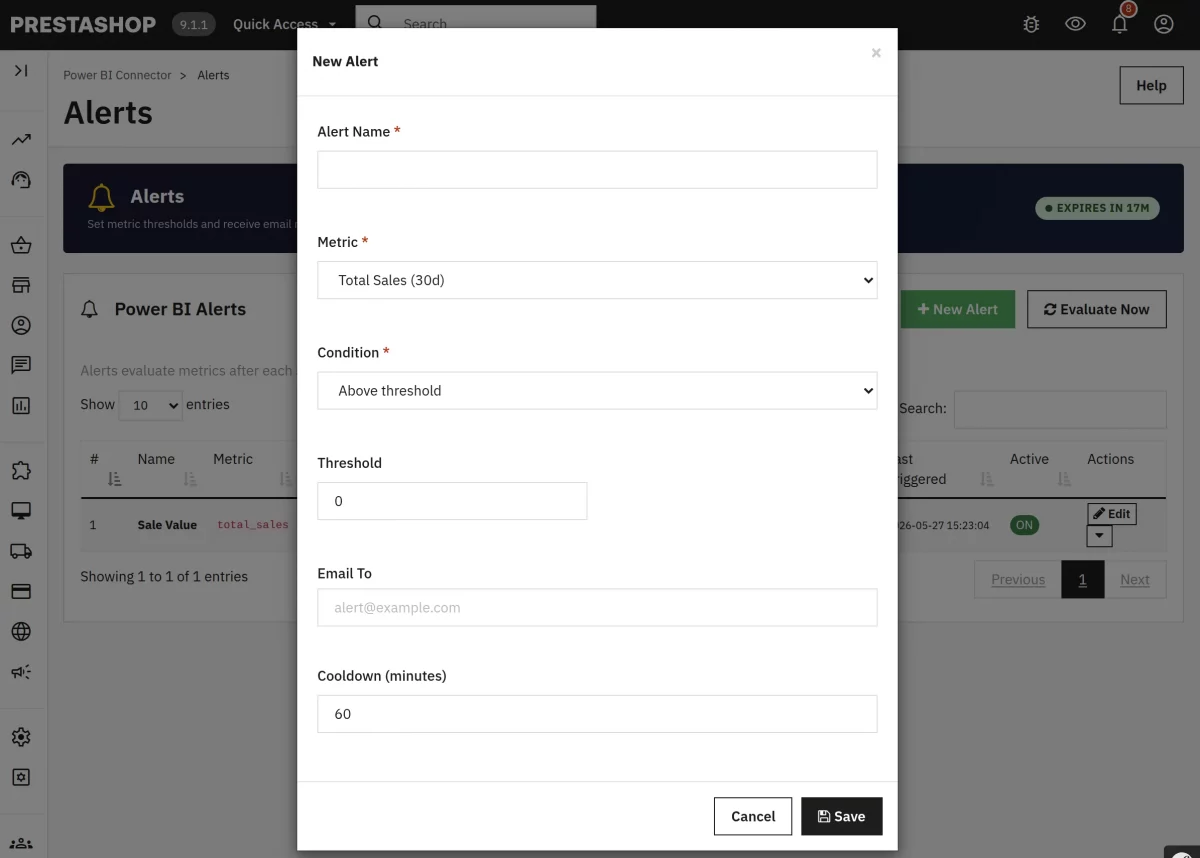
Create new Alert:
- Click + Create Alert on the Alerts page.
- Fill in the form:
| Field | Description |
|---|---|
| Alert Name | Friendly label, e.g. “High Refund Rate Warning” |
| Metric | One of the supported metrics |
| Condition | Above / Below / Between / Outside Range / Equals |
| Threshold Value(s) | The numeric comparison |
| Recipients | To which alert email should be sent |
| Cooldown | Minimum minutes between repeat emails to avoid spam. |
- Click Save.
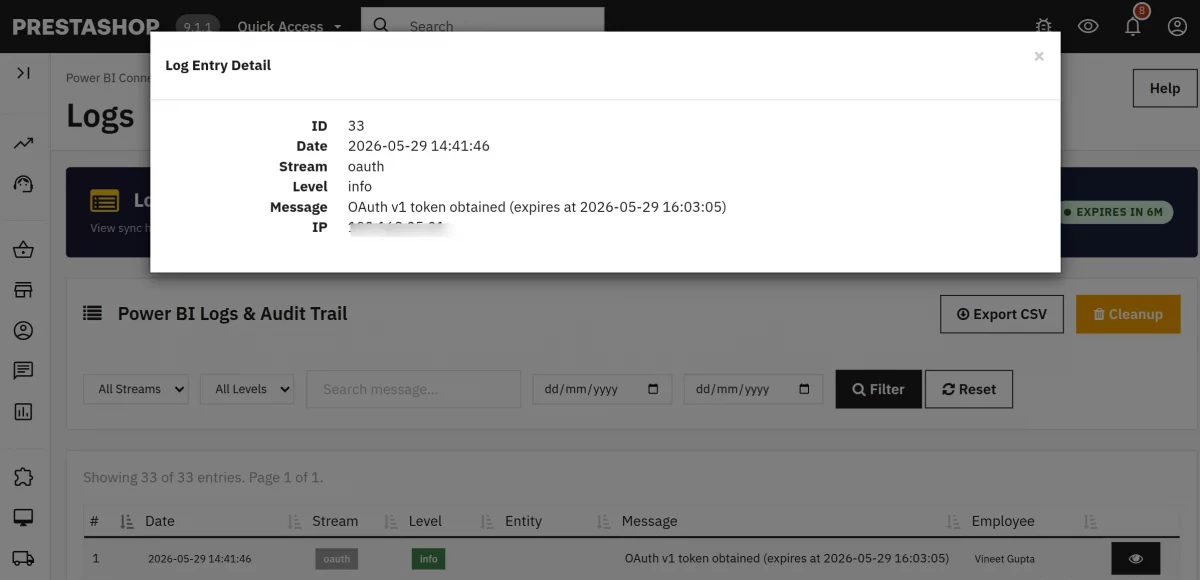
Logs
View and filter unified module logs. Filter by stream (sync, api, audit, alert), level (info, warning, error), date range, or search term. Export filtered results to CSV.
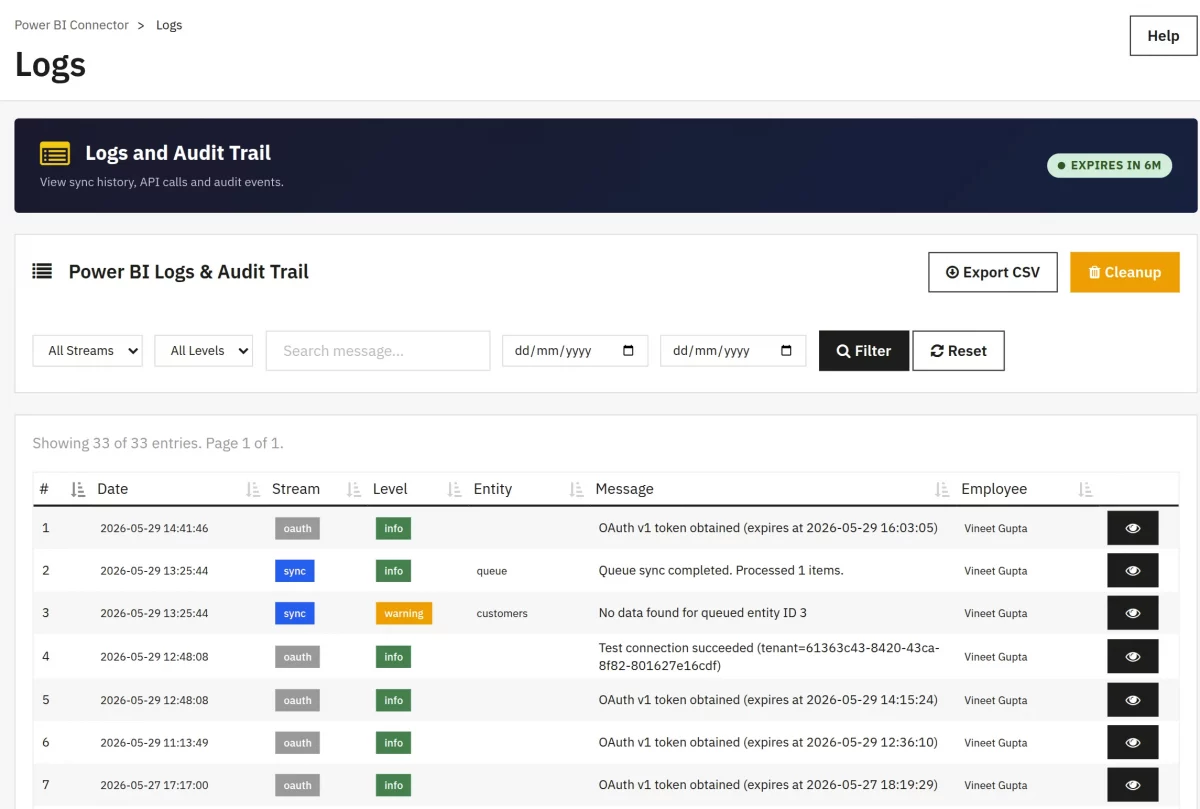
• Stream Filters — View specific log types (Sync, Audit, API, and Alert)
• Level Filters — Show only errors, warnings, or info
• Export CSV — Download filtered logs for analysis
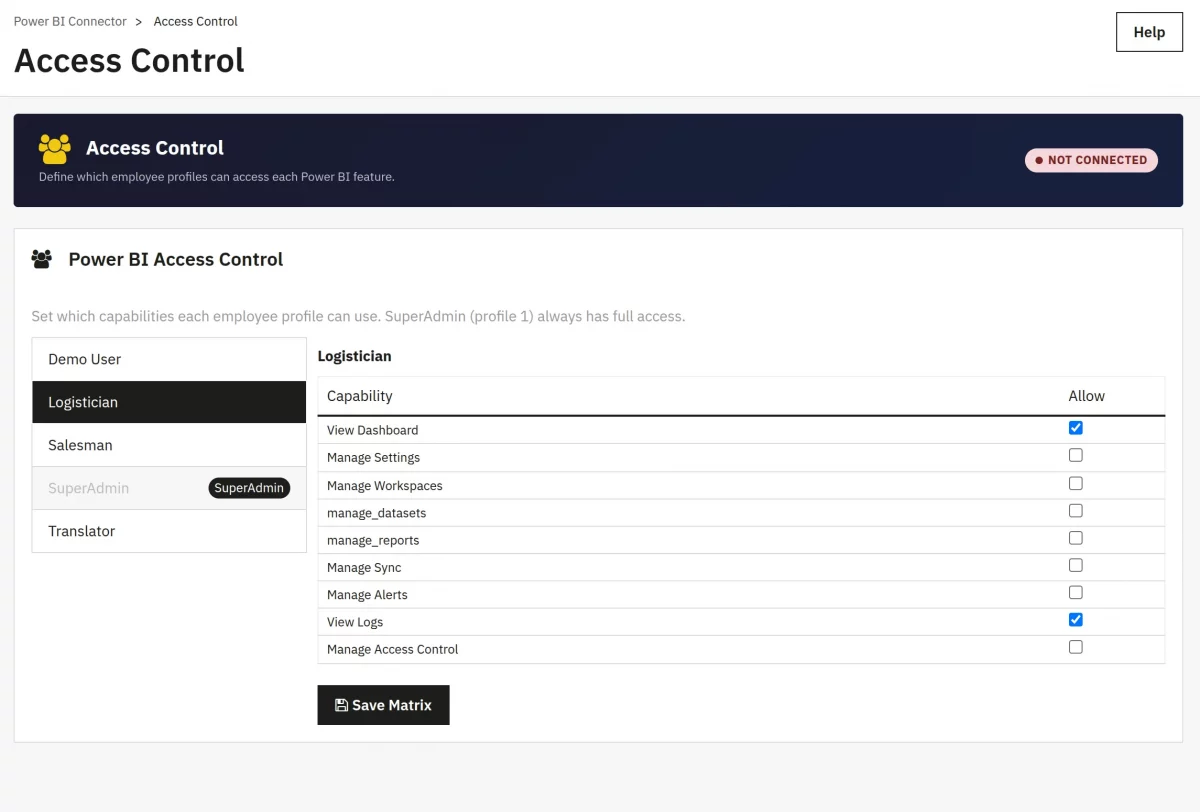
Access Control
Access Control lets the admin decide which PrestaShop employee profiles can access which parts of the Power BI module.
For example, you might allow your marketing team to view reports but not change sync settings.
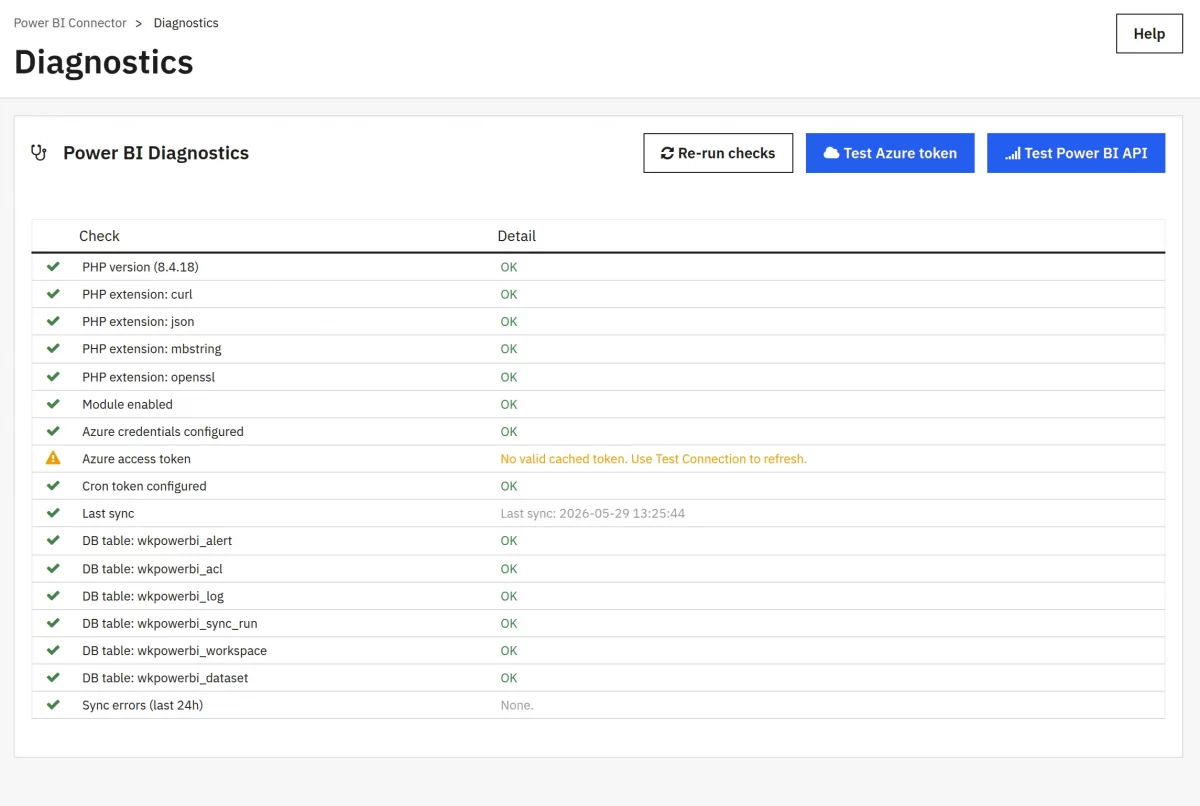
Diagnostics
Troubleshoot connection and configuration issues. The diagnostics page displays connection status, PHP environment details, current configuration values, and table row counts.
Support
For any kind of technical assistance or query, please raise a ticket or send us a mail at [email protected]
Also, please explore our Prestashop development services and vast range of quality Prestashop addons.
Current Product Version - 1.0.0
Supported Framework Version - 9.x.x, 8.x.x, 1.7.x.x

Be the first to comment.