INTRODUCTION
Manage your library efficiently with Odoo Website Library Management System!!
Reading is one of the most productive habits, but not everyone can buy every book they like. Also, reading broadens perspective and vocabulary. However, books are not cheap, and some of them are pretty expensive that a regular user can’t afford.
Hence, there are libraries, which make books accessible for all. Libraries allow users to read any book they want. Additionally, from the library, they can get any book issued which they want to read.
Odoo Website Library Management System enables you to manage your library both; online and offline. Moreover, with this module, you can add or remove books, issue a book, re-issue a book, configure a return policy, and much more.
NOTE: Odoo Website Library Management System Module works in conjunction with the following module:
Odoo Library Management System
You would require to install this module first for Odoo Website Library Management System to work properly.
FEATURES
- Manage library efficiently by integrating Odoo Website Library Management System.
- Create book entities from the Odoo backend.
- Add book details in the backend such as Author name, book name, price, pages, etc.
- You can create categories and subcategories for the books.
- Moreover, you can add a description of that created category.
- Manage stock inventory of the books.
- Use incoming type while adding a stock of the books.
- Additionally, you can use outgoing type while issuing the book.
- Users can request a new book in the Odoo Website Library Management System.
- After that, the manager can approve or disapprove the request as per their wish.
- You can set the days to keep the books.
- Also, you can fix a fine if the preset days exceed.
- Any user or employee can get the book issued.
- You can accept or reject the issue request as per book availability.
- When a book is not available, a popup message will show unavailability.
- Maintain the issue request date of the book.
- Also, maintain the serial number to track the issued books.
- From the site, users can search for any book.
- Additionally, they can see the availability of the book by searching.
- Readers can check the status of the books requested, issued, or added to the library.
- Readers can also check the no. of the book issued and added on the request.
INSTALLATION
- Once you purchase the App from Webkul store, you will receive the link to download the zip file of the module.
- Extract the file on your system after the download finishes. You will be able to see a folder named- ‘website_library_management.’
- Copy and paste this folder inside your Odoo Add-Ons path.
- Now, open the Odoo App and click on the Settings menu. Here, click on Activate the Developer Mode.
- Then, open the Apps menu and click on ‘Update Modules List.’
- In the search bar, remove all the filters and search ‘website_library_management.’
- You will be able to see the module in the search result. Click on ‘Install’ to install it.
WORKFLOW CONFIGURATION
BACKEND CONFIGURATION
1. Firstly, log in to your Odoo backend and go to ‘Library Management’ to view all the books you have. Click the ‘Create’ button to create a new book.

2. Fill in the details such as name, category, and other information needed in the ‘Information’ tab. Once done, click the ‘Save’ button to save the changes. Moreover, you can ‘Publish’ the book on the site by clicking the ‘Unpublished’ option.

3. Now, go to the ‘Inventory’ tab to view and edit the stock inventory of the book.

4. After that, click the ‘Description’ tab to add a description of the book.

5. Next, click on the ‘Book Request’ tab to view all the issue requests by users and employees. Click and open any request to view all the details. You can view details such as the date and time and who requested the book issue. Moreover, you can ‘Check Book in Library’ from there and change status to ‘In Progress’ or ‘Reject’ the request.


6. Go to the ‘Register’ tab, create a request for an issue from the backend. On the page, click the ‘Create’ button.

7. Choose the book from the ‘Book Name’ dropdown or type the name. Then select the ‘Serial Number,’ ‘Subscriber,’ and ‘Issue Request Date.’ Once done, you can directly issue the book by the ‘Issue’ button or click ‘Request Issue’ for requesting an issue. Further, on the top-right side, you can see the ‘Status’ update.

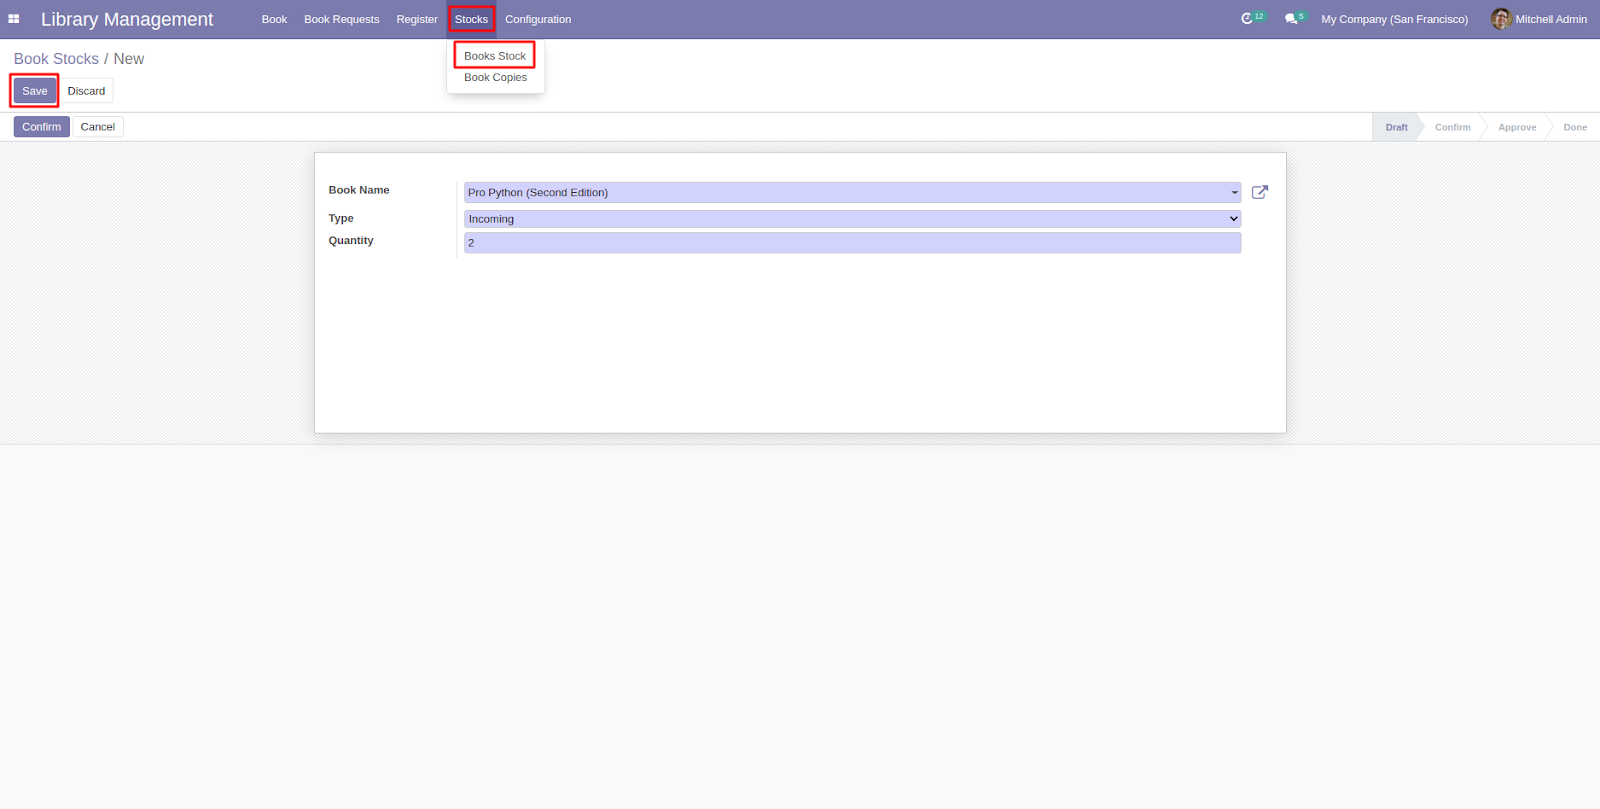
8. After that, click the ‘Stock> Books Stock,’ and click the ‘Create’ button to add new book stock. On the new page, fill in the details and click the ‘Save’ button. Also, ‘Confirm’ the stock request from the same page. After confirming the stock request, enter the ‘Serial Number’ and validate it. Once done, you can confirm and approve the stock.

9. Now, click on the ‘Stock> Book Copies’ to view all the books and their stock. Additionally, you can export all the records by the ‘Export’ button.

10. Once done, now configure the ‘Return Policy’ present under ‘Configuration> Library Configuration.’ Enter the ‘Day(s) to Keep the Book’ and ‘Fine’ amount per day and click the ‘Save’ button.

11. Lastly, go to ‘Configuration> Categories’ to create a new category. Enter the ‘Category Name,’ ‘Parent Category Name’ (If applicable), and ‘Description’ in the boxes and click the ‘Save’ button.

FRONTEND VIEW
12. Go to your website and open the ‘Library’ tab to view all the books and their availability status. You can also search for a book from the search bar. On the page, click on any book to view its details.

13. Now, click on ‘Book Issue Request’ to create an issue request.

14. On clicking ‘Book Issue Request,’ a popup will appear asking for a reason for the issue with a date stamp in the top column.

15. Once done, it will show a successful request submission message.

16. Go to ‘My Account’ to view the ‘Issued books’ and ‘New Book Requests’ tab.
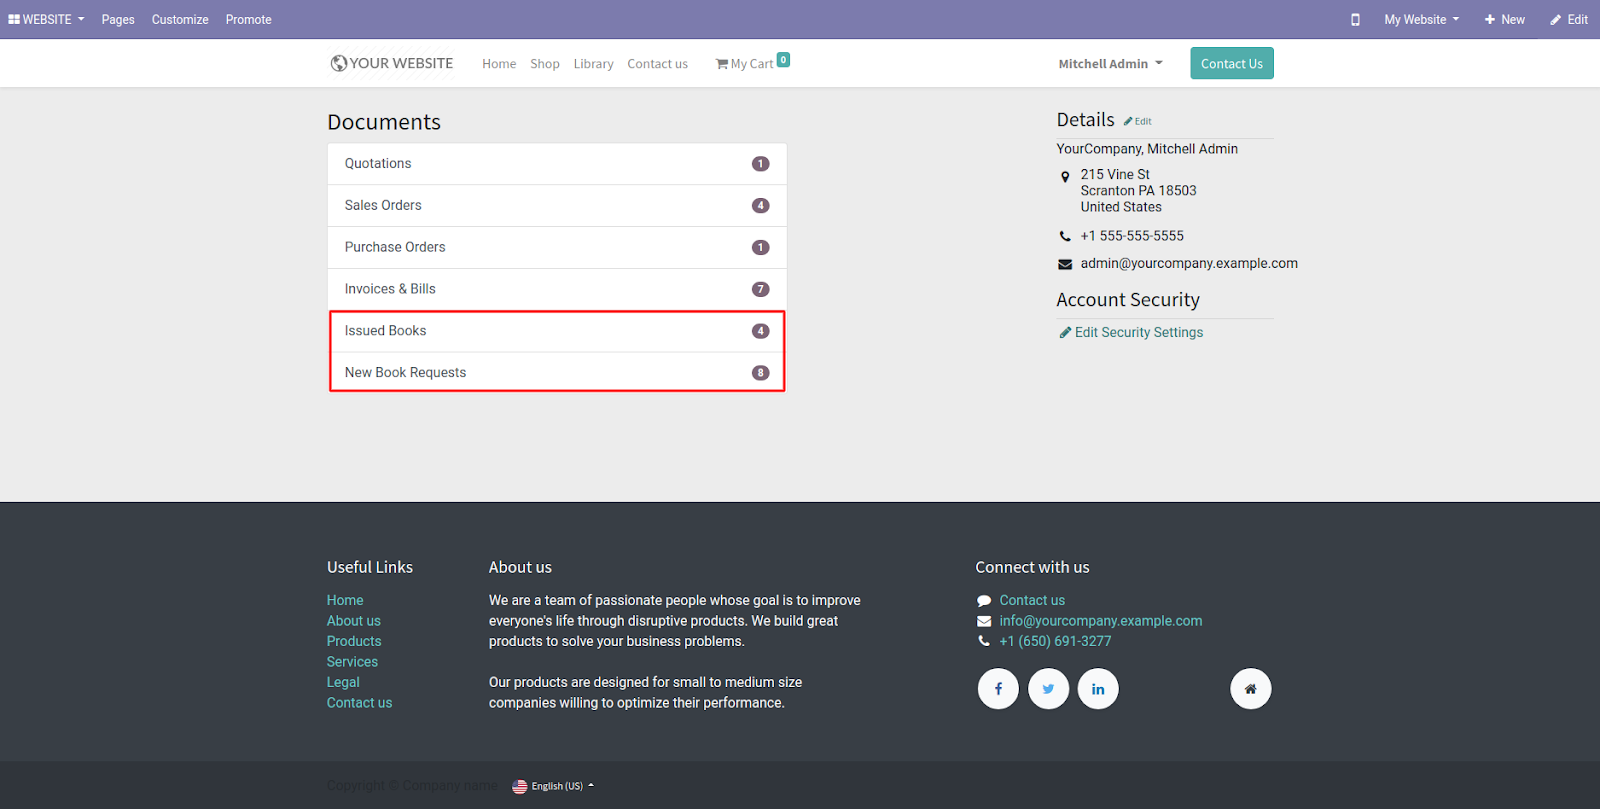
17. In the ‘Issued Books’ section, you can view the status as ‘Request: Issue.’ Also, you can view the ‘Book Details’ and ‘Assignee Details.’

18. In the ‘Requested Books’ section, you can view the status as ‘Requested.’ Additionally, you can view every book detail along with the details of the person who requested it.

OTHER ODOO MODULES
- Odoo Multi Website
- Odoo Reminder Mail
- SKU Generator
- Odoo OneDrive Integration
- Odoo GeoIP Redirect
- Dealership Management
- Odoo Website SSO
- Odoo Vendor Portal
- Latest Tweet
- Odoo Website Debranding
- Odoo Affiliate Management
- Aliexpress Dropshipping
- Odoo Parking Management
- Odoo LeaderBoard
- Queue Management
NEED HELP?
Hope you find this guide helpful! Please feel free to share your feedback in the comments below.
If you still have any issues/queries regarding the module, please raise a ticket at https://webkul.uvdesk.com/en/customer/create-ticket/.
Also, please explore our Odoo development services & an extensive range of quality Odoo Apps.
For any doubt, contact us at [email protected].
Thanks for paying attention!!
Current Product Version - 1.0.0
Supported Framework Version - V15, V14, V13, V12

Be the first to comment.