INTRODUCTION
Simplify e-Invoicing with Odoo GST e-Invoice EWay-Bill System!
Transporters have to generate E-Way bills for all their transit exceeding 50,000. But it is a tedious task as most of the time, due to server load the page either stucks or is unbelted to upload orders.
Due to this, you are unable to generate an E-Way bill. Hence, you require a module that eases this process and makes E-way bill generation easier for you.
Odoo GST e-Invoice EWay-Bill System allows you to generate E-Way Bill quickly as it converts the order into a JSON file, which you can upload on the E-Way portal.
NOTE: GST e-Invoice EWay-Bill System Module works in conjunction with the following module:
You would require to install this module first for GST e-Invoice EWay-Bill System to work correctly.
FEATURES
- Single-click to generate JSON format for GST E-Way Bill with a single click.
- All Unit Quantity Codes (UQC) are available, which helps prepare JSON for E-Way Bills.
- Moreover, create multiple transporters in Odoo, which help to prepare E-Way Bills.
- With a proper reason, you can update the vehicle number too.
- An additional tab (E-Way Bill Details) to help you get all the required details for E-Way Bill generation.
- Further, you can manage the E-Way Bill Orders in Odoo.
- Inside the E-Way Bill Orders menu, under bulk action, you can generate JSON for both ‘E-Way Bill’ and ‘Consolidated E-Way Bill’.
- With ‘Bulk action,’ generate JSON for vehicle number updation in the E-Way bill portal.
- You can also manage E-Way bill source location warehouse-wise.
- You can Manage E-Way Bill Consolidation conveniently.
INSTALLATION
- Once you purchase the App from Webkul store, you will receive the link to download the zip file of the module.
- Extract the file on your system after the download finishes. You will be able to see a folder named- ‘gst_einvoice_system.’
- Copy and paste this folder inside your Odoo Add-Ons path.
- Now, open the Odoo App and click on the Settings menu. Here, click on Activate the Developer Mode.
- Then, open the Apps menu and click on ‘Update Modules List.’
- In the search bar, remove all the filters and search ‘gst_einvoice_system.’
- You will be able to see the module in the search result. Click on ‘Install’ to install it.
WORKFLOW CONFIGURATION
1. Firstly, log in to your Odoo Backend and go to ‘GST Eway Bill> Configuration> Settings.’

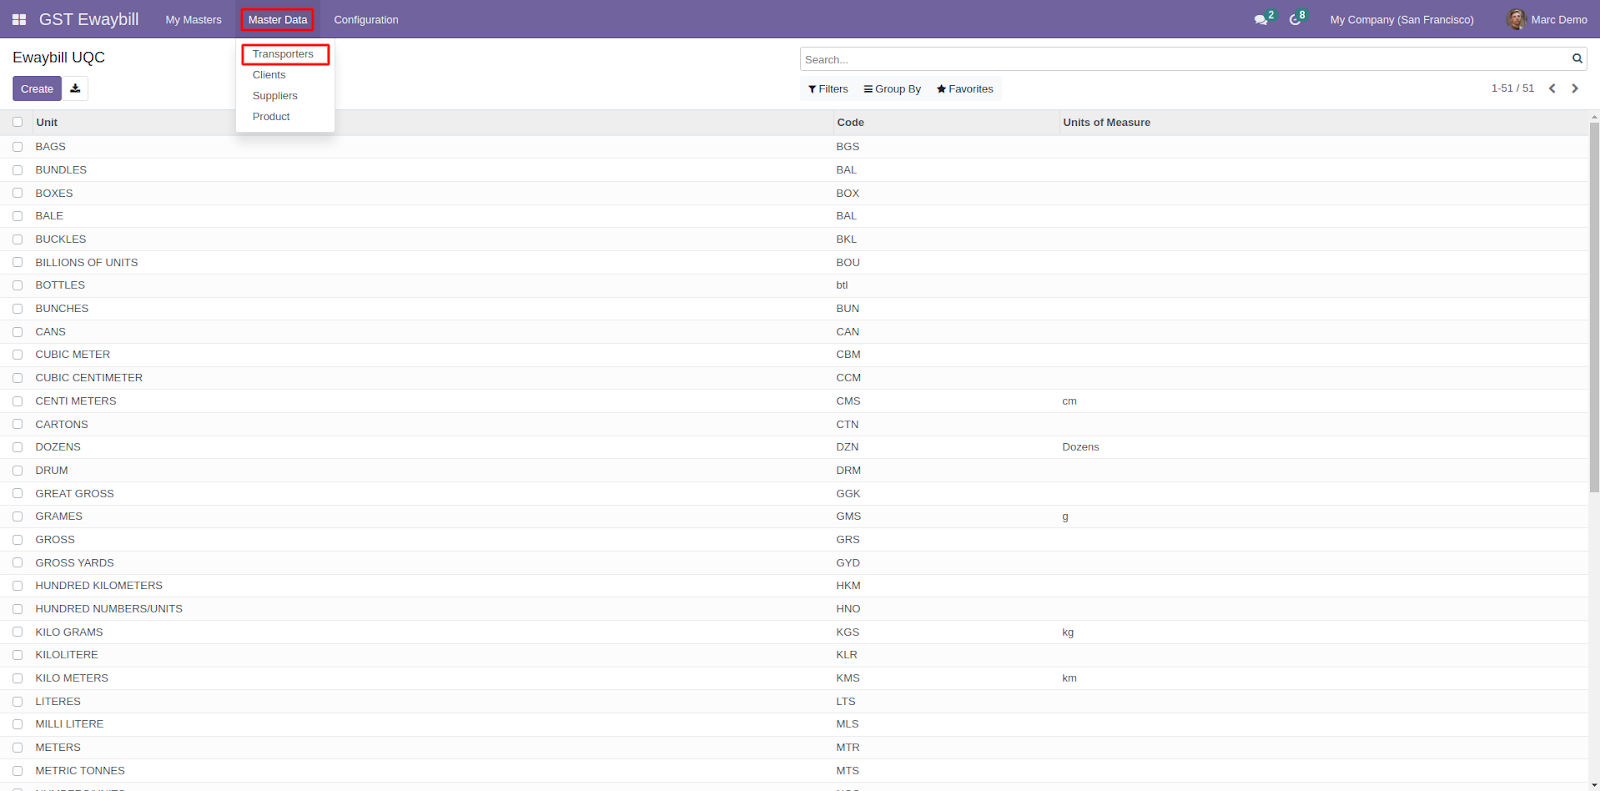
2. On the setting page, you can click on the ‘Click here to check version’ to check its version. After that, go to ‘Configuration> Unit Quantity Code.’

3. On the UQC page, you can see all the created UQC. Moreover, you can create new ones by clicking the ‘Create’ button.

4. Next, click on the ‘Master Data> Transpoerters> Create.’
5. On the page, fill in the details and click the ‘Save’ button.

6. Now go to ‘My Master> Orders’ and click on any order to open it.

7. On the order detail page, click the ‘Edit’ button and tick the box next to ‘Generate E-Way Bill.’
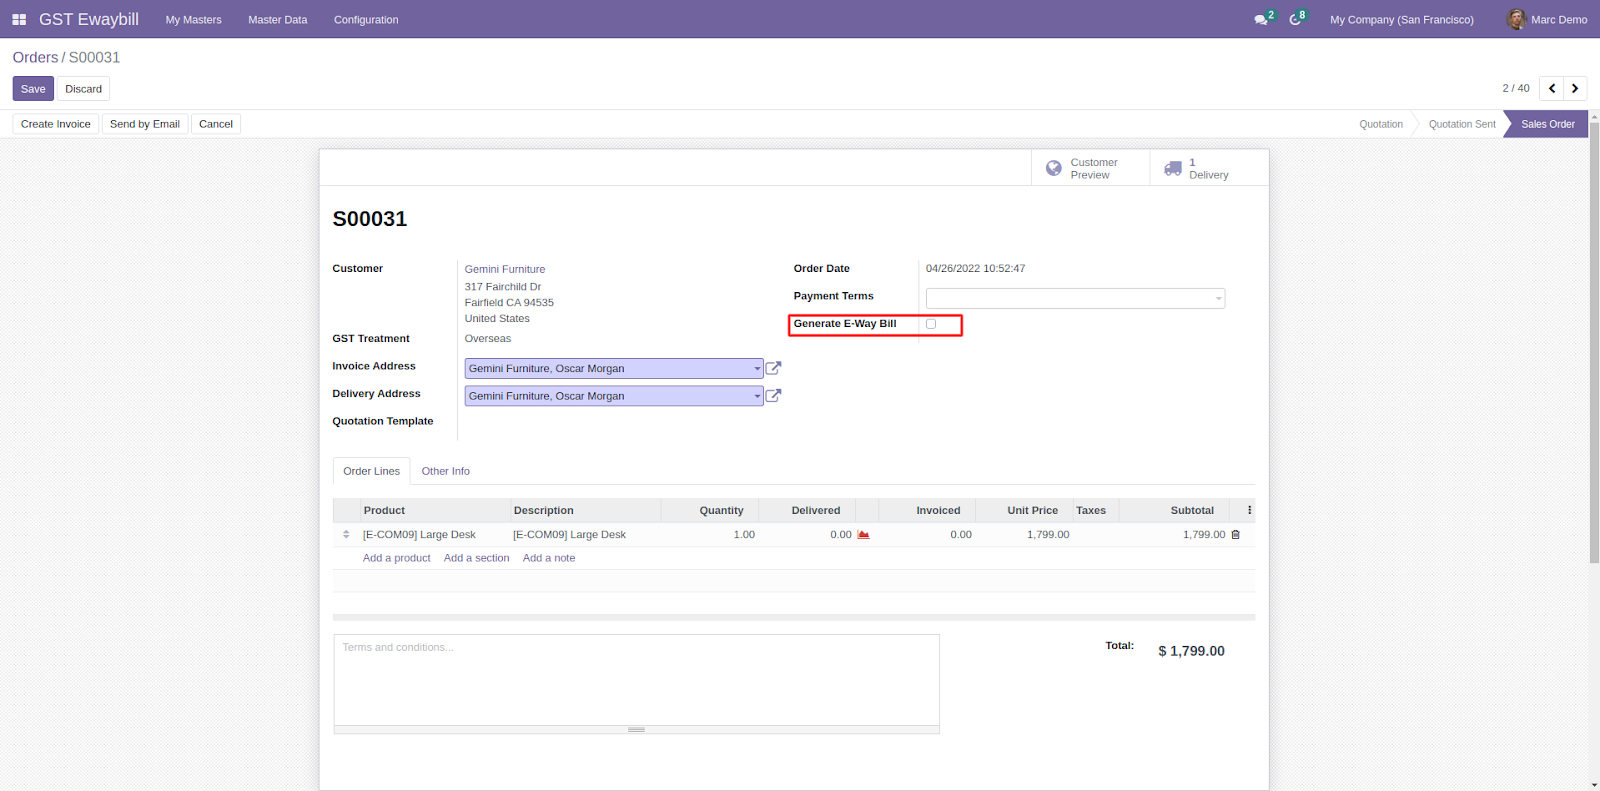
8. On ticking the box, a new tab (‘E-Way Bill Details’) will add to the page click on this tab and fill in the ‘Transportation Details.’ Once done, click on the ‘Save’ button to save the changes.

9. After that, click on ‘My Master> E-Way Bill Order’ to see all the E-Way Bill Orders.
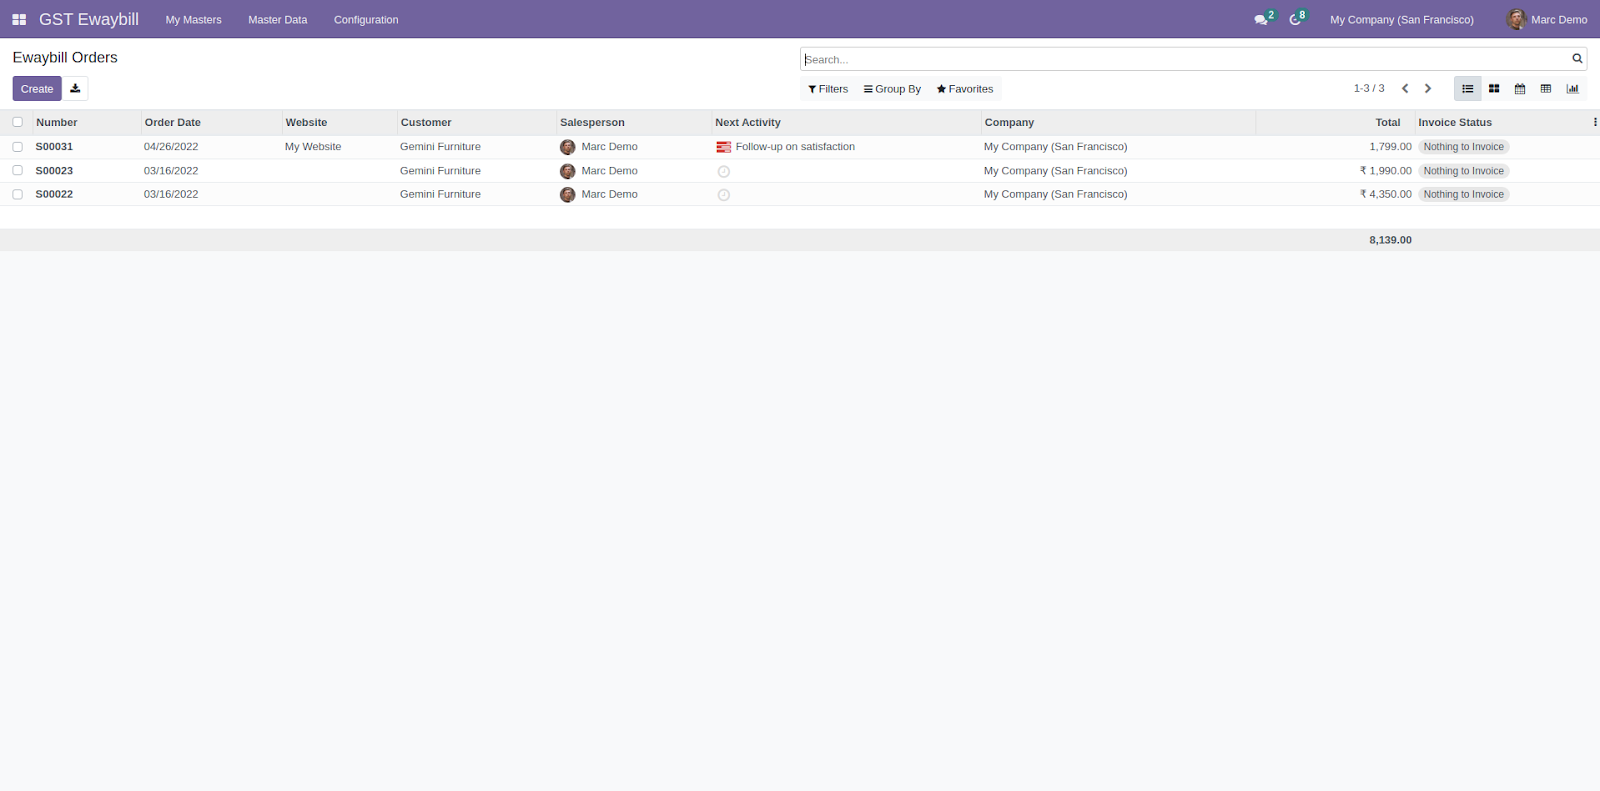
10. Now, select one or two or all E-Way orders and click on the ‘Action> Generate E-Way Bill JSON’ to generate JSON of the selected orders.

e-Invoice JSON
11. The JSON file will look like this, which you can use for the E-Way bills.

12. Next, select the E- Way bill and click on ‘Action> Consolidated E-Way Bill JSON,’ which will open a popup.

13. In the popup, fill in the details asked and click on the ‘Print’ button to generate a consolidated E-Way bill.

14. In case of any problem relating to the vehicle, you can update it as well. Just open an E-Way Bill and click on the ‘Update Vehicle NO.’

15. In the popup, fill in the ‘Vehicle Number, Reason, and Remarks,’ once done, click on the ‘Update’ button.

16. You can also manage the source address inside the Odoo warehouse; you need to add the GSTIN number to link it with the GST E-way bill.

e-Invoice e-Way Bill Portal Setup
17. After that, go to the GST e-Invoice portal and upload the e-Invoice JSON file.

18. Once uploaded, it will show the details of the JSON. Also, it will show the details and IRN number. You can copy it or Download the ‘Excel or Signed JSON’ from the button present on the page.

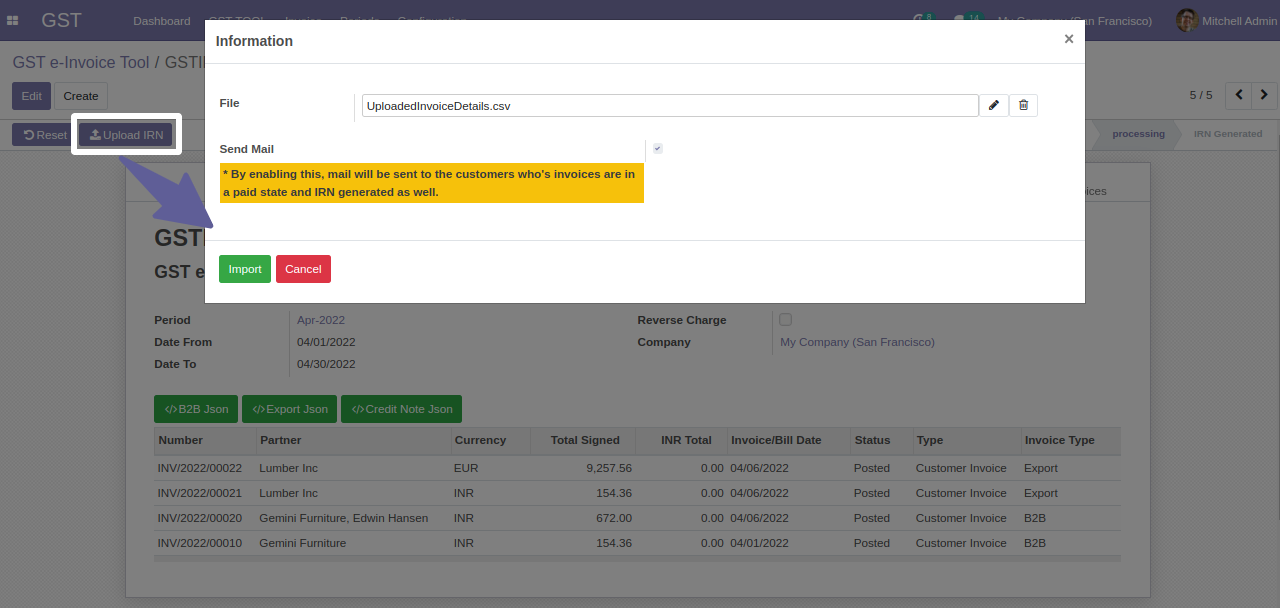
19. Now, go to GST e-Invoice and open any invoice and click the ‘GST e-Invoice’ tab and click the ‘Generate IRN’ button.

20. In the popup, you will get two methods:
20.1. Upload IRN via CSV: Which is the file you downloaded from the GST e-Invoice e-Way bill portal.
20.2 Manually Add GST e-Invoice Response: When you have to enter all details manually.

21. On choosing ‘Upload IRN via CSV’ you just need to upload the previously downloaded CSV and have to click the ‘Import’ button.
22. On selecting ‘Manually Add GST e-Invoice Response,’ enter the details such as ‘Acknowledgement Number, Acknowledgement Date, Invoice Reference Number, SIgned QRCode, and Signed Invoice’ and click the ‘Import’ button.

23. Once done, you can see all the details saved in the system with the updated status ‘IRN Generated.’

OTHER ODOO MODULES
- Odoo GST – Returns and Invoices
- Odoo Invoice Tax Stamp
- Price Inclusive For Group Taxes
- Odoo POS Tax Details
- Odoo GST e-Invoicing System
- Website Social Network Tabs
- Odoo Custom Product Tabs
- Odoo Website Product Tags
- Marketplace Seller Profile Tabs
- Odoo View Records In New Tab
- Odoo Website General Product Tabs
- Marketplace Custom Product Tabs
NEED HELP?
Hope you find the guide helpful! Please feel free to share your feedback in the comments below.
If you still have any issues/queries regarding the module, please raise a ticket at https://webkul.uvdesk.com/en/customer/create-ticket/.
Also, please explore our Odoo development services & an extensive range of quality Odoo Apps.
For any doubt, contact us at [email protected].
Thanks for paying attention!!
Current Product Version - 1.0.0
Supported Framework Version - V15

Be the first to comment.