Wallet Management app for Shopify gives your eCommerce store a wallet concept for your customers.
This enables your customers to pay via wallet, to recharge the wallet and can even get refunds in the wallet and much more.
Let’s understand its functionalities in detail.
Features
- Admin can enable wallet functionality on the eCommerce site.
- The admin can let buyers manage the fund/amount in the wallet.
- He can also configure to provide cashback.
- Cashback conditions can also be created by Admin.
- Admin can set wallet cash rules.
- Admin can import existing customers into the app.
- Also, the wallet transaction status of customers is maintained.
- Besides that, the history of the customer’s wallet transaction can be monitored.
Installation
Moving on, to install this app click here and then enter your Shopify store URL to continue with the installation.

Workflow
Once the payment is accepted and the installation is complete, the wallet management app will show on your apps section of Shopify.

Clicking will take you to the app’s homepage, where you’ll find stats, pie charts, order statistics, recent wallet orders, and other wallet-related data for your eCommerce store.


Configuration
From this section, you can configure the domain, edit the labels, manage the email configuration, edit the theme and much more. The configuration section is divided into four parts :
- General Configuration
- Wallet Configuration
- Label Configuration
- Mail Configuration
- SMTP Configuration
- Theme Configuration
General Configuration
From this section, you can configure your Domain Name, Business Email & Shop Logo.

Wallet Configuration
This section will let you configure the wallet settings.
TRANSACTION CHARGE
This is the amount charged by the admin in case of any refund. Let’s understand this with an example:
Suppose you need to refund $100 USD to a customer on his order and the transaction charge set by you is 10%.
Then, the refund amount received by the customer will be $90 USD and the rest $10 USD will be the admin’s share.
Note: Enter the percentage amount that you want to deduct from the customer’s refund amount.
REFUND AMOUNT TO CUSTOMER WALLET
Enable this option if you want to refund the order amount to the customer’s wallet.

ALLOW CUSTOMERS TO TRANSFER THEIR WALLET AMOUNT
Enable this option if you want to allow your customers to transfer their wallet amount to another customer’s wallet.
SEND VERIFICATION EMAIL TO CUSTOMER BEFORE WALLET AMOUNT TRANSFER
Enable this option if you want to send a verification email to the customer before transferring the amount to another customer’s wallet.
PARTIAL PAYMENT VIA WALLET
Enable this option if you want your customers to make the partial payment through Wallet.
Partial Pay via Wallet
Here, we have an option to enable partial pay through the wallet. For this, you first need to disable the ‘allow customers to add money into their wallet” option.
Let’s take an example to understand this-
Suppose, you have enabled this option with pay wallet percentage as 10%.
Now, suppose a customer has bought a product worth $100 & the amount in his wallet is $200, he can use only 10% of his Wallet amount to pay for that order.
And rest of the order amount needs to be paid via any payment method configured by the admin.
Therefore, the customer can pay only $20 (10% of $200) from his wallet & rest, $80 will be paid via other payment modes.
Here, the amount of $20 paid by the customer is:-
[(pay wallet %) of (total wallet amount)]
NOTE:- Partial Payment Option will not work in case you use “Wallet as a Payment Method”.
ALLOW CUSTOMERS TO ADD MONEY TO WALLET
Enable this option if you want to allow customers to add money to their wallets.
ADD TAG TO ORDERS PAID VIA WALLET
Enable this option to get the tags added automatically to customer orders paid through the wallet.
Capped Amount
From this section, you can set the amount usage limit of the customer’s wallet.
For example, if you set 100$ as the capped amount and the total customer cart amount is 500$ then the customer can only pay up to 100$ from the wallet
(Does not matter how much money is in his wallet) and the rest of 400$ will be paid by the other payment method.
Use Wallet as Discount Type
If you want to show the pay via wallet option on the cart page then from here you can configure it:
Wallet App > Configuration > Wallet Configuration > you’ll have the following option:
SELECT A METHOD FOR YOUR CUSTOMERS TO USE THE WALLET

Further, your customers will be able to see the pay via waller option on the cart page.
Frontend:

Auto Pay Draft Order
We have introduced a new feature in the wallet app Auto Pay Draft Order, where the admin can create a draft order for the customer.
Payment can be done automatically from the customer’s wallet as per the order amount and the amount available in the customer’s wallet.

Once you enable Auto Pay Draft Order configuration button, then you will get two configuratuion,
- Auto Pay Previous Draft Order: This configuration allows admin to enable automatic payment for customer’s previous draft orders directly from their wallets .Firstly, it will check if the customer’s wallet contains sufficient amount.
- If the amount in the wallet is equal to or greater than the required amount, it will automatically deduct the necessary amount from customer’s wallet . This feature enhances customer convenience and operational efficiency within admin’s e-commerce platform, optimizing the overall shopping experience.

Shipping Charges: This configuration allows you to choose between using the shipping amount set up within the app or utilizing the shipping setup managed through Shopify.

In shipping charges you will have two shipping charges configuration :
1. Dynamic shipping
2. Fixed shipping
1. Dynamic Shipping
This configuration dynamically calculates shipping rates during checkout based on the weight .
This makes sure customers know exactly how much shipping will cost based on their order details.

Shipping Name For Draft Order: From here the admin can add the shipping name of their choice.
Shipping Cost Over Draft Order Amount: In this section, admin can add the shipping amount that admin wants to charge for the draft orders.
2. Fixed shipping
This feature allows admin to set a fixed shipping amount for all orders.
Regardless of factors such as item weight this ensures a consistent and predictable shipping cost for every purchase.

Just like dynamic shipping, admin can add the name of the shipping name of their choice and can add the shipping amount that admin wants to charge for the draft order .
Shipping charges priority : Shipping charges priority allows admin to control how shipping costs are handled when multiple shipping rules apply to the same order. It has three major cases :-

CASE 1 :
Minimum Priority: Makes sure customers pay the lowest shipping cost when different rules overlap.
Suppose a customer wants to order a product of 2.99 kg and the shipping ranges set by the admin are
Range 1: $1.86 for orders between 0kg-2.99kg
Range 2: $2.34 for orders between 2.99 kg- 4.99kg.
The customer would be charged $1.86 for their order .
CASE 2 :
Maximum Priority: It chooses the highest shipping cost available for the weight of the product falling under both the ranges.
Range 1: $1.86 for orders between 0kg-2.99kg
Range 2: $2.34 for orders between 2.99 kg- 4.99kg.
With the Maximum priority, the customer would be charged $2.34
CASE 3 :
Shipping condition do not fall under any configured rules
If the shipping condition do not fall under any configured ranges then admin can manually set the shipping cost above the ranges specified.
If the admin sets shipping rates as $1.86 for 0-2.99kg and $2.34 for 2.99-4.99kg, any order above 5kg will have a manually set,
fixed shipping price for all orders above this range.

Cases
Case 1: If the draft-ordered product is not having shipping then the
Shipping Cost Over the Draft Order Amount of10$ will be applicable then the total amount of the order is 110$ including the shipping.
Case 2: If the draft-ordered product is having shipping cost of 5$ then the
Shipping Cost Over the Draft Order Amount will not be applicable then the total amount of the order is 105$ including the shipping.
Now, how the Auto Pay Draft Order works?
Let’s suppose,
If the customer’s wallet amount is 500$. then for the draft order payment will be deducted automatically and the draft order will be marked as paid.
And, if the customer’s wallet amount is zero then the draft order will be as unpaid until or unless the customer adds the amount to the wallet
But in case the customer adds the amount to the wallet in the future then automatically it will deduct the amount and mark it as paid.
Note: In case of multiple draft orders, payment of the draft order is automatically done as per the draft order creation sequence, and the condition is there must be the amount in the wallet.
Use Wallet as Payment Method
Now, in case, you want wallet as a payment method on the checkout page, here’s how you can configure it:
Wallet App > Configuration > Wallet Configuration > you’ll have the following option:
SELECT A METHOD FOR YOUR CUSTOMERS TO USE THE WALLET

Select the field as ‘Payment Method‘. Further, enter the Payment Method Name here, for example: ‘Pay Via Wallet’.
However, at Shopify backend, you need to set up a custom payment method with the same that you have used here. Follow these steps:
Shopify backend > Settings > Payment Provider:


The frontend will look like this:

To have this payment method on the frontend, you need to set up the Payment Method details that you have selected in configuration (PayPal/Stripe/Razorpay).
NOTE:- In case you are using “Wallet as a Payment Method”, the partial payment feature will not work.
PayPal Configuration
In case you have selected ‘PayPal’ in ‘Wallet Configuration’, you need to enter the following details:
Learn how to get PayPal Credentials: Click here…

Stripe Configuration
In case you have selected ‘Stripe’ in ‘Wallet Configuration’, you need to enter the Secret Key, Publish Key & Client ID.

You need to log in to your Stripe Account to get the above keys.
“Secret key” and “Publish key” you will get from the “API” section of your Stripe account.
“Client ID” you will get from “settings > Connect Settings” of your Stripe account.

Copy the client ID:

Razor pay Configuration
In case you have selected ‘Razor pay’ in ‘Wallet Configuration’, you need to enter your Key Id & Key Secret.

To know how to get the Key Id & Key Secret click here.

Gokwik Integration
If you are using Gokwik checkout instead of Shopify checkout, you need to integrate the wallet with the Gokwik checkout so the wallet works on the Gokwik checkout.
You have to enable the “Use Gokwik checkout” option from the Configuration >> Wallet and copy the URL from there.
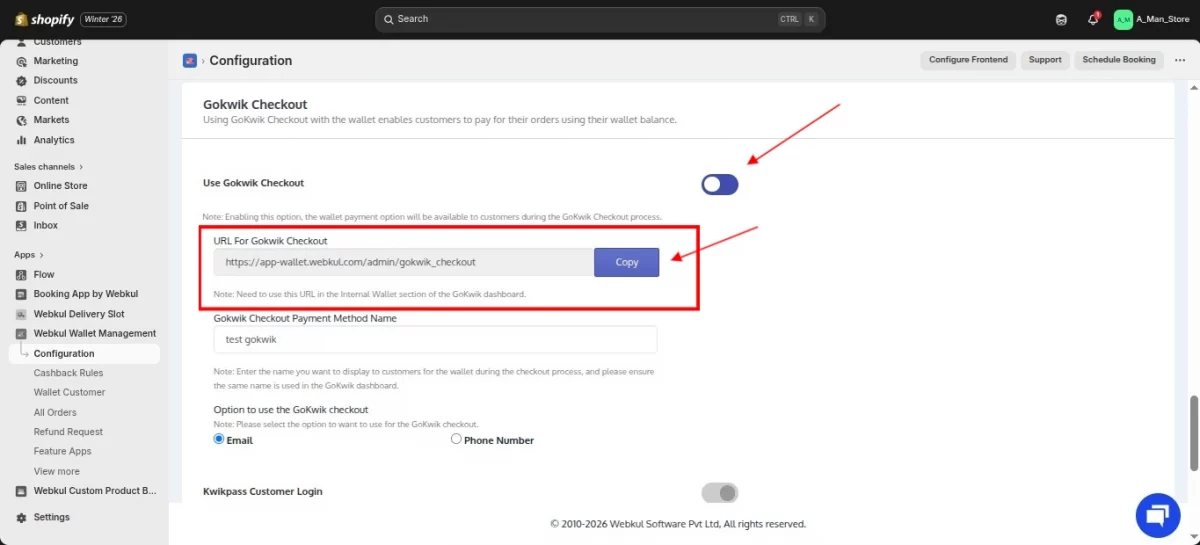
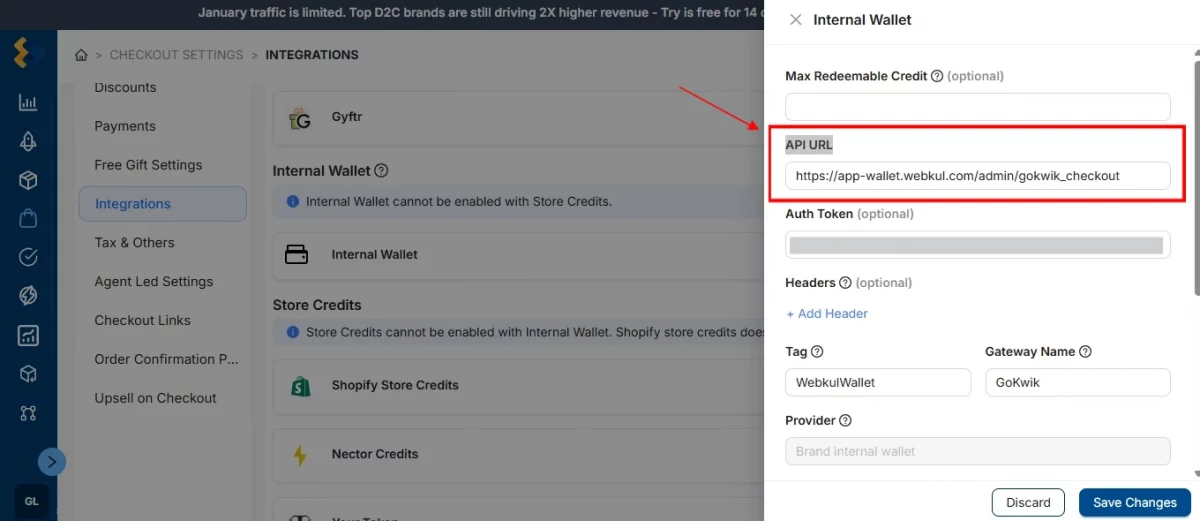
And, paste it here in the App URL section inside the Integration section of the Gokwik dashboard.
Now, in the “Gokwik Checkout Payment Method Name”, enter the name you want to display to customers for the wallet during the checkout process.
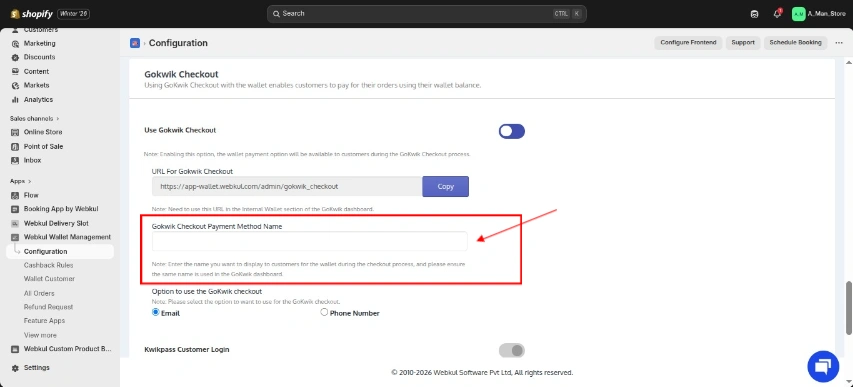
Please ensure the same name is used in the GoKwik dashboard.
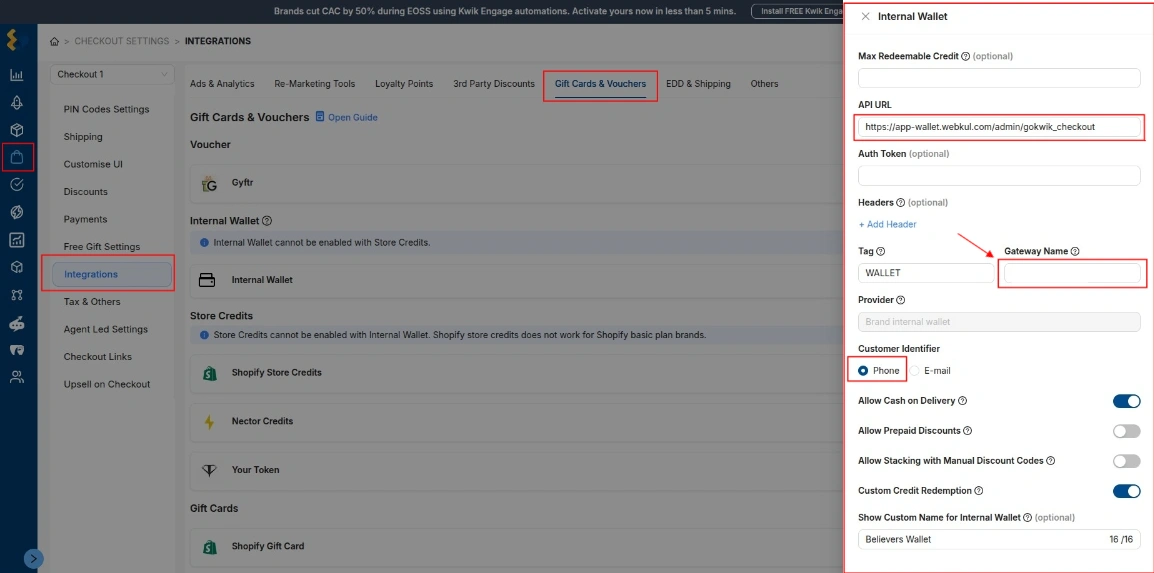
Now select the option you want to use during checkout for the customer identifier.

Select the same in the Gokwik dashboard as you have chosen in the wallet app.
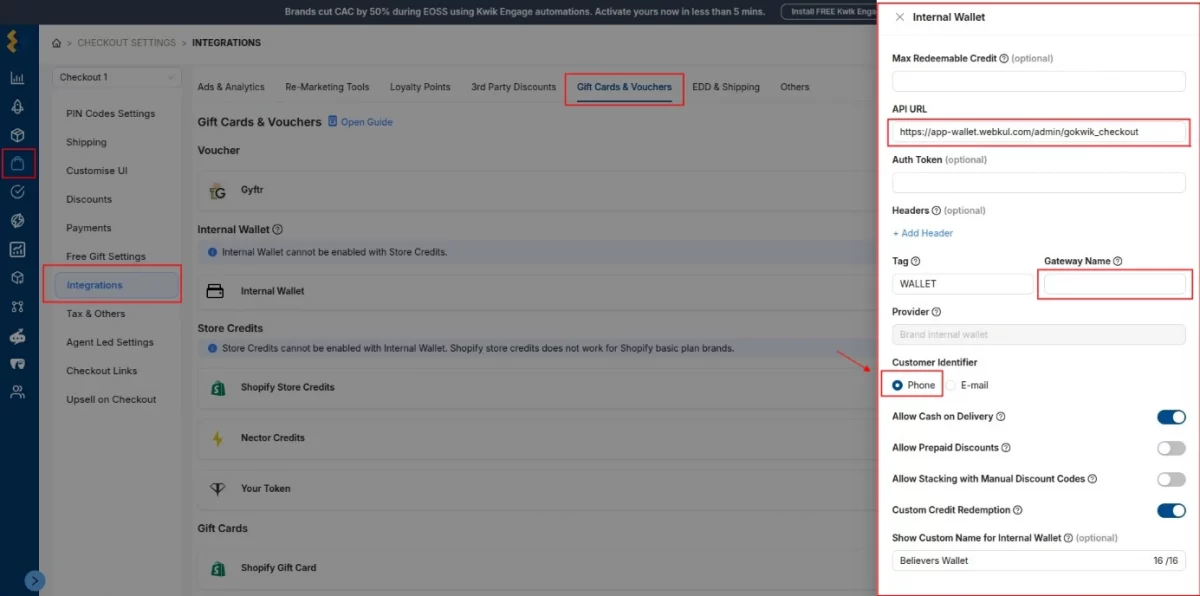
After this, your wallet is now integrated with Gokwik checkout.
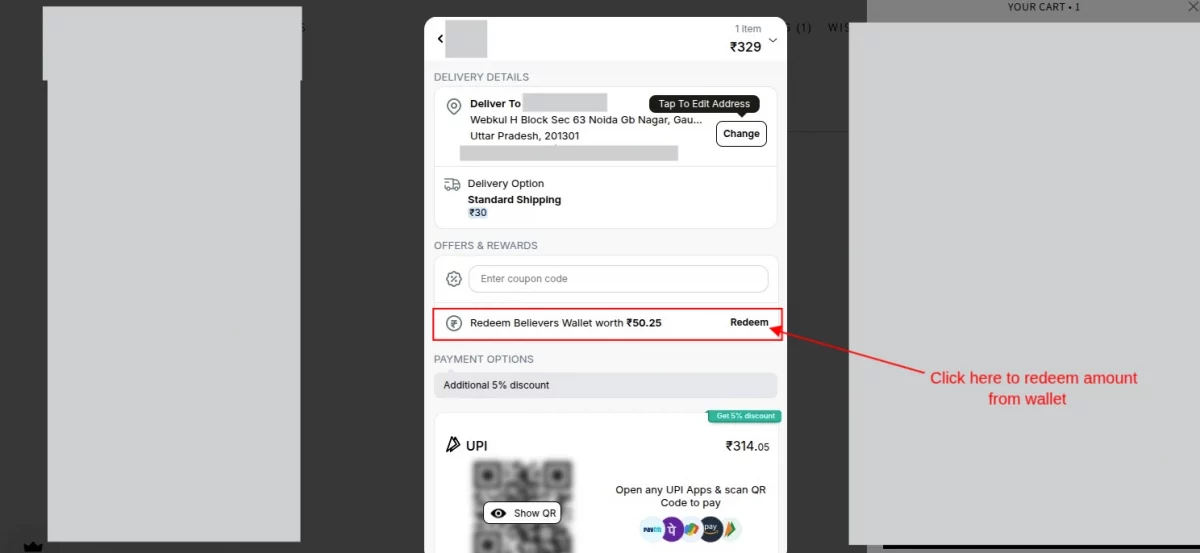
Website frontend view of the Gokwik checkout page after the integration.
You have to click on “Redeem” to use the amount from the wallet.
CASHBACK PRIORITY
Choose an option to be given the cashback priority
Priority on Cashback
You can manage which option to be given more priority on cashback: Minimum cashback or Maximum cashback.
Let’s understand this in detail.
In the app, You can add Cashback rules for Products as well as for Cart amount.
Example:-
10% Cashback is set for Product A of $100 USD
Also, 20% Cashback is set for a $100 USD Cart amount.
Suppose a customer adds Product A to the cart. So, the cart amount is $100 USD. In this case, both the cashback rules are satisfied.
After that, it’s up to the admin if he wants to provide the 10% cashback (minimum cashback) or the 20% cashback (maximum cashback) on this order.

Label Configuration
From the label configuration section you can edit all the labels of the app from here:

Mail Configuration
With mail configuration you can actually edit the content of mail sent on below four events:
- Amount Credited
- Amount Debited
- Cashback Amount
- Amount Refunded
- Email Verification
- Auto Amount Credited

SMTP Configuration
You can configure your own SMTP to send emails to the customers from your own mail engine.
To learn more about this, please click here.
Theme Configuration
Theme configuration lets you change the color theme.

Cashback Rules
Then in this section will list all the cashback rules created by you. Then you can create, view and manage cashback rules from this section of the app.

Clicking on the Add rule button, then you can create a new cashback rule based on your desired conditions.

After that the admin can apply cashback on product, cashback for adding amount into wallet, cart & promotions:

In the case of Product Cashback:

Enter the time duration for cashback validity, cashback on a product, then select the product, choose cash back option as fixed or percentage & lastly, add the amount.
Clicking on the add product button, you can select the products on which you want to apply this rule:

The selected products will be listed like this:

In the case of Cashback For Adding Amount Into Wallet:
The customer will get cashback if they add the amount to their wallet as per the configuration.
After selecting the cash back on Amount, then the admin needs to set the TARGET AMOUNT.
- CHOOSE CASH BACK OPTION: Two options are available Fixed or Percentage, select as per your need.
- CASHBACK AMOUNT: Here you need to enter the cashback amount that you will offer upon adding the amount to the wallet.

In the case of Cart Cashback:

Enter the validity period, target amount (the minimum cart amount after which the customer can earn this cashback) & lastly, choose the cashback type (fixed/percentage) the enter the amount.
In the case of Promotion Cashback:

After that using this the admin can offer his new customers a cashback amount whenever they create a new account on your store.
So for this, simply add the validity period, cashback option as fixed, and enter the amount.
Wallet Customer
The wallet customer section shows the list of customers and their wallet transaction details.
In addition to it,then you can import the existing customers into the app by selecting a date range, export customer’s details as well as Add Money to the customer’s wallet via CSV.

Let’s understand each of them one by one.
Export Customers
After that, you can use this feature to export the details of your customers.
Note: The Exported file will be sent to your configuration email and the file contain the name, email, and current wallet balance.
Then just click the Export button & export your customer’s data.

Add Money via CSV
With this new feature, you can add money to your customer’s wallet in bulk via CSV upload.
All you need to do is just click the “Add Money via CSV” button & you will get the option to upload the CSV file.
Before uploading the CSV file, you are suggested to read the instructions carefully provided in the app.

Note:-You can upload a maximum of 500 records at a time. After uploading the file, you will receive a notification mail for the same.
POINT TO BE NOTED
The CSV upload will take time. So, please wait for a while until you receive the CSV upload confirmation mail. Do not upload the same CSV file again & again if it is under process.
Uploading a CSV file multiple times will add the amount to the customer’s wallet each time.
Import Customer
This feature will help you to import customers directly to the app. Clicking the import button, then you will be asked to select a start & end date.
After selecting the dates, proceed to import customers of the selected date range.
How to Import Customers?
In order to import customers in the wallet app, the admin needs to follow the below steps:
- Go to the Wallet Customers section.
- Click on the Import Customer button.

- Select a Date Range.

After that click on the Import button to import the customers between the selected date range.
This way, you can import all the existing customers to the app.
Clicking on view details you can see the whole transaction history of that customer along with their status.

Moreover, you can Export Transactions and Add Amount to the customer’s wallet.

Add Amount to Customer Wallet
Now, we have given the new option “Add Amount” which enables the admin to add money directly to the customer wallet.

Admin end>> Apps>> Wallet management app>> Wallet Customer >> Click on “View Details” in front of customer name>> Add Amount>> Enter amount>> Add.

Please Note:- You can enter a negative value to deduct the wallet amount from the customer’s wallet.
Export Transaction
Clicking the Export Transaction button,then you can export the transaction details of your customers.

Now, choose whether you want to export all transactions or some cashback transactions of the customer.

After that click the Export button to export the CSV file.
Wallet Orders
This section in the app shows the list of customers and their wallet transaction details. You can search for any of the wallet orders from this section.

REFUND REQUEST
In this section, the admin can see the list of refund requests made by customers from their account at the Shopify store.

How customer request for a refund:-
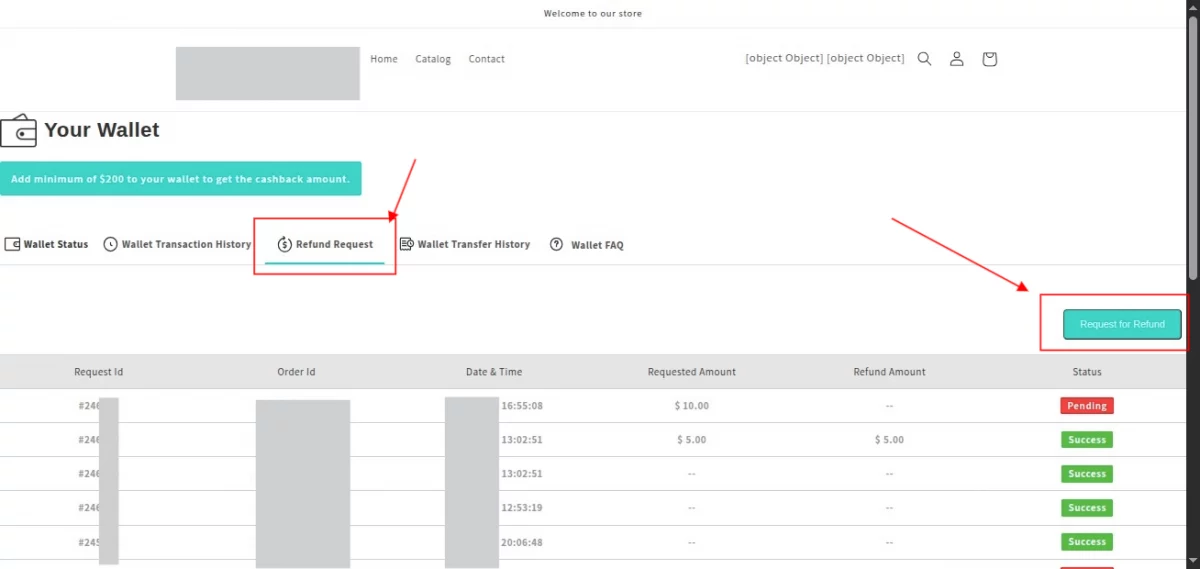
Customers can submit a refund request directly through their Wallet account. To do so, they need to navigate to the Wallet section and open the Refund Request tab.
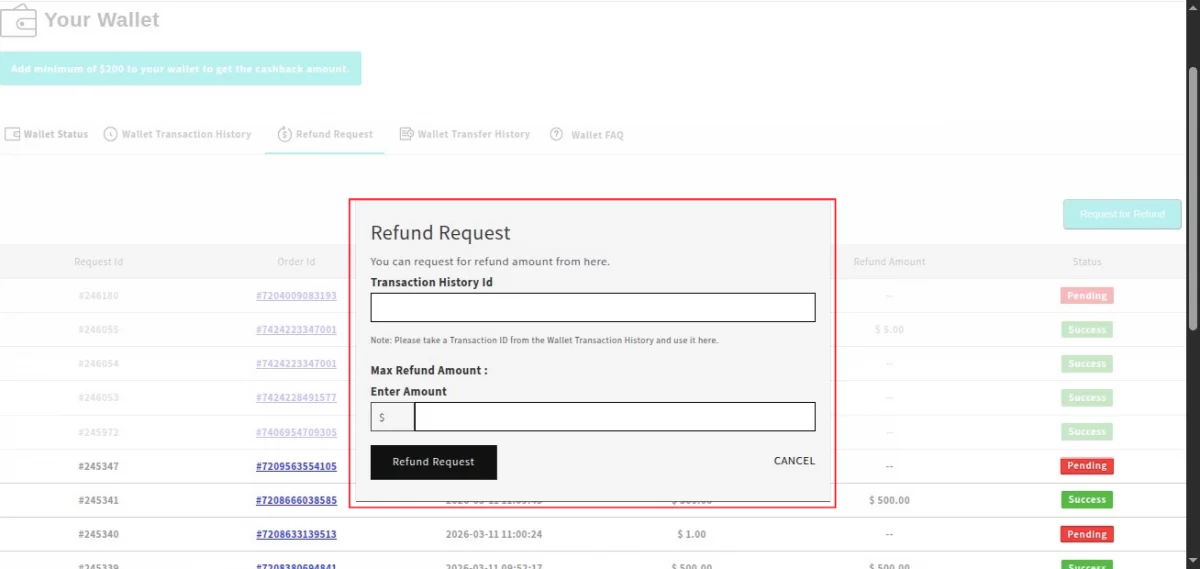
From there, they can click on the Request Refund button, which will open a popup form.
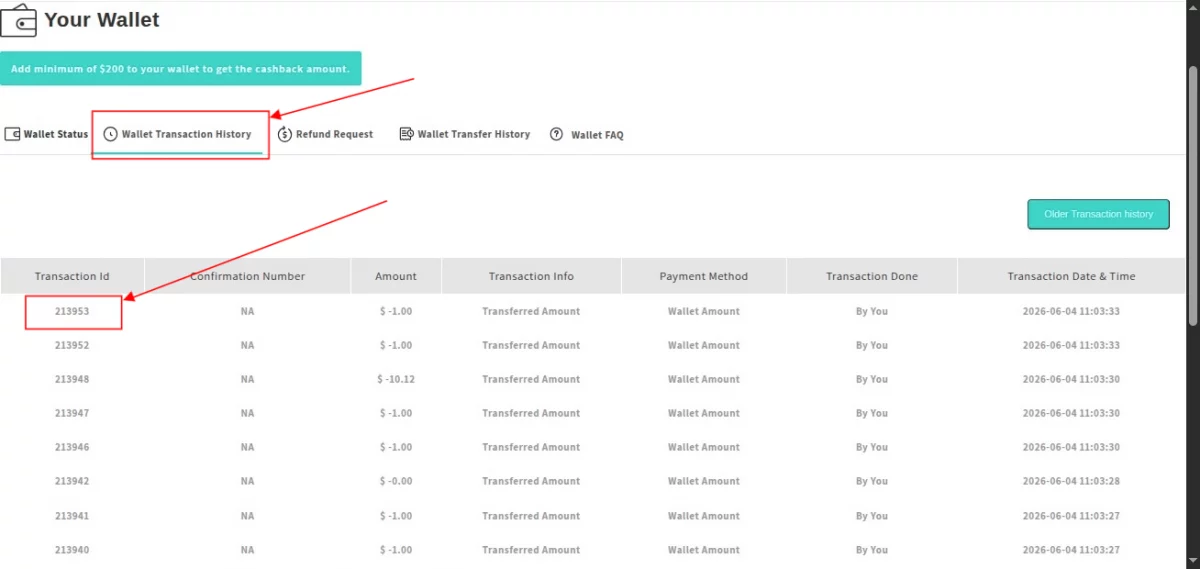
In this form, the customer must enter the Transaction History ID, which can be found in the Transaction History section of the Wallet.
After providing the Transaction History ID, the customer needs to enter the refund amount and submit the request by clicking the Request Refund button.
Once the request has been submitted successfully, it is forwarded to the store administrator for review and further processing.
Please refer to the screenshot below:-
Now admin can view the list of all the refund requests made by the customer in the”Refund request” section of the wallet management app and refund the requested amount to the customer.
Admin end>> Apps>> Wallet management app>> Visit “Refund request” section >> click on ” Refund request” In “Action” section to refund the requested amount to customer.


Feature App
The Wallet Management app for Shopify now comes with the Wallet Management API.
To enable this feature app, go to the More Options menu > Feature Apps

Here, you will get the Wallet API feature app.

Click on the “Enable” button to activate this feature app.
Note – The Wallet API feature app comes against a charge of $10/month in addition to the Wallet Management app plan.

Once enabled, a section “Wallet API credentials” will be created.
Then the section will contain the options to “Add User” and “API doc”.

Upon clicking the “Add User” button, you need to fill in the following details as listed in the screenshot to add the user.

Once a user is added, the access token and the refresh token will be genarated for the user.

The API Doc contains the list of all the APIs for the Wallet Management App.
The Wallet Management API doc contains detailed information on the Wallet APIs and their parameters.
TRANSFER DETAILS
In this section admin can see the list of all the customers who have transferred the money from their wallet to other Shopify store customers along with the
“Transfer amount” as well as “Transfer date”.
How customers will transfer money:-
Firstly Admin will enable the option “Do you want to give the customer to transfer wallet amount to other wallets?” in order to give the option of “Transfer money” at customers’ frontend.
Admin end >> Apps >> Wallet management app>> General configuration>> Wallet Configuration >> Enable the Config ” Allow Customers to transfer wallet amount” >> Save.

Now the customer will get the option of “Transfer Money” on their account at Shopify store’s frontend.
Here customer needs to mention the email of other Shopify store customers (to whom they want to send the money) and the transfer amount.

Now admin can view the details of transfer money in “Transfer details section of wallet management app as referring in below screenshot:-
Admin end >>Apps>> wallet management app>> visit “Transferred detail” section

The FAQ for wallet management
FAQ stands for frequently asked questions. From this section, you can create faqs for wallet management.
Then click on the Add FAQ button to add the FAQ, enter the question and its answer and FAQ sequence.

Click on add FAQ button to add a new FAQ.

Configure Frontend
After that, you need to configure your theme to make this wallet management App work.
Copy the code given on the configure frontend section of the app and paste it to their respective files as specified.

- Go To Themes.
- Click on Customize Theme button.
- Click on Edit HTML/CSS button.
- Select the respective template or .liquid file as given in instructions.
- At last, paste the code and save.
Code Pasting for Online Store 2.0
If you are using Online store 2.0 (Example- Dawn), you need to follow the steps to add the codes.
To show cashback on the product page, add the below code into main-product.liquid template file:-
<div class="wk_cashback_product" product_id="{{ product.id }}"></div>
For showing wallet information, add the codes to account.liquid file:-
<div id = "wk_wallet" customer_id="{{ customer.id }}" customer_email = "{{ customer.email }}" customer_tag = "{{ customer.tags }}"></div>
To show pending order information, add the codes to account.liquid file:-
<div id = "wk_wallet_orders" customer_id="{{ customer.id }}" customer_email = "{{ customer.email }}" customer_tag = "{{ customer.tags }}"></div>
To show cashback on products of collection page, add the codes to account.liquid file:-
<div class="wk_cashback" product_id="{{ product.id }}"></div>
Also, for showing cashback on cart, add the codes to account.liquid file:-
<div id="wk_get_cashback" customer_id ="{{ customer.id }}"></div>
For showing pay from wallet button on cart, add the codes to sections/main-cart-items.liquid file:-
<div id="wk_pay_wallet" customer_id="{{ customer.id }}" customer_email="{{ customer.email }}"></div>
Also, for showing Wallet Amount on all pages, add the codes to sections/header.liquid file:-
<div class="wk_wallet_amount" customer_id="{{ customer.id }}" customer_email = "{{ customer.email }}"></div>
Front End Display
Moreover, on the front, the customer “My account” page will show all the details of the wallet which will include wallet amount, transaction histories, transaction status and much more.

Lastly, the customer will have to click on the add money button to add money.
Mobile Interface
Now our wallet is also available in mobile interface.


Moreover, your website will display the collections and products where cashback is applicable.

On product description page the cashback offer flashes like this:

Also, the “Cashback” & the “Pay from Wallet” option on the Cart Page will appear like this:

Demo
In conclusion, you can refer the link given below to check the DEMO of Wallet Management App for Shopify.
Demo store password: 1
Support
Moreover, if you need any kind of support/Consultancy then please raise a ticket at http://webkul.uvdesk.com/ or drop an email at [email protected]
Thanks for reading this blog!!! 🙂

i would like to know more about this how does it works.
than you