We have updated and upgraded one of the most popular app Product Auction for Shopify. While restoring every old feature and adding a lot new to our customer’s demand.
Product Subscription for Auto pay
We’re excited to introduce a new feature app within our Auction App : Product Subscription for Auto Pay.
With this feature, the auto-payment is automatically deducted once a customer wins an auction.
In this auto pay feature the user needs to validate through a free product by purchasing the product with 0 amount .
Note : This feature will only be available in Executive and Pro Plan of Auction App.
How It Works
- Purchase the Webkul Subscription App:
To use this feature, you first need to install and purchase the Webkul Product Subscription App. - Enable the Feature App:
Once the subscription app is set up, enable the “Product Subscription for Auto Pay” feature from your Auction App.
To enable this Click on Three dots >> Feature app >> Enable the Product Subscription for Auto Pay .

- Configuration:
In the configuration settings, select “Auto Pay with Product Subscription” under the Auto Payment options.
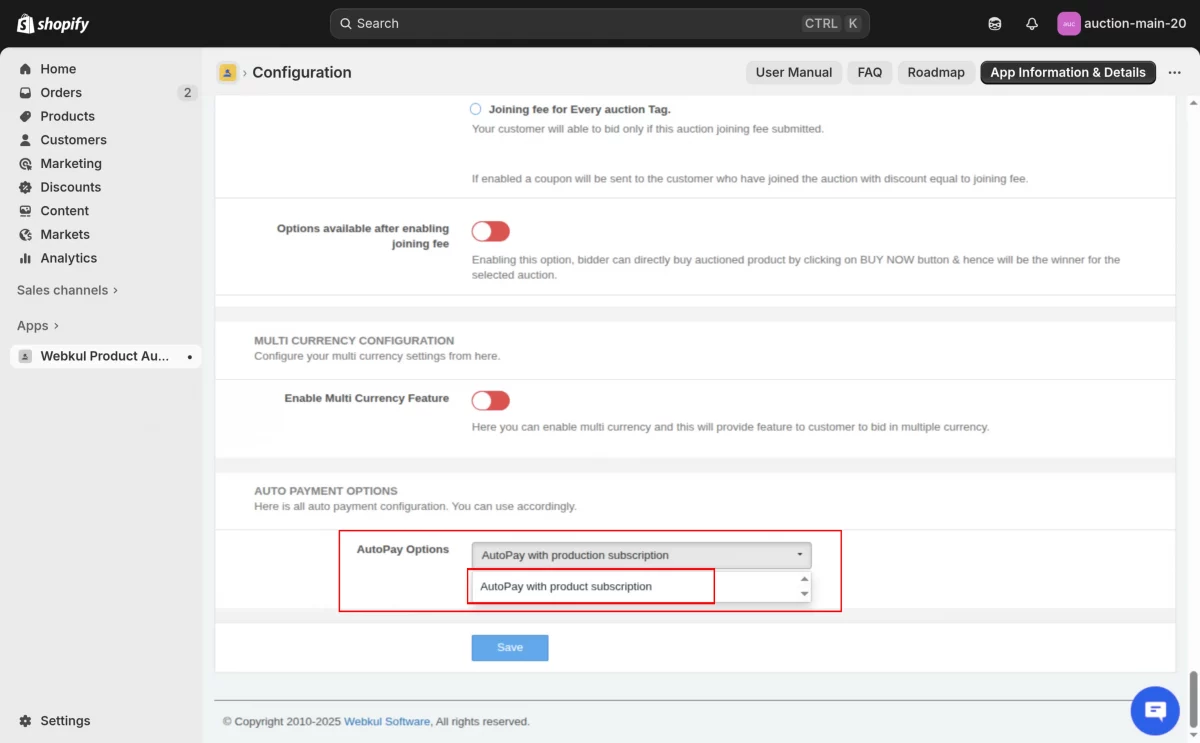
- Check if the auto payment auction product is created or not
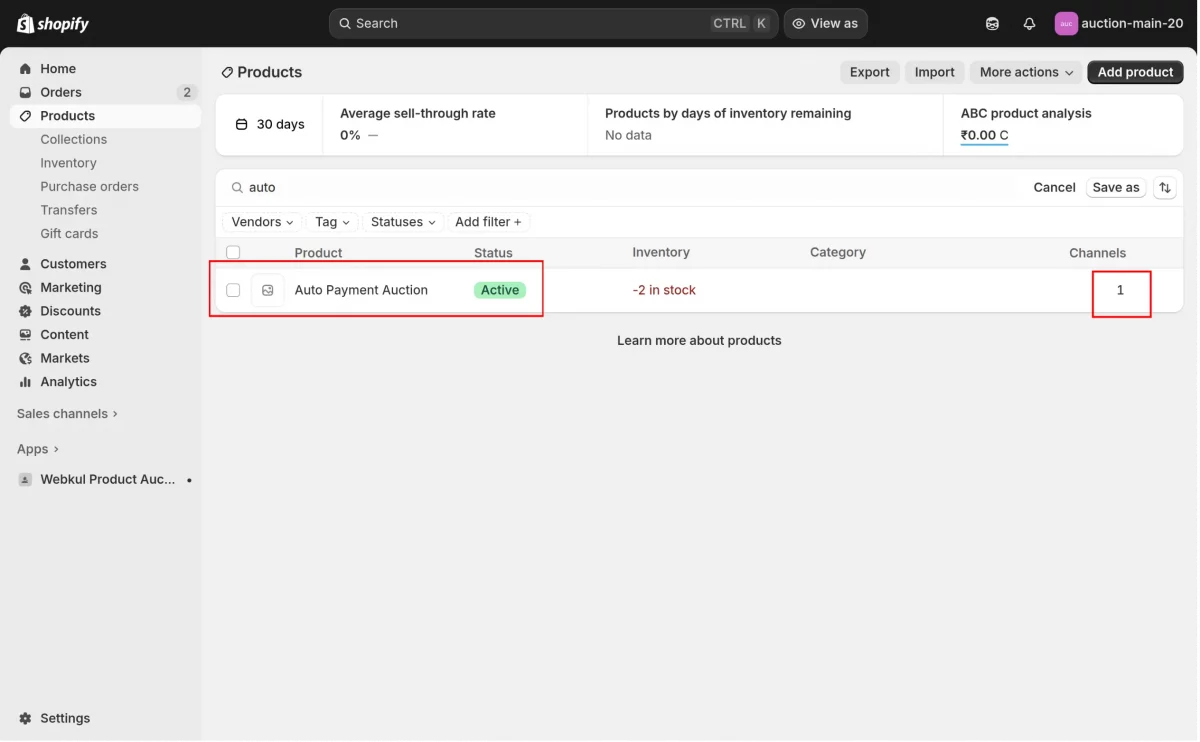
The app will create a product named “Autopay Auction” make sure it’s available in the Sales Channel and not in draft mode.
If the Product is not created automatically in that case Contact us .
Front-End Flow
- When a customer places a bid, a pop-up will appear prompting them to validate through a free (0-amount) product. As this will save the card details or payment details of the customer .
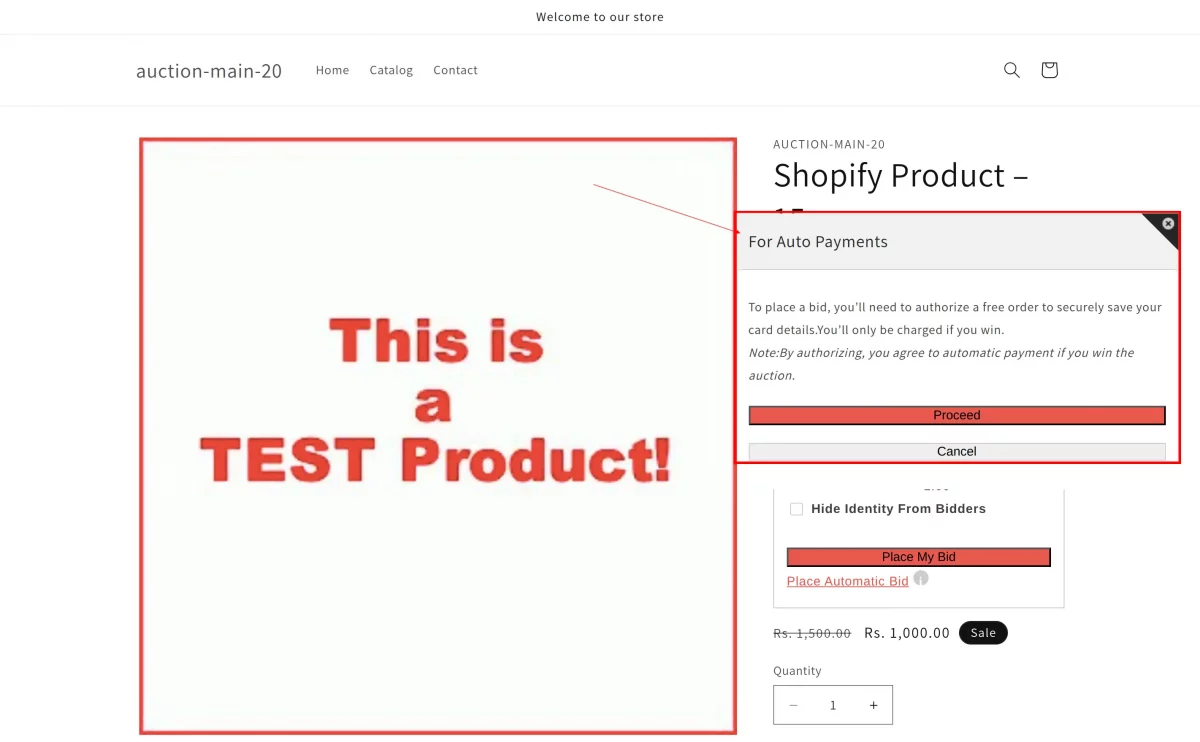
- After successful validation, the customer can place bids as usual.
- Once the auction ends and a winner is declared, the payment will be processed automatically through the subscription setup.
The customer will authorize their payment method by purchasing a free product (one-time only).
This step securely saves their payment details. Once the auction ends, if the customer wins,
the payment will be automatically deducted from the saved payment method, and the purchase status will be updated within the auction automatically.

This feature offers a seamless, secure, and automated payment experience for auction participants, ensuring faster checkout and enhanced user convenience.
Note: Currently, this feature does not work with Seller Auctions/Marketplace.
Also, it will not function when the winner is canceled and redeclared. (Support for these cases will be added in a future update.)
Penny Auction
We’re excited to announce a new feature in the Product Auction App — Penny Auction. This option works somewhat like the existing
Joining Fee feature but provides more flexibility for admins to manage how bidders participate.
It is important to note that Joining Fee and Penny Auction cannot be enabled together. Admins must select one of the two options at a time.
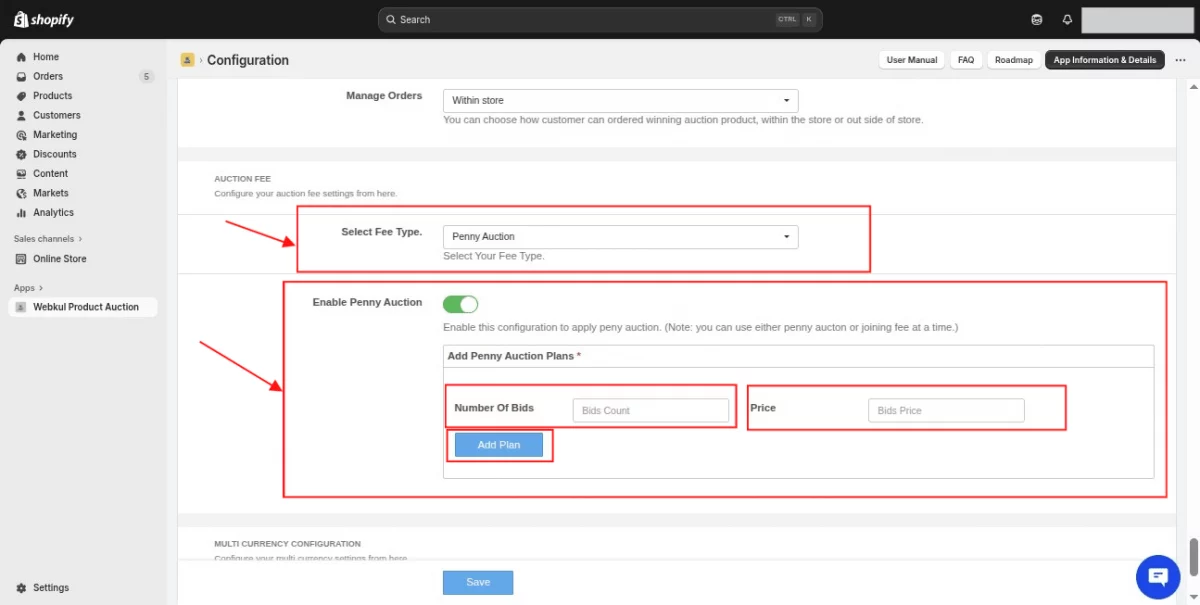
You can find this setting in the Product Auction App > Configuration section > Auction Config > Penny Auction.
To enable Penny Auction, the admin needs to create at least one plan. Each plan defines how many bids a participant will get. For example, an admin can set up a plan such as:
- $10 for 1000 bids
This allows bidders to purchase a plan and use their allocated bids across multiple auctions.
Additionally, when a bidder uses Proxy Bidding, every proxy bid placed will deduct one penny bid from their plan balance. This ensures fair usage and encourages more strategic bidding.
By offering Penny Auction as an alternative to the Joining Fee,
Admins can choose the model that best fits their marketplace while providing bidders with a more engaging and cost-effective way to participate.
Auction Joining Fee
We have introduced a major feature called joining fee. Where the admin can charge a joining fee from the prospective bidders who want to join any particular auction along with various other features.
Visiting the auction configuration in the configuration section of the app. Here you can configure the settings for this joining fee feature.
Before proceeding towards creating an auction, let’s look into this :
Auction Joining Fee
The customer will be able to enter or join the Auction only if he pays the Joining amount.
Now Admin can set this amount from the Auction Configuration section and then click on save.

You can set a single joining fee for all the auctions or you can also set joining fee auction wise. In case of auction wise, you will get an option to add the fee on the add auction detail form:

If you enable it, we will send a coupon to customers who have joined the auction with a discount equal to the joining fee.
Options available after enabling the joining fee
Enabling this option allows bidders on auctions with joining fees to directly purchase the item by clicking “BUY NOW” and immediately win the auction.

Once you enable this from the Auction configuration, it will be set.We will have a set of new options to enter while adding an auction on any product. Let’s try it out:
Go to a product and add an auction. Now you will view a new option on the auction creation page called enable joining fee. Enable that feature and select the rest of the details accordingly.

Enabled Joining Fee
Enter the booking amount: Enter booking amount payable by the winner after winning the auction to book that product.
Enter Buy Now Price: Enter Buy Now price on which the bidder or auction joiner can immediately agree to pay this much and auction comes to an end.
The number of days prior to which customer can join the auction for this product: Admin can set the number of days prior to which the customer can pay the joining fee and join the auction.
Rest everything in the add auction page will be the same as earlier.
Hence please note if you are planning for setting up an auction on an upcoming date always click on SAVE if you will click o SAVE & START: the auction will start immediately.
Joining fee for Every Auction Tag
Now you can enable joining fees on the basis of product tag.
Admin can add the joining fee rule on the basis of product tags from Configuration >> Auction Confiq >> Joining fee for Every auction Tag


Note: Products must have the tag in order to use this feature.
Additionally, if a bidder has already paid the joining fee for a specific product tag (e.g., AUC001), they will not be charged the joining fee again for the same tag.
Reconcile winner
We are introducing a new feature called “Reconcile Winner.” This feature empowers admins to efficiently identify auctions where winners haven’t been declared yet.
Admin will be able to declare all those winners in just a click by using this feature.
NOTE:
- The admin can only declare the winner of the past 90 days (3months).
- This feature only works in the case of Approve Winner Automatically.
Configurations of Reconcile Winner
Firstly the admin needs to enable Approve Winner Automatically Once The Bid Is Over tab from Configuration->Auction Config:: Approve Winner Automatically Once The Bid Is Over.

Once the admin enable the configuration, a tab will be visible on the auctions tab page as shown in the below image,

Admin can apply a date-wise filter to get the previous winner list who has not declared yet.
click on proceed to view the winner list.

The auction ids will display where the winner has not been declared.

Send Purchase Reminder
Now, the admin can send a reminder to the winner to make the purchase complete and also configure the days , configuring days helps the admin to maintain the reminder gap.
suppose the admin select 1 in days then the reminder will send after 1 day of auction end if select 2 then a reminder will send after 2 days of auction end to the winner.
Purchase Reminder Time Slots
With the help of this feature, admin can set time intervals at which purchase reminders will be sent to auction winners before the winner is canceled.
For example, you can choose to send reminders at 1, 2, and 5 hours before winner’s cancellation.
Note – Admin can add maximum of up to 5 time interval slots for purchase reminders.
Admin needs to follow the path Configuration > Auction Configuration > Scroll down to “Time slots for Purchase Reminder” > Enable > Set the hour/hours prior to which
you want to send the reminder > Click on Add > Click on Save

Configuration of the send purchase reminder
Admin need to follow the path Configuration->Auction Config:: Send Purchase Reminder

Enable Bootstrap Grids
Now the option to enable or disable the Bootstrap Grid is here. From the Configuration section, you can enable/ disable this feature in accordance with your theme.

Enable Twilio SMS Gateway
This section of the app will let you configure Twilio settings including the SMS contents.
We have introduced the Twilio Gateway which you can integrate with our app to send messages (predefined) to customers/bidders.
For this, you must have your own Twilio account and your messages and charges will be borne by yourself on the basis of Twilio charges.
Hence to enable this, you have to first enable the Twilio option from the configuration. (ref image below)

Once enabled, you can visit the Twilio SMS Gateway section and configure Twilio by entering the API KEY.
Note: This API you will get from your own Twilio account.

Options available after ENABLING “joining fee”
Enabling this option, all of those auctions on which joining fee feature is enabled- bidder can directly buy auctioned product by clicking on BUY NOW button &
hence will be the winner for the selected auction.
Admin can configure & choose the payment option for auction winner out of the two methods given.
Either: Booking Amount
Or
Bidding Amount
Now when the booking amount is chosen, the admin will enter the amount which he wants the winner of the auction to Pay, this amount may or may not be the price of the product.
This amount is paid by the winner to book the product which he has just won in the auction.
In case of Bidding amount: the winner will have to pay the highest Bid on which he has won the auction.
*** There will be a time frame or window given to the winner to pay this amount and if winner failed to pay this amount in the set time frame,
the second higher bidder will become the winner and so on & this loop will continue till the auction reaches the reserve price.
Admin can set or change the time duration to pay the booking/bidding amount from the auction configuration section.

The message will be sent to the second and third position holder after declaring the winner, to hold on in case the current winner fails to pay the amount, the next highest amount bidder will win.
Front end display
Auction in two different tabs for:
Running Auctions & Upcoming Auctions:

To join any running or upcoming auction,
-the customer will have to select the auction,
-and click on the Join Now button,
-Pay the joining fee for that particular auction
-and then start bidding.
Include Product Images in Auction Emails
You can now send product images in the product auction emails sent via the app. For this, you need to enable this below feature:
Visit Product Auction app backend>>Go to Configurations>>General Configuration.

Edit Bid
You will now have a edit bid option for merchant when you manually declared a winner.

Edit/Delete Current Proxy Bid
You can now edit or delete the current proxy bid applied on any auction.

Charge Taxes on Joining Fee
You can now charge taxes on the joining fees. In the app, you need to visit the Auction Configuration and configure the below two options as per your requirement:
- Charge Taxes on Each Joining Fee: You need to select this option if you want to charge taxes with joining fee on each product once the customer joins the auction.
- Charge Taxes with Joining Fee only with Taxable Products: You need to select this option if you want to charge taxes with joining fee only on those products to which tax is applied on Shopify.

App Information Page
A new page for is created for the apps’s information like the tags getting added automatically, or any other details related to the app. You can find the page in Configure Frontend section in the app.

Sorting Feature On Auction Listing Page
We have now introduced the “Sorting” feature on the “Products On Auction” page – A page where all the auctions get listed on your storefront.
To display the Sorting feature for your customers, you need to visit the App admin panel>>General Configuration & enable the settings.
Once enabled, select the options that you want to display for your customers.

After that, all the “Sort By” options will appear on the Product Auction Listing page. Now, the customers will visit & sort the auctions by Alphabet, Current bid, Auction Ending Soon, Latest.

Pagination for products listed on the Auction page
We have now added the pagination option for the appearance of product listing on the auction page.
To display the auctioned product listing in the pagination style on the auction page,
you need to visit the App admin panel>>Auction Configuration & enable “Pagination for products on auction page”>> save.

After enabling the configuration, the products will be listed in pagination style
i.e, 12 products listed on every page, and on disabling the configuration, the product will be listed in “infinite scroll” style.

Edit winning bid
The merchant can now modify the winning bid after the auction closes but before the winner purchases the item.
To be able to edit the winning bid, the admin has to enable this configuration from App admin panel>>Auction Configuration & enable “Edit winning bid” >> save.

After enabling the configuration, the admin can edit the winning bid of the ended auctions from the “Auctions” section(Auction app >> auctions >> view.)

Clicking on the “Edit” button, A window will pop up and you need to enter your updated bid and a message for the customer which will be received by the customer on their email.
Please NOTE: You can only enter a greater bid than the winning bid while editing the bid.

After submission, the new bid will be updated as the final bid, and you can also view the history of edited bids by clicking on the ‘view’ button.”

Send Notification To Highest Bidder In Case Reserved Price Has Not Met
We have introduced a new feature that enables the admin to send an email notification to the highest bidder if the reserve price has not been met and the auction is close to ending.
The merchant can set a specific time frame for sending the email notification to the highest bidder before the auction ends. This feature will help to minimize the number of failed auctions.
Merchant can set up the time frame prior to which email notification will be sent to the highest bidder before the auction is ending. This will reduce the chances of failed auctions.
Set the time frame:
Merchants can configure a time frame before which the highest bidder will receive an email. To set a time frame, Navigate to Configuration > Auction Configuration > Mail To Higher Bidder

Configure Highest Bidder Mail
Admin can modify the content of the email sent to the highest bidder.
PLEASE NOTE: Do not change the variable as every variable retrieves its corresponding values.
For making changes to the mail template, navigate to Configuration > Mail Configuration > Select Highest Bidder Mail template

Bidding Username
We have added a new feature in our Product Auction app where the admin can allow bidders to add a username while bidding on an auction product,
Navigate to Configuration > Auction Configuration > Bidding Username

Add an extra field to the auction product where bidders can input their usernames. Bidder can also update their username from their respective accounts page as well.

Banned Username Keywords
Admin can add banned keywords that the bidder cannot use. If the bidder tries to use the prohibited keywords then they will get an error message to use another bidder’s username.

Capped amount for Bidders
We have introduced a new feature that enables the admin to set a capped amount for bidders, which limits the maximum bid the bidder can place.
However, Bidders need to be approved if they wish to bid above this capped amount.
To configure the capped amount, you need to visit the App Admin panel >> Auction Configuration >> Capped amount for Bidders.

NOTE: The feature will not be functional in case “0” is set as a capped amount.
Storefront Flow:
Now once the Admin sets the capped amount to Rs. 200 then the bidder won’t be able to place a bid of more than Rs. 200.
However, if the bidder tries to place a bid of more than RS 200 then a popup with an alert notification will be displayed on the product page, as you can see in the image below:

After this, until the Admin approves the bidder, the bidder will not be able to place the bid, as you can see in the image below;

In the meantime, the Admin will receive an e-mail regarding the bidder bidding more than the capped amount, as can be seen in the below image;

Now the Admin can directly click on the open app button in the e-mail received or can directly navigate to the Auction App >> Bidders, to approve or reject the bidder,
if the admin approves the bidder then the bidder will be able to place a bid more than the capped amount.

Now, when the admin approves the bidder, then the bidder will also receive Bidder approval mail, as you can see in the below image;

Additionally, the Admin can edit the template of the e-mail accordingly; For this kindly navigate to the Auction App >> Configuration >> Mail Configuration, as you can see in the image below;

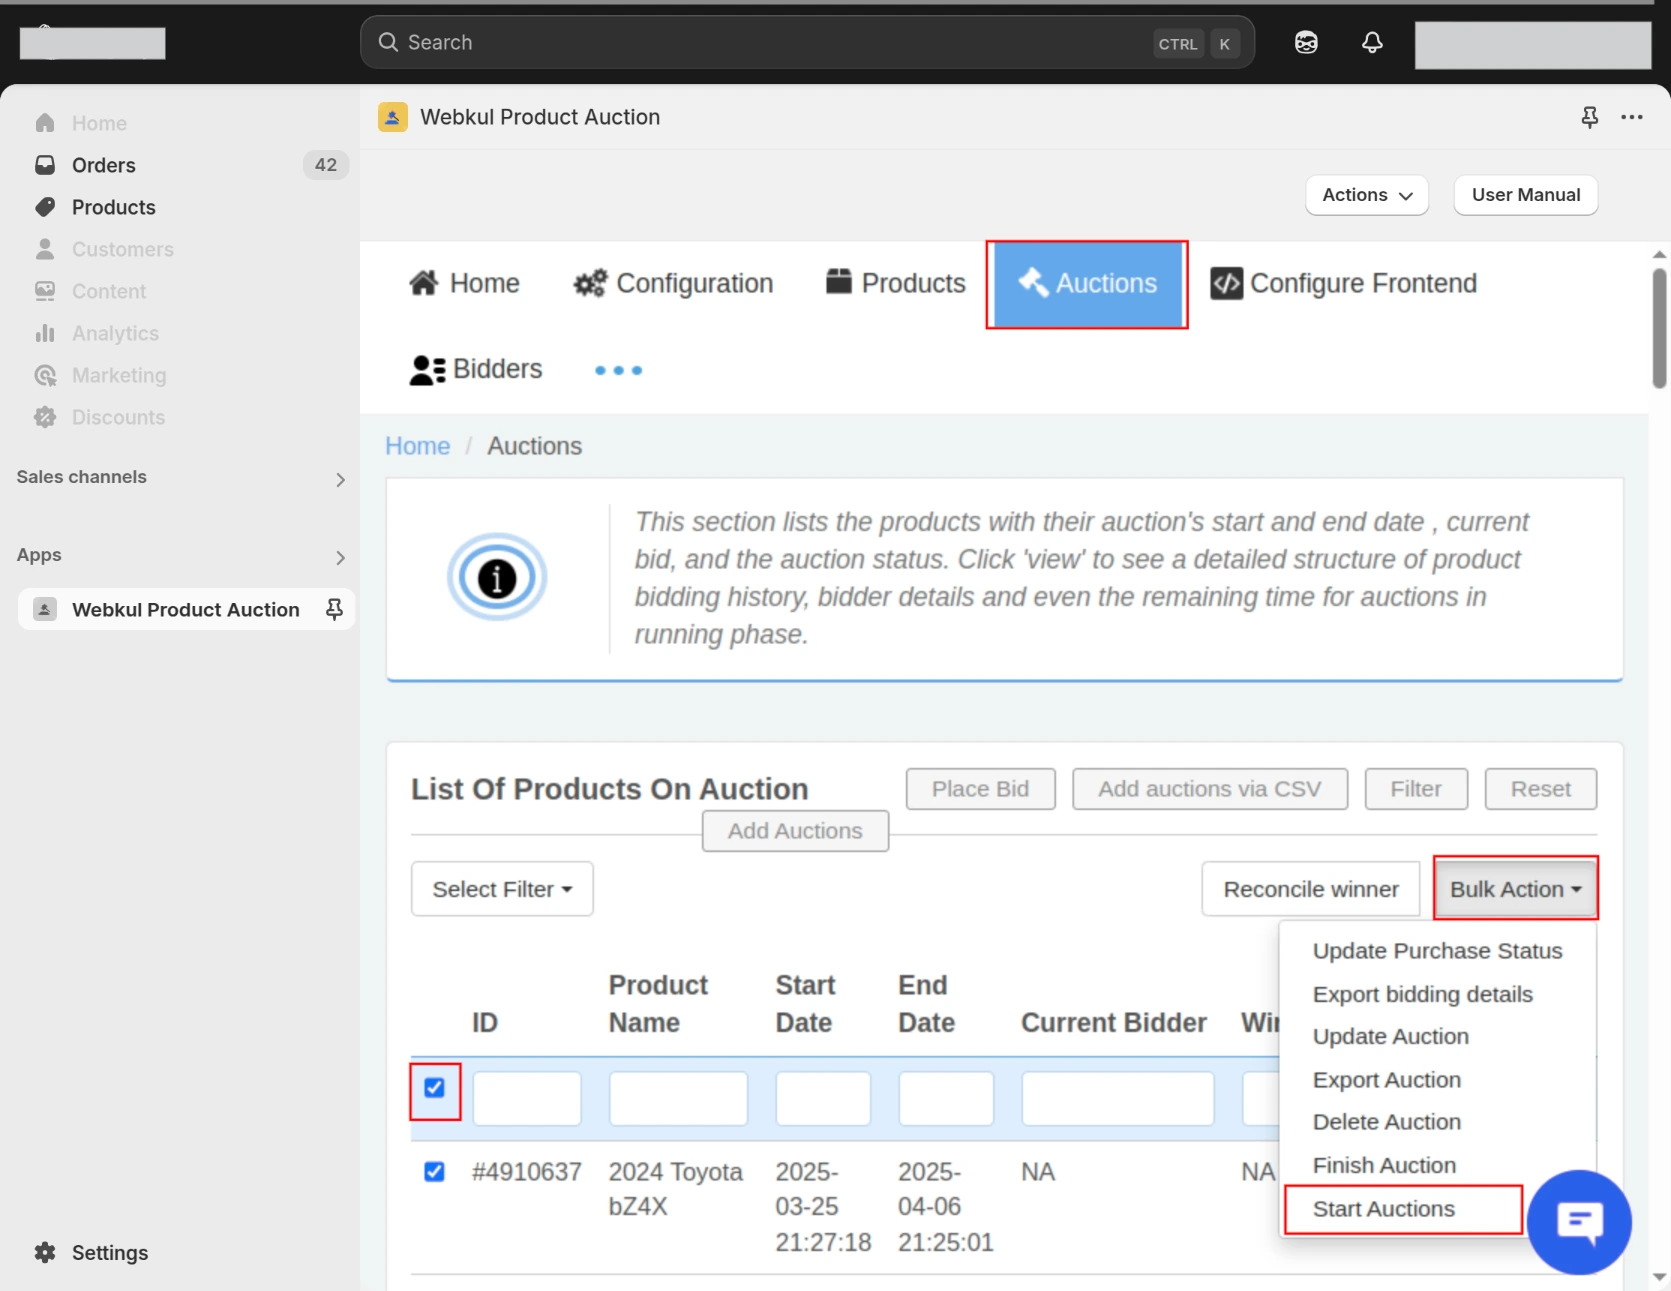
Start Missed Pending Auctions
We have introduced a new feature in the Auction app, i.e., Start Missed Pending Auctions
With this, if an auction doesn’t start even after its scheduled time has passed or if there are multiple pending auctions with past dates, the admin can now use this option to start the auction.
To use this option, go to the Product Auction app >> Auction, then you can choose the missed pending auctions and then click on Bulk Action >> Start Auctions
Enable Multi Language
A new feature, “Enable Multi Language,” has been added to the Product Auction app. By turning it on, you can change the entire app’s language to the one you prefer.
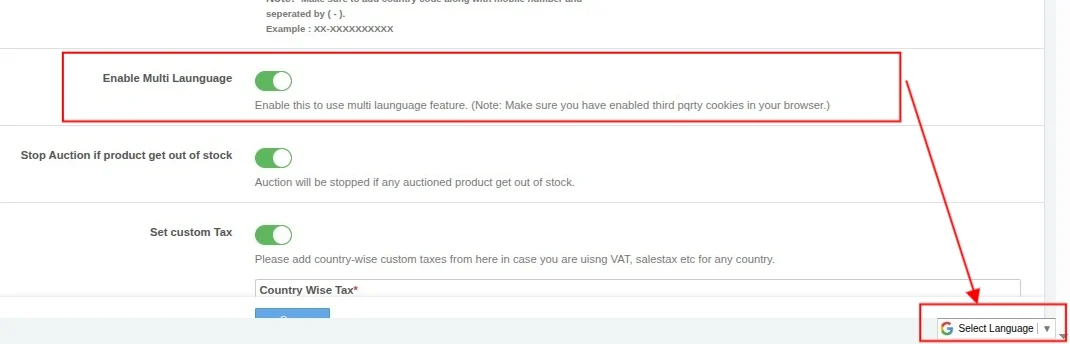
Navigation: Go to the Auction App → Configuration Menu → Auction Configurations and enable the Enable Multi Language option.
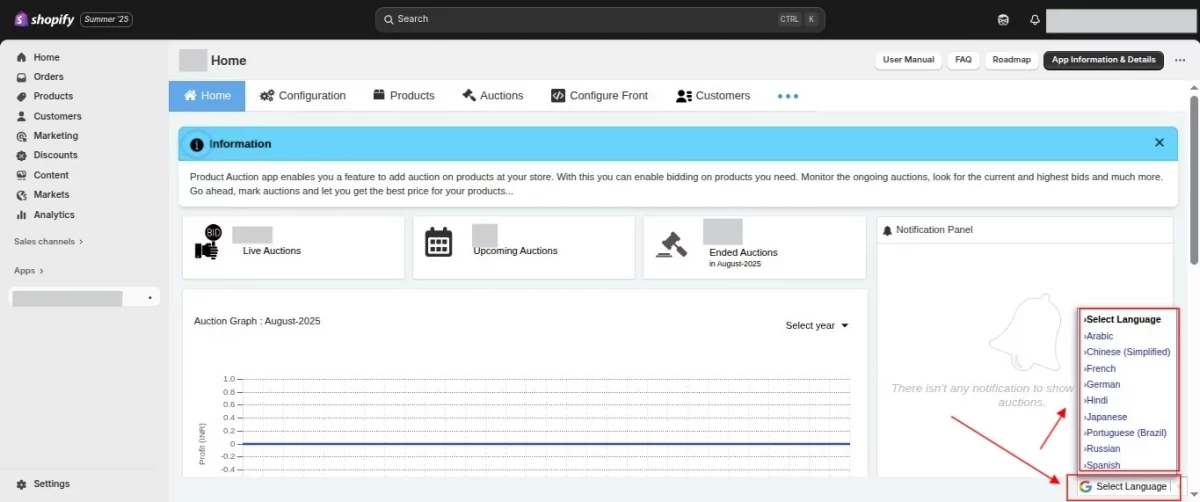
Once activated, you’ll see a Select Language option at the bottom right corner, where you can choose any language in which you want to use the Auction app.
DEMO
Support
Furthermore for any kind of technical assistance, just raise a ticket at http://webkul.uvdesk.com/and for any doubt contact us at [email protected]
Current Product Version - 1.1

Be the first to comment.