Multi-Vendor Marketplace for Shopify is now Integrated with another shipping add-on: ShipStation .
What is ShipStation?
ShipStation is a web-based, multi-carrier shipping solution for ecommerce retailers. Designed to streamline the fulfillment process.
This feature will allow you to ship your goods via multiple carrier shipping methods. Moreover, you can automatically generate shipping labels.
NOTE
ShipStation feature app is available only with the Multivendor Pro Plan ($60/month). Moreover, you need to enable the Shipping add-on (free) from the ‘feature apps’ section of the app.
Above all, access to Shipping requires your Shopify store to be on the plan that supports Real-Time Carrier-Calculated Shipping.
Also, you can enabled only one shipping method within ShipStation to calculate the shipping rates.
CHARGES
This feature will have an additional charge of USD 15 per month over & above your current Multivendor Marketplace plan.
SHIPSTATION SHIPPING FEATURE APP IS AVAILABLE BOTH FOR RATE CALCULATION & FULFILLMENT.
Installation
The admin needs to visit the multi-vendor marketplace admin panel > click on the three dots > click on the feature apps. Further, enable the ShipStation feature app.

Furthermore, agree & approve the charges:

Configuration: Admin End
Firstly, the admin needs to enable this shipping method from the shipping configuration. So, for this, visit:
Multivendor marketplace admin panel > configuration > shipping configuration.
Click on the three dots under the Action menu & further, click on enable.
Note: Kindly choose only those shipping services which you need. Don’t keep all the services selected otherwise it creates delay to retrieve shipping rates at the storefront.

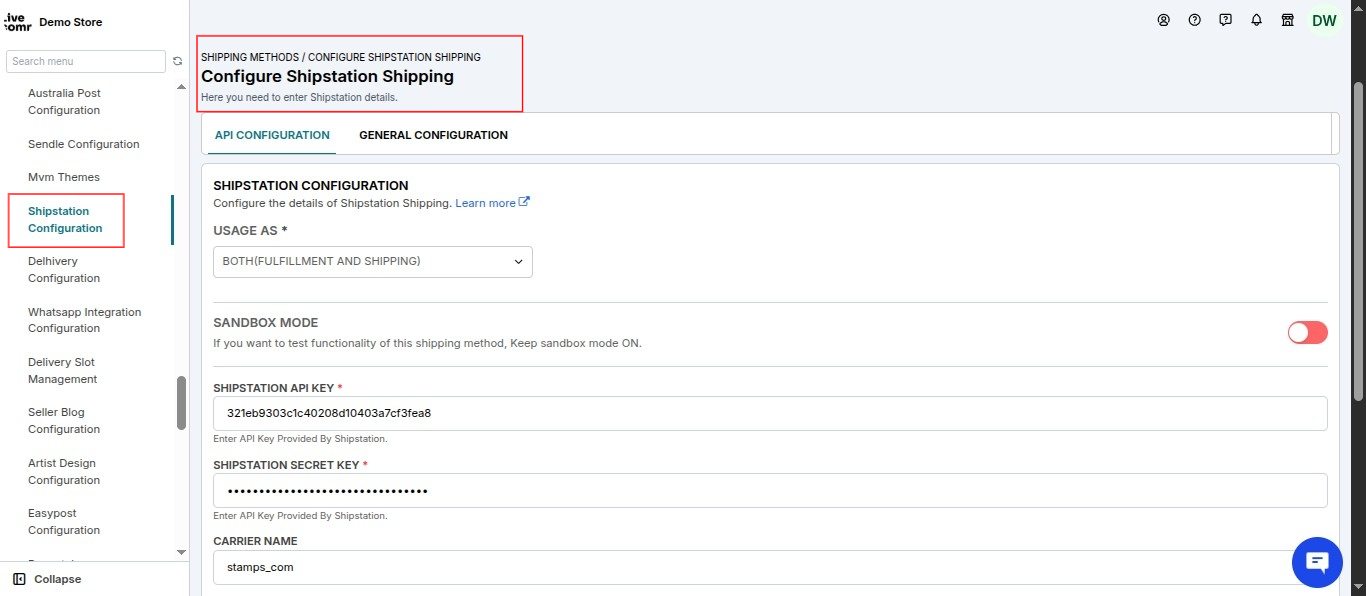
Moving on, the admin needs to configure the ShipStation shipping method. So, for this, either click on Configure Shipping or go to multi vendor marketplace admin panel >
configuration > ShipStation Configuration
Refer:

Configure ShipStation
On the following page, configure the following details:
- Sandbox Mode: If you want to test the functionality of this shipping method, keep the sandbox mode enabled. Remember, shipping labels won’t be generated in testing mode.
- Automatic shipping label generation: By enabling this, the shipping label will be automatically generated at the tie of order fulfillment.
- Usage as: Select whether you want to use shipstation for fulfillment or both fulfillment & shipment.
- Allow seller to configure their own shipstation account: In case you select fulfillment, you can let sellers add their details & fulfill instead of yourself adding the details.
- Choose a country on the basis of your ShipStation account: You have the option to choose from Canada, Australia, United States & United Kingdom.
- ShipStation API key: Enter API key provided by ShipStation.
- ShipStation Secret key: Enter the Secret key provided by ShipStation.
- Carrier Code: After entering all the keys, click on ‘Get Carrier Code’ & you’ll get another option called CHOOSE SHIPPING SERVICE CODE FOR ORDER FULFILLMENT. After selecting this shipping service code & saving the settings, the carrier code will be auto-generated.
- Package: Choose the package type for order fulfillment & shipping.
- Shipping label cost is borne by: Choose who will bear the shipping label charges, the admin, or the seller. (This is an extra cost apart from what the customer has paid.)
- Custom Dimension on fulfilment: Enabling this, you can allow sellers to add custom weight and dimensions for their order ignoring the product dimension and weight.
- Restrict shipping method: Enabling this, you can restrict the sellers to only use the shipping method that has been selected by customer on their order. Only useful if you are using shipstation for both “shipping and fulfilment”.


Set Shipping Method For Sellers:
The admin can further set the shipping methods for his sellers.
Go to multi vendor marketplace admin panel > Sellers > Seller Listing > Edit (under Action).
On the edit seller page, the admin will have the following block from where he can enable/disable/set as default:

Further, the admin can view all the sellers which are using this shipping method by going to multi vendor marketplace admin panel > configuration > Shipping Configuration:

The redirected page:

Here, clicking on the ‘Edit’ button for a particular seller will redirect you to the ‘Edit Seller’ page from where you can disable the following shipping method for that seller .
Make Shipping Address Phone Number Mandatory
To use this feature add-on, the admin needs to make the Shipping address phone number mandatory at the time of checkout.
So, to do this, go to Shopify Backend > Settings > Checkout > Under Form Options, make Shipping address phone number as Required:

Configuration: Seller End
Further, the seller can configuration ShipStation from his panel.
Go to multi vendor marketplace seller panel > configuration > shipping configuration> enable the shipping:

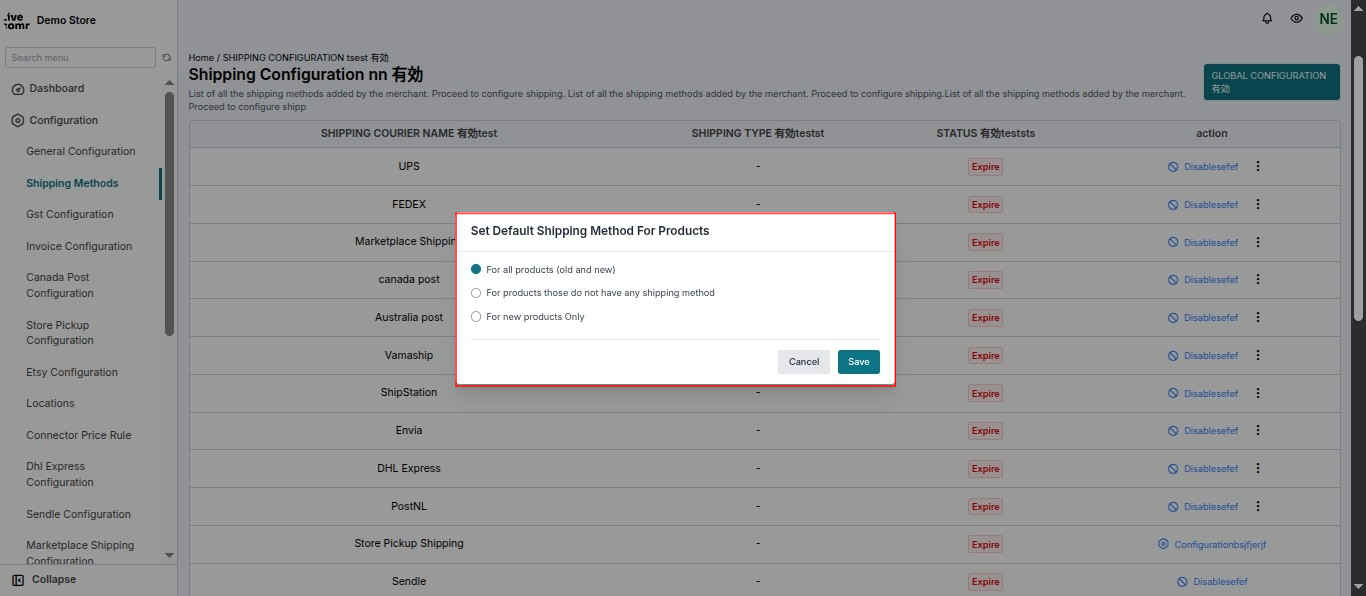
Furthermore, the seller can set the shipping method as by-default so that every single product created by him will have ShipStation as the by-default shipping method.

Clicking on ‘Set As Default‘ will give you the following dialogue box:
In case the admin has allowed the sellers to add their details:
The seller will have this drop-down menu:
And further add these details:
Set Default Shipping Method For Products
- For all products (old and new)
- Only for new products
- For products that don’t have any shipping method on
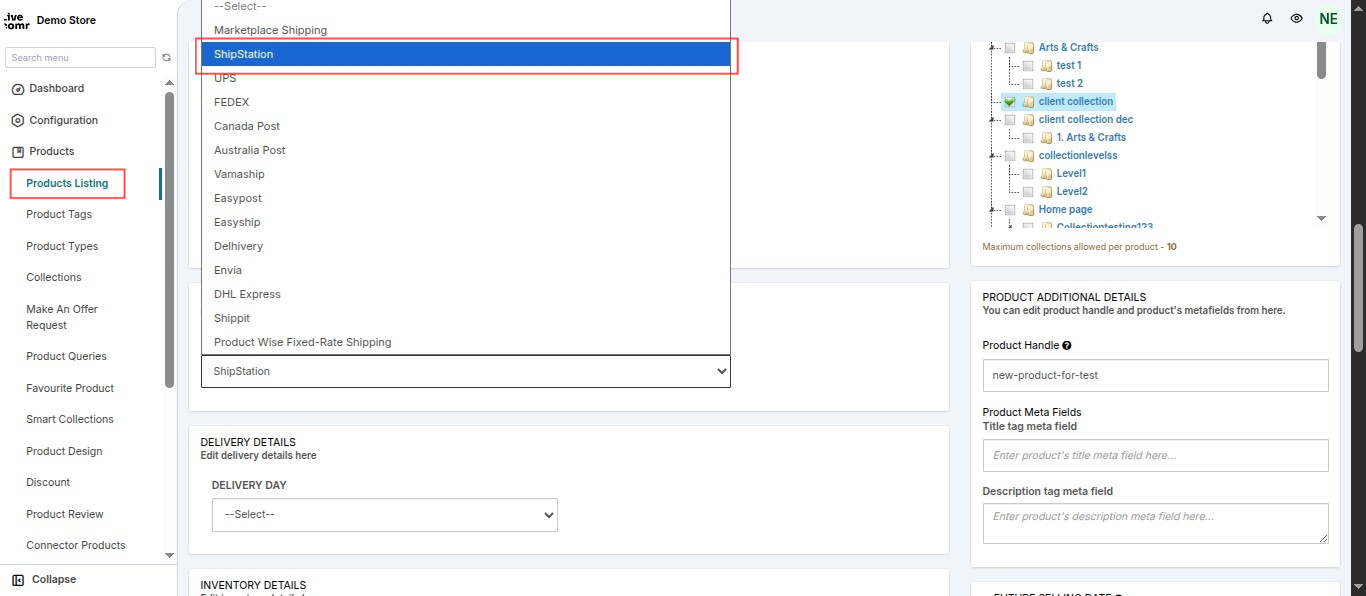
If not this, the seller can set the shipping method on individual products while adding/editing them.
So, go to Multi-vendor marketplace seller panel > Products >Product Listing > Add/Edit the Product:
Global Configuration
Further, click on the Global Configuration menu:

So, from here, the seller can do the SHIPPING PACKET CONFIGURATION:

NOTE: It is mandatory to add product weight while creating one.
Shopify Store Frontend
Likewise, the customer will have an option to select the shipping method as per configured from the backend after entering the information:

Shipping Label Generation
Seller will have an option to generate the shipping label from their seller panel. Also, shipping labels can only be generated for fulfilled orders.
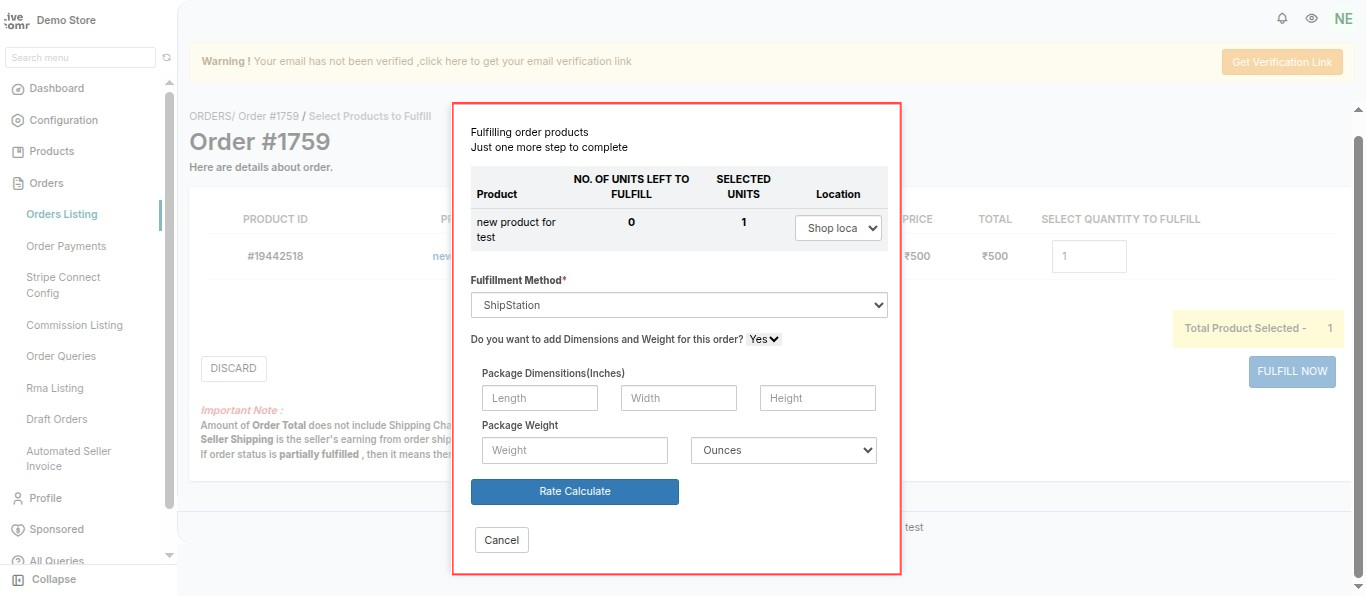
Fulfilling order via ShipStation:
Go to Multi-vendor marketplace seller panel > Orders > Order Listing > View (under Action). Select the method of order fulfillment as ShipStation and fulfill the order.
As soon as the order will be fulfilled, the shipping label will be automatically downloaded.

Moreover, if you again want to download the shipping label, go to ADDITIONAL ORDER DETAILS, click on Actions > Print Shipping Label:

Furthermore, this is how the shipping label will be downloaded in pdf form:


Allow Sellers to fulfill orders directly from their Shipstation Dashboard.
This new feature will create the order directly on seller’s Shipstation account and they Will be able to fulfill the order directly from Shipstation and further,
the fulfilment status and Tracking details will sync back to Marketplace app.
Configuration from Admin end
To configure this feature from the admin side, follow these steps
1. Navigate to the ‘Configuration’ section and select ‘ShipStation Configuration’.
2. In the ‘Usage As’ section, choose ‘Fulfillment’ from the dropdown menu.
3. Enable ”ALLOW SELLER TO CONFIGURE THEIR OWN SHIPSTATION ACCOUNT” button
4. Enable the ‘Allow Seller to Register Webhook’ option.
5. We offer a customisation configuration in ShipStation that lets you choose the specific information displayed on each order Id with order id .
You can select to show the Admin shop name, Seller shop Name, or order ID Only in this .

Configuration from seller end
To configure this feature from seller end , follow these steps :
1.In the ShipStation configuration settings, enable the option for ‘CREATE ORDER BEFORE FULFILLMENT ‘.

2. Copy the provided URL for ‘Webhook Register for ShipStation shipping’ and configure it in the ShipStation dashboard.

3. Once the order is created on the ShipStation dashboard, the ShipStation order ID will be displayed on the order detail page

4. if the order is fulfilled on shipstation dashboard then automatically it will be fulfilled on M ultivendor-market place as well.
Here is how you fulfill the order from Shipstation:

Note –
(1) It may take up-to 5 min to sync the fulfillment status and tracking details to Marketplace App after the order is fulfilled from Shipstation.
(2) Once the functionality is enabled, sellers need to go to their “My Profile” section and click “Save Changes” to update their profile.
This will create a warehouse for the seller’s marketplace location.
(3)Orders will be fulfilled in their entirety, with no partial or item-by-item fulfillment allowed.
(4) If an order is canceled on the ShipStation dashboard, it will not be canceled in Multi Vendor marketplace.
(5) If an order has been fulfilled either partially or fully, then editing the order or removing an item will not update the order on the shipStation dashboard.
Drop Box
We’ve added an exciting new enhancement to the ShipStation shipping method — a feature called “Dropbox.”
This feature allows sellers to create custom shipping boxes, define their dimensions, manage temperature settings, and add dunnage materials for safer and more controlled deliveries.
How to configure and use this feature from both the admin and seller ends:
Enable Dropbox from the Admin Panel
Start by enabling the Dropbox configuration from the admin panel.
This allows sellers to,
Create and define custom shipping box dimensions, set a minimum and maximum temperature range, and add dunnage materials to the box.
Configure General Settings for ShipStation
Navigate to the general configuration section of the ShipStation shipping method.
Enable all the options you want the sellers to have access to, then click Save to apply the settings.

Seller Configures Custom Box
From the seller panel, go to:
Shipping Methods → ShipStation → (Click the three dots on the right) → Configure Custom Box
Click on “Configure Custom Box”, then enable the toggle for “Create Custom Box for ShipStation.”
Once enabled, the “Add Custom Box” option will appear.

Select Custom Box Type
Sellers can choose from two types of custom boxes:
1. Normal Box – Allows you to set:
◦ Box Dimensions
◦ Dunnage Dimensions

2. Climate Control Box – Allows you to set:
- Box Dimensions
- Dunnage Dimensions
- Minimum and Maximum Temperature

Save Custom Box
After filling in the required details, click Save to store your custom box configuration.
Apply Custom Box on Product
When adding a new product or editing an existing one, go to the Product Listing Page.
Select ShipStation as the shipping method. You will now see options to:
- Apply the saved custom box
- Define box dimensions
- Add dunnage dimensions
- Set minimum and maximum temperature (if using climate control)

How it appears on the Order Page
When the seller selects a Normal box,
The Order page shows fields for box dimensions and dunnage dimensions only.

When the seller selects a Climate Control box,
The Order page displays inputs for box dimensions, dunnage dimensions, and controlled temperature range (minimum and maximum).

Need Help?
Lastly, you can drop your query/suggestion at [email protected] or create your ticket at Webkul UV Desk

Be the first to comment.