Sendle:- An Australian-based shipping company that provides courier services locally within the country.
The Sendle shipping is now integrated with the Multi-vendor Marketplace App for Shopify to let sellers fulfill their orders via Sendle shipment service and generate shipping labels.
This feature app costs you a minimal amount of $10 per month over and above your current Multivendor plan.
NOTE:-
- The Sendle shipping feature app is available only with the Multivendor Pro Plan ($60/month).
- You need to enable the Shipping Add-on for FREE from the ‘Feature Apps’ section of the app.
Moreover, access to Shipping requires your Shopify store to be on the plan that supports Real-Time Carrier-Calculated Shipping.
Additional Feature
- A simplest & convenient way to manage shipment via Sendle courier service.
- Both admin and seller can configure their Sendle accounts from their respective panels.
- Allow sellers to generate shipping labels for fulfilled orders.
- Sendle will pick up the order from the seller’s location & deliver it to the customer. Countries for Shipment: Australia (Domestic), Australia (International), USA (Domestic).
- The sellers can configure their shipping packet details from their seller panel.
How to Enable Sendle Shipping Feature?
To enable the feature app, all you need to do is to visit the “Featured Apps” section of the admin panel and enable it from there.

Once you click on “Feature Apps”, you will get the list of apps listing in this section. There, You will get the Sendle feature.

You need to click the “Enable” button.
In this way, you can activate the Sendle Shipping feature app within your Multivendor App.
Admin Panel Configuration
Workflow
Once you enable this feature app, a new sub-menu gets added in the Configuration menu of the app i.e. Sendle Configuration.
In this section, you can enter the URL for sellers to connect to Sendle Shipping. Now, the sellers can create their Sendle account from their respective seller panel.
Please Note:- It is not mandatory for sellers to create a Sendle account. In case the seller has not connected to Sendle Shipping,
the shipping will be managed via the admin’s Sendle account details configured in the app.
Now, you need to enter the Sendle Username and Sendle API Key. Also, enable International Shipping in case you ship internationally.
You will get these details from your Sendle account.
Moreover, automatically generate shipping labels.

Click the Save button.
How to get Sendle ID & API Key?
Firstly, Login to Sendle Shipping: https://www.sendle.com/users/sign_in
Note:- You need to have an account on Sendle.

Once you login to your Sendle account, you will be redirected to the Sendle Dashboard. Click the Settings menu.

In the Settings section, click the “Integration” section and there, You will get the Sendle API key. If you don’t get the API key,
Please contact the Sendle Support to provide access to API.

Once approved by Sendle, you will get the API Key and Sendle ID i.e Username to be configured in the app.

That’s how you get the details and configure the same in the app to make Sendle shipping works.
Seller Panel Configuration
Once you configure these details, the sellers will also get the option to enable the Sendle shipping from the Shipping Configuration menu of their seller panel.

Visiting the Global Configuration menu, the seller can configure the Shipping Packet Details.

Once enabled, the seller can proceed to create his/her Sendle account. (Please Note:- It is not a mandatory step for the sellers to have an account on Sendle).

Now, the sellers can connect their Sendle accounts and configure the details.

Now, the seller can fulfill orders via the Sendle shipping courier service.
Generate Shipping Label
Both admin and seller can generate the shipping label for the fulfilled orders. You can configure the shipping Label details from the admin panel>>Sendle Configuration.
Seller needs to follow the below-given steps to generate shipping labels for fulfilled orders:
- Login to Multi-vendor Seller Panel.
- After that, Go to Orders.
- Visit the Order Listing section.

- Now, accept the Order.

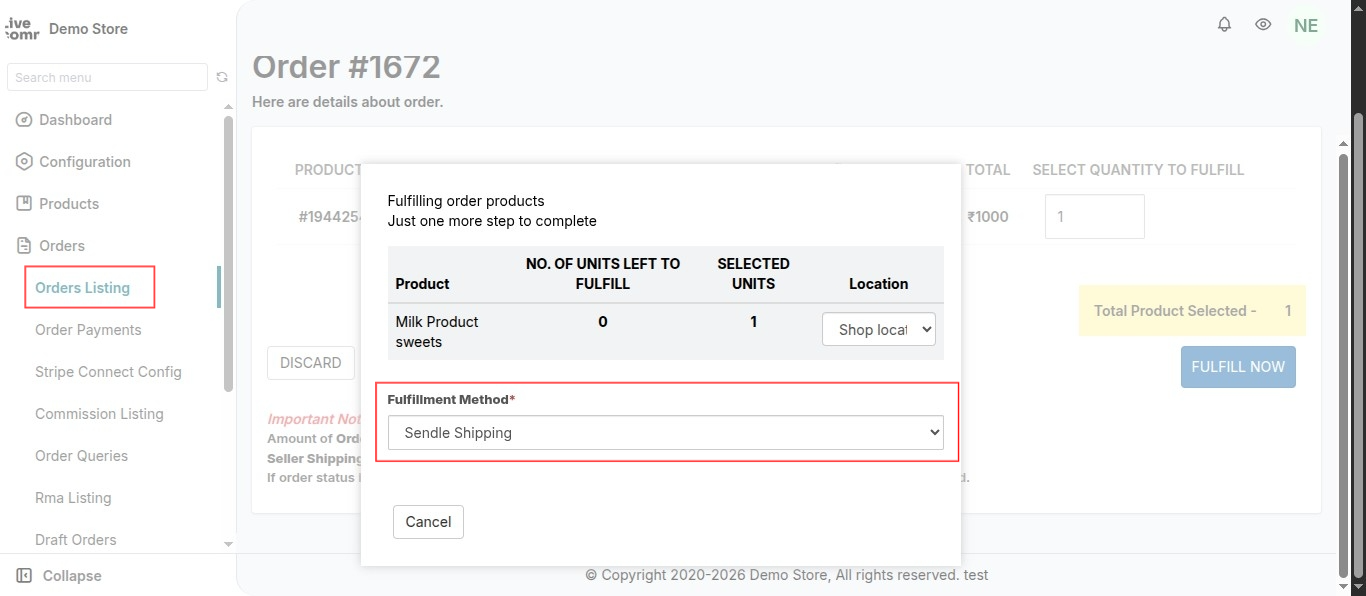
Clicking the Fulfill button, you need to select the Sendle as the shipping method.
Now, the seller will generate/print shipping label from “Additional Order Details” section.

Thus, the shipping label will be generated automatically for the fulfilled orders. Thus, the seller can easily print the shipping label from here:

That’s all about the Sendle Shipping Feature App.
DEMO
Link to check the demo of Multi-vendor Marketplace app for Shopify: https://egsma.io/shopify-multivendor-marketplace/
Need Help?
Hope you like this blog. To get more interesting blogs, keep in touch with us. If you need any kind of support, just raise a ticket at https://webkul.uvdesk.com/en/.
You can also contact [email protected] to get proper assistance.
Thank You for reading this Blog!

Be the first to comment.