Multi-Vendor Marketplace for Shopify has got an add-on by the name Seller Membership. This app lets the Admin create different membership plans for his sellers.
Sellers can subscribe to the one they want to start selling on the admin’s store.
These membership plans can differ on prospects like:
- The number of products allowed.
- Commission by membership plan.
- Time duration as monthly and yearly.
- Trial days.
- Setup fee
- Membership type as prepaid.
We offer Prepaid Membership Plans. With a prepaid plan, you pay for your service upfront.
Based on the same, the Admin has to enable payment method(s) to receive subscription payments from his sellers.
In this blog, we are going to discuss the seven different payment methods regarding the same.
If you want to learn more about the Seller Membership app (installation, configuration or other settings), then visit the following link:
Multivendor Marketplace for Shopify: Seller Membership
(This blog is specifically to explain the payment methods in depth.)
Enable this add-on from the ❛Feature App❜ section of Multi-Vendor Marketplace.

Once, you enable this feature, you’ll have all seven payment methods in the Multi-Vendor Admin Panel > Configuration > Payment Details section:

On the ‘Membership Payment Details’ page, the Admin will have the following payment methods:
- Razorpay
- Manual
- Payfast (recurring)
- PayPal (recurring)
- Stripe
- Windcave

Let’s divine into each payment method that you can enable for prepaid plans.
Payment Methods Available for PrePaid Membership Plans:
In the case of Prepaid plans, your sellers have to pay before using the service. In other words, as soon as your sellers subscribe for your added prepaid plan,
they have to pay first using the payment methods enabled by you.
There are two kinds of payment methods, i.e., Recurring Payment Method and Manual Recurring Payment Method.
Recurring Payment Methods
These payment methods auto-deduct the payment from the Seller’s account at the end of his/her billing period.
There are two recurring payment methods:
Payfast (Recurring)
Payfast is only available for South African websites.
Enable this by clicking on the activate button and then providing all the required details regarding your Payfast account:

PayPal (Recurring)
We have now introduced the PayPal prepaid payment method to make recurring payments with PayPal.

Once enabled, you need to enter the details to activate this payment method.

Note:-
1. Make sure you have subscription permission in the admin’s PayPal account to work the PayPal recurring payment method completely
i.e., then only the seller will see Paypal recurring payment option while paying for the seller membership plan.
2. In case the setup fee is charged before the trial, we create charges and get redirected to create recurring charges via PayPal at the same time.
If the setup fee is charged after the trial, the seller will get straight away redirected to the dashboard.
So, If you need to charge only the setup fee before the trial, only the setup charge will be created. Otherwise, the recurring charges will be created for the remaining charges (if any).
SELLER PANEL
Now, after the seller chooses PayPal recurring and clicks the continue button the below window appears:

To charge the remaining amount along with the setup fee, the seller needs to click the Continue button. After that, the below window appears to create a recurring charge:


Moreover, the seller can check how much amount will be deducted and when to make the payment.

In case the seller has approved the payment but you have not yet get hit of receiving payment, the seller will see the below page:

Manual Recurring Payment Methods
Manual Recurring Payment Methods are the ones that will not auto-deduct money at the end of the billing period.
Instead, the Seller needs to log in using his credentials at the end of the billing period to pay the amount.
There are three kinds of payment methods that you can enable, i.e., Offline Payment Methods, Recurring Payment Methods, and Manual Recurring Payment Methods.
Offline Payment Method: Manual Payment in Prepaid plan
You can now allow your sellers to pay the membership fee via the manual payment method in the prepaid plan. To allow, you need to enable the tab from the “Membership Configuration” menu of the app.

Once you enable this option, you will have another option to select whether you want to approve your seller’s manual payment automatically or not.
Moreover, you can set a maximum days limit for your sellers to make manual payments i.e. the Grace Period.

Case 1:- The Auto-approval option is disabled.
In this case, if the Grace Period for Manual Payment is set to 2 then, the seller needs to pay for the order within two days.
If the payment is not accepted, all the products of that seller get disabled. And the seller won’t be able to access the seller panel.
Case 2:- The Auto-approval option is enabled.
In this case, if the Grace Period for Manual Payment is set to 2 then, the payment will automatically be accepted after 2 days,
or you can also mark the payment as Paid before 2 days from your admin panel.
Now, as soon as the seller logs in to their seller panel, they can select the plan and proceed to pay via manual payment method.

The seller can simply select the manual payment and proceed to pay.

You as an admin can mark the order as paid from the “Seller Membership” section of the app.

This was the manual payment option for sellers in prepaid plans of the seller membership feature app.
Payfast (Recurring)
Payfast is only available for South African websites.
Enable this by clicking on the activate button and then providing all the required details regarding your Payfast account:
Manual Recurring Payment Methods
Manual Recurring Payment Methods are the ones that will not auto-deduct money at the end of the billing period.
Instead, the Seller needs to login using his credentials at the end of the billing period to pay the amount.
Razorpay
Razorpay works with Indian Currency (INR) only.
This method is for sellers who want to make recurring payments using Razorpay.

Generating API Keys for Razorpay Payment Method
To get the API keys, you should log in to your Razorpay account. Once logged in, navigate to “Account & Settings” and then click on “API Keys,” as illustrated in the image below:

Copy the Key ID and Secret Key, then paste them into the corresponding fields in Razorpay.

To paste the Key ID and Secret Key, go to Configuration >> Membership Payment Details >> Paste the keys in the respective fields and save your changes.

To enable recurring payments, follow these steps to add a webhook in your Razorpay account:
- Go to “Account & Settings.”
- Click on “Webhooks.”
- Select “+Add New Webhook.”
- Enter your store’s URL.
- Specify the “Active Events.”


Once you’ve completed these steps, your Razorpay account will be set up to handle recurring payments efficiently.
Windcave
You can also select the windcave payment method to obtain payments from the sellers for their membership plans.


Once enabled, you need to enter the details to activate this payment method.
Creating a Seller Membership Plan with Windcave Payment Method
When the Windcave payment method is activated, the admin will have access to three additional configurations while creating a seller member plan:
Add Product Listing Fees, Add Bump Up Fees, and Add Auto-Renewal Fees.
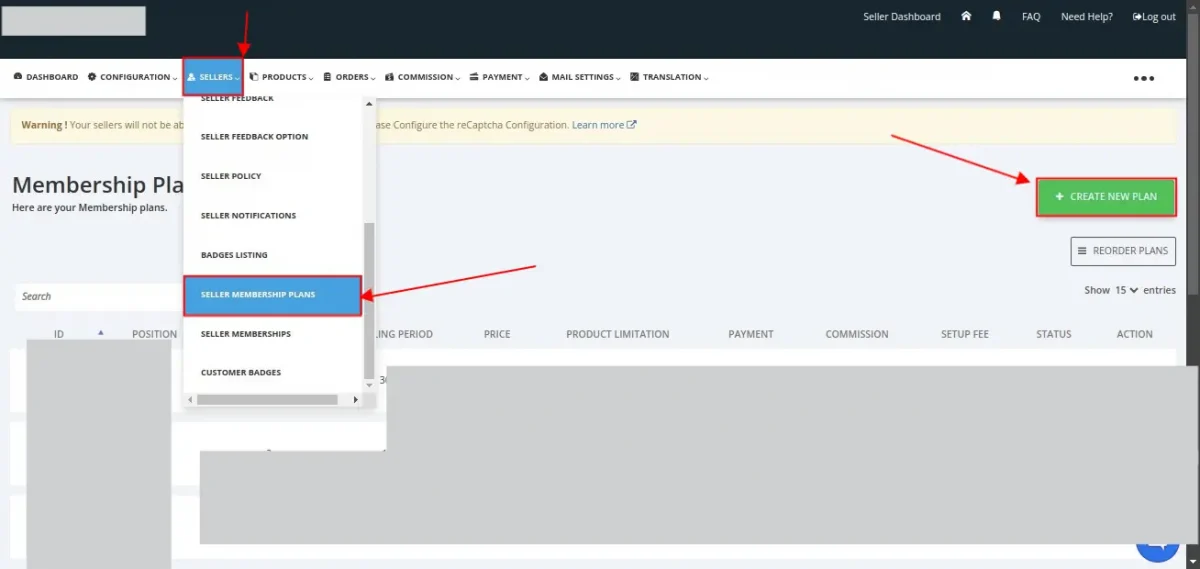
To Create Memberships Plan Admin needs to navigate to the Admin panel of marketplace>> Seller >> Seller Membership Plan>> Create New Plan.
Add Product Listing Fees
Product Listing Fees refers to the fee that will be charged whenever a seller adds a product (via the Multivendor marketplace app, CSV, or API).
This fee will be applicable according to the membership plans, and enabling Windcave payment method is required for this functionality.

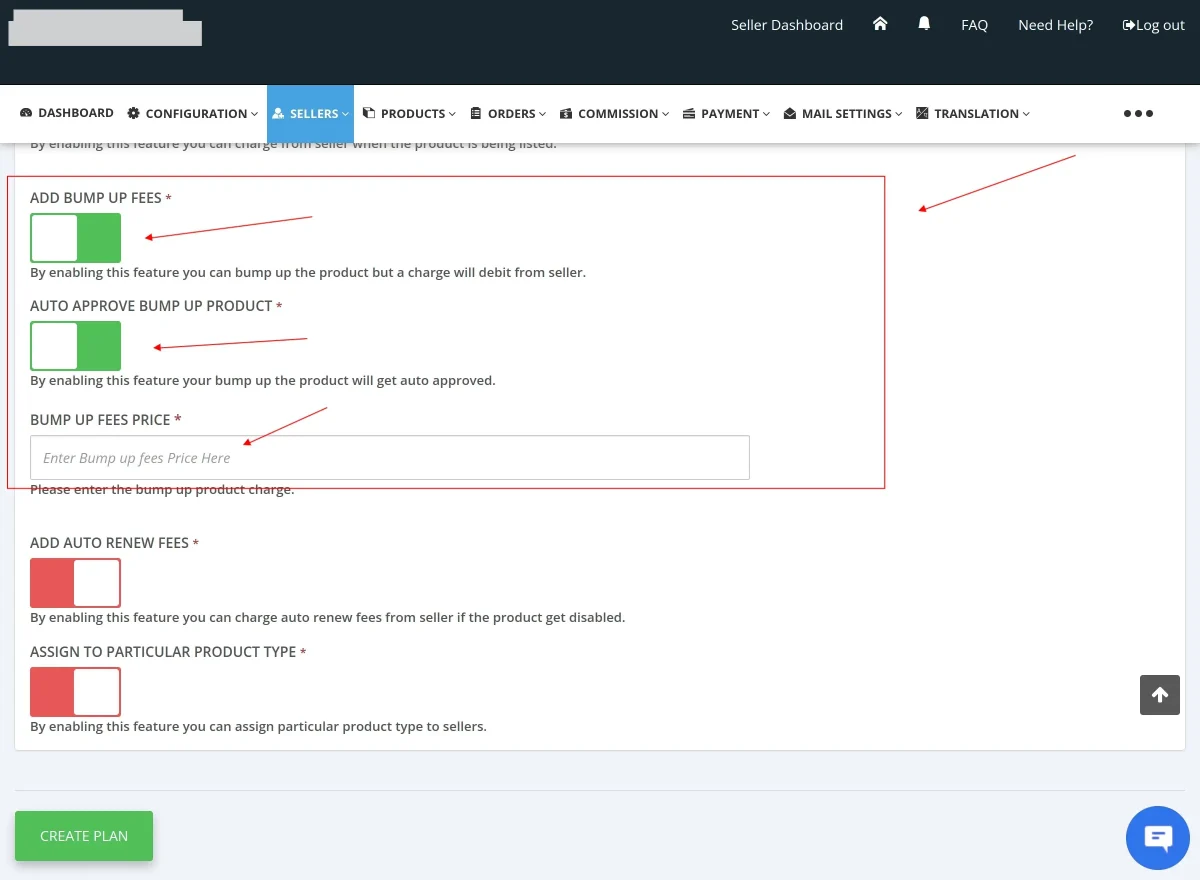
Add Bump Up Fees:
While creating a plan, if admin enable the “Add Bump Up Fees” option and specify the bump fee amount.
The “Bump Up this Product” option will be accessible on the seller’s side. Whenever a seller bumps up their product, the specified fee will be charged.
Whenever a seller bumps up a product, the admin will receive an email notification containing the details of the product that has been bumped up.
This helps the admin stay informed about seller activities related to product visibility.
Upon enabling, an additional configuration, “Auto-Approve Bump Up Product,” will become available. If the admin enables this setting, bumped-up products will be automatically approved.
Enabling Windcave payment method is required for this feature to function.
Seller can bumpup their by navigating to the seller panel of the marketplace >> Product >> Product listing >> on the “Bump Up this Product” from the 3 dots under the action menu.

Add Auto-Renewal Fees
Any product that is automatically disabled will be re-enabled, and a fee will be charged for re-enabling it as specified in the membership plans.
Enabling Windcave is necessary for this functionality. The process is automated whenever a product is disabled, the fee will be deducted shortly afterward, and the product will be re-enabled.
Upon enabling this functionality, an additional configuration, Auto-approve auto-renew product, will become visible.
If this configuration is enabled, disabled products will be automatically approved.
Another configuration, Add auto-renew for out-of-stock products, will also be available. When enabled, the admin can charge a fee for auto-renewing out-of-stock products.

Note: Once this payment method is enabled, you will not be able to take payment from any other selected payment method.
To obtain the required API details, please contact Windcave directly.
For API authentication HTTPS header, you will need to complete and submit the form to Windcave’s team.
Refer to the attached screenshot for guidance on accurately filling out the form fields.


💡 Need Help?
Drop your query at [email protected] or Webkul UV Desk.

2 comments
We have created a ticket on your behalf and our team will soon revert to your queries over it.
Thanks.