Till now you must have switched to the new theme, or some of you have just installed the Multivendor Marketplace App and want to have the “Seller Membership” feature app, then do refer to this.
This feature app allows the Admin/Store Owner to make plans for the Sellers and they need to subscribe to the plan in case they need to publish the products in the Admin Shopify Store.
Features
- Admin can make membership plans for the Sellers.
- Sellers can subscribe to the plan to publish their products to the admin’s store.
- Being an admin, You can enable or disable the membership for the sellers.
- If disabled, Your sellers will log in directly to their respective seller panels without having a membership.
- Admin can allow sellers to deactivate their membership plan if required.
- He can also set a one-time Setup fee for Sellers for the Plans he creates.
Admin will set the payment methods through which he/she wants the payment from sellers. You can activate any of the payment methods of your choice from the Payment Details section.
The featured app is a monthly costing of 25$ USD per month apart from the Multivendor App.
Check the below video of Seller Membership:
Activation
You need to enable the App from here :
Go to Admin Panel>>Feature App section>>Enable the feature>>Save Changes.

Once you enable the featured app, you need to approve the charges for the app ie 25$ USD per month.
This way you can enable the featured app.
Admin End
Once the App is activated, Admin will configure the same from the configuration >> membership configuration menu :

– Display Membership plan to Seller: Admin can select whether the Seller must select the membership plan at the time of signup or after the signup.
– If Seller Payment is due (after the last date of payment): Admin can select whether the Seller must be disabled,
or he cannot access the products or disable the seller products if the Membership Payment is not made after the due date.
– Apply updated Plan changes: It might happen that the Admin makes changes to the Seller Membership Plan
then select whether the changes be applied to all the current subscribed sellers or just to the new sellers.
-Enable Membership for Sellers: Admin can now enable/disable the seller membership. If disabled, sellers will directly login to their respective seller panels without membership.
-Allow Seller to deactivate Membership: Admin can now allow sellers to activate/deactivate their membership if required.
-Provide Membership Plans link on Seller Dashboard Header: You can also display the “Plan” link on the header of the Seller Dashboard.
Accept Card Details Before Trial Period
You can now choose to accept card details before the trial ends.
To configure this, visit the Multi-vendor admin panel>>Configuration>>Membership Configuration>>Enable the tab.

Create New Plans
You need to make plans for the Sellers after the configurations.
Go to Sellers >> Seller Membership Plans menu in the app :

Create Membership Plans for the Seller :

While creating the plan, you need to select the name of the plan, the subscription type (monthly, yearly, etc.),
and the price of the plan, you can either limit the number of products with the plan or keep unlimited product addiction with the plan.
In case you select to limit the number of products to the plan, then specify the number of products and specify whether the number includes all the products or just the active products.
Select the date of the month on which the payment is due and you can also specify the grace period.
Set Commission on Membership Plans:-
While Creating Membership plan, admin can now set percentage commission based on the plans created
and this commission will have the highest priority among all the other commissions (Global, seller, product-wise, category-wise commissions) set by the admin.
Just you need to enable the “Set Commission by Membership Plan” Tab while creating the plan and set a Percentage commission.

Only one of the commission applied in this way: Membership Commission > Product Wise Commission > Category wise Commission > Seller wise Commission> Global Commission.
RESTRICT SELLERS TO ADD STAFF IN MEMBERSHIP PLAN
In case You are using the Seller Staff Feature app, You can limit the number of staff for Your Sellers while creating the membership plan.
While creating a membership plan, You need to enable the Tab and enter the number of staff that You want to be added by the sellers in that plan.

This is how a new plan can be created for the Membership app.
Set One Time Set-up Fee For Sellers
While creating a membership plan for the sellers, You can also set a one-time setup fee for the sellers.
Admin will decide whether he/she wants to charge this One-time setup cost before the trial period gets to start or after the trial period gets over.

This is how an admin can create a Seller Membership plan for his sellers.
After creating the membership plans, the admin can reorder the plans also as per their priority to manage the plans.
Redirect to the same sections i.e. Sellers >> Seller membership >> click on “REORDER PLANS”

Assign Membership Plans to Sellers
Admin can now assign a membership plan for his/her sellers while adding or editing any seller.
While Adding Seller:
Clicking on Add Sellers, the admin will fill the seller details and once he/she clicks on the Save button, he will be asked to select a plan for that seller.
Once he selects any plan, the same will get applied to that seller.
While Editing Seller:

In the Edit Seller section, once the admin clicks on the Save Changes button, the membership plans get appear on the page.
From there, the admin can select any plan and assign it to his seller.
Admin can view the list of the subscribed sellers from the “Seller Membership” menu:
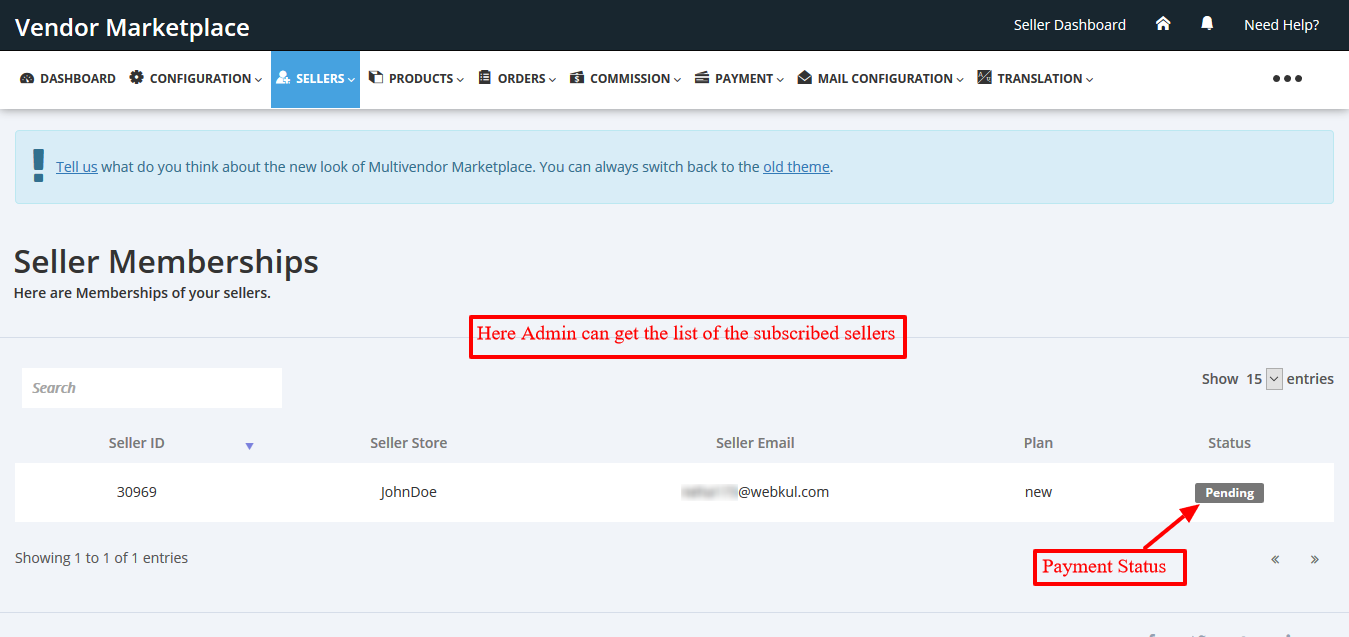
Admin can see all the subscribed seller list and can see the payment status.
Payment from Seller
To know about the payment methods in depth, please visit:
Now once you have created the Membership Plan then you need to set the Payment Mode through which you want the payment from Seller for the Membership Subscription.
Go to configuration >> payment details :

Setup the payment mode and save the changes.
Seller end
As we have created a Prepaid Plan for the Seller, then as soon as the they Sign up to create an account, the membership plans appear on the page.
Sellers can pay for the plan from here.


In the case of Prepaid Plans:
To get the plan, Seller needs to pay as per the “Payment Modes” enabled by the “Payment Detail” menu.

Seller will pay here to subscribe to the plan and use the features.
Seller Membership Plan: How to Deactivate Plan?
Admin can deactivate the seller’s membership plan from the Seller Membership Details section of his admin panel.
Multivendor Admin Panel>>Go to Sellers>>Membership Plan sub-menu>>Click the Seller>>In Seller Membership Details section, click the Deactivate button.

It also allows the sellers to deactivate their plans from their respective seller panels.
Admin just needs to enable the tab from the Membership Configuration menu of the app.

In case Seller wants to deactivate his/her membership plan, he/she can anytime deactivate the plan once allowed by the admin.
For this, the seller needs to follow the below-given steps:
- Go to Seller Panel.
- Visit Membership Plan sub-menu in Profile menu.
- In the plan detail section, click the “Deactivate” button.
This way, the sellers can deactivate their membership plan from their respective seller panels.

On this page, the seller will have an option to update his/her card payment details. For this, click on the ‘view‘ button as marked in the above screenshot. This will give you a popup.
Further, click on the ‘Update Card‘ button & then save the changes made. Refer:


In case the existing card is invalid, you can have the “Update Card” option on the membership payment page.

Payment History
Both the admin and seller can view the membership transaction detail from their respective panel.
In the transaction detail, the admin and seller can see the payment method, transaction ID, transaction date, billing cycle date and charge paid.
Admin can view the transaction detail from seller >> seller memberships >> click on that seller,
scroll down a bit then you will see the payment history section >> click on the three dots >> Click on view

then the admin will have the transaction detail page like below:-

In the same way the seller can view it from their panel >> Profile >> membership plan sub menu
Display membership plan only to particular sellers
Now, you can choose to display a membership plan only to the sellers you want. While creating the membership plan,
you can enable the “Assign to Particular Seller” option and add the emails of the sellers whom you want to be able to see and purchase that plan.

EcPay Payment method for Membership
We’ve added EcPay as a new payment method for membership plan payments. Here’s how you can enable and use it:
How to Enable EcPay:
Go to Configuration >> Membership Payment Details >> Click on Activate EcPay.

Enter your Merchant ID, Hash Key, and Hash IV. Click Save to complete the setup.

Once these details are correctly configured, sellers can start using EcPay to pay for their membership plans.
How Sellers Can Use EcPay to Pay for Membership:
Go to the Seller Dashboard and choose a plan.
On the Choose Payment Method page, select EcPay, then click Pay and Proceed.

You’ll be redirected to the EcPay Payment Page. Enter your payment details and click Pay Now.

After that, you’ll be taken to the Transaction Confirmation Page. Enter the OTP sent to your registered mobile/email and click Submit.

You will then be redirected to the Payment Successful page.

That’s it! Your membership payment is now complete using EcPay.
Once the payment is done and confirmed you will be redirected to the seller panel automatically .
How to deactivate the membership
If you no longer wish to continue with your current membership, you can easily deactivate it by following these steps:
- Go to the Seller Dashboard → Profile → Membership Plan.
- You will see an option to Deactivate your membership.
- Click on Deactivate, then confirm your action.


Once confirmed, your membership will be successfully deactivated.
Note:
The above steps are based on the EcPay sandbox environment. You can use the test credentials provided by EcPay for testing purposes.
Access the sandbox test details here: EcPay Developer Sandbox Details
Demo Details
Use below link and credentials to check the demo of Seller Membership Feature App:- https://multivendor-membership.myshopify.com/pages/demo-details
Support
Furthermore, if you need any kind of support then please raise a ticket
at http://webkul.uvdesk.com/ or drop an email at [email protected].

Be the first to comment.