With this module, the seller can create web services for the marketplace so that seller can provide access to the third-party user to use their marketplace database through CRUD API. Prestashop Marketplace Web Service API will help them with that.
Furthermore, users can now use the GET, POST, PUT and DELETE methods on PrestaShop Marketplace Module tables using Core PrestaShop Webservice API.
Note:
- This module is an add-on to Marketplace Module. Therefore, to use this module, you need to install PrestaShop Advanced-Multi Vendor Marketplace first.
- API usage is described in module README.md file.
- Module v6.x.x is only compatible with Marketplace v6.x.x
- Module v6.x.x only supports JSON not XML
- Compatible with PrestaShop version 8.x.x.
Features
- A seller can create Auth Key to access their own Marketplace Details
- Admin has access to manage seller auth key permissions
- Seller and Admin can manage access to every resource permission
- View (GET) Marketplace seller’s details using REST API
- View, add, update and delete Marketplace seller’s products
- Admin can create own admin auth key for some API
- View Marketplace Seller’s Orders
Installation
In order to install the module, you need to install the PrestaShop Advanced Multi-Vendor Marketplace module first.
After installing the marketplace module, you can now proceed to install the PrestaShop Marketplace Web Service API module.
- Firstly, go to the module manager in the back office and click on ‘upload a module’.
- After that, drag and drop the module file or select the file from the system.
- In this way, the module installation will be successful.


How to configure the module
On the configuration page, currently, you can allow sellers to create web service requests.

Activate the PrestaShop WebService API
Firstly, the admin needs to activate PrestaShop Webservice API.
To do so, go to the Advanced Parameters section and then to the Webservice tab.
1: After that, enable the PrestaShop Webservice from the configuration page.
2: Then, click on the “Add new webservice key” button to add a new key,


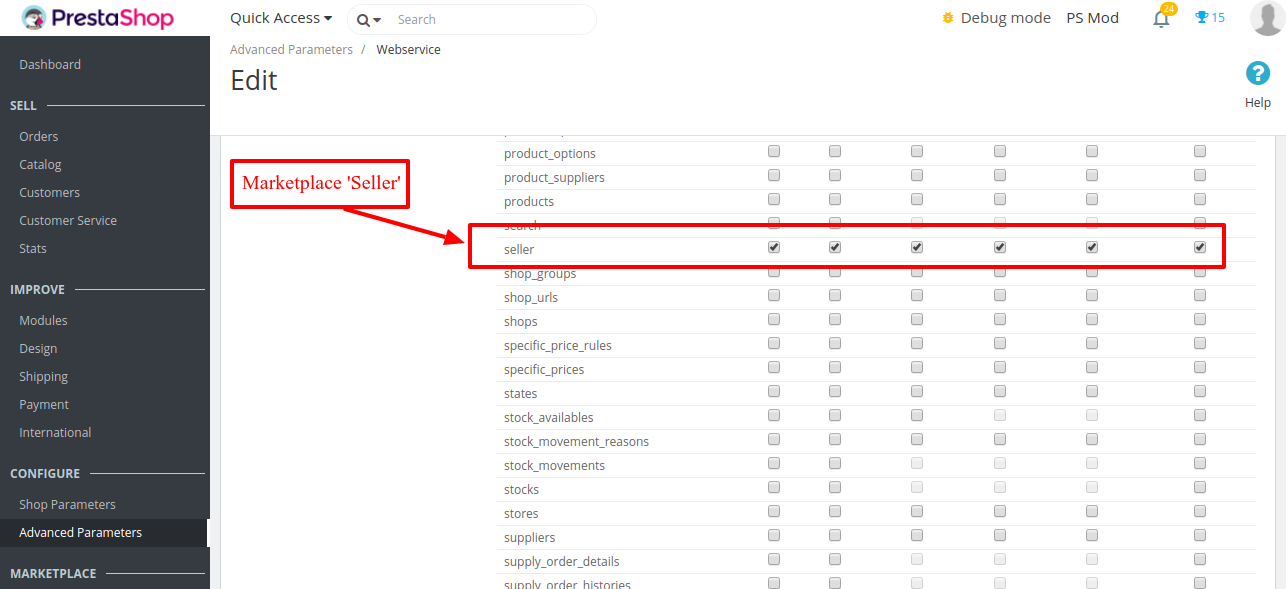
3: Finally, add an API key. Thus, it is advised to generate a random key as well for the security purpose. Add a description, activate the status, and then give all permissions to the marketplace “seller” resource.

Follow the process of PrestaShop API and then you can see the Marketplace Database API
Using the PrestaShop Web Service
Process to create seller’s authentication key
Moving further, now seller needs to create an authentication key to access the web service API.
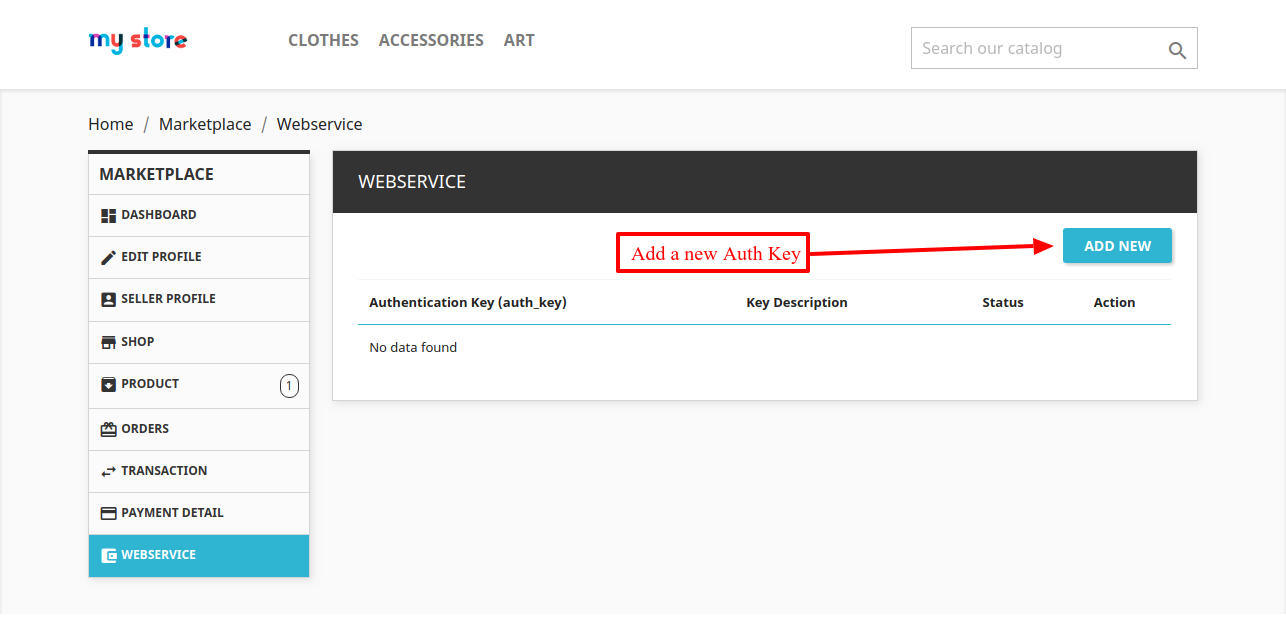
In order to create an authentication key, go to the “Webservice” tab available under my account section.

After that, proceed to add a new authentication key.

Moreover, on create authentication page, the seller can see the form to generate the web service API key.
The seller can generate an authentication key & can also add the description. They can also manage status (if admin allows) and manage permission for multiple marketplace resources.

Above all, remember that resources allowed for sellers are accessible by the endpoint URL.
Manage authentication key at admin’ end
After installing the Marketplace Webservice module, finally, a new tab adds to the Marketplace tab.
This is where the admin can also create and manage the seller authentication key. In other words, this new tab contains settings of web service.
After that, go to the manage webservice” tab available under the marketplace.

Click on the ‘Add New’ button to open the form. After that, here you can select a seller and provide an Authentication key.

Marketplace Webservice URL with Auth Key
Firstly, you need to access the URL with the PrestaShop ws_key. Then only sellers can access the Marketplace API using the ‘auth_key’ parameter added in the URL.
For that reason, this ‘auth_key’ is the identifier to get the particular seller information.
Complete URL: domain/api/seller?auth_key=PFTVH97CEI&ws_key=IP2LASMH7W5N6T8PB
Seller API details
Get the seller details
Endpoint : /api/seller/sellerinfo
Method: GET
Seller Product API
Get the seller product details
Endpoint : /api/seller/sellerproduct
Method: GET
Get the seller product combinations
Endpoint : /api/seller/getproductcombination?id_mp_product=[id]
Method: GET
Create seller product
Endpoint : /api/seller/saveproduct
Method: POST
Update seller product stock
Endpoint : /api/seller/stockupdate
Method: POST
Create seller product combination
Endpoint : /api/seller/saveproductcombination
Method: POST
Delete seller product
Endpoint : /api/seller/deleteproduct
Method: DELETE
Parameter: id_mp_product
Delete seller product combination
Endpoint : /api/seller/deleteproductcombination
Method: DELETE
Seller Order API
Get the seller order details
Endpoint : /api/seller/sellerorder
Method: GET
Create order for the seller
Endpoint : /api/seller/createorder
Method: POST
Seller Images API
Get the list of types of images
Endpoint : /api/seller/mpimages
Method: GET
Get the logo of the seller
Endpoint : /api/seller/mpimages/sellerlogo
Method: GET
Get the banner of the seller
Endpoint : /api/seller/mpimages/sellerbanner
Method: GET
Get the Shop Logo
Endpoint : /api/seller/mpimages/shoplogo
Method: GET
Get the Shop Banner
Endpoint : /api/seller/mpimages/shopbanner
Method: GET
Get list of product images available
Endpoint : /api/seller/mpimages/products
Method: GET
Get list of images for a particular product
Endpoint : /api/seller/mpimages/products/[id_product]
Method: GET
Get a particular image of a product
Endpoint : /api/seller/mpimages/products/[id_product]/[id_image]
Method: GET
Admin API
Assign product to seller
Endpoint : /api/seller/assignproduct
Method: POST
9: Finally, Upload the seller image by creating a form similar to the PrestaShop default API. And therefore to know more, go through this documentation.
So, this was all about Prestashop Marketplace Web Service API Configuration Module. Finally, I hope this document will help you in checking the functionality of the module in a better way.
Furthermore, do let us know about your views in the comments.
Support
For any kind of technical assistance or query, please raise a ticket at http://webkul.uvdesk.com or send us a mail at [email protected]
Also, please explore our PrestaShop development services & vast range of featureful PrestaShop Addons.
Current Product Version - 6.2.1
Supported Framework Version - 8.x.x, 1.7.x.x

I want to add/update products and their images on prestashop shop using webservice api.
How can I do it what steps I need todo, what are the services you people are providing and what are the charges for those services.
Thanks