Opencart Quick Order: The Quick Order module will allow the customers to add the products in bulk to the cart in one place without the need of visiting each product page within the website.
Furthermore, this extension is convenient for customers who already know the products they want. Also, the customers can easily search the products using the product name or just by entering the alphabets of the product name to populate the products.
Watch the below video tutorial to understand the module workflow:
Features – Opencart Quick Order
- Products can be searched by Name or alphabets.
- Customers can purchase all products from a single page.
- Add multiple different products to the quick order.
- The buyer/customer can add the different options of the products in a row.
- Estimate shipping and tax from the quick order page.
- Guest users can place a quick order.
- Product types supported – simple, downloadable, and products with options.
- Customer can add to cart product in bulk via CSV file
Installation
Step 1:
Now, extract the contents of the received zip folder on your system according to your OpenCart version. The extracted folder has admin, catalog, and ocmod folders.
Now, upload the admin and catalog directories into the Opencart root directory.
Step 2:
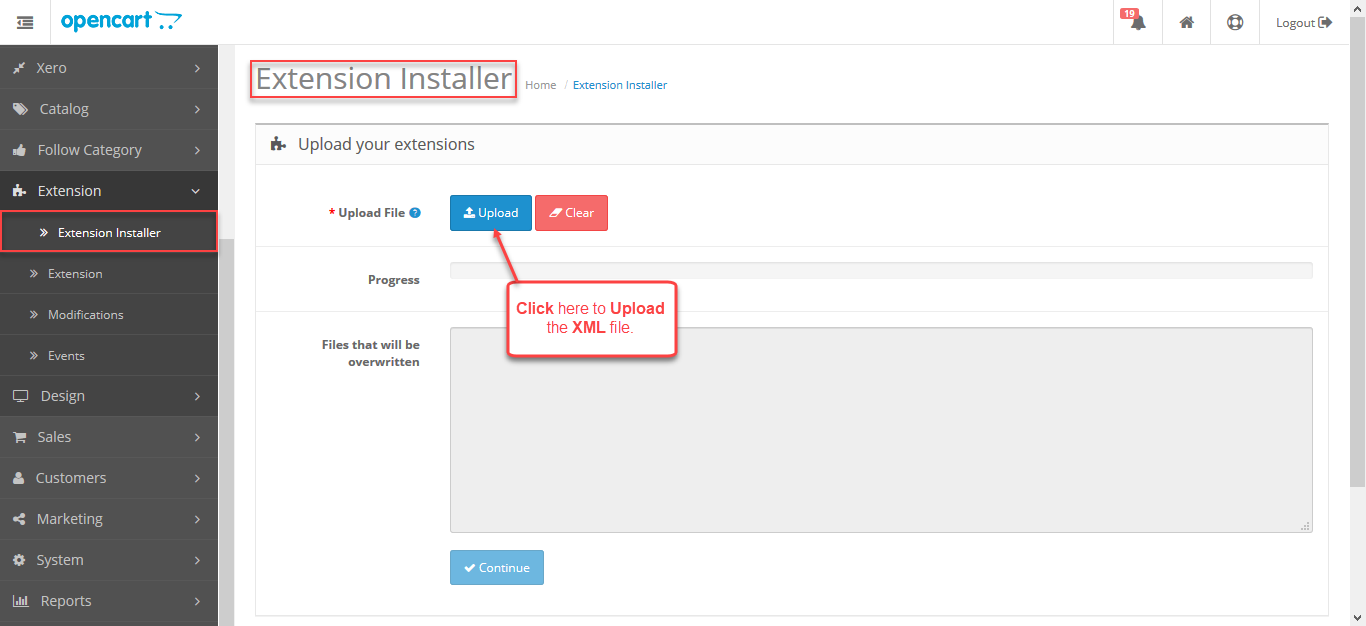
And, once you have uploaded the folders, login to the admin panel and then go to Extensions> Extension Installer and then upload the XML file.
Then, the XML file is in the ocmod folder under the module directory. In the ocmod folder, select the Opencart version that you are using and under it, you will find quick_order.ocmod.xml file.
Step 3:
So, after uploading the XML file go to the Extension -> Modifications and click on the refresh field.
Step 4:
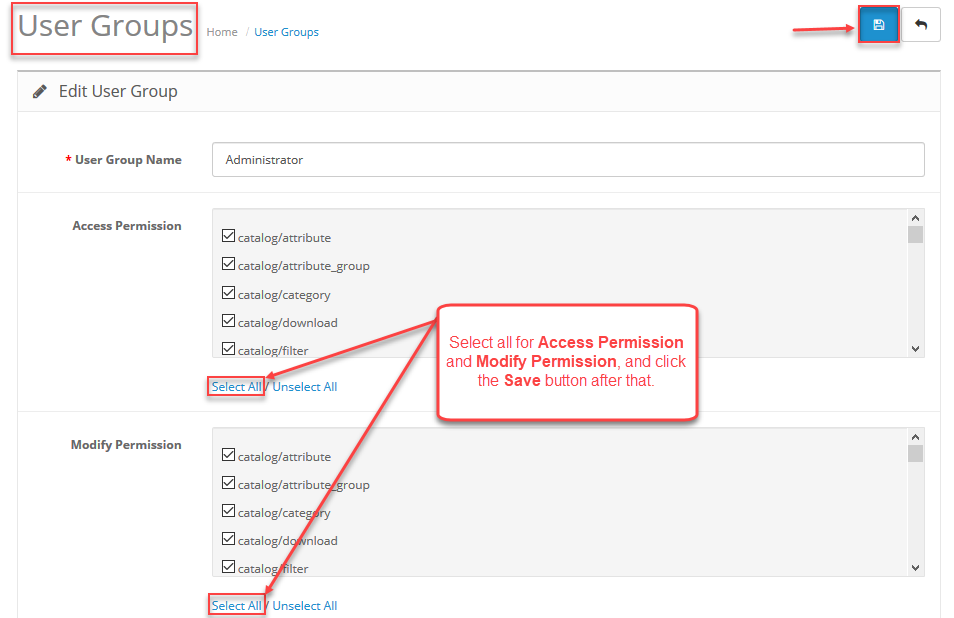
After that in the Admin panel go to System -> Users -> User Groups and edit the ‘Administrator’ and choose to select all for both Access and Modify Permission for the permission that you want to provide and Save it.
Step 5:
Now go to Extensions-> Modules->Quick Order and click the install button to install the module.
Module Configuration – Opencart Quick Order
After the successful installation of the extension, the admin will configure the module for use. To do so, navigate through Extension->Extension->Modules->Quick Order and click on the edit button.
And, this brings up the section with the module configuration settings as shown in the snapshot below:

Here, the admin will –
- Enable the status of the module by selecting “Enabled” else select the ‘Disabled‘ option.
- Set the Row limit for the customers. This will restrict the customers from adding more than the set number of rows for adding the products to the cart. E.g: In the above image, the row limit is 10 so the customer will be able to add only 10 products.
- Allows admin to enable Add through CSV feature from here.
Quick Order – Front End
On the website front end, the users can reach the Quick Order page by clicking the Quick Order link in the header of the website as per the below image:

On the Quick Order page, the buyer can see a text-box to enter the Product Name.
To search a product the buyer will have to enter the name of the product or can type in the alphabets of the product name to populate the products.
For the reference, you can check the below snapshot:

After that, just click on the product if it’s available within the populated search list so as to add it directly to the product cart with the default quantity as 1.
After entering the product name & selecting the respective product, the rest of the fields get auto-filled which includes – Quantity of the Product, Sub-Total, and Image (click on the image to redirect to product page).
The users can also add more rows by clicking the Add Row button. For the reference, you can check the below snapshot:

After adding a product to the row, the customer can see the product added in the row and into the cart as well.
The customer can click the on Remove button to remove the added product.
If the customer have already added a product within a row, and if they are adding the same product. then they will see a pop-up for confirmation of the same with an option of Yes or No.

In this case, if the customer selects Yes on the pop-up, then its get adds a single quantity of the product to the already added same product quantity. Else select No and nothing happens.
Add Product – CSV File
The customers can download the sample file by clicking on the Download Sample button as per the below snapshot:

Here, the users need to enter the Name of the product, it’s Model, and the required Quantity of the product as per the below snapshot:

After that, they can upload the CSV file by clicking on Add the CSV button as shown below in the snapshot:

Products With Option
The buyers can also add products with options as well in the quick order.
If the product is with options then the buyers will get a pop-up for choosing the product options before adding the product to the cart. For the reference, please check the below snapshot:

After selecting the product option, they can click the Add Cart button to add all the products to the cart as per the below snapshot:

Additional Features under Quick Order
If any discount or reward points is available, then the customers can apply under the quick order. Else they can continue to directly estimate their delivery cost.
To estimate the delivery cost, click ‘Estimate Shipping & Taxes‘ drop-down option. Here, the buyers will select their country, region, and enter your postcode and then click the Get Quotes button:

So, this brings up a pop-up to select the shipping method. Select the shipping method and click the Apply Shipping button after that.

This applies the shipping estimate of the cart and the buyers can see the shipping cost applied.
Quick Order – Check Out
Once, the all process is done, then the customer needs to click on the Checkout button.

This brings up the checkout page. Here, complete all the required steps and click on the Confirm Order button in the last to complete your quick order.

After placing the order the customer can check the placed order details by navigating to the Order History section.
Guest Users
Guest users will also be able to make use of the Quick Order.
For the guest users also the Quick Order link is visible in the header of the website:

All the steps of selecting the products to add to the cart are the same.
Clicking the Proceed to Checkout button brings up the checkout page. The guest needs to select the Guest Checkout radio option and click the Continue button after that.
 Under the billing details section, add the required fields and click the continue button.
Under the Delivery, Details section select your preferred shipping method for use on this order.
After making the selection for the payment method, under the Confirm Order section click the Confirm Order button.

Support
That’s all for the OpenCart Quick Order extension.
If you have any queries, doubts or suggestions regarding the extension get back to us at [email protected]
Current Product Version - 3.1.0.2
Supported Framework Version - 2.x.x.x, 3.x.x.x


Be the first to comment.