Opencart Purchase Order Management allows the admin to manage Purchase orders. With the help of this extension.
The admin can maintain complete purchase records like which products he has purchased from which suppliers, at what price, and the quantity.
The most helpful feature of this module is inventory management based on Purchase Orders for an e-commerce store with a sales order.
This extension lets the admin control the business purchases. It is easy to use and user-friendly module.
Watch the video to understand the extension workflow:-
Features – Purchase Order Management
- Enter the default purchase order prefix.
- Select the Procurement Methods as Make to Order or Make to Stock.
- Enter the Default Quotation Quantity for the purchase order.
- The admin can enable to generate the purchase order automatically whenever the customer places the order.
- Can set the order status for which the purchase order will generate from the front-end.
- Set the Email Id for the purchase order.
- The admin can set the low stock quantity for the automatic generation of the purchase order.
- Automatic generation of the purchase order whenever the product quantity becomes zero after placing the order.
- The admin can easily manage inventory with the help of this module.
- The Email Template for both the admin and the supplier on modifications of the purchase order.
- The admin can configure the shipping and payment methods.
- Manage the supplier’s payment method.
- Also admin can add a new supplier and manage the entire records of the existing ones.
- Multiple Products can assign to a Supplier.
- The admin can create a new Quotation by entering the relevant details like Supplier Name, Shipping Method and mode of payment, etc.
- Edit the details of the items and even remove the Ordered Items from the Quotation and Purchase Orders.
- Besides this admin can manage the Entire Purchase Order Records.
- Create the bulk Purchase orders from the Order List panel.
- The admin can Purchase the entire Quantity of Products at once or can Purchase them Partially.
- The admin can schedule the shipment of the products according to his requirements.
- Easy to manage the supplier Ledger.
- The admin can see the profit and loss of the purchase on under the Supplier Ledger List.
- Moreover Multi-Lingual Support.
Installation
The customers will get a zip folder and they have to extract the contents of this zip folder on their system according to your Opencart version.
The extracted folder has admin and catalog folders. You need to transfer these folders into the Opencart root directory on the server as shown below:

Once you have uploaded the folders, login to admin and then go to Extensions> Extension Installer and upload the XML file.
The XML file can be found on ocmod folder under module directory.
In ocmod folder select the Opencart version you are using under which you will find oc_purchase_order.ocmod.xml file. In version 3 the zip file will be found on ocmod.
Moreover after uploading the XML file go to the Extensions > Modification and click on refresh field.

After that, in the admin panel go to System -> Users -> User Groups.
Now, edit ‘Administrator’ and choose to select all for both Access and Modify Permission for the permission that you want to provide and save it.

Admin Configuration – Purchase Order Management
After the successful installation of this extension on the web store, the admin has to navigate through Purchase Management-> Purchase Configuration.

Also admin can enable or disable this module and can configure the module settings like –
General Settings:
Default Order Prefix– The admin can set an order prefix of the purchase Id.
Procurement Methods – The admin can set the procurement method as Make To Order and Make To Stock.
- Under Make To Order, whenever the product quantity becomes zero after placing the order, a purchase order will be created automatically.
- Under Make To Stock, the admin has to create purchase manually.
Default Quotation Quantity– This Quantity will be visible in the Quotation Quantity field until the admin enters it as per his requirement.
Generate PO on Order Placed – If the admin enables this option, then whenever the customer places the order a purchase order will create automatically else not.
Order Status for Purchase Order – Set the order status for which the purchase order will generate from the front-end.
Set the Email Id for PO – Enter the e-mail address on which the purchase order notification will be sent.
Low stock quantity for automatic PO Generation – Enter the quantity on which the purchase order creates automatically.
Email Settings:
Here the admin can select the Email templates which the admin and supplier will recevice if there are any changes or modifications done in the Purchase Order.

Quotation Email to Admin/Store– An email notification will be received by the admin after adding a Quotation.
Quotation Email To Supplier– An email notification will be sent to the supplier after the Quotation request has been placed by Admin.
Add Product To Quotation Email To Admin/Store- The Admin will receive an email notification after adding a product to the Quotation.
Add Product To Quotation Email To Supplier– An email notification will be sent to the supplier after the product addition to Quotation by the Admin.
Update Details To Quotation Email To Admin/Store– The Admin will receive an email if he updates any information about the Quotation.
Update Details To Quotation Email To Supplier– An email notification will be sent to the supplier if the Admin updates the Quotation.
Purchase Order Email To Admin/Store– The Admin will receive an email notification after placing the purchase order.
Purchase Order Email To Supplier- An email notification will be received by the supplier after the purchase order has been placed by the admin.
Shipping Settings:
From here, the admin can add the Shipping Methods. In addition admin can enable or disable and even remove the added shipping methods.
In this section, the admin can enter the Default Shipping Cost and Default tax Cost for the Purchase Order.

Default Shipping Cost– The Shipping amount which will be paid by the Admin if he does not change the Shipping Cost at the time of Quotation creation.
Default Tax Cost– The tax amount which will be paid by the Admin if he does not change the Tax(%) while adding products to the Quotation.
Payment Settings:
The admin can add new payment methods or can enable or disable the existing one. They can also delete the added payment methods.

Supplier’s Payment Method:
From here, the admin can manage the supplier’s payment method. Also they can add, delete or changes the status of the supplier’s payment methods.

Supplier Management
The admin can manage the Suppliers Information by navigating through Purchase Management > Supplier.
In this section, the admin can add a new supplier, filter a particular supplier from the list of Suppliers, modify their information and even delete a supplier.

Adding a New Supplier
The admin can add a new supplier by entering the relevant information:
Company Name, Email Address, Owner Name, Phone no. and Address. Also admin can also enable or disable the Supplier.

Assigning Multiple Products to Supplier
After entering the supplier’s details, the admin can assign multiple products to a supplier.

or that, they need to click on the Assign Store Product button.
After clicking on the button, the product list will display and then the admin can select the product which they wants to assign to the particular supplier.
Besides this for the reference, check below:

On clicking Save Records button, the selected products will be assigned to the supplier.

Supplier’s Quotation List
The admin can also check the list of Quotations under the quotation tab as per below image:

Supplier’s Purchase Order List
The admin can also view the Purchase Order List of the supplier. For the reference, please check the below snapshot:

Supplier Payment Method
Here, the admin can see all the payment method for supplier as per below image:

Also, they can click on the View button to view the payment information as per below snapshot:

Quotation Management
The admin can manage the quotations by navigating through Purchase Management > Quotation.
In this section, the admin can view the Quotation details, create a Quotation, filter a particular quotation from the list, modify the quotation and even delete a quotation.
For the list of the quotation, you can check the below snapshot:

For creating a new quotation, the admin can click on the Create Quotation button. After that, they have to fill the required information:
General Information
Admin can create a new Quotation for the Products by entering Supplier Details, Shipping Details, and Mode of payment as shown below:

Add Product to Quotation
Once the Admin has entered the general information required to create a Quotation, then he has to click on Continue To Add Product for adding Products to the Quotation.
Here, the admin searches the product from the search panel which the admin wants to add to the quotation.

The admin can even add the product with options to the quotation as per the below image.

Add Comment
The Admin can add a comment and send a copy of that comment to the supplier.

Quotation Submission
After clicking on the Save Comment button, the admin will be able to view all the information regarding the Quotation.
The admin can make changes in Supplier Cost, Ordered Quantity, and Tax Percent. Also, they can remove the product from the Quotation.

Note: There should be at least one Product added in the Quotation.
Once the Quotation has been confirmed by the admin, a Quotation Id will be generated for that particular Quotation. The admin can see the details in the Quotation List.
The Admin can modify the Quotation Information by clicking on the edit.
From here, the admin can change the Quotation Status, modify the details of the ordered items like Supplier Cost, Ordered Quantity, Tax(%), etc.

Purchase Order Management
Once the admin changes the Quotation Status from Pending to Converted To PO, a Purchase Id will get generated.
The admin can view all the details regarding Purchase order by navigating through Purchase Management > Purchase Order.
In this section, the admin can view the Purchase order details. Also, they can filter a particular Purchase Order from the list, modify the Purchase Orders.
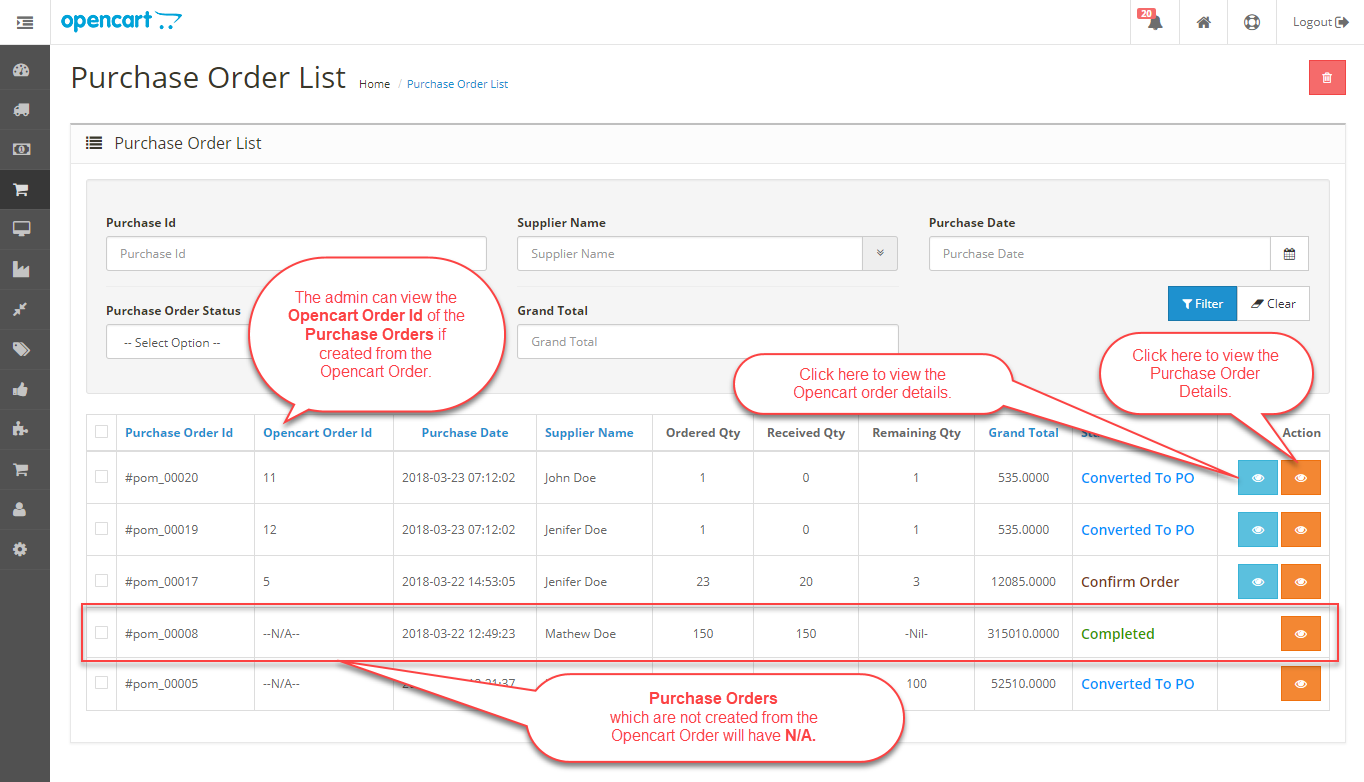
Under Opencart Order Id column:
The admin can view the Opencart Order Id of the Purchase Orders if that is created from the Opencart Order.
Else it has N/A which are not created by the Opencart Order (if the purchase order is created through the quotation).
View purchase order:
The admin can also view the purchase order details and also the order details of the Purchase Orders by clicking on the view button.
After that, the admin can view Purchase Order details, change the order status, edit the ordered items details and even remove the ordered products.

Once the admin has changed the Order Status from Converted To PO to Confirm Order, then they cannot modify the details of the Ordered Items.

Shipment of products:
Now, the admin can also schedule the shipment of the products according to their requirement.

The admin can print the shipment by clicking on the Print Shipment button.
Also, they can click on the view button to see the shipment schedule and can update the shipment details by entering schedule date and comment.

Ready to receive:
Thus, the admin can edit the received quantity of the product by clicking on the Ready To Receive buton.

Once the admin clicks on Receive Now button, the Partially ordered products will be visible in the Received Item section as shown below:

The admin can change the Order Status from Confirm Order to Completed after receiving the Products.

Once the Purchase Order has been completed, the admin can check the updated quantity of the products by navigating through Catalog > Products as shown below:

Bulk Purchase Order
The admin can also create the bulk Purchase orders of created orders from the Order List panel.
For that, the admin needs to navigate through sales > orders and then select the orders.
Now, they have to click on the Create Bulk PO button as per the below image:
Also, if the admin has set the Order Status for Purchase Order to “Pending” in the backend configuration.
Then the admin can create the purchase order for another order status also. For eg, Complete, Processing, Processed, Canceled, etc.
Mail Template List
The admin can create or view Email Templates by navigating through Purchase Management > Mail Template List.
Form here, the admin can view the details regarding Email Templates which will be received by both the admin and the supplier if they make any modifications.
The admin can also edit the added Email Template if required.

While creating a new Email Template, the admin has to enter Template Name, Template Subject, and the Message.

Supplier Ledger
Under the supplier ledger tab, the admin can see the list of all the suppliers. Also, they can pay to the supplier by clicking on the Pay Now button.

After clicking on the Pay Now button, the admin can see the supplier name, supplier email and the amount due.
For making the payment, the admin needs to select the Purchase Order Id from the list and then has to add reference comment, lastly, click on the Pay Now button.

The admin can also see the Profit and Loss details of the purchase order as per below image:

Here the profit will be shown with a “+” sign and the loss will be shown with “–“sign.
Support
Thus, that’s all for the Opencart Purchase Order Management module. Still have any issue feel free to add a ticket at http://webkul.uvdesk.com/.
Current Product Version - 4.0.0.1
Supported Framework Version - 3.x.x.x

I plan to buy this module in next few days and have a question:
Can I combine to 1 PO for each supplier when I use “Create Bulk PO” function?
Thanks,
Nguyen