OpenCart Marketplace Seller Price Comparison extension helps in comparing prices among the sellers for a single product.
Also, this module allows the sellers to add their products to the existing products with different prices and quantities.
Since it’s an add-on to the Marketplace Module, so the marketplace module must be installed before installing the OpenCart Marketplace Price Comparison.
Note:
- This module supports all templates and themes including the Journal theme.
- Opencart Marketplace Price Comparision module supports the Multi-Store feature of default Opencart.
Check the plugin’s working at the marketplace storefront along with the vendor setting up the assigned product that is already there within the global catalog –
Features
- The admin can create multiple product condition names.
- Separate product collection for every seller.
- Display different sellers on product page with their product price, quantity available, ratings, make offer button, and the price alert button.
- The admin can approve, delete, and preview details of the assigned products.
- Admin can set the number of assign product images to upload.
- The admin can set up the emails for the default conditions within the extension.
- Admin can set up the number of days up-till a coupon can validate.
- The admin can view/delete the customers who subscribes for the price alert.
- Sellers can add the product with different price, quantity, make offer option, shipping information, description, and images.
- The sellers can add assign products in bulk using the CSV file.
- Order history generates with the particular seller details whose product has sold out.
- The sellers can approve the default or custom offers made by the customers.
- Base sellers can update the whole information of that product but assign seller can only edit the price and quantity of that product.
- The customers can opt to subscribe for the price alert of the assigned product.
- Customers can filter products from other sellers on the product page using the seller name, rating, and the price of the products.
- The customers can make a default or custom offer on the assigned product.
- Customers can make a custom offer by entering the price per product & quantity.
- The customers can make use of the coupon code for purchasing the same assigned product.
Opencart Marketplace Mobile App
This is a technology based era where everything is simplified even the online shopping. We all know about shopping apps and its advantages-how it reduces and makes our shopping experience hassle proof.
So it is very important for all the Store owner to have a shopping app for providing a more convenient way to shop from their online store and now Webkul’s has launched its new app Opencart Marketplace Mobile App. Also, Opencart Marketplace Mobile App converts your marketplace store for Opencart into a mobile app.
Your customers can easily purchase products on the go. Also, they don’t need to have a laptop or desktop, they can easily explore your store through their smartphones. It will not only benefit the store owner and customer it will benefit the sellers too. Sellers can see their dashboard, order history through the mobile app.
So what are you waiting for, you must now have an Opencart Marketplace Mobile App to be a step ahead.
- Seller list.
- The Seller Collection.
- Seller Profile.
- The Seller Dashboard.
- Seller Order History.
- Customers can contact the seller.
- Market Place Sell Page.
- Users can review seller.
- Seller Location mention on the map.
Installation & Configuration
Installation of the Opencart Marketplace Price Comparison module is very simple. After you unzip the main module directory, you will find folder named with Marketplace-PriceComparisonV2.0.x.x.zip.
Also, you will find admin, catalog, ocmod and system folders. You just need to move admin, system and catalog folder into the root directory of your opencart website.

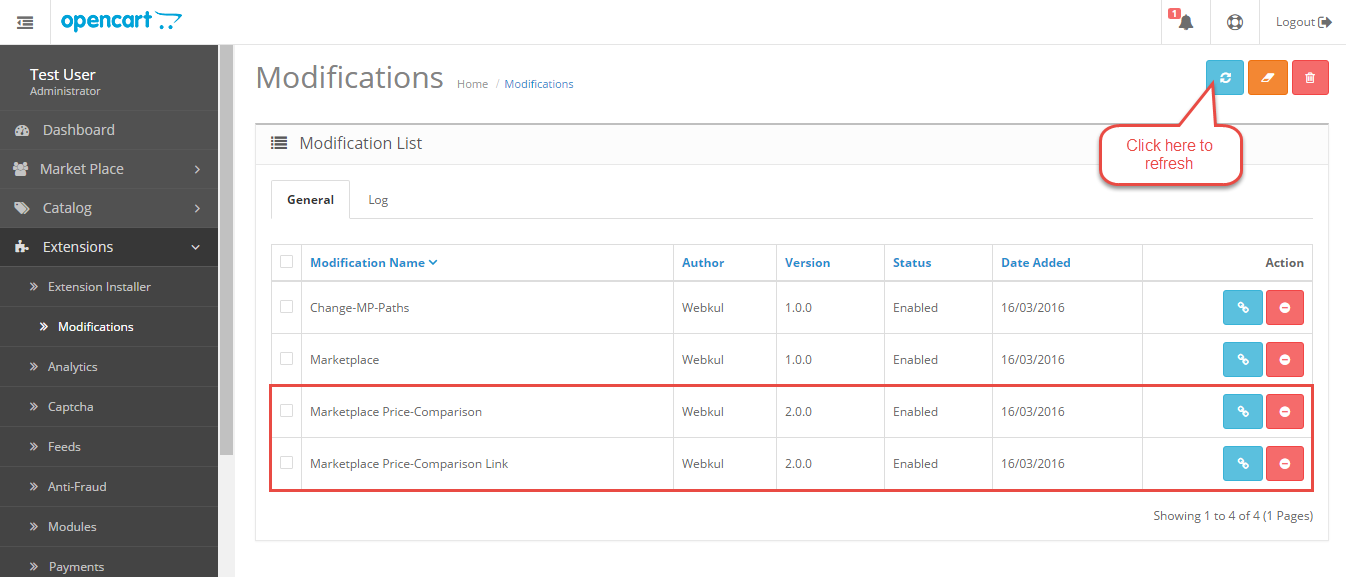
Once you upload the file then login to admin and from catalog section go to Extensions> Extension installer and upload the xml file. Also, the xml file can be found on ocmod folder under module directory. From here upload Mp_Price_comparison1.ocmod.xml and Mp_Price_comparison2.ocmod.xml file.

After uploading the file go to the Extensions > Modification and click on refresh field.
Also, after that in Admin panel go to System -> Users -> Usergroup and edit ‘Administrator’ and choose select all for both Access and Modify Permission and save it.

After that under Extension > Module, install the Marketplace Price Comparison module like this way.

Also, after click on edit option the configuration settings of the extension will open. Here, we have 2 tabs to configure the extension –
- General

Initially, the admin has to enable the extension for use else he can set it as Disable to disable the extension for use.
1. General
Assign Product Approval
When it enable then admin approval will require when any seller assigns another seller’s product and if disabled then admin approval does not require.
Assign Product Update Approval
Also, when it is enabled then admin’s approval requires when any seller will update any assigned product and if it is disabled then the admin’s approval does not require.
Product Delete Option
When this is enabled and if the product from the original seller deletes then assigned seller will become the main seller of that product and that assigned product will become main product. Also, If it is disabled then all the products ( main & assigned) will delete.
Product List Filter Option
The admin can select the product list filter option as Global Catalog ( Complete Store) or Seller Catalog ( Seller products).
Assign Seller Display Order
Also, Use this option for displaying assign seller product on the product page. The admin can choose from two options – ASC or DESC.
Assign Product Image Number
Here, the admin can set the number of assign product images that can upload. The admin can set this option as required and can increase or decrease the number of allowed images for the assigned product.
Coupon Validate Time
Here, the admin will set up the number of days up-till the coupon can validate. The admin can increase or decrease the number of days as required.
2. Mail
Under this section, the admin will be able to select the corresponding template option from the drop-down list for related email options.

Product Assign Mail to Store
Also, while seller will assign Global/Seller Catalog product and email for the same will be sent to the store.
Product Assign Mail to Assign Seller
While seller will assign Global/Seller Catalog product and email for the same will be sent to the assign seller.
Product Approval Mail to Assign Seller
When the admin will approve the assign product and email will be sent to the assign seller.
Assign Product Update Mail to Store
When an assign seller will update the assign product an email for the same will be sent to the store.
Assign Product Update Mail to Assign Seller
Also, when an assign seller will update the assign product an email for the same will be sent to the Assign Seller.
Base Seller Delete Product Mail to Store
When the base seller will delete his product then an email for the same will be sent to the store.
Base Seller Delete Product Mail to All Assign Seller
Also, when the base seller will delete his product then an email for the same will be sent to the all the assign sellers.
Admin Deny Assign Product Mail to Assign Seller
When the admin will deny assign seller product an email will be sent to the assign seller for the same.
Customer Price Alert
When the admin/seller will edit the assign product and if the customer alert price is less or equal to product assign price then the customer will receive a mail for the same.
Customer Subscription
When a customer adds a product for receiving the price alert then a mail for the same will be sent to the customer.
Customer Unsubscription
Also, when a customer removes a product for receiving the price alert then a mail for the same will be sent to the customer.
Customer Apply For Offer
Both the seller and the customer will receive a mail after the customer product apply for the offer.
Seller Approve Offer
When the seller will approve the offer product at that time the customer will receive a mail for the same.
Note – If this option “Partner Delete Product From Store” ( Marketplace -> Products ) enable and main seller delete their product then assigned products will also delete.

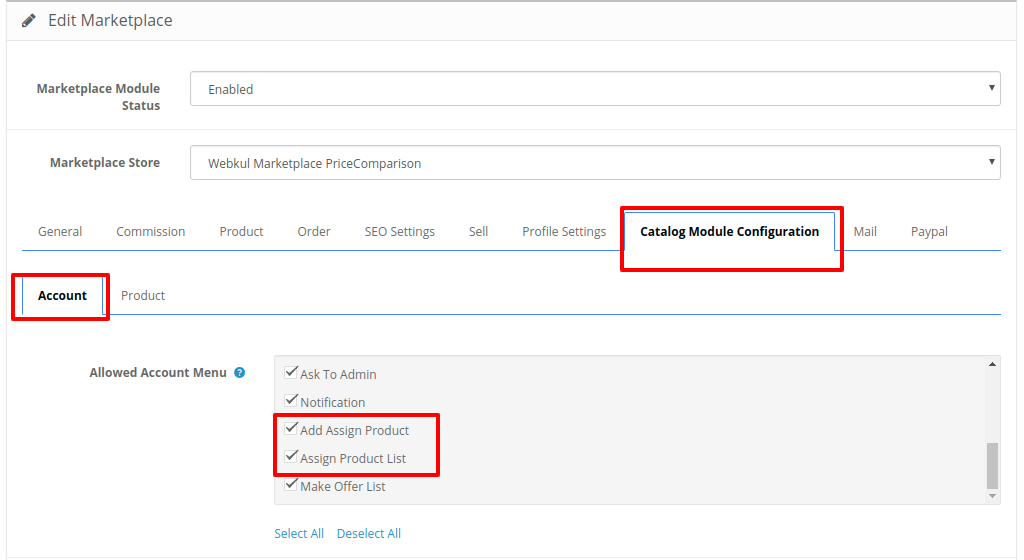
After enabling the Opencart Marketplace Price Comparison module, edit the Opencart Marketplace module by clicking on Catalog Module Configuration tab and select the menus Add Assign Product & Assign Product List from “Allowed Account Menu” so that sellers can view this option in their account section.
Module Translation
As this Marketplace module supports multiple languages so this section will describe how to make the module work in different languages. Please check this link for language translation
Workflow Seller’s End
At the frontend, the sellers will have the below-mentioned menu options available to manage the extension –
- Add Assign Product
- Assign Product list
- Make Offer List

1. Add Assign Product
The seller can first search the product by entering the name of the product which they want to assign.

After search, the product will appear if it’s available within the global catalog.

Also, the seller can tap on the Sell Your button to sell his own assigned product which brings up this section.

The Seller can add products to their product list with selling price and quantity. The seller can select the product condition as “New” or “Old” and select the price as fixed or percent ( If the base price of the product is 100 and a seller sets percent as 20%, then 20% of 100 will be the price set by the assign product seller). Also, the seller can set the product offer as applicable or not depending upon the requirement of the seller.
Under here, the seller will also be able to add assign products in bulk. The seller needs to first click on the CSV Import button which brings up this section.

Now download the CSV file that looks something like as shown below in the snapshot.

Here, enter the assign product details and upload it back and hit the Save CSV file.
In the admin dashboard, navigate through Design> Layouts> Product Page> Module. The Module option is set to Marketplace Price Comparison and under the Position tab, ‘Content Bottom’ option is chosen so as to display the products from the other sellers at the bottom of the product page. 
2. Assign Product List
Also, the seller can see all the products that have assign under the Assign Product List menu.

Here, the seller can export the assigned products in a CSV file. The seller can also edit or delete the assigned products as required. After editing the assigned product, the seller can edit the product options under the General tab.

Apart from that, the seller can also add images for the assigned product under the Images tab. Here, the seller will be able to add more images by tapping the add button under the Action header.

3. Make Offer List
Under this section, the seller will be able to check all the customers who have applied for the Make offer for his assigned product.

The customers can make an offer on the sellers assign product by navigating to the “More Sellers” section

and then tapping the Offer button on the respective seller’s product.

This allows the customers to make the default offer for the product that has having some kind of a discount allowing you to earn the coupon for making use while purchasing the same product and with the same quantity only.

The customers can also make a custom offer and when it enables(approves) the customer receives a coupon code for purchasing the same product with the same quantity for which the customer has made the offer.

After making an offer like the custom or default the customer will not be able to again apply for the offer. Also, an email would be sent to the customer after applying for the offer.

The seller if finds the custom offer as okay, then the seller can process the offer by enabling the offer made by the customer. To enable the offer tap the enable button and this brings this pop-up for confirmation. Tap on Ok.

After enabling the offer request by the customer, the seller can see the coupon code generated on the seller’s end.

After the seller has approve the offer, the customer will be able to find the coupon code under their own account panel under the Make Offer List menu option.

The customer also receives an email for the confirmation of the same.

Now, the customer can easily go for the checkout for the same seller’s product with the same quantity and make use of the Coupon to receive the offer.
Note: The coupon code will not work on any other seller’s product or if you are making the quantity less or more than what you set while submitting the offer.

Now, when the custom goes to the View Cart section, the customer can apply the same coupon code to receive the discount for the asked quantity.

After tapping the Checkout button, the customer will be able to complete the order by tapping the Place Order button with the applicable discount.

Workflow Customer’s End
The buyer can find a product along with the same product from other sellers available on the product page.

When the customer will clicks on the “View Details” button for the assigned product, then a pop-up will come up with details.

Customers can also see available seller option at the product search page, but when they will add that product to the cart then the base product will add to the cart.

The cart will have the base product added to it and not the assigned ones.

On the Category Page, the customer can see the products that are assigned to different sellers.

When the customer adds the product from the Category Page, then Main seller product will add to the cart.

When the customer will go to the Seller Collection page and then add the product, the assigned product will add to the cart.

Admin Management
The admin also has the Price Comparison menu option visible with 5 sub-menu options –
- Assign Product
- Mail Template
- Price Alert list
- Product Condition
- Make Offer List

Assign Product
Under the “Assign Product” menu option, the admin can –
- Approve the assigned product
- Delete the product
- Preview the product details

After tapping on the preview button the assign product displays with the respective details.

The admin can deny any assign product by tapping the Deny Product button under the Action column for the respective assigned product. The admin can even enter a email message for the same and hit the Send button to send it to the respective seller.

Mail Template
Under this section, the admin will be able to create mail messages that will be sent for the default conditions of the Marketplace Price Comparison. The admin can edit any previously crated ones and can delete them as well.
To add a new email message, tap the Add button at the top.

This brings up this section where the admin needs to enter the –
- Name which will display at the time of selection
- Subject – Add the Mail subject
- Message – Add the Mail Message(Under the Info. tab you can make use of the keywords for creating your emails)
Under the Info. tab the admin will find the keywords that can utilize within the email for sending the respective data.

Price Alert List
Under this section, the admin can find a list of customers who have subscribe to the price list alert. The admin can even delete the entries for the price list by checking them and tapping the delete button.

When a customer is on the product page, the customer is able to see all the other sellers who are selling out the same product with different price and quantity.
Now, the customer can opt to subscribe for the price alert by tapping the Price Alert button for the assigned products as shown below in the snapshot.

After tapping the Price Alert button, the customer will see a pop-up wherein the customer will enter –
- Email address to receive the price alert and
- Enter the price which when reach for the respective product the customer will receive a price alert mail.
- Lastly, tap the Subscribe Alert button to subscribe for the price alert.

After tapping the Subscribe Alert button the customer will see a success message for subscribing to the price alerts.

and will also receive a email for the same.

Now, this allows the customers to receive price alerts when the price of the assigned product gets reduced.
Suppose the assigned product has price $45 and the customer subscribed to the price alert $40. now, whenever the seller of the assigned product reduces the price of the product from $45 to $40 a mail is received by the customer for the same. And after that, the customer can reach the product that displays the price as $40 and purchase the product with the said price.
Product Condition
Under this section, the admin will be able to create product conditions. The admin can add, edit, and delete the created product conditions. A list of created product conditions is also visible to the admin.

To add a new product condition, tap the add button at the top right-hand side. This brings up this section where the admin need to –
- Enter the Product Condition Name – Enter a name to describe the product condition.
- Status – Enable or Disable the status of the created product condition.

After creating the new product condition, you can see it available under the product condition

Make Offer list
Under this section, the admin will be able to check all the customer who have send in the custom/default offer for the seller’s product. The admin can also delete the offer list by selecting the product’s checkbox and tapping the delete button after that.

That’s all for the Opencart Marketplace Price Comparison module, still have any issue feel free to add a ticket and let us know your views to make this module better https://webkul.uvdesk.com/en/
Current Product Version - 3.3.1.5
Supported Framework Version - 3.x.x.x

Be the first to comment.