It facilitates Ubiquity- Easier information access in real-time,
Convenience- Devices that store data are always at hand, Accessibility- Choice to limit the accessibility to particular persons who can be contacted anywhere anytime.
Also, it facilitates Personalization- Creating services that customize the end-user experience, and Localization- Matching services to the location of the customers.
Furthermore, it may be likely that customers do not access options such as newsletters, emails, etc.
Moreover, the app follows the latest technology of Flutter wherein one can use Dart to build a mobile app.
Almost everybody carries a mobile phone, therefore using the OpenCart Mobile App customers can receive notifications about offers and deals, instantly on their phones.
Watch the below video tutorial to understand the extension workflow:
Features
- However, to attract the attention of the customers any time anywhere, while they are on the move with their mobiles.
- Customers’ privacy and security are guaranteed.
- Multiple currencies and multiple languages are supported.
- Supports Cheque / Money Order, Cash on Delivery, and bank transfer as a payment method.
- Supports all shipping methods.
- Provides flexibility and ease of connectivity to the customers.
- The customer can view recent orders made.
- The customers can delete their account
- Featured Product Carousel is present for a better UI.
- Reward Points, gift vouchers, and coupon code functionality are present.
- Quick login in the web panel via QR-code scanning with the same credentials as of app.
- The customer will receive the notification of all the order-related notifications.
- The admin can set the order of carousels by easy drag and drop under the Home Page Configurator settings.
- Customers can delete their accounts.
- The app has support for AI-based features like- AR Product Visualisation.
- Moreover, the admin will also add emojis with the title and content of the notifications before sending them to the customer.[Add-on]
Admin Configuration
The admin can manage the general settings of the applications and the basic functionalities of the mobile app. This can be done under the Mobikul tab.
The admin can view the Mobikul option right from the dashboard section in the admin panel.

Part 1: Banner
We can set the Banners on top of the Home page in the Application. The ideal size for banners is in ratio 2:1 (width: height).
Furthermore, you can add any number of banners and attach a redirect property to them. You can also add different images for the same banner as per language.
- Title: You can set the title of the Banner in different languages.
- Status: You can set the status enabled or disabled.
- You can select the ‘ID from‘ to ‘ID to’ of the banner, which will be chosen based on the specified ID mentioned.
- Type-Product/Category: You can attach the redirect property to your banner as either a product or a Category type.
- Product Type: After you select the product type you have to attach any Product with the banner when you click the banner by App it will open that specific Product that you have attached to the banner.
- Category Type: If you select the category type, you must attach any category to the banner. When you click the banner by App, it will open that specific category that you have attached to the banner.
To create a new banner image, Click on the “+” icon in the upper-right corner which will display the next section.

We can set the parameters as shown below-
- Enter the title of the banner.
- Choose the banner type from the available options: product, category, external link, or no link based on needs.
- When the banner type is set to “product,” the option to select a product becomes available.
- When the banner type is set to “category,” the option to select a category becomes available.
- When the banner type is set to “external link,” the option to select an external link becomes available.
- If “No Link” is selected, only the option to create a banner will be available.
- Select the link.
- Sort the order.
- Set the status as ‘enabled’ or ‘disabled’.
- Upload the banner image through the available choices.
Part 2: Notification
From this part of the panel, you can send push notifications to all the OpenCart Mobile App users.
Further, just Create a new Notification and add the desired action like want to open a Product or category or custom collection, then select a particular product and category and send it to everyone.

To add a new notification the admin needs to click on the + symbol, present on the right top corner of the Notification Information List page (above image).

- Notification
- Title: Set the notification title in different languages.
- Content: This is the description part of the push notification.
- Type: Here the admin can select the type of notification among Product Type, Category Type, Other Type, and Custom Type.
- Notification Status: The admin can enable and disable the Notification.
- Banner: Moreover, the admin can also set the banner to your push notification.
Notification Emoji
However, the admin can also add the emoji to the Title and Content of the notification.
The admin will click on the emoji present in the field. The collection of emoji will be visible in the image below:
These emojis will also be visible to the customer when they receive them.
Note: Notification Emoji is an add-on to the OpenCart Mobikul App. To use this feature please install the OpenCart Mobile Emoji Push Notification module first.
Formerly, then click on “Send & Save” (send the notification as well as save your notification for the next time) and “Save”.
Part 3: Manage Category

Part 4: Custom Collection
In addition, the admin can also send the set of products to the customer under a specific category as a push notification.
For that, the admin will create some custom collections under the Mobikul > Custom Collections Tab.

By clicking on the + button, the admin can add a new collection and by clicking on the edit button, the admin can edit according to order demand.
The admin will have to select the products coming under that collection and provide a suitable name for them as shown in the image below:
Part 5: Augmented Reality: OpenCart Mobile App
This product type will allow e-commerce customers to try products in 3D visualization with the help of the mobile application.

However, when clicking on “+” on the right side. Admin can upload the Android 3D model and IOS 3D model.

Under this tab following options will appear.
- Product Name – Add the name of the product.
- Upload for Android – The admin needs to upload the .sfb file which will contain a 3D image of the product.
- Upload for iOS –The admin needs to upload the .usdz file which will contain a 3D image of the product.
- Status – Admin can enable/Disable the status.
However, once the admin configures all the details of the product, the customer can view the product in the front end of the app.
The customer can also use the AR icon for better visualization of the product.


Part 6: Manage Carousel
This is the part where we can set the brands which are shown at the bottom of the Application same as the open cart store.
Here, the admin can create multiple carousels using products and images as needed.

To create a new carousel, tap the ‘+’ button, and the following page will appear

Here, the admin for the new carousel will –
- Enter the title of the carousel.
- Sort the order.
- Set the Status as Active or Disabled.
- If the type is chosen as Product then –Options for sub-types include Best, Popular, Latest, Special, Discounted, Random, Manufactured, Manufacturer selective products, Best and Category products. After selecting a sub-type, choose the number of products to display.
- If the type chosen is an image then select the sub-type as – All Categories, All parent categories Image carousel, All manufacturer Image carousel, All manufacturer Image carousel, Banner Image carousel, create_new_one, Manufacturer, Featured categories or Reality.
- Set the Status as Active or Disabled.
Finally, save the new carousel. It will then be visible in the mobile app, as shown in the snapshot below.
In the case of the type chosen as Product:
If ‘Product’ is chosen as the type, the admin can create the following sub-types using the CS-Cart Multivendor Mobikul Mobile App feature:

- Best Products –In this section, app users can purchase the top-rated or best products available in the store.
- Popular Products – Displays products that are currently popular or trending on the app.
- Latest Products – This section allows app users to purchase the latest products added to the store.
- Special Product – This carousel features unique or exclusive products that stand out in the store.
- Discounted Products Carousel – This carousel showcases products currently on sale or offered at a reduced price.
- Random Products Carousel – This carousel displays a selection of products chosen at random, giving users a chance to discover new and varied items in the store.
- Manufacturer All Products – This section features all products from a specific manufacturer, allowing users to browse the complete range of items available from that brand.
- Manufacturer Products – This section highlights a curated selection of products from a specific manufacturer, showcasing only the most notable items from that brand.
- Categories All Products – This section organizes products into distinct groups, making it easy for users to browse and find items based on their interests or needs.
- Categories Product: The way for businesses to group similar items, making it easier for customers to find what they need.
In the case of the type chosen as Image:
If ‘Product’ is chosen as the type, the admin can create the sub-types listed below using the CS-Cart Multivendor Mobikul Mobile App feature:

- All Parent Categories – This carousel showcases images highlighting each parent category in the store, providing users with a clear visual overview of the main product.
- Manufacturer – This section provides information about the brands that create the products in the store, making it easier for users to explore items by specific manufacturers.
- Featured Categories – This section highlights specific categories that are promoted for their popularity or relevance, which helps users find the various product groupings.
- Banner Image – This features promotional banners or advertisements, enabling users to explore special offers, events, or announcements in a visually appealing way.
Part 7: Manage Walk Through
Navigate through Mobikul->Walkthrough.
Although, the last part of the admin panel is the configuration part where we can manage all the functions which we want to show on the Home page.

In the admin panel, go to Mobikul and select Walkthrough. You will see a list of any existing walkthroughs you’ve created.
To start a new walkthrough, just hit the “+” button located in the top-right corner.
This will bring up the setup interface where you can set up your new walkthrough one step at a time.

Here, the admin will enter the –
- Title of the walk-through.
- Add the footer.
- Upload the Walk-through image.
- Set the order of the mobile app.
- Set the status as enabled or disabled.
Finally, click the ‘Create button’ to finalize the new walkthrough.
Additionally, the admin has the option to modify an existing walkthrough.

Part 8: Theme Editor
Admin can fully customize the platform’s appearance by editing the theme.

Check Order Type
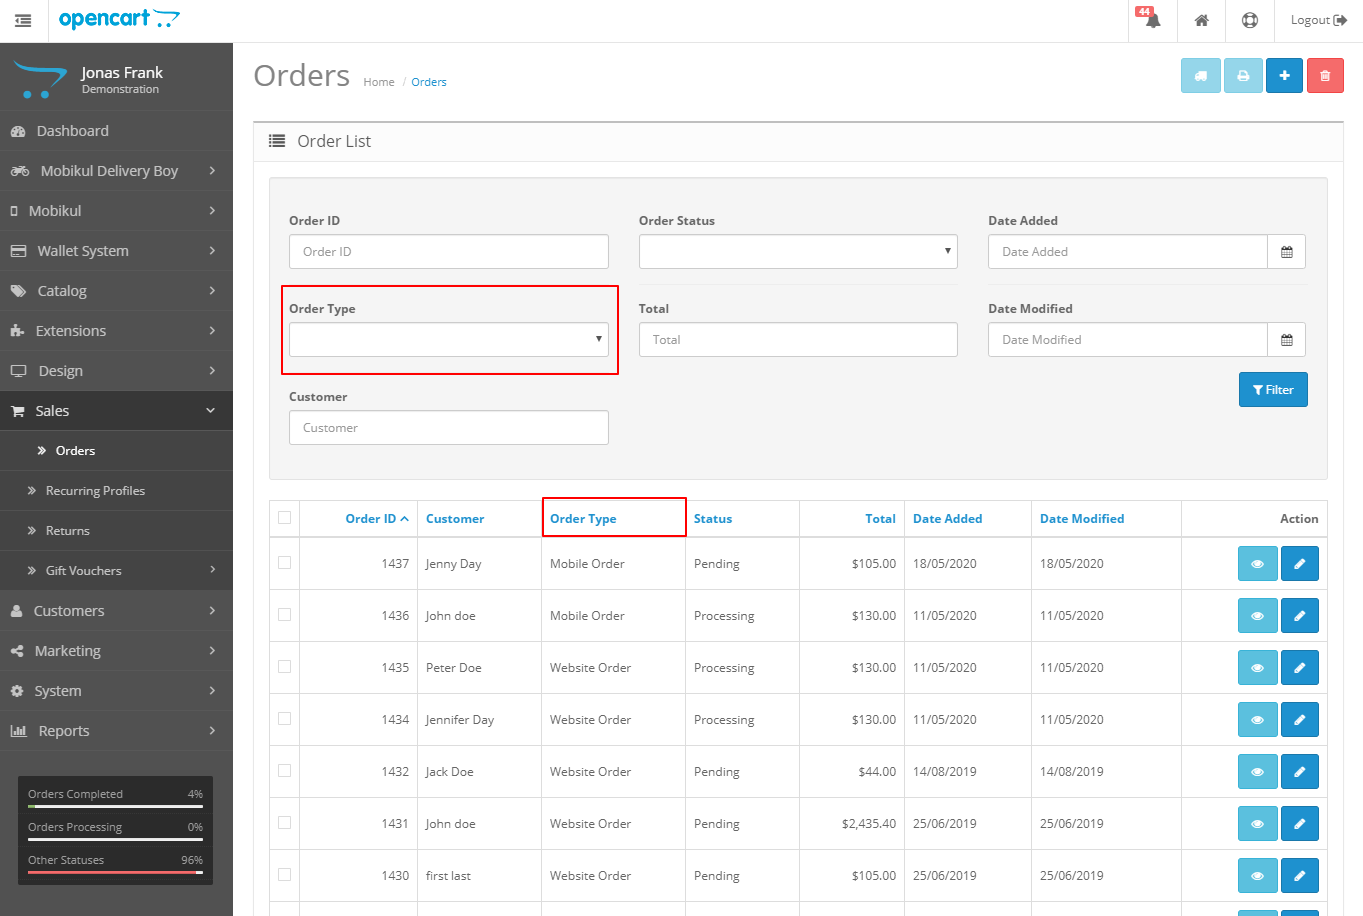
However, the admin can also check whether the order placed by the customer is from the mobile device or the website.
This detail will be visible to the admin under Sales > Orders, under the column Order Type as shown in the image below:
The admin can also navigate to the filter section to check the same under Order Type as shown in the image below.
Furthermore, on the Order Details page as well, the admin can find whether the order is placed using a mobile or desktop under the Order Details column as shown in the images below.

In the Add Order History column, Order notification language, the admin can select the different languages according to the order requirement
Check order status i.e. pending or not and notify the customer about the order.

The Configuration part
Admin can choose the extension by navigating to Extensions > Extensions > Modules > Mobikul.
From there can manage the Mobikul extension settings, enabling or disabling features and customizing the mobile app as required.

Although, the last part of the admin panel is the configuration part where we can manage all the functions which we want to show on the Home page.


- Status: Enable the Mobikul API status.
- Edit General Settings: API key and password which is used for the authentication of the request.
- API Key: Enter the API key for the application.
- API Password: The admin will enter the API password for the app.
- FCM Key: To enable the notification we have to use the FCM authorization key.
- Edit Application Settings:
- Display Playstore Link: The admin will Enable this to display the Play Store link to the
application. - Display AppStore Link: The admin will Enable this to display the AppStore link to the
application. - Playstore Link: The admin will enter the Play Store link.
- AppStore Link: The admin will enter the AppStore link.
- Visible on Top: The admin will enable this to display the links in top position.
- Visible on Bottom: The admin will enable this to display the links on the bottom position.
- Frontend Text: Enter the text that will be visible in the front end with the app links.
- Shipping Methods: Here the admin will select the shipping methods that will be available for the customer in the frontend.
- Payment Methods: The admin will select the available payment methods for customers.
Home Page Configurator
The admin can manage the sort order of the app’s banner, product, and category carousels on the homepage.
For this, the admin will navigate to the Extensions > Modules > Mobikul > Home Page Settings tab.
Under this, the admin will find three sections, the first column is for adding any new carousel.
The second column is for managing the sorting orders of carousels that will be visible on the homepage.
The admin can click on the delete icon to delete any specific carousel. The deleted carousel will not be visible in the application anymore.
The admin can add the new or deleted carousel to the second column by clicking on the + button present in the first column.
The sort order can be changed by dragging and dropping it to the desired position.

In addition, the third section is the mobile mockup that previews the sort order that is set by the admin.
Login/Register
The customers can sign up/ register or log in to the OpenCart Mobile App under the Profile tab. The customer can log in through Facebook or Google as well.
Note: The social login feature is a paid feature. For more details, please check the following link.

Sign in –
The customers will have to enter the login credentials under the Profile tab so as to sign in for the OpenCart Mobile App as shown.

Register
However, In order to sign up, the customers will have to add the registration details which include Personal Details and the Password.
The customer can even subscribe to the Newsletter. The customer will have to accept the privacy policy for the app and click on the Register button to register with the OpenCart Mobile App.

Here customer needs to enter the registration details-
- First and Last Name- The customers need to add their first and last names.
- Email address- The email ID of customers through which they can log in in the future.
- Telephone- The mobile number details of the customer.
- Your Password- The password that the customer can use while signing in.
- Newsletter- The customer can subscribe to the newsletters.
Homepage
The customer will come across a very interactive Homepage that includes various features such as a banner, category carousel, etc.

Search
If the customers have a product in their minds, it can be directly searched by simply adding the product keyword or the product name in the search tab as shown in the image below.
As the customer adds a keyword for the product, other products, or search suggestions associated with the keyword shall also appear.
The customers can select any of the results to view the details of that product. The customers will find the details on the product with related products as well.

Wishlist
If a customer likes a product and wants to look for more options as well,
the product can be added to the Wishlist, which is present in the right-top corner of the App (a heart-shaped icon), for a later purchase.
The best feature of a wishlist is that the customer can directly add any of the wishlist products to the cart. Also, the customer can remove any product from the Wishlist.

Cart And Checkout Process
CART –
As the customer chooses a product to buy, it must be added to the cart for a better purchase process.
On adding the products to the cart, the customer can view the Product Image and its Name, append quantity option, Add to Wishlist and Remove options, Update Cart, and Proceed to Checkout options.
The customer can also view the Reward Points. The customer may add the coupon code to avail discount on the total price.
Moreover, the Sub Total and the Total amount will be visible to the customers before proceeding for checkout as shown in the image below.


Checkout-
The customer can proceed to checkout age by clicking on the ‘Proceed’ button.
The customer needs to enter the Billing and Shipping address and select a Shipping and Payment Method to finalize the order.
However, before placing the order, the customers can even Review the Order and View the Order Details as shown in the image below.
As the customer places the order, a confirmation message shall display for the customer as shown in the image.


\


Banner
A Banner of any application lays a basic idea of the products which the application exhibits. It advertises the category, product, offers, notifications, etc.
It appears in the form of an interactive slider presenting the app to the customers in a much more profound and sophisticated manner.

Featured Product
The admin can enter the product that he wishes to advertise exclusively in the form of a list under Featured Products. These products can be from various categories.

Latest Product
The product that has been added recently to the store is displayed in this section in the form of a list under Latest Products as shown in the image below.

Browse by Brands
Under Browse by Brands, the customers can browse products according to the brand names which shall be visible in the form of a grid.

Navigation drawer
The left navigation drawer of our mobile application includes:
- All Categories and Products
- Language
- Currency
All Categories and Products
Moreover, the OpenCart Mobile App includes multiple Parent Categories and their Sub-Categories to provide smooth navigation through products throughout the customers’ shopping process.
In the Category Page, the customer can view the Main Category as well as its respective Sub-Categories. The customers can sort the category results by multiple sorting options provided by OpenCart.
The customers can also opt for a grid and list view of the sub-category pages, where the customer can view various products with options such as Add to Cart or Add to Wishlist.


On the Product page, the customer can see the Product Image, Description, Specification, Reviews with Quantity Box, and Add to Cart button.
Furthermore, the customer can filter the products for an easy and sorted search process. The customer may choose to sort products by Name, Price, Rating, or Model.
However, for instance, if a customer chooses to sort products by Price (low to high),
the name of the product with the lowest shall display first and the products with a higher price shall display after the products at a lower price.

Multiple Language Support
Language constraint, which is a major concern for the apps, is resolved in the OpenCart Mobile App.
It supports multiple languages that shall benefit the customer in choosing products in the desired language. The customer can select a language navigate through the shop and make a purchase.


MULTIPLE CURRENCY SUPPORT
The OpenCart Mobile App allows customers to choose from multiple currency options. The customer can make payment of the orders by simply choosing the required currency.


Category
The Category tab displays various categories for products along with the banners in the form of a list as shown in the image below.
On clicking a particular category, the customer will be redirected towards sub-categories of the respective category.


Notification
However, the Notification tab includes all the notifications and offers that are currently offered by the store.
Moreover, the customers can take the leverage of the offers and avail discounts while making a purchase.

Order Notification
However, the customer will also receive notifications whenever they place an order, or the order status is changed, or any order-related details will be sent as a notification.


Profile
The profile section shows various details related to the customer’s profile which can be edited from here.
- My Wishlist
- Address Book
- My Orders
- My dashboard
- Edit your account information
- Login Using QR Scanner
- Newsletter
- Change your password
- My Downloadable Products
- Your Rewards Points
- Your Transactions
- Return
- Logout

Address Book
The customer can view his address details under the Address Book. Furthermore, the customer can Add a New Address, Edit the address and even Delete the address.
Customers can add multiple addresses and set an address as default.


My Orders
Under My Orders, the customer can view the order details by simply clicking the View Details button present against the Order Id.
It includes details such as Order Id, Status of the Order, Date when the order was placed, Shipping and the Default Address details, Shipping, and the Payment Method.
The customers can also view the details of the products like a model, price, sub-total, and the total amount of the order under My Orders.


Dashboard
The Dashboard displays the graphical representation of the sales as shown in the image below. The dashboard also includes the My Address and the My Orders tab.
The customer can edit or delete the address and view the order details under the My Address and the My Orders tab directly.


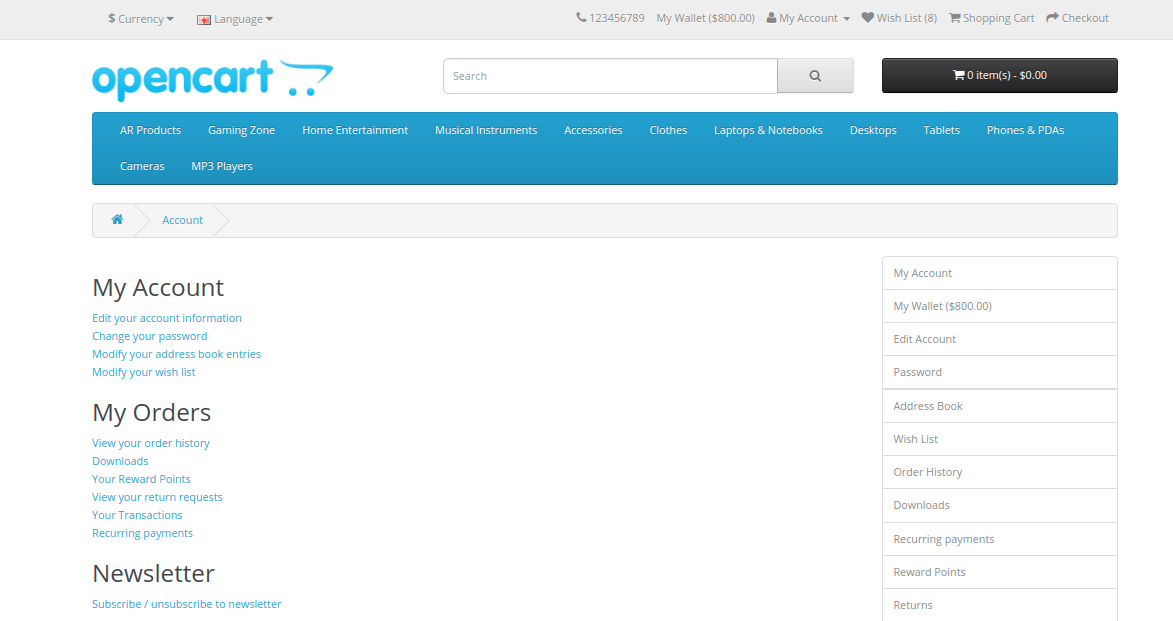
Account Information
In the Account Information page, the customer can view and modify various information for a particular customer.
- First and Last Name- The first and the last name of the customer.
- Email Address- The email ID that the customer uses while logging in to the account.
- Telephone and Fax number- The contact number and the fax number of the customer.
- Change Password– The customers can change their passwords whenever required.
- Delete Account- Customers can delete their account

My Downloadable Products
The downloadable products will be visible to the customers under My Downloadable Products.
It includes details such as the Name of the downloadable product, the size of the file, and the Date on which it was downloaded.

Reward Points
This section shows the total reward points in the customer account along with the description for which the reward points are being given to them.

Transactions
Your Transactions tab displays a list of transactions that the customer has made through the application.
The customers can view the Current Balance, Date Added, Description, and Amount associated with each transaction.

Return
The Return Information page includes the details of the orders which are returned by the customers. It includes details such as Return ID, Order ID, Name, Status, and Date Added.
On clicking the View tab, the complete Return Information will display.
Return Details displays the Return ID, Order ID, Date Added, and Order Date.
Product Information and reason for Return displays details such as Product Name, Model, Quantity, Reason, Opened, Action, Comment, and Order History.


Extended Feature – Login Via QR-Code
As we already know the app remains synchronized in real-time with the website. This extended feature will allow the app user to log in to the website with the same credentials as in the app.
This feature helps in the enhancement of security especially when we are working on some public system(like cyber cafes).
The app user here needs to type in the complete username and password. Rather they can just scan the QR-Code to log on to the website.
Wherein, the login credentials will be the same as being used in the app. Remember, here you need to log into the app to use the functionality.
Note: For using this feature you must install the OpenCart Mobile App QR Code Login addon first.
Android QR-code login-
In the Android device, the app user will navigate to Profile Tab>Login through QR Code, from where the app user will scan the QR-Code to log in.
However, on the website end, the app user needs to click on the option- Login by QR-code to open a QR-Code popup.

Post login the app user will get a success message stating the successful login.

iOS QR-code login-
Similarly, in the iOS device the app user, needs to navigate to the Profile section>Login through the QR Code, which will open a scanner.
Again in this case on the website end the app user needs to click on the option- Login by QR-code to open a QR-Code popup.

After this, the app user will receive a success message on the app for a Successful login.

Web-End –
Thus, the app user can see a successful login in the web end and avail the functionality of the web store.
Contact Us Form
The customers can contact or reach out to the admin through contact us forms, in case of any query or concern.
Under the left navigation drawer, the customer will select the Contact Us tab:


The customer can also click on the View Google Map button to find the location on the map so that they can track it directly very seamlessly.
That’s all for the OpenCart Mobile App. Still, you still face any issues, feel free to add a ticket and let us know your views to make the module better http://webkul.com/ticket/index.php
Current Product Version - 2.8.4
Supported Framework Version - 3.x.x.x

disabling some steps