Opencart Marketplace UPS Shipping Version2 module allows the customers to use UPS as their preferred shipping method. UPS (United Parcel Service) is the world’s largest package delivery company and a provider of supply chain management solutions.
Please Note: – In order to use UPS shipping add-on you need to install the Opencart Marketplace module first.
Note:
1. This module supports all templates and themes including the Journal theme.
2. Opencart Marketplace UPS Shipping module supports the Multi-Store feature of default Opencart.
Watch the below video tutorial to understand the extension workflow:
features
- Enable or disable the UPS Shipping method status.
- Custom name for this shipping method that will appear on the front-end.
- Set packages request type.
- Select the type of container and its size.
- Average dimensions of the package can be set.
- Set different weight classes.
- The admin has an option to add tax class rule.
- The dynamic shipping method for freight calculation.
- Select various domestic and international shipping services.
installation
To install this add-on please follow each and every step carefully. First, you need to upload both admin and catalog folders into the opencart root folder directory as shown in below screenshot.

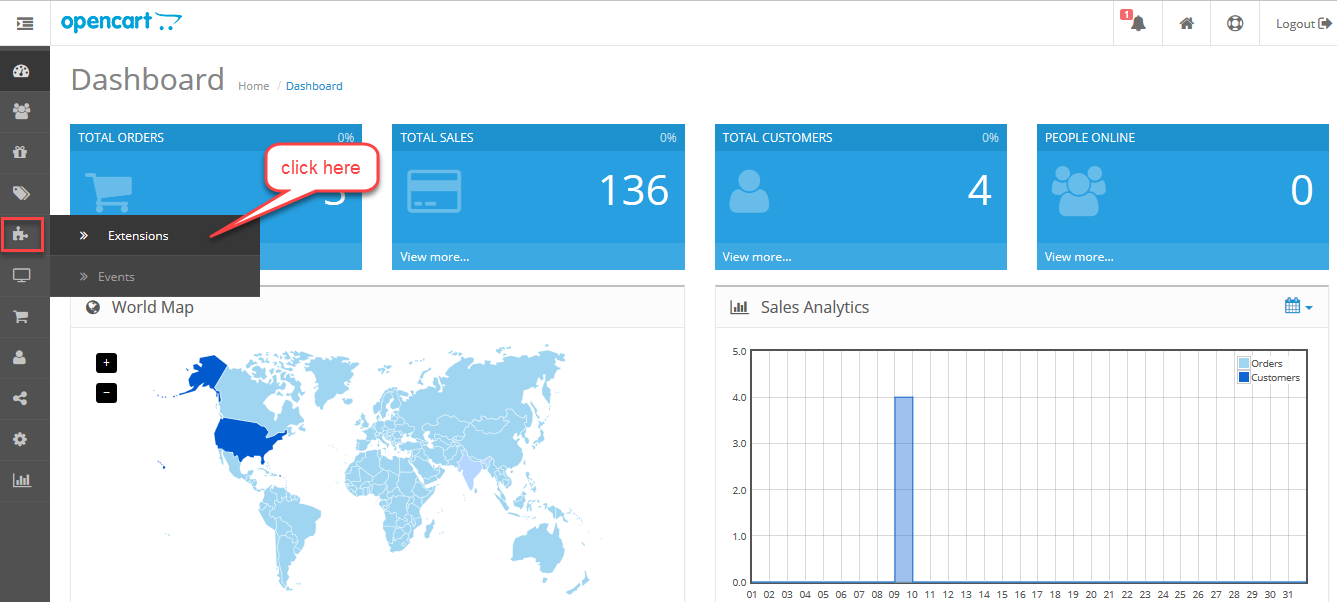
After copying both folders, log in to your Admin account in opencart and click the Extensions menu option as shown below.
This is the Extensions settings page here you can find all list of Opencart extensions. Here you have to go to the drop-down menu and select the Shipping option as shown in the below screenshot.

After selecting a Shipping menu option, a new page will appear where you will find all the list of shipping extensions, you will find Webkul MP UPS extension in the list click the Install button as shown in the below screenshot.

language Translation
This Marketplace add-on supports multiple languages. To set up different languages for this add-on please click here to view the instructions.
Module Configuration
After successfully installing the UPS Shipping marketplace add-on click Edit button to make changes to this extension.

Also, after clicking the Edit button, you will arrive at the Webkul Marketplace UPS Shipping configuration page. Here the admin has to provide all the necessary details as follows:
Store -The customer will select the desired store for which the configuration will be set.
Method Name – The title will appear on the front-end for the buyers on the website during the checkout process.
Access Key – Enter the XML Rates Access Key given by UPS.
Username – Enter your UPS services account username
Password – Enter your UPS services account password.
Pickup Method – Select any one of the UPS pickup method using the drop-down menu option. This option is available for only US origin shipments.
Package Type – Also, Select the type of package you want to use.
Customer Classification Code – Select anyone from the following options:
01 – If you’re billing to a UPS account and have a daily UPS pickup.
03 – If you’re billing to a UPS account or don’t have a UPS account and do not have a daily UPS pickup.
04 – If you’re shipping from a retail outlet (US origin only).
Shipping Origin Code – Select which origin point should be used (this setting affects only what UPS product names are shown to the user)
Admin Store Origin Details:
City – Enter the name of your origin city.
State/Province – Enter two-letter code for your origin state or province.
Country – Enter the two-letter code for your origin country.
Zip/Postal Code – Enter your origin zip/postal code.
Test Mode – Click Yes to enable test mode or NO to make this module live.
Quote Type – Select quote for Residential or Commercial delivery.
Services – Also, Select whichever UPS shipping services to be offered on the front-end using the checkbox.
Enable Insurance – Select Yes or NO use insurance. If it is Yes then the UPS is liable for any loss or damage, at no extra cost, for up to $100.00 for each domestic package, international shipment, or pallet.
Display Delivery Weight – Select Yes or No to display shipping weight on the front-end to buyers or not.
Weight Class – Select the default weight unit for this shipping method.
Tax Class – Also, select any tax class rule for this shipping method.
Geo Zone – Select any of the one geographic zone from the drop-down menu for this shipping method.
Status – Set this to Enabled to provide this shipping method to buyers or select Disabled to remove this option during the checkout process.
Sort – Set the order view of this shipping method using numeric value, (0 – being the top).
Debug Mode – Set this to Enabled to allow to receive error reports and logs.
Don’t forget to click the Save button on the top right of the page. Please view the below screenshot for any assistance.

After Saving you settings, UPS shipping method will appear during the checkout process on the Front-End.
Customer Front-End view
After entering the delivery details, the Delivery Method option appears on checkout process, where the buyer selects Marketplace UPS Shipping. Buyer can select any one of the available shipping services using radio button as shown below in the screenshot. The buyer can also add custom delivery instruction or note for its product.

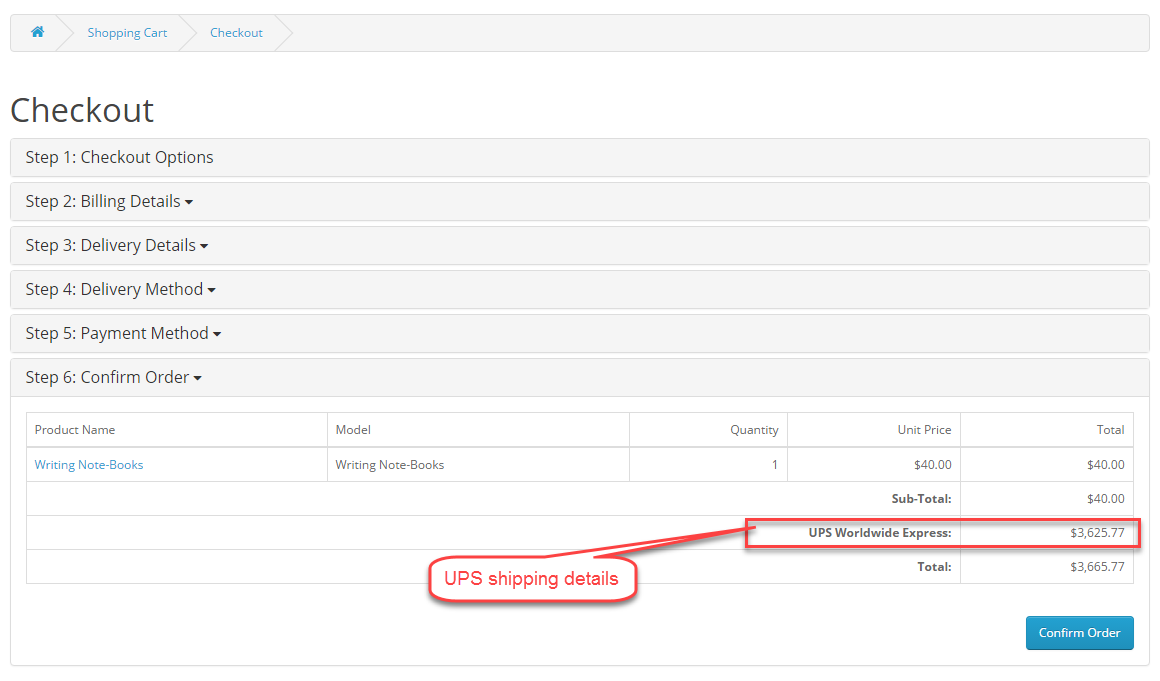
After selecting the shipping and payment method, on the Confirm Order page, you can see your UPS shipping service name and its price as shown in below screenshot.
After placing the order the buyer can view their order information in My Accounts > Order History. On this page it will show you all the orders the buyer made so far, click View button as shown in below screenshot.

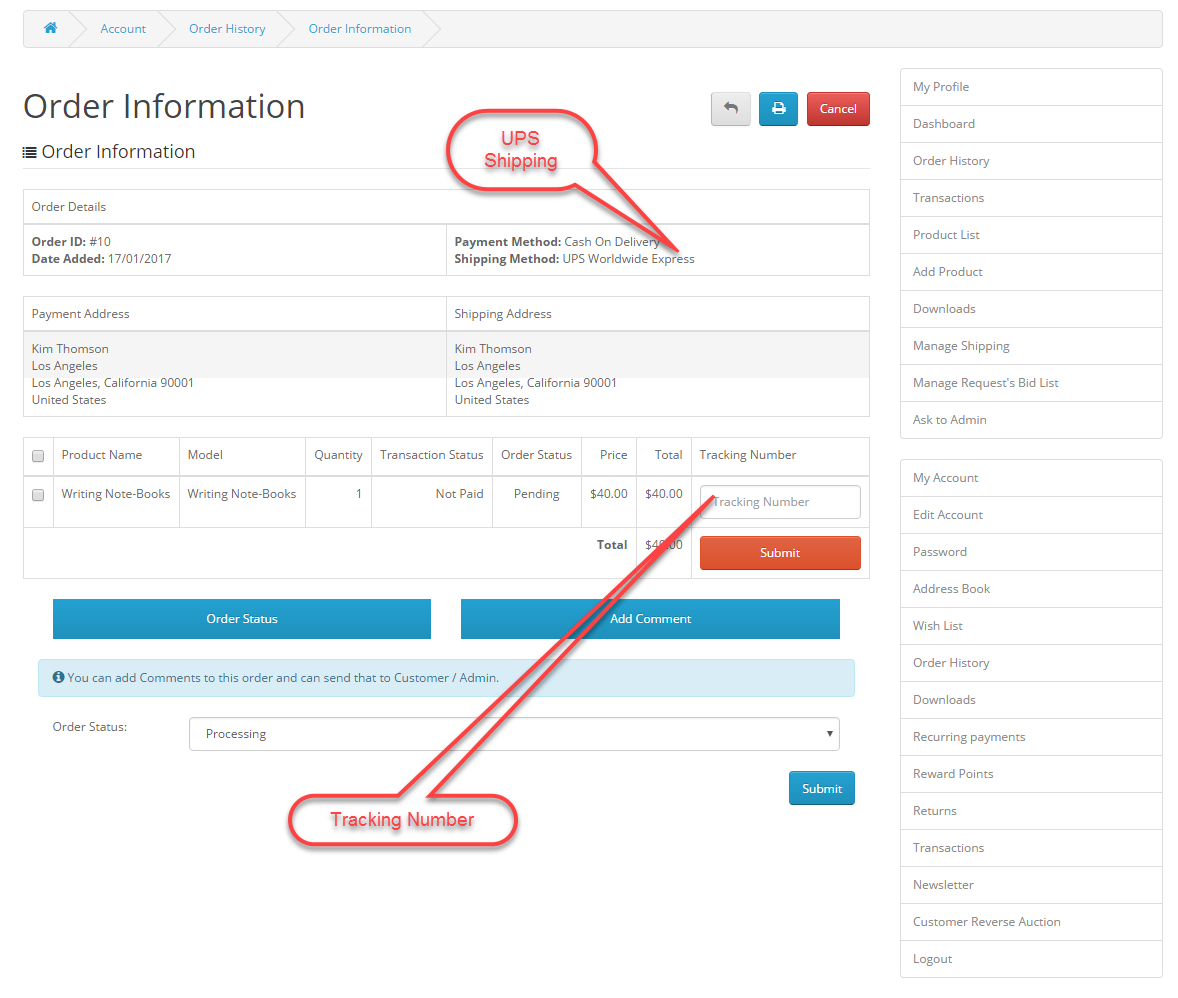
After clicking order View button, order information page will show all the details about your specific order.

Seller Front-End View
The seller can also view their order information for their products sold under Sell > Order History.
Shipment Tracking Number can be entered by the seller, this number will be sent to the buyer.
The seller can also print the invoice for their orders by clicking Print Invoice button at the top. Here is the sample Order invoice below.

Please feel free to reach us if you have any further query about this marketplace add-on https://webkul.uvdesk.com/.
Current Product Version - 2.0.1.2
Supported Framework Version - 3.x.x.x

Be the first to comment.