Opencart Marketplace Hotel Booking System allows creating an efficient hotel booking website using Opencart Marketplace Hotel Booking System add-on. This module allows the admin and the hosts to add hotels, rooms, and various facilities (free and paid both).
Moreover, the admin can choose all permissions he wants to give to the hosts and can set the limit for the addition of hotels, rooms, and facilities. Additionally, this online hotel reservation extension holds an attractive home page banner with slide show effects.
Customers, after reaching the site, can instantly start searching for hotels based on ‘Location’, ‘Check-in’ and ‘Check-out’ date. Even customers can give reviews to hotels and can also rate the hosts of Hotel Booking System Marketplace.
Features
- The admin and Host can add and manage multiple hotels.
- Owner can add and manage multiple rooms without any hassle.
- Admin can add and manage fixed facilities for the rooms.
- The store owner can add and manage optional facilities which will be paid services.
- Owner can enable or disable customer reviews from the admin panel manually.
- Admin can book the rooms from their end.
- The admin can see the list of all bookings and also can export the list to Excel and CSV form.
- Host can see the list of all bookings.
- Host can contact admin.
- Customized search option for hotel booking with a location, Check-In Date and Check Out Date.
- Search rooms based on categories like price, room amenities, optional amenities.
- The customer can search nearest hotels too.
- The shopper can submit their own ratings and reviews for hotels and rooms.
- The customer can also take the advantage of optional room facilities (paid services).
- Admin and Host both can cancel the bookings.
- Customer can ask query to seller/partner.
- It supports multi-language feature too.
Note – Google Map API feature is a paid service.
Installation
Customers will get a zip folder and they have to extract the contents of this zip folder on their system according to your Opencart version. The extracted folder has admin, catalog, image, ocmod, and system folders.
Further, you need to transfer the admin, catalog, image and system folders into the Opencart root directory on the server as shown below.
Once you have uploaded the folder, log in to admin, and from the catalog section go to Extensions> Extension Installer and upload the zip file.
Thereafter, the zip file can be found on ocmod folder under the module directory. In the ocmod folder select the Opencart version you are using under which you will find wkMpHotelBooking.ocmod.zip file.
Now, in the ocmod folder, select the Opencart version that you are using and under it, you will find wkMpHotelBooking.ocmod.zip file for Opencart version 3.x.x.
However, there is an ocmod.xml file for the Opencart version below 3.xx.
Afterward uploading the zip file go to the Extensions > Modification and click on refresh field.
After that in Admin panel go to System -> Users -> User Groups and edit ‘Administrator’ and choose to select all for both Access and Modify Permission and save it.
Translation
Moreover, this Opencart Marketplace Hotel Booking System module supports multiple languages so this section will describe how to make the module work in different languages. Please check this link for language translation.
How To Get Google Location API Keys
To configure this module, you will also need a geolocation API key.
You can get this API using the following steps :
- Go to: https://console.cloud.google.com
- Login in and go to API’s and Services > Credentials.
3. Now, create a project here
4. Then, select API key from the option and Click on create credentials.
5. Now, credentials will be created
Therefore this is how the geolocation API key can be obtained and used to configure our module.
Domain Verification
Even the user needs to follow the given steps for verifying the domain.
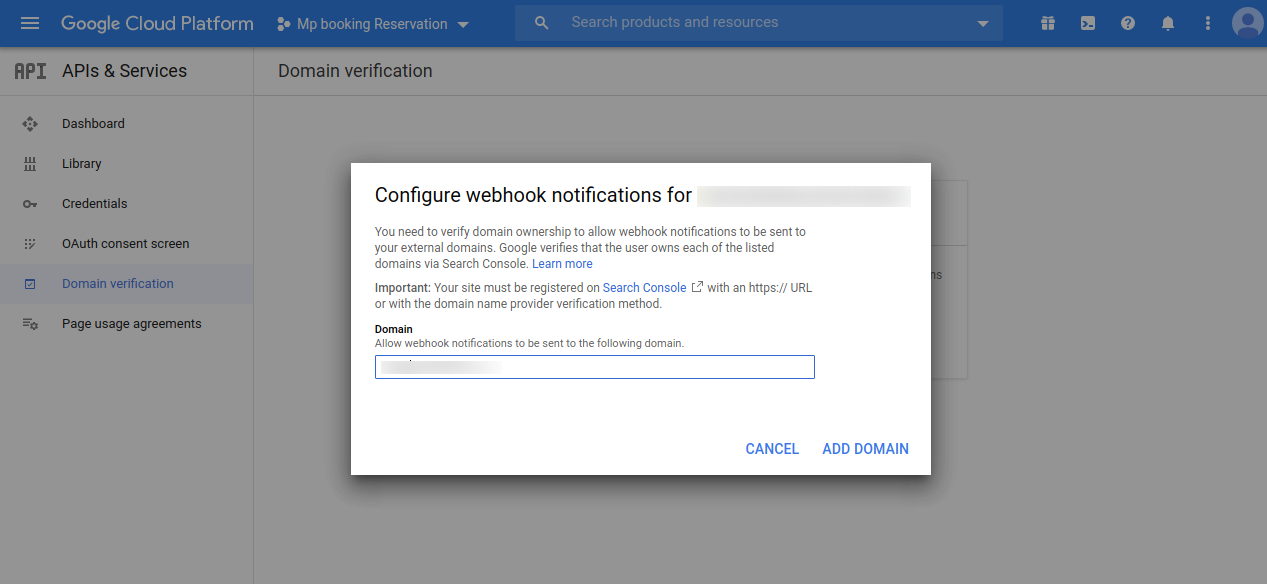
Initially, on the Google Cloud Platform page, the user must navigate to APIs & Services > Domain verification as shown below.
Furthermore, this navigates the user to the Domain Verification page, where the user needs to click on the Add Domain button.
Now the next, a popup shall appear as shown in the image, where the user needs to fill in the Domain URL (https://example.com/) in the text box and click the ADD DOMAIN button.
Then on clicking the ADD DOMAIN button, another popup opens up bearing the name Verify ownership.
Now, the user must click on TAKE ME THERE, to proceed further.
On clicking the same, it redirects the user to the Webmaster Central page as shown in the image below.
The user must click on ADD A PROPERTY button present on this page.
A textbox opens up where the user needs to add the URL of the property that the user wishes to verify and click on Continue.
Google recommends some steps that the user must follow to verify the URL of the property.
Thereafter, the user can tick-mark the I’m not a robot checkbox and further click Verify button.
Once the verification process is completed, the following page shall appear.
Enable Google API Keys
To enable the Google APIs, the user must open up the Google Cloud Platform page and navigate to the Credentials page.
The user will find All Google Maps APIs dropdown, clicking which the user needs to click on the ENABLE API.
In doing so, a list of Google APIs opens up. If users don’t find the required API, they can type the name of the API in the search box and search for it.
To enable the API, the user needs to click on it.
Geocoding & Maps JavaScript APIs
Geocoding API: Enable
Maps JavaScript API: Enable
Places API: Enable

Admin Configuration
So, install and enable the Marketplace Hotel Booking and Reservation Module. Also, you will have to install and enable(already included in the main module) the under-given modules –
- Advanced Layer Navigation
- Marketplace Hotel Search
- Popular Hotels

Advanced Layer Navigation
Now, click on the edit button for the module “Advanced Layer Navigation” and another page opens up. Here the admin will enable the module and the “Attribute Group List” named price as shown below in the screenshot.
Marketplace Hotel Search
Furthermore, after clicking on the edit button, a new page will open up from where the admin can configure this module. Here, the admin will enable the module for use.
Popular Hotels
Afterward clicking on the edit button, a new page will open up from where the admin can configure this module. Here, the admin will enable the module for use and add the popular hotels that will be visible at the front-end home page.

Marketplace Hotel Booking And Reservation
Thereafter clicking on the edit button, a new page will open up from where admin can configure the module. The admin also can enable or disable the module.
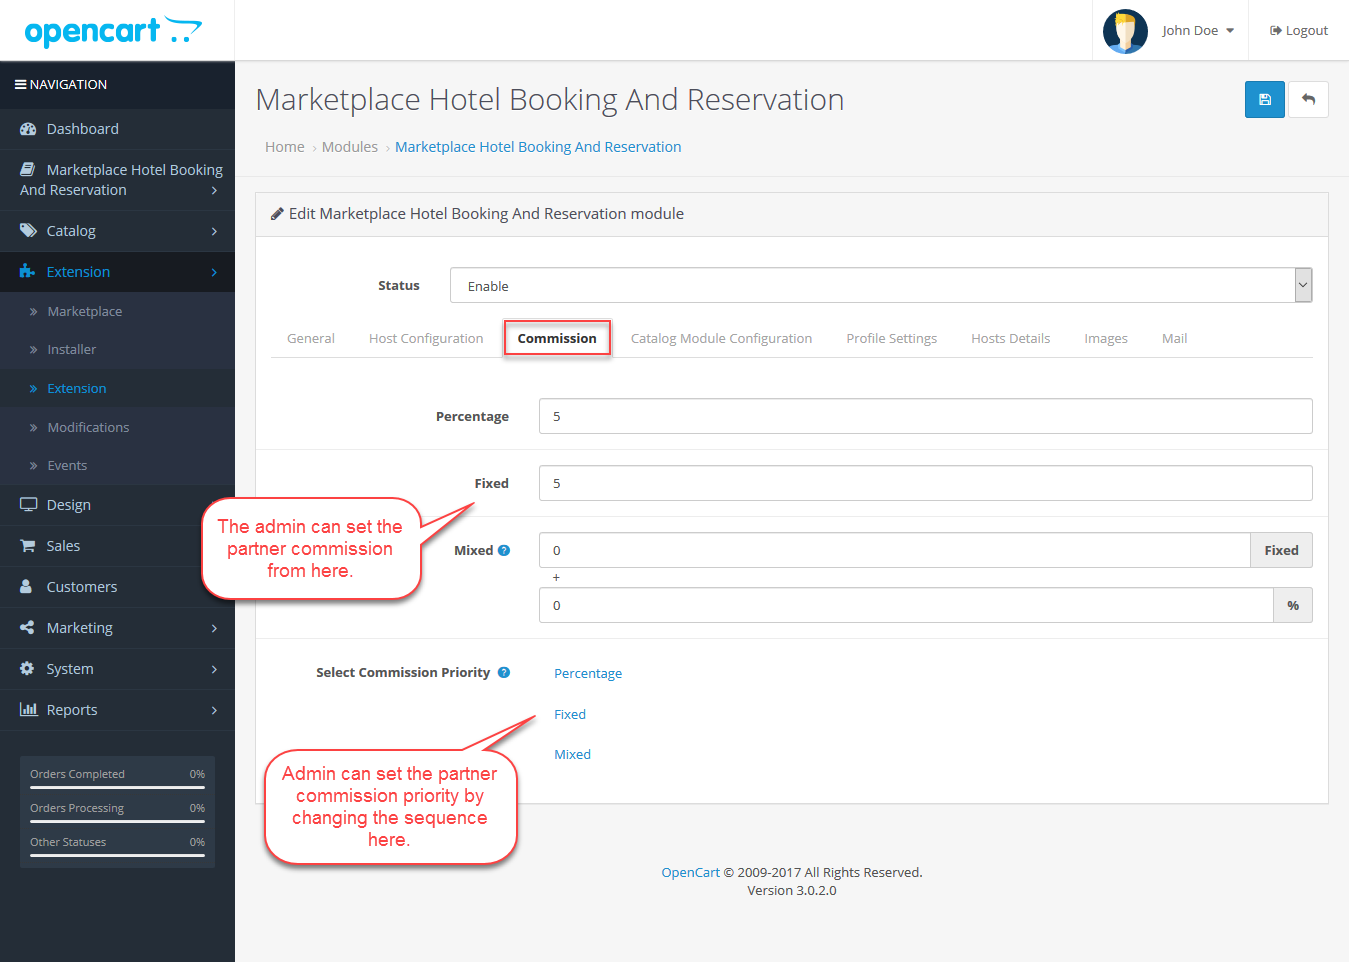
Even various tabs (General, Host Configuration, Commission, Catalog Module Configuration, Profile Settings, Host Details, Images and Mail) for different settings are visible on this page.
General
Here admin can enable or disable various options for hosts, such as Automatic Hotel Approval, Automatic Room Approval, Fixed Facility access, etc. Apart from enabling and disabling the options as per need the admin can also –
- Enter the Google Key
You have to enter the Google API key that is used to generate the map. - Set the Hotel Range Display
The hotels within the specified range will be shown during the search. If this field is left empty then all the hotels will be shown.
Host Configuration
Here admin can enable Host Registration Page, Automatic Partner Approval if the customer can contact partner, notifications to admin, if the partner can edit or delete hotel reviews and if the partner can cancel bookings. The admin can also select what to do with a host’s – Delete All or Assign Admin for a host’s rooms and hotels after the host is deleted.
The admin can also set the limit for the host for – the addition of hotels, rooms, fixed facilities and optional facilities. The hosts will only be allowed to add the set number of hotels, rooms, and facilities.
Commission
Admin can set the commission rates from here and can also set the commission priority as per the requirement.
Catalog Module Configuration
Here admin can choose which options or menus he wants to provide to the host’s in their account. The admin can also set the sequence of these menus.
Profile Settings
Here, the admin can select the fields which he wants to display on the host’s profile. The admin can also choose whether customers can see the host’s emails id and telephone number or not.
Host Details
Here, under the General tab the admin can provide the host’s Registration Page Heading and Button title.
Under the Hotel Policies Tabs, the admin can add the hotel policy tabs which will be visible on the host’s Registration Page. The admin can enter the Tab Title and the Sell Description.
Images
Under this section the admin can add the host central page image and the header image for the host central page.

Here, the admin can choose the mail templates for various conditions which will occur in the Marketplace Hotel Booking System and can also make use of the mail keywords within the emails.
Set The layout –
1. Now, navigate to Design->Layout and create a new layout Hotel Home by clicking the add button at the top right-hand side.

After that set the layout name as Hotel Home, set the Route as common/hotel_home and choose the position of the modules. Set the Marketplace Hotel Search position to Content Top and For Popular Hotels set the position to Content bottom.
2. Go to Category layout and edit it. Set the Route as product/category and under modules for the Column Left set Marketplace Hotel Search and Advanced layer Navigation and then save the configuration.

3. Lastly, go to Account layout and edit it. Set the Route as account/% and under modules for the Column Right set Marketplace Hotel Booking And Reservation and Account and then save the configuration.

For managing Hotels and Hotel Hosts, the admin has to go to Marketplace Hotel Booking and Reservation. Here, the admin will see 2 sub-menu options –
- Hotels
- Hotel Hosts
Admin Management – Hotel Hosts
On clicking Hotel Hosts, a sub-menu will open where admin can see –
- Hosts
- Income
- Transactions
- Mails
- Host Reviews
- Queries
Now, we’ll discuss each, one by one.

Hosts
In here, the admin can see all the hosts of the marketplace. The list of all the registered hosts will be displayed here. The admin can approve partners’ requests from here and can also cancel any host’s partnership with the marketplace. If the admin wants then he can also delete any hosts as well. The admin will also be able to view and edit the host details.
On clicking edit, the admin will see the Hosts’ details page and admin can edit or modify any information if he wants.
Income
Under Income menu, the admin will be able to see all the income details of the hosts. Admin will be able to pay the hosts from here. Admin’s commission amount will be deducted from the total income of partner and rest of the amount can be paid to partner by just simply clicking the “Pay” button.
Transaction
Here admin can see all the transaction history i.e. the amount that the admin has paid to hosts.
Mails
Here admin can create Mail templates for the various condition that can occur in the marketplace. Admin can also edit or delete any previously added templates.
Add Mail
On clicking on the ‘Add Mail‘ button, the admin can add new mail template. Here, the admin has to enter the mail name, subject, and message (mail body). Admin can also view the mail keywords and other information by going to the Info tab.
Host Reviews
Here admin will see all the reviews made by the customers for the marketplace partners. Admin can edit or delete these reviews. Admin can also show or hide these reviews from the front-end by enabling or disabling them.
Edit Review
Queries
Admin can see the customer queries made for the marketplace hosts. Also can edit or delete these queries. Even the store owner can also show or hide these queries from the front-end by enabling or disabling them.
Admin Management – Hotels
On Clicking Hotels under Marketplace Hotel Booking and Reservation, sub-menus will open up where admin can see –
- Hotels
- Rooms
- Fixed Facilities
- Optional Facilities
- Hotel Reviews
- Book Rooms
- All Bookings
We’ll discuss each, one by one.
Hotels
Here the admin can see the list of all the hotels present in the marketplace. The admin can – approve the Hosts created/added hotels. The admin can also edit or delete any hotel if he wants and can also add new hotels from here.
Add Hotel
The admin can add a new hotel by providing the Hotel name, description, meta tag title and other information.
Under Data tab, the admin has to set the status for hotel and also can add the hotel image.
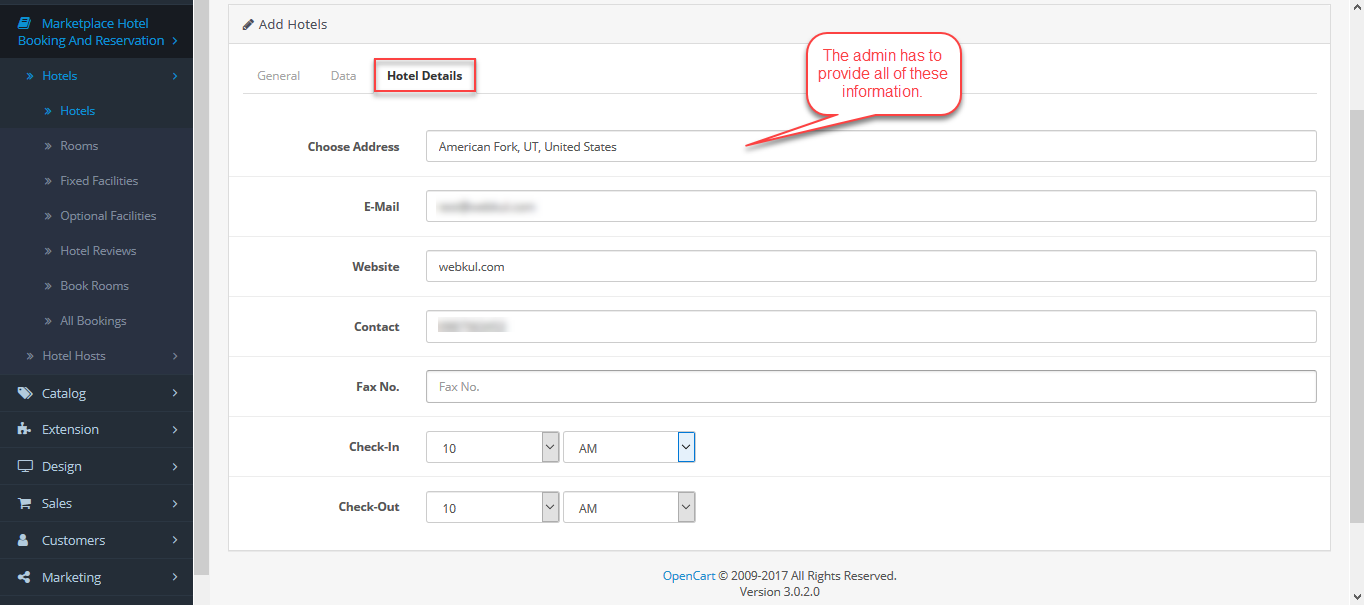
 Under Hotel Details tab, the admin has to choose the hotel address, enter the email id, website, contact info and Check in & check out timings.
Rooms
Here the admin will see the list of all the rooms present in the marketplace. The admin can approve host’s created/added rooms. Admin can also edit or delete any room if he wants. Admin can also add new rooms from here.
Add Room
Here admin can add new room by providing the Hotel name, description and meta tag title.
Under Data tab, admin has to enter the room charges(per night), quantity of people that can stay in the room, maximum number of adults and children that can stay in room, room booking from and till date. Admin can set the room status as enable or disable.
Under Hotel tab, admin has to select the hotel to which he wants to assign the room.
Under the Fixed Facilities tab, the admin can add fixed facilities to the room. Only the already added fixed facilities will be displayed here and admin can choose from them only.
Under Optional Facilities, the admin can add optional facilities to the room. Admin can set the prices and status for the facilities.
Under the Image tab, the admin has to upload the room images. And then after filling all the tabs admin has to click on the save button to save and add the room to the marketplace.
Fixed Facilities
Here admin can create/add fixed facilities that will be used while adding or editing a room. These facilities can then be added to the rooms. From here admin can approve the host’s created/added facilities. The admin can also edit or delete any facility if he wants. Admin can also add new facilities from here.
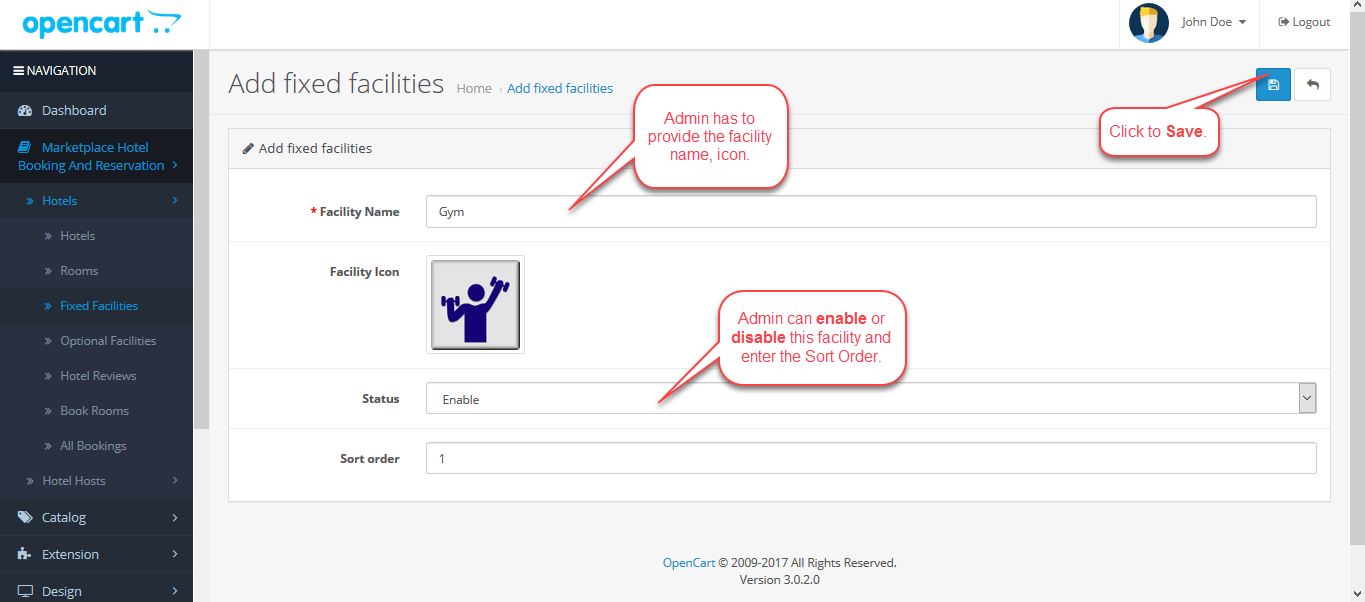
Add Facility
Admin can add a new facility by providing the facility name, icon and status.
Optional Facilities
Here admin can create/add optional facilities that will be used while adding or editing a room. These facilities can then be added to the rooms. From here admin can approve the host’s created/added facilities. Admin can also edit or delete any facility if he wants. Admin can also add new facilities from here.
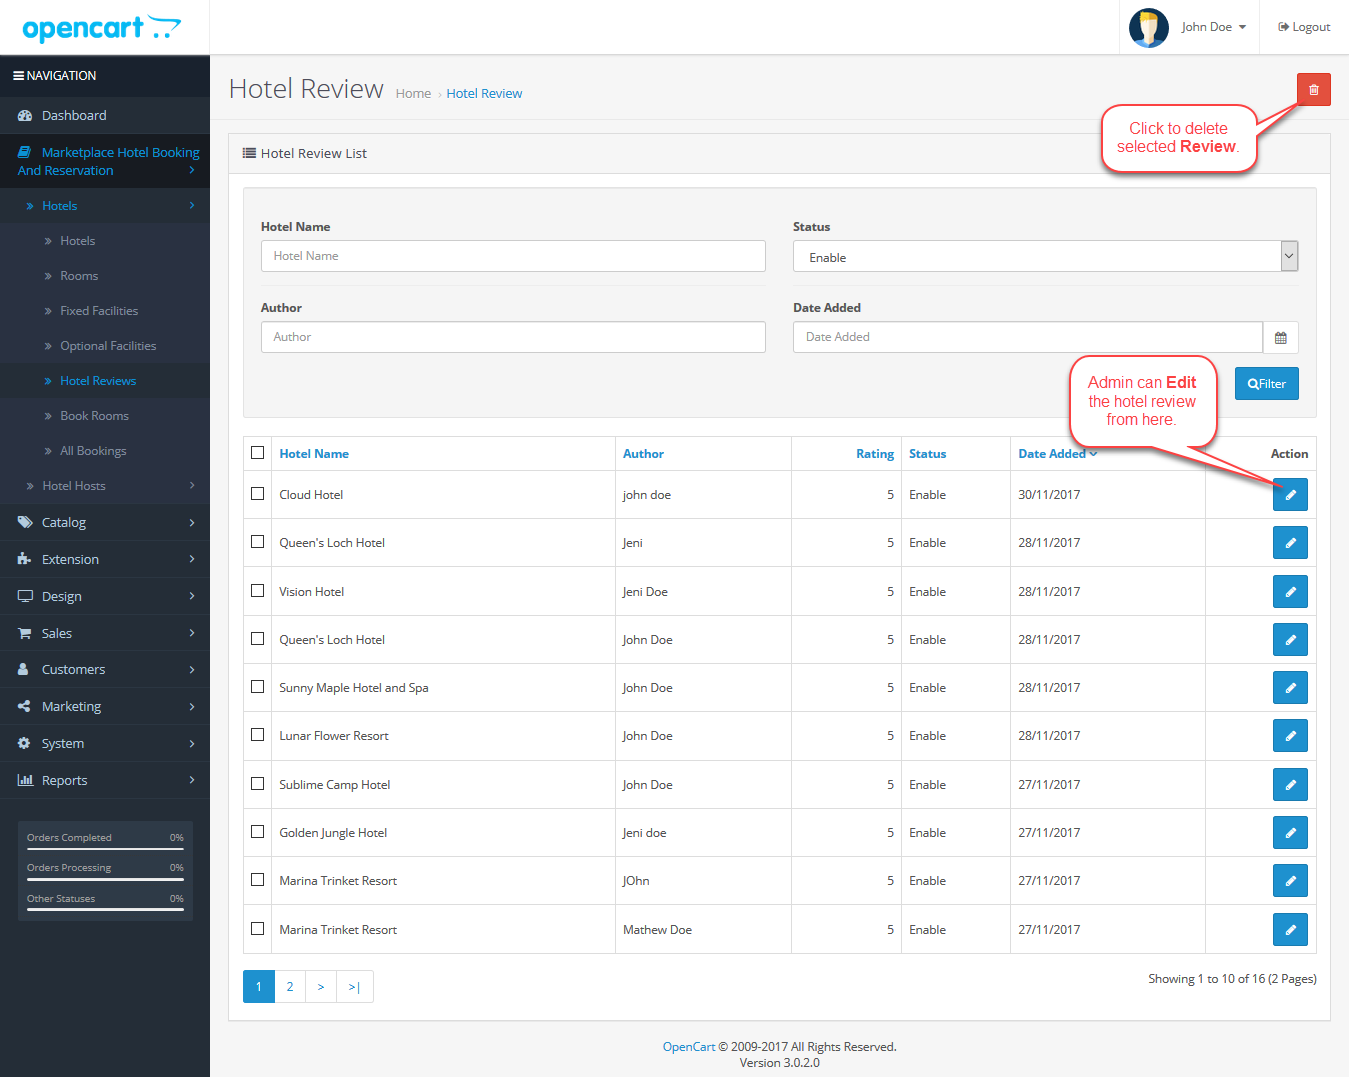
Hotel Reviews
Furthermore, the admin can see all the hotel reviews from here and can also edit them as well. Even can also delete any review if he wants.
Moreover, the admin can choose to display this review on the front-end or not by enabling or disabling the review status.
Edit Review
Book Rooms
Further, from here admin can book rooms on behalf of customers. Even the admin can select the hotel and room, check-in & check-out date, and other information and can then check the room availability. If the room is available then the admin can book the room.
Furthermore, the admin has to provide all the customer, payment details shown in the below screenshot and can then book the room for the customer.
All Bookings
Admin can see the rooms list under the All Booking tab. Here admin can click on “Booking” and can see all the bookings for that room.
On clicking “Booking“, the admin will see all the bookings for that room and can export all the booking history from here. The admin can also cancel any booking if he wants.
Host – Management
Registering as a Host
There is an option for registering as “Host” at the top right-hand side corner. Clicking the “List Your Hotel” link will bring up a section where the Hosts can register or login to their account panel.
After clicking the option “List Your Hotel“, the host will be redirected to another page. Here, the customer can register himself as a host or login to his host account.
Clicking the Register option will bring the registration section. Here, the host will enter his details like – First Name, Last Name, Email, telephone, and password. After entering the information, the customer will click Step 2 to proceed further.
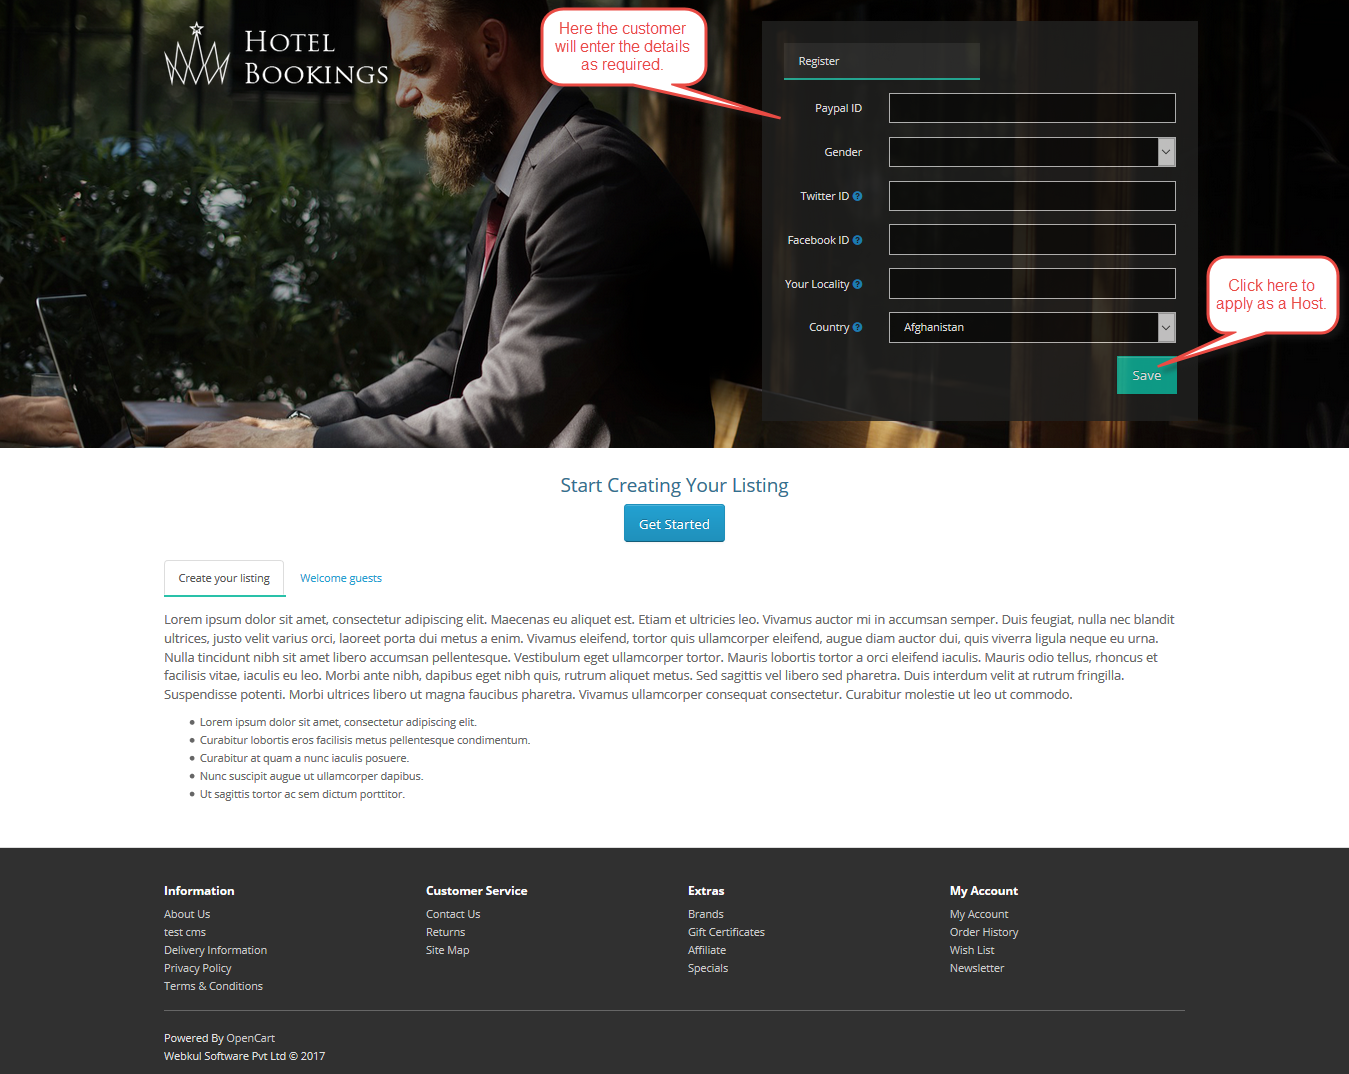
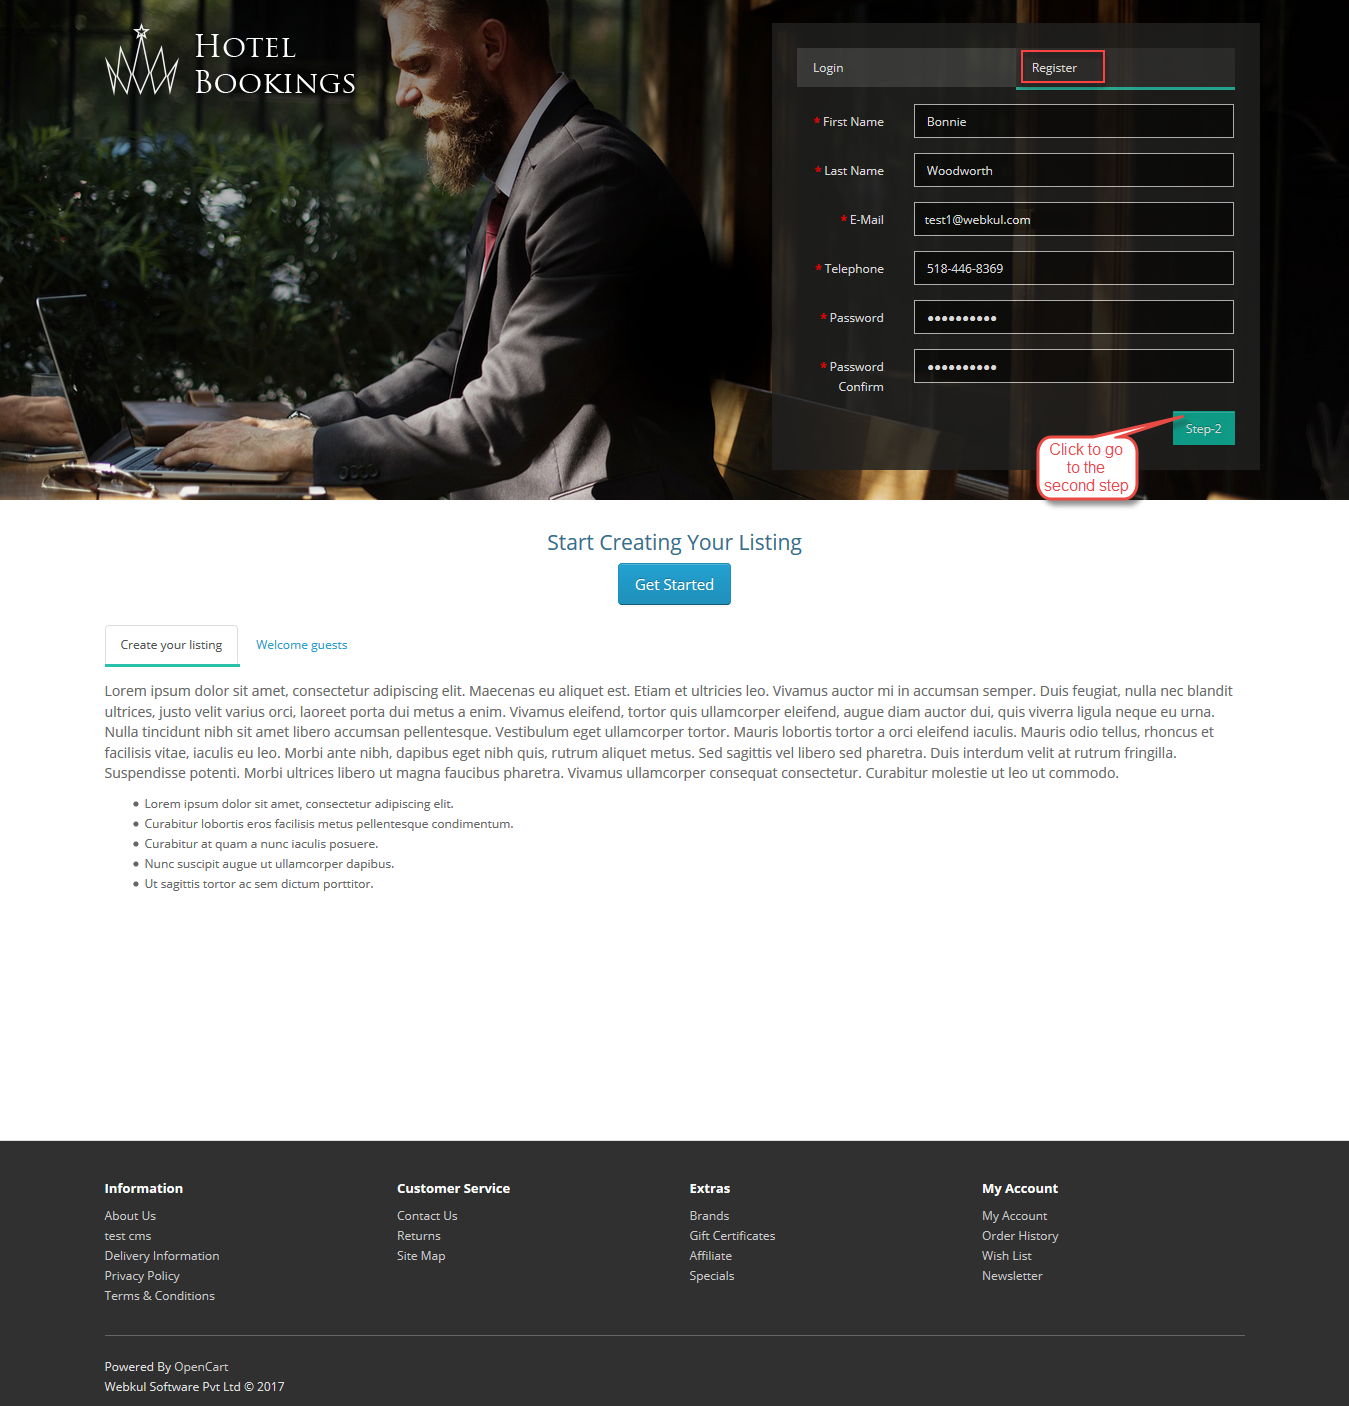 Clicking Step 2 will bring another section, wherein the host needs to enter the details like – The Host’s PayPal ID, Gender, and other information. After that, the host will click on the Save button to register as a Host.

Registering as a Customer:
When a customer visits the Hotel Booking site, he can go to My Account option and under it can see the Register and Login option.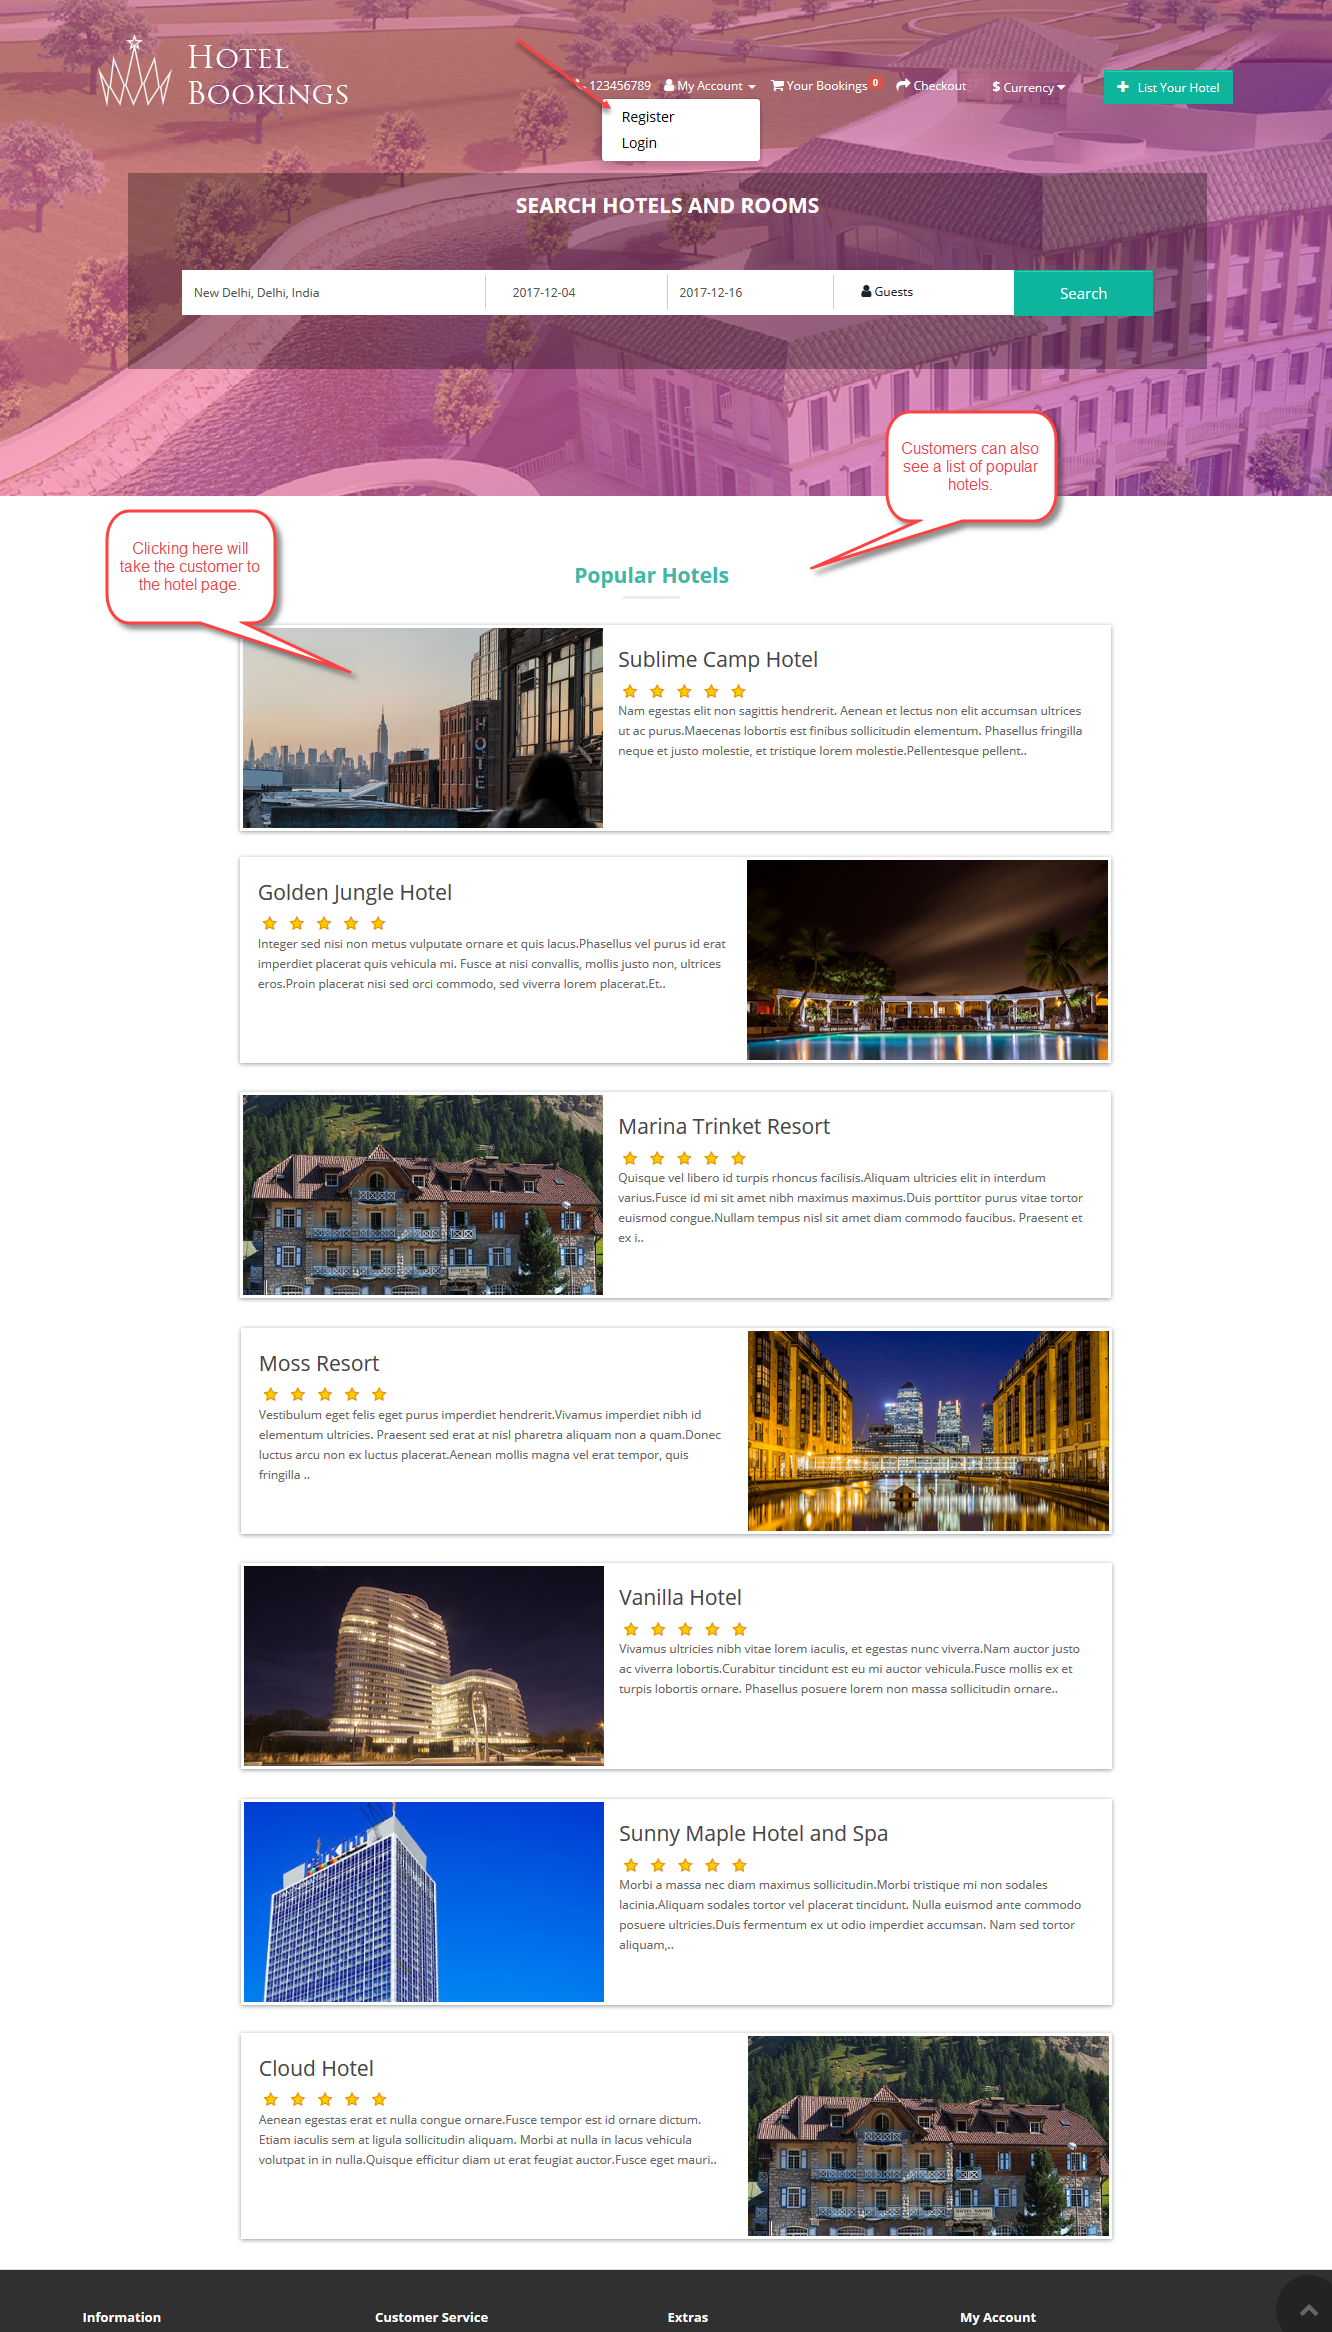
If the customer is new, then he can choose Register and then the customer registration page will open. Here, the customer has to fill the registration form and at the bottom of form check the terms and conditions check box and then click the continue button. After that the customer will be logged in.

If the customer has already registered, the customer will directly click the “Login” under the My Account option to login to their account panel.
If any already registered customer wants to become the host of the marketplace then he can request for becoming a host by clicking on “List Your Hotel” option visible at the top right-hand side side under their account panel.
After the customer clicks the “List Your Hotel” button, Host Registration Page will appear. Here, the customer can enter the required information and can then click on “Save button and then host request will be sent to the admin.
After applying for the host, the customer under their account panel can see the Option – “Pending Host Approval” in place of “List your Hotel” as shown below in the snapshot.

For the Host:
When the partnership is approved by an admin or auto-approved then the host can see various new menus that have been enabled by admin for the hosting account. These menus are Profile, Dashboard, Transactions, Hotels, Rooms, Fixed Facilities, Optional Facilities, Hotel Review, All Bookings, Queries, and Ask to Admin.

Profile
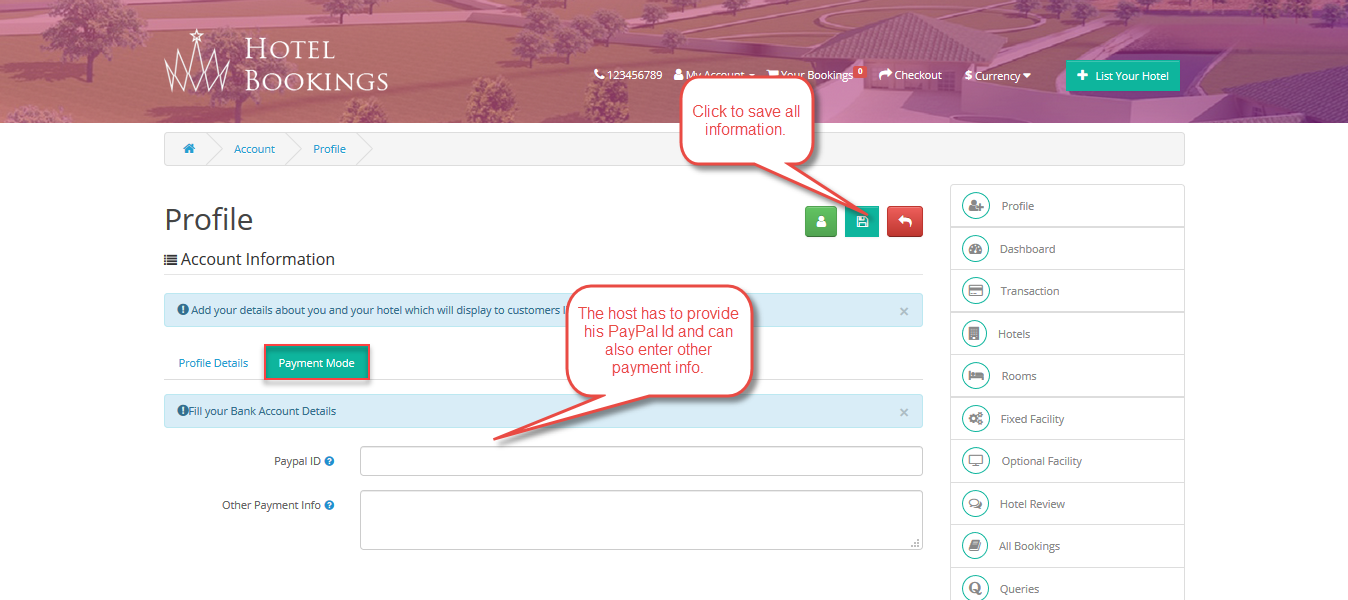
The host can edit his profile details like shown below.

Under the Payments Mode tab, the Host can add his PayPal ID or any Other Payment information so that money can be transferred to those accounts.
Dashboard
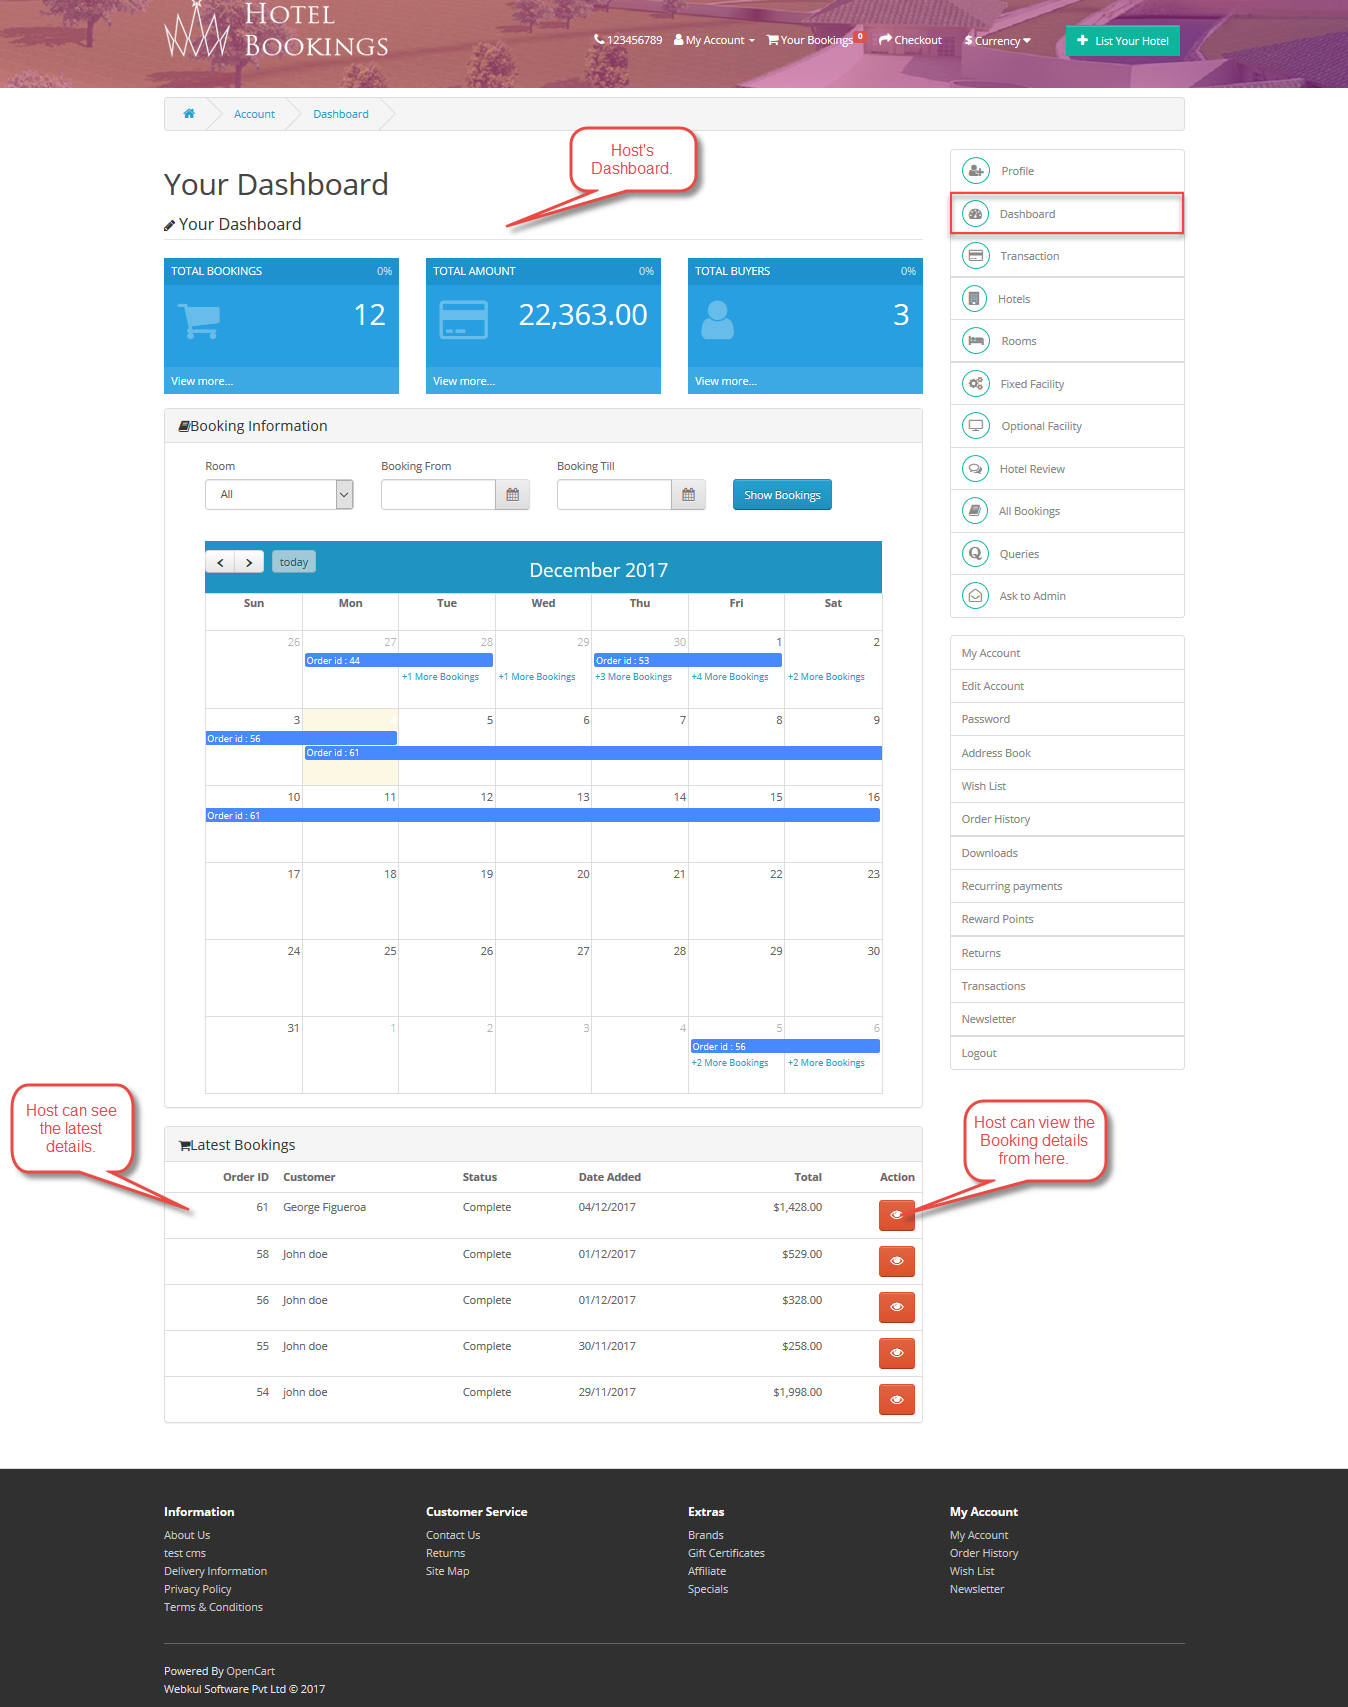
Here, the host can view the summary of his account, bookings, etc.
Transaction
The host can see all the transaction history from here. Here, all the transaction history of payments made by the admin to the host will be displayed.
Hotels
The hosts can see their list of all hotels created by them. Hosts can add new hotels, edit already added hotels, or even can delete the hotels.
In case the host has reached the limit and added the number of hotels allowed by the admin then host cannot add any more hotels.

Add Hotel
The host has to enter the hotel name, description, and meta tag title for the hotel.
And under the Hotel Details tab, the host can enable or disable the hotel status, can upload the hotel image, enter the hotel details such as an address, email id, website, contact info, and Check-in & check out timings.

Rooms
Here the host will see the list of all the rooms added by him in the marketplace. The host can also edit or delete any room if he wants. The host can also add new rooms from here. In case the host has reached the limit and added the number of rooms allowed by the admin then the host cannot add any more rooms.
Add Room
The host can add a new room from here by providing all the required details such as room name, description, and meta tag title for the room.
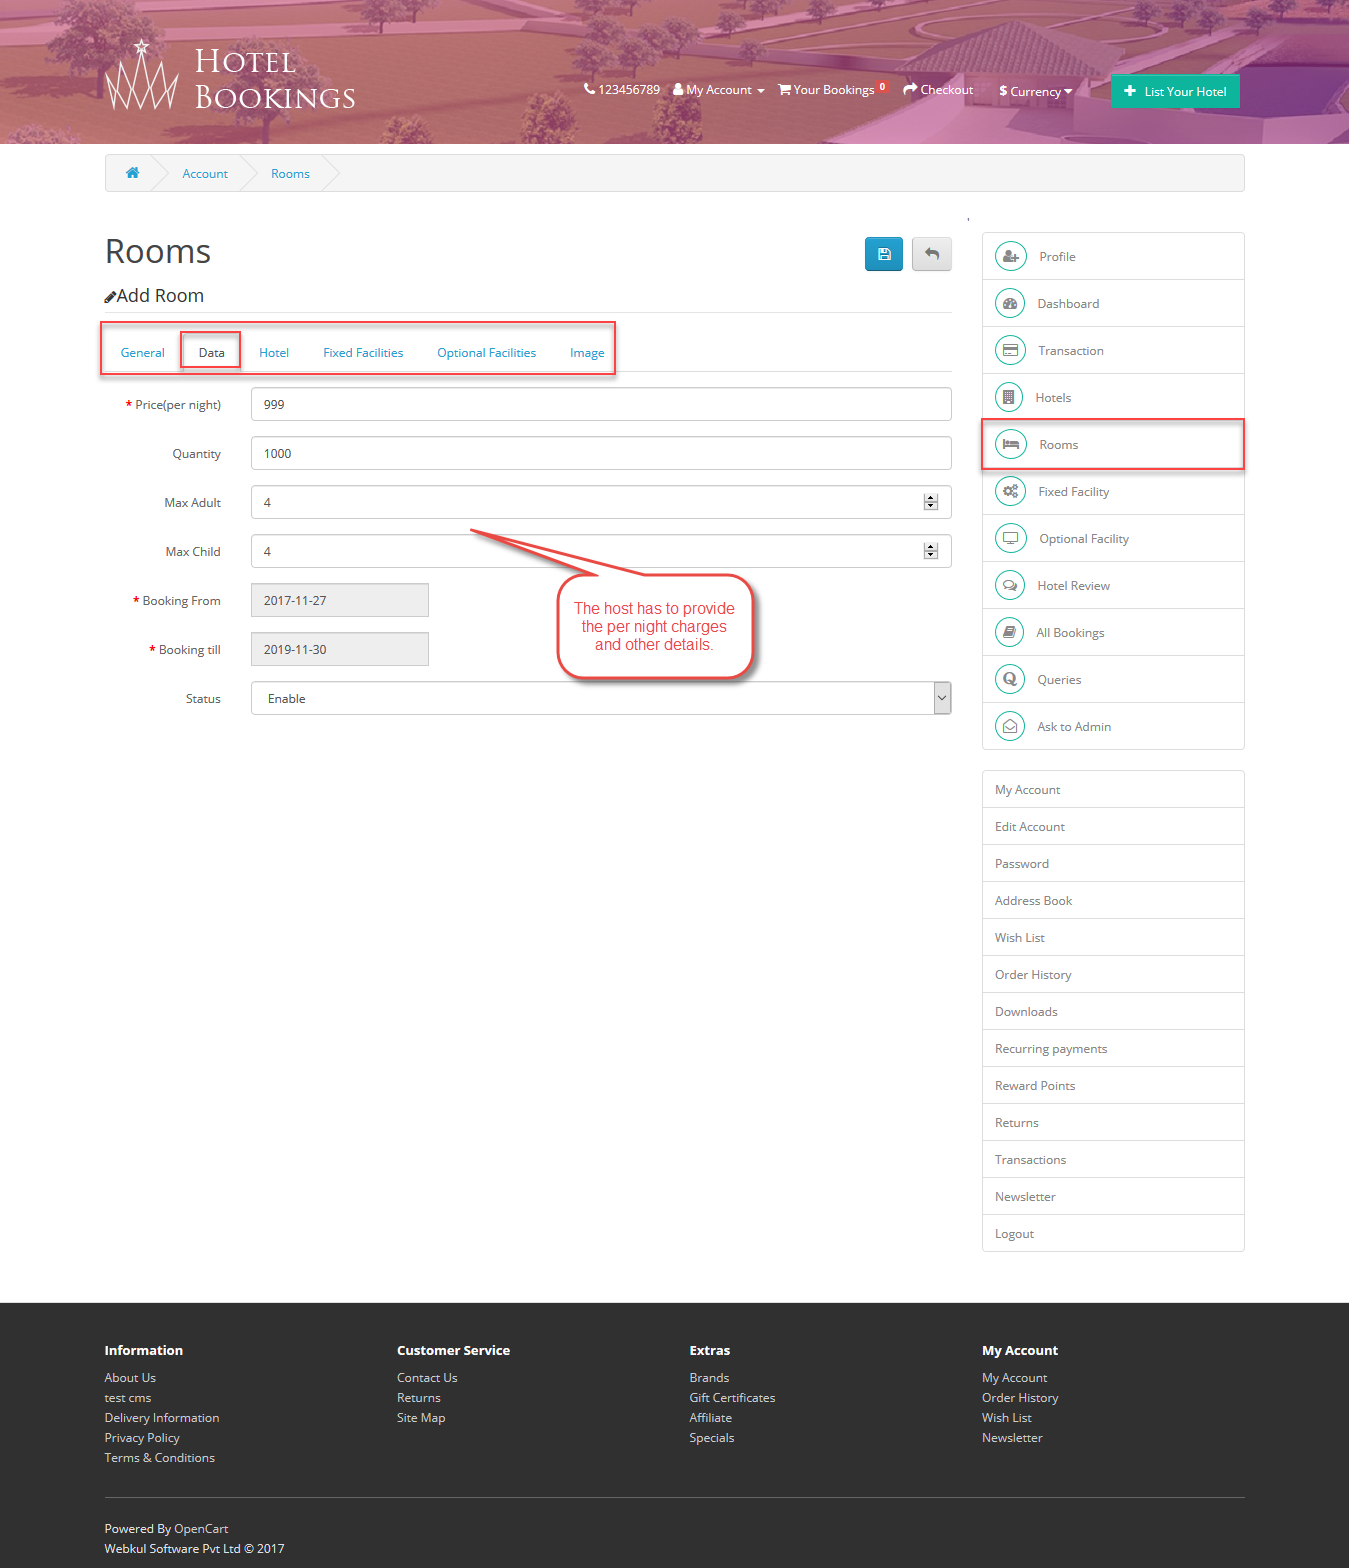
Under the Data tab, the host has to enter the room charges, the number of people that can stay in the room, the maximum number of adults and children that can stay in the room, room booking from and till date. The host can set the room status as enabling or disable.
Under Hotel tab, the host has to select the hotel to which he wants to assign the room.
Under Fixed Facilities tab, the host can add fixed facilities with the room. Only the already added fixed facilities will be displayed here and the host can choose from them only.

Under Optional Facilities, the host can add optional facilities to the room. Host can set the prices and status for the facilities.
Under Image tab, the host has to upload the room images. And then after filling all the tabs host has to click on save button to save and add the room to the marketplace.
Fixed Facilities
Here the host can create/add fixed facilities that will be used while adding or editing a room. These facilities can then be added to the rooms. The host can also edit or delete any facility if he wants. The host can view the facilities created by the admin.
Add Facility
The host can add a new facility by providing the facility name, facility icon image, and status.
Optional Facilities
Here the host can create/add optional facilities that will be used while adding or editing a room. These facilities can then be added to the rooms. The host can also edit or delete any facility if he wants. The host can view the facilities created by admin.
Hotel Reviews
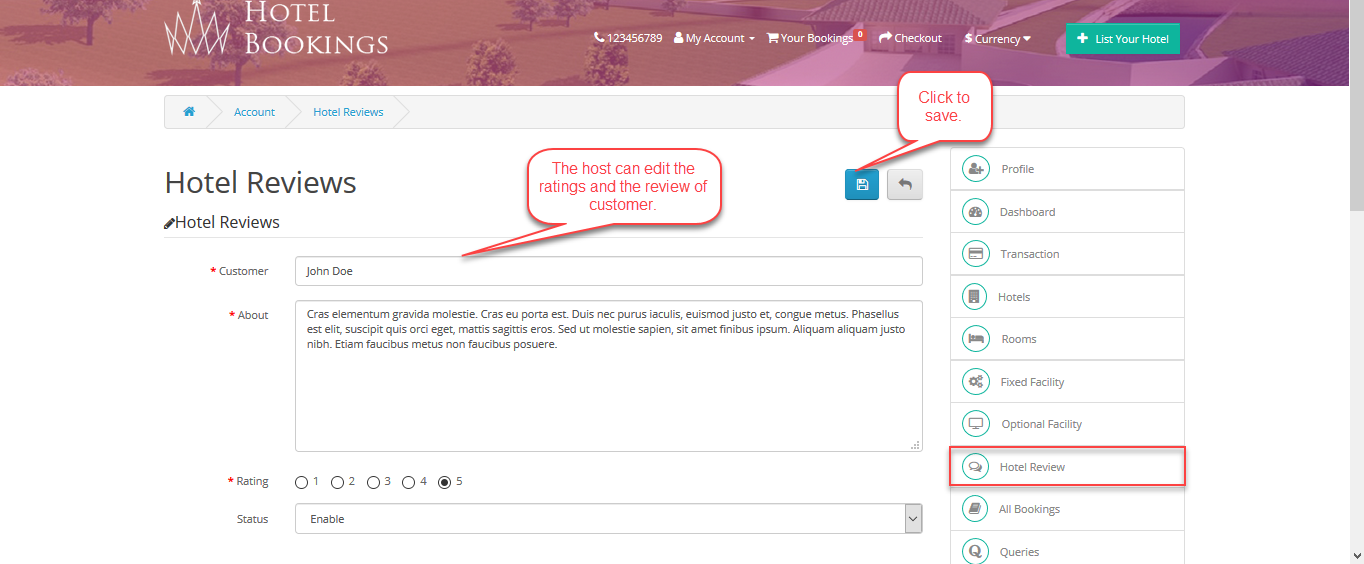
Under this section, the host can find all the reviews that have been added for his hotels. The host can also edit any of the reviews.

Even the host can edit the reviews and can save the changes as well.
All Bookings
Here the host can see and manage all the booking for his rooms. Host can view the details for bookings.
On Booking details page, host can see who made the booking, check-in and check-out dates and other information. Host can also cancel the booking if he wants by just simply clicking on “Cancel” button.
Queries
Here the host will see the queries that are made by the customers. The admin approved queries will be displayed here.
Host can view the query details like shown in the screenshot below and can respond to the query through the email.
Ask to Admin
Using this menu, the host can contact the admin and can ask their queries.
Customer Management
After the installation and configuration (admin rooms and hotels), the customer can see a wonderful page on the front-end like the below image.
Here, the customer can search the hotel rooms by entering the hotel name or the name of a place and selecting the check-in date, check-out date, selecting the number of adults, children, number of rooms required and clicking the “Search” button as shown below in the screenshot.
After clicking the “Search” button, the customer will be redirected to another page. Here, the customer can see a list of hotel rooms available for the check-in and check-out time for all the available hotels as shown below in the screenshot.

After clicking on the “View More” button the customer will be taken to the hotel page having the details of the hotel – like description of the hotel, room type description, room amenities, available amenities, customer reviews, and leave response where the customer can write their review about the hotel and can check other customer reviews as well as shown below.

Hitting the More Details button for the room you can see the details, amenities, and the reviews(you can also add the reviews) as shown below in the snapshot.

Customers can also contact host with their queries by clicking the Contact Host button.
After clicking the “Book Now” button the room gets added to the cart and you can see the details as well. Now click the Checkout button to proceed further.

Tapping the checkout button will take the customers to the page where they have to select an existing address or can add a new one as well. After that, click the Continue button.
Clicking the continue button will take you to the payment section. Here, the customer has to select the payment method and then click the continue button.

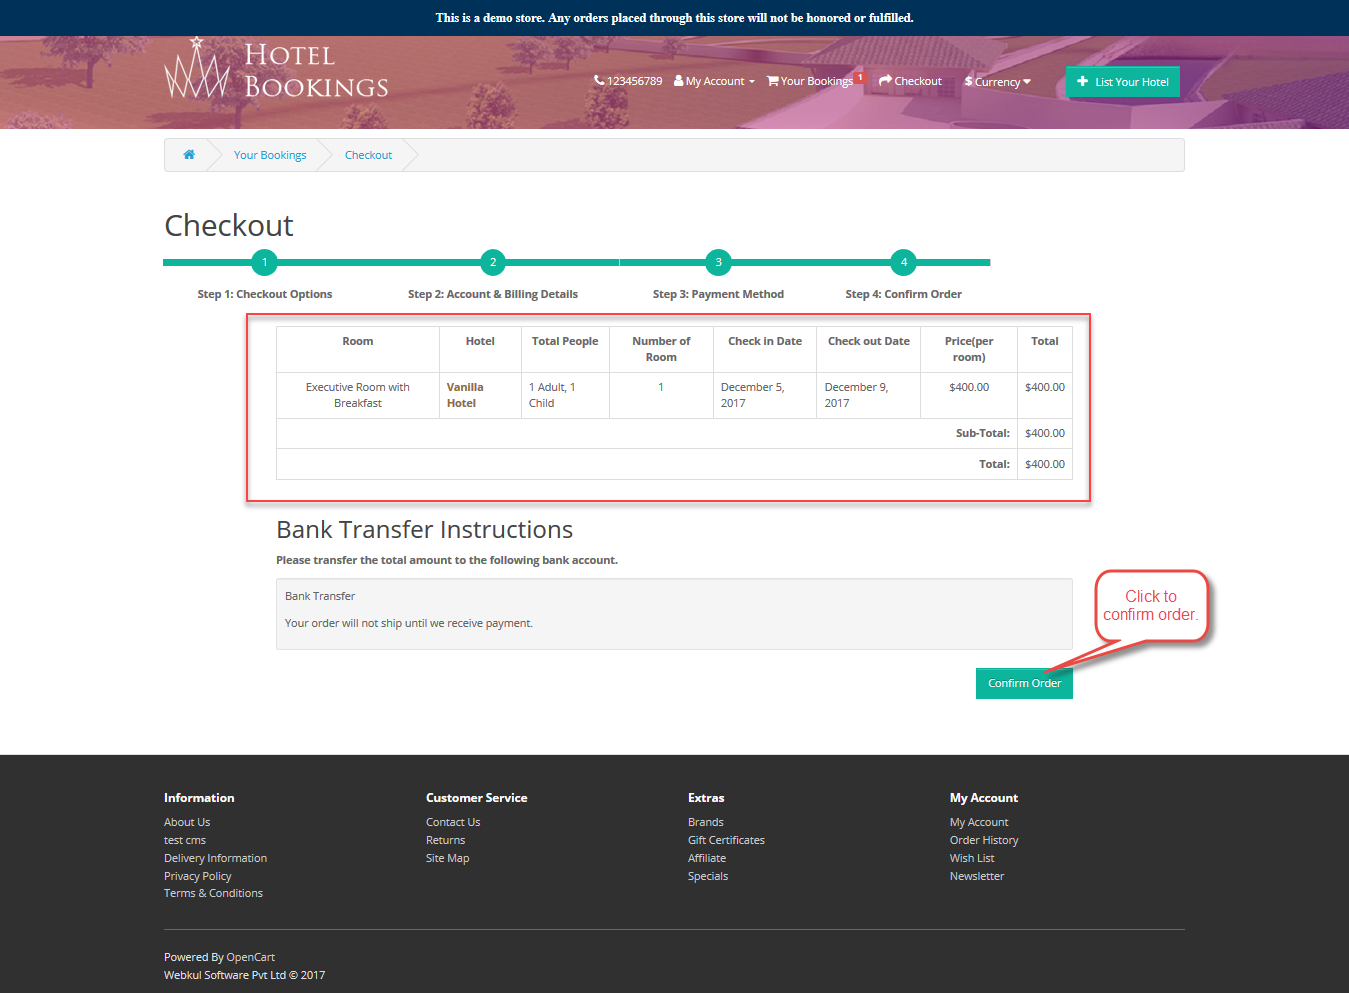
Tapping the continue button in the above section will take the customer to the Confirm Order page. Here, The customer can confirm the order details by clicking the “Confirm Order” button as shown below.
The customers will be able to see the order details under “Booking History” as shown below. rama
Hence, that’s all for the Opencart Marketplace Hotel Booking System module, still, have any issue then feel free to add a ticket and let us know your views to make the module better https://webkul.uvdesk.com
Current Product Version - 3.0.2.10
Supported Framework Version - 2.x.x.x, 3.x.x.x
















Be the first to comment.