Opencart Headless PWA (Progressive Web Applications) uses web compatibilities to provide fast, reliable and engaging mobile application experience to your users.
Front-end of Opencart Headless PWA is build using the React-Js which provides an advanced and rich experience to its users.
Opncart Headless PWA is developed in a way that offers the same experience to the users as a native Android or iOS application.
Features
- It provides a fast user experience to the users as it is lightweight.
- The users can also use the PWA’s in the poor network connection too.
- Easy to customize because the frontend is built on React JS.
- Support Push Notifications
- Works in offline mode.
- Support Android and IOS.
- PWA’s are responsive on all the platforms which provide cross-browser compatibility.
- It provides a feel of a native app.
- There is no need to update the app regularly as it is not a native app.
- The users can easily add the app to the home screen by visiting the website.
- The App provides a better User Interface and fast experience to the users which helps to increase the sale and generate more revenue.
- The admin can set the splash background color, application header color, application icon, application name, and application’s short name.
- The Admin can manage or add banner images, notifications, featured products, category icons, and custom collection.
Note: The Opencart Headless PWA runs on HTTPS (Hyper Test Transfer Protocol secure) only.
Watch the below video tutorial to understand the extension workflow :
Installation
The installation of the Opencart Headless PWA is very simple. The admin just needs to move or upload the admin, catalog, and react-app folders into the Opencart root folder.

Note – You can also install the Opencart Headless PWA module by uploading the ZIP or XML file from the ocmod folder. Please upload the ZIP file for version 3.X and upload the XML file for version 2.X.
After transferring the folders, use the extension installer for uploading the wkpwa.ocmod.zip file which you will find in the ocmod folder.

Now go to the Extensions>Modification then click on refresh button as shown in the image below –

Now in the Admin panel go to System>Users>Usergroup and edit ‘Administrator’ and select all for both Access and Modify Permission then save it.

After that under Extensions>Modules, you can install or edit the module.

Module Configuration
Using the Opencart Headless PWA, the admin can configure the module from the admin panel easily and it can be done by navigating to Extensions> Extensions> Modules> PWA-Webkul

Here, the admin can –
Status – Enable or Disable the module as per their requirements.
Edit General Settings –
FCM Authorization Key – The admin can enter the FCM Authorization Key here. It can be generated after registering for the Firebase Console. Click here to know how to get FCM Authorization Key
Edit Notification Settings –
Notification Status – The admin can Enable or Disable the notification as per their needs.
Application Name – The admin can enter the Application Name here.
Application’s Short Name – The admin can enter the Application’s Short Name here.
Application Icon – The admin can upload the Application Icon here that will be displayed to the users.
Splash Background Colour – The admin can select the Background Colour for the Splash Screen.
Application Header Colour – The admin can select the Header Colour for the Progressive Web Application.
How to Run and Deploy Opencart Headless PWA On Server
You will need to navigate react-app/src/constants/constants.js and then change the base_url with your opencartbase_url.

Now you will need to run and deploy Opencart Headless PWA on your server. You will need to run these commands where you have installed the application.
First Command – npm install
Second Command – npm run-script build
This will create a build folder in the react-app folder that will contain some files as shown in the image below, and then you will need to copy and paste this build folder on the server where you have installed the Opencart Headless PWA.

How to Get FCM Authorization Key –
In order to use this module, you need to have Firebase Project Credentials, which will be used in the Opencart Headless PWA configuration. Please visit this link and create a new project with your Gmail account.

1. After opening the Firebase website, please click the CREATE NEW PROJECT button as shown in the above screenshot.
2. A small pop-up window will appear with the name of Create a project, here you have to enter your Project Name and then select your Country/Region.
3. After completing the details click the CREATE PROJECT. Thus you will receive the message displaying your new project is ready and then click on the continue.

4. After creating your new project add firebase to the app.

Now register the app by providing the app nickname and click on the register as shown in the image below –

After registering the app now click on the Project Setting as shown in the image below.

Now move to the Cloud Messaging tab from here and you can get the Server Key (FCM Authorization Key) which will be used to configure the module.

Manage PWA
Now from the admin dashboard, the admin can manage the PWA and its features. Here, the admin can manage the –
- Banner
- Notification
- Featured
- Category icons
- Custom Collection

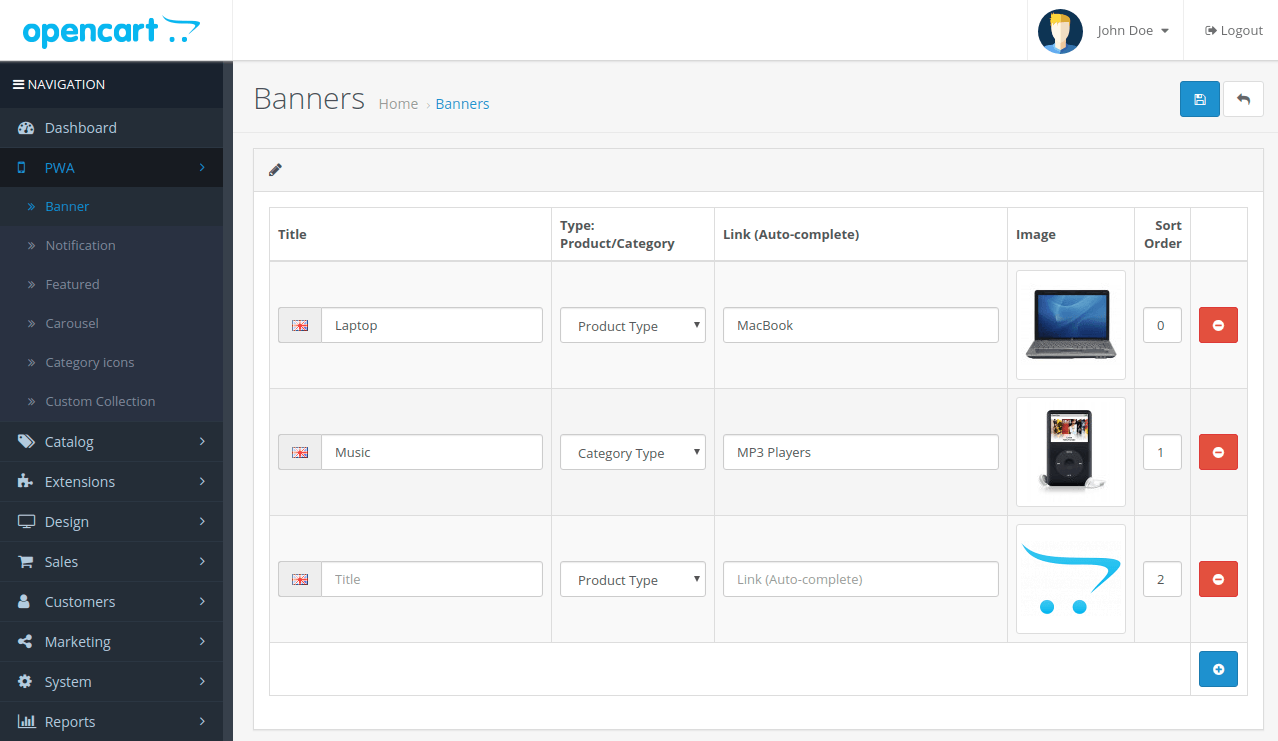
Manage Banner –
The admin can manage the banner for the PWA here. The admin can view the already created banner, create a new banner, select the type i.e. product or category here, link the selected product/ category, upload the image of the banner, sort the order of the banner and also delete the banner from here.

To create a new banner, the admin can click on the “Add button” and create a new banner. Here, the admin can enter the title of the banner, select the type for the banner i.e. product/ category, link the product or category accordingly, upload the banner image, sort the order of the banner, and can also delete the created banner as shown in the image below –
Manage Notification –
From the notification menu, the admin can create and manage the notification. This notification is used to send push notifications to the customer on a PWA.
Here, the admin can also edit the already created notification, filter the notification based on notification title, notification status, notification type, and date added.
To send a push notification, the admin will have to select the notification, and then click on the send button, that is showing on the top-right near to the add button. In this way, push notification will be sent to the users who opt-in to receive the push notification.

To add a new notification the admin can click on the “Add button” and then fill the required details to create a new notification as shown in the image below –

Here, the admin can enter the Notification title, notification content, type of the notification for which the admin wants to create the notification i.e. products, categories, other, etc. Now, the admin can select the product or categories based on the previously selected notification type.
Moreover, the admin can enable or disable the notification, and also select the banner for the notification and then can click on the send & save or save button according to their needs.

The admin can now see the newly created push notification as shown in the image above.
Manage Featured Product –
The admin can manage the featured products that will be displayed to the customers at the front-end. The customer can select the product and then click on the Save button.

Manage Category Icons –
Here, the admin can assign the icons for the available categories. These icons will be displayed to the customers on progressive web applications.
The admin can assign these icons to the categories by navigating to category icons under the PWA menu.
Create And Manage Custom Collection –
The admin can create the custom collection by clicking on the “Add button” and then add the products to the custom created collection. The admin can also delete the created custom collection by clicking on the delete button next to the custom collection.

Here, the admin can add the products to the newly created collection based on the –
Product Ids – The admin can add the products to the custom created collection and select the products as shown in the image below –

Customer View
Now when a customer will visit an Opencart Headless PWA enabled website, the customer will receive a popup to enable notification. The customer will need to allow permission to receive the push notifications using the PWA.

Now, when a customer will click on the “allow” button, the customer will be able to receive the push notification on the PWA.
Add To Home Screen –
After allowing the permission to receive the notification, the customer can click on the “Add OC-PWA to Home screen” to add the app to the home screen.

Now a pop-up will display to the customer to add the app to the home screen. The customer can now click on the “Add” button to add the app to the home screen.

after clicking on the “Add” button, the PWA app will be added to the customer’s home screen as shown in the image below –

Splash Screen –
Now when the customer will open the Headless PWA App, the customer can see the Splash Screen that enables a rich experience for the customers just like a native app.

Home Page –
Now when a customer will open the Headless PWA App, the customer will experience and feel the same as in a native app. After opening the app the customer will be able to see the home page of the admin’s website as shown in the image below –

the customer can view the Popular Products, New Products, Featured Products from the homepage using the Opencart Headless PWA.

View Navigation Drawer –
Customers can view the categories, and manage their profiles from the navigation drawer. The customer can also log in and signup from here as shown in the image below –
to log in or sign up, click on the profile and log in or sign up if you don’t have an account already.

Add Product To The Cart –
Now, the customer can visit the product page

And add the product to the cart as shown in the image below –

Now the customer can select or add the billing address as shown in the image below –

After adding the billing address, the customer can add or select the shipping address

Now, the customer can select the shipping method and then process further to make the payment.

Here, the customer can select the payment method and Make the payment.

After completing the successful checkout the customer can also see the thank you page.

Push Notification –
If the customer allowed permission to receive the notification, the customer will be able to receive the push notification sent by the admin.

Offline Mode –
The customer can access the app even in a flaky network connection. Moreover, in the slow internet speed, the customer can also access the PWA pages once cached.

That’s all for the Opencart Headless PWA. Still, have any issue feel free to add a ticket here – https://webkul.uvdesk.com. Also, let us know your views to make the module better. ツ
Current Product Version - 1.0.0.0
Supported Framework Version - 3.x.x.x
Be the first to comment.