OpenCart Elasticsearch: Now easily integrate the Elasticsearch engine within your OpenCart web store using the OpenCart Elasticsearch extension. Store your entire product catalog on the server where you have to install the Elasticsearch then provide search and autocomplete suggestions for the customers of your web store.
Elasticsearch is a highly scalable open-source full-text search engine. It allows you to store, search, then analyze big volumes of data very quickly. It is the fastest search engine that returns the results of the Enter query in real-time.
Check a brief overview of the plugin working at the store front and few configuration settings –
**Note
- Before installing this module, an Elastic Search Engine must Install on the system then must be running.
- The Elasticsearch version should have version 7.
- This module supports all templates and themes including the Journal theme.
- Opencart Elastic Search module supports the Multi-Store feature of default Opencart.
- For using the new feature of product search based on the location you need to install Opencart Marketplace Hyperlocal System.
- For checking this feature hyperlocal must be enabled.
How To Enable Hyperlocal:
To enable the status of hyperlocal Extensions>>Extensions>>Module>>Marketplace Hyperlocal will navigate to an option for Hyperlocal Module Status that is needed to choose as enable to enable this module.

In order to know whether the Elastic Search server working fine or not, you have to enter the mentioned URL https://your_server_ip:9200 on the browser where 9200 is the default port number for the Elastic Search server.

Features
- Admin can replace the MySQL search engine with the Elastic search engine.
- The admin can upload/update products, categories, manufacturer then information pages data to the elastic server.
- Admin can allow Elasticsearch login authentication.
- Store data on the elastic server according to the index types.
- The customer can search data by name, description and short description of the Product.
- Has the “Did You Mean” Feature according to which the search engine automatically corrects the keywords if they type incorrectly.
- A customer can search for products base on products, categories, manufacturers, then information.
- Also, a customer can search on the basis of keywords & tags.
- Admin will set up Cron Job for refreshing the ElasticSearch Indexes on the server.
- The Elasticsearch is compatible with Opencart Advanced Layered Navigation.
- The customer will be shown search results based on their location i.e the product of those seller’s who are present within their region using the hyperlocal Elasticsearch feature.
Installation – OpenCart Elasticsearch
Extract the contents of the receive zip folder on your system according to your Opencart version. The extracted folder has admin, catalog, ocmod, system composer.json & cronindex.php folders. Now, upload the admin, catalog, system, system composer.json & cronindex.php directories into the Opencart root directory as shown below in the snapshot.

Run Commands
After uploading the files, run the following commands in the terminal for installing the composer.json file.
curl -s http://getcomposer.org/installer | php
php composer.phar install
Note: – You have to increase post_max_size to 200M.
Once you have uploaded the folders, login to admin and then from the catalog section go to Extensions> Extension Installer then upload the XML file. The XML file is in the ocmod folder under the module directory. In the ocmod folder, select the Opencart version that you are using then under it, you will find wk_elastic_search.ocmod.xml file.

After uploading the XML file go to Extensions > Modification then click on the refresh field at the top right corner.

Go to System -> Users -> User Groups then edit ‘Administrator’ and choose to select all for both Access and Modify Permission for the permission that you want to provide then save it.

Module Configuration – OpenCart Elasticsearch
Once you have performed the above steps you can now see the module under Extensions >Modules >Opencart Elastic Search. Here, you can install then edit the module as required.

Setting Cron Jobs
After the module installation, the store owner or the admin will set up the Cron Job. Just log in to the c panel Account then click on Cron Job.

To find the PHP directory path go to the terminal and log in with your ssh account using the command ‘ ssh user@ip/host‘. After that find the PHP path by running this command ‘whereis php‘.

Now copy the usr/bin/php and write
it in the command section followed by the Webkul ElasticSearch file path like this.

Click the edit option to configure the module.
First, select the store for which you want to implement the Elastic search. This option is for a multi-store configuration.
Now, the admin will configure the options under the General Settings tab –

General Settings
- Select the Status of the Elastic search engine as Enabled/Disabled as required
- Enter the Elasticsearch Host address(IP address of the server with Elasticsearch installed)
- Enter the Elasticsearch Port number(server with Elasticsearch installed)
- Index Prefix is used to create your data index unique on the elastic server.
- Select the Elasticsearch Scheme to use HTTP or HTTPS
- Enable this setting if you want products should be searched as per user location. For this Webkul Hyperlocal Extension must be installed.
- Choose to have a Login Authentication for the Elastic Server by selecting Enabled(need to enter Username & Password) or select Disabled
- Enter the numeric value in multiples of 10 for defining how many entries are indexed in every cron run or leave blank/zero(0) for complete indexing.
After this, the admin has to configure the settings under the Search tab. Here, you have 2 more tabs –
- General

Here, configure the General settings for the Search –
- Enter the Minimum Number Of Characters To Search
- Select to Redirect If Single Result by selecting Enabled or Disabled
- For Search In check the sections where you want to search on the front-end
- Check the sections under the option Search In Product For where you want to search for the product
- For the option Search In Category For check the sections where you want the search
- Search In Information Check the sections that should be searched on the information pages.
And under the Design tab –
Design

Here for the below two options –
- Details To Be Shown On Search Result – check the product detail sections that you want to display at the front-end
- Search Text Box Placeholder – enter the placeholder for the front-end search box
Finally, you can click the Save button at the top right-hand side to save the configuration settings.
How to Connect to the Elasticsearch Server?
Under the General section in the configuration settings, after you have entered the correct details click the Check Status button at the top right-hand corner.

This checks the connection and if the connection is established you will see a message with details.

Else, if there is some issue then you will see an error message.

Elastic Search Index Management
After the successful installation of the extension, the admin will have the Elastic Search menu option visible under the admin side panel.

Here, the admin will do the indexing for the elastic search. Admin can add, edit, delete, and clear the indexes for products, categories, manufacturers, and information.
Now, add details for the elastic search.

To add an index click on the add button at the top right-hand side.
Here, to add an index enter –
- Index Name(every character must be lower case) & also predefined Index prefix i.e elastic_ is added before the Index name to make every field unique from other.
- The Index Type(select the index type for this mapping).
- The No of Shards (The ability to subdivide your index into multiple pieces).
- Number of Replicas(if the node holding a primary shard dies, a replica is promoted to the role of primary).
- Select the Status of this Index as Enabled or Disabled.
- lastly, click the Save button to save the Data Index.
To sync the data index to the Elastic Server click the refresh button at the right of the respective index.

When the index data is uploaded/updated you will see a confirmation for the same.

To clear all synced data in the particular index to the Elastic server. Firstly, select the particular index and then click on the Clear Index button at the top right-hand side to clear all the synced data.

How to Synchronize the product to ElasticSearch?
The admin will have the module under Catalog >Products. Here, you can add, edit, delete, synchronize, and desynchronize the product as required.

To sync the product/s to the Elastic Server click the Synchronize button at the right of the respective index. as shown in the below snapshots.
When the products are synchronized, you will see a confirmation for the same.

Similarly, for removing the product/s from the Elastic Server click the desynchronize button at the right of the respective index as shown in the below snapshots.
When the products are removed from the Elastic Server you will see a confirmation for the same.

Elasticsearch at Work
On the front end, the customers can now make use of Elasticsearch for making the fastest search within your OpenCart web store.

Did You Mean: This feature allows the customers to search for the desired products even if they had mistakenly entered the wrong product name. In this feature will suggest to them all the products which have a nearby same product name.
For further detailed information regarding this feature, you can follow this link.

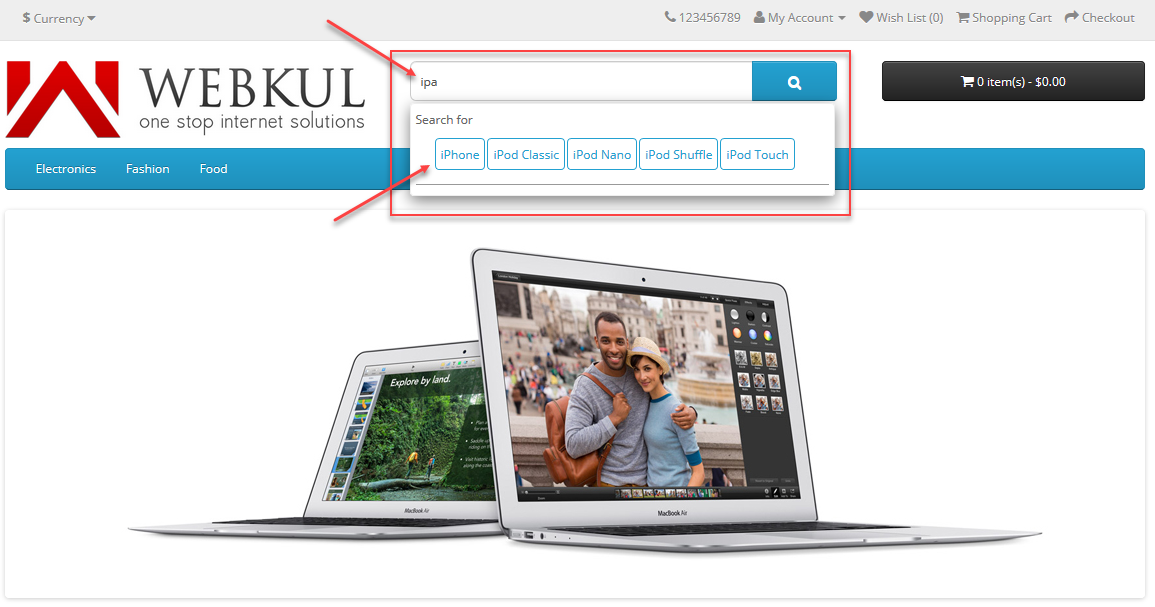
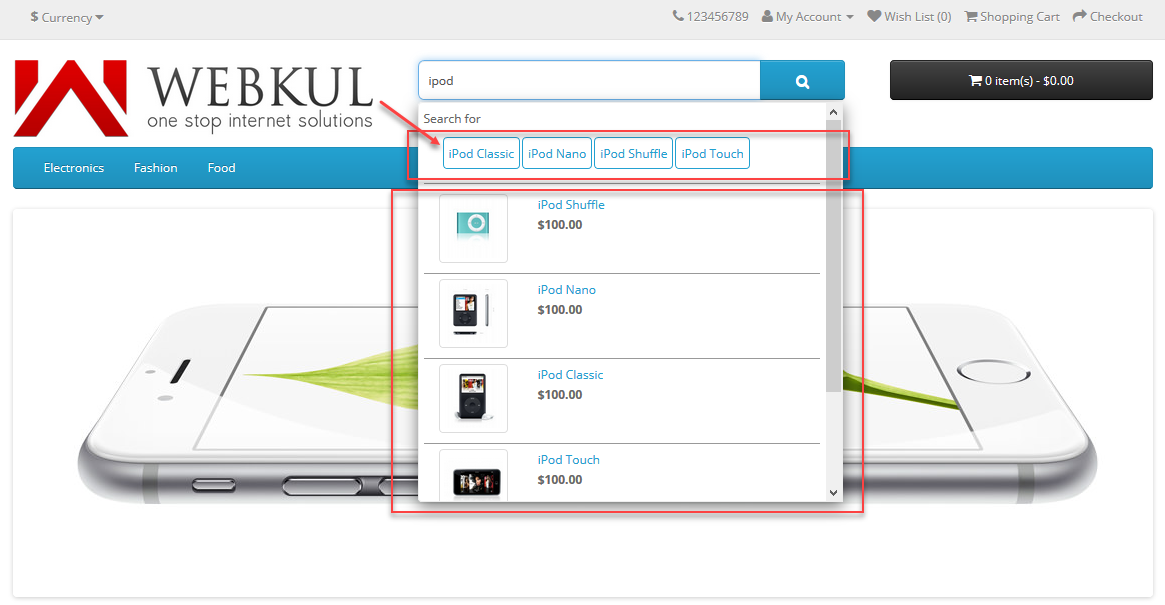
Search Suggestions: When a customer searches for a character string suggestions are provided for the entered string. The customer can now click any of the suggestions to redirect to the selected suggestion.

Full Keyword Search: When a keyword is searched; along with the suggestions you see the products being displayed with the keyword.

Description Search: Customers can also search the products using the product description.
Category-Based Search: Customers can easily search for their desired products by using the category’s name.

Manufacturer based Search: Here the customers can easily search for the products by using the manufacturer names.

Information-based search: Customers can easily search for the products by providing information titles in the search bar and can find the related products.

Tag-based search: The customer can search for their desired products by just using the tags associated with products.

Elasticsearch Integrated With Hyperlocal
The module helps the customers find the products based on their location. Using this feature product search result includes the product of all those sellers who are located in the same region as that of the customer location.
As shown in the below image to use this feature the store admin must enable the field Hyperlocal Status.

Add Seller Location – Elasticsearch
Firstly, the seller needs to add their location. As a result, the product of the sellers of the region will be visible in the customer search results.
For this go to the Seller panel click Seller Location > Add Location. Further, simply enter the location and click Save.

Fetch Customer Location – Hyperlocal Feature
On the front end, the customer can enter their location and click Continue with Location.

Also, the customers can change their location as shown in the below image.

Support
Further, the customer can search for the products and he/she will be shown search results based on their location i.e the product of those seller’s who are present within their region.
For any query or suggestion/customization request get back to us at [email protected] or raise a ticket at webkul.uvdesk.com
Current Product Version - 4.3.0.2
Supported Framework Version - 2.x.x.x,3.x.x.x


Be the first to comment.