Opencart Amazon Connector integrates the Amazon store with the Opencart store.
With the help of this extension, the store owner can import products, orders, and customers from Amazon to Opencart.
Meanwhile, the extension also enables the store owner to export its products from Opencart to Amazon.
Opencart Amazon Connector performs real-time updates of synchronized products price and quantities on the Amazon store.
Additionally, if you would also like to connect your eBay store with Opencart, then you can check Opencart eBay Connector.
Also, you can connect your Opencart Store with the Amazon cloud using the OpenCart Amazon S3 extension.
Note:
- Supported API – This module is now based on the Amazon Selling Partner API (SP-API), ensuring compatibility with Amazon’s latest technology and standards.
- Amazon will not provide customer personal details until you have requested customer details.
- RDT ( Restricted data token ) is also needed to get order info details.
- Currently, we are supporting these marketplace IDs – A2EUQ1WTGCTBG2(Canada), ATVPDKIKX0DER(USA), A1AM78C64UM0Y8(Mexico), A2Q3Y263D00KWC(Brazil), A1F83G8C2ARO7P(UK), A1PA6795UKMFR9(Germany), APJ6JRA9NG5V4(Italy), ARBP9OOSHTCHU(Egypt), and A21TJRUUN4KGV(India).
- Before the extension configuration you need to run composer update command in your project root directory.
Understand the extension workflow:-
Features
- Connect multiple Amazon seller accounts with Opencart.
- Set the default quantity and weight of import products.
- Select the default Opencart store for order sync and import products.
- Update import and export products’ prices & quantities on Amazon.
- Select the default Opencart order status of Amazon orders.
- Add custom price/quantity rule for the import/export products.
- Provide the currency exchange rate of the Amazon store.
- The admin can check the feed status of export products.
- Import the Amazon orders according to the date or order ID.
- View the customer data (name, address, email) from the Amazon orders.
- Import the Amazon product using ASIN (Amazon Standard Identification Number).
- Export Opencart Un-mapped products to the Amazon Store through the cron job
- Update Map product stock, price, and product image according to their Sync Source through a cron job.
- Admin can set the images as per the product variations.
- Opencart Amazon Connector source code is open for customization.
This extension will work only in the region that’s listed on this page: Click here
Installation
Upload Files of Opencart Amazon Connector
First, extract the download zip file. After that, open the correct Opencart Version Folder.
According to Opencart Version install in the system. After that, upload admin, lib, catalog, and system folders and cron files to the Opencart root directory.

Upload XML
After that, log in to the admin backend and navigate to Extensions > Installer. Click the Upload button and browse the XML file, this file is in the ocmod folder.
Please select the correct ocmod folder. According to the Opencart version install it on your system.

Click Continue after uploading the XML file.
Refresh Modifications
After uploading the XML file, please navigate through Extensions>Modifications. Now click the Refresh button as visible in the below screenshot.

Edit User Groups
Furthermore, go to System>Users>Usergroups. And then edit ‘Administrator’. Click Select All for both Access Permission and Modify Permission and Save it.

Installation: Opencart Amazon Connector
After that, navigate to Extensions> Extensions > select Module from the dropdown. Find Opencart Amazon Connector from the list. Click the Install button as visible in the screenshot below.
How to Add Cron Job:
By using a cron job, all new add Opencart products will export only to the first add Amazon seller’s account.
1)Go to your Cpanel and click on cron jobs under Advanced.
2)Move to Add New cron job, select common settings, and set your time when you want to run the cron file.
3)Go to command and add your path where amazon_cron.php exist.
ex- public_html/opencart_root_directory/amazon_cron.php.
4)Click on “Add New Cron Job”.
How to Get Amazon Credentials?
How to create/get the required credentials for the Amazon connector module
1. Registering as a developer
You must register as a Selling Partner API developer before you can register your Selling Partner API application.
We will use the following:
- Private seller applications: Applications for sellers that are available only to your organization, and are self-authorized.
To register as a developer (for private seller applications)
- Sign in to Seller Central using the credentials that you want to associate with your developer account.
- In the Partner Network menu, click Develop Apps.
The Developer Central page appears. - If you have not yet completed a developer profile for this selling account, click the Proceed to Developer Profile button. Otherwise, click the Your Developer Profile link.
- Complete the form. In the Data Access section, in the dropdown box.
- Select My organization sells on Amazon, and I only want to integrate to manage my own business.
Note: If you want to import the buyer information and shipping address with the orders, then you must have access to the customer’s Personally Identifiable Information (PII).
For this, you need Approval for the roles that are required to access buyer information and/or shipping address information. These are:
- Direct-to-consumer shipping. Required to access shipping address information.
- Tax remittance. Required to access buyer information.
- Tax invoicing. Required to access buyer information.
2. Checking the status of your request to register as a developer
After you have submitted your request to register as a developer, Amazon evaluates the information provided and approves or denies your request.
If denied, you can address the reason for the denial and then resubmit your Developer Profile.
The following procedures show you how to check the status of your request to register as a developer, depending on the type of application you want to create.
To check the status of your request (private seller applications)
- Sign in to Seller Central with the credentials that you used when you registered as a developer.
- In the Partner Network menu, click Develop Apps.
The Developer Central page appears. - Follow the instructions in the Your developer registration under the review banner. The banner will change to reflect the status of your application.
After we have registered you as a developer, you can create and configure IAM policies and entities. To view your developer information, see Viewing your application information and credentials.
3. Creating and configuring IAM policies and entities
The following steps explain how to create and configure IAM policies and entities with the end goal of creating an IAM role that you provide when you register your application.
In this workflow, you create an IAM user (with an AWS STS policy attached) that assumes an IAM role that has permission to call Selling Partner API.
Steps:
You need an AWS account because the Selling Partner API security model uses AWS authentication credentials.
If you’re not already an AWS customer, you can create a free AWS account. For more information, see AWS Free Tier.
Step 1. Create an AWS account
Step 2. Create an IAM user
You need to create an IAM user to get AWS keys to authenticate calls to the Selling Partner API. We recommend creating a new IAM user exclusively for this purpose.
Use the IAM user to assume the IAM role that you create in Step 4.
To create an IAM user
- If you are not already signed in, sign in to the AWS Management Console and open the IAM console at console.aws.amazon.com/iam.
- In the navigation pane on left, click Users and then click Add user button.

- Enter a user name for the new user.
- Select Programmatic access and then click the Next: Permissions button.

5. On the Set Permissions page, accept the defaults and click the Next: Tags. You will set permissions when you create an IAM role.

6. On the Add tags (optional) page, add optional tags if you want them, and then click the Next: Review button.

7. On the Review page, review the choices you have made. You can ignore the This user has no permissions warning.
You will set permissions when you create an IAM role. When you are ready to proceed, click the Create user button.

The AWS access key ID for your new IAM user is displayed.
8. Click Show to view the AWS secret access key. To save the AWS access key, click Download .csv and then save the file to a safe location.

Important:
This is your only opportunity to view or download your AWS secret access key, which you will need to authenticate your calls to the Selling Partner API.
Save the AWS access key ID and AWS secret access key in a safe and secure place.
You will not have access to the AWS access key again after this step. If you lose your AWS secret access key you will need to create a new IAM user with its own new set of keys.
9. Click Close.
10. In the User name column, click your new IAM user and make a note of the User ARN. You will need it in Step 4. Create an IAM role.

11. Save your User ARN. You will need it:
i. In Registering your Application
ii. In Step 4. Create an IAM role.
Note: The created AWS access key ID and AWS secret access will be used for module configurations: Access Key of AWS IAM User, Secret Key of AWS IAM User
Step 3. Create an IAM policy
This IAM policy defines permissions to make calls to the Selling Partner API.
You will attach it to the IAM role(that you create in Step 4. Create an IAM role) and the IAM user(that you created in the previous step).
Note: If your AWS account leverages AWS Organizations you must ensure that your organization level policy allows access to the Selling Partner API.
For more information, refer to Managing AWS Organizations policies in the AWS documentation.
To create an IAM policy
1. Sign in to the AWS Management Console and open the IAM console at console.aws.amazon.com/iam.
2. In the navigation pane at the left, click Policies.
If this is your first time choosing Policies, the Welcome to Managed Policies page appears. Click Get Started.
3. Click the Create policy button.

4. Click the JSON tab.
5. Paste the following code into the text box, replace the existing code, and then click Review policy.
{ “Version”: “2012-10-17”, “Statement”: [ { “Effect”: “Allow”, “Action”: “execute-api:Invoke”, “Resource”: “arn:aws:execute-api:*:*:*” } ] }


6. On the Review policy page, type a Name and a Description (optional) for the policy that you are creating.

7. Review the policy Summary to see the permissions that are granted by your policy, then click the Create policy button.

Your new IAM policy appears in the list.
Step 4. Create an IAM role
Now, Create an IAM role that trusts the IAM user that you created in Step 2. Create an IAM user and has permission to call the Selling Partner API.
To create an IAM role
1. If you are not already signed in, sign in to the AWS Management Console and open the IAM console at console.aws.amazon.com/iam.
2. In the navigation pane on left, click Roles and then click Create role button.

3. On the Create role page, click Another AWS account.

4. In the Account ID box, enter the account identifier for the AWS account in which you created your IAM user in Step 2. Create an IAM user, and then click the Next: Permissions button.

5. On the Attach permissions policies page, under the Policy Name, select the policy that you created in Step 3. Create an IAM policy, and then click Next: Tags.
Tip: Click Filter policies and then select Customer managed to narrow your choices.

6. On the Create role page, enter a role name in the Role name box, an optional role description in the Role description box, and then click the Create role button.

7. On the Add tags (optional) page, add optional tags if you want them, and then click the Next: Review button.

8. Under Role name, click the name of your new role.

The Summary page appears

9. Save your role ARN. You will need it:
i. In Step 5. Add an AWS Security Token Service policy to your IAM user.
Step 5. Add an AWS Security Token Service policy to your IAM user
Adding AWS Security Token Service (AWS STS) policy to your IAM user enables you to request temporary AWS access keys that you can use to authenticate your requests to the Selling Partner API.
These credentials expire after a set period of time, helping you to control access to your AWS resources.
1. If you are not already signed in, sign in to the AWS Management Console and open the IAM console at console.aws.amazon.com/iam.
2. In the navigation pane on left, click Users and then click the user that you want to add the AWS STS policy to.
In this workflow, choose the user you created in Step 2. Create an IAM user. You might choose a different IAM user for other use cases.

3. On the Permissions tab, click Add inline policy.

4. On the Create policy page, click Choose a service.
5. Click the STS service.
Tip. Type STS in the search box to narrow your choices.

6. Click the arrow next to Write to expand it.
7. Select AssumeRole.

8. Click the arrow next to Resources to expand it, and then click Add ARN.

9. In the Add ARN(s) dialog box, enter the role ARN from Step 4. Create an IAM role in the Specify ARN for role box, click Add, and then click the Review policy button.

10. On Review policy page, enter name for your policy in the Name box. Review the choices you have made. If you are ready to proceed, click Create policy button.
11. Again choose user you created in Step 2. Create an IAM user. Now, On Permissions tab, click “Add Permissions“.

12. Now, click on “Attach existing policies directly”. Then, select policy that you created in Step3. Create an IAM policy, and then click “Next: Review”.

13. Click on “Add Permissions“.

4. Registering your application
Before you register your application, create and configure your IAM policies and entities. We will register applications for
- Private seller applications: These are seller applications that are available only to your organization, and are self-authorized.
The following procedures show you how to register your application.
To register your application (for private seller applications)
- Sign in to Seller Central using the credentials that you used to register as a developer.
- In the Partner Network menu, click Develop Apps.
The Developer Central page appears. - Click the Add new app client button.
The App registration page appears. - Complete the form.


Important: When registering your application, the IAM ARN that you provide must be for the IAM User to which you attached the IAM policy from
Step 3. Create an IAM policy. Since you register your application using your IAM user, be sure that the IAM policy is attached to it. Otherwise, your calls to the Selling Partner API will fail.
5. Viewing your application information and credentials
After you register your application you can view information about your application, as well as your Login with Amazon (LWA) credentials. Here, we have used :
- Private seller applications: These are seller applications that are available only to your organization, and are self-authorized.
The following procedures show you how to view your application information and credentials, depending on the application type.
To view your application information and credentials (for private seller applications)
- Sign in to Seller Central using the credentials that you used to register as a developer.
- In the Partner Network menu, click Develop Apps.
The Developer Central page displays information about your application(s), including the IAM ARN associated with them. - Click View under LWA credentials for the application you want.

Your LWA client identifier and client secret for that application appear. You will need these credentials in module configurations: App Client ID from Seller Central, The corresponding Client Secret
Self authorization
When you create a private application for your own organization you can self-authorize it to access your account information.
Before doing this you must register as a developer and register your application. You can self-authorize your application in draft status; there is no reason to publish a private application.
To self-authorize your application (seller application)
- Sign in to Seller Central using the credentials that you used to register as a developer.
- In the Partner Network menu, click Develop Apps.
The Developer Central page appears. - For the application that you want to authorize, click the arrow next to the Edit App button, and then click Authorize.
The Authorize application page appears.

Note. If your selling partner account is merged with accounts in other regions, you will see an Authorize app button for each of your merged accounts.
4. Click the Authorize app button for each selling partner account that you want your application to access. The Marketplaces column indicates the marketplaces in which an account is active.
A Login with Amazon (LWA) refreshes token appears with every Authorize app button that you click.
Note:
1. Keep this LWA refresh token as this will be used in module configuration: Refresh Token
2. If you click on Authorize app button multiple times, a new refresh token is generated each time. Generating a new refresh token does not invalidate previous refresh tokens.
Opencart Amazon Connector Configuration
To do the module configuration, go to Extensions>Modules>Opencart Amazon Connector and click Edit button.

The following page will open, and set the Status option as Enabled to use Opencart Amazon Connector. Else select Disabled if do not want to use this module.

General Options
Choose Default Category – Select the default Opencart category for the Amazon products where they will get imported.
Default Product Quantity – Set the default quantity of Amazon and Opencart products that have zero quantity. After exporting or importing zero quantity products, this value will become the quantity.
Amazon Product Weight (in Grams) – Enter the default weight of those Amazon products which have no weight.
Opencart Un-mapped Product to Amazon(through Cron Job) – If “enabled” the unmapped product will get export to Amazon from the first Amazon Account only.
Update Mapped products (through Cron Job) – If “enabled” then you can update the mapped product quantity and price according to their synchronization source.

Order Options
Default Store for Order Sync – Select the default Opencart store for importing Amazon orders.
Amazon Imported Order Status – Select the default order status of the Amazon orders.

Product Options
Default Store for Product – Select the default Opencart store where Amazon products will be import. The selected store will be assigned to all the Amazon imported products.
Product Variation (Option) Choice – Select Option 1 for importing every product from the Amazon store including the variations/options.
Note – Each variation/option will be created as a separate Opencart product.
Else, select Option 2 for importing only those Amazon products which do not have any variations. The Amazon products which have variations/options will not be imported to Opencart.

Real-Time Update Settings
Further, if the store owner changes the price or quantity in Opencart, it can update on Amazon automatically using the following options:
Update Imported Product on Amazon Store – Set On to do a real-time update of imported products’ price and quantity on Amazon.
Updated Exported Product on Amazon Store – Set On to do a real-time update of exported product’s price and quantity on Amazon.

Price/Quantity Rules Settings
Price Rule For The admin can select whether the price rule should be applied for the Imports or Exports.
Quantity Rules For Imported Products: If “enabled” the quantity rule will be applied for the Imported products.
Quantity Rules For Exported Products: If “enabled” the quantity rule will be applied for the Exported products.

Manage Amazon Accounts
Amazon Accounts List
After doing the module configuration, the store owner needs to add Amazon account credentials. Go to Opencart Amazon Connector>Manage Amazon Accounts.
The following page will open showing Amazon accounts list with the Account ID, Store Name, Marketplace ID, Seller ID, and Added Date.
Add Amazon Account – Click this button to add a new Amazon account for synchronization.
Delete – Click this to remove an existing Amazon account from the list.
Edit – Click this to manage the Amazon account and do synchronization.

Add Amazon Account
After clicking Add Amazon Account button, the following page will open. The store owner needs to provide the following information:
- Store Name: Enter the name of your Amazon store.
- Select Attribute Group: Choose an attribute group for this Amazon account.
- Marketplace ID: Enter the Marketplace ID that corresponds to the region where you are selling on Amazon. Each Amazon marketplace has a unique Marketplace ID.
- Seller ID: Enter your Amazon seller account’s Seller ID.
- Access Key ID: Provide your Amazon AWS Access Key ID.
- Secret Key: Enter your Amazon developer secret key. This secret key is used for secure authentication when accessing Amazon’s API.
- Access Key of Amazon IAM User: If applicable, provide the Access Key of an Amazon IAM (Identity and Access Management) user that has the necessary permissions for this integration.
- Secret Key of Amazon IAM User: Enter the Secret Key associated with the Access Key provided in the previous step.
- AWS IAM Role: Enter the AWS Identity and Access Management(IAM) role here.
- Refresh Token: The refresh token is used to obtain new access tokens when they expire.
- Default Store: Select the default Opencart store to which the Amazon products will be imported.
- Currency Rate: Enter the exchange rate of your Opencart store’s currency to the currency of your Amazon store.
Once you’ve provided all the necessary information, save the configuration. Your Amazon account is now added to the Opencart Amazon Connector

Products Mapping in Opencart Amazon Connector
To do the mapping of products, go to Opencart Amazon Connector>Manage Amazon>Accounts>Edit>Map Product.
The following page will open showing the imported Amazon product list with Map ID, Opencart Product ID, Product Name, Amazon Product ASIN, Sync Source, Price, and Quantity.
Import Product – Click the Import Product button for importing products from the Amazon store to the Opencart store.
Update/Delete Exported Products – Click on this button for updating/deleting in already exported products on Amazon.

Delete Product – Click the delete Product button for removing the existing mapped product record from the list.
Import Products from Amazon Store
After clicking the Import Product button, the following page will open. Moreover, click Generate Report ID, and importing process will start.
It will import the Amazon product’s names, price, weight, specifications, quantity, main product image, and description.

After that, generating the report ID, a success message will appear:

Further, to import products from Amazon, click the Import Amazon Products button and the products will start import to the Opencart database.

Meanwhile, if the products are already added to the database then the existing products will be updated.
Further, or creating/updating imported products, the admin will click on Create/Update Imported product button. After successful creation/updation of the product, it will give a success message.

Mapped Product Listing
Under the following section, the admin can Map Products for the already existing products.
This will allow the admin to update the existing products by clicking on the “Map Product” button as shown in the image below.

After clicking on the “Map Product” button, a Pop Box will appear on the page where the admin can enter the product that is to be mapped after this a successful message will appear in the back end.

The products with variations are listed under the “Variation List” tab which will display the variations of all the products. 
Create/Update Amazon Store Products By ASIN
To create or update products using Amazon product ASIN ID (Amazon Standard Identification Number), click Create/Update Amazon Products By ASIN button. A small pop-up window will appear.
Enter the Amazon Product ASIN value and click the Import Product button. Only one product at a time can be imported using ASIN.

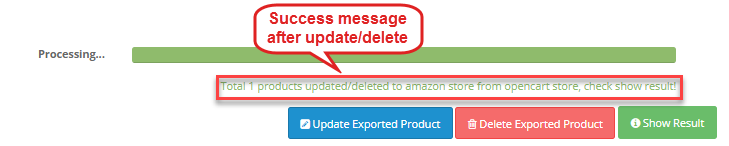
Update/Delete Exported Products to Amazon Store:
The admin can update or delete exported products to the Amazon store. The admin needs to select a product first.
After that, the admin needs to click on the Update Exported Product button for updating exported products and the Delete Exported Product button for deleting exported products to the Amazon store.

Success Result: After clicking on “Update Exported Product” OR “Delete Exported Product“, the admin can view a success message with a total number of products updated/deleted to the Amazon store.
Import Orders: Opencart Amazon Connector
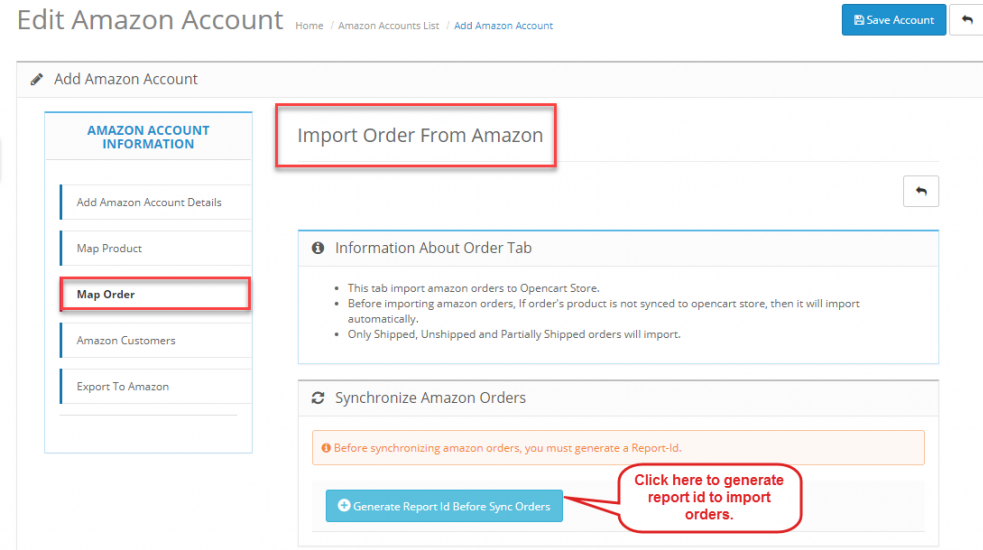
To import orders from Amazon to Opencart, go to Opencart Amazon Connector>Manage Amazon Accounts>Edit>Map Order.
The following page will open, showing an import Amazon orders list mentioning Map ID, Opencart ID, Amazon Order ID, Buyer Name, Buyer Email, Amazon Order Status, and Order Total.
Import Order – Click the Import Order button to fetch orders from the Amazon store to the Opencart store.
Delete – Click the Delete button, to remove the records of the mapped order from the list.
Filter Order: The admin can apply the filter to orders like Amazon order-id, buyer name, buyer email, order total, Amazon order status, date added, and Opencart order-id options.

Import Orders from Amazon
After clicking the Import Order button, the following page will open. Click the Generate Report ID Before Sync Orders button.
class style=”color:blue”Note : –
- It can only import Amazon orders which are either shipped, unshipped, or partially shipped.
- It can import only those orders which were created a day before the Report ID was generated.
- If the store owner has selected Option 2 for Product Variation (Option) Choice in Module Configuration, then orders containing product variations will not be imported.
- After importing the orders from Amazon, the products in the order will also be imported to Opencart.
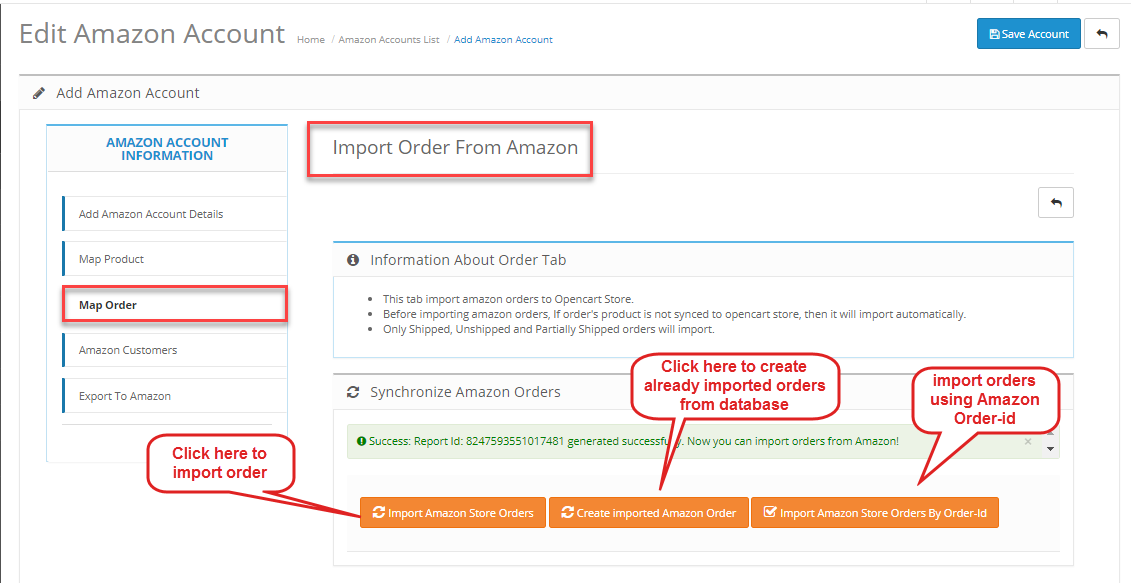
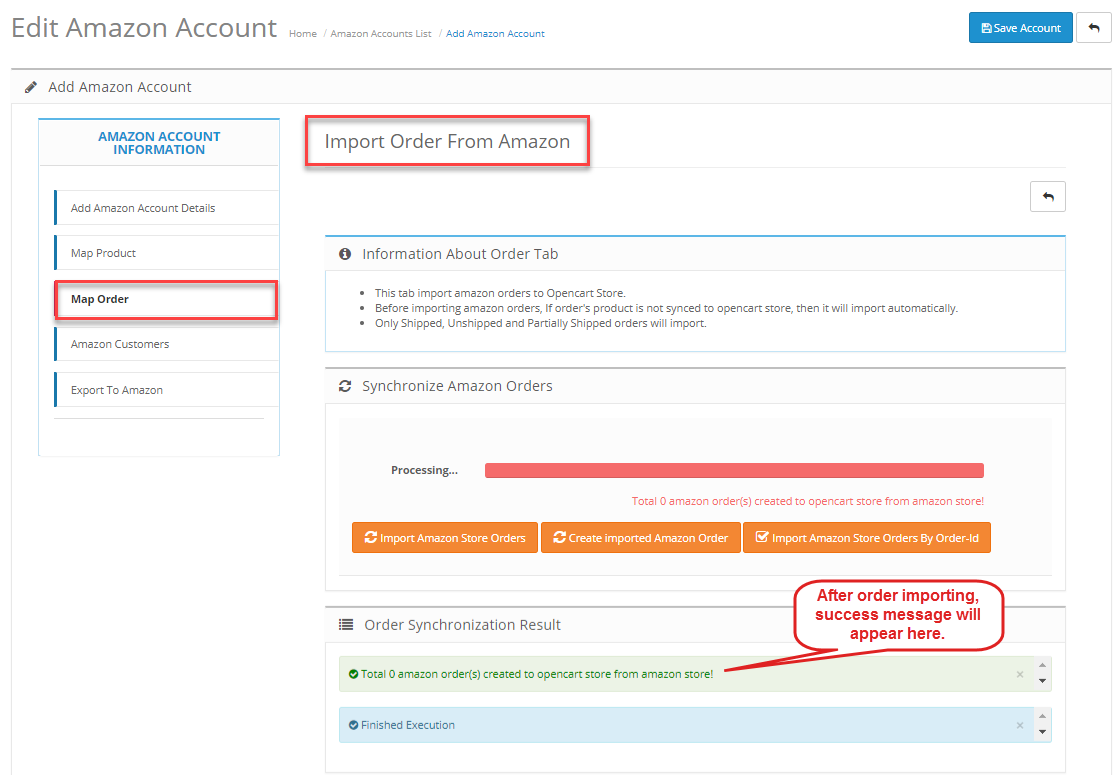
After that, generating the report ID, a success message will appear. Now, click the Import Amazon Store Orders button and it will import orders to the Opencart database.
Moreover, for creating imported orders to the Opencart store, the admin needs to click on “Create Imported Amazon Order“. It will create orders in the Opencart store according to the dates.
After that, the admin can import orders through Order-ID. The admin needs to click on Import Amazon Store Orders By Order-ID button to fetch orders using the Amazon Order ID.
Enter Order Details
Whereas, when the admin will click on “Import Amazon Store Orders” then the admin needs to select from which date to fetch the Amazon orders.

Create Imported Amazon Order:
Therefore, this button will create all the imported orders from Amazon to the Opencart store order tab. It will give a message after creating the product.
Sync Amazon Store Order By Order ID
Whereas, enter the Amazon Order ID to fetch and click the import Order button. Also, only one order at a time can be imported from Amazon to Opencart.

Order View
Although, after importing the orders from the Amazon store, the admin can view the Amazon orders in the Opencart store-backend.
In the Order Details, the Amazon shipping will be displayed as shown in the sample order imported from the Amazon store.

Amazon Customers
The store owner can fetch the customer data from the Amazon store to the Opencart store by importing orders.
To view the Amazon customer data, go to Opencart Amazon Connector>Manage Amazon Accounts>Edit>Amazon Customers.
Moreover, the following page will open showing the list of all the Amazon customers whose orders have been synced with the Opencart store.
Note:-
- Amazon customer data is fetched from the orders. So, it is essential to import the orders first.
- It will import the customer’s name, email, address, pin code, city, and country.
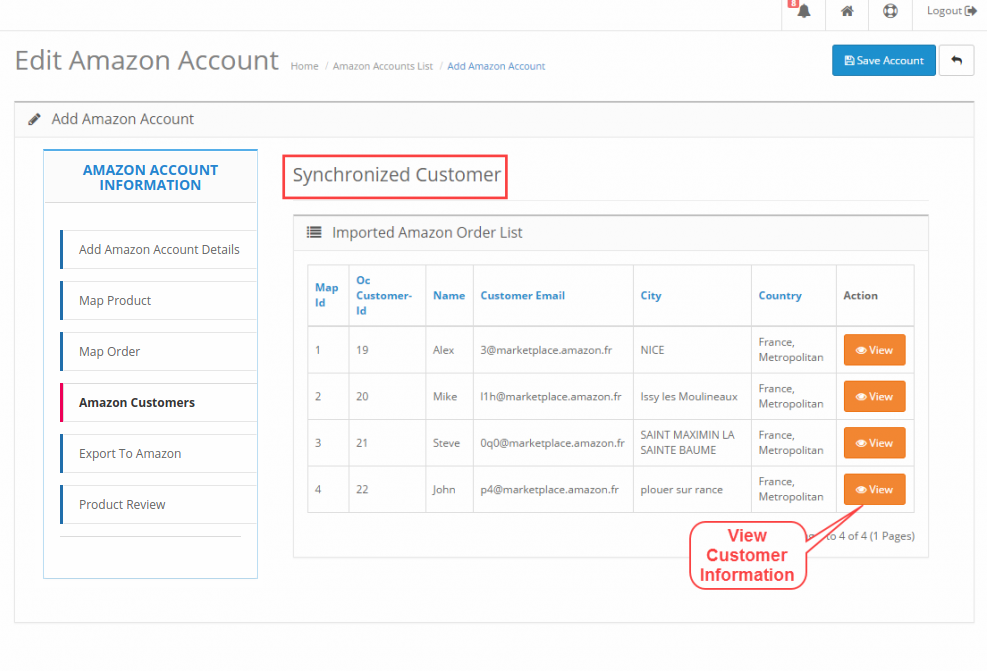
Furthermore, the store owner can view Amazon customer information in the Opencart backend. It can view the name and e-mail.

Moreover, it will also fetch the customer’s address, city, pin code, and country from the orders.

Front-End View of Opencart Amazon Connector
Amazon Store View of Opencart Amazon Connector
Moreover, please view the below screenshot, where the store owner is importing the product from Amazon to the Opencart store.
Opencart Front-End View
After that, successfully importing the product from Amazon, it will appear as follows. It will show the product name, image, price, description, specifications, stock, and variations.
Therefore, if products with variables are selected then the respective image for that variable is displayed. Consider a product with variation as shown in the image below.

After that, the customer can select the variation, then the variation also changes along with the respective image that is uploaded for that particular variation.

Export Product To Amazon
The admin can export the OpenCart products to the Amazon shop.
While adding a new product the admin will see a new tab “Amazon “. Here, the admin can select product type,ID, then they have to select the condition and enter the requried filed.
On the basis of amazon category admin need to select the amazon child category.
The admin needs to provide a genuine Unique Identification Code which will be used while exporting the Adobe Commerce products to the Amazon shop.
Also, fill the other fields and options as per the requirement.

After that admin can navigate to Amazon account list then click on the “Export Products To Amazon” option under Amazon Account Information.

In order to export the products to the Amazon store using the Amazon connector, the admin will:
- Select the products that the admin wants to export to the Amazon store.
- Then select the “Export as FBA To Amazon” or “Export as FBM to Amazon” option from the “Action” drop-down list.
- If selected as “Export as FBA To Amazon” then the product will be exported as FBA (Fulfillment by Amazon) product.
- If selected as “Export as FBM To Amazon” then the product will be exported as FBM (Fulfillment by Merchant) product.
- Proceed further by clicking on the “Submit” button which gets visible when selecting any of the options from the “Action” drop-down list. This will navigate the admin to the “Run Profile” page as per the image.

Once the execution is completed, the admin will click on “Back” button to navigate back.
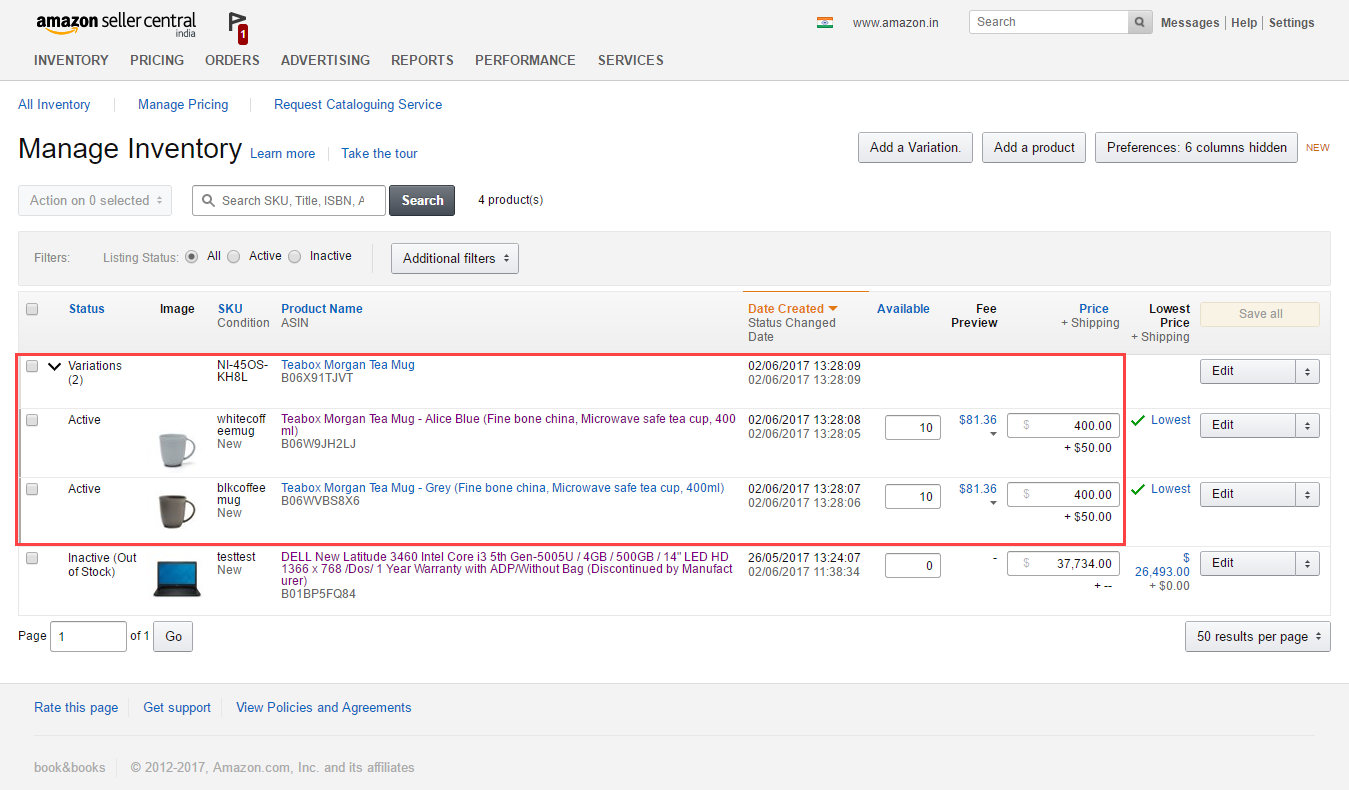
Then, the admin will go to his Amazon seller central account page and navigate to INVENTORY>Manage Inventory.
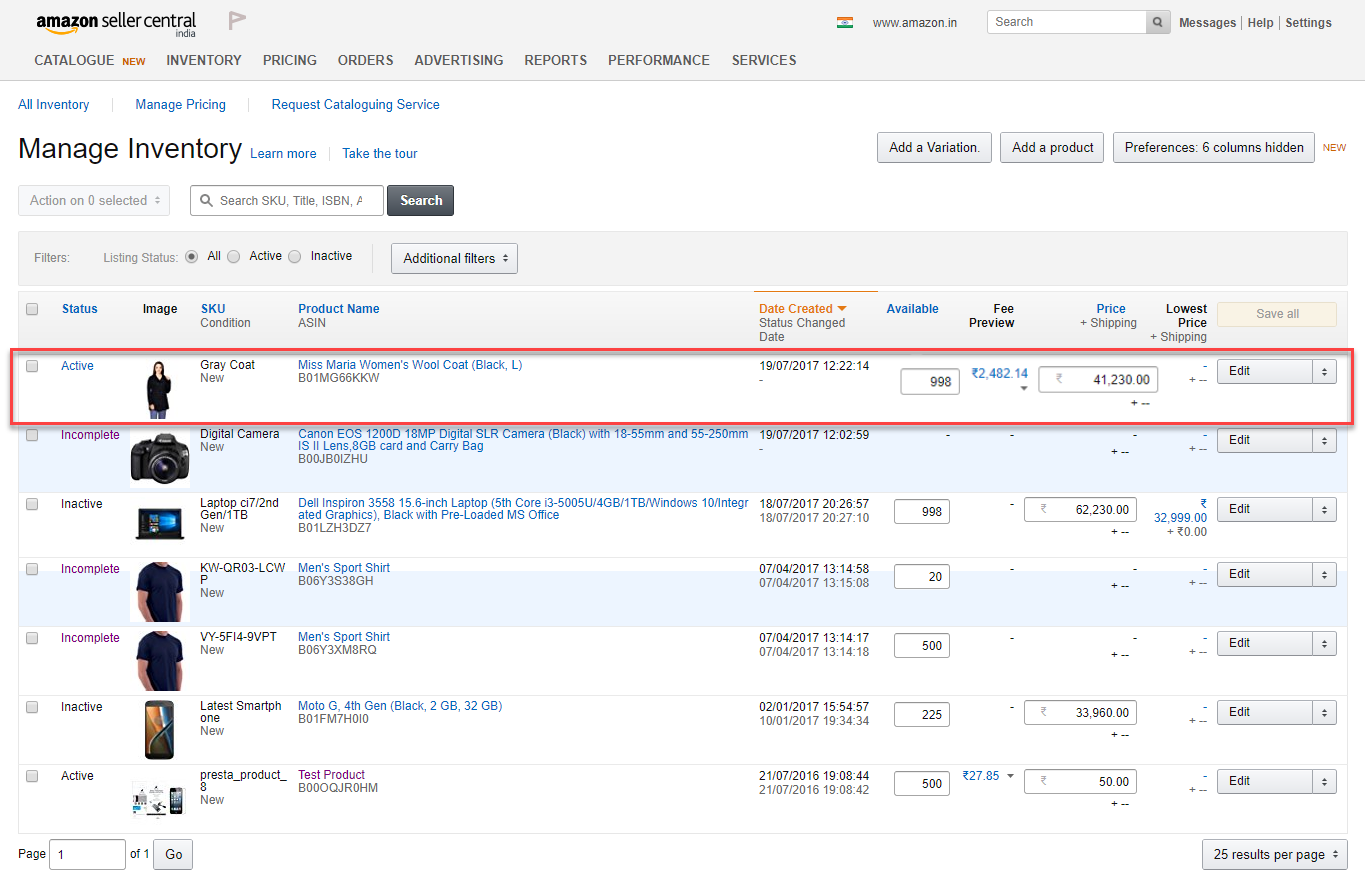
Here, the admin can check the exported product after 15 minutes because the process of exporting products takes 10-15 minutes to reflect the exported products on the Amazon store.
Support
Lastly, thank you for viewing the Opencart Amazon Connector blog.
If you have any queries regarding this module, please contact us at webkul.uvdesk.com or drop us an email at [email protected].
You can also go through Opencart Development Services for any kind of development and integration services.
Current Product Version - 3.8.0.1
Supported Framework Version - 3.x.x.x

Be the first to comment.