Introduction
OpenCart Akeneo Connector allows you to connect your OpenCart website with the Akeneo PIM platform. Using this integration, you can export products, categories, attributes (including values), attribute groups, and product images from Akeneo to the OpenCart store.
Please Note –
- This module is compatible with the Akeneo community and Enterprise(Flexibility) edition.
- If you want to use this extension on Akeneo EE Serenity mode, please contact us.
- For the Akeneo installation, your Akeneo server should meet these system requirements.
Features
- Mapping Akeneo attributes with OpenCart product fields
- Create an additional mapping for more product fields using OpenCart field code.
- Send detailed information about catalog information from Akeneo to Opencart
- Export multiple images of a product.
- Filter Data to be exported based on category, family, completeness, and time condition.
- Using SKU you can export only specific product(s) to the OpenCart store.
- Select language and currency for product export jobs.
- Individual jobs for the category, attribute group, attribute, and product export.
- View mapped entries of previous export jobs.
- Update exported product information from Akeneo.
- Send multi-language content to OpenCart.
- Also compatible with the latest version of Akeneo 2.0.x, 2.1.x, 2.2.x, 2.3.x, 3.0.x, 3.1.x, 3.2.x, 4.0.x, 5.0.x, 6.0.x and 7.0.x
Video Tutorials
OpenCart Connector Configuration
Composer Installation
Before beginning the composer installation
1: Get the ACCESS KEYS [Create a support ticket]
2: In Akeneo composer.json, add our repository as well as the installation script.
For Akeneo 6.x and 7.x
{
  "scripts": {
        "post-update-cmd": [
           "vendor/webkul/opencartconnectorbundle/Akeneo/src/Webkul/OpencartConnectorBundle/install/config.sh COMPOSER=true NO_DOCKER=true"
        ],
        "post-install-cmd": [
           "vendor/webkul/opencartconnectorbundle/Akeneo/src/Webkul/OpencartConnectorBundle/install/config.sh COMPOSER=true NO_DOCKER=true"
        ],
        "post-create-project-cmd": [
          "vendor/webkul/opencartconnectorbundle/Akeneo/src/Webkul/OpencartConnectorBundle/install/config.sh COMPOSER=true NO_DOCKER=true"
       ]
   },
  "repositories": [{
    "type": "composer",
    "url": "https://akeneorepo.webkul.com/"
  }]
}
For Akeneo <=5.x
{
  "scripts": {
        "post-update-cmd": [

"vendor/webkul/opencartconnectorbundle/composer_install.sh"
        ],
        "post-install-cmd": [

"vendor/webkul/opencartconnectorbundle/composer_install.sh"
        ],
        "post-create-project-cmd": [

"vendor/webkul/opencartconnectorbundle/composer_install.sh"
       ]
   },
  "repositories": [{
    "type": "composer",
    "url": "https://akeneorepo.webkul.com/"
  }]
}
3: Use composer to install the extension.
composer require webkul/opencartconnectorbundle
4: Complete the authentication form.
5: Send a Message of Success
6: Delete your browser’s cache.
Installing Module for Version 6.0.x and 7.0.x
- After unzipping the appropriate extension zip, merge the “src” folder into the akeneo project.
- From the PIM directory, run the following command over the NO-DOCKER Instance.
./src/Webkul/OpencartConnectorBundle/install/config.sh COMPOSER=false NO_DOCKER=true
- Run the command below over the PIM directory’s DOCKER instance.
./src/Webkul/OpencartConnectorBundle/install/config.sh COMPOSER=false NO_DOCKER=false
Module Installation Version 4.0.x to 5.0.x
After extracting the downloaded zip file you will find three folders, Akeneo, OpenCart and config. Please follow the process for installing the modules on both platforms.

Please follow these steps for installing OpenCart Akeneo Connector module in your Akeneo PIM platform.
1 – Unzip the respective extension zip then merge the “src” folder into akeneo project root directory.

2 – After that goto config/Bundles.php then add line:
Webkul\OpencartConnectorBundle\OpencartConnectorBundle::class => ['all' => true],

in return array.
3 – Copy the “config” folder into akeneo project root directory for routing.

To run the Quick export in Akeneo 5.0.x, you need to run the below command.
Install composer dependency
php -d memory_limit=4G /usr/local/bin/composer --prefer-dist --no-scripts require navneetbhardwaj/akeneo-quickexport-configurator;
After that, register bundle in config/bundles.php
\Webkul\QuickExportConfiguratorBundle\QuickExportConfiguratorBundle::class => ['all' => true],
Define routing to create a file in the config/routes/wk_quick_export.yml
wk_quick_expoort:
    resource: "@QuickExportConfiguratorBundle/Resources/config/routing.yml"
    prefix: /
4 – Then run this command after ssh to your akeneo server by the terminal
php bin/console opencart:setup:install && php bin/console opencart:batch:quick_export
5. If you are using php-fpm. Then you need to restart the php-fpm services and apache web server.
For Akeneo 5
sudo service php-fpm7.4 restart
For Akeneo 4
sudo service php-fpm7.3 restart
Docker Installation Command :
For Akeneo 5
alias docker_php='docker-compose run -u www-data --rm php php';
alias docker_yarn='docker-compose run -u node --rm node yarn';
docker_php bin/console cache:clear --env=prod;
docker_php bin/console pim:installer:assets --symlink --clean --env=prod;
docker_php bin/console d:s:u --force;
docker_yarn run webpack;
docker_yarn run update-extensions;
docker_yarn run less;
For Akeneo 4
alias docker_php='docker-compose run -u www-data --rm php php';
alias docker_yarn='docker-compose run -u node --rm node yarn';
docker_php bin/console cache:clear --env=prod;
docker_php bin/console pim:installer:assets --symlink --clean --env=prod;
docker_php bin/console d:s:u --force;
docker_yarn run webpack;
docker_yarn run less;
Module Installation Version 2.X To 3.X
After extracting the downloaded zip file you will find three folders, Akeneo, OpenCart and Config. Please follow the process for installing the modules on both platforms.

Akeneo Module Installation
1. Open Akeneo folder then merge the “src” folder into akeneo project root directory.
![]()
2. After that goto app/AppKernel.php then add the line

new Webkul\OpencartConnectorBundle\OpencartConnectorBundle(),
in function registerProjectBundles()
3. After that you have to navigate first to Akeneo installation directory (Ex: cd /opt/bitnami/apps/akeneo/htdocs). After SSH, you have to run the command to your Akeneo server by the terminal.

opencart_connector:
    resource: "@OpencartConnectorBundle/Resources/config/routing.yml"
    prefix:   /
4. Run this command after ssh to your akeneo server by the terminal
php bin/console opencart:setup:install && php bin/console opencart:batch:quick_export
5. After that you have to restart your web server like Apache, Nginx. Run the command for Apache web server.
sudo service apache2 restart
6. If you are using php-fpm. Then you need to restart the php-fpm services.
sudo service php-fpm7.2 restart
Common Issues After Installation
It might happen that even after proper installation, upon opening your Akeneo admin dashboard, you see a loading screen. In that case, do check for the following solution:
- Webpack Installation: If you get the below error

- It means that webpack is not installed in your system. Run the following command
npm install --save-prod webpack
npm install
- Module routing.yml is not configured properly. Re-check the routing.yml file as mentioned in the 3rd step of Module Installation
- Clear your browser cache.
Uninstall Module: For Akeneo 6 and 7
- From the PIM directory, run the command below over the NO-DOCKER Instance.
./src/Webkul/OpencartConnectorBundle/uninstall/uninstall.sh COMPOSER=false NO_DOCKER=true
- Run the command below over the PIM directory’s DOCKER instance.
./src/Webkul/OpencartConnectorBundle/uninstall/uninstall.sh COMPOSER=false NO_DOCKER=false
OpenCart Module Installation
1. Upload the ‘catalog‘ folder to the root directory of Opencart’s root directory.
2. Upload the wk_akeneo.ocmod.xml file inside ocmod folder from admin side (Extension > Extension Installer) for Opencart Version up to 2.3.x.x, for 3.x.x.x, upload the wk_akeneo.ocmod.zip file from the folder ocmod/Opencart_3.x.x.x
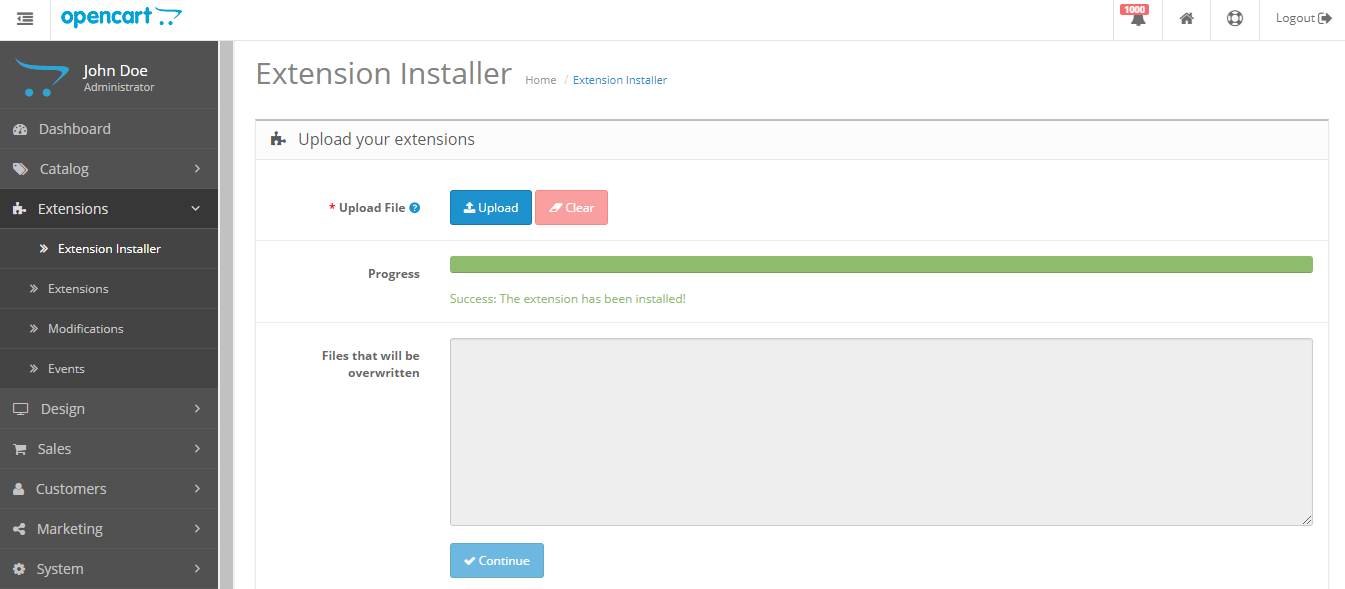
3. Refresh the cache from the admin side (Extension>Modification) by clicking the refresh button at the top.
4. Add an API from System>Users>API (add API). After that enter any API Name then click Generate button, the API Key will be created.

5. If there are any changes in the ‘admin’ or ‘catalog’ folder names then replace them at the file catalog/controller/api/akeneo/catalog.php at 618 line in (str_replace(‘catalog’,’admin’,DIR_APPLICATION)).
Akeneo Connector Configuration
Once you installed the modules on both the platforms, after that please log in to your Akeneo panel after that go to OpenCart Connector>Setup Credentials.
Then here you need to enter your OpenCart store URL and then paste the API Key generated.

Default Configuration
After that go to the Default Configuration tab then select your default language and default currency of your OpenCart store.
Also, you need to mention where Akeneo product SKU will be mapped in OpenCart, you have the following options:
- SKU
- UPC
- EAN
- JAN
- ISBN
- MPN

Locale Mapping
In the Locale Mapping section, you need to map the Akeneo locale with OpenCart Locale ID. So that you’ll be able to send content in multiple languages.

Product Field Mapping
You can mention detailed information about your products by creating attributes in Akeneo and mapping them OpenCart product fields. By default, the following product fields can be mapped:
- Product Name
- Description
- Meta Information – Tag Title, Tag Description, Tag Keywords
- Product Tags
- Model, SKU, UPC, EAN, JAN, ISBN, MPN
- Price
- Quantity
- Minimum Quantity
- SEO URL
- Weight
- Product Images
- Store IDs

Map Existing Attributes, Attribute Groups, and Categories
For avoiding duplication of attributes, attribute groups, and categories creation in OpenCart, you must map them with Akeneo before running an export job.

To do new mapping, click Map Attribute/Category button then click Create Mapping. After that select Mapping Type as – Category, Attribute or Attribute Group.
Then, select Akeneo value and OpenCart value, click Save.

Once everything is mapped between Akeneo and OpenCart, you can check the mapping entries below.
Please note that, if you have deleted the exported attribute, attribute group, category, or product in OpenCart and want to export that to them again. Then, you must delete the mapped entries from here.

Map More Fields
In case you want to send more product information from Akeneo, you can add the OpenCart product field code and then map it with the Akeneo attribute code.

Option Mapping
Option Mapping is used to map the attributes of variants of products. Map the Quantity, Weight, Price, Points attribute with the Variant Axes. If you do not map the attributes with the variant axes then the value will be zero.

Create Product in Akeneo
After that to create a product in Akeneo, go to navigate to Products then click the Create button.
After that, you need to choose the product type – as Product or Product Model.
Product – Select this type for creating simple and virtual products.
Product Model – Select this type for creating a configurable product with variations. Now enter the required SKU, choose a family,then click the Save button.
Product Family – A family is a set of attributes that will be the same for all products belonging to a family. The product family represents product type, imposes product information structure, and defines the list of attributes for a product that it belongs.
After that go to Products>Create then select the Product option. Then, enter any SKU then select a family.

Select Attributes
For adding product information, select the attribute options you require. You can also create new options for the attribute. Following Attributes from Akeneo are supported for export:
- Text
- Text Area
- Number
- Date
- Boolean
- Select
- Price
- Metric
- Image
Add Product Details
Now, you can provide all the information about this new product such as – name, price, description, model, etc.

You can mention as much information as you want, but please make sure that you have correctly mapped the Akeneo attributes with OpenCart product fields.

Upload Images
You can upload multiple images of a product.

Please make sure you have mentioned the image attribute codes in the module configuration.

Multilingual Information
You can mention translated content for multiple locales.

Select Category
Select a category for this product from the left menu panel. You can also select more than one category.

Click the save button after that, and the product will be added to the product list as seen in the below image:

Export Job
Using OpenCart Akeneo Connector, you can create five types of export jobs for sending product catalog information to the OpenCart website.

Export All – If have newly set up your OpenCart store, you can use this job for exporting all the attributes, attributes groups, categories, products from Akeneo to OpenCart.
Create a Job Profile
To export everything from Akeneo to OpenCart, go to Exports>Create Export Profile. Then enter any code and label. Then select Job as Webkul Opencart Connector>Export All.

Select Locale and Channel
Once you create an export profile, you need to select an eCommerce channel and choose for which locales your content will be sent. Please make sure you have mentioned all the translated content in your products.

Filter Export Data
To avoid exporting all the products from Akeneo to OpenCart, you can decide which all products should be created in OpenCart. There are various filters through which you send only selected products to your eCommerce store.
- Family – Send products belonging to a family.
- Status – Send only enabled or disable products.
- Completeness – Send products whose information is complete.
- Time Condition – Send products based on date edited, created, etc.
- Category – Send products belonging to a category.
- Identifier – Mention SKU separated by commas for sending only specific products.

Export Now
After saving all the details, click Save. Export Now button will be visible to you. Here you can see the progress of your export job, you can check the number of data read and written to OpenCart, plus view any error logs as well.
![]()
View Exported Products in OpenCart
You can see the exported product in the Opencart catalog. If you want to edit or change the information you can also do it as well.

Exported product general information, you can also see the translated information for the product with meta information.

Check out the detailed product information in the Data tab.


Opencart Frontend:
As illustrated in the image below, you may view the product on the OpenCart frontend.

Export Attribute
For exporting all the attributes from Akeneo to your OpenCart store, you can use the Export Attribute profile. Go to Exports>Create Export Profile. Now enter any code, the label then selects Webkul Opencart Connector>Export Attribute.
Once you have created and saved the job, you can click the Export Now button.
![]()
After the completion of the export process, you can see the new attributes in the OpenCart admin panel.

Export Attribute Group
For exporting all the attribute groups from Akeneo to OpenCart store, please go to Exports>Create Export Profile and enter the following information. You need to select Webkul Opencart Connector>Export Attribute Group.

Once you have saved the profile, please click the Export Now button. You can check the progress of the export execution process.
![]()
Export Categories
If you want to export all the categories from Akeneo to Opencart, then you can use the Export Category job. Go to Exports>Create Export Profile and enter code, label, select Webkul Opencart Connector>Export Category job.
Once you have saved this profile, please click the Export Now button. You can see the progress of your export process.
![]()
After the completion of the export process, all the categories of Akeneo will be created in OpenCart. But, please note that to make the parent category visible on the frontend in the top menu bar, you need to edit a category and enable Top option.

Export Products Model
Now, if you want to export only products to OpenCart from Akeneo, you can use the Export Product Model job. Please go to Exports>Create Export Profile.
After that enter any code and label and select the job export product model.

Using Filter The Data section, you can filter products which you want to export to OpenCart store. So that all the products are not exported to Opencart.

After saving all the details, click Save. Export Now button will be visible to you. Then click on Export Now button and check the execution detail.
![]()
You can see the exported product model in the Opencart catalog list.

Opencart Frontend:
As illustrated in the image below, you may view the product model on the OpenCart frontend.

Support
Thank you for reading this documentation. In case you find anything missing or not explained correctly, or you have any customization needs, reach out to us at [email protected]. You can also raise a ticket at our HelpDesk System.
Please explore our Akeneo Development Services and Quality Akeneo Extensions.
Current Product Version - Akeneo 2 to 5 || 2.0.0 and Akeneo 6 || 3.0.0 and Akeneo 7 || 4.0.0
Supported Framework Version - OpenCart 3.x.x.x || Akeneo 2.0.x, 2.1.x, 2.2.x, 2.3.x, 3.0.x, 3.1.x, 3.2.x, 4.0.x, 5.0.x, 6.0.x and 7.0.x

Be the first to comment.