Moodle Connector for Magento 2 extension allows you to connect your Moodle platform to your Magento 2 store.
With the help of Moodle Connector for Adobe Commerce, the Moodle courses will be created in the Magento store.
The user can purchase the Moodle courses from the Magento store.
And if the user does not have an account on Moodle then after purchasing the course in the Adobe Commerce store the user account will be created.
And when the invoice will be generated the user will be enrolled for the purchased course on Moodle as well.
The customer will be notified via email for the enrollment in Moodle.
Video Tutorial of Magento 2 Moodle Connector
Watch the video tutorial below to understand the Moodle Connector extension:
Features
- Allow admin to synchronize courses from Moodle to the Adobe Commerce store.
- The user account will auto-created on the Moodle store if not available.
- Users can directly enroll in the courses from the Magento store after purchase.
- Customer will be notified via email for enrollment and account creation in Moodle.
- Admin can map the Moodle category with the Adobe Commerce category.
- Admin can delete Imported Moodle product
Installation
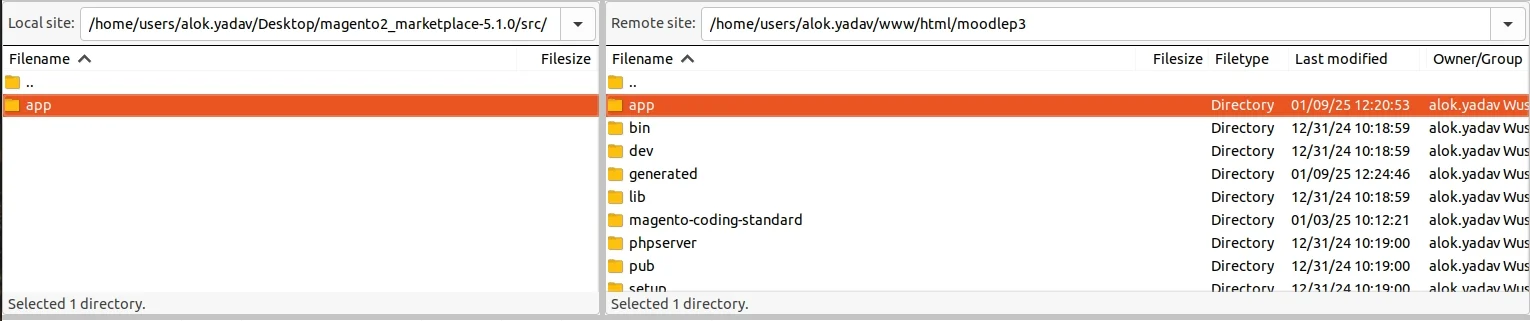
Customers will get a zip folder and they have to extract the contents of this zip folder on their system.
The extracted folder has an src folder, inside the src folder you have the app folder.
You need to transfer this app folder into the Adobe Commerce root directory on the server as shown below.
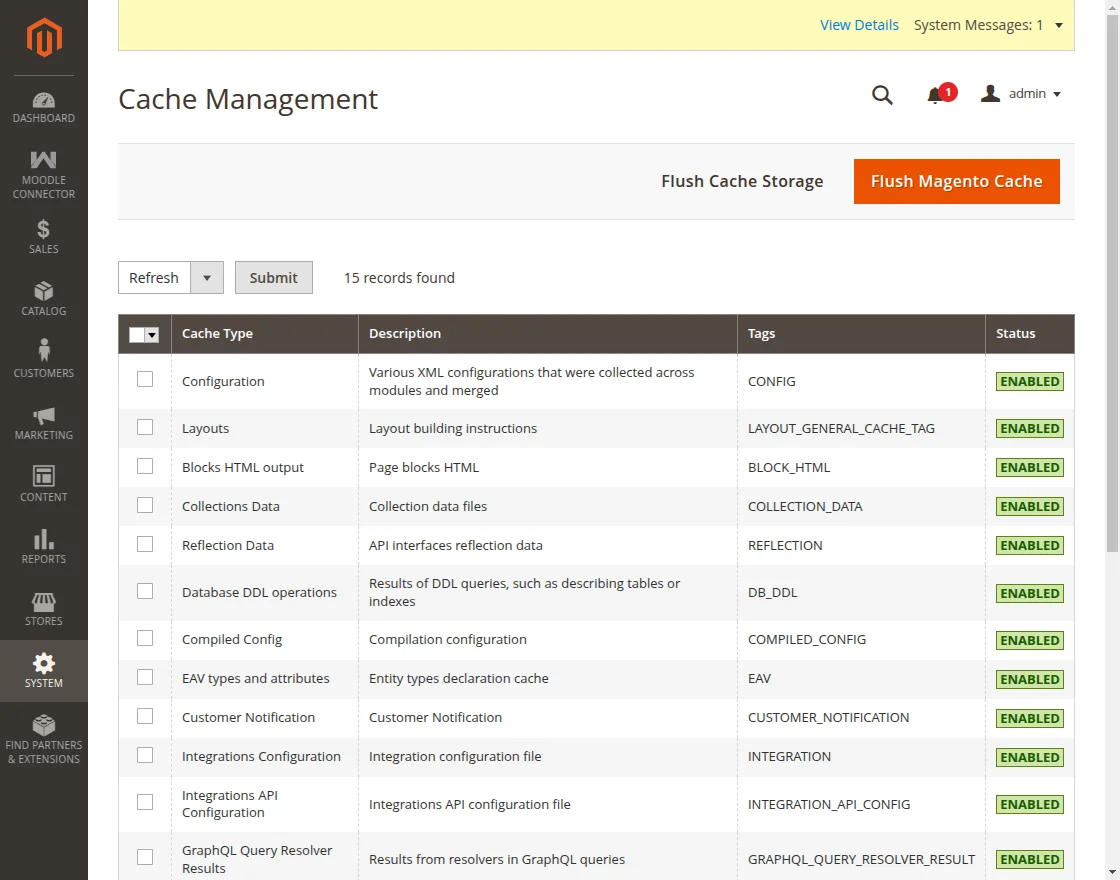
After the successful installation, you have to run these commands in the Adobe Commerce root directory.
php bin/magento setup:upgrade
php bin/magento setup:di:compile
php bin/magento setup:static-content:deploy
php bin/magento indexer:reindex
php bin/magento cache:flush
After running the commands, you have to flush the cache from the Adobe Commerce admin panel by navigating through System -> Cache management as shown below.
Multilingual Configuration
For Multilingual support, please navigate to Store > Configuration > General > Locale Options.
Choose your desired language from the Locale option.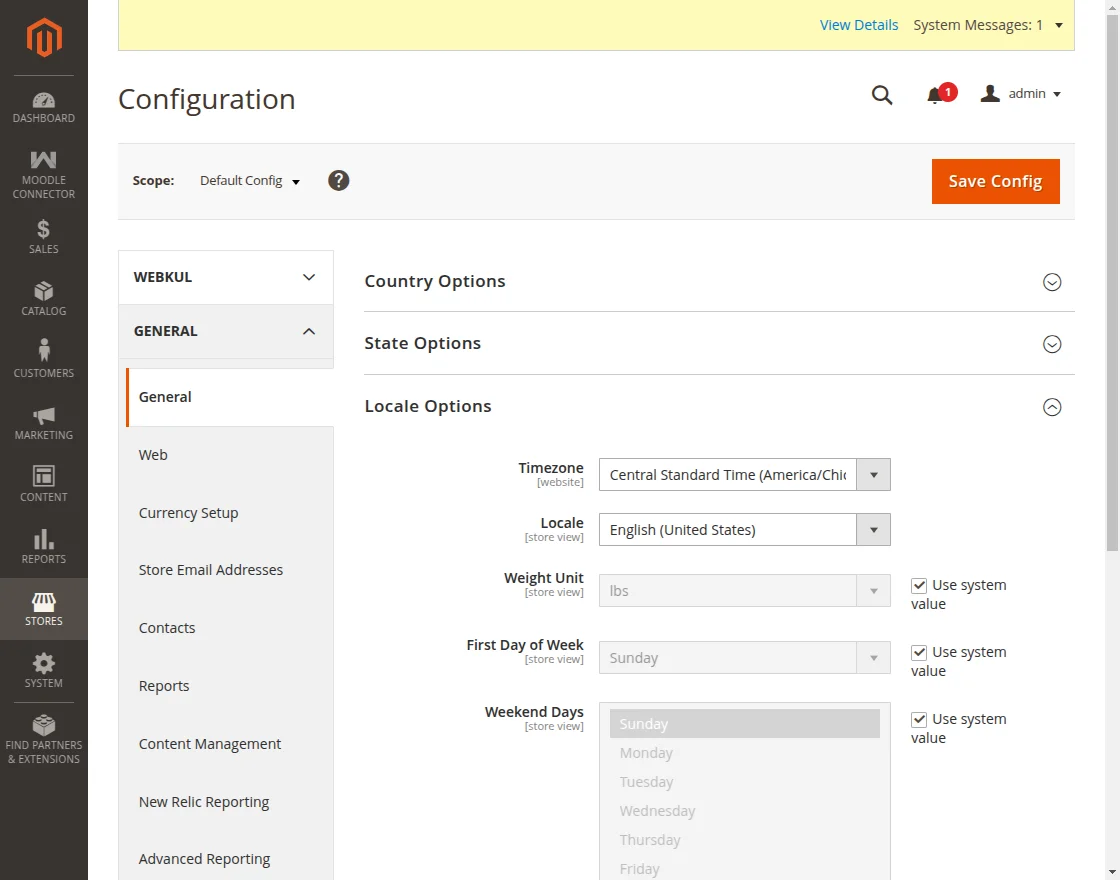
Language Translation
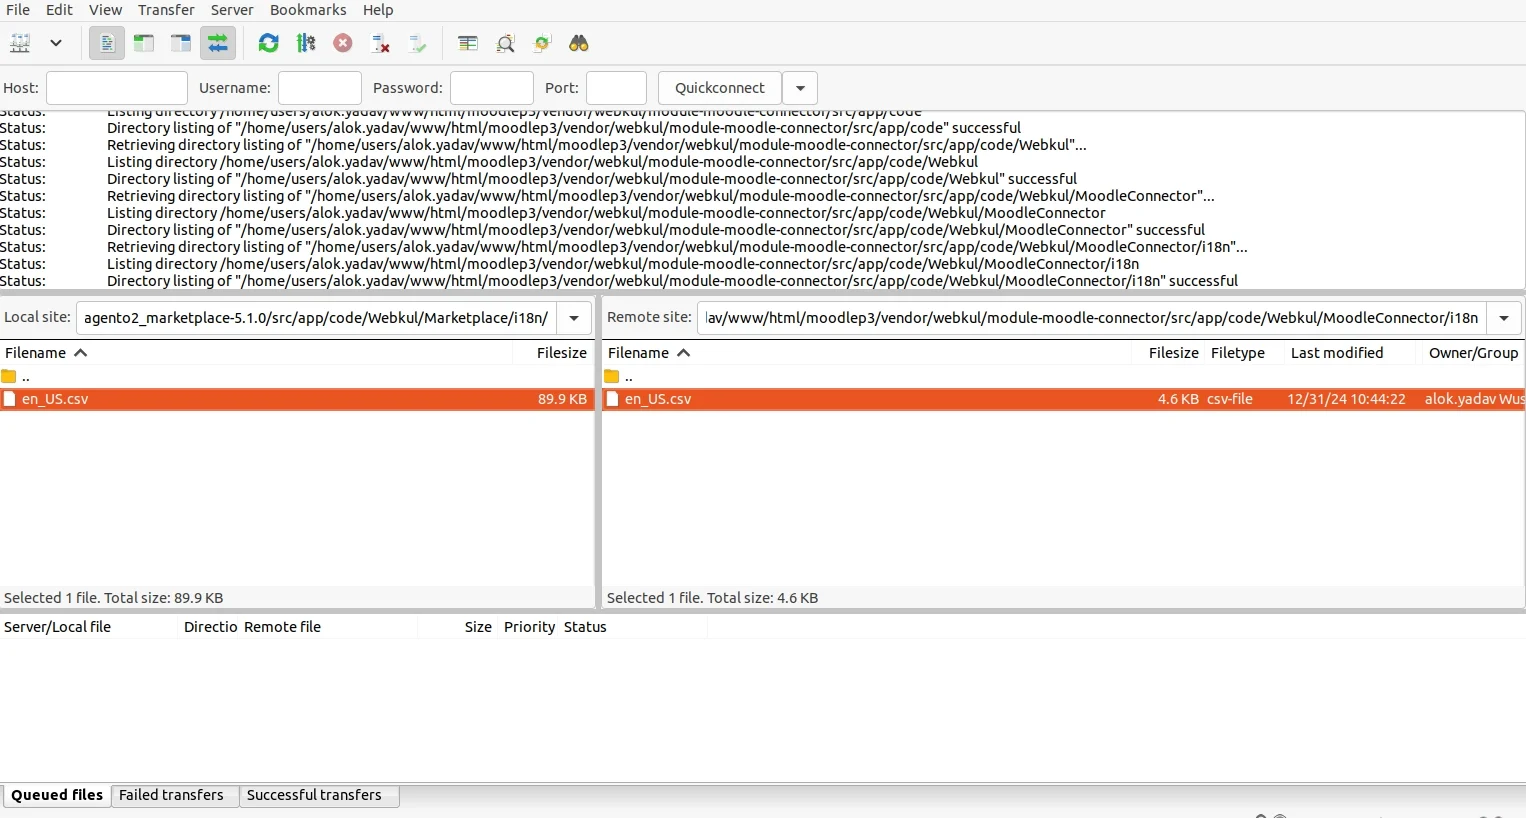
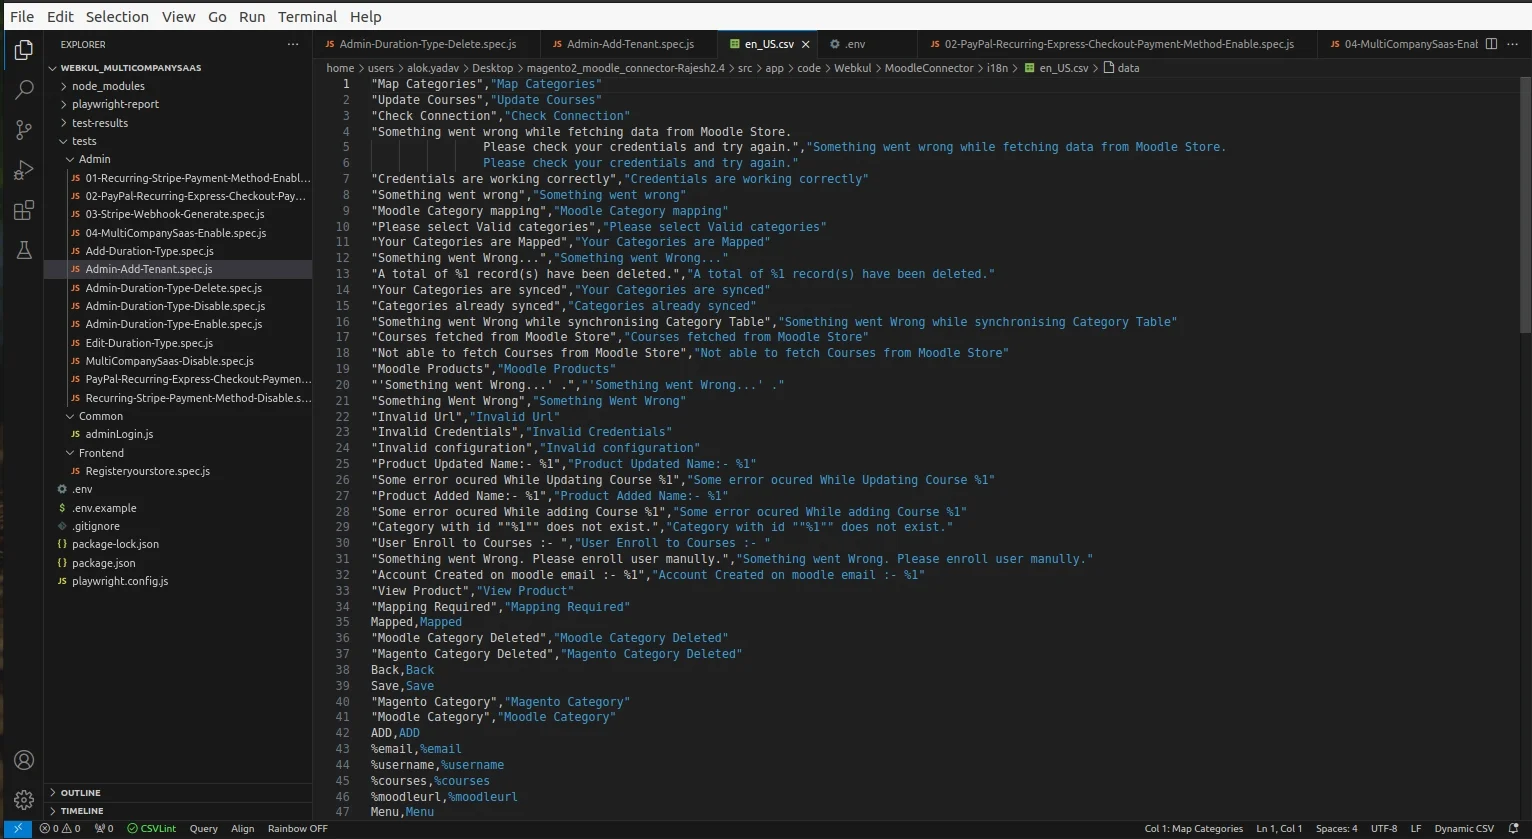
If you need to do the module translation, please navigate to the following path in your system app/code/Webkul/MoodleConnector/i18n.
Open the file named en_US.CSV for editing as shown in the below screenshot.
Once you have opened the file for editing. Replace the words after the comma(,) on the right with your translated words.
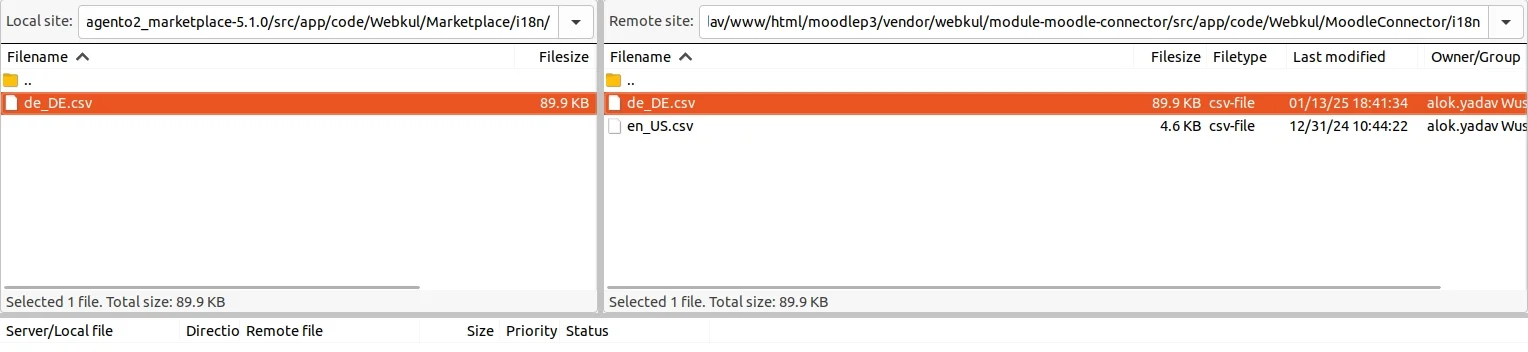
After editing and translating the CSV file, you need to save the translated file name according to your region language and country code such as – de_DE.CSV.
Then upload the translated file to the same folder from where you have obtained it. Now your module translation is complete.
Installing Moodle to your Local Host
Initially, the admin will have to install Moodle on their localhost. For this, the user needs to follow the steps given below.
Step 1:
- Initially, the user will have to download moodle on their localhost.
- The user can click here to install moodle.
- Further, the user can proceed with the installation process by Choosing a Default Language in the Moodle Installation page, as shown in the image below.

Step 2:
- Thereafter, the user needs to Confirm the Paths of the Web Address, Moodle Directory, Data Directory.

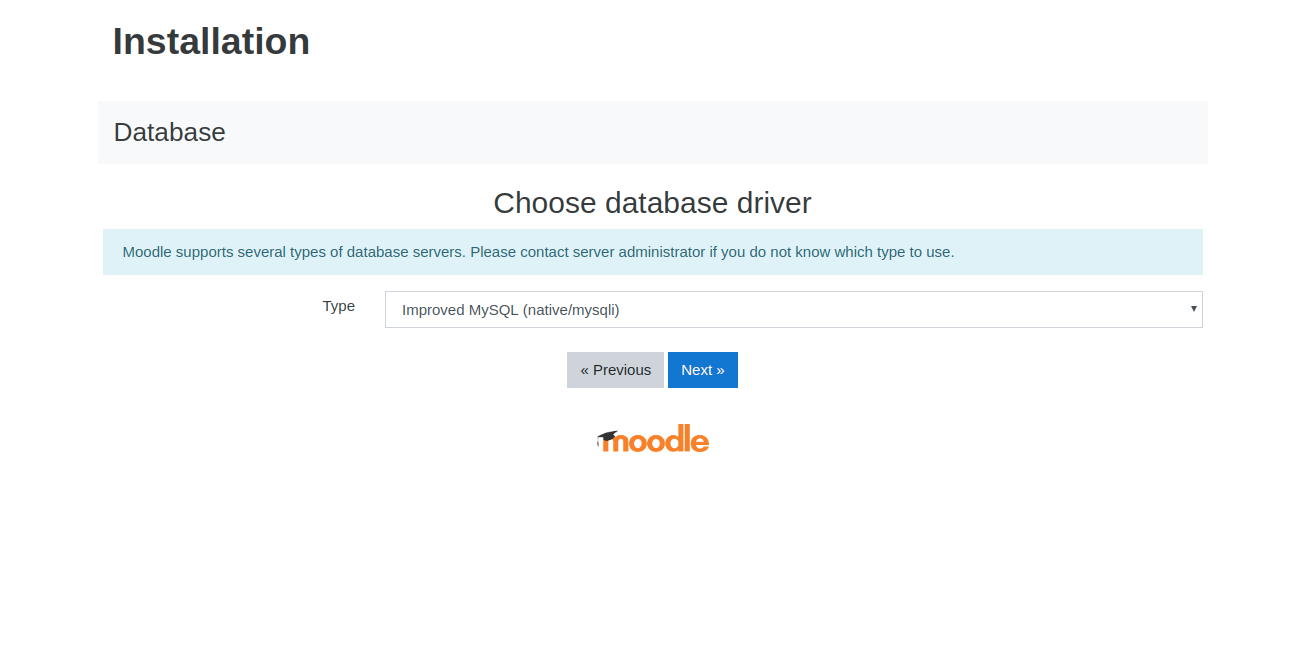
3:
- In the next step, the user will have to Choose the Database Driver from the given dropdown list as shown below.
Step 4:
- Further, the user can configure the Database Settings by filling in the details such as Database host, Database name, Database user, Database password, etc. as shown in the image below.

Step 5:
After tapping the Next button, redirects to the Login/ Create an Account page as shown in the image below.

This installs the Moodle into the localhost of the user and thereafter, the user can proceed further for account creation.
Creating an Account with Moodle
After the Moodle is installed into the localhost of the user, the user can create an account by clicking Create new account tab as shown in the image below.

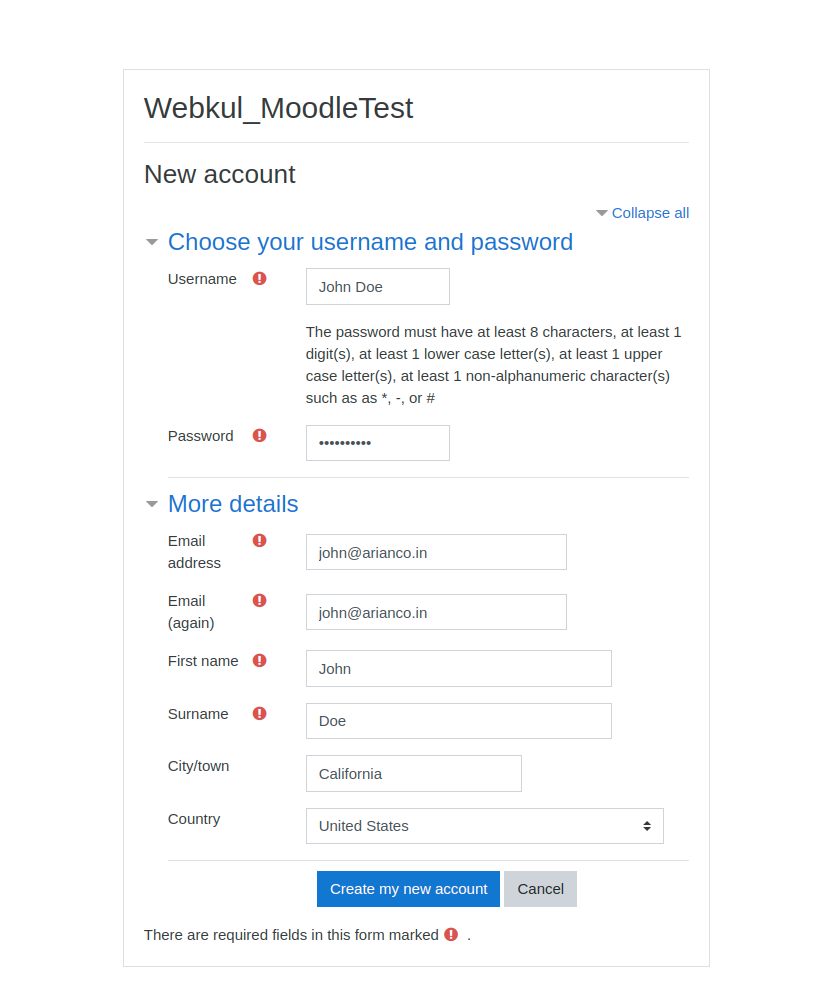
As the user clicks on Create new account tab, it redirects to the New Account creation page as shown in the image below.
The user will have to fill in the details such as Username, Password, Email Address, First Name, Surname, City/ Town, and Country as shown in the image below.
It redirects to Confirm your account page as shown in the image below.
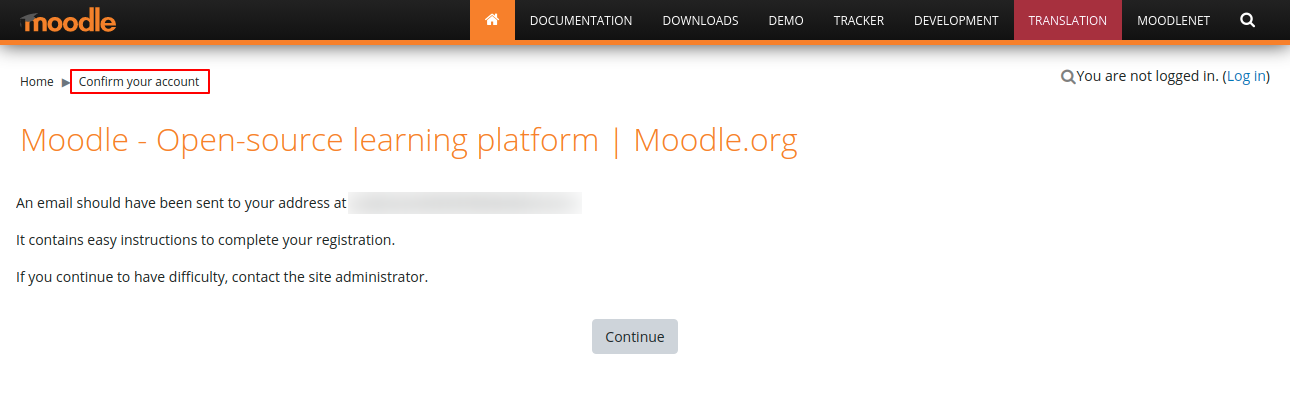
The user will have to check the mail id configured while creating an account.
The link present on the email is to be tapped so as to confirm the account creation process.

This creates an account for the user and the user can further proceed to visit their dashboards.
Dashboard: Moodle Connector
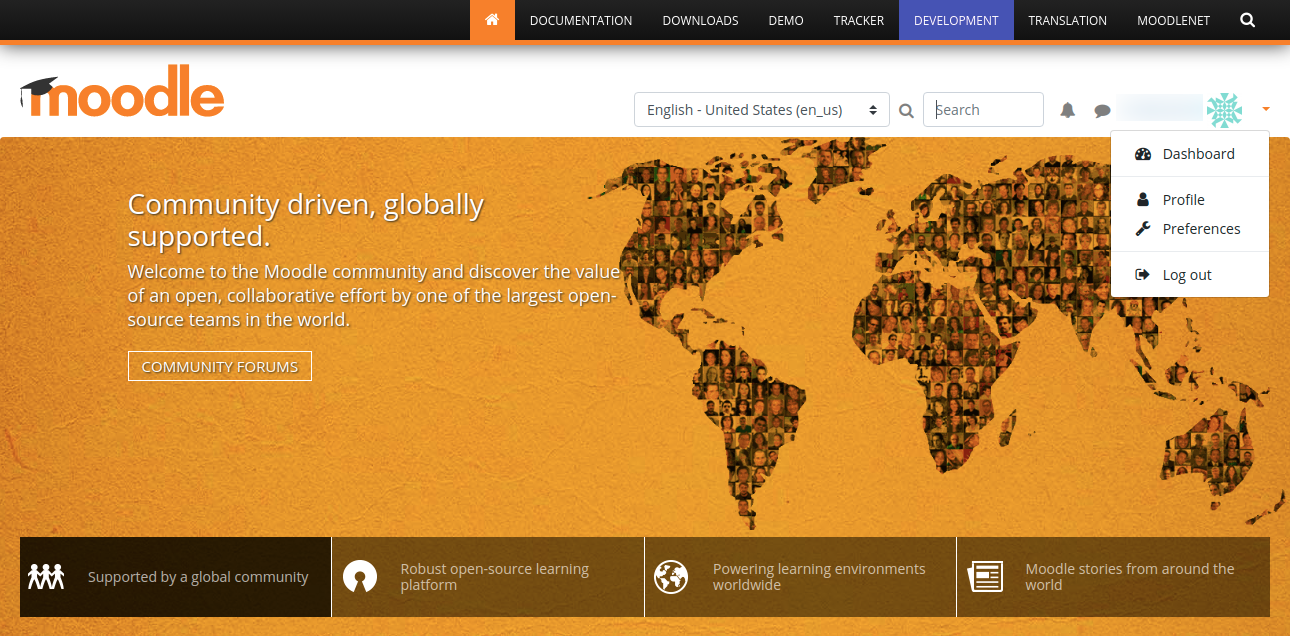
The users can log in to their accounts and visit their respective dashboards as shown in their image below.
The user’s dashboard will display the details such as Recently accessed courses, Course overview, Online Users, etc.
Further, the users can navigate to their Site home, view calendars, Private files, My Courses, etc.

Under Site Administration, the user will find the following menu options-:
- Site Administration,
- Users,
- Courses,
- Grades,
- Plugins,
- Appearance,
- Server,
- Reports,
- Development.
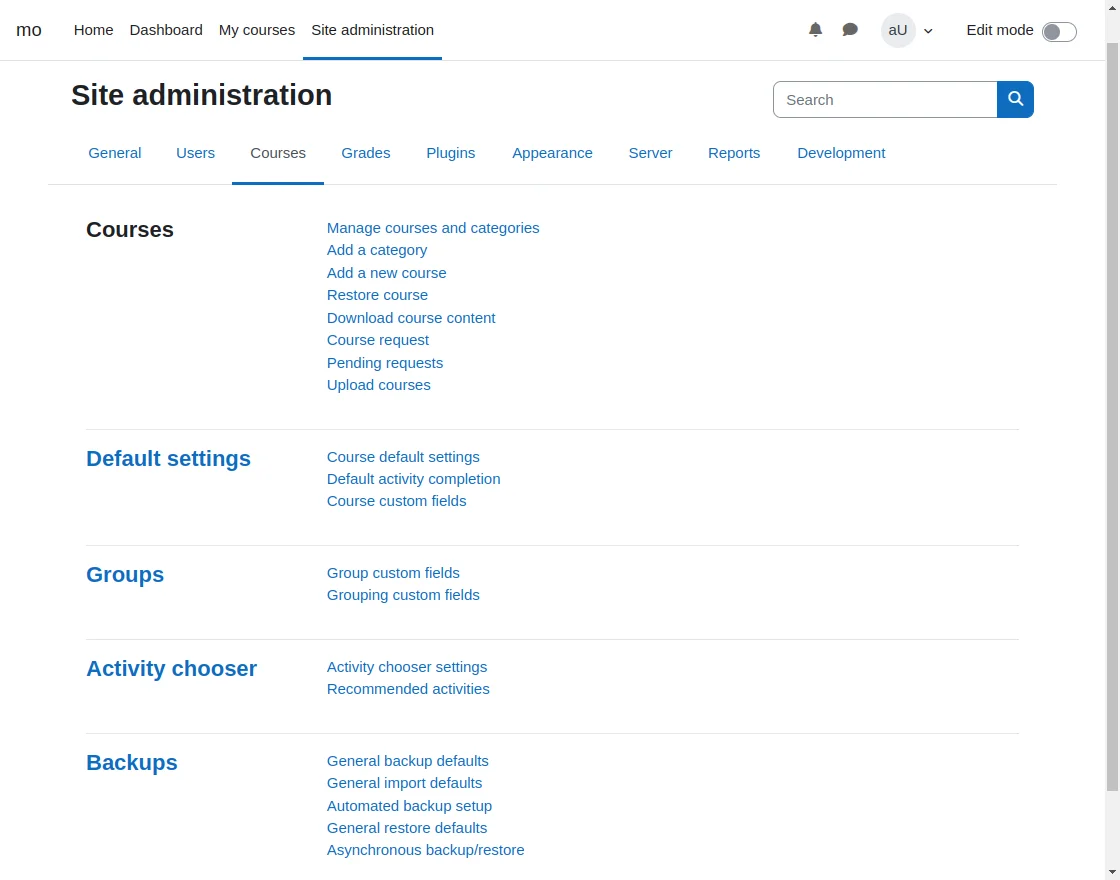
Under Courses, the user can add a new course by clicking its “Add a new course” sub-menu option.
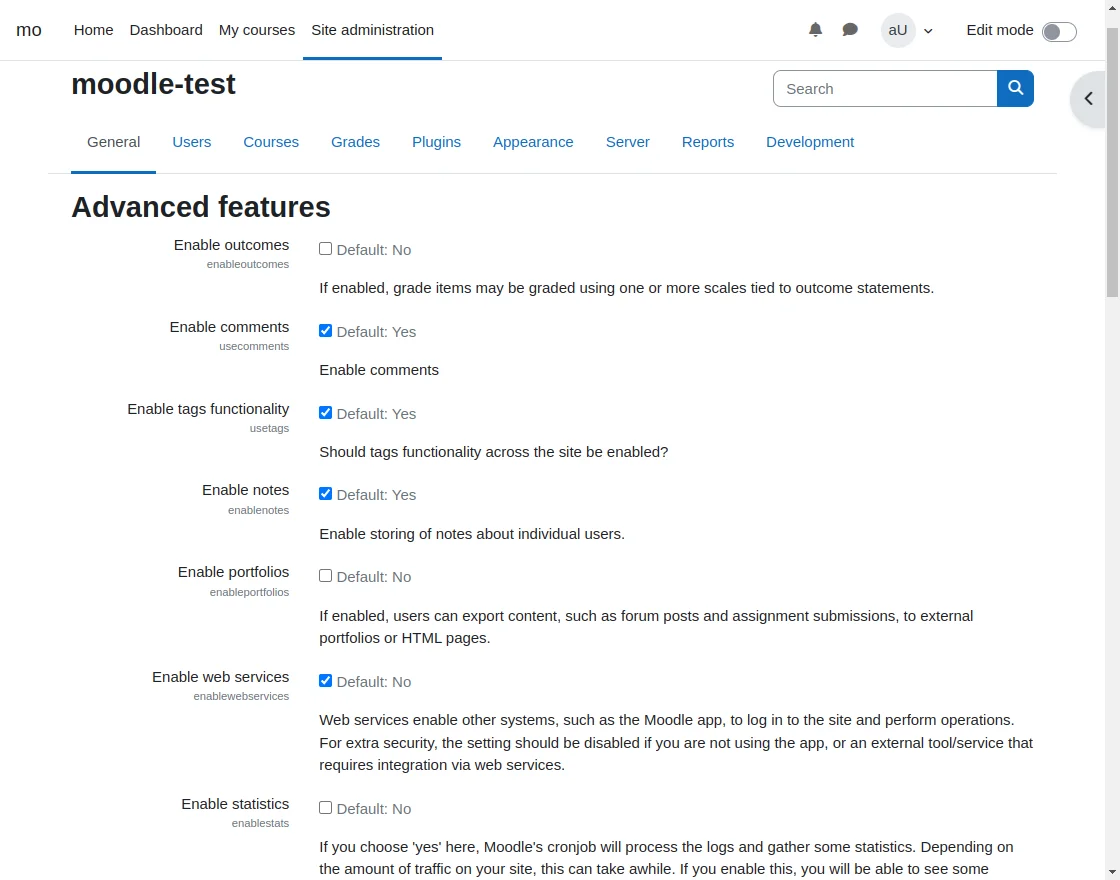
Note:
- The user will have to navigate through the following path i.e. Dashboard > Site administration > General > Advanced Features > Enable web services for mobile devices.
- As by default, the Enable web services for mobile devices is set to No, therefore, the user will have to uncheck the checkbox to enable the mobile settings.

Retrieving Credentials: Moodle Connector
Enabling web services:
The first admin needs to enable web services in Moodle. Follow the below steps to enable web services:
- Navigate to Site Administration > General > Advanced Features.
- Check “Enable web services” then click “Save Changes”
Enabling protocols:

Now, admin needs to enable the protocols to create external service
- Navigate to Site administration > Server > Web services > Manage protocols
- Enable the protocols (REST, SOAP).
- Make sure the Web services documentation is enabled.
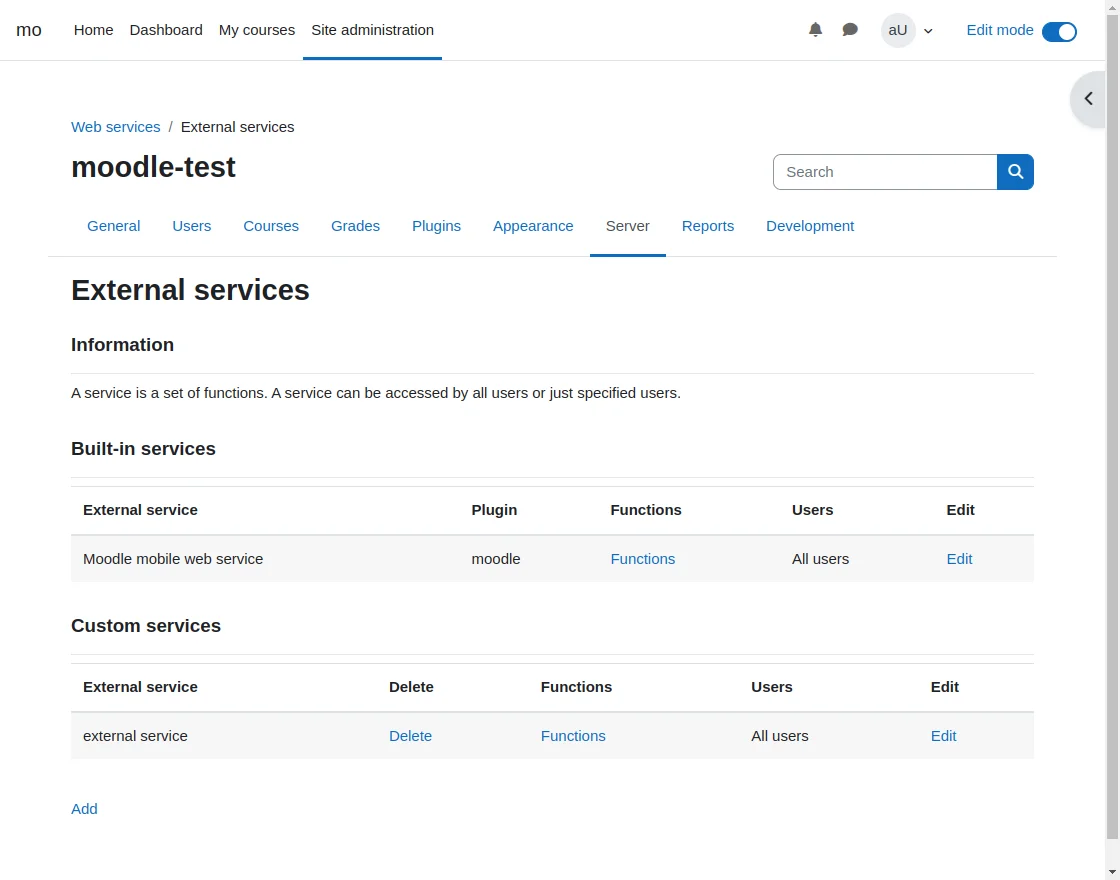
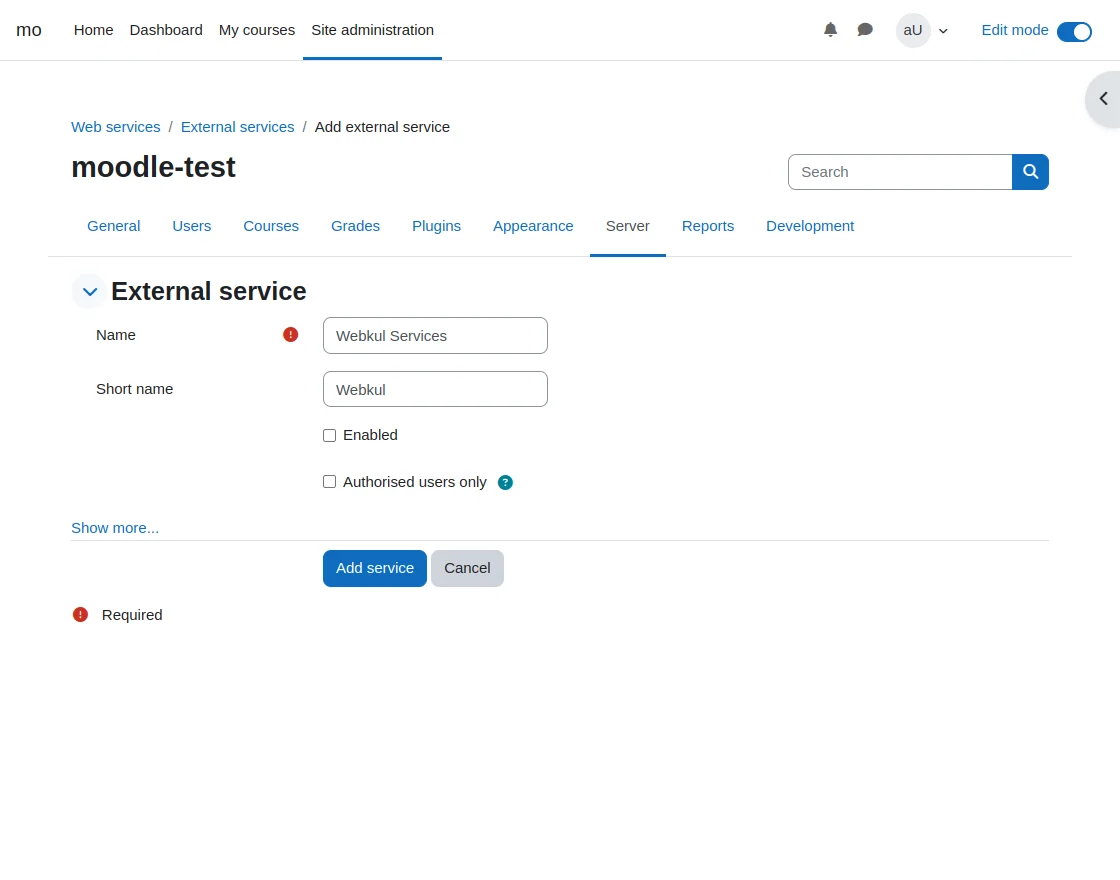
Creating a service:

- Navigate to Site Administration> Server > Web services > External services
- Click Add to add a new custom service
- Enter a name and check Enabled
- Click the button “Add service”
Adding functions to a service:
 After service creation, we need to add the functions required for Moodle Connector to the service.
- Navigate to Site Administration> Server > Web services > External services
- Click Functions to add functions
Further, after clicking Functions a new page will be open. Here click on Add functions to this service.
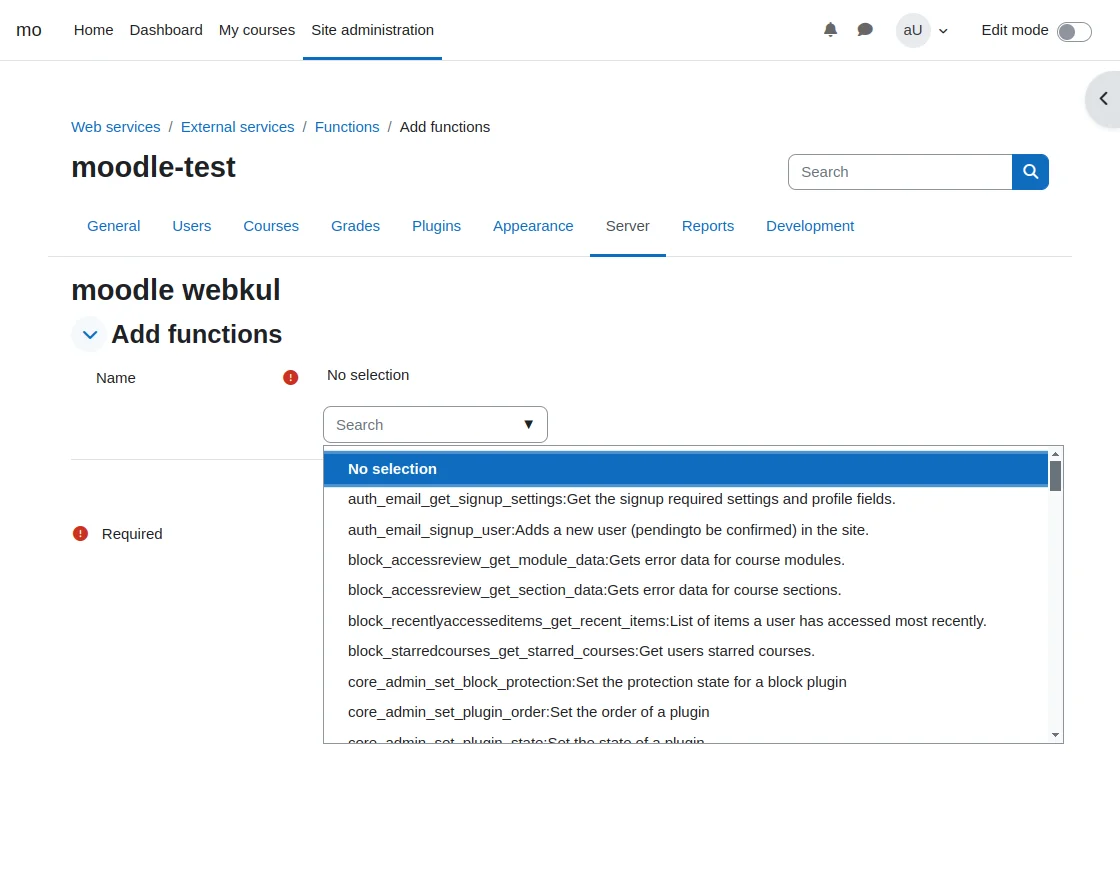
After clicking Add Functions on a new page select the required functions.
Below is the list of functions we must select from this list.
- core_enrol_get_course_enrolment_methods
- core_enrol_get_enrolled_users_with_capability
- core_user_get_users
- core_user_create_users
- enrol_manual_enrol_users
- core_enrol_get_users_courses
Thereafter, select all the required functions from the above list and click Add functions to add the selected functions to the list.
Creating a token:
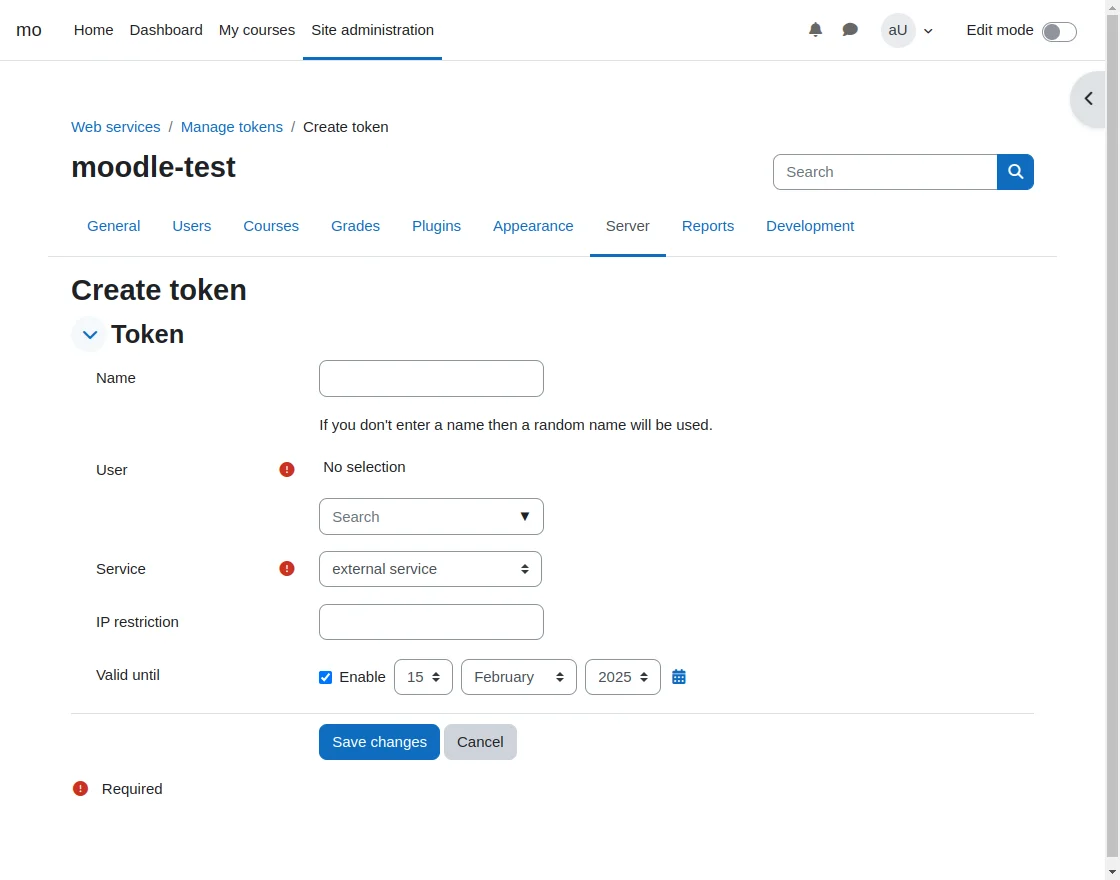
- Navigate to Site Administration > Server > Web services > Manage tokens
- Click on Create Token.
- Select the created user and service
- Click on Save changes
Hence, you need to repeat this process two times. First, you need to create a token for the default Moodle mobile web service.
Thereafter, you need to create the token for the created service.

Subsequently, after the token creation, you can use them in the module configuration.
Configurations: Moodle Connector
After the successful installation of the module the admin can configure it under “Store > Configuration > Moodle Connector”.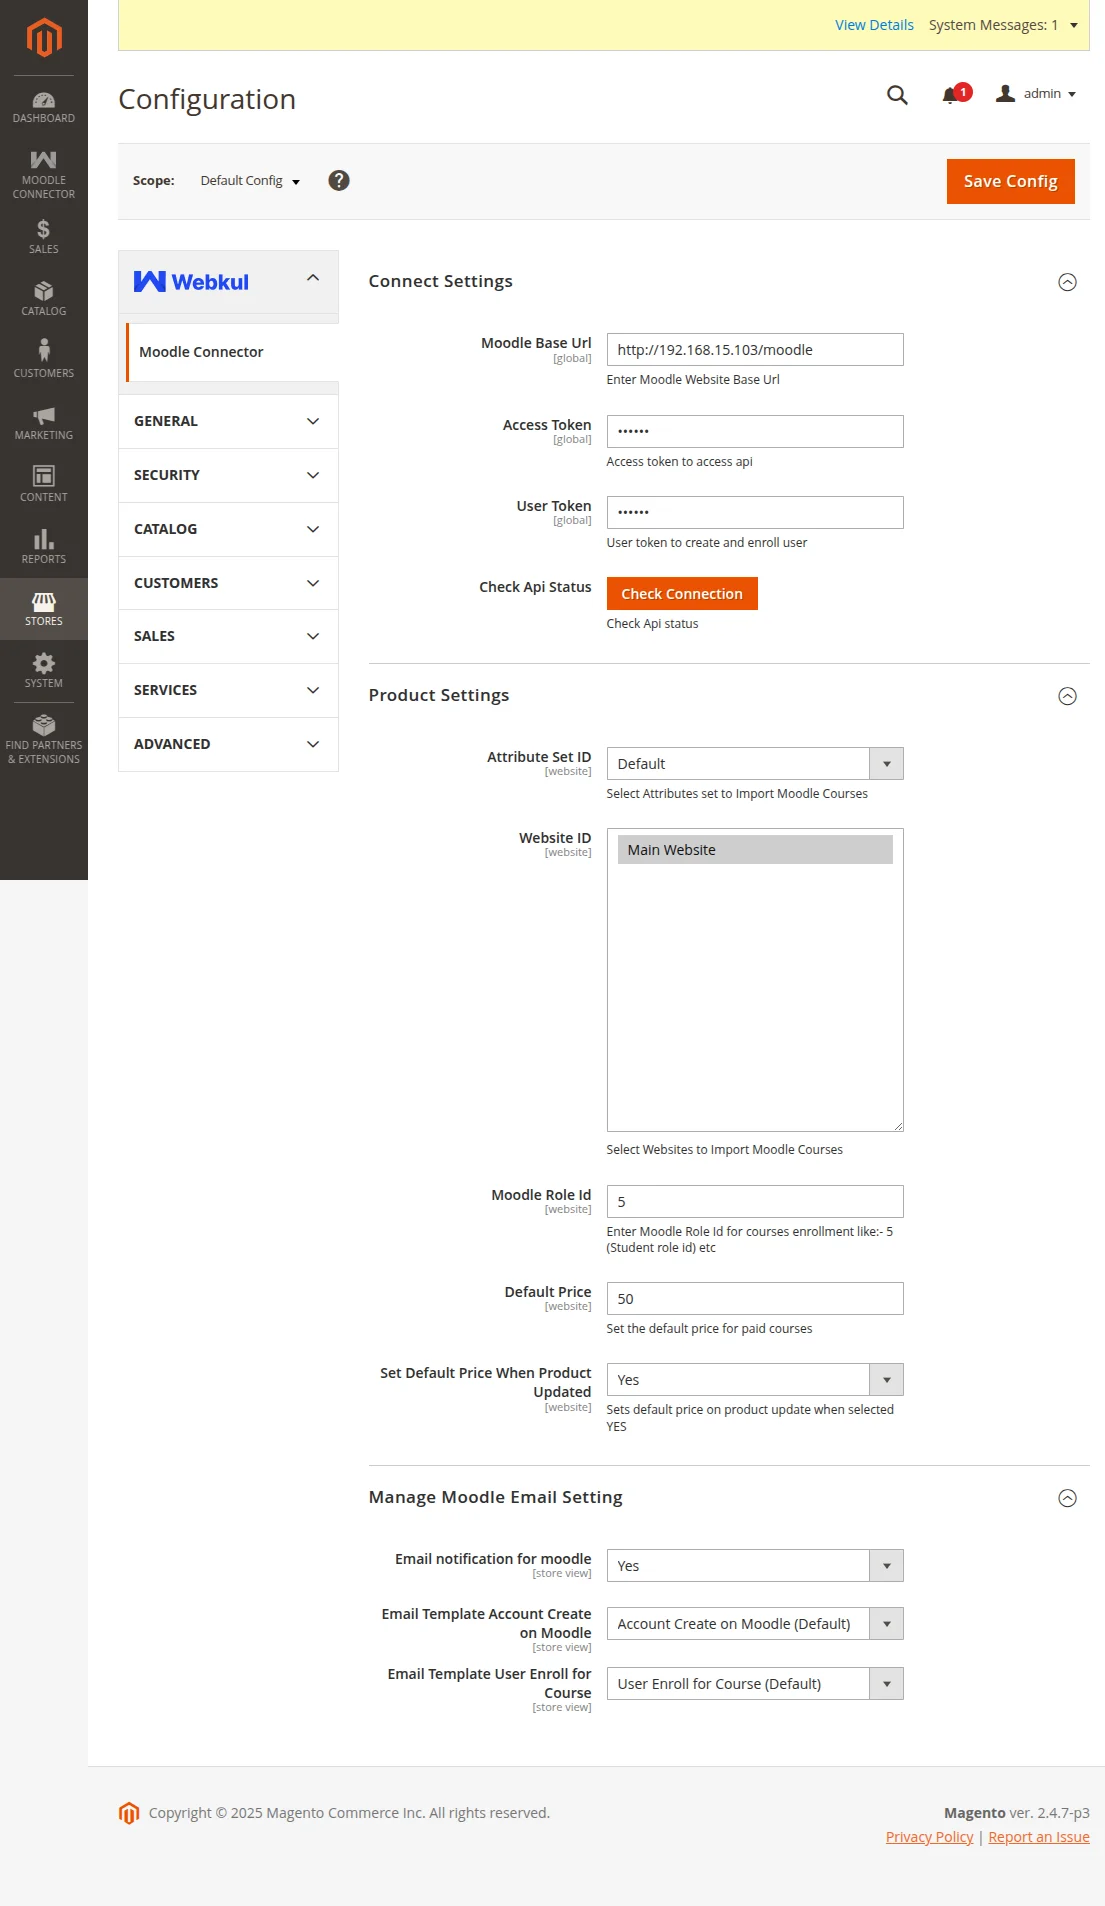
Connect Settings:
Moodle Base Url – Here admin will enter the base URL of Moodle.
Access Token – Here enter the default token of Moodle mobile web service.
User Token – Here enter the user token created for customer service.
Check API Status – Here admin checks the API status.
Product Settings:
Attribute Set ID – Select the respective attribute set id for the Moodle courses(Adobe Commerce products).
Website ID – Select the website where the courses(Magento products) will be created.
Moodle Role Id – Enter the role id for which you want to create the enrolment in Moodle after purchasing the course in Adobe Commerce Store.
Default Price – Here the admin can enter the default price of paid courses.
Set Default Price When Product Updated – If the admin enables this option, then it sets the default price on product update else not.
For Example,
—> If the imported course does not exist in Adobe Commerce, it is created in Magento with the Moodle attributes and the default price.
–> If the course already exists in Adobe Commerce, then skip the default price if it is set as NO because the product has already its price.
In this case, the price of the product will remain the same set by the user.
Note:
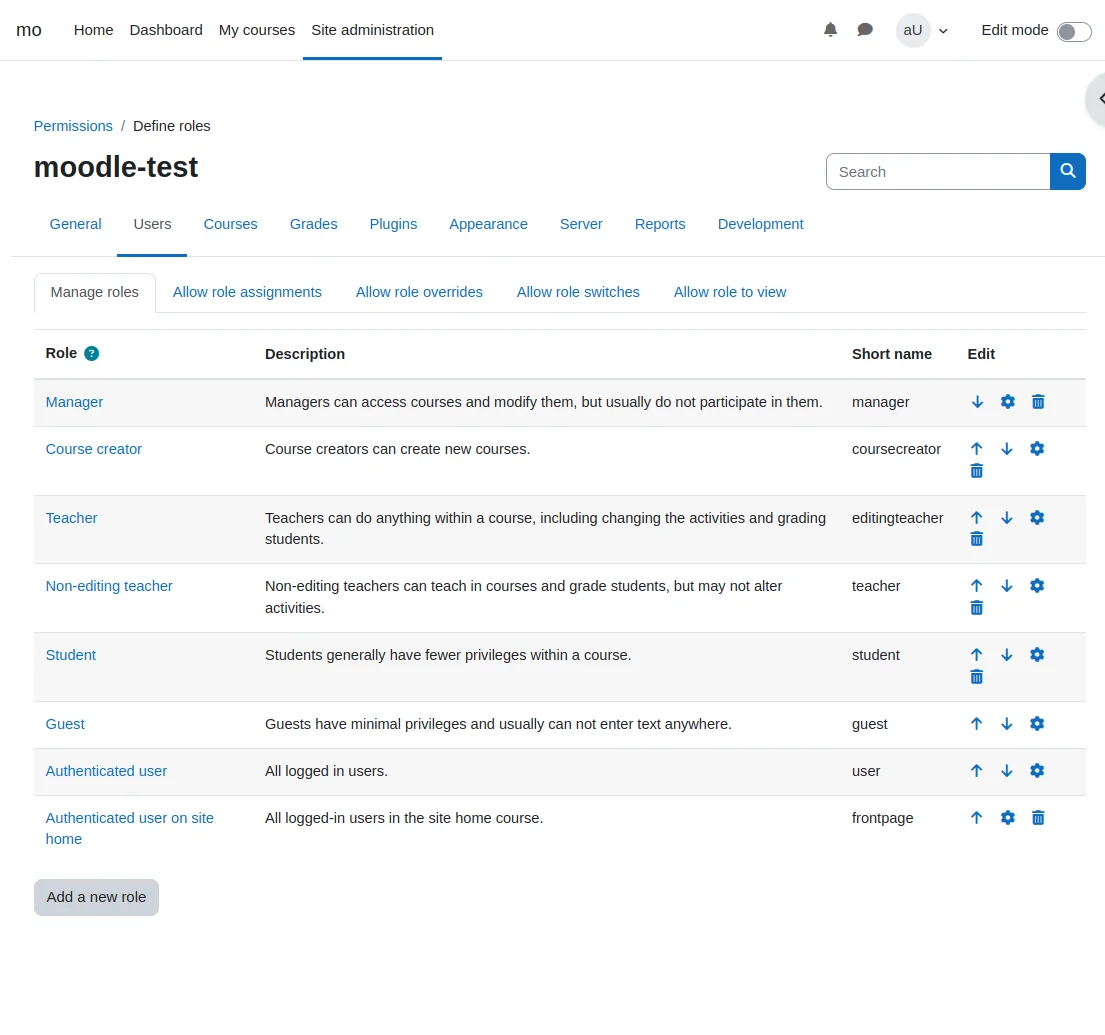
- You can get the Moodle Role id of the user from Moodle.
Navigate to Site Administration > Users > Permissions > Define roles select a role and from the URL you can get the role id. As in the below image, the role id for Student is 5.
Default price – Enter the default price for the courses (Adobe Commerce products) which will assign to the course when it will create in Adobe Commerce.
Later on, the admin can update it as per the requirement.
Manage Moodle Email Setting:
Email:-
Notification for moodle – Select “Yes” to enable email notification for Moodle.
Template Account Create on Moodle – Select an email template for account creation in Moodle.
Template User Enroll for Course – Select an email template for user enrollment in Moodle.
Moodle Connector: Manage Moodle Categories
After the successful configuration of the module, the admin can map Moodle categories by navigating to MOODLE CONNECTOR > Manage Moodle Categories.
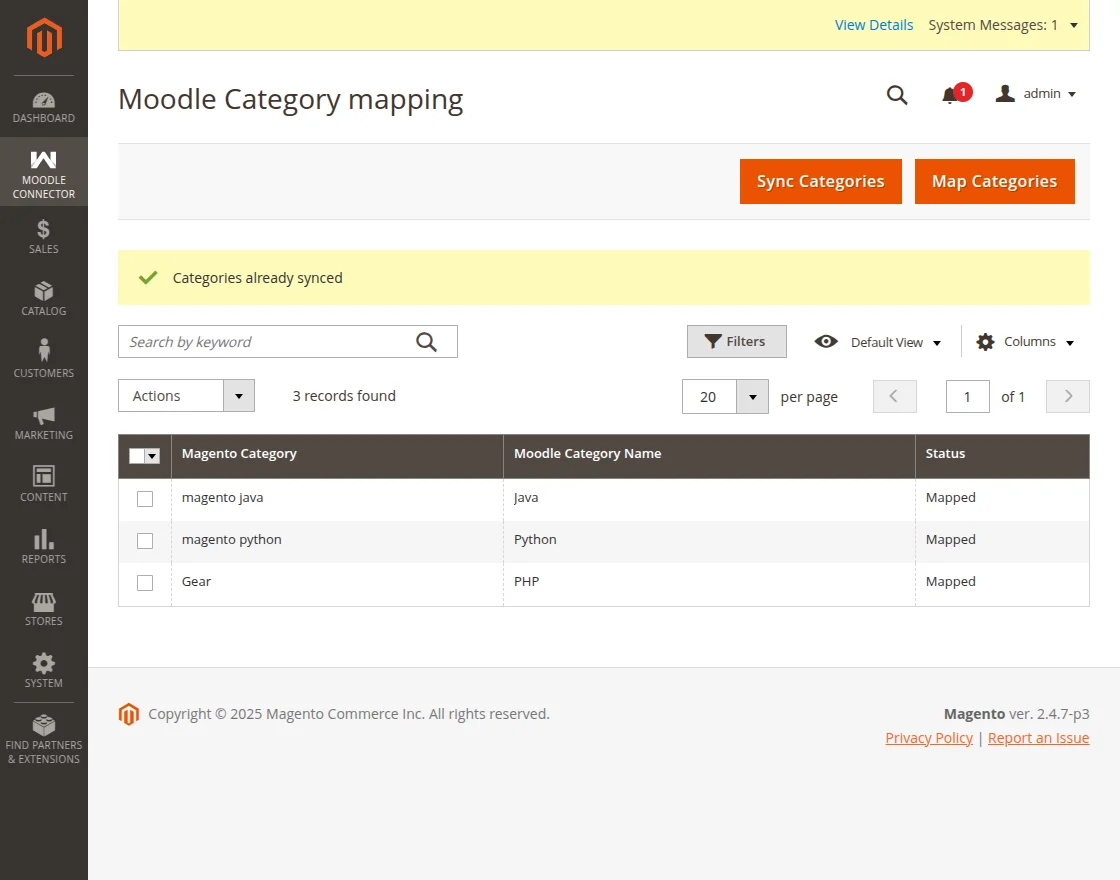
On clicking the Sync Categories button all the categories of the Moodle will be synchronized in the Magento.
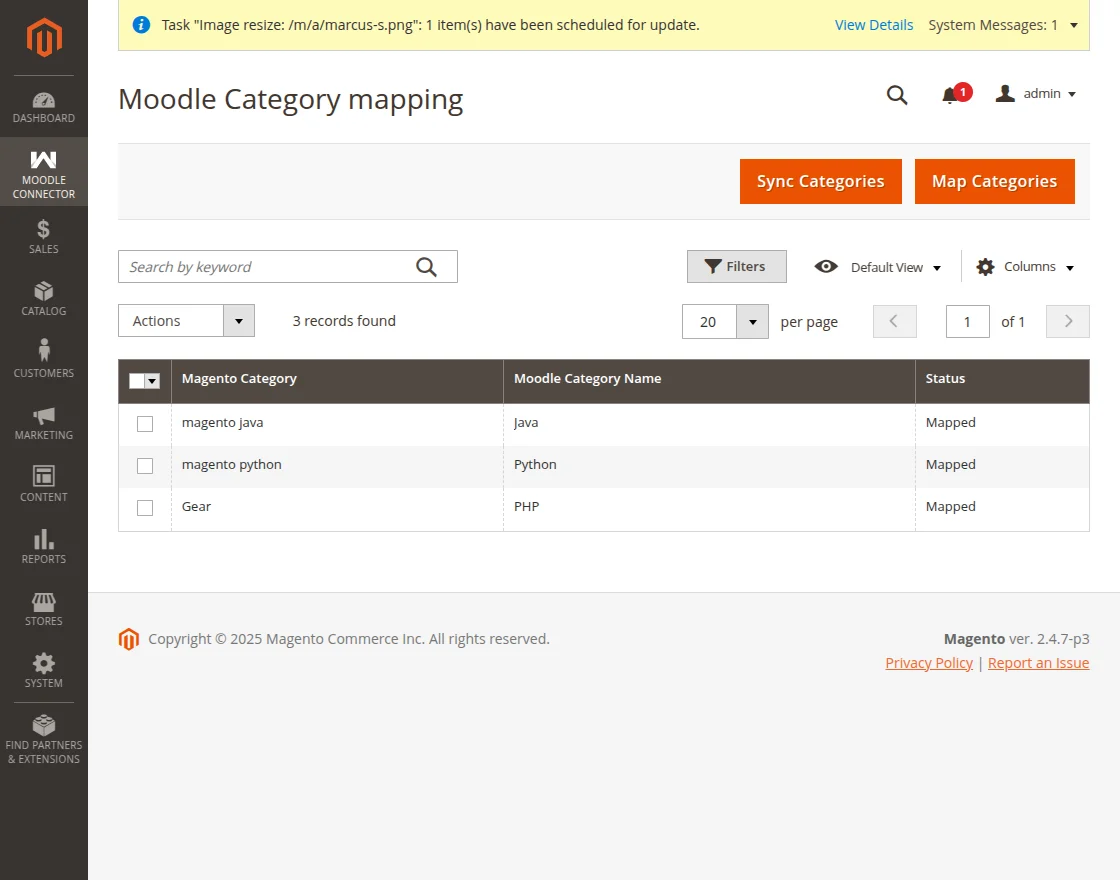
Once the categories are successfully synchronized, the status of the categories will be “Mapping Required”.
To map Moodle categories with the Magento categories click on Map Categories.
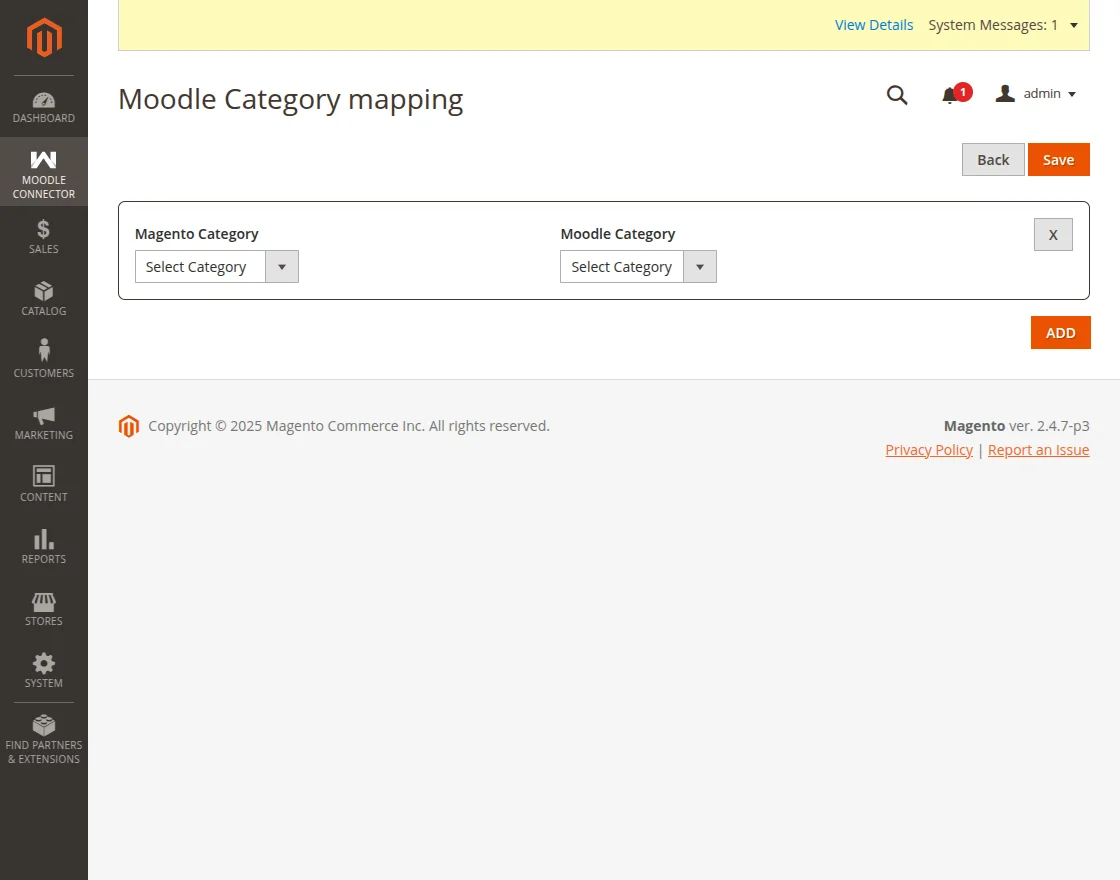
By clicking ADD the option to map categories will be available.
Here, the admin can choose the Adobe Commerce category and its respective Moodle category from the drop-down.
After clicking Save the categories will be mapped and displayed as below image.
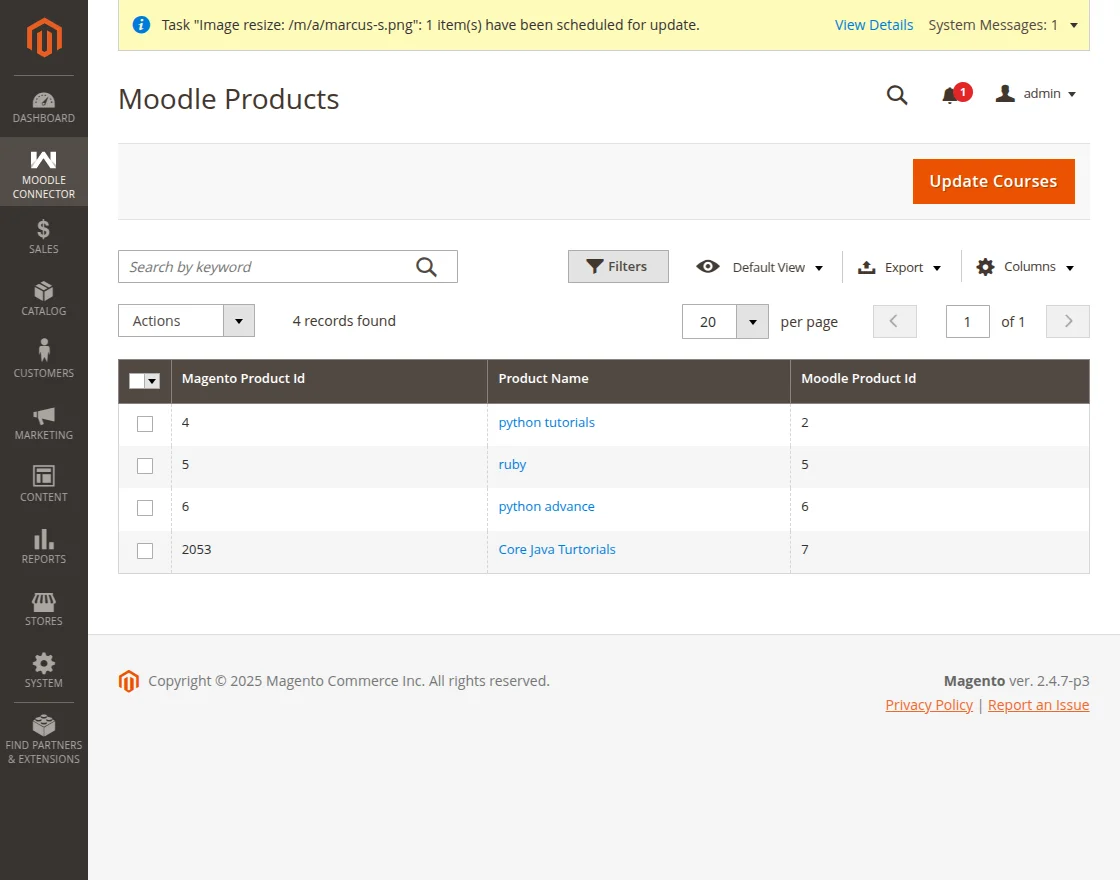
Moodle Connector: Manage Moodle Products
Subsequently, the admin can manage the Moodle products under MOODLE CONNECTOR > Manage Moodle Product.
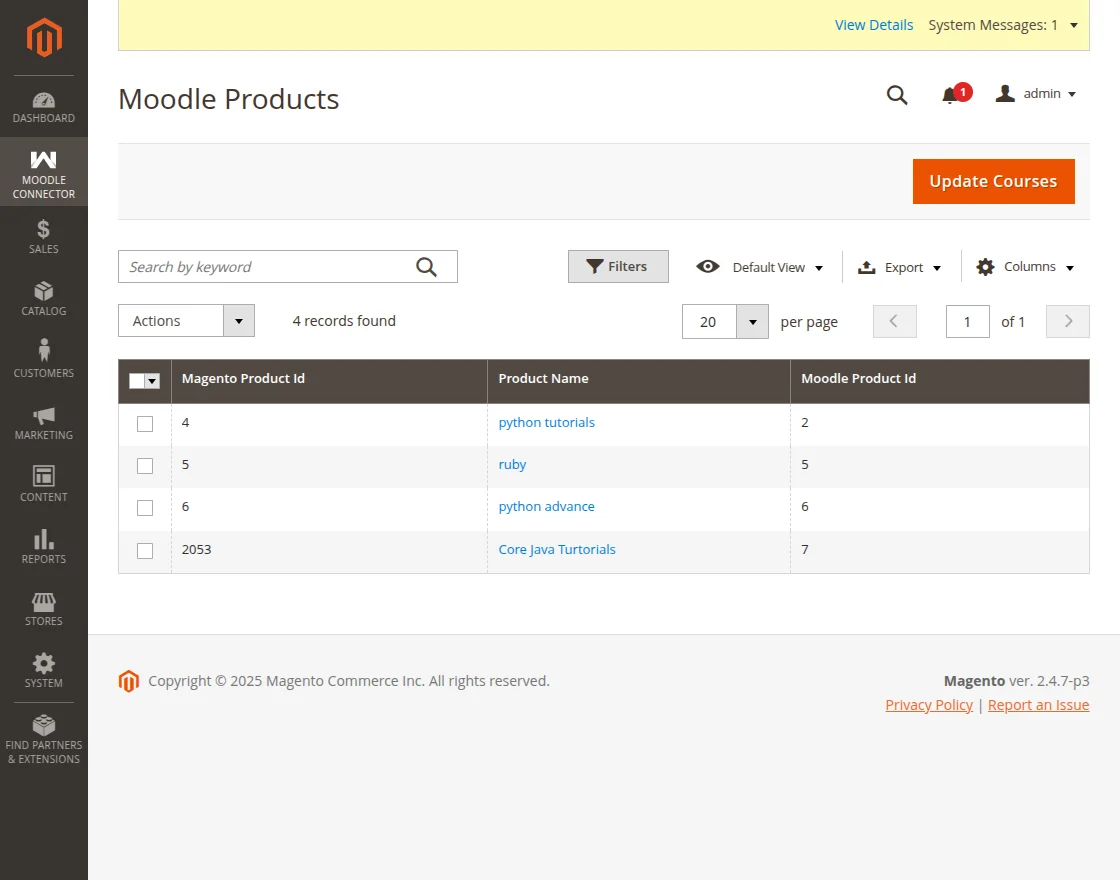
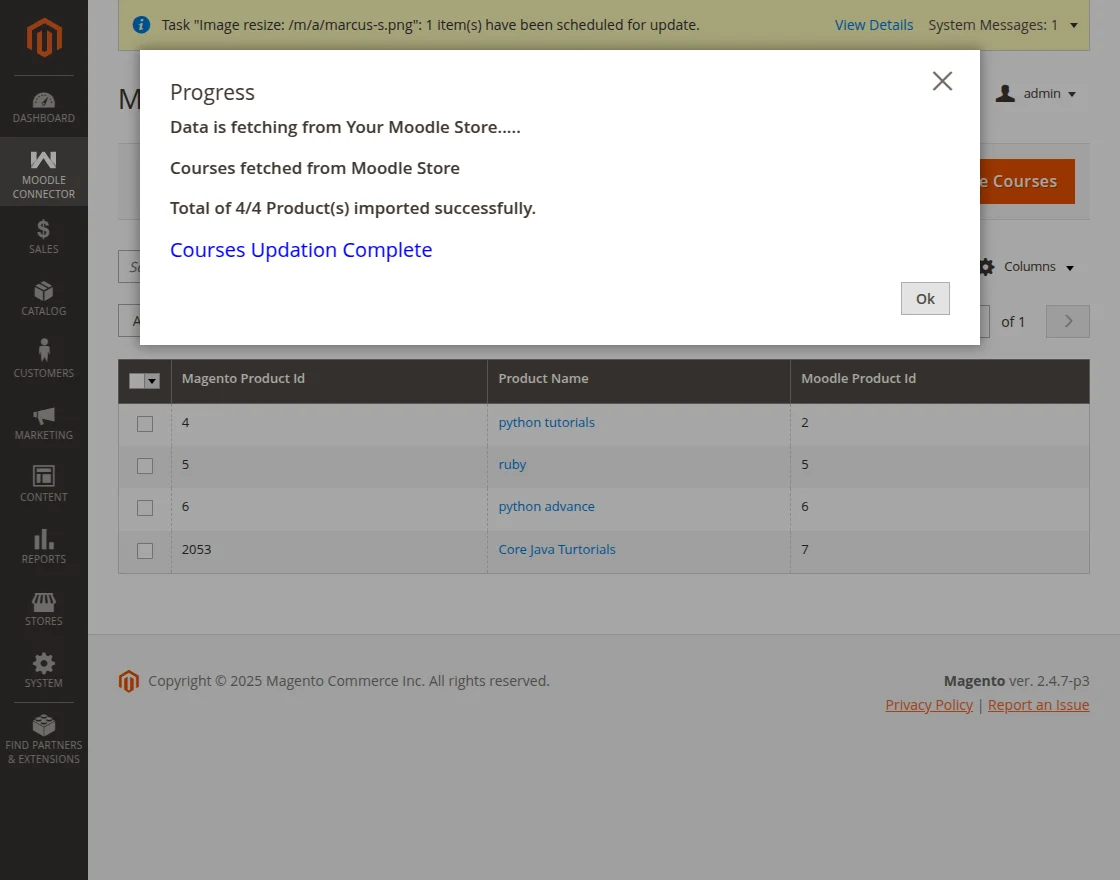
On this page, by clicking Update Courses the Moodle courses will be fetched from the Moodle to the Adobe Commerce store.
The courses fetch status displays as shown in the image below.
As soon as the fetching process is completed, the Moodle courses display in Magento as per the below image.
Admin can also delete Imported Moodle products from MassAction.
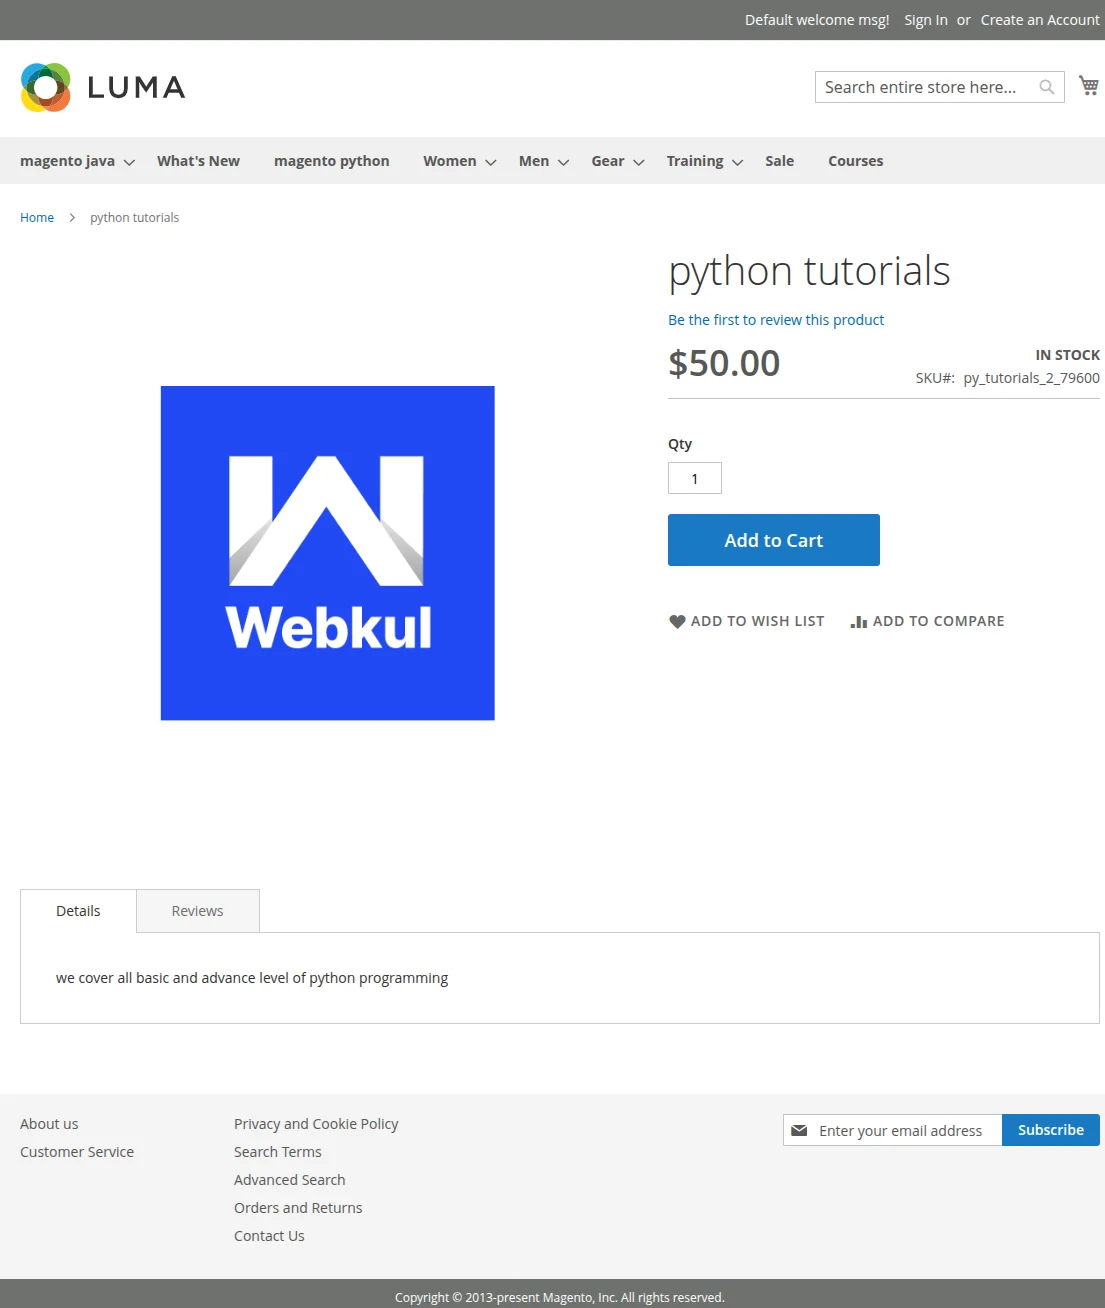
Front-end Workflow: Moodle Connector
Meanwhile, in the Adobe Commerce store, the course will be displayed as per the below image.
Further, the user can purchase a course from the Adobe Commerce Store.
Thereafter, on placing the order the account will be created for the customer over Moodle if the account is not available on Moodle with the email id used to purchase the course.
The customer will be notified for account creation by email as per the below image.

Furthermore, as the invoice for the purchase is generated in the Adobe Commerce store the user will be enrolled on Moodle for the purchased course.
Also, the user is notified via email as per the below image.

Moreover, as the user logs in to Moodle, the purchased course is visible to the user as shown in the image below.

That’s all for the Moodle Connector for Magento 2 if you still have any issues feel free to add a ticket and let us know your views to make the module better http://webkul.uvdesk.com/
Current Product Version - 5.0.2
Supported Framework Version - Magento 2.0.x, 2.1.x, 2.2.x,2.3.x, 2.4.x

2 comments
If you are looking for which course attributes are created in Magento 2 you can check the same in the demo.
Please email us your complete requirements at [email protected] and we will get back to you accordingly.
Thank You
Webkul Team